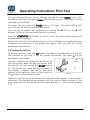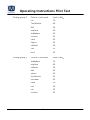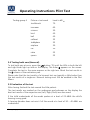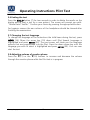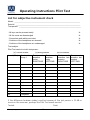
1
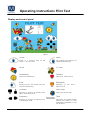
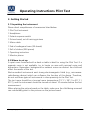
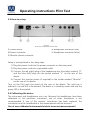
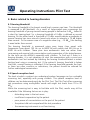
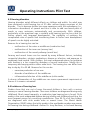
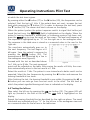
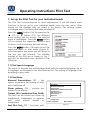
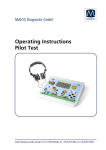
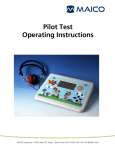
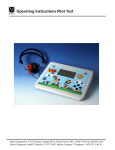
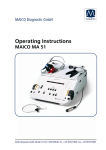
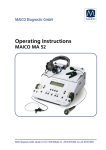
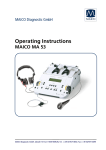
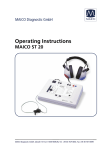
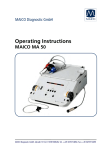
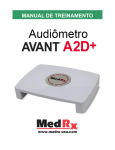
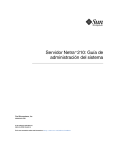
Operating Instructions Pilot Test Operating Instructions Pilot Test Contents Software Release 2.20 Page 1. Introduction.................................................................................................. 3 2. Instrument Description .................................................................................. 4 Display and control panel............................................................................... 5 3. Getting Started ............................................................................................. 6 3.1 Unpacking the instrument ....................................................................... 6 3.2 Where to set up ...................................................................................... 6 3.3 How to set up ......................................................................................... 7 3.4 Calibrating the device .............................................................................. 7 4. Basics related to hearing disorders ................................................................. 8 4.1 Hearing threshold .................................................................................... 8 4.2 Speech reception level ............................................................................. 8 4.3 Hearing disorders .................................................................................... 9 4.4 Incidence of hearing loss.......................................................................... 9 5. Performing the Pilot test ............................................................................. 10 5.1 Preparing the child ................................................................................ 10 5.2 Testing the right ear .............................................................................. 10 5.3 Testing the left ear ................................................................................ 12 5.4 Testing both ears (binaural) .................................................................... 14 5.5 Evaluation of the test ............................................................................. 14 5.6 Ending the test ...................................................................................... 15 5.7 Changing the test language ................................................................... 15 5.8 Adjusting volume of monitor phone ....................................................... 15 6. Performing pure tone screening test ............................................................ 16 6.1 Explanation of the test ........................................................................... 16 6.2 Preparing the test .................................................................................. 16 6.3 Testing the right ear .............................................................................. 16 GEBA_Pilot_e_13b.doc 1 851 854/5 03/13 Operating Instructions Pilot Test 6.4 Testing the left ear ................................................................................ 17 6.5 Evaluation of the test result ................................................................... 18 7. Set up the Pilot Test for your individual needs .............................................. 19 7.1 Pilot Speech Language ........................................................................... 19 7.2 Pilot Menu ............................................................................................ 19 7.3 Audiometry Submenu ............................................................................ 20 7.3.1 Advanced Settings........................................................................... 21 7.4 Start with… .......................................................................................... 21 7.5 Display Language .................................................................................. 21 7.6 Device Information ................................................................................ 21 7.7 PC or Printer .......................................................................................... 21 7.8 Display Contrast .................................................................................... 22 7.9 Reset to Default..................................................................................... 22 8. Care and maintenance of the instrument .................................................... 23 9. Technical data and accessories .................................................................... 24 10 Troubleshooting ........................................................................................ 29 11. Warranty, maintenance and after-sales service ........................................... 30 12 Safety regulations ...................................................................................... 31 GEBA_Pilot_e_13b.doc 2 851 854/5 03/13 Operating Instructions Pilot Test 1. Introduction Thank you very much for purchasing a quality product from the MAICO family. The Pilot Hearing Test is produced under the regulations of the German medicine production law. Qualified for the CE-symbol this device is manufactured according to the latest quality and security standards. By designing the Pilot Hearing Test we paid particular attention in making it a user-friendly device, easy to use and understand. The instruments functions are controlled by software. You have thus invested in a device that always will be up to date. This user manual should make it as easy as possible for you to become familiar with the functions of the Pilot Hearing Test. Please open the flap of illustrations on the last page. The description of the position (e.g.) of the controls, displays and connections, found again in this manual, will make it easy for you to learn how to operate the Pilot Hearing Test. If you have problems with the operation of the device or you would like to make suggestions for improvement, please get in touch with us. Simply call your MAICO distributor. Your MAICO-Team GEBA_Pilot_e_13b.doc 3 851 854/5 03/13 Operating Instructions Pilot Test 2. Instrument Description The MAICO Pilot Hearing Test is mainly used in the pediatrician’s office. The Pilot Hearing Test is a simple screening speech audiometric test, especially for children’s needs. Due to the possibilities of future language and speech development delays, it is imperative to screen children at the youngest possible age. Anyone who has tried to administer pure tone audiometry screening to young children is very aware of the problems and inefficiencies: very young children have short attention spans and exhibit problems with comprehending the abstract directions associated with traditional pure tone audiometry. In comparison, speech recognition screening incorporates simple, nonthreatening directions. The child is asked to listen to a series of two syllable “spondee” words at different decibel levels. The levels automatically decrease in 5 dB increments from 70 dB to 25 dB so there is no need to adjust levels or change settings. The child responds by pointing to the appropriate picture on the picture board. The operator records each response on the score sheet. A complete screening of both ears can take less than four minutes - significant savings in time and money. The quality of the MAICO Pilot Hearing Test is very high, as the speech test is saved on a MP3 file in the device. Thus a large degree of durability is given. Moreover, up to six different languages can be saved in the device. The change of languages can easily be carried out by entering the integrated user menu. So children speaking a foreign language can also be tested without any further problems. Additionally a screening tone audiometer is integrated in the device for testing especially older children. Tone audiometry with 8 test frequencies from 250 Hz to 8 kHz and levels between -10 dBHL and 100 dBHL can also be carried out. Even the control panel of the Pilot Hearing Test has been designed especially child-friendly. For that reason you will not see any technical control knobs but keys "hidden" behind nice illustrations such as butterfly or sun (see figure 1). The MAICO Pilot Hearing Test operates with mains voltage 100 ...240 V, 50/60 Hz. Tests are performed via headphones. On special requests the test can also be carried out with loudspeakers or insert phones. Output levels cover 25 dBHL to 70 dBHL. GEBA_Pilot_e_13b.doc 4 851 854/5 03/13 Operating Instructions Pilot Test Display and control panel Figure 1 Group Menu Group 0 = Training with 70 dB Group 1 - 4 = Pilot Test Set up Menu (See Chapter 7 of Operating Instructions) Pause L / R Ear Audiometer Forward Starts Tone Audiometry Next word - Pulse tone on Enter Backwards Memory key for test results Pilot Test and Tone Audiometry Repetition of Pulse tone off Loudness Start / Stop Decrease or increase of intensity level (dB) in audiometry mode Start / Stop of Pilot tests Frequency Tone Decrease or increase of frequency (Hz) in audiometry mode Interrupter or Presenter button Memory key and/or for Tone Audiometry (adjustable in the set up Menu) GEBA_Pilot_e_13b.doc 5 last word 851 854/5 03/13 - Operating Instructions Pilot Test 3. Getting Started 3.1 Unpacking the instrument Please check completeness of accessories listed below: 1 Pilot Test Instrument 1 Headphone 1 Patient response switch 1 Picture board, set of training pictures 1 Mains cable 1 Pad of audiogram forms (50 sheets) 1 Roll of stickers (500 pieces) 1 Operating instruction 1 Monitor phone 3.2 Where to set up A quiet room furnished with a desk or table is ideal for using the Pilot Test. If a separate room is not available, try to locate an area with minimal noise and distractions. Remember: background or ambient noise can distract the child and affect the results of the test. Electro-medical instruments emit strong electromagnetic fields (e.g., microwaveradiotherapy devices) which can influence the function of this device. Therefore, do not use those types of instruments in close proximity to the Pilot Test. The test room should be at normal room temperature (15º C / 59º F to 35º C / 95º F), and the instrument should be turned on about 10 minutes before the first measurement. When placing the picture board on the table, make sure the child being screened can comfortably point to the pictures on the picture board. GEBA_Pilot_e_13b.doc 6 851 854/5 03/13 Operating Instructions Pilot Test 3.3 How to set up Figure 2 Rear view of the MAICO Pilot Test Power switch Headphone connector (red) Power connector Headphone connector (blue) Monitor phone connector Setup is accomplished in four easy steps: 1.) Plug the power cord into the power connector on the rear panel. 2.) Plug the power cord into a grounded outlet. 3.) Connect the red (right) plug of the headphone into the socket marked “R” and the blue (left) plug into the socket marked “L” on the rear of the device. 4.) Connect the monitor phone (if required) to the socket marked “Monitor” on the rear of the device. Turn on the Pilot with the switch at the rear of the device. The right ear is selected – the red LED is illuminated. The device is in stand-by mode now and the group LED is illuminated. 3.4 Calibrating the device The instrument and headphones are a set. Because the headphones have been calibrated to this particular instrument, use of other transducers is not recommended. If one of the acoustic transducers has been replaced, the instrument must be recalibrated or the measurements will be incorrect. Use of non-calibrated instruments leads to incorrect measurements! GEBA_Pilot_e_13b.doc 7 851 854/5 03/13 Operating Instructions Pilot Test 4. Basics related to hearing disorders 4.1 Hearing threshold The hearing threshold is the lowest sound level a person can hear. This threshold is measured in dB (decibels). As a result of large-scaled mass screenings the hearing threshold of young normal-hearing people is defined as 0 dBHL. Index HL is short for hearing level. So, a hearing threshold of 0 dBHL is defined as normal hearing. On the other hand, a threshold of 70 dBHL would indicate a moderate to servere hearing loss since sound is heard only when its intensity is 70 dB higher than normal. In the reverse case of a negative value (e.g., -10 dBHL) the hearing is even better than normal. The hearing threshold is measured using pure tones (sine wave) with frequencies from about 125 Hz up to 8000 Hz with adults and 250 Hz up to 4000 Hz with children. These pure tone audiometric tests are rather timeconsuming and require high concentration and cooperation of the tested person. So the tests can be difficult, especially with children. To find out if there is a hearing disorder, it is not necessary to start the examination with a pure tone audiometric test but instead by checking the hearing threshold below a certain limiting level using a screening test. If the patient’s hearing threshold is below that limit, normal hearing is indicated. If the hearing threshold exceeds the limit, or there are other concerns or indications, the patient should be referred for further audiological examination. 4.2 Speech reception level The level at which a patient can understand spoken language can be a valuable screening tool, especially with young children. This speech reception level of children can be determined easily by the Pilot Test. The Pilot Test offers screening test procedures using multisyllabic words with eight test levels from 70 to 25 dBHL. While the screening test is easy to facilitate with the Pilot, results may still be unreliable if the following factors are in play: - disturbing noise in the test room - insufficient cooperation by the patient - poor power of concentration on the part of the patient - the patient did not comprehend the test procedure - the measuring instrument is not functioning GEBA_Pilot_e_13b.doc 8 851 854/5 03/13 Operating Instructions Pilot Test 4.3 Hearing disorders Hearing disorders entail different effects on children and adults. An adult may have sustained a mild hearing loss of 35 dBHL without being conscious of the disorder. That is because he/she has more experience with the redundancy (i.e., information abundance) of speech and thus is able to add non-heard parts of words or even sentences automatically and unconsciously. With children, particularly at the preschool age, a similarly mild hearing loss can be critical for further speech and language development. The capability of realizing the complicated rules of speech and transferring them to his/her own development of speech can be highly restricted. Reasons for a hearing loss can be: - malfunction of the outer or middle ear (conductive loss) - malfunction of the inner ear (sensory loss) - malfunction of the neural pathway (neural loss) Sensory and neural losses can be caused by many different factors, including congenital disorders, ototoxic medications, disease or infection, and exposure to excessively loud sounds. With children, the most widespread reason for problems with hearing is a loss caused by disorders of sound conduction. Mostly this is temporary and varying within rather wide limits. The hearing loss can differ from day to day by 5 to 30 dB. Reasons for this can be: - excessive production of ear wax - disorder of ventilation of the middle ear - inflammation/infection of the middle ear (otitis media) A chronic inflammation of the middle ear can cause a permanent impairment of the ear if it remains untreated! 4.4 Incidence of hearing loss Studies show that one out of every thousand children is born with a serious sensory or neural hearing disorder. Two more children are diagnosed during early childhood. Much more frequently, a conductive type hearing loss is found. Otitis media is the most widespread disease during infancy and childhood and thus the most frequent reason for consulting a pediatrician. Over 90 % of all the children are diagnosed with otitis media once or several times. The World Health Organization (WHO) states that otitis media is the worldwide number-one-reason for hearing loss during childhood. Author Dr. Jerry Northern, in his book Hearing GEBA_Pilot_e_13b.doc 9 851 854/5 03/13 Operating Instructions Pilot Test in children supposes that 30% of all the children under the age of eleven suffer from an ear infection and therefore have a certain degree of hearing loss. If the hearing loss remains untreated a delay in speech development is inevitable. 5. Performing the Pilot test 5.1 Preparing the child The child will first need to learn the correct names for the pictures. This can often be accomplished by having a parent help the child in the waiting room while they are waiting for the health care professional to administer the test. Instruct the child to point to each picture and identify it. To be sure the child understands, ask the child to identify the pictures in the same manner as the screening test, i.e., “Point to the bathtub; show me the airplane, etc.”. Once you are confident that the child understands, tell the child that when the test starts the pilot needs his/her help and will ask some questions. The best way to prepare a child is to pretend that he/she is going to play the “Pilot Game.” This will reduce the anxiety associated with screening. Introduce the headset by telling the child that in order to help the pilot; he/she must put on the headphones – just like pilots wear – so that they can hear each other. NOTE: Place the red earphone on the right ear. The headset needs to fit snugly (make sure the child’s hair and/or glasses are away from the ear). Explain that the pilot will ask where a picture is and he/she should point to it on the large picture board. The child should be told that the voice will start out loud and get softer, so he/she must listen very carefully. You are ready to begin. 5.2 Testing the right ear Press the L/R button (15) (located on the butterfly) and the green LED (located on the bird in the right corner) will light up. On the display the letter “R” is shown. The test will start with words of “GROUP 1” indicated by the green LED located on the airplane. Next, the first test word picture will appear on the screen along with the starting level (70 dB). 70dB R RIGHT 1 Group: Result: Left Right Both 0 40 0 STIMULUS Figure 3 By pressing the GROUP (7) button, you can choose which set of sentences to run on the test. There are four test sets. Press the START/STOP (9) button to start the GEBA_Pilot_e_13b.doc 10 851 854/5 03/13 Operating Instructions Pilot Test test. "Test Running" shows on the display. The test will begin with the introduction: “Let’s look at the pictures.” Next, the first test sentence will play at a level of 70 dBHL. If the patient points to the picture on the picture board that corresponds to the sentence, mark the corresponding field in column R on the audiogram pad with a . That means the answer was correct. If the answer was wrong, mark the field with an . If there was no response at all, mark the field with ”NR”. The test will go on to the next sentence and the volume level decreases to 60 dBHL. Continue to mark the answers as described above. Each successive sentence will decrease in volume as shown in the following chart. Testing group 1 Picture = test word Level in dB HL ball 70 Car 60 sun 50 cake 40 icecream 40 spoon 35 airplane 35 bird 30 scissors 30 sailboat 25 teddybear 25 You can also record the test results by pressing the ENTER (22) button if the patient signals his/her understanding and points to the corresponding picture on the picture board. The level is saved under results beside the respective ear. The result is then shown on the display. While the level decreases, the displayed test results will remain the same unless the hearing is confirmed by pressing the ENTER (22) button again. The test results change according to this confirmation. The level at which the patient correctly understood the sentence is shown beside the respective ear on the display. You can also write these results on the score pad. GEBA_Pilot_e_13b.doc 11 851 854/5 03/13 Operating Instructions Pilot Test You can interrupt the test at any time by pressing the blue PAUSE button (11) (located on the kite). The green PAUSE LED will light up and "Test Pause" will be indicated on the display. To restart the test, press the PAUSE button (11) again. The green PAUSE LED turns off and the last test sentence will repeat. You can skip or repeat test sentences by pressing the ►(13) or the (12) buttons. This only functions while the test is running. Press the START/STOP (9) button to end the test. The next training group will automatically be entered. Repeat the test with the next word group if the child does not understand two successive test sentences. If the patient fails again, refer the child for further audiometric examination. 5.3 Testing the left ear To test the left ear, press the L/R button (located on the butterfly) until the left LED (located on the bird in the left corner) illuminates. The letter L will be displayed on the screen. Choose a different test group for the left ear so that the patient does not get too familiar with the test. Do this by pressing the GROUP button (7). The group you chose will be indicated on the display. Complete the test in the same manner as the right ear. Mark the test results in the L column of the evaluation pad. 35dB Group: RIGHT Result: Left Right Both L 2 35 0 0 STIMULUS Figure 4 Additional testing can be performed by using the other groups of test words / sentences. The standard pause between the test words is three seconds. In the pilot menu you can change the pause length between 1 – 20 seconds (chapter 7.2). GEBA_Pilot_e_13b.doc 12 851 854/5 03/13 Operating Instructions Pilot Test Testing group 2 Testing group 3 GEBA_Pilot_e_13b.doc Picture = test word Level in dBHL car 70 Toothbrush 60 Ball 50 ariplane 40 teddybear 40 scissors 35 cake 35 Spoon 30 sailboat 30 Sun 25 bird 25 Picture = test word Level in dBHL teddybear 70 airplane 60 sailboat 50 ball 40 spoon 40 toothbrush 35 icecream 35 cake 30 sun 30 car 25 scissors 25 13 851 854/5 03/13 Operating Instructions Pilot Test Testing group 4 Picture = test word Level in dB HL toothbrush 70 icecream 60 scissors 50 bird 40 ball 40 sailboat 35 teddybear 35 airplane 30 car 30 cake 25 spoon 25 5.4 Testing both ears (binaural) To test both ears at once, press the L/R button (15) until the LEDs in both the left and right birds light up and on the display. The letter B appears on the screen. Complete the test in the same manner as the right ear. Mark the test results in the B column of the evaluation pad. Please note that the test results of a binaural test are typically a little better than the test results of a single ear. Binaural testing must first be enabled in the Pilot Menu. 5.5 Evaluation of the test After having finished the test reward the little patient. The test results are marked on the audiogram pad whereas on the display the best test results of the respective ear (Left, Right, Both) are also saved. If the child understands all the words spoken at a level of 25 dBHL the child’s hearing is very good. A hearing disorder does not exist if all the words at a level of 30 – 40 dBHL are understood. GEBA_Pilot_e_13b.doc 14 851 854/5 03/13 Operating Instructions Pilot Test 5.6 Ending the test Press the GROUP button (7) for two seconds in order to delete the results on the display and to start a test for a new patient. The screen will prompt you with: “Delete Data? Yes/No.” Confirm your choice by pressing the appropriate button. For hygienic reasons the ear cushions of the headphone should be cleaned after finishing the examination. 5.7 Changing the test language To change the language of the instructions the child hears during the test, press MENU (16). Move the arrow key (19) down until Pilot Speech Language is highlighted and press ENTER (22). The next screen will show you the language options that are programmed into the Pilot. Press the down arrow key until the language you wish to select is highlighted and press ENTER (22). You can now start the test. 5.8 Adjusting volume of monitor phone Press the (21) or the (19) buttons to increase and decrease the volume through the monitor phone while the Pilot test is in progress. GEBA_Pilot_e_13b.doc 15 851 854/5 03/13 Operating Instructions Pilot Test 6. Performing pure tone screening test This test investigates the hearing threshold of the patient and also offers a frequency-specific test result. Because high concentration and better understanding is required the test is only applicable to adults and school children. 6.1 Explanation of the test To receive reliable test results, the cooperation of the patient is very important. Motivation and explanation is very important. „You will hear now different low or high tones. If you hear a tone, please lift your right hand or press the patient response button. If you don’t hear anything, please don’t lift it. In the beginning the tones are quite loudly. But then they are becoming softer. So you have to listen very carefully.“ 6.2 Preparing the test The patient should sit at least one meter from the instrument. Place the headphones on the patient: red side on the right ear, blue side on the left ear and make sure that they are secure. Adjust the headband of the headphones so that the transducers are at the correct angle facing the auditory canal. Put the monitor phone on your ear. Normally you should start the test with the right ear. The right LED on the front panel (located in the bird at the right) will light. 6.3 Testing the right ear Press the TONE button (located in the sun) in order to start with the audiometric test. On the display you will see a blank audiogram or table. The following procedure is based on the basic screen that appears. Chapter 7 will instruct you how to customize the set up. Figure 5 Display The TONE LED will light up. The test starts at 1 kHz with a sound level of 0 dB. A tone will be presented when you press the STIMULUS button (18). As soon as the button is pressed, the STIMULUS field on the display is highlighted. If the field is already highlighted when starting the test, the Interruption Mode is selected. The tone is presented as cross-hairs in the audiogram. The horizontal axis indicates the frequencies (250 Hz - 8 kHz) and the vertical axis indicates the levels GEBA_Pilot_e_13b.doc 16 851 854/5 03/13 Operating Instructions Pilot Test at which the test tone is given. By pressing either the ◄button (17) or the button (20), the frequencies can be selected. Start the test at 1 kHz. If the patient does not react, increase the test level while pressing the ▲button (21). In order to decrease the test level, press the ▼ button (19). The chosen test level is shown on the display. When the patient pushes the patient response switch to signal that he/she just heard the test tone, the RESPONSE field is highlighted on the display. When the patient’s hearing threshold is established, or screening protocol has been met, press the ENTER key to store the result on the screen. The level and frequency of the response is highlighted by an “O” for the right ear in the audiogram view. The response in the table view is stored as a numerical value in the row for the right ear. The cross-hairs automatically goes on to the next frequency. The test begins at 0 dB again. Save the patient’s response by pressing the ENTER button (22). The measurements are connected by a line in the audiogram view (Figure 6). Proceed with the test as described above Figure 6 for 1 kHz up to 8 kHz. The next measured points will be reflected on the table. After saving the results at 8 kHz, the crosshairs automatically return to the test results at 1 kHz. Retest the results at 1 kHz. The patient is now trained and a better result can be expected. Select the low frequencies by pressing the ◄ button and measure the hearing threshold at low tones. After finishing the test, the hearing threshold is now visible. By pressing the ◄ or ►button you can now go from one test result to the other. The test level at which the patient signalled hearing each tone is indicated on the display. 6.4 Testing the left ear Now select the left ear by pressing the L/R ear button (15). The green LED will light up (located in the bird at the left). The LEFT field is highlighted on the display. Repeat the hearing threshold test as described for the right ear above. The saved thresholds are indicated with an “X” for the left ear in the audiogram view and as a numerical value for the left ear in the table view. GEBA_Pilot_e_13b.doc 17 851 854/5 03/13 Operating Instructions Pilot Test 6.5 Evaluation of the test result The test results can now be recorded on the audiogram pad, printed with the optional Pilot Test printer or stored with the software for tone audiometry. By pressing either the ◄ or button you can now go from one result to the next. The test level at which the patient signalled hearing each tone is indicated on the display. If you use the optional printer, you can print the results by pressing the TONE button (23) again. Press the TONE button (23) for two seconds in order to delete the results on the display and to start a test for a new patient. If all test tones are heard by 30-40 dBHL a large hearing disturbance cannot be assumed. If a child even hears tones at 15 dBHL the child’s hearing is very good. For hygienic reasons the ear cushions of the headphone should be cleaned after finishing the examination. GEBA_Pilot_e_13b.doc 18 851 854/5 03/13 Operating Instructions Pilot Test 7. Set up the Pilot Test for your individual needs The Pilot Test is pre-configured for most requirements. If you still require some functions to be set up for your individual needs, enter the user menu. After having set the changes they are saved in the device. The settings remain unchanged even if the device has been switched off. Press the MENU button (16). By pressing the ▲ (21) or ▼ button (19), the different menu options can be chosen. The selected menu is highlighted. Press the ENTER button (22) to choose the respective submenu and to select, confirm and save the new setting. Press the MENU button (16) again to exit the respective menu or user menu (Figure 3). After leaving the user menu you will return to the test you last selected. The possible settings of the Pilot are as shown in Fig. 7 and will be descriped more detailed in the following. Figure 7 7.1 Pilot Speech Language The words of the pilot test will be played back with the selected language. Up to 6 languages can be saved in the Pilot Hearing Test. The setting of language is set according to your order. 7.2 Pilot Menu Binaural Presentation: OFF – the option to measure the hearing of both ears is switched off. Show picture: ON – pictures are shown on the display. Output (Air Conduction/Free Field): The test can be carried out either by headphones, loudspeaker or optional with insert phones instead of headphones. Fast Pilot Test: OFF – Test starts with GEBA_Pilot_e_13b.doc 19 Pilot Menu Binaural Presentation Show Picture Output (Air Conduction/free Field) Fast Pilot test Pilot Pause Length Show Results Print Size Change Item Enter: Select Item Menu: Return Figure 8 851 854/5 03/13 Operating Instructions Pilot Test 70 dB. ON – the Fast Test starts with 40 dB. Pilot Pause Length: Use the arrow keys to to change the pause length between 1 – 20 seconds. Standard length is 3 seconds. Show results: Scored results will or will not be displayed on the test screen. If PRINT is selected in PC or PRINT option in the User Menu, results will always be displayed. Print Size: Printout will be numerical data only (short) or will display all pictures of Pilot Test. 7.3 Audiometry Submenu This submenu covers all settings of performing audiometry tests. Display Audiogram: The audiogram is displayed either as a diagram or table. Setting: Diagram. Presenter / Interrupter: The presenter mode is set up. The signal field on the display is marked. A tone is only given by pressing the stimulus button. Audiometry Submenu Display Audiogram Presenter / Interrupter Go to next freq. after saving Level after frequency change Save Data with Advanced Settings Change Item Enter: Select Item Go to next frequency after saving: If this function is switched off, the next frequency has to be selected by pressing ( ). Menu: Return Fi 9 Level after frequency change: Remaining: The test level remains if the frequency has been changed. Return to minimal level: The next frequency will be measured at the selected start frequency (0 dB, optional -10 dB). Decrease by 30 dB: The test level of the next frequency is decreased by 30 dB of the last level of the test. Return to 30 dB: The test level of the next frequency will return to 30 dB of the last level of the test. Save Data with: Stimm / Enter Choose if the data will be saved by pressing the Enter Button or the Stimulus button . GEBA_Pilot_e_13b.doc 20 851 854/5 03/13 Operating Instructions Pilot Test 7.3.1 Advanced Settings Advance Frequency Selection: Allows only specific frequencies to be displayed and tested from the audiometer test screen. Choose On/Off for each individual frequency by using the arrow keys ,➔ . Frequency range is from 250 Hz to 8 kHz. The 1000 Hz frequency is turned on by default and cannot be turned off by the user. Pulse Tone as Default: ON / OFF Advanced Settings Advance Frequency Selection Pulse Tone as Default Return to 1 kHz Minimal Level -10/0dB Direction of level button Change Item Enter: Select Item Menu: Return Figure 10 Return to 1 kHz: After having reached the highest (8 kHz) or lowest (250 Hz) test frequency by pressing Enter the test frequency of 1 kHz is automatically selected. Setting ON, can be turned OFF. Minimal level -10/0dB: The hearing threshold test and the audiogram start either at -10 dB or 0 dB. Setting 0 dB. Direction of level button: This function sets the direction of the button (increasing / down of level) and (increasing / down of level) or vice versa. Setting: (increasing / down). 7.4 Start with… The test which you like to start with will be selected after switching on the device: Pilot Test or Tone Audiometry. 7.5 Display Language The language of the instructions shown on the display can be selected. English, Spanish, German and French are available as operating languages. 7.6 Device Information General information can be found here, e. g. software version, serial number, quantity of test. 7.7 PC or Printer Select Print (serial) or PC data transfer. GEBA_Pilot_e_13b.doc 21 851 854/5 03/13 Operating Instructions Pilot Test 7.8 Display Contrast By pressing the (light) or (dark) button the display can be adapted to your personal requirements. Press the Enter button to confirm your selection. 7.9 Reset to Default Returns all settings to factory default settings. GEBA_Pilot_e_13b.doc 22 851 854/5 03/13 Operating Instructions Pilot Test 8. Care and maintenance of the instrument Disconnect the mains cable before cleaning! To clean the instrument, headphones and accessories use a soft cloth dampened with a little warm soapy water; no alcohol-based cleaner should be used. The ear cushions of the headphones can be detached for cleaning. To remove the ear cushion, pull it gently from the earphone. To assemble the cleaned or changed cushion, press it on the earphone and make sure that it sits properly. The sound outlet hole must be exactly in the middle of earphone. During cleaning, make sure that no liquids run into the switches, headphone capsules or loudspeaker openings. To maximize the service life of your audiometer and accessory equipment, we suggest the following: 1. Turn off the instrument overnight. 2. Wipe the headset cords, ear cushions and casing occasionally with a cloth dampened (not dripping wet) with warm water. Dry with a soft cloth. 3. Leave the accessories such as the headset, power supply, and monitor phone permanently connected to the audiometer to minimize strain on the connections. It is not necessary to disconnect accessories that are not in use while performing other tests. Should it be necessary to disconnect cords, always grasp the barrel of the plug — never pull the cords. Never drop or snap the headphones together. Mechanical shock may change the earphone’s electrical and operational characteristics and require recalibration of the Pilot. 4. Avoid sharply bending or twisting any of the cords. Although they are designed to be highly flexible, rough treatment may cause damage. Broken or defective cords can cause crackling noise and intermittent or weak operation in the headset. Headset cords may be replaced without recalibrating the audiometer. GEBA_Pilot_e_13b.doc 23 851 854/5 03/13 Operating Instructions Pilot Test 9. Technical data and accessories The Pilot Test is an active, diagnostic medical product according to class IIa of the EU Medical Directive 93/42/EEC. Pilot Speech Test Test signal: Speech Sound pressure level: 25, 30, 35, 40, 50, 60, 70 dBHL Speech signal source: MP3 Sound file Tonaudiometer Audiometer class: A 4 according to EN 60 645-1 Test signal: Pure tone Test frequencies: 250; 500 Hz; 1; 2; 3; 4; 6; 8 kHz Sound pressure level: adjustable in 5 dB-steps Air conduction headset TDH 39 or HDA 280: -10 dBHL...100 dBHL Loudspeaker Typ SBC (optional): -10 dBSPL...70 dBSPL (measurem. at a distance of 10 cm) Presenter mode: Tone will be presented by pressing the STIMULUS button Interrupter mode: Tone will be interrupted by pressing the STIMULUS button Electrical safety: EN 60601-1 class I, Type BF Mains voltage: 100 ... 240 V~ ±10 % , 50/60 Hz Power consumption: 15 VA Warm up time: > 10 min after power on Environment conditions: + 15° ... + 35° C / + 59 F …+95 F (operation) + 5 °... + 50° C / + 41 F …+122 F (storage) max. Humidity 90 % (storage and operation) Dimensions: Weight: GEBA_Pilot_e_13b.doc W x D x H: 30 x 25 x 6 cm / 11.8“ x 9.8“ x 2.4“ 1.3 kg / 2.86 lbs. 24 851 854/5 03/13 Operating Instructions Pilot Test Connection plugs: Connections: Specifications: Mains left/right=mains 100...240 V~, 50/60 Hz middle=protection earth 1=GND, 2=RX, 3=TX, RS 232 C Serial interface USB 1.1 Universal serial interface Sleeve=Mass, ZA= 10 Ω, UA= 35 mVeff Monitor Phone Tip=Output Patient response switch Sleeve=Mass, Tip=Input RI= 500 Ω Loudspeaker (opt.) Sleeve=Mass, Tip=Output ZA= 8 Ω, UA= 3,5 Veff Headset right (red) Sleeve=Mass, Tip=Output ZA= 8 Ω, UA= 3,5 Veff Headset left (blue) Sleeve=Mass,, Tip=Output ZA= 8 Ω, UA= 3,5 Veff GEBA_Pilot_e_13b.doc 25 851 854/5 03/13 Operating Instructions Pilot Test Calibration values: AC-Headphone DD45 Force 4,5 N Equivalent treshold sound pressure level with coupler according to IEC 60318 Frequency [Hz] [dB] (re 20 µPa) 125 47,5 250 27 500 13 750 6,5 1000 6 1500 8 2000 8 3000 8 4000 9 6000 20,5 8000 12 GEBA_Pilot_e_13b.doc 26 851 854/5 03/13 Operating Instructions Pilot Test Calibration values: AC-Headphone DD65 Force 10,6N +/- 1N Equivalent threshold sound pressure level with coupler according to IEC 60318 Frequency [Hz] [dB] (re 20 µPa) 125 52,5 250 39,5 500 19,5 750 11 1000 8,5 1500 13 2000 9 3000 11,5 4000 10,5 6000 29,0 8000 14,0 Calibration values: Loudspeaker Philips SBC measured at 1m distance Reference equivalent threshold Frequency [Hz] [dB] (re 20 µP) 250 -2.5 500 0 1000 0 2000 -1,0 3000 0 4000 0 6000 -1 8000 0 GEBA_Pilot_e_13b.doc 27 851 854/5 03/13 Operating Instructions Pilot Test Standard accessories: - 1 Pilot Test instrument - 1 Headphone - 1 Patient response switch - 1 Monitor phone - 1 picture board set of training pictures - 1 mains cable - 1 pad of audiogram forms (50 sheets) - 1 roll of stickers „pilot license“ (500 pieces) - 1 operating instruction Optional accessories: - Speech test available in Africans, Arabic, Catalan, Chinese, Croatian, Czech, Danish, Dutch, English, Euskara, French, Galego, German, Greek, Hungary, Italian, Japanese, Korean, Norwegian, Polish, Portuguese, Russian, Sami, Serbian, Slovakian, South Sotho, Spanish, Swedish, Swiss German, Turkish, Vietnamese, Xhoso, Zulu. - Thermal printer Primotherm 1409 - Loudspeaker SBC - Soft-side carrying case Consumables: - 1 pad Audiogram forms (à 50 sheets) - 1 roll of stickers (500 pieces) „Pilot license“ GEBA_Pilot_e_13b.doc 28 851 854/5 03/13 Operating Instructions Pilot Test 10. Troubleshooting If your instrument is no longer working properly, please check the following points: Lamps do not light up: - Is the power switch on? - Is the power cord plugged in correctly in the power connector? - Is the wall outlet working? No sound from headphone: - Is the headphone cable plugged in correctly to the socket? - Is the lead loose or defective? No sound from monitor: - Is the cable plugged in correctly to the socket? - Is the lead loose or defective? If your instrument still does not work properly after this short check, please consult your dealer or send the instrument to your dealer or a service center. Please include a detailed description of faults. GEBA_Pilot_e_13b.doc 29 851 854/5 03/13 Operating Instructions Pilot Test 11. Warranty, maintenance and after-sales service The MAICO Pilot Test is guaranteed for 2 years. This warranty is extended to the original purchaser of the instrument by MAICO through the distributor from whom it was purchased and covers defects in material and workmanship for a period of two years from date of delivery of the instrument to the original purchaser. The Pilot Test may be repaired and serviced only by your dealer or by a service center recommended by your dealer. We urgently advise you against attempting to rectify any faults yourself or commissioning non-experts to do so. In the event of repair during the guarantee period, please enclose evidence of purchase with the instrument. In order to ensure that your instrument works properly, the Pilot Test should be checked and calibrated at least once a year. This check has to be carried out by your dealer. When returning the instrument for repairs it is essential to send the headphones, as well. Send the device to your dealer or to a service center authorized by your dealer. Please include a detailed description of faults. In order to prevent damage in transit, please use the original packing if possible when returning the instrument. Within the European Union it is illegal to dispose electric and electronic waste as unsorted municipal waste. According to this, all MAICO products sold after August 13, 2005, are marked with a crossed-out wheeled bin. Within the limits of Article (9) of DIRECTIVE 2002/96/EC on waste electrical and electronic equipment (WEEE), MAICO has changed their sales policy. To avoid additional distribution costs we assign the responsibility for the proper collection and treatment according legal regulations to our customers. GEBA_Pilot_e_13b.doc 30 851 854/5 03/13 Operating Instructions Pilot Test 12. Safety regulations 12.1 Electrical safety: The MAICO Pilot Test is constructed to comply with protection class I of the international standard IEC 601-1 (EN 60601-1). The instrument is not intended for operation in areas with an explosion hazard. 12.2 Measuring security: To guarantee that the instrument works properly, the instrument has to be checked and calibrated at least once a year. The service and calibration must be performed by an authorized service center. In accordance with the regulations of the EU Medical Directive, MAICO is not liable if these checks are not completed. 12.3 Device control: The user of the instrument should perform a subjective instrument check once a week. This check can be completed following the list for subjective instrument check (see next page). A possible malfunction of the instrument will be better investigated if you copy the list, complete it once a week and store it in your files. GEBA_Pilot_e_13b.doc 31 851 854/5 03/13 Operating Instructions Pilot Test List for subjective instrument check Model: _________________________________________________________________ Serial #: ________________________________________________________________ Test person: _____________________________________________________________ - All keys can be pressed easily - All the cords are disentangled - Connectors and cables are intact - Cushions of the headphone are cleaned - Cushions of the headphone are undamaged Test subject: Pilot Test carried out with test person: () correct answer Level (dBHL) (x) wrong answer (na) no answer Word from Test person’s Test person’s Test person’s Test person’s Group 1 answers answers answers last answers last today today session session RIGHT EAR 70 Ball 60 Car 50 Sun 40 Cake 40 Icecream 35 Spoon 35 Airplane 30 Bird 30 Scissors 25 Sailboat 25 Teddybear LEFT EAR RIGHT EAR LEFT EAR If the difference between today's and last answer of the test person is 10 dB or more on the same ear, perhaps the Pilot Test needs service! Tested: GEBA_Pilot_e_13b.doc Date: 32 851 854/5 03/13 Operating Instructions Pilot Test Specifications are subject to change. MAICO Diagnostic GmbH Salzufer 13/14 10587 Berlin Telefon +49 3070 71 46 50 Telefax +49 30 70 71 46 99 e-mail: [email protected] Internet: www.maico.biz GEBA_Pilot_e_13b.doc 33 851 854/5 03/13