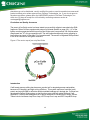
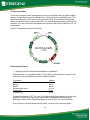
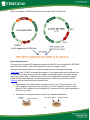
1
CRISPR/Cas9 Genome Editing Application Guide I. Genome-Wide knockout kit using CRISPR ............................................................................. 5 Package contents................................................................................................................... 5 Related Optional Reagents .................................................................................................... 5 Related OriGene Products ..................................................................................................... 5 Notice to purchaser ................................................................................................................ 5 Product Description ................................................................................................................ 6 Experimental Protocol ............................................................................................................ 7 II. pCas-Guide precut cloning kit (SKU: GE100001) ..................................................................12 Package contents..................................................................................................................12 Related Optional Reagents ...................................................................................................12 Related OriGene Products ....................................................................................................12 Notice to purchaser ...............................................................................................................12 Production and Quality Assurance ........................................................................................13 Introduction ...........................................................................................................................13 Product Description ...............................................................................................................14 Experimental Protocols .........................................................................................................15 I. Design target sequence..................................................................................................15 II. Addition of extra bases to the ends of the target sequence ...........................................15 III. Cloning the double-stranded oligos into the pCas-Guide vector ...................................16 III. pCas-Guide plasmid (SKU: GE100002) ...............................................................................17 Package contents..................................................................................................................17 Related Optional Reagents ...................................................................................................17 Related OriGene Products ....................................................................................................18 Notice to purchaser ...............................................................................................................18 Product Description ...............................................................................................................18 Experimental protocol ...........................................................................................................19 IV. pLenti-Cas-Guide precut cloning kit (SKU: GE100009) ........................................................20 1 Package contents..................................................................................................................20 Related Optional Reagents ...................................................................................................20 Related OriGene Products ....................................................................................................20 Product Description ...............................................................................................................21 Experimental protocol ...........................................................................................................21 Lenti-based protocols: .......................................................................................................22 V. pLenti-Cas-Guide plasmid (SKU: GE100010) .......................................................................23 Package contents..................................................................................................................23 Related Optional Reagents ...................................................................................................23 Related OriGene Products ....................................................................................................23 Product Description ...............................................................................................................24 Experimental Protocol ...........................................................................................................24 VI. pCas-Guide-EF1a-GFP plasmid (SKU: GE100018) .............................................................25 Package contents..................................................................................................................25 Related Optional Reagents ...................................................................................................25 Related OriGene Products ....................................................................................................25 Product Description ...............................................................................................................26 Experimental Protocol ...........................................................................................................26 VII. T7 driven CRISPR/Cas system-pT7-Guide-IVT (SKU: GE100025) and pT7-Cas9 (SKU: GE100014) ...............................................................................................................................27 Package contents..................................................................................................................27 Related Optional Reagents ...................................................................................................27 Related OriGene Products ....................................................................................................27 Product Description ...............................................................................................................28 Experimental protocol ...........................................................................................................29 I. Design genomic target sequence and cloning into pT7-Guide-IVT vector .......................29 II. Producing gRNA and Cas9 mRNA using T7 in vitro transcription kits ............................30 VIII. pCas-Guide-EF1a-CD4 (SKU: GE100022) ........................................................................30 Package contents..................................................................................................................30 Related Optional Reagents ...................................................................................................30 Related OriGene Products ....................................................................................................31 Product Description ...............................................................................................................31 2 Experimental Protocol ...........................................................................................................31 IX. Cre expression vector for Cre-Lox recombination, pCMV6-Entry Cre (SKU: GE100017) .....32 Package contents..................................................................................................................32 Related Optional Reagents ...................................................................................................32 Related OriGene Products ....................................................................................................32 Product Description ...............................................................................................................33 X. Cas9 D10A nickase vectors, pCas-Guide-Nickase (SKU GE100019), pT7-Cas9-Nickase (SKU GE100020) ......................................................................................................................33 Package contents..................................................................................................................33 Related Optional Reagents ...................................................................................................33 Related OriGene Products ....................................................................................................34 Product description ...............................................................................................................34 Experimental protocol ...........................................................................................................34 XI. CRISPR scramble controls, pCas-Scramble (SKU GE100003) and pCas-Scramble-EF1AGFP (SKU GE100021) ..............................................................................................................35 Package contents..................................................................................................................35 Product description ...............................................................................................................35 XII. AAVS1 Transgene knockin via CRISPR .............................................................................36 Introduction ...........................................................................................................................36 Products offered ....................................................................................................................36 pCas-Guide-AAVS1 (SKU GE100023) ..................................................................................36 Package contents ..............................................................................................................36 Related Optional Reagents ...............................................................................................37 Related OriGene Products ................................................................................................37 Product Description ...........................................................................................................37 pAAVS1-puro-DNR ...............................................................................................................37 Package contents ..............................................................................................................38 Related Optional Reagents ...............................................................................................38 Related OriGene Products ................................................................................................38 Product Description ...........................................................................................................38 Cloning a transgene to pAAVS1-puro-DNR .......................................................................39 AAVS1 Transgene knockin vector kit ....................................................................................41 3 Package Contents .............................................................................................................41 Related Optional Reagents ...............................................................................................41 Related OriGene Products ................................................................................................42 Notice to purchaser ...........................................................................................................42 Description of AAVS1 transgene knockin vector kit ...........................................................42 pAAVS1-RFP-DNR (SKU GE100026) ...................................................................................43 Package contents ..............................................................................................................43 Related Optional Reagents ...............................................................................................43 Related OriGene Products ................................................................................................43 Product Description ...........................................................................................................44 Experimental protocol ........................................................................................................45 FAQ ..........................................................................................................................................49 4 I. Genome-Wide knockout kit using CRISPR Package contents 2 vials of gRNA vectors, (SKU KN2xxxxxG1, KN2xxxxxG2), 3-5 µg DNA in TE buffer 1 vial of donor vector containing left and right homologous arms and a GFP-puro functional cassette (SKU KN2xxxxxD), 3-5 µg DNA in TE buffer *3 vials of bacterial stabs (2 gRNA vectors and 1 donor vector). To recover the bacteria, add 100 µL of LB media in the stab tube, rock the tube a few times, then take out the LB liquid, spread on a LB Amp+ agar plate or directly add to LB media for overnight culture. 1 vial of negative scramble control vector (SKU GE100003), lyophilized. Reconstitute in 100 µL dH2O, final concentration 100 ng/ µL. Certificate of Analysis Application Guide available on line by searching the cat# (KNxxxxxxx) *International customers may only receive the plasmid DNA if their counties don’t accept bacterial stabs. Note: The cDNA clone is shipped at room temperature, but should be kept at -20C for longterm storage. If properly stored, clones are guaranteed to be stable for 12 months. Please store the bacterial stabs at 4C and culture the bacteria within 1 week. Related Optional Reagents LB agar plates with ampicillin, 100 g/mL LB broth (10 g/L Tryptone, 5 g/L Yeast Extract, 10 g/L NaCl. Adjust pH to 7.0 with 1 N NaOH) Related OriGene Products Transfection reagent: http://www.origene.com/cdna/transfection.mspx Reagents and supplies for immunoblots: user preferred. OriGene has a selection of antibodies and detection reagents that are available at www.origene.com/antibody/ . DNA purification reagents http://www.origene.com/Other/Plasmid_Purification/ qPCR reagents http://www.origene.com/geneexpression/ CRISPR/Cas9 products http://www.origene.com/CRISPR-CAS9/ Notice to purchaser This product is for research use only. Use in and/or for diagnostics and therapeutics is strictly prohibited. By opening and using the product, the purchaser agrees to the following: The plasmids may not be distributed, resold, modified for resale or used to manufacture commercial products without prior written approval from OriGene Technologies, Inc. If you do not agree to the above conditions, please return the UNOPENED product to OriGene Technologies, Inc. within ten (10) days of receipt for a full refund. 5 Product Description OriGene offers genome-wide gene knockout / knockin kits via CRISPR (human and mouse); one specific kit for each gene locus. The gene knockout/knockin kit is a complete kit to knockout any coding gene and knockin a functional cassette containing GFP and puromycin resistant gene. GFP will be under the native promoter after genomic integration; the puromycin resistant gene is under PGK promoter. gRNA vectors are provided in pCas-Guide vector with a target sequence cloned. Both of the target sequences are located at the 5‟ end of the ORF; therefore gRNA vectors will make a precise cleavage at the 5‟ end of the ORF of the gene loci. A negative scramble gRNA control is also provided. The Applications are: 1. you can knockin GFP reporter for your promoter study. 2. Knock-out genes at the chromosomal level. Fig. 1. Scheme of genome-editing knockout kit ATG 1 CRISPR/Cas cuts the double-stranded DNA at the targeting site 2 Donor template DNA provides the template for the homologous repair. 3 The functional cassette is incorporated into the genome when 6 1 + 2 are cotransfected. Experimental Protocol Each kit contains two gRNA vectors, one scramble negative control and one donor vector. To ensure high efficiency of cleavage, two gRNA constructs are provided. A scrambled control vector serves as the negative control. A sample protocol listed below is for experiments performed in 6-well plates and using TurboFectin (cat# TF81001) as transfection reagent. If your experiments require a different size of culture plates, just scale up or down the reagents accordingly based on the relative surface area of your plate (Table 1). Different type of cells may need a different transfection reagent; please follow the manufacturer‟s corresponding protocol. OriGene just launched Virus-like Viromers which are best for difficult-to-transfect cells. 1. Approximately 18-24 hours before transfection, plate ~3 X 10⁵ adherent cells in 2 ml culture medium into each well of a 6-well plate or ~5x10⁵ suspension cells per well to obtain 50-70% confluence on the following day. The amount of cells varies depending on the size of your cells. 2. Transfection in a complete culture medium. Three separate transfections: scramble control donor gRNA 1 donor gRNA 2 donor In a small sterile tube, combine the following reagents in the prescribed order. The order of reagent addition is important to achieve the optimal results. a. Dilute 1 μg of one of the gRNA vectors (or scramble control) in 250 uL of Opti-MEM I (Life Technologies), vortex gently. Then add 1 μg of the donor DNA into the same 250 μL of Opti-MEM I. Vortex gently. Two gRNA vectors and scramble control are in three separate tubes, so the gRNA efficiency can be tested individually. b. Add 6 μL of Turbofectin 8.0 to the diluted DNA (not the reverse order) and pipette gently to mix completely. c. Incubate the mixture 15 minutes at room temperature. Note: We recommend starting with the ratios of Turbofectin 8.0 and DNA listed in table 1; however, subsequent optimization may further increase the transfection efficiency. d. Add the mixture above drop-wise to the cells plated in step 1 (no need to change the media). Gently rock the plate back-and-forth and side-to-side to distribute the complex evenly. e. Incubate the cells in a 5% CO 2 incubator. 7 3. 48hr post transfection, split cells 1:10, grow additional 3 days; then split the cells again 1:10. Split cells 7 times in total. Since puromycin resistant gene in the donor vector contains PGK promoter, the plasmid donor DNA before genomic integration will also provide puromycin resistance. The reason to grow cells for around 3 weeks before puromycin selection is to dilute out cells containing the donor as episomal form. Time lines of genome editing CRISPR targeted gene knockout / knockin--- 1 week post transfection Episomal donor vector dilution with cell passaging--- 3 weeks post transfection Note 1. Since stable cell selection takes time, you can try to analyze the cells at P2 to detect genomic integration using genomic PCR (Fig 2). When designing primers for genomic PCR, one primer should be outside of the homologous arm region in donor DNA and one primer is in the functional cassette. Please see details in Fig. 3. The amplified PCR fragment is around 1kb. There could be some difficulties doing genomic PCR at this step before selection due to the percentage of edited cells and difficulties of genomic PCR. qPCR measuring the targeted mRNA level would not work due to the small percentage of edited cells. Note 2. You might be able to use GFP to sort genomic edited cells between P2-P5 (Fig. 2). Since donor DNA contains 600bp left homologous arm sequence which is immediately upstream of ATG, Donor DNA transfected + scramble control could express weak or bright green fluorescence depending how much promoter sequence the left homologous arm sequence contains. The best case scenario is donor DNA + scramble gives weak GFP signal while after integration the promoter is strong and constitutive, so you can sort strong GFP positive cells, thus avoiding the lengthy donor vector dilution step before puro selection. 4. Apply puromycin selection. Split P5 or P7 cells 1:10, then grow cells directly in the puromycin containing complete media in 10 cm dishes (apply puro selection at P6 might work, but you might get more random donor integrated clones than P8). The dose of puromycin needs to be determined with a kill curve to find out the lowest dose that kills the non-transfected cells completely 4-7 days post selection; the range of puromycin is 1μg/ml to 10μg/ml). Change the media every 2-3 days. Note: We recommend you still keep growing or freeze some of the transfected cells without selection; just in case, you need to perform the puromycin selection again. 5. The puromycin resistant cells are ready to be analyzed for genome editing. WB can be used to measure gene knockdown if there is a good protein-specific antibody available (better after isolating individual cell colonies). You will also need to do genomic PCR to verify the integration of the functional cassette. You can directly sequence the amplified genomic fragment using the PCR primers to verify the integration in the genome. Note: Scramble control and donor vector will also give you some puromycin resistant cells as donor vector alone can randomly integrate into the genome too; however the efficiency should be a lot lower than with a specific gRNA. Therefore, you should get more colonies with gene specific gRNA than scramble control if the gene specific gRNA cleaves efficiently. 8 6. Isolate individual cell colonies. Two main methods, limiting dilution and cloning rings / cylinder. 1) Limiting dilution This method is better to be used after puromycin selection. Dilute cells to seed about 1-2 cells/well in 96-well plate, after 1-2 weeks, observe under the microscope and select the wells only containing one cell colony, then further expand them to 6-well plate when they are confluent in the 96-well plate and so on. 2) Cloning rings / cylinder This method can be used in the same time with puro selection. Seed cells at lower density, such as 5% confluency in a larger cell culture dish, such as 10cm dish, apply puromycin selection when seeding. Note 1: How to make bi-allelic knockout: If you isolate single cell colonies, in some cells gene knock-out may occur only in one allele; in some cells gene knock-out may occur in both alleles. If you only have monoallelic knockout (heterozygous) and you want to get bi-allelic knockout (homozygous), you can order another donor vector containing a different mammalian selection marker, such as blastocidin or neomycin resistant marker. Make sure the other allele is intact. You can confirm it with genomic PCR with a set of PCR primers amplifying the endogenous chromosome and sequence it. If this allele is targeted by Cas9/gRNA, repaired by NHEJ, introduced indels and the indels change the protein reading frame, then you have a bi-allelic knockout (one via HDR and one via NHEJ). If this allele is intact, you can do the knockout again. OriGene has both functional cassettes. You can do the knockout procedure again with the new donor vector to target the second allele (one allele is already targeted and replaced with GFP-puro cassette). Alternatively, you can use Cre (SKU GE100018) to flox out the puro cassette from your edited cells and use the same donor vector from the knockout kit to do the knockout again to target the second allele. Note 2: If you gene is essential, you will not be able to get bi-allelic knockout. The solution is to do conditional knockout using LoxP system by introducing LoxP sites around the exon(s) to be knocked out. Table 1. Recommended starting transfection conditions for Turbofectin 8 Tissue Culture Vessel Growth area, cm2/well g of DNA Ratio of Turbofectin:DNA 96-well plate 0.35 0.1-0.15 3:1 24-well plate 2 0.5-1 3:1 12-well plate 4 1-2.5 3:1 6-well plate 9.5 1-5 3:1 35 mm plate 8 1-5 3:1 9 60 mm plate 20 2-10 3:1 100 mm plate 60 5-15 3:1 Fig. 2. Diagram of knockout / knockin process P1, 48 hr post transfection 1:10 split Grow for 3 days P2, 5-day post transfection 1:10 split Grow for 3 days Optional: Extract genomic DNA for PCR P3, 8-day post transfection 1:10 split Grow for 3 days P7, 20-day post transfection 1:10 split P8, 23-day post transfection Freeze or keep growing, if puro selection is needed again Puro selection 10 Fig. 3. Diagram of genomic PCR Primer design. Integrated cassette LHA LF GFP LR PGK-Puro chromosome RHA RF RR Primer set to detect Primer set to detect left integration junction right integration junction (~ 1kb PCR fragment) (~ 1kb PCR fragment) LF, LR: Forward and reverse PCR primer to amplify the left integration junction RF, RR: Forward and reverse PCR primer to amplify the right integration junction 11 II. pCas-Guide precut cloning kit (SKU: GE100001) Package contents The following components are included: One (1) vial of precut pCas-Guide plasmid DNA (SKU GE100001V), lyophilized ready for ligation (10 RXNs). Reconstitute in 10 µL dH2O, final concentration 10 ng/ µL. One (1) vial of forward sequencing primer, CF3 (SKU GE100008) to sequence the targeting sequence cloned into pCas-Guide vector; 100 picomoles dried onto the bottom of screw cap tubes. Reconstitute the primer in 10 µL dH2O to make a 10 µM solution. One (1) vial of annealing buffer (SKU GE100007) for oligo annealing (10X), 200 µL Certificate of Analysis Application Guide * OriGene plasmids are purified using ion-exchange columns for high-yield, low endotoxin preparations (PowerPrep® HP Midiprep Kit www.origene.com/other/Plasmid_Purification) The cDNA clone is shipped at room temperature, but should be kept at -20C for long-term storage. If properly stored, clones are guaranteed to be stable for 12 months. Related Optional Reagents Nuclease free water T4 DNA ligase and buffer Competent E. coli cells LB agar plates with ampicillin, 100 g/mL LB broth (10 g/L Tryptone, 5 g/L Yeast Extract, 10 g/L NaCl. Adjust pH to 7.0 with 1 N NaOH) DNA purification reagents Related OriGene Products Cloning the homologous arms in predesigned donor rescue construct harboring functional cassettes (service from www.blueheronbio.com ). GFP-PGK-Loxp-Puro-LoxP RFP-PGK-Loxp-BSD-LoxP Luciferase-PGK-Loxp-Puro-LoxP mBFP-PGK-Loxp-Neo-Loxp TrueClone™ FL cDNA clones http://www.origene.com/cDNA/TrueClone/ HuSH™ shRNA Plasmids http://www.origene.com/shRNA/ Validated Antibodies http://www.origene.com/Antibody/ Purified Proteins http://www.origene.com/protein Over-expression lysates http://www.origene.com/Lysate/ Transfection Reagents http://www.origene.com/cdna/transfection.mspx Anti-tag Antibodies http://www.origene.com/Antibody/AntiTagAntibody.aspx Notice to purchaser This product is for research use only. Use in and/or for diagnostics and therapeutics is strictly prohibited. By opening and using the product, the purchaser agrees to the following: The 12 plasmids may not be distributed, resold, modified for resale or used to manufacture commercial products without prior written approval from OriGene Technologies, Inc. If you do not agree to the above conditions, please return the UNOPENED product to OriGene Technologies, Inc. within ten (10) days of receipt for a full refund by contacting customer service at [email protected]. Production and Quality Assurance The precut pCas-Guide vector has been tested to successfully religate to annealed oligo DNA fragments. When OriGene experimental protocol is followed (details on page 6-8), 1 L of the ligation reaction generated with this precut pCas-Guide vector can produce 100 colonies when transformed into 106 cfu/g competent cells. The self-ligation background (vector religating to itself without an insert) is less than 5% of transformants. The amount of digested DNA provided in the kit is sufficient for ten ligation reactions. Figure 4. The vector map of pre-cut pCas-Guide Introduction Cas9 based genome editing has become a popular tool for targeted genome manipulation because of its simplicity and high cutting efficiency. This system requires a functional cas9 protein and a guide RNA for effective double-stranded breakage at a desired site. OriGene has developed the pCas-Guide system, a dual-function vector with both guide RNA and Cas9 expression. OriGene also designed a set of donor cassettes for construction of donor vectors. These include Luciferase-Loxp-Puro-Loxp, tGFP-Loxp-Puro-Loxp and tRFP-Loxp-BSD-Loxp. 13 Figure 5. Flow chart of genome editing using Cas9/CRISPR. Target seq cloned in pCas-Guide Predesigned donor template DNA or one of your own GFP Loxp eg. LHA GFP RFP Luciferase Co-transfection 14 Loxp Puro RHA SD Puro Product Description The pCas-Guide vector is designed for cloning a guide RNA insert for genome editing purpose. The vector also has a CMV-driven codon-optimized Cas9. When co-transfected with a proper donor DNA, targeted genome editing can be achieved. The vector retains the ampicillin resistance gene for the selection of E. coli transformants. The vector is supplied as a precut vector, ready for insert ligation. This system has been successfully validated in multiple cases of genome editing. Experimental Protocols I. Design target sequence OriGene has developed a proprietary Cas9 guide RNA designing tool which is free to use, http://www.blueheronbio.com/. Follow the instructions below to design your guide RNA: 1. Select your desired Cas9 cutting site from your genomic region of interest. 2. Copy around 100 bp of genomic sequence flanking the cutting site (-50 to +50). Paste the sequence to the sequence box and click the Search button. 3. The program will return all possible targeting sequences with location and GC content obtained from searching both the plus and minus strands. If there is no target returned, expand your genomic region of interest (-100 to +100) and search again until there is a positive return. 4. Select a few target sequences to Blast against the genomic DNA database to check sequence specificity. 5. Select 2 to 3 target sequences to clone into pCas-Guide vector. II. Addition of extra bases to the ends of the target sequence To facilitate cloning of the 20-bp target sequence, extra bases need to be added to the ends. 1. Select a desired 20-bp sequence as a target. The following is an example sequence: 5‟ ATGGGAGGTGGTATGGGAGG 3‟ 5‟ CCTCCCATACCACCTCCCAT 3‟ Forward sequence: Reverse complement sequence: 2. Add „gatcg‟ to the 5‟ end of the forward sequence and „g‟ to its 3‟ end. The final sense oligo in this example will be 5‟ gatcgATGGGAGGTGGTATGGGAGGg 3‟ 3. Add „aaaac‟ to the 5‟ end of reverse complementary sequence and „c‟ to its 3‟ end. The final reverse complementary sequence is 5‟ aaaacCCTCCCATACCACCTCCCATc 3‟ 15 The two oligos should anneal to form the following double strand: 5’gatcgxxxxxxxxxxxxxxxxxxxxg 3’ 3’cxxxxxxxxxxxxxxxxxxxxcaaaa 5’ 4. Order the two final oligos from a commercial oligo provider, such as IDT. III. Cloning the double-stranded oligos into the pCas-Guide vector 1. Anneal the oligos to form double-stranded duplexes In a PCR tube, add the following: 2 μL Forward oligo (100 μM stock) 2 μL Reverse oligo (100 μM stock) 4 μL 10X annealing buffer 32 μL dH2O Mix the solution and follow the steps to anneal the oligos in a PCR machine: 940C for 4min 750C for 5 min 650C for 15 min 250C for 20 min After annealing, transfer the solution to a 1.5 mL tube and add 360 μL of dH2O. The double-stranded oligo DNA is ready for ligation. 2. Ligation and transformation A. Prepare the ligation according to the following protocol Component 10x Ligation buffer Precut pCAS-Guide vector (10 ng/ µL) Annealed double-stranded oligos (diluted from step 1) Ligase (0.5 u/ µL, Weiss unit) dH2O Total Volume Volume 1 µL 1 µL 1 µL 0.5 µL 6.5 µL 10 µL B. Mix the solution and incubate the tube at 22 to 370C or room temperature for two hours according to the manufacturer‟s recommendation. C. Add 1 µL of the ligation mixture to 10 µL of competent cells (efficiency rated > 106 cfu/µg DNA) on ice. Do the transformation according to the manufacturer‟s protocol. For chemically competent cells, follow steps D-E. D. Mix the tube gently and keep it on ice for 25 minutes. E. Heat shock the tube for 30 seconds at 420C. F. Put the tube on ice for 2 minutes, then add 500 µL LB or SOC medium. 16 G. Rock the tube gently at 370C for 1 hour. H. Spread 50 µL of the E. Coli cells on an LB ampicillin-agar plate. I. Centrifuge the remaining E. Coli cells at 5K rpm for 5 minutes. Discard the majority of the supernatant (around 50 µL supernatant left) and resuspend the cell pellet in the remaining liquid. Spread all the E. Coli cells on a separate LB ampicillin-agar plate. J. Incubate the two plates at 370C for 16 hours to allow colony formation. 3. Screening colonies In a typical subcloning ligation, at least 95% of the colonies should contain the desired insert. Pick 6 to 10 colonies into 5 mL LB-ampicillin culture each, and culture overnight. Perform DNA purification using a mini-prep kit from OriGene, http://www.origene.com/Other/Plasmid_Purification/ . Sequence the purified DNA and analyze the sequencing data to identify a correct clone for proper insert identification and orientation. III. pCas-Guide plasmid (SKU: GE100002) Package contents One (1) vial of pCas-Guide plasmid DNA, 10 g (SKU GE100002V), lyophilized. Reconstitute in 100 µL dH2O to make a final concentration of 100 ng/ µL. One (1) vial of CF3 sequencing primer (SKU GE100008) to sequence the targeting sequence cloned into pCas-Guide vector; 100 picomoles dried onto the bottom of screw cap tubes. Reconstitute the primer in 10 µL dH2O to make a 10 µM solution. Certificate of Analysis Application Guide * OriGene plasmids are purified using ion-exchange columns for high-yield, low endotoxin preparations (PowerPrep® HP Midiprep Kit www.origene.com/other/Plasmid_Purification) The cDNA clone is shipped at room temperature, but should be kept at -20C for long-term storage. If properly stored, clones are guaranteed to be stable for 12 months. Related Optional Reagents Oligo annealing buffer, www.origene.com/pCas9, SKU GE100007 BamH I and BsmB I T4 DNA ligase and buffer Competent E. coli cells, http://www.origene.com/Other/CompetentCells.aspx LB agar plates with ampicillin, 100 g/mL LB broth (10 g/L Tryptone, 5 g/L Yeast Extract, 10 g/L NaCl. Adjust pH to 7.0 with 1 N NaOH) DNA purification reagents 17 Related OriGene Products Cloning the homologous arms in predesigned donor rescue construct harboring functional cassettes (service from www.blueheronbio.com ). GFP-PGK-Loxp-Puro-LoxP RFP-PGK-Loxp-BSD-LoxP Luciferase-PGK-Loxp-Puro-LoxP mBFP-PGK-Loxp-Neo-Loxp TrueClone™ FL cDNA clones http://www.origene.com/cDNA/TrueClone/ HuSH™ shRNA Plasmids http://www.origene.com/shRNA/ Validated Antibodies http://www.origene.com/Antibody/ Purified Proteins http://www.origene.com/protein Over-expression lysates http://www.origene.com/Lysate/ Transfection Reagents http://www.origene.com/cdna/transfection.mspx Anti-tag Antibodies http://www.origene.com/Antibody/AntiTagAntibody.aspx Notice to purchaser This product is for research use only. Use in and/or for diagnostics and therapeutics is strictly prohibited. By opening and using the product, the purchaser agrees to the following: The plasmids may not be distributed, resold, modified for resale or used to manufacture commercial products without prior written approval from OriGene Technologies, Inc. If you do not agree to the above conditions, please return the UNOPENED product to OriGene Technologies, Inc. within ten (10) days of receipt for a full refund by contacting customer service at [email protected]. Product Description The pCas-Guide vector is designed for cloning a guide RNA insert for genome editing purpose. Target sequence can be cloned into the vector via BamH I and BsmB I sites. The vector also expresses a CMV-driven codon-optimized Cas9. When co-transfected with a proper donor DNA, your desired targeted genome editing can be achieved. The vector retains the ampicillin resistance gene for the selection of E. coli transformants. 18 Figure 6. The vector map of pCas-Guide plasmid. Experimental protocol 1. Digest pCas-Guide plasmid with BamH I and BsmB I Resuspend the 10 µg lyophilized DNA in 100 µL dH2O, and incubate for at least 30 min before use. Set up a digestion reaction as described below. Component 10X restriction buffer BamH I BsmB I* Nuclease free water Vector DNA Total volume Volume 3 µL 0.8 µL 0.8 µL 15.4 µL 10 µL 30 µL Incubate the reaction at 37oC for 3 hrs. Purify the desired vector fragment by running the digestion reaction on an agarose gel, and isolate the appropriate band using a gel purification column. Elute the digested plasmid vector in 40 µL of 10 mM Tris buffer. Note: Please do not dephosphorylate the vector as oligos are not phosphorylated. * BsmB I from Fermentas works at 37oC, the enzyme from NEB works at 55oC 2. Target sequence designing and cloning into the precut pCas-Guide vector, please follow the detailed protocol from page 14-16 in this manual. 19 IV. pLenti-Cas-Guide precut cloning kit (SKU: GE100009) Package contents The following components are included: One (1) vial of precut pLenti-Cas-Guide plasmid DNA (SKU GE100009V), lyophilized ready for ligation (10 RXNs). Reconstitute in 10 µL dH2O, final concentration 10 ng/ µL. One (1) vial of forward sequencing primer, CF3 (SKU GE100008) to sequence the targeting sequence cloned into pLenti-Cas-Guide vector; 100 picomoles dried onto the bottom of screw cap tubes. Reconstitute the primer in 10 µL dH2O to make a 10 µM solution. One (1) vial of annealing buffer (SKU GE100007) for oligo annealing (10X), 200 µL Certificate of Analysis Application Guide * OriGene plasmids are purified using ion-exchange columns for high-yield, low endotoxin preparations (PowerPrep® HP Midiprep Kit www.origene.com/other/Plasmid_Purification) The cDNA clone is shipped at room temperature, but should be kept at -20C for long-term storage. If properly stored, clones are guaranteed to be stable for 12 months. Related Optional Reagents Nuclease free water T4 DNA ligase and buffer Competent E. coli cells LB agar plates with chloramphenicol (34 µg/ml) LB broth (10 g/L Tryptone, 5 g/L Yeast Extract, 10 g/L NaCl. Adjust pH to 7.0 with 1 N NaOH) DNA purification reagents Related OriGene Products Cloning the homologous arms in predesigned donor rescue construct harboring functional cassettes (service from www.blueheronbio.com ). GFP-PGK-Loxp-Puro-LoxP RFP-PGK-Loxp-BSD-LoxP Luciferase-PGK-Loxp-Puro-LoxP mBFP-PGK-Loxp-Neo-Loxp 20 Product Description The pLenti-Cas-Guide vector is designed for cloning a guide RNA insert for genome editing purpose. pLenti-Cas-Guide vector is also a 3rd generation lentiviral vector that you can generate lentiviral particles to infect your hard to transfect cells including primary and stem cells. The target sequence can be cloned into the vector via BamH I and BsmB I sites. The vector also expresses a CMV-driven codon-optimized Cas9, C-terminal Myc-DDK tagged. When cotransfected with a proper donor DNA, your desired targeted genome editing can be achieved. The vector retains the chloramphenical resistance gene for the selection of E. coli transformants. Figure 7. Vector map of precut pLenti-Cas-Guide Experimental protocol 1. Target sequence designing and cloning into the precut pLenti-Cas-Guide vector, please follow the detailed protocol from page 14-16 in this manual. 2. pLenti-Cas-Guide vector with the target sequence cloned can be used as a regular expression plasmid for transient transfection. You can also make lentiviral particles using a lentiviral packaging mix (cat. TR30022); you can then infect your hard to transfect cells including primary cells and stem cells, etc. 21 Lenti-based protocols: NOTE: Performing Lentiviral experiments REQUIRES special laboratory conditions and/or permissions (BL2). Follow the guidelines and regulations of your institution. Perform the experiments with due caution to avoid exposure to infectious materials. A. Production of pseudovirus (10 cm plate format, the production size can be scaled up or down accordingly): 1. Day 1, plate HEK293T cells in a 10 cm dish to approximately 40% confluency the day before transfection. Cells should reach 65-70% confluency within 24 hours. 2. Day 2 a. Re-suspend the Lenti plasmid in 100 µl dH2O to obtain a final concentration 100 ng/µl. Label a sterile 1.5 mL eppendorf tube and to the tube, add 50 µl of the Lenti plasmid (5 µg) and 50 µl of the packaging plasmids (6 µg) from the Lentivpak packaging kit, cat# TR30022. b. Add 110 µl Opti-MEM (Invitrogen) to the tube. Mix the DNA by gently vortexing. Add 44 µl of MegaTran 1.0 (or other transfection reagent) to the DNA tube. Mix the solution by gently vortexing. c. Set the DNA tube inside a cell culture hood for 20 mins. d. Transfer the DNA:transfection solution to the 10 cm plate prepared the day before by gentle and even dropping. Gently rock the plate back-and-forth and from side-to-side to achieve even distribution of the transfection complex. Incubate the plate in a CO2 incubator. 3. Day 3, change the growth medium and continue to incubate the plate for 48 hours. 4. Day 5 a. After the 48 hour incubation, transfer the cell culture supernatant to a 15 mL centrifuge tube. b. Centrifuge the tubes at 3K RPM for 10 mins and filter the supernatant through a syringe filter (0.45 micron) and collect the viral solution to a new sterile tube. 5. The viral particles are ready to be used. They can be stored at 4 oC for 2 weeks or put at -80 oC for long-term storage. B. Transduction of lentivirus to target cells 1. Day 1, plate target cells in three 10 cm plates at a density that will produce approximately 60% confluency in 24 hours. Note: other size formats can also be used depending on the nature of your experiment. Adjust the reagent amount accordingly. 2. Day 2, Remove the growth media from the plates prepared the day before. To plate 1, add 4.5 mL of fresh growth medium and 0.5 mL of Lentiviral particles; To plate 2, add 4.0 mL of growth medium and 1 mL of Lentiviral particles; To plate 3, add 2.5 mL of growth medium and 2.5 mL of Lentiviral particles (for a low titer viral preparation, the amount of virus added can be increased to 5 mL). Mix the solution by gentle swirling. 3. Add 5 µl polybrene (1,000x, 8 mg/mL) to each plate. Mix by gentle swirling. 22 4. Incubate the cells at 37 oC with 5% CO2 for 4 hours. Remove the transduction medium and add 10 mL of fresh growth medium. Incubate the cells for three more days. The transduced cells are ready for downstream analyses such as RNA and protein detection. V. pLenti-Cas-Guide plasmid (SKU: GE100010) Package contents One (1) vial of circular pLenti-Cas-Guide plasmid DNA, 10 g (SKU GE100010V), lyophilized. Reconstitute in 100 µL dH2O to make a final concentration of 100 ng/ µL. One (1) vial of CF3 sequencing primer (SKU GE100008) to sequence the targeting sequence cloned into pLenti-Cas-Guide vector; 100 picomoles dried onto the bottom of screw cap tubes. Reconstitute the primer in 10 µL dH2O to make a 10 µM solution. Certificate of Analysis Application Guide * OriGene plasmids are purified using ion-exchange columns for high-yield, low endotoxin preparations (PowerPrep® HP Midiprep Kit www.origene.com/other/Plasmid_Purification) The cDNA clone is shipped at room temperature, but should be kept at -20C for long-term storage. If properly stored, clones are guaranteed to be stable for 12 months. Related Optional Reagents Nuclease free water Oligo annealing buffer, www.origene.com/CAS9, SKU GE100007 BamH I and BsmB I T4 DNA ligase and buffer Competent E. coli cells, http://www.origene.com/Other/CompetentCells.aspx LB agar plates with LB_Chloramphenicol (34 µg/ml) LB broth (10 g/L Tryptone, 5 g/L Yeast Extract, 10 g/L NaCl. Adjust pH to 7.0 with 1 N NaOH) DNA purification reagents Related OriGene Products Cloning the homologous arms in predesigned donor rescue construct harboring functional cassettes (service from www.blueheronbio.com ). GFP-PGK-Loxp-Puro-LoxP RFP-PGK-Loxp-BSD-LoxP Luciferase-PGK-Loxp-Puro-LoxP mBFP-PGK-Loxp-Neo-Loxp 23 Product Description The pLenti-Cas-Guide vector is designed for cloning a guide RNA insert for genome editing purpose. Target sequence can be cloned into the vector via BamH I and BsmB I sites. The vector also expresses a CMV-driven codon-optimized Cas9, C-terminal Myc-DDK tagged. When co-transfected with a proper donor DNA, your desired targeted genome editing can be achieved. The vector retains the chloramphenicol resistance gene for the selection of E. coli transformants. Figure 8. Plasmid map of pLenti-Cas-Guide Experimental Protocol 1. Digest pLenti-Cas-Guide plasmid with BamH I and BsmB I Resuspend the 10 µg lyophilized DNA in 100 µL dH2O, and incubate for at least 30 min before use. Set up a digestion reaction as described below. Component 10X restriction buffer BamH I BsmB I Nuclease free water Vector DNA Total volume Volume 3 µL 0.8 µL 0.8 µL 15.4 µL 10 µL 30 µL Incubate the reaction at 37oC for 3 hrs. Purify the desired vector fragment by running the digestion reaction on an agarose gel, and isolate the appropriate band using a gel purification column. Elute the digested plasmid vector in 40 µL of 10 mM Tris buffer. Note: Please do not dephosphorylate the vector as oligos are not phosphorylated. 24 2. Target sequence designing and cloning into the precut pLenti-Cas-Guide vector, please follow the detailed protocol from page 14-16 in this manual. Regarding lenti-based protocol, please refer to page 13-15 in this manual. VI. pCas-Guide-EF1a-GFP plasmid (SKU: GE100018) Package contents One (1) vial of circular pCas-Guide-EF1a-GFP plasmid DNA, 10 g (SKU: GE100018), lyophilized. Reconstitute in 100 µL dH2O to make a final concentration of 100 ng/ µL. Certificate of Analysis Application Guide * OriGene plasmids are purified using ion-exchange columns for high-yield, low endotoxin preparations (PowerPrep® HP Midiprep Kit www.origene.com/other/Plasmid_Purification) The cDNA clone is shipped at room temperature, but should be kept at -20C for long-term storage. If properly stored, clones are guaranteed to be stable for 12 months. Related Optional Reagents Nuclease free water Oligo annealing buffer, www.origene.com/CAS9, SKU GE100007 BamH I and BsmB I T4 DNA ligase and buffer Competent E. coli cells, http://www.origene.com/Other/CompetentCells.aspx LB agar plates with ampicillin, 100 g/mL LB broth (10 g/L Tryptone, 5 g/L Yeast Extract, 10 g/L NaCl. Adjust pH to 7.0 with 1 N NaOH) DNA purification reagents Related OriGene Products Cloning the homologous arms in predesigned donor rescue construct harboring functional cassettes (service from www.blueheronbio.com ). GFP-PGK-LoxP-Puro-LoxP RFP-PGK-LoxP-BSD-LoxP Luciferase-PGK-LoxP-Puro-LoxP mBFP-PGK-LoxP-Neo-LoxP 25 Product Description The pCas-Guide-EF1a-GFP vector is designed for cloning a guide RNA insert for genome editing purpose. Target sequence can be cloned into the vector via BamH I and BsmB I sites. The vector also expresses a CMV-driven codon-optimized Cas9, C-terminal Myc-DDK tagged. In addition, pCas-Guide-EF1a -GFP vector expresses EF1a promoter driven GFP to monitor or to sort your transfected cells. When co-transfected with a proper donor DNA, your desired targeted genome editing can be achieved. The vector retains the ampicillin resistance gene for the selection of E. coli transformants. Figure 9. Plasmid map of pCas-Guide-EF1a-GFP Experimental Protocol 1. Digest pCas-Guide-EF1a-GFP plasmid with BamH I and BsmB I Resuspend the 10 µg lyophilized DNA in 100 µL dH2O, and incubate for at least 30 min before use. Set up a digestion reaction as described below. Component 10X restriction buffer BamH I BsmB I Nuclease free water Vector DNA Total volume Volume 3 µL 0.8 µL 0.8 µL 15.4 µL 10 µL 30 µL Incubate the reaction at 37oC for 3 hrs. Purify the desired vector fragment by running the digestion reaction on an agarose gel, and isolate the appropriate band using a gel purification column. Elute the digested plasmid vector in 40 µL of 10 mM Tris buffer. 26 Note: Please do not dephosphorylate the vector as oligos are not phosphorylated. 2. Target sequence designing and cloning into the precut pCas-Guide-EF1a -GFP vector, please follow the detailed protocol from page 14-16 in this manual. VII. T7 driven CRISPR/Cas system-pT7-Guide-IVT (SKU: GE100025) and pT7-Cas9 (SKU: GE100014) Package contents One (1) vial of circular pT7-Guide-IVT (SKU: GE100025) plasmid DNA or pT7-Cas9 (SKU: GE100014), 10 g, lyophilized. Reconstitute in 100 µL dH2O to make a final concentration of 100 ng/ µL. Certificate of Analysis * OriGene plasmids are purified using ion-exchange columns for high-yield, low endotoxin preparations (PowerPrep® HP Midiprep Kit www.origene.com/other/Plasmid_Purification) The cDNA clone is shipped at room temperature, but should be kept at -20C for long-term storage. If properly stored, clones are guaranteed to be stable for 12 months. Related Optional Reagents Nuclease free water Oligo annealing buffer, www.origene.com/CAS9, SKU GE100007 BsmB I T4 DNA ligase and buffer Competent E. coli cells, http://www.origene.com/Other/CompetentCells.aspx LB agar plates with ampicillin, 100 g/mL LB broth (10 g/L Tryptone, 5 g/L Yeast Extract, 10 g/L NaCl. Adjust pH to 7.0 with 1 N NaOH) DNA purification reagents T7 In vitro transcription kits Related OriGene Products Cloning the homologous arms in predesigned donor rescue construct harboring functional cassettes (service from www.blueheronbio.com ). GFP-PGK-Loxp-Puro-LoxP RFP-PGK-Loxp-BSD-LoxP Luciferase-PGK-Loxp-Puro-LoxP mBFP-PGK-Loxp-Neo-Loxp 27 Product Description To make gene knockout out animals, Cas9 mRNA and gRNA are often injected into the embryos; the T7 driven CRISP/Cas system will serve the purpose. pT7-Guide-IVT vector can be used to clone the target sequence; the gRNA expression is under T7 promoter. Therefore gRNA can be produced using the T7 in vitro transcription system. In pT7-Cas9 vector, Cas9 gene is under T7 promoter; therefore Cas9 mRNA can be produced using the T7 in vitro transcription system. Figure 10. Plasmid maps of pT7-Guide-IVT and pT7-Cas9 Only BSmB I sites are used to clone the target sequence into pT7-Guide-IVT (different from other pCas-Guide vectors) 28 Experimental protocol I. Design genomic target sequence and cloning into pT7-Guide-IVT vector 1. Digest pT7-Guide-IVT vector with BsmB I restriction enzyme Resuspend the 10 µg lyophilized DNA in 100 µL dH2O, and incubate for at least 30 min before use. Set up a digestion reaction as described below. Component 10X restriction buffer BsmB I* Nuclease free water Vector DNA Total volume Volume 3 µL 0.8 µL 16.2 µL 10 µL 30 µL Incubate the reaction at 37oC for 3 hrs (the isoschizomer ESP3 I from Thermo Scientific can be used. Purify the desired vector fragment by running the digestion reaction on an agarose gel, and isolate the appropriate band using a gel purification column. Elute the digested plasmid vector in 40 µL of 10 mM Tris buffer. Note: Please do not dephosphorylate the vector as oligos are not phosphorylated. 2. Target sequence designing and cloning. OriGene has developed a proprietary Cas9 guide RNA designing tool which is free to use, http://www.blueheronbio.com/. Design a target sequence of 20 bp, To facilitate cloning of the 20-bp target sequence, extra bases need to be added to the ends. 1). Select a desired 20-bp sequence as a target. The following is an example sequence: Forward sequence: 5‟ ATGGGAGGTGGTATGGGAGG 3‟ Reverse complement sequence: 5‟ CCTCCCATACCACCTCCCAT 3‟ Add „atagG‟ to the 5‟ end of the forward sequence and „G‟ to its 3‟ end. The final sense oligo in this example will be 5‟ atagG ATGGGAGGTGGTATGGGAGGg 3‟ 2). Add „aaaac‟ to the 5‟ end of reverse complementary sequence and „C‟ to its 3‟ end. The final reverse example complementary oligo: 5‟ aaaacCCTCCCATACCACCTCCCATc 3‟ The two oligos should anneal to form the following double strand: 5’atagGxxxxxxxxxxxxxxxxxxxxG 3’ 3’CxxxxxxxxxxxxxxxxxxxxCaaaa 5’ 29 3) Order the two final oligos from a commercial oligo provider, such as IDT. The oligos are ready to be cloned into the BsmB I digested pT7-Guide-IVT vector. Following the oligo cloning procedure on page 15-16 of this manual. 3. Sequencing the cloned target sequence in pT7-Guide-IVT can be done by the common M13 forward primer: 5‟ CGCCAGGGTTTTCCCAGTCACGAC 3‟ II. Producing gRNA and Cas9 mRNA using T7 in vitro transcription kits To make gRNA using pT7-Guide-IVT after the genomic target sequence cloned, we recommend using MeGAshortscript T7 kit (Life Technologies) and follow the manufacturer‟s protocol. pT7Guide-IVT vector can be linearized using EcoR I. EcoR I will cut T7 and gRNA out; but you don‟t need to purify the fragment. You only need to clean it using a PCR purification column. Then follow the MeGAshortscript T7 kit protocol to produce gRNA. To make Cas9 mRNA using pT7-Cas9, we recommend using mMESSAGE Mmachine T7 ULTRA kit (Life Technologies) and follow the manufacturer‟s protocol. pT7-Cas9 vector can be linearized using Pme I which is at the 3‟ end of Cas9 sequence. You can then clean up the Pme I digested reaction using a PCR purification column; then follow the mMESSAGE Mmachine T7 ULTRA kit protocol to produce capped and polyadenylated Cas9 mRNA. VIII. pCas-Guide-EF1a-CD4 (SKU: GE100022) Package contents One (1) vial of circular pCas-Guide-EF1a-CD4 (SKU: GE100022) plasmid DNA, 10 g, lyophilized. Reconstitute in 100 µL dH2O to make a final concentration of 100 ng/ µL. Certificate of Analysis * OriGene plasmids are purified using ion-exchange columns for high-yield, low endotoxin preparations (PowerPrep® HP Midiprep Kit www.origene.com/other/Plasmid_Purification) The cDNA clone is shipped at room temperature, but should be kept at -20C for long-term storage. If properly stored, clones are guaranteed to be stable for 12 months. Related Optional Reagents Nuclease free water Oligo annealing buffer, www.origene.com/CAS9, SKU GE100007 BamH I, BsmB I T4 DNA ligase and buffer Competent E. coli cells, http://www.origene.com/Other/CompetentCells.aspx LB agar plates with ampicillin, 100 g/mL LB broth (10 g/L Tryptone, 5 g/L Yeast Extract, 10 g/L NaCl. Adjust pH to 7.0 with 1 N NaOH) DNA purification reagents 30 Related OriGene Products Cloning the homologous arms in predesigned donor rescue construct harboring functional cassettes (service from www.blueheronbio.com ). GFP-PGK-Loxp-Puro-LoxP RFP-PGK-Loxp-BSD-LoxP Luciferase-PGK-Loxp-Puro-LoxP mBFP-PGK-Loxp-Neo-Loxp Product Description The pCas-Guide-EF1a-CD4 vector is designed for cloning a guide RNA insert for genome editing purpose. Target sequence can be cloned into the vector via BamH I and BsmB I sites. The vector also expresses a CMV-driven codon-optimized Cas9, C-terminal Myc-DDK tagged. In addition, pCas-Guide-EF1a –CD4 vector expresses EF1a promoter driven CD4 to enrich transfected cells using anti-CD4 antibody beads. The vector retains the ampicillin resistance gene for the selection of E. coli transformants. Figure 11. Plasmid maps of pCas-Guide-EF1a-CD4 Experimental Protocol 1. Digest pCas-Guide-EF1a-CD4 plasmid with BamH I and BsmB I Resuspend the 10 µg lyophilized DNA in 100 µL dH2O, and incubate for at least 30 min before use. Set up a digestion reaction as described below. Component 10X restriction buffer BamH I BsmB I Nuclease free water Volume 3 µL 0.8 µL 0.8 µL 15.4 µL 31 Vector DNA Total volume 10 µL 30 µL Incubate the reaction at 37oC for 3 hrs (the isoschizomer ESP3 I from Thermo Scientific can be used). Purify the desired vector fragment by running the digestion reaction on an agarose gel, and isolate the appropriate band using a gel purification column. Elute the digested plasmid vector in 40 µL of 10 mM Tris buffer. Note: Please do not dephosphorylate the vector as oligos are not phosphorylated. 2. Target sequence designing and cloning into the precut pCas-Guide-EF1a –CD4 vector, please follow the detailed protocol from page 14-16 in this manual. IX. Cre expression vector for Cre-Lox recombination, pCMV6-Entry Cre (SKU: GE100017) Package contents One (1) vial of circular pCMV6-Entry-Cre (SKU: GE100017) plasmid DNA 10 g, lyophilized. Reconstitute in 100 µL dH2O to make a final concentration of 100 ng/ µL. Certificate of Analysis Application Guide * OriGene plasmids are purified using ion-exchange columns for high-yield, low endotoxin preparations (PowerPrep® HP Midiprep Kit www.origene.com/other/Plasmid_Purification) The cDNA clone is shipped at room temperature, but should be kept at -20C for long-term storage. If properly stored, clones are guaranteed to be stable for 12 months. Related Optional Reagents Nuclease free water Competent E. coli cells, http://www.origene.com/Other/CompetentCells.aspx LB agar plates with Kanamycin, 25 g/mL LB broth (10 g/L Tryptone, 5 g/L Yeast Extract, 10 g/L NaCl. Adjust pH to 7.0 with 1 N NaOH) DNA purification reagents Related OriGene Products Genome wide gene knockout/knockin kit via CRISPR, www.origene.com/cas9 Cloning the homologous arms in predesigned donor rescue construct harboring functional cassettes (service from www.blueheronbio.com ). GFP-PGK-Loxp-Puro-LoxP RFP-PGK-Loxp-BSD-LoxP Luciferase-PGK-Loxp-Puro-LoxP BFP-PGK-Loxp-Neo-Loxp 32 Product Description In our predesigned donor vector cassette, the PGK-puro cassette is flanked by two LoxP sites, which can be floxed out by Cre recombinase. pCMV6-Entry-Cre is a Cre recombinase mammalian expression vector in which Cre is under CMV promoter. Expressed Cre contains a C-terminal Myc-DDK tag (DDK is the same as Flag tag). Figure 12. Plasmid map of pCMV6-Entry-Cre X. Cas9 D10A nickase vectors, pCas-Guide-Nickase (SKU GE100019), pT7-Cas9Nickase (SKU GE100020) Package contents One (1) vial of circular nickase plasmid DNA, pCas-Guide-Nickase (SKU: GE100019) or pT7-Cas9-Nickase, 10 g, lyophilized. Reconstitute in 100 µL dH2O to make a final concentration of 100 ng/ µL. Certificate of Analysis Application Guide Related Optional Reagents Nuclease free water Oligo annealing buffer, www.origene.com/CAS9, SKU GE100007 BamH I, BsmB I T4 DNA ligase and buffer Competent E. coli cells, http://www.origene.com/Other/CompetentCells.aspx LB agar plates with ampicillin, 100 g/mL LB broth (10 g/L Tryptone, 5 g/L Yeast Extract, 10 g/L NaCl. Adjust pH to 7.0 with 1 N NaOH) DNA purification reagents 33 Related OriGene Products Cloning the homologous arms in predesigned donor rescue construct harboring functional cassettes (service from www.blueheronbio.com ). GFP-PGK-Loxp-Puro-LoxP RFP-PGK-Loxp-BSD-LoxP Luciferase-PGK-Loxp-Puro-LoxP mBFP-PGK-Loxp-Neo-Loxp Product description WT Cas9 has two active nuclease domains and it can produce double-stranded DNA breaks. D10A mutation in Cas9 disables one nuclease domain; therefore Cas9D10A can only nick the targeted genome. pCas-Guide-Nickase (SKU GE100019) is in the same vector backbone as pCas-Guide (SKU GE100001 and GE100002) which is all-in-one vector, target sequence can be cloned and the vector express Cas9. pT7-Cas9D10A is in the same vector backbone as pT7Cas9 (GE100014) which is used for in vitro production of Cas9 mRNA. Since Cas9D10A only nicks the genomic DNA, it needs two different gRNAs (one on sense strand and one on antisense strand) to cause double-stranded break. The off-target problem is significantly decreased as Cas9D10A needs two gRNAs. Experimental protocol The experimental protocol of GE100019 will be similar to pCas-Guide, page 12 on this manual. The experimental protocol of GE100019 will be similar to pT7-Cas9, page 24 on this manual. Since Cas9D10A needs two different gRNAs, you will need to validate the cleavage efficiency of each gRNA using WT Cas9 before using them together with Cas9D10A vectors. Figure 13. Plasmid maps of pCas-Guide-Nickase and pT7-Cas9-Nickase 34 XI. CRISPR scramble controls, pCas-Scramble (SKU GE100003) and pCasScramble-EF1A-GFP (SKU GE100021) Package contents One (1) vial of circular plasmid DNA, pCas-Scramble (SKU: GE100003) or pCasScramble-EF1a-GFP (SKU GE100021), 10 g, lyophilized. Reconstitute in 100 µL dH2O to make a final concentration of 100 ng/ µL. Certificate of Analysis Application Guide Product description Using CRISPR technology for genome editing, you need a negative scrambled control, a 20bp scrambled sequence cloned in CRISPR vectors. After transfecting the CRISPR scrambled control into cells, a guide RNA containing the scrambled sequence (which does not target any sequence) will be produced. Figure 14. Plasmid maps of pCas-Scramble and pCas-Scramble-EF1a-GFP 35 XII. AAVS1 Transgene knockin via CRISPR Introduction Many research projects require inserting a full-length cDNA expression cassette into a host genome for the purpose of stably expressing the encoded protein. In such studies, the integration site of the transgene is very critical. An inserted gene should have the least negative effect to the host cells and the transgene should be genetically stable. Adeno-associated virus (AAV) integration site (AAVS1) on human chromosome 19 is accepted to be a safe harbor transgene integration site and transcriptionally active; transgene expression is robust and stable. OriGene has the largest validated human full length cDNA collection. Development of a high efficiency transgene integration kit can facilitate the use of the cDNA collection. Taking advantage of recently discovered CRISPR, we developed an AAVS1 safe harbor knockin system for a transgene integration. Products offered Cat# GE100027 Product name AAVS1 Transgene knockin vector kit pCas-Guide-AAVS1 GE100023 pAAVS1-Puro-DNR GE100024 pAAVS1-RFP-DNR GE100026 Description Vector kit for targeted transgene insertion into AAVS1 locus, including GE100023, GE100024 and GE100003 AAVS1 gRNA vector, validated AAVS1 targeting sequence cloned in pCas-Guide vector Donor vector with AAVS1 homologous arms cloned, ready for transgene cloning Positive control for AAVS1 insertion (RFP insertion via CRISPR) Price Availabilit y $850 2 weeks $350 2 weeks $560 2 weeks $320 2 weeks pCas-Guide-AAVS1 (SKU GE100023) Package contents One (1) vial of pCas-Guide-AAVS1 (SKU: GE100023) plasmid DNA 10 g, lyophilized. Reconstitute in 100 µL dH2O to make a final concentration of 100 ng/ µL. Certificate of Analysis * OriGene plasmids are purified using ion-exchange columns for high-yield, low endotoxin preparations (PowerPrep® HP Midiprep Kit www.origene.com/other/Plasmid_Purification) The cDNA clone is shipped at room temperature, but should be kept at -20C for long-term storage. If properly stored, clones are guaranteed to be stable for 12 months. 36 Related Optional Reagents Competent E. coli cells, http://www.origene.com/Other/CompetentCells.aspx LB agar plates with ampicillin, 100 g/mL LB broth (10 g/L Tryptone, 5 g/L Yeast Extract, 10 g/L NaCl. Adjust pH to 7.0 with 1 N NaOH) DNA purification reagents Related OriGene Products pAAVS1-puro-DNR (SKU GE100024) pAAVS1-RFP-DNR (SKU GE100026) AAVS1 Transgene knockin vector kit (SKU GE100027) Product Description pCas-Guide-AAVS1: a plasmid DNA with Cas9 expression and gRNA targeting AAVS1 site. This two-in-one vector will generate a double strand breakage in the human host cells at AAVS1 locus. Figure 15. Vector map of pCas-Guide-AAVS1. 37 pAAVS1-puro-DNR Package contents One (1) vial of pAAVS1-puro-DNR (SKU: GE100024) plasmid DNA 10 g, lyophilized. Reconstitute in 100 µL dH2O to make a final concentration of 100 ng/ µL. One (1) Vial of dried 5' (VP1.5) primer (100 picomoles), reconstitute in 10 µL dH2O to make a 10 µM solution. One (1) Vial of dried 3' (XL39) primer (100 picomoles), reconstitute in 10 µL dH2O to make a 10 µM solution. Certificate of Analysis * OriGene plasmids are purified using ion-exchange columns for high-yield, low endotoxin preparations (PowerPrep® HP Midiprep Kit www.origene.com/other/Plasmid_Purification) The cDNA clone is shipped at room temperature, but should be kept at -20C for long-term storage. If properly stored, clones are guaranteed to be stable for 12 months. Related Optional Reagents Competent E. coli cells, http://www.origene.com/Other/CompetentCells.aspx LB agar plates with ampicillin, 100 g/mL LB broth (10 g/L Tryptone, 5 g/L Yeast Extract, 10 g/L NaCl. Adjust pH to 7.0 with 1 N NaOH) DNA purification reagents Related OriGene Products pCas-Guide-AAVS1 (SKU GE100023) pCas-Guide-scramble (SKU GE100003) pAAVS1-RFP-DNR (SKU GE100026) AAVS1 Transgene knockin vector kit (SKU GE100027) Product Description pAAVS1-puro-DNR: an AAVS1 repair donor vector containing multiple cloning site to clone your gene of interest. The plasmid has AAVS1 left homologous arm and right homologous arm for homologous repair to integrate the transgene cassette into AAVS1 locus. Flanked by the two arms, there is a CMV promoter driven expression cassette for a transgene expression and a PGK driven puromycin resistant gene for transgene integration selection (Fig. 16). A mutiple cloning site downstream of the CMV promoter is designed to be compatible to Origene‟s precision shuttle vector system so that the ORF clones can be easily shuttled to this integration vector by simplely “cut and ligate”. Note: pAAVS1-puro-DNR is a donor vector without your gene of interest; the gene of interest needs to be cloned. 38 Figure 16. Vector map of pAAVS1-puro-DNR Multiple cloning sites: Cloning a transgene to pAAVS1-puro-DNR To clone an ORF insert to the vector, the first step is to select which pair of enzymes. There are a few rare restriction enzymatic sites designed in the multiple cloning site region and c-terminal Myc-DDK tag. Four pairs of restriction enzymes can be used for cloning: SgfI/MluI, Asc/MluI, Sgf1/Not1 and Asc/NotI. Among them, SgfI/MluI is suitable for over 95% ORF insert. If the ORF inserts are from OriGene‟s TrueORF clones, they can be easily shuttled from pCMV6-Entry vector to the AAVS1 donor vector using the above enzyme pairs; the insert will be in frame with c-terminal Myc-DDK tags. In case of none of the enzyme pair can be used, a single enzymatic site can be used for cloning. In such case, screening an insert with the right orientation is needed. If one wants to express a native protein without a tag, a termination codon must be introduced at 3‟ end of the ORF insert which can be achieved by PCR or site-direct mutagenesis. The following protocol is for shuttling an ORF insert to pAAVS1-Puro-DNR using Sgf1/MluI enzymatic pair. 39 Digest an ORF insert from TrueORF clone in pCMV6-Entry vector (cat# RC2xxxxxx) Component 10X restriction buffer Sgf I (10 U/μl) Mlu I (10 U/μl) nuclease-free water TrueORF clone (500 ng) Total volume Volume 2 μl 0.6 μl 0.6 μl 13.8 μl 3 μl 20 μl Incubate at 37oC for 3 hrs. 2. Digest pAAVS1-puro-DNR vector: Component 10X restriction buffer Sgf I (10 U/ μl) Mlu I (10 U/ μl) nuclease-free water pAAVS1-puro-DNR (200ng) Total volume Volume 2 μl 0.6 μl 0.6 μl 14.8 μl 2 μl 20 μl * For the 4% of the clones that have internal Sgf I or Mlu I sites, please use the appropriate combination of restriction sites as recommended by OriGene. Incubate at 37oC for 3 hrs. Add 0.5 μl antarctic phosphatase (units used according to the manufacturer‟s protocol) to the digestion, and continue to incubate at 37oC for an additional 30 minutes. 3. Purify the digestion using a commercial PCR purification column and elute in 20 μl 10 mM Tris. 4. Set up a ligation reaction: Component 10 x T4 DNA ligation buffer T4 DNA Ligase (4U/μl) nuclease-free water digested ORF insert (step 1) digested vector (Step 2) Total volume Volume 1 μl 0.75 μl 3.25 μl 2 μl 3 μl 10 μl Incubate the ligation reaction at room temperature for 1 hour. 40 5. Transform the ligation reaction using high-efficiency competent E. coli cells (≥ 1×10⁸ CFU/μg DNA) following the appropriate transformation protocol. Plate the transformants on LB-agar plates supplemented with 100 μg/ml ampicillin. 6. Pick at least four colonies for subsequent DNA purification and screening. Amplify and purify the selected clone(s) by growing overnight in liquid LB containing the corresponding antibiotics (100 μg/ml ampicillin), then isolating the DNA using standard plasmid purification procedures. Confirm the insert by restriction digestion and/or vector primer sequencing using the provided V1.5 for 5‟ end sequencing and XL39 for 3‟ end. AAVS1 Transgene knockin vector kit Package Contents One (1) vial pCas-Guide-AAVS1 (cat# GE100023), targeting AAVS1 site, 10 g, lyophilized. Reconstitute in 100 µL dH2O to make a final concentration of 100 ng/ µL*. One (1) vial containing pCas-Guide-scramble (cat# GE100003) negative control, 10 g, lyophilized. Reconstitute in 100 µL dH2O to make a final concentration of 100 ng/ µL*. One (1) vial containing pAAVS1-puro-DNR (cat# GE100024), 10 g, lyophilized. Reconstitute in 100 µL dH2O to make a final concentration of 100 ng/ µL*. Forward (VP1.5) and reverse (XL39) sequencing primers, 100pmols each, dried onto the bottom of screw cap tubes. Reconstitute each in 10 µL dH2O to make a 10 µM solution. Primers are for pAAVS1-puro-DNR only, not for pCas-Guide-AAVS1 or pCas-Guidescramble. Certificate of Analysis Application Guide, downloadable on line: www.origene.com/CRISPR_manual.pdf * OriGene plasmids are purified using ion-exchange columns for high-yield, low endotoxin preparations (PowerPrep® HP Midiprep Kit www.origene.com/other/Plasmid_Purification.) The cDNA clone is shipped at room temperature, but should be kept at -200C for long-term storage. If properly stored, clones are guaranteed to be stable for 12 months. Related Optional Reagents Nuclease free water SgfI and Mlu I T4 DNA ligase and buffer Competent E. coli cells, http://www.origene.com/Other/CompetentCells.aspx LB agar plates with ampicillin, 100 g/mL LB broth (10 g/L Tryptone, 5 g/L Yeast Extract, 10 g/L NaCl. Adjust pH to 7.0 with 1 N NaOH) DNA purification reagents 41 Related OriGene Products pAAVS1-RFP-DNR (SKU GE100026) Genome-wide ORF clones: http://www.origene.com/ORF/ Transfection reagent: http://www.origene.com/cdna/transfection.mspx CRISPR/Cas9 products http://www.origene.com/CRISPR-CAS9/ Reagents and supplies for immunoblots: user preferred. OriGene has a selection of antibodies and detection reagents that are available at www.origene.com/antibody/ . DNA purification reagents http://www.origene.com/Other/Plasmid_Purification/ Notice to purchaser This product is for research use only. Use in and/or for diagnostics and therapeutics is strictly prohibited. By opening and using the product, the purchaser agrees to the following: The plasmids may not be distributed, resold, modified for resale or used to manufacture commercial products without prior written approval from OriGene Technologies, Inc. If you do not agree to the above conditions, please return the UNOPENED product to OriGene Technologies, Inc. within ten (10) days of receipt for a full refund. Description of AAVS1 transgene knockin vector kit The AAVS1 transgene knockin vector kit is a complete vector kit to knock in your gene of interest in AAVS1 locus in human genome for robust and stable expression. The kit contains the following three plasmids: 1. pCas-Guide-AAVS1: a plasmid DNA with Cas9 expression and gRNA targeting AAVS1 site (Fig. 15). This two-in-one vector will generate a double strand breakage in the human host cells at AAVS1 locus. 2. pCas-Guide-Scrambled control: the negative gRNA control containing a non-specific gRNA sequence in pCas-Guide vector. 3. pAAVS1-puro-DNR: An AAVS1 repair donor vector containing multiple cloning site to clone your gene of interest. The plasmid has AAVS1 left homologous arm and right homologous arm for homologous repair to integrate the transgene cassette into AAVS1 locus. Flanked by the two arms, there is a CMV promoter driven expression cassette for a transgene expression and a PGK driven puromycin resistant gene for transgene integration selection (Fig. 16). A mutiple cloning site downstream of the CMV promoter is designed to be compatible to Origene‟s precision shuttle vector system so that the ORF clones can be easily shuttled to this integration vector by simplely “cut and ligate”. Note: pAAVS1-puro-DNR is a donor vector, the gene of interest needs to be cloned in this donor vector. 42 Figure 17. Diagram of how AAVS1 targeted insertion via CRISPR works. pAAVS1-RFP-DNR (SKU GE100026) Package contents One (1) vial of pAAVS1-RFP-DNR (SKU: GE100026) plasmid DNA 10 g, lyophilized. Reconstitute in 100 µL dH2O to make a final concentration of 100 ng/ µL. Certificate of Analysis * OriGene plasmids are purified using ion-exchange columns for high-yield, low endotoxin preparations (PowerPrep® HP Midiprep Kit www.origene.com/other/Plasmid_Purification) The cDNA clone is shipped at room temperature, but should be kept at -20C for long-term storage. If properly stored, clones are guaranteed to be stable for 12 months. Related Optional Reagents Competent E. coli cells, http://www.origene.com/Other/CompetentCells.aspx LB agar plates with ampicillin, 100 g/mL LB broth (10 g/L Tryptone, 5 g/L Yeast Extract, 10 g/L NaCl. Adjust pH to 7.0 with 1 N NaOH) DNA purification reagents Related OriGene Products pCas-Guide-AAVS1 (SKU GE100023) pCas-Guide-scramble (SKU GE100003) pAAVS1-puro-DNR (SKU GE100024) 43 AAVS1 Transgene knockin vector kit (SKU GE100027) Product Description pAAVS1-RFP-DNR is a positive donor vector with RFP cloned in pAAVS1-puro-DNR vector. This vector can be used as a positive control for CRISPR knockin system when combined with pCas-Guide-AAVS1. pCas-Guide-AAVS1 generate double strand break at AAVS1 site; then pAAVS1-RFP-DNR provides repair template for homologous recombination. The result is RFPpuro expression cassette is inserted in AAVS1 locus. Figure 18. Vector map of pAAVS1-RFP-DNR 44 Figure 19. Diagram of CRISPR positive control to knockin RFP at AAVS1 site Experimental protocol This protocol is to knockin RFP expression cassette into AAVS1 locus using pAAVS1-RFP-DNR and pCas-Guide-AAVS1; pCas-Guide-scramble is used as a negative control. A sample protocol listed below is for experiments performed in 6-well plates and using TurboFectin (cat# TF81001) as transfection reagent. If your experiments require a different size of culture plates, just scale up or down the reagents accordingly based on the relative surface area of your plate (Table 1). Different type of cells may need a different transfection reagent; please follow the manufacturer‟s corresponding protocol. OriGene just launched Virus-like Viromers which are best for difficult-to-transfect cells. 1. Approximately 18-24 hours before transfection, plate ~3 X 10⁵ adherent cells in 2 ml culture medium into each well of a 6-well plate or ~5x10⁵ suspension cells per well to obtain 50-70% confluence on the following day. The amount of cells varies depending on the size of your cells. 2. Transfection in a complete culture medium. Two separate transfections: scramble control pAAVS1-RFP-DNR pCas-Guide-AAVS1 45 pAAVS1-RFP-DNR In a small sterile tube, combine the following reagents in the prescribed order. The order of reagent addition is important to achieve the optimal results. a. Dilute 1 μg of pCas-Guide-AAVS1 (or scramble control) in 250 uL of Opti-MEM I (Life Technologies), vortex gently. Then add 1 μg of the RFP-donor DNA into the same 250 μL of Opti-MEM I. Vortex gently. b. Add 6 μL of Turbofectin 8.0 to the diluted DNA (not the reverse order) and pipette gently to mix completely. c. Incubate the mixture 15 minutes at room temperature. Note: We recommend starting with the ratios of Turbofectin 8.0 and DNA listed in table 1; however, subsequent optimization may further increase the transfection efficiency. 3. Add the mixture above drop-wise to the cells plated in step 1 (no need to change the media). Gently rock the plate back-and-forth and side-to-side to distribute the complex evenly. 4. Incubate the cells in a 5% CO 2 incubator. 5. Passage cells around 3 weeks before puro selection or RFP sorting. 48hr post transfection, split cells 1:10, grow additional 3 days; then split the cells again 1:10. Split cells 7 times in total. Since puromycin resistant gene in the donor vector contains PGK promoter, RFP is driven by CMV promoter, the plasmid donor DNA before genomic integration will also provide puromycin resistance and express RFP. The reason to passage cells for around 3 weeks before puromycin selection is to dilute out cells containing the donor as episomal form. Timelines of genome editing CRISPR targeted gene knockout / knockin--- 1 week post transfection Episomal donor vector dilution with cell passaging--- 3 weeks post transfection Note 1. Since stable cell selection takes time, you can try to analyze the cells at P2 to detect genomic integration using genomic PCR (Fig 2). When designing primers for genomic PCR, one primer should be outside of the homologous arm region in donor DNA and one primer is in the functional cassette. Please see details in Fig. 20. The amplified PCR fragment is around 1kb. There could be some difficulties doing genomic PCR at this step before selection due to the percentage of edited cells and difficulties of genomic PCR. 6. Apply puromycin selection or RFP sorting. Since after around 3-week cell passaging, episomal donor DNA is most in most cells, you can use RFP to do cell sorting to enrich edited cells. Another way is to use puromycin selection. Split P5 or P7 cells 1:10, then grow cells directly in the puromycin containing complete media in 10 cm dishes (apply puro selection at P6 might work, but you might get more random donor integrated clones than P8). The dose of puromycin needs to be determined with a kill curve to find out the lowest dose that kills the non-transfected cells completely 4-7 days post selection; the range of puromycin is 1μg/ml to 10μg/ml). Change the media every 2-3 days. 46 Note: We recommend you still keep growing or freeze some of the transfected cells without selection; just in case, you need to perform the puromycin selection again. 7. The puromycin resistant cells are ready to be analyzed for genome editing. Use microscope to observe RFP expression. WB with anti-tRFP antibody (cat# TA150061) to detect RFP expression Genomic PCR to verify the integration of the functional cassette, then directly sequence the amplified genomic fragment using the PCR primers to verify the integration in the genome. Note: Scramble control and donor vector will also give you some puromycin resistant cells as donor vector alone can randomly integrate into the genome too; however the efficiency should be a lot lower than with a specific gRNA. Therefore, you should get more colonies with gene specific gRNA than scramble control if the gene specific gRNA cleaves efficiently. 8. Isolate individual cell colonies. Two main methods, limiting dilution and cloning rings / cylinder. 3) Limiting dilution This method is better to be used after puromycin selection. Dilute cells to seed about 1-2 cells/well in 96-well plate, after 1-2 weeks, observe under the microscope and select the wells only containing one cell colony, then further expand them to 6-well plate when they are confluent in the 96-well plate and so on. 4) Cloning rings / cylinder This method can be used in the same time with puro selection. Seed cells at lower density, such as 5% confluency in a larger cell culture dish, such as 10cm dish, apply puromycin selection when seeding. Table 1. Recommended starting transfection conditions for Turbofectin 8 Tissue Culture Vessel Growth area, cm2/well g of DNA Ratio of Turbofectin:DNA 96-well plate 0.35 0.1-0.15 3:1 24-well plate 2 0.5-1 3:1 12-well plate 4 1-2.5 3:1 6-well plate 9.5 1-5 3:1 35 mm plate 8 1-5 3:1 60 mm plate 20 2-10 3:1 100 mm plate 60 5-15 3:1 47 Fig. 2. Diagram of knockin process P1, 48 hr post transfection 1:10 split Grow for 3 days P2, 5-day post transfection 1:10 split Grow for 3 days P3, 8-day post transfection Optional: Extract genomic DNA for PCR 1:10 split Grow for 3 days P7, 20-day post transfection 1:10 split P8, 23-day post transfection Freeze or keep growing, if puro selection is needed again Puro selection Fig. 20. Diagram of genomic PCR Primer design. Integrated cassette LHA LF PGK-puro LR CMV-RFP chromosome RHA RF RR Primer set to detect Primer set to detect left integration junction right integration junction (~ 1kb PCR fragment) (~ 1kb PCR fragment) LF, LR: Forward and reverse PCR primer to amplify the left integration junction RF, RR: Forward and reverse PCR primer to amplify the right integration junction 48 FAQ Q: A 20bp target sequence is needed with a NGG PAM seq. Shall the NGG be exactly immediately following the 3′ of this 20bp sequence? Yes, the NGG is located immediately next to the 3′ end of the 20bp sequence in the genome. However NGG is not included in the guide RNA sequence. Q: How to design the 20bp target-specific sequence? The 20bp target-specific sequence should precede NGG (PAM). Please BLAST the seed region (8-14 bp PAM-proximal) of the 20bp target sequence to make sure it‟s unique along the genome to guarantee its specificity. 5‟-NNNNNNNNNNNNNNNNNNNN 3‟-NGG Seed-region Q: How to avoid off target issue using CRISPR/Cas? You can blast your target sequences. If the off-target sequences don‟t have the PAM (NGG), then they won‟t be targeted by CRISPR/Cas9. You also want to choose target sequences with mismatches in the 8-14 bp at the 3‟ end of the target sequences. This way, the off-target issue can be decreased dramatically. For therapeutic purpose, you can use Cas9 nickase which only cuts one strand. Q: How many target RNA sequences should I use for a genome editing project? Due to the un-predicable nature of gRNA, we recommend 3 and more gRNA targeting sequences to be designed to make sure that at least one targeting sequence will provide efficient cleavage. Q: Do you know the specific cleavage site of the Cas:gRNA complex in terms of where in the targeting sequence the cleavage occurs? Cas9 cleaves at 3 bp away from the 3‟ end of the target sequence in the genome. Q: Why I cannot find the gRNA targeting sequences in the cDNA sequence? The targeting sequences could be located in either exon or intron in the genome; the cDNA sequences only contain the exons. CRISPR/Cas9 will target the genomic sequence, then genome editing will be achieved. Q: why do you need T7-driven vector to express gRNA and cas-9? For making gene knockout mice and genome editing in other organisms, such as Drosophila, some researchers do microinjection of gRNA and Cas9 mRNA into cells. Q: Both of the guide and donor plasmids need to be transfected into cells; So transfection may be a limiting factor. 49 You can find a good transfection reagent for your cells. For hard to transfect cells, many researchers use electroporation. The new type of transfection reagent, Viromer is also excellent for hard-to-transfect cells, http://www.origene.com/cdna/transfection.mspx . The GFP expression in pCas-Guide-EF1a-GFP can be used to monitor transfection efficiency and to sort out transfected GFP positive cells. You can also use anti-CD4 antibody beads to enrich transfected cells if you use pCas-Guide-EF1a-CD4 vector. Q: The transfection efficiency of my cell line is only 20%, how to enrich CRISPR transfected cells? You can use pCas-Guide-EF1a-GFP to sort out transfected cells since GFP is also expressed. We also have pCas-Guide-EF1a-CD4 vector; you can use anti-CD4 antibody beads to enrich transfected cells. Alternatively, you can transfect a plasmid with a selection marker and select the cells. Q: For knocking down a target gene, donor plasmid is not necessary, correct? Without donor template DNA, the double-stranded break will be repaired by NHEJ; unpredicted indels will be introduced. You will screen the deletions/insertions that cause frame shift. With donor DNA, you will get desired insertion/deletion/mutations. Q: How long should the LHA and RHA be? 600-1000 bp left or right homologous arms should work for HDR mediated repair. Q: How to knockout all the splicing variants of a gene using OriGene’s pre-designed donor vectors, eg. OriGene’s CRISPR knockout / knockin kit? Different splice variants of a gene are generated from the same pre-mRNA, splicing at different locations. When we design target sequences to knockout all the splicing forms of a gene, the target sequences are located around the start codon, ATG, of the longest splice variant. The 3‟ end of the left homologous arm in the donor vector is right upstream of the start codon ATG. After homologous recombination, the GFP-puro cassette replaces part of the coding region of the longest splice variant in the genome. At the 3‟ end of the GFP-puro functional cassette, there is a transcriptional stop signal; therefore the rest of the target gene will not be transcribed. Q: Is there a method for cloning knockout cell lines from the engineered pool of cells? series of dilution or Isolating individual cell colonies using cloning cylinders. Q: Do you need to linearize a donor template before transfection for efficient repair? The donor template DNA is not preferred to be linearized as this will increase random integration. Q: How to select for positive clones if using long oligos as a donor template? Isolate single cell colonies, do WB (for gene knockout or tagging) or genomic PCR or sequencing (for mutations) to detect the genome editing depending on the nature of the editing. 50 Q: How to screen the edited cells after transfecting the CRISPR/Cas9 vector? If it is gene knockout, do genomic PCR to verify the genomic integration. For mutations, you can do genomic PCR and sequence it. If you do gene knockout, the selection marker in the donor template DNA will help the selection. If necessary, you can isolate individual cell colonies for introduction of specific mutations and other genome editing applications. You can do WB for gene knockout after cloning cell line isolation. Q: Does Crispr/Cas system work for non-dividing cells? NHEJ repair works in non-dividing cells; HDR is not active in non-dividing cells. Therefore, you can do gene disruption using CRISPR/Cas9 system without donor template DNA. Q: What is your validation data for your CRISPR knockout / knockin kit? Please see the downloadable validation data at www.origene.com/Cas9 Q: Using CRISPR, can you get monoallelic knockout (heterozygous) or biallelic knockout (homozygous)? CRISPR/Cas9 double-strand cleavage is very efficient. If just using CRISPR/Cas9 vectors to introduce indels, if transfection efficiency is high, more biallelic knockout can occur. In the presence of donor DNA, since homologous recombination may be a limiting factor, some cells contain monoallelic knockout and some cells contain biallelic knock out. Q: Do I get monoallele knock-out or biallele knock-out using the knock-out kit via CRISPR? What do I need to do to get biallele knock-out? If you isolate single cell colonies, in some cells gene knock-out may occur only in one allele; in some cells gene knock-out may occur in both alleles. If you only have monoallelic knockout and you want to get biallelic knockout, you can order another donor vector containing a different mammalian selection marker, such as blastocidin or neomycin resistant marker. Make sure the other allele is intact as it can be targeted and repaired via NHEJ; confirm with genomic PCR and sequencing. OriGene has both functional cassettes. You can do the knockout procedure again with the new donor vector to target the second allele (one allele is already targeted and replaced with GFP-puro cassette). Alternatively, you can use Cre to flox out the puro cassette from your edited cells and use the same donor vector from the knockout kit and do the knockout again to target the second allele. Q: What is the sequence of the reverse primer at the GFP region to amplify the left integration region using the CRISPR knockout / knockin kit? tGFP-integeration_3R TAGGTGCCGAAGTGGTAGAAGC LHA F RHA R Q: Do you have the cas9 antibody? 51 Yes, We do have Cas9 antibody (cat# TA190309), http://www.origene.com/antibody/TA190309.aspx . In our CRISPR/Cas9 vectors, Cas9 has a Cterminal Myc-DDK tag. DDK is the same as Flag; OriGene‟s anti-DDK antibody (SKU TA50011100), www.origene.com/Antibody/AntiTagAntibody.aspx Q: If I want to use CRISPR/Cas9 to knock down a certain gene, what kind of negative control should I use? You can use a scramble control, pCas-Scramble, SKU GE100003, or pCas-Scramble-EF1aGFP, SKU GE100021. Q: For gene targeting in mice, do you recommend transfecting ES cells or pronuclei? You can do both. You can inject mRNA (gRNA and Cas9 mRNA) or plasmid DNA (target sequence cloned pCas-Guide) into the zygotes or ES cells. Q: What is the limit for multiple gene disruption? You can do multiplexes using CRISPR/Cas9 system. You can co-transfect the gRNA vectors or co-inject several guide RNAs into your cells; so you will achieve multiple gene disruption or genome editing. The limit could be transfection efficiency. Q: How do you make sure that Cas9 will not integrate in genome if you use lentivector? For screening purpose, for short term, integration of Cas9 into the genome for 2 weeks does not affect cells. There is also a non-integration lenti packaging kit commercially available from Clontech that the lenti vector won‟t be integrated after transduction. Q: Can you introduce mutations anywhere in the genome, including in promoters or enhancers? Yes. The 20 bp target sequences only need to precede NGG. Q: Do you see variability in success with different cell lines? Yes, depending on the cell line and the gRNA sequences. Q: For fluorescently labeling (tagging) a gene of interest, is it necessary to serially dilute transfected cells for clonal analysis? If in the donor construct the fluorescent protein does not have a mammalian expression promoter, then you don‟t need to dilute transfected cells as the unintegrated donor DNA won‟t express the fluorescent protein. If the fluorescent protein in the donor template DNA does contain a mammalian expression promoter (for N-terminal tagging, the left arm main contain partial or full promoter), you will need to pass the transfected cells several passages to dilute the cells containing the donor construct. You will know if the left arm contain a functional promoter by transfecting donor vector only into cells. Q: What is the known efficiency relative to other genome editing approaches? 52 In general, the genome editing efficiency of CRISPR/Cas9 is similar or higher than TALEN. However, CRISPR/Cas9 is much more simple and easy to do. You will need to engineer the protein to recognize new DNA sequence in TALEN system, while CRISPR/Cas9 is RNA based. Q: What is the sequence of CF3 sequencing primer? 5‟-ACGATACAAGGCTGTTAGAGAG-3‟ Q: What is your validation data for your pCas-Guide system? Please see the downloadable validation data at www.origene.com/Cas9 Q: What is the scrambled sequence in pCas-Scramble and pCas-Scramble-EF1a-GFP? 5‟ GCACTACCAGAGCTAACTCA 3‟ Q: Do you provide gRNA cloning service and donor vector service? Yes, you can order donor vector service via OriGene‟s gene synthesis company, Blue Heron: http://www.blueheronbio.com/Services/Genome-Editing.aspx . gRNA cloning service can be ordered via both OriGene site (http://www.origene.com/CRISPR-CAS9/Service.aspx) and Blue Heron. Q: Is there any safety issue with this pLenti vector? The pLenti vector is a third generation lentiviral vector and it is the safest lenti-viral vector because both LTRs are truncated. Please contact the biosafety office at your institution prior to use of the pLenti vector for permission and for further institution-specific instructions. BL2/(+) conditions should be used at all times when handling lentivirus. All decontamination steps should be performed using 70% ethanol/1% SDS. Gloves should be worn at all times when handling lentiviral preparations, transfected cells or the combined transfection reagent and lentiviral DNA. Q: What is unique about the 3rd generation of Lentiviral vectors? The 3rd generation lentiviral vectors are safer than the 2nd generation vectors. The 3rd generation packaging systems express gag and pol from one packaging vector and rev from another. The 3rd generation packaging systems DO NOT express tat (Trans-Activator of Transcription). Q: Can I use a second generation packaging system with the pLenti vectors? Yes, a second generation packaging system should work with OriGene‟s third generation pLenti vectors although we have not explicitly tested this. You can use OriGene‟s high efficient third generation lenti-packaging kit (cat# TR30002) for pLenti-vectors. Q: How can I sequence the target sequenced cloned in pT7-Guide vector? M13 forward primer, 5‟ CGCCAGGGTTTTCCCAGTCACGAC 3‟ 53