1
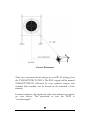
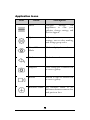
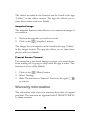
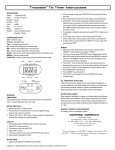
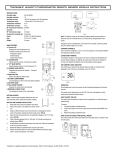
TARGETVISION CAMERA SYSTEM TARGETVISION, LLC . USER MANUAL TARGETVISION TARGETVISION CAMERA SYSTEM USER MANUAL TARGETVISION, LLC. 133 N. Friendswood #330 Friendswood, TX 77546 Phone 281.205.8134 • Fax 281.205.8133 Table of Contents System Components.................................. 4 Camera System ......................................... 5 Setup ........................................................... 5 Camera Placement ....................................... 5 Receiver Placement ...................................... 8 TARGETVISION Application ...................... 9 Download the Application ............................ 9 Application Icons ....................................... 10 App Layout ................................................ 11 App Functions............................................ 12 Sessions ...................................................... 12 Track Shots ................................................. 12 Mark Shots .................................................. 13 Grouping Marked Shots .............................. 14 Record Video .............................................. 15 Snapshot Image .......................................... 16 Prevent Screen Timeout ............................. 16 Warranty Information ............................... 16 What is Covered? ...................................... 17 What is Not Covered? ............................... 17 Getting Started System Components The TARGETVISION Camera System will come with the following components: TARGETVISION Camera TARGETVISION Receiver Case Charging Cable 4 Camera System The system is easy to use and set up system at any range. Setup Be sure that all components are present in the case and that the unit is fully charged before using the system to allow for optimal experience. Also, remember to bring the smart device you intend to view your camera feed from. Camera Placement Take the camera and your smart device down range next to the target you intend to shoot. Turn the camera on. Place the camera around 10 ft. to 15 ft. away from the target (depending on the size of your target you may need to further adjust your distance to get the best image). Place the camera slightly off to the side, out of the direct line of fire from your bench to minimize the chance of accidentally shooting the unit. See diagram below for example. 5 Camera Placement Take out your smart device and go to your Wi-Fi settings. Join the TARGETVISION Wi-Fi. The Wi-Fi signal will be named TARGETVISION, followed by your system’s unique unit number (this number can be found on the backside of the camera). In some instances, the signal may take a few minutes to register on your device. The password to join the Wi-Fi is “neverlosesight”. 6 Once you have established connection, open the TARGETVISION application on your smart device. Using the camera feed displayed through the application, and adjust the positioning of the camera until your target is centered and clearly visible. Camera adjustment 7 Receiver Placement The receiver is built into the Pelican Case. Turn on the receiver. Place receiver on or around the bench you are shooting from. Point the backside of the Pelican Case toward the camera. Receiver Placement The receiver communicates with the camera to allow you to view your shots up to 1 mile away. The better the line of site between the receiver and the camera, the stronger the connection will be. 8 TARGETVISION Application The system uses an application TARGETVISION to run the feed from the camera to your smart device. Download the Application The application is free and is available in both the App Store (for Apple) and the Play Store (for Android) 1. Go to your App or Play Store 2. Search for “targetvision” 3. Download the application 9 Application Icons Icon Name Description Menu Navigate through the application to view your galleries, change settings, and ask for support. Options Adjust your current session settings, turn on shot marking, and change group color. Show/Hide Marks Hide or display shot markers. Undo Undo shot mark. Snapshot Take a snap shot of camera feed to save to gallery. Record Record a video of camera feed to save to gallery. Reference Frame Set reference frame to see difference between current shot and previous shot. 10 App Layout App Icon Locations 11 App Functions Use the functions built into the TARGETVISION application to enhance your experience. Sessions Starting a new session allows you to name, date, and add notes to the next shooting session. 1. Click on the (Options) button 2. Select “New Session” 3. Provide an album name, date, and notes Note: To finish and save your session properly, you must end the session once you are done. Your session information will be stored and logged in the application so you can go back and reference past outings. The album can be found in the gallery. If there is a session currently ongoing, you will need to end that session in order to start a new one. Track Shots Using the tracking shots function shows you how your target changes from shot to another. 1. 2. 3. 4. 5. Click on the (Reference Frame) button Take your shot Click the on the (Reference Frame) icon Take your next shot Repeat 12 The application with blink back and forth between the images of what the target looked like before your shot (the previous time you clicked the “Reference Frame” button) and the shot you just took (the most recent time you clicked the “Reference Frame button). Change Blinking Duration When tracking your shots, the images of the reference frames will blink back and forth for a default of 5 seconds. You can change the blinking duration in your application settings. 1. 2. 3. 4. Click on the (Menu) button Select “Settings” Selected “Blinking Effect Duration” Use slide bar to adjust duration between 0 and 10 seconds Mark Shots The mark shots feature give you the ability highlight, number, and group your shots on target. 1. 2. 3. 4. 5. 6. 7. Click on the (Options) button Slide “Shot Marking” button to the right to turn on Take your shot Tap on the screen over the bullet hole created in the target Take your next shot Tap on the screen over the new bullet hole in the target Repeat Note: Be sure that your marks mode. (Show/Hide Marks) button is in the show 13 The marks will appear in the default size and default color. All subsequent marks are numbered in sequential manner. To undo a mark made accidentally, you will need to use the (Undo) button. The marks will stay on your screen until you wish the reset your overlays. Change Default Marker Color When marking shots, the application uses orange as the default marker color. You can change your default marker color in the application settings. 1. 2. 3. 4. Click on the (Menu) button Select “Settings” Selected “Default Marker Color” Select the color Change Marker Size When marking shots, the application uses a medium default marker size. You can change your default marker size in the application settings. 1. 2. 3. 4. Click on the (Menu) button Select “Settings” Selected “Default Marker Size” Select the color Grouping Marked Shots The mark shots feature also gives you the ability to mark your groups with up to 7 different colors. 14 1. 2. 3. 4. 5. 6. Take your shot Mark shot Repeat until you are finished with your group Click on the (Options) button Select “Mark Group” Choose the color you wish to mark the group you just shot with Note: The color you choose to mark your group should be different from the default color or previous group colors. Once you choose a color to mark your shots with, the app will change all new marks you have made since your last grouping to the specified color. To undo a mark made accidentally, you will need to use the (Undo) button. The marks will stay on your screen until you wish the reset your overlays. Reset Overlays Resetting overlays will erase all the marks you have made. 1. Click on the (Options) button 2. Select “Reset Overlays” Record Video The record function video allows you to capture a video of your session. 1. Click on the (Record) button to begin video 2. Perform the activities you wish to record 3. Click on the (Record) button again to end video 15 The videos recorded in the function can be found in the app “Gallery” in the videos section. The app also allows you to share these videos with your friends. Snapshot Image The snapshot function video allows you to capture an image of your session. 1. Perform the activities you wish to record 2. Click on the (snapshot) button The images that you capture can be found in the app “Gallery” in the images section. The app also allows you to share these photos with your friends. Prevent Screen Timeout Preventing the screen from timing out stops your smart device from turning off or going to sleep while the app is active. This function is set to off by default. 1. Click on the (Menu) button 2. Select “Settings 3. Slide “Prevent Screen Timeout” button to the right to turn on Warranty Information The unit comes with a one year warranty from date of original purchase. The unit must be registered with TARGETVISION to claim warranty. 16 What is Covered? TARGETVISION warrants the hardware product against manufacturer defects when used in accordance with TARGETVISION’s user manuals, technical specifications and other published guidelines for a period of ONE (1) YEAR from the date of original retail purchase by the end-user purchaser. You will be able to direct your claims to TARGETVISION even in situations where you purchased the TARGETVISION Product from a retailer. What is Not Covered? This warranty does not apply to any non-TARGETVISION branded hardware products or any software, even if packaged or sold with TARGETVISION hardware. Non-TARGETVISION products may have the benefit of a manufacturer's warranty, which provides benefits in addition to consumer law rights - please check your product box and literature for details. Service options may be limited if requesting service in a country that is not the country of purchase for the TARGETVISION product. In the event that service for the TARGETVISION product is not available in such country, TARGETVISION will notify you of any additional charges for shipping and handling that may apply before rendering service. This warranty does not apply to the following: Consumable parts, such as batteries or protective coatings that are designed to diminish over time, unless failure has occurred due to a defect in materials or workmanship 17 Cosmetic damage, including but not limited to scratches, dents and broken plastic on ports Damage caused by use with another product Damage caused by accident, abuse, misuse, liquid contact, fire, earthquake or other external cause Damage caused by operating the TARGETVISION product outside the user manual, the technical specifications or other TARGETVISION product published guidelines Damage caused by service (including upgrades and expansions) performed by anyone who is not a representative of TARGETVISION Defects caused by normal wear and tear or otherwise due to the normal aging of the TARGETVISION product 18