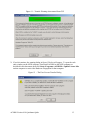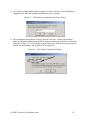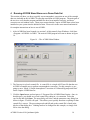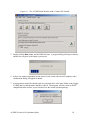
1
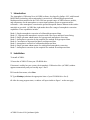
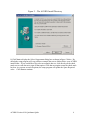
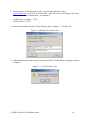
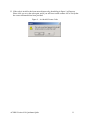
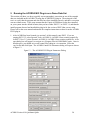
.
© 2002 Analytical Imaging and Geophysics, LLC.
All rights reserved. ACORN is an AIG product developed by
ImSpec LLC with MODTRAN licensed technology
The MODTRAN 4 license is held by ImSpec, LLC. ACORN is
sold and supported by Analytical Imaging and Geophysics. ENVI
is a registered trademark of Research Systems, Inc. ACORN is a
Pending trademark of ImSpec Associates, LLC
ACORNTM Quick
Start Guide
Analytical Imaging and Geophysics LLC
4450 Arapahoe Ave. Suite 100
Boulder, CO 80303 USA
Phone: 303-926-8284
Fax: 303-665-6090
Email: [email protected]
ACORN Version 4.10 Quickstart Quide
ACORN Version 4.10
March, 2002 Edition
Copyright © ImSpec, LLC.
All Rights Reserved
1
Getting Started
with ACORN
The following topics are covered in this guide:
1
Introduction............................................................................................3
2
Installation .............................................................................................3
3
Requesting your ACORN License ..........................................................9
3.1 A Note about the Hardware Fingerprint ........................................................................9
3.2 Requesting your ACORN License .................................................................................9
3.3 Transferring Your ACORN License .............................................................................12
4
Running ACORN Stand Alone on a Demo Data Set..............................16
5
Running the ACORN ENVI Plug-in on a Demo Data Set .......................20
ACORN Version 4.10 Quickstart Quide
2
1
Introduction
The Atmospheric CORection Now (ACORN) software, developed by ImSpec LLC with licensed
MODTRAN4 technology allows atmospheric correction of calibrated Hyperspectral and
Multispectral data measured in the 350 to 2500 nm spectral range. ACORN assesses, models,
and compensates for the atmosphere to convert input radiance spectra to apparent surface
reflectance. After atmospheric correction the spectral absorption features inherent to the surface
materials are revealed. ACORN has eight modes that offer a range of atmospheric correction
capabilities. These capabilities include:
Mode 1: Simple atmospheric correction of calibrated hyperspectral data.
Mode 1.5: Hyperspectral atmospheric correction with water vapor and liquid water fitting.
Mode 2: Single spectrum enhancement of a hyperspectral atmospheric correction.
Mode 3: Atmospheric correction by the empirical line method for hyperspectral data.
Mode 4: Convolution of hyperspectral data to multispectral data.
Mode 5: Atmospheric correction of calibrated multispectral data.
Mode 6: Single spectrum enhancement of a multispectral atmospheric correction.
Mode 7: Atmospheric correction by the empirical line method for multispectral data.
2
Installation
To install ACORN:
1. Insert the ACORN CD into your CD-ROM drive.
If Autorun is enabled on your system, the Atmopheric CORrection Now (ACORN) window
appears automatically and you can skip steps 2 and 3.
2. From the Start menu, select Run.
3. Type d:\setup (substitute the appropriate letter of your CD-ROM drive for d).
4. After the setup program starts, a window will open similar to figure 1 on the next page.
ACORN Version 4.10 Quickstart Quide
3
Figure 1 – The ACORN Setup Program
5. Click Next to display the note below about installing ACORN 4 as an upgrade. If this is an
upgrade from ACORN 3, then you must be sure that ACORN 3 is currently licensed and running
on this machine so that the licensing information can be found and inherited by ACORN 4. If
you do not do this, then ACORN 4 will not run.
ACORN Version 4.10 Quickstart Quide
4
6. Click Next to display the note below about installing ACORN as an ENVI plug in. Please be
sure that ENVI 3.2, 3.4, or 3.5 is installed on your computer and is licensed and up and running
before continuing. If you do not do this first, then ACORN may not correctly locate the ENVI
installation, and the install of the plug-in will be bypassed.
7. Click Yes to display the AIG license agreement dialog box. Please read the agreement
carefully and click Yes if you accept the terms of the agreement.
8. The following screen is shown in Figure 2 below. The Choose Destination Location dialog
box shows the default location for the ACORN program and example data files.
*** PLEASE NOTE ***
It is recommended that this default location be used when installing ACORN. While
ACORN can be installed in any folder on your system, the content of the example control
files WILL NEED TO BE EDITED SO THEY POINT TO THE EXAMPLE FILES IN
YOUR NEW FOLDER. If this is not done, then the examples will not run correctly!
If you would like to choose a new location for ACORN, click the Browse button and navigate to
the desired location on your system. The setup program will ask to create the folder if it does not
exist.
ACORN Version 4.10 Quickstart Quide
5
Figure 2 – The ACORN Install Directory
9. Click Next to display the Select Components dialog box as shown in figure 3 below. By
default the setup program will copy all three example data sets to folders below your ACORN
install folder. If you would like to de-select an example data set, click directly on the check
mark next to each data set to turn off that option. Click that area again to turn the check mark
back on. As you turn on and off options, the setup program will update the Space Required
value. Click Next to continue.
ACORN Version 4.10 Quickstart Quide
6
Figure 3 – The ACORN Example Data and Control Files
10. The final dialog box lists the name of the folder that will show up under the Start menu on
your system. The default value of ACORN4 is typically not changed. After you hit Next the
setup program will begin copying all of the program and data files to your system. Note that this
could take a few minutes depending on the speed of your system, CDROM drive and hard drive.
11. When the copy operation is complete the setup program will attempt to detect the presence of
ENVI® version 3.2, 3.4 or version 3.5. If one, two or all three programs are detected a
dialog box similar to the one shown in figure 4 will be displayed. Click OK to continue.
Figure 4 – The ACORN ENVI Plug-in Dialog
12. At this point the setup program is complete, and the dialog in figure 5 will appear. Click the
Finish button, and the setup program will exit. There is no need to restart your system after the
setup program is finished.
Although the program and data files are now installed on your system, ACORN will not run until
a valid license is received from AIG. The next section of this document will describe how to
request your license.
ACORN Version 4.10 Quickstart Quide
7
Figure 5 – The Final ACORN Setup Dialog
ACORN Version 4.10 Quickstart Quide
8
3
Requesting your ACORN License
The ACORN license is node locked to a single computer. The security that ACORN uses
collects various parameters about your system, and generates a unique Hardware Fingerprint
for your computer. This code is then sent to AIG, who in turn will send back a Name and Key
value that will allow ACORN to run. Once a valid code is entered, ACORN will store that value
and no further user action is required to run ACORN.
3.1 A Note about the Hardware Fingerprint
Because ACORN uses various parameters about your system to generate a hardware fingerprint,
please keep in mind that changing certain aspects of your system may invalidate the ACORN
license. Examples include changing your primary hard drive and updating the Flash BIOS in
your computer. If you know that you intend to upgrade your computer, you can transfer your
license to a second machine temporarily, and transfer it back after your machine is upgraded.
3.2 Requesting your ACORN License
1. The first step in requesting your ACORN license is to retrieve the Hardware Fingerprint of
your computer. To do this, from Windows, click the Start->Programs->ACORN4>Update License Info item. When you do the dialog box shown in Figure 6 will appear.
The Hardware fingerprint is circled and pointed to in that figure. In this example the value is
7424-9250. Note this code for use in the next step.
Figure 6 – The ACORN License Dialog
ACORN Version 4.10 Quickstart Quide
9
2. The next step is to send this code to AIG. You can either email the code to
[email protected], or call AIG at 303-926-8284. After AIG enters your hardware code, they
will return two lines of information. An example is:
ACORN User - Company - 12345
5C88-D158-9C51-3CA3
3. Enter this information into the License Dialog as shown in figure 7. Click the OK.
Figure 7 – Entering Your License Code
4. If the information has been entered correctly, then the Key Valid dialog will appear as shown
in figure 8.
Figure 8 – A Valid License Code
ACORN Version 4.10 Quickstart Quide
10
5. If the code is invalid or has been entered incorrectly, then dialog in figure 9 will appear.
Please click yes to try the code again, and if you still have trouble contact AIG to verify that
the correct information has been provided.
Figure 9 – An Invalid License Code
ACORN Version 4.10 Quickstart Quide
11
3.3 Transferring Your ACORN License
1. You can transfer your ACORN license to another machine at any time if you like. This
might be useful, for example, if you need to run ACORN on a laptop when in the field, or if
you simply change over to a new computer. Note that when you transfer the license, the
license on the current machine will become invalid, and ACORN will no longer execute.
You would then have to transfer ACORN back from the second machine by repeating these
steps.
2. To transfer the ACORN license to a new machine simply click the Transfer License! menu
from the stand-alone GUI main window as show in figure 10 below. When this menu is
selected, a warning dialog shown in figure 11 below will open to remind you of the steps it
will take to successfully transfer the license.
Figure 10 – The Transfer License Menu Item
ACORN Version 4.10 Quickstart Quide
12
Figure 11 – Transfer Warning when started from GUI
3. If you hit continue, the warning dialog in figure 12 below will appear. To open the code
entry window on the NEW computer, first install ACORN on the NEW computer as
described in this document, then click Start->Programs->ACORN4->Update License Info
on that computer to retrieve the Hardware Fingerprint for that computer.
Figure 12 – The First License Transfer Dialog
ACORN Version 4.10 Quickstart Quide
13
4. Click Yes to continue, and the dialog in figure 13 below will open. Enter the hardware
fingerprint from the NEW computer into this dialog box as shown.
Figure 13 – The Hardware Fingerprint Code Entry Dialog
5. The confirmation dialog shown in figure 14 below will open. Double check that the
hardware fingerprint displayed on the NEW computer matches the code that is circled and
pointed to in figure 14. If you enter this number incorrectly, then the license may become
invalid on both machines, and ACORN will no longer run.
Figure 14 – The Transfer Confirmation Dialog
ACORN Version 4.10 Quickstart Quide
14
6. Click Yes and the Lock Transferred dialog shown in figure 15 below will open.
*** PLEASE NOTE ***
At this point ACORN is disabled on the current computer, so you absolutely must
write down the Name and Key in figure 15 below!
Figure 15 – The Lock Transferred Dialog and the Name and Key for the New Computer
TIP: As noted in the dialog box, you can also select Alt->Printscreen in Windows to copy
this dialog box to the windows clipboard. You could then paste this image into another
windows program such as Microsoft Word to save or print this information.
7. This dialog box will appear three times as a reminder, so after the Name and Key are
saved, hit OK until the final dialog closes. At this point ACORN will now run on the NEW
computer and will no longer run on this computer.
ACORN Version 4.10 Quickstart Quide
15
4
Running ACORN Stand Alone on a Demo Data Set
This section will show you how to quickly run an atmospheric correction on one of the example
data sets included on the ACORN CD using the stand alone ACORN program. The main goal of
the test is to verify that the program and data files have been installed correctly, and that a
correction can run without errors. These steps assume that the Cuprite AVIRIS data set has been
installed on your system into the default location. Please refer to the users manual and tutorial
for complete instructions on how to run ACORN.
1. After ACORN has been licensed (see section 3 of this manual), from Windows, click Start>Program->ACORN4->ACORN. The main ACORN program will start as shown in figure
16.
Figure 16 – The ACORN Main Window
2. The first step is to load a control file. A control file is a simple ASCII text file that the core
ACORN executable uses to perform an atmospheric correction. For this example, we are
going to run a “Mode 1: Simple Atmospheric Correction of Calibrated Hyperspectral Data”
on the Cuprite AVIRIS data set.
3. Click the Open button, and navigate to C:\Program Files\ACORN4\Data\Cuprite. Once in
that directory, you should see several control files ending in a .in extension. Select the
cup1.in file and click Open. The open dialog will close, and the parameter entry dialog box
shown in figure 17 below will open. This allows you to quickly note that everything for that
control file is correct. The processing mode and full path to the control file is listed in the
title bar of that dialog box.. Nothing needs to be changed for this example, so simply click
OK to close the dialog.
ACORN Version 4.10 Quickstart Quide
16
Figure 17 – The Parameter Entry Dialog Box
4. The parameter entry dialog will close and the main ACORN window will now contain
various parameters that are specific to this control file as shown in Figure 18. The window
will also note the available disk space on the drive where the output image will reside to
remind you how much remaining disk space you have.
ACORN Version 4.10 Quickstart Quide
17
Figure 18 – The ACORN Main Window with a Control File Loaded
5. Finally click the Run button, and ACORN will start. A progress dialog will open as shown,
and the bar will grow as the image is processed.
6. After a few minutes (depending on the speed of your system) the run will complete, and a
confirmation dialog will appear as shown.
7. At this point an output file should reside on your hard drive in the same folder as the Cuprite
AVIRIS data set, and the name should be cup1rfl. The program will also create an ENVI®
compatible header to allow you to load and view the results with that package.
ACORN Version 4.10 Quickstart Quide
18
8. At this point you are ready to use ACORN on your own data set, so please see the ACORN
user’s manual – stand alone version - for a complete description of the software and all of its
modes of operation.
ACORN Version 4.10 Quickstart Quide
19
5
Running the ACORN ENVI Plug-in on a Demo Data Set
This section will show you how to quickly run an atmospheric correction on one of the example
data sets included on the ACORN CD using the ACORN ENVI plug-in. The main goal of the
test is to verify that the program and data files have been installed correctly, and that a correction
can run without errors. These steps assume that the Cuprite AVIRIS data set has been installed
on your system into the default location, that you have either ENVI 3.2 or ENVI 3.4, and that the
install program detected and installed the plug-in for the version of ENVI that you are using.
Please refer to the users manual and tutorial for complete instructions on how to run the ACORN
ENVI plug-in.
1. After ACORN has been licensed (see section 3 of this manual), start ENVI. If you are
running ENVI 3.2, select Spectral Tools->ACORN 4->ACORN 4 from existing control file.
In ENVI 3.4 or 3.5, select Spectral->ACORN 4->ACORN 4 from existing control file. A file
open dialog box will appear, so navigate to c:\Program Files\ACORN\Data\Cuprite. Once in
that directory, you should see several control files ending in a .in extension. Select the
cup1.in file and click Open. The ACORN Contol File Parameters dialog will open as shown
in figure 13.
Fgure 13 – The ACORN ENVI Plug-in Parameters Dialog
ACORN Version 4.10 Quickstart Quide
20
2. At this point, you could edit the parameters, but for this run, do not change any of them or the
correction may not execute correctly. Click the OK button, and the dialog will close, and a
progress dialog will open as shown, and the bar will grow as the image is processed.
3. After a few minutes (depending on the speed of your system) the run will complete, and a run
time dialog will open as shown below. Click OK and the ENVI available bands list will
open with the cup1rfl image loaded and ready for use.
4. At this point you are ready to use ACORN on your own data set, so please refer to the
ACORN user’s manual – ENVI Plug-in version - for a complete description of the software
and all of its modes of operation.
ACORN Version 4.10 Quickstart Quide
21