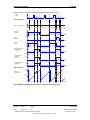
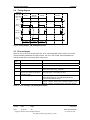
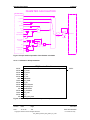
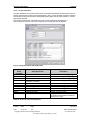
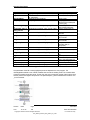
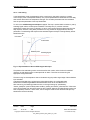
1
Simotion Easy Basics
Released / by
André Krull
Review
06.11.2003
reviewed
Simotion Easy Basics (SEB)
15.11.04
V3.0
The reproduction, transmission or use of this document or its contents is not permitted without express written authority.
Offenders will be liable for damages. All rights, including rights created by patent grant or registration or a utility model or design, are reserved.
This document is for internal use only and will not be updated/withdrawn when changes are made.
Type
User Documentation
Title
User Manual, Simotion Easy Basics
Author
André Krull
RD NRH RHN KOE / F
A&D B18
Distribution
Tel.: +49 (0221) 576 - 3020
Mail: [email protected]
-- = not distributed, x = only cover sheet
Version
Date
Page
V3.0
15.11.04
1
Document
User Documentation
Copyright © Siemens AG 2003 All Rights Reserved
User_Manual_Simotion_Easy_Basics_V3_0.doc
For internal use only
Simotion Easy Basics
Change Log
Version
V0.1
V0.2
V0.3
reviewed
Date
04.06.03
30.06.03
04.07.03
Author
Krull
Fink
Krull
V0.4
V0.5
V0.6
V0.7
V0.7.1
V1.0
15.07.03
05.08.03
18.08.03
18.09.03
23.10.03
24.11.03
Krull
Krull
Krull
Krull
Krull
Krull
V2.0
01.04.04
Krull
V2.0
03.06.04
Krull
V2.0
30.06.04
Krull
V2.0
6.10.04
Michl
V3.0
08.11.04
Eisfeld
V3.0
09.11.04
Eisfeld
V3.0
V3.0
10.11.04
11.11.04
Eisfeld
Eisfeld
V3.0
12.11.04
Krull
Version
Date
Page
V3.0
15.11.04
2
Change
First generated
Further information on OMAC
Corrects to OMAC incorporated, DP slave
diagnostics supplemented
Chapter 2.2.2.5 supplemented
Alarm_S technique supplemented
Print mark correction supplemented
Bit signaling technique supplemented
Various debugs carried-out
Review comments incorporated together with
the comments from Workshop
- Date and time functions added
- Handling of unit data added
- Functions for ASI modules added
- Control of the ALM added
Clock memory added
Chapter 13 supplemented (Description of the
"winder")
Chapter 14 supplemented (Description of the
"basic positioning function")
New name "Simotion Easy Basics (SEB)’
instead of "Standard Application Library
(SAL)’
Chapter 15 supplemented (FB for closedloop temperature control)
Changes to the DP slave diagnostics,
supplements to the ALM control
Adaptation, print mark correction
Chapter 16 supplemented (displaying curves
on the HMI)
Chapter "OMAC" description has been
updated
Document
User Documentation
Copyright © Siemens AG 2003 All Rights Reserved
User_Manual_Simotion_Easy_Basics_V3_0.doc
For internal use only
Simotion Easy Basics
reviewed
Siemens did not carry-out a system test on the “Simotion Easy Basics” software library. This is the
reason that it is available free-of-charge in the form of the source code. This software is intended to
make it easier to get to know and use the SIMOTION automation system from Siemens using preconfigured examples and function modules. Siemens authorizes customers to use the software and
associated documentation for the applications for which it is intended. This authorization is not
exclusive, cannot be passed-on to third parties and cannot be licensed. Customers may modify the
software and copy it, either unchanged or changed and use it in their SIMOTION automation systems.
The documentation is not a replacement for the product documentation of the SIMOTION automation
system. Therefore, customers may only use the documentation when used together with the software
for the SIMOTION automation system with the product documentation of the specified automation
system. It is especially important that all of the warning and hazard information and instructions in the
Operating Instructions of the SIMOTION automation system are carefully observed.
Rights to claim damages, irrespective of the legal grounds, in particular due to software errors,
documentation errors, or damages arising from advice/consultation shall be excluded unless liability is
based on intent or gross negligence, breach of obligations or an injury of life, body or health or on the
assurance of the absence of a defect. The above stipulations shall not change the burden of proof to
the detriment of the customer.
German legislation applies under the exclusion of the UN purchasing rights dated 11.04.1980.
Erlangen is the place of jurisdiction."
Version
Date
Page
V3.0
15.11.04
3
Document
User Documentation
Copyright © Siemens AG 2003 All Rights Reserved
User_Manual_Simotion_Easy_Basics_V3_0.doc
For internal use only
Simotion Easy Basics
reviewed
Table of contents
1
2
Introduction ....................................................................................................................... 9
Mode management.......................................................................................................... 10
2.1
General................................................................................................................................................. 10
2.1.1
2.1.2
2.1.3
2.1.4
2.1.5
2.1.5.1
2.1.5.2
OMAC Packaging Workgroup ........................................................................................... 10
Basics of the OMAC State Model...................................................................................... 11
Description of the states.................................................................................................... 13
Operating states and functions of production machine according to OMAC...................... 15
Control and status signals of an OMAC machine .............................................................. 17
Control signals .................................................................................................................. 17
Status signals.................................................................................................................... 18
2.2
Implementing and handling the OMAC mode management within the scope of the "Simotion
Easy Basics"............................................................................................................................................................ 19
2.2.1
2.2.2
2.2.3
Description of the OMAC - mode manager ....................................................................... 19
Changes with respect to the "old" version of the mode manager ...................................... 19
Structure of the OMAC – mode manager .......................................................................... 20
2.2.3.1
2.2.3.2
2.2.3.3
OmacVar unit ...........................................................................................................................................................20
OmacStUp unit.........................................................................................................................................................20
OmacMain unit.........................................................................................................................................................21
2.2.4
Incorporating state functions motion task, ... ..................................................................... 22
2.2.4.1
2.2.4.2
2.2.4.3
Using state functions................................................................................................................................................22
Using motion tasks...................................................................................................................................................23
States without any function ......................................................................................................................................24
2.2.5
2.2.6
3
Operating data in compliance with OMAC......................................................................... 25
Function elements and their integration ............................................................................ 26
Motion library .................................................................................................................. 27
3.1
3.2
Function blocks .................................................................................................................................. 27
Function elements and their integration.......................................................................................... 28
4
Print mark correction with dynamic measuring range adaptation.............................. 29
4.1
Function description .......................................................................................................................... 29
4.1.1
4.1.2
Print mark correction ......................................................................................................... 29
Dynamic measuring range adaptation............................................................................... 30
4.1.2.1
4.1.2.2
Automatic measuring range adaptation (from V3.1.1 onwards) ..............................................................................30
Measuring range adaptation in the application (to V3.0) .........................................................................................31
4.2
4.3
4.4
4.5
Input and output interface ................................................................................................................. 32
Signal timing diagram ........................................................................................................................ 34
Error description................................................................................................................................. 36
Function elements and their integration.......................................................................................... 37
5
Generating cams using the _FB_AddSegmentToCam................................................. 38
5.1
5.2
5.3
5.4
5.5
5.6
Description .......................................................................................................................................... 38
Making calls......................................................................................................................................... 42
Parameters .......................................................................................................................................... 42
Timing diagram ................................................................................................................................... 43
Error messages................................................................................................................................... 43
Example ............................................................................................................................................... 44
5.6.1
5.6.2
5.6.3
Segment 1 ........................................................................................................................ 44
Segment 2 ........................................................................................................................ 45
Segment 3 ........................................................................................................................ 45
5.7
Function elements and their integration.......................................................................................... 46
6
Alarm and message handling ........................................................................................ 47
6.1
System message handling in the Technological Fault Task ......................................................... 47
6.1.1
Sequence when handling an alarm or message that has occurred ................................... 47
6.1.1.1
6.1.1.2
progTechFault program ...........................................................................................................................................48
FCResetError function .............................................................................................................................................49
6.1.2
Function elements and their integration ............................................................................ 49
6.2
Alarm_S technique ............................................................................................................................. 50
6.2.1
Assigning categories and acknowledging faults ................................................................ 50
6.2.1.1
6.2.1.2
Fault categories .......................................................................................................................................................50
Acknowledgement types of the fault categories.......................................................................................................51
6.2.2
6.2.3
Principle of the AlarmS technique ..................................................................................... 51
Structure of the Alarm_S technique .................................................................................. 52
Version
Date
Page
V3.0
15.11.04
4
Document
User Documentation
Copyright © Siemens AG 2003 All Rights Reserved
User_Manual_Simotion_Easy_Basics_V3_0.doc
For internal use only
Simotion Easy Basics
reviewed
6.2.3.1
6.2.3.2
6.2.3.3
6.2.3.4
Function and integrating the FCAlarmSRequest .....................................................................................................53
Function and integrating the progAlarmSStartUp ....................................................................................................53
Function and integrating the progAlarmSBackground .............................................................................................53
Function and integrating the progAlarmSActualCycle .............................................................................................54
6.2.4
6.2.5
6.2.6
Inserting and parameterizing a new alarm ........................................................................ 54
Examples in the "AlarmS" unit........................................................................................... 56
Function elements and their integration ............................................................................ 57
6.3
Bit signaling technique ...................................................................................................................... 58
6.3.1
Allocating categories and acknowledging errors ............................................................... 58
6.3.1.1
6.3.1.2
6.3.1.3
Error categories .......................................................................................................................................................58
Acknowledgement types of the various error categories .........................................................................................59
Acknowledging error messages via the PLC or HMI ...............................................................................................59
6.3.2
6.3.3
Principle of operation of the bit signaling technique .......................................................... 60
Structure of the bit signaling technique ............................................................................. 61
6.3.3.1
6.3.3.2
6.3.3.3
6.3.3.4
Function and integrating the FCBitErrorRequest .....................................................................................................61
Function and integrating the progBitErrorStartUp....................................................................................................62
Function and integrating progBitErrorBackground...................................................................................................62
Function and integrating progBitErrorActualCycle ...................................................................................................62
6.3.4
Configuring the messages and connecting the area pointer.............................................. 63
6.3.4.1
6.3.4.2
6.3.4.3
Configuring messages .............................................................................................................................................63
Linking the area pointer for the error messages ......................................................................................................64
Linking the area pointer for the acknowledge area of the HMI ................................................................................65
6.3.5
6.3.6
7
Inserting and parameterizing new error messages............................................................ 66
Function elements and their integration ............................................................................ 67
DP slave diagnostics ...................................................................................................... 68
7.1
General information on DP slave diagnostics................................................................................. 68
7.1.1
7.1.2
Data management ............................................................................................................ 68
Description of the DP slave information according to EN50170 ........................................ 70
7.2
7.3
7.4
7.5
FCDPSlaveDiag function ................................................................................................................... 72
progDPSlaveDiagStartUp program................................................................................................... 72
progDPSlaveDiagPeriFault program ................................................................................................ 72
Function elements and their integration.......................................................................................... 74
8
Function blocks for date and time................................................................................. 75
8.1
Setting the system time and the data of the controller .................................................................. 75
8.1.1
8.1.2
8.1.3
Mode of operation ............................................................................................................. 75
Integrating into the application .......................................................................................... 75
Function elements and their integration ............................................................................ 76
8.2
Synchronizing the date and time of the HMI on the controller ..................................................... 77
8.2.1
8.2.2
8.2.3
Mode of operation ............................................................................................................. 77
Integration into the application .......................................................................................... 78
Function elements and their integration ............................................................................ 78
8.3
Synchronizing the real time clock between several controllers ................................................... 79
8.3.1
Mode of operation ............................................................................................................. 79
8.3.1.1
8.3.1.2
FBSyncSimotionMaster ...........................................................................................................................................79
FBSyncSimotionSlave .............................................................................................................................................79
8.3.2
8.3.3
9
Integrating into the application .......................................................................................... 80
Function elements and integration .................................................................................... 81
Handling global unit data ............................................................................................... 82
9.1
Description of the FBHandleUnitData .............................................................................................. 83
9.1.1
9.1.2
9.1.3
9.1.4
10
Mode of operation ............................................................................................................. 83
Input and output interface of the FBs ................................................................................ 84
Schematic LAD representation.......................................................................................... 85
Function elements and integration .................................................................................... 85
Functions for ASI modules............................................................................................. 86
10.1
Function block for ASI couplers ....................................................................................................... 86
10.1.1
10.1.2
10.1.3
10.1.4
Description of the function block FBAsiLink20EControl..................................................... 86
Input and output interface of the FBs ................................................................................ 86
Schematic LAD representation.......................................................................................... 87
Input and output parameters ............................................................................................. 87
10.1.4.1
10.1.4.2
10.1.4.3
10.1.4.4
boExecute [BOOL] ...................................................................................................................................................87
boReset [BOOL].......................................................................................................................................................88
iLAddr [DINT] ...........................................................................................................................................................88
bStatNibIN [BYTE] ...................................................................................................................................................88
Version
Date
Page
V3.0
15.11.04
5
Document
User Documentation
Copyright © Siemens AG 2003 All Rights Reserved
User_Manual_Simotion_Easy_Basics_V3_0.doc
For internal use only
Simotion Easy Basics
reviewed
10.1.4.5
10.1.4.6
10.1.4.7
10.1.4.8
10.1.4.9
10.1.4.10
auSend [ARRAY] .....................................................................................................................................................88
uSendLen [UDINT]...................................................................................................................................................89
boDone [BOOL] .......................................................................................................................................................89
boError [BOOL] ........................................................................................................................................................89
auReceive [ARRAY].................................................................................................................................................89
bStatus [WORD] ......................................................................................................................................................89
10.1.5
bStatus
10.1.6
10.1.7
Signal characteristics of the parameters boExecute, boReset, boDone, boError and
90
Program example.............................................................................................................. 91
Function elements and their integration ............................................................................ 92
10.2
Diagnostics of the ASI Safety Monitor ............................................................................................. 93
10.2.1
10.2.2
10.2.3
10.2.4
Description of the function block FBAsiMonDiag............................................................... 93
Input and output interface of the FBs ................................................................................ 93
Schematic LAD representation.......................................................................................... 94
Input parameters............................................................................................................... 94
10.2.4.1
10.2.4.2
Enable [BOOL].........................................................................................................................................................94
InBit0, InBit1, InBit2, InBit3 [BOOL] .........................................................................................................................94
10.2.5
Output parameters ............................................................................................................ 95
10.2.5.1
10.2.5.2
10.2.5.3
10.2.5.4
10.2.5.5
10.2.5.6
10.2.5.7
10.2.5.8
10.2.5.9
Busy [BOOL] ............................................................................................................................................................95
OutBit0; OutBit1; OutBit2; OutBit3 [BOOL] ..............................................................................................................95
ErrorK1 [BOOL]........................................................................................................................................................95
ErrorK2 [BOOL]........................................................................................................................................................95
SumK1 [USINT] .......................................................................................................................................................95
SumK2 [USINT] .......................................................................................................................................................95
ErrorMonitor [Byte]...................................................................................................................................................96
ErrorFB [WORD] ......................................................................................................................................................96
Data [StructDataASiMon].........................................................................................................................................96
10.2.6
Data structure ................................................................................................................... 97
10.2.6.1
10.2.6.2
10.2.6.3
10.2.6.4
10.2.6.5
bStateMonitor [byte].................................................................................................................................................98
abStateChannel [1] / abStateChannel [2] ................................................................................................................98
abQuantity [1] / abQuantity [2] .................................................................................................................................99
aaChannel [x].abDevice[y].iIndex ............................................................................................................................99
aaChannel [x].abDevice[y].iState.............................................................................................................................99
10.2.7
10.2.8
10.2.9
11
Runtime of the diagnostics block..................................................................................... 100
Program example............................................................................................................ 101
Function elements and their integration .......................................................................... 102
Clock memory ............................................................................................................... 103
11.1
11.2
11.3
Integration into the application and mode of operation .............................................................. 103
Frequencies....................................................................................................................................... 103
Function elements and their integration........................................................................................ 104
12
Controlling the Active Line Module ............................................................................. 105
12.1
12.2
12.3
12.4
12.5
12.6
12.7
Calling type........................................................................................................................................ 105
Parameter MC_HandleALM.............................................................................................................. 105
Schematic LAD representation ....................................................................................................... 106
Function description ........................................................................................................................ 106
Signal flowchart ................................................................................................................................ 107
Fault description ............................................................................................................................... 107
Function elements and their integration........................................................................................ 108
13
Standard "winder" application..................................................................................... 109
13.1
Function description ........................................................................................................................ 110
13.1.1
13.1.2
13.1.3
Direct closed-loop tension control with dancer roll using speed correction...................... 110
Direct closed-loop tension control using speed correction and a tension transducer....... 111
Direct closed-loop tension control using torque limiting and a tension transducer........... 112
13.2
13.3
Selecting the control concept ......................................................................................................... 114
Description of the blocks................................................................................................................. 115
13.3.1
FB_Control_WithSpeedSetpointChange ......................................................................... 115
13.3.1.1
13.3.1.2
Schematic LAD representation ..............................................................................................................................116
Input and output interfaces of the FBs ...................................................................................................................117
13.3.2
FB_Control_WithTorqueLimitation .................................................................................. 118
13.3.2.1
13.3.2.2
Schematic LAD representation ..............................................................................................................................118
Input and output interfaces of the FBs ...................................................................................................................119
13.3.3
FB_GainAdapter ............................................................................................................. 120
13.3.3.1
13.3.3.2
Schematic LAD representation ..............................................................................................................................121
Input and output interfaces of the FBs ...................................................................................................................121
13.3.4
FB_DiameterCalculator................................................................................................... 122
Version
Date
Page
V3.0
15.11.04
6
Document
User Documentation
Copyright © Siemens AG 2003 All Rights Reserved
User_Manual_Simotion_Easy_Basics_V3_0.doc
For internal use only
Simotion Easy Basics
reviewed
13.3.4.1
13.3.4.2
Schematic LAD representation ..............................................................................................................................123
Input and output interfaces of the FBs ...................................................................................................................124
13.3.5
FB_TensionTaper ........................................................................................................... 125
13.3.5.1
13.3.5.2
Schematic LAD representation ..............................................................................................................................126
Input and output interfaces of the FBS ..................................................................................................................127
13.3.6
FB_Setpoint_RFG........................................................................................................... 128
13.3.6.1
13.3.6.2
Schematic LAD representation ..............................................................................................................................129
Input and output interfaces of the FBS ..................................................................................................................129
13.3.7
FB_Inertia ....................................................................................................................... 130
13.3.7.1
13.3.7.2
Schematic LAD representation ..............................................................................................................................130
Input and output interfaces of the FBS ..................................................................................................................130
13.3.8
FC_Pre_Control .............................................................................................................. 131
13.3.8.1
13.3.8.2
Schematic LAD representation ..............................................................................................................................131
Input and output interfaces of the FBs ...................................................................................................................131
13.4
Integrating the functions into the project ...................................................................................... 133
13.4.1
13.4.2
13.4.3
13.4.4
13.4.5
13.4.6
13.4.7
13.4.8
13.4.9
Reading-in values and filtering ........................................................................................ 134
Diameter computer FB_DiameterCalculator.................................................................... 135
Torque calculation........................................................................................................... 137
Torque pre-control .......................................................................................................... 138
Commissioning the winding hardness characteristic ....................................................... 140
Ramp-function generator ................................................................................................ 142
Adaptation of the controller gain...................................................................................... 143
Tension controller ........................................................................................................... 144
Converting and the output of values................................................................................ 148
13.5
13.6
13.7
13.8
Communications, Simotion ÅÆ drive with extended Profibus protocol .................................. 149
Drive commissioning ....................................................................................................................... 151
Systematically commissioning the winder.................................................................................... 153
Function elements and their integration........................................................................................ 154
14
Standard application "Simotion Easy Pos" ................................................................ 155
14.1
Hardware and software requirements ............................................................................................ 156
14.1.1
14.1.2
14.1.3
Engineering PC............................................................................................................... 156
Motion controller ............................................................................................................. 156
Drives.............................................................................................................................. 156
14.2
Commissioning ................................................................................................................................. 157
14.2.1
14.2.2
14.2.3
14.2.4
14.2.5
14.2.6
14.2.7
Configuring the axes ....................................................................................................... 157
I/O coupling..................................................................................................................... 159
HMI coupling ................................................................................................................... 160
Structure of the traversing blocks of an automatic program ............................................ 161
Calling the basic positioning function (FB_EPosCmd) .................................................... 162
Changes in EposProg ..................................................................................................... 162
Integration into the SIMOTION task system .................................................................... 164
14.3
14.4
Comparison of the basic positioning function in Simodrive and Masterdrives ....................... 165
Function elements and their integration........................................................................................ 167
15
Temperature controller................................................................................................. 168
15.1
General description of the TO temperature channel .................................................................... 168
15.1.1
15.1.2
15.1.3
15.1.4
15.1.5
15.1.6
Configuration................................................................................................................... 168
Auto tuning...................................................................................................................... 169
Actual value monitoring by defining tolerance bandwidths .............................................. 170
Interface to the TO .......................................................................................................... 171
Activating in the execution system and setting the clock cycles ...................................... 171
Configuring a temperature channel ................................................................................. 174
15.2
15.3
Tips and tricks................................................................................................................................... 174
FB_TempControl function block..................................................................................................... 174
15.3.1
15.3.2
Input and output interface of the FB ................................................................................ 175
Schematic LAD representation........................................................................................ 176
15.4
Function elements and their integration........................................................................................ 176
16
Graphic representation of the position profile of a cam ............................................ 177
16.1
16.2
16.3
16.4
FBGetCamValueForHMI function block ......................................................................................... 177
Calling the FB.................................................................................................................................... 177
HMI configuring in ProTool ............................................................................................................. 178
Input/output interface of the FB ...................................................................................................... 180
Version
Date
Page
V3.0
15.11.04
7
Document
User Documentation
Copyright © Siemens AG 2003 All Rights Reserved
User_Manual_Simotion_Easy_Basics_V3_0.doc
For internal use only
Simotion Easy Basics
reviewed
16.5
16.6
Schematic LAD representation ....................................................................................................... 180
Function elements and their integration........................................................................................ 180
17
Literature ....................................................................................................................... 181
Version
Date
Page
V3.0
15.11.04
8
Document
User Documentation
Copyright © Siemens AG 2003 All Rights Reserved
User_Manual_Simotion_Easy_Basics_V3_0.doc
For internal use only
Simotion Easy Basics
reviewed
1 Introduction
The "Simotion Easy Basics" is intended to provide SIMOTION users with support when configuring
and programming (engineering) production machines.
The library provides standards which can be adapted depending on the specific system and
application.
These standards cover the typical basic functions of a production machine. The functions are mainly
provided in the public domain.
The appropriate interfaces are available for system and application-specific adaptation.
These interfaces are described in detail in the following documentation. Changes and revisions to the
standard functions going beyond this, should only be made in exceptional cases, as such a procedure
is not part of our strategy when it comes to the level of standardization that we are trying to achieve.
The "Simotion Easy Basics" includes, in Version 3.0, the following functions:
-
mode management in compliance with the OMAC model
-
motion library
-
print mark correction with dynamic measuring range adaptation
-
cam generation during the runtime
-
alarm and message handling
system message handling in the TechFault task
Alarms_S technique
bit message technique
-
DP Slave diagnostics
-
Function blocks for system, date and time
Setting the system time via HMI
Synchronizing the system time of the HMI on the controller
Synchronizing several Simotion platforms
-
Handling global units data
-
Function blocks for ASI modules
ASI – Link
ASI – Safety Monitor
-
Clock memory
-
FB to control an Active Line Module
-
Standard "Winder"function
-
Standard "Basic positioning" function
-
FB to handle the technology object, temperature channel
-
FB to visualize the position profile of a cam
These functions will be described in more detail in the following text regarding their application and
handling.
Version
Date
Page
V3.0
15.11.04
9
Document
User Documentation
Copyright © Siemens AG 2003 All Rights Reserved
User_Manual_Simotion_Easy_Basics_V3_0.doc
For internal use only
Simotion Easy Basics
reviewed
2 Mode management
2.1
General
Every machine includes a mode management. This controls the operating modes and states of the
machine. The type and method of implementation differs depending on the programmer or also the
control system. As a result of this, the structure and operation of production lines is a complex
undertaking. The reason for this is that frequently, the individual machines are from various
manufacturers and equipped with different control systems.
The standard application is a template for the operating mode management. The template is based on
a recommendation from the Packaging Machinery Group of OMAC.
2.1.1
OMAC Packaging Workgroup
The Packaging Machinery Working Group of OMAC (Open Modular Architecture Controls) was
initiated by the following large US end users:
•
•
•
•
•
•
•
•
•
•
Procter&Gamble
Nabisco
Hershey Foods
Kraft Foods
Heineken
General Mills
Anheuser Busch
M&M Mars
Ralston Purina
Philip Morris
End users, machinery construction OEMs and control manufacturers discuss about various standards
associated with the automation of production machines. The objective - to restrict a proliferation of
different products and technologies.
The target is to achieve a 50 % improvement in the following points.
•
•
•
•
Delivery time
Commissioning (start-up)
time
Machine dimensions
Machine performance
•
•
•
•
Format change time
Flexibility
Machine modularity
Machine downtimes
The results of the OMAC are described in detail in the Guideline for Packaging Machinery Automation
and in the Machine Modes Definition Document, refer to [1] and [2].
Version
Date
Page
V3.0
15.11.04
10
Document
User Documentation
Copyright © Siemens AG 2003 All Rights Reserved
User_Manual_Simotion_Easy_Basics_V3_0.doc
For internal use only
Simotion Easy Basics
2.1.2
reviewed
Basics of the OMAC State Model
The mode management is based on the following state model (OMAC State Model). The simplified
state model serves as our entry point.
Fig. 1: States and transitions
All of the states, that a production machine can assume and the transitions between these states are
defined here. The states are briefly explained in the following table. The state model will then be
described in detail on the following pages.
Emergency Stop
This is reached when Emergency Stop is pressed. When the power
is switched-on, and a check is made whether EMERGENCY STOP
is present - and in a fault-free state the system goes directly into the
IDLE state.
All of the circuits and systems are in the fail-safe state (fail-safe,
IEC50191). This means that the power supply for sensors and
control is available, the motion systems are in a no-voltage
condition.
All of the control and motion systems have the necessary power,
safety circuits / EMERGENCY OFF are ready. The operator can
select the various modes.
The requirements in the manual mode differ depending on the
machine and application. Some of the usual functions are listed in
the following.
In this mode the machine is in productive operation.
A production cycle is sub-divided into x individual steps that must be
acknowledged.
Idle Mode
Manual
Automatic
Semi Automatic
Comment: This is not supported by the standard application.
Table 1: Explanation of the states
Version
Date
Page
V3.0
15.11.04
11
Document
User Documentation
Copyright © Siemens AG 2003 All Rights Reserved
User_Manual_Simotion_Easy_Basics_V3_0.doc
For internal use only
to ABORTING
from PRODUCING
to ABORTING
STOPPING
to ABORTING
STOPPED
STARTING
Prepare
READY
STANDBY
HELD
Start
All m odules
ready
Hold
Stop
AUTOMATIC
Other Mode
HOLDING
PRODUCING
ABORTED
IDLE
to STOPPING
E-Stop
MANUAL
Other M ode
Pow er On
(Initialise)
E-Stop
MANUAL
Drives
Stand still
E-STOP
from STOPPING
from HELD
ABORTING
E-Stop
from STOPPED
POW ER
AUTOMATIC_
Fig. 2: Extended representation of the state model
Comment: The states with bold outline in the diagram are so-called "quiescent states". In these particular states, the machine is stationary and waits for the
appropriate continue conditions. No motion - of any kind - is initiated.
Simotion Easy Basics
2.1.3
reviewed
Description of the states
State name
STOPPED
Description
The machine is in the AUTOMATIC mode and is stationary. All of the
communications with other systems are functioning (if applicable).
In this state, the machine is prepared for running! This could include such
processes as heating, self-testing or calibrating.
STARTING
Comment: Of course, it goes without saying that the machine can also be set-up in the MANUAL
mode. In this case, in the simplest case, STARTING only includes the change into the next state.
READY
This is a state which indicates that STARTING has been completed.
The machine is now ready for production.
This state can be reached in response to a start command from READY and
the machine goes into the PRODUCING state. However, the machine stays in
this state if the start command is present but there is not material.
STANDBY
Comment: The machine can, for example, be brought into the PRODUCING state using a
“Material OK“ command. I then operates under no-load conditions without any products.
The finer details must then be implemented in the particular application.
PRODUCING
STOPPING
ABORTING
The machine goes from the PRODUCING state into the STANDBY state, if,
e.g. “material runout” state occurs (no material in the machine feed). The
machine is stationary or remains, dependent on the application, in the no-load
mode with the relevant setpoint speed. In both of these cases, no product is
produced.
Once the machine is processing materials, it is considered to be producing.
This state executes the logic that brings the machine to a controlled and safe
stop.
The aborted state can be entered at any time in response to the ABORT
command or on the occurrence of a machine fault. The aborting logic will bring
the machine to a rapid, controlled safe stop. Operation of the Emergency Stop
or “E-Stop” will cause the machine to be tripped by its safety system – it will
also provide a signal to initiate the aborting state.
Comment: The change state is normally initiated in the background (the appropriate digital input
is evaluated). For time-critical responses (e.g. when fast responses are required, the change of
state can, for example, be made in a UserInterrupt task.
ABORTED
This state maintains machine status information relevant to the ABORT
condition. If the ABORTED state is reached, e.g. as a result of a machine fault,
then the transition into the STOPPED state is initiated using a stop command.
If the machine goes into the ABORTED state due to an EMERGENCY STOP,
then the machine is directly switched into the E-STOP state.
When the machine is in the STANDBY or PRODUCING state, the HOLDING
command can be used to start HOLDING logic which brings the machine to a
controlled stop (refer to HELD).
The HELD state would typically be used by the operator to hold the machine’s
operation while material blockages are cleared – or to stop a throughput while
a downstream problem is resolved.
HOLDING
HELD
Version
Date
Page
V3.0
15.11.04
13
Document
User documentation
Copyright © Siemens AG 2003 All Rights Reserved
User_Manual_Simotion_Easy_Basics_V3_0.doc
For internal Use Only
Simotion Easy Basics
reviewed
State name
MANUAL
Description
The machine is in the manual mode. The operator can manually select
various individual functions, e.g.
- HOMING
Searches for the reference position of an axis. This is defined using a BERO
and/or a zero mark. This is normally set when the machine is powered-up
and remains valid as long as the control is operational.
- SYNCHRONIZATION
Various functions of a machine (mechanical, servo or software) are runthrough when the appropriate signal is present.
- JOGGING
Every machine axis is moved with a defined motion with the required
direction – without any target.
IDLE
The control system has been switched-in and has run-through its
initialization routine.
From the IDLE state, MANUAL can be selected – i.e. the typical manual
modes such as jogging, setting-up, homing or AUTOMATIC.
All of the communications with other machines (applicable) is possible.
Version
Date
Page
V3.0
15.11.04
14
Document
User documentation
Copyright © Siemens AG 2003 All Rights Reserved
User_Manual_Simotion_Easy_Basics_V3_0.doc
For internal Use Only
Simotion Easy Basics
2.1.4
reviewed
Operating states and functions of production machine according to OMAC
The open-loop control/operator control of a production machine is now explained using the OMAC
model. This model describes the complete machine and not just individual axes. Not all of the status
and control signals are listed, as these depend on the particular application.
The names of the status and control signals as well as the states, refer to Fig. 2.
After the machine has been powered-up, the control runs-up, runs-through its initialization routine and
the machine goes into the E-STOP state. The control voltages and drive enable signals (permissive
signals) are switched-out in the E-STOP state.
The fault status of the machine is checked. If there is no fault (e.g. EMERGENCY STOP signal), then
this means that the machine is in a fault-free state and it then changes into the IDLE state.
AUTOMATIC or MANUAL can be selected from IDLE.
When AUTOMATIC is selected, the machine goes into the STOPPED state.
The machine starts with the “prepare” command and goes into the READY state via the STARTING
state. In the STARTING state, all of the prerequisites, required for production, are created or checked.
For example:
traversing/moving into the initial state and/or checking whether the initial state has been reached
homing and/or checking whether axes are referenced
These prerequisites can alternatively also be created in the manual mode. In the case, the STARTING
state is run-through.
Production is started with “Start“ and the machine goes into the PRODUCING state. If there are no
products to be processed, the machine remains in the STANDBY state. If required, the machine can
also be brought, without any material, into the PRODUCING state where it then “produces under noload conditions”. The machine is brought into the PRODUCING state using an appropriate signal/logic
(e.g. using a "Product OK" button).
As soon as the button is released, the machine goes into the STANDBY state after the last cycle has
been completed.
It is possible to go into the STOPPED state (with "Stop" through STOPPING).
The machine goes back into the STANDBY state if there is no material in its material feed (material
runout). Depending on the particular machine type, it is stationary or runs under no-load conditions
(e.g. production speed).
Productive operation can be exited using "Stop" (STOPPED through STOPPING).
The machine can be held. This can either be done by the operator by selecting “Hold“ or due to
faults/blockages on the downstream machines. The machine goes into the HOLD state through
HOLDING. This state can, for example, be used in order to remove blockages or in order to hold the
machine until the downstream machine is ready.
To start producing again, “Start“ is selected. In this case, this causes a change to STANDBY or
PRODUCING (the associated logic is automatically dependent on the machine).
The machine goes into the STOPPED state through STOPPING when the “Stop“ command is issued.
This corresponds to a standard, desired machine stop. In this case, “Prepare” can again be selected.
If a changeover is made to AUTOMATIC from MANUAL, then in the starting state, a check is made as
to whether all conditions are available for the machine to change into the AUTOMATIC state. If yes,
(axes manually honed, heating switched-in manually and ready), the machine goes into the ready
state. If not, then it goes back STOPPED.
Version
Date
Page
V3.0
15.11.04
15
Document
User documentation
Copyright © Siemens AG 2003 All Rights Reserved
User_Manual_Simotion_Easy_Basics_V3_0.doc
For internal Use Only
Simotion Easy Basics
reviewed
ABORTING is a non-standard state. This can occur, e.g. as a result of a machine fault that can occur
in every state. The associated logic, programmed by the user, brings the machine into a fast,
controlled safe stop. After the axes have come to a standstill, the machine goes into the ABORTED
state. Here, the user should/can evaluate/save all of the relevant information from a program related
perspective, that caused the abort. The machine goes into the STOPPED state when a “stop”
command is issued.
In the AUTOMATIC mode, an EMERGENCY STOP always result in the machine changing into the
ABORTING state. If a change is made from there into the ABORTED state, then in this state, an
immediate change is made to E-STOP.
The response to an EMERGENCY STOP can be initiated, dependent on the plant or system, in the
background (the appropriate digital input is evaluated), or for time-critical responses (where a fault
response is required), e.g. within an interrupt task.
The different characteristics of various machine faults or EMERGENCY STOP can be appropriately
programmed by users.
In the other modes (MANUAL, IDLE), a response to an EMERGENCY STOP is implemented in these
modes themselves. After the response, an immediate change is made to E-STOP.
The OMAC model can be used both for individual machines as well as for machines in a complete
line. The status signals of the individual machines or a line-up of machines can, where required, be
evaluated using an MES system (Manufacturing Execution System).
Version
Date
Page
V3.0
15.11.04
16
Document
User documentation
Copyright © Siemens AG 2003 All Rights Reserved
User_Manual_Simotion_Easy_Basics_V3_0.doc
For internal Use Only
Simotion Easy Basics
2.1.5
reviewed
Control and status signals of an OMAC machine
The control and status signals of the OMAC machine are used, on one hand, to change between the
individual states, and on the other hand, indicate the state of the machine in a simple and transparent
fashion.
2.1.5.1 Control signals
The following list of control signals has already been referred to the "Simotion Easy Basics". This is
the reason that the names of the states deviate with respect to the OMAC definition (the states within
the automatic mode have the prefix - "Automatic").
Selecting the modes and
states
Signal
g_eNewState
Type
ENUM
Actual state
The mode is selected using the values of the enum:
OM_EStop
OM_Idle
OM_Manual
OM_AutomaticStopped
OM_AutomaticStopping
OM_AutomaticStarting
OM_AutomaticReady
OM_AutomaticStandby
OM_AutomaticProducing
OM_AutomaticHolding
OM_AutomaticHeld
OM_AutomaticAborting
OM_AutomaticAborted
Table 2: List of the values for the state control
Version
Date
Page
V3.0
15.11.04
17
Document
User documentation
Copyright © Siemens AG 2003 All Rights Reserved
User_Manual_Simotion_Easy_Basics_V3_0.doc
For internal Use Only
Simotion Easy Basics
reviewed
2.1.5.2 Status signals
The following list of status signals has already been referred to the "Simotion Easy Basics". This is the
reason that the names of the states deviate with respect to the OMAC definition (the states within the
automatic mode have the prefix - "Automatic").
To display the actual state of the machine, in addition to the value of the enum, there is also a display
showing the global boolean variables for each individual state.
Display, Machine States
Signal
g_eActualState
Type
ENUM
g_boOM_EStop
g_boOM_Idle
g_boOM_Manual
g_boOM_AutomaticStopped
g_boOM_AutomaticStarting
g_boOM_AutomaticReady
g_boOM_AutomaticStandby
g_boOM_AutomaticProducing
g_boOM_AutomaticStopping
g_boOM_AutomaticHolding
g_boOM_AutomaticHeld
g_boOM_AutomaticAborting
g_boOM_AutomaticAborted
BOOL
BOOL
BOOL
BOOL
BOOL
BOOL
BOOL
BOOL
BOOL
BOOL
BOOL
BOOL
BOOL
Actual state
The actual state is displayed using the values of the
enum:
OM_EStop
OM_Idle
OM_Manual
OM_AutomaticStopped
OM_AutomaticStopping
OM_AutomaticStarting
OM_AutomaticReady
OM_AutomaticStandby
OM_AutomaticProducing
OM_AutomaticHolding
OM_AutomaticHeld
OM_AutomaticAborting
OM_AutomaticAborted
OM_EStop
OM_Idle
OM_Manual
OM_AutomaticStopped
OM_AutomaticStarting
OM_AutomaticReady
OM_AutomaticStandby
OM_AutomaticProducing
OM_AutomaticStopping
OM_AutomaticHolding
OM_AutomaticHeld
OM_AutomaticAborting
OM_AutomaticAborted
Table 3: List of the values for the status display
Version
Date
Page
V3.0
15.11.04
18
Document
User documentation
Copyright © Siemens AG 2003 All Rights Reserved
User_Manual_Simotion_Easy_Basics_V3_0.doc
For internal Use Only
Simotion Easy Basics
2.2
reviewed
Implementing and handling the OMAC mode management within the
scope of the "Simotion Easy Basics"
2.2.1
Description of the OMAC - mode manager
The Omac State Coordinator comprises a program that regulates and handles the coordination of the
states and transitions. The state change with respect to time is logged in a diagnostics array with an
associated time stamp. Further, variables are included to display the actual states and operating hours
counter that are defined according to the so-called "OMAC Tag Naming Guidelines" [3].
The structure and the individual elements of the mode manager are described in the following.
2.2.2
Changes with respect to the "old" version of the mode manager
The changes in the mode manager - with respect to the last version 2.0 - are listed in the following
table:
No.
1
2
3
4
5
Actual
New
All functions and programs are
programmed in ST.
Name of the program that contains the
mode manager:
progOmacChangeState.
The individual states are represented by
constants
(e.g.:. OM_E_STOP : INT := 1;).
State changes are executed by calling the
function FCSelectState.
State functions in the form of empty ST
functions are made available that do not
have any return value (data type VOID).
6
8
9
The programs are generated in MCC.
Name of the program that contains the mode
manager:
OmacMain.
All states are represented using a defined
enum variable that contains all of the states as
value (enumStates).
The FCSelectState function has been removed
and has been integrated into the OmacMain
program.
State changes are executed by setting the
global variable g_eNewState.
No empty state functions are provided any
more. This means that the user himself can
select the programming language.
Recommendation: The state functions should
have the return value enumStates.
Operating data in-line with the OMAC definition
have been added.
A time stamp, that displays the instant in time
that a state changed, has been added to the
diagnostics array.
For each individual state, a global boolean
variable has been added. This displays
whether the state is active or not.
FCs or FBs can be started using these
variables (e.g.: PLC Open functions).
Table 4: Comparison of the OMAC versions
Version
Date
Page
V3.0
15.11.04
19
Document
User documentation
Copyright © Siemens AG 2003 All Rights Reserved
User_Manual_Simotion_Easy_Basics_V3_0.doc
For internal Use Only
Simotion Easy Basics
2.2.3
reviewed
Structure of the OMAC – mode manager
The mode manager comprises a total of three units (OmacVar, OmacStUp and OmacMain), that
contain the variable declarations and two programs. One program is used to initialize all of the
relevant variables when the controller runs-up - the second program contains the actual mode
manager and runs cyclically in the BackgroundTask.
As far as the program is concerned, when implementing, a differentiation is not made between the
various modes (manual, automatic, ...) and states (stopped, producing, ...). This is the reason that in
the following text, only the term state is used.
The change between the individual states is realized by setting a global variable.
2.2.3.1
OmacVar unit
The OmacVar unit includes the declaration of all of the type definitions and global variables of the
mode manager.
The EnumStates enum includes all of the states according to the OMAC definition.
To display the actual machine states, there is on one hand, the g_eActualState variable, type
EnumStates - and on the other hand, thirteen boolean variables that are precisely assigned to one
state. If the machine is, for example, in the Manual state, then the g_eActualState variable has the
value OM_Manual and the g_boOM_Manual variable is TRUE.
Further, a diagnostics array is declared (g_asDiagnosticsArray) that logs a history of the state
transitions with an associated time stamp. The DIAG_ARRAY_MAX_ELEMENT constant can be used
to define the size of the diagnostics array.
All of the variables that start with the "PML_" prefix belong to the operating data that are defined
according to the OMAC Tag Naming Guidelines. Some of these variables are declared as retain
variables - in order to ensure that values are retained even after the power supply has been powereddown.
A detailed description of these operating data is provided in Chapter 2.2.5.
2.2.3.2
OmacStUp unit
The program in this unit is used to initialize all of the variables of the mode manager. It is assigned to
the StartUp task and is executed at when the controller transitions from stop to run.
In this program, the output state of the machine is pre-assigned the ESTOP state by setting the
eLocalActState variables. This ensures that after being powered-up, the machine is in a safe, defined
output state. Further, the elements of the diagnostics array g_asDiagnosticsArray are initialized with
the values "OM_NoState" or "DT#0001-01-01-0:0:0.0".
Operating data is also initialized according to OMAC, that is not declared as retain data.
Version
Date
Page
V3.0
15.11.04
20
Document
User documentation
Copyright © Siemens AG 2003 All Rights Reserved
User_Manual_Simotion_Easy_Basics_V3_0.doc
For internal Use Only
Simotion Easy Basics
2.2.3.3
reviewed
OmacMain unit
The kernel of the mode manager is contained here: The OmacMain program.
This program can be roughly sub-divided into two sections.
The first section comprises a case structure - whose branches represent a state of the machine.
Dependent on the value of the eLocalActState, in which the actual state is saved, the appropriate
structure branch is run-through. The boolean variables to display the states are updated in these
branches. Further, here, the user must integrate - as a function of the application – his various
functions, motion tasks etc. for the particular states (refer to Chapter 2.2.3). It is the only position in the
program that the user must process.
The second section, a module (No changes necessary by user), contains functions to check the
validity of a state change, the update of the diagnostics array and process operating data.
The user does not have to make any changes/modifications in the module itself as no applicationdependent changes or modifications are required.
Fig. 3: Excerpt from the OmacMain program
A repeat-until loop (iCountStateChange count variable) is configured around these two program
sections; this ensures, but only for a successful state change, that the last run of the old and the first
run of the new state are processed in the same background cycle.
Note: The repeat-until loop only becomes active for a successful state change and is then run
precisely twice. If, as a result of this loop, a time overflow occurs in the BackgroundTask - and
therefore results in the Simotion controller going into stop - then the state change has not been
correctly programmed. State changes are then continuously executed which means that an endless
loop is formed.
Version
Date
Page
V3.0
15.11.04
21
Document
User documentation
Copyright © Siemens AG 2003 All Rights Reserved
User_Manual_Simotion_Easy_Basics_V3_0.doc
For internal Use Only
Simotion Easy Basics
2.2.4
reviewed
Incorporating state functions motion task, ...
The user must incorporate the various functions (motion control, logic, …) of the individual states into
the case structure of the OmacMain program.
The user has various ways of doing this. Three possibilities will be now described in more detail.
2.2.4.1
Using state functions
The first way of incorporating motion control and logic functions is to use functions that are cyclically
called in the case structure in the relevant branch (refer to the diagram).
Fig. 4: Calling a state function
The procedure is precisely the same as in the original OMAC version. In this case, the difference is
that no state functions are entered in the form of empty ST functions. The advantage is that users are
no longer tied down to a particular programming language (ST). All of the programming languages that
Simotion supports can now be used (ST, MCC, LAD, FBD).
It is also possible to mix programming languages. For instance, the MANUAL state can be
programmed in MCC and the AUTOMATIC_STOPPED state in ST.
If all of the state functions are used, then these should contain, as return value, the data type of the
enum for the machine states (EnumStates).
If a state change is not made within the function, then the actual state should be cyclically assigned to
it as it loses its last value at each call.
If a state change is made, then the function must be assigned the new state.
Example: A state function is used for the AUTOMATIC_READY state that is cyclically called from the
OmacMain program.
If the state is not to be changed, then the function is cyclically assigned the current state Æ
FCAutomaticReady := OM_AutomaticReady.
If the state should change to AUTOMATIC_STANDBY, the function is assigned the new state Æ
FCAutomaticReady := OM_AutomaticStandby.
The actual state change itself is initiated after the state function is called by assigning the return value
to the variable g_eNewState Æ g_eNewState := FCAutomaticReady.
Version
Date
Page
V3.0
15.11.04
22
Document
User documentation
Copyright © Siemens AG 2003 All Rights Reserved
User_Manual_Simotion_Easy_Basics_V3_0.doc
For internal Use Only
Simotion Easy Basics
2.2.4.2
reviewed
Using motion tasks
Another possibility is to use motion tasks. These can also be generated using any programming
language.
The user can generate sequential program runs in the motion tasks.
When incorporating these in the CASE structure it must be ensured that the motion task is also always
cyclically started by the cyclic run of the CASE structure. This can, for example, be interlocked by
using global variables.
Fig. 5: Starting a motion task
When using motion tasks, the state change (assigning the g_eNewState variable) can either be
realized after the motion task has been run or from within the motion task.
Version
Date
Page
V3.0
15.11.04
23
Document
User documentation
Copyright © Siemens AG 2003 All Rights Reserved
User_Manual_Simotion_Easy_Basics_V3_0.doc
For internal Use Only
Simotion Easy Basics
2.2.4.3
reviewed
States without any function
If a project contains states, that do not have any function or it isn't even used, then the specified state
model is not modified.
We recommend that the functions, that represent the states and that are not used, are kept and that
these only contain a variable assignment. This variable assignment then results in an immediate
change into the next state. This means that states that are not used are run once "empty".
Example 1: The STARTING state is not required. In this case, after the start condition has been
fulfilled, this would mean a state change from STOPPED to STARTING. However, in the STARTING
state, there is only the variable assignment g_eNewState := OM_AutomaticReady; this means that an
immediate change to READY is initiated without any associated condition.
This means that states without any function are run once without having any impact on the overall
function of the application.
Fig. 6: Assigning variables in the AUTOMATIC_STARTING state
Example 2: The HOLDING and HELD states are not required. In this case, the states aren't even
called by FCSelectState function in the first place. This means that the state model can remain
unchanged - but it also not fully used.
Version
Date
Page
V3.0
15.11.04
24
Document
User documentation
Copyright © Siemens AG 2003 All Rights Reserved
User_Manual_Simotion_Easy_Basics_V3_0.doc
For internal Use Only
Simotion Easy Basics
2.2.5
reviewed
Operating data in compliance with OMAC
The OMAC mode manager provides operating data defined by the OMAC Tag Naming Guidelines and contains current states as well as operating hour counters.
An overview of the variables and their significance are provided in the following table:
Variable name
PML_Cur_Mode
PML_Mode_Time
PML_Cur_State
PML_State_Time
PML_Cum_Time_Modes
PML_Cum_Time_States
PML_Reset
Data type
BYTE
TIME
BYTE
TIME
Array of TIME
Array of TIME
BOOL
Retain
Significance
No
Actual mode :
No
No
0 = not defined
1 = automatic
2 = semi automatic (not supported)
3 = manual
4 = idle
Operating time of the actual mode
Actual state:
No
Yes
Yes
No
0 = not defined
1 = off (not automatic)
2 = stopped
3 = starting
4 = ready
5 = standby
6 = producing
7 = stopping
8 = aborting
9 = aborted
10 = holding
11 = Held
Operating time of the current state
Total time of the modes
Total time of the states
Reset, all operating data
Table 5: Description of the operating data
Version
Date
Page
V3.0
15.11.04
25
Document
User documentation
Copyright © Siemens AG 2003 All Rights Reserved
User_Manual_Simotion_Easy_Basics_V3_0.doc
For internal Use Only
Simotion Easy Basics
2.2.6
reviewed
Function elements and their integration
Source
Library
---
Program / function
Properties, features / function
OmacVar
Type definition and declaration of all variables for
the OSC (Omac State Coordinator).
Start initialization of the OSC
The program is assigned to the startup task.
The OSC is cyclically processed. The function of the
actual state is cyclically called. When the state
changes, the previous state and the newly selected
state are processed in a call cycle.
The program is assigned the background task.
OmacStUp
OmacMain
Programming language
Know-how protection
ST / MCC
No
Must be adapted
to the application
No
No
Yes
Table 6: Program elements of the Omac - state model
Version
Date
Page
V3.0
15.11.04
26
Document
User documentation
Copyright © Siemens AG 2003 All Rights Reserved
User_Manual_Simotion_Easy_Basics_V3_0.doc
For internal Use Only
Simotion Easy Basics
reviewed
3 Motion library
The "System Function Library" libraries are used as motion libraries.
These libraries are provided on the CD "SIMOTION Scout" in the "Function_Library" folder.
3.1
Function blocks
Presently the PLC open blocks include the following functions (V 3.1.1):
-
MC_Power: You can switch all of the enable signals at the axis (positioning, synchronous and
closed-loop speed controlled axis) using the MC_Power function block.
-
MC_Stop: You can stop an axis (positioning, synchronous and closed-loop speed controlled axis)
using the MC_Stop function block.
-
MC_Home: You can home an axis (positioning and synchronous axis) using the MC_Home
function block. Homing is only possible when using incremental encoders.
-
MC_MoveAbsolute: You can position an axis (positioning and synchronous axis) in absolute
terms (the target position is specified) using the MC_MoveAbsolute function block.
-
MC_MoveRelative: You can move the axis (positioning and synchronous axis) through the
programmed distance from the actual position using the MC_MoveRelative function block.
-
MC_MoveVelocity: You can endlessly move an axis (positioning, synchronous and closed-loop
speed controlled axis) with a specified velocity using the MC_MoveVelocity function block.
-
MC_MoveAdditive: You can move an axis (positioning and synchronous axis) relatively and
additively to the remaining distance through a defined distance using the MC_MoveAdditive
function block.
-
MC_MoveSuperImposed: You can relatively superimpose a new motion on an axis (positioning
and synchronous axis) that is already moving using the MC_MoveSuperImposed function block.
-
MC_VelocityProfile: You can move an axis (positioning, synchronous and closed-loop speed
controlled axis) with a previously defined velocity/time profile (cam) using the MC_VelocityProfile
function block.
-
MC_ReadActualPosition: You can read the actual axis positioning (positioning and synchronous
axis) using the MC_ReadActualPosition function block.
-
MC_ReadStatus: The status of an axis (positioning, synchronous and closed-loop speed
controlled axis) can be read using the MC_ReadStatus function block.
-
MC_ReadParameter: You can read the important axis parameters (data type: LREAD) using the
MC_ReadParameter function block.
-
MC_ReadBoolParameter: You can read important axis parameters (data type: BOOL) from the
configuration data or system variables using the MC_ReadBoolParameter function block.
-
MC_WriteParameter: You can write important axis parameters (data type: LREAL) from the
configuration data or system variables using this function block.
Version
Date
Page
V3.0
15.11.04
27
Document
User documentation
Copyright © Siemens AG 2003 All Rights Reserved
User_Manual_Simotion_Easy_Basics_V3_0.doc
For internal Use Only
Simotion Easy Basics
reviewed
MC_WriteBoolParameter: You can write important axis parameters (data type: BOOL) into
configuration data or system variables using this function block.
-
A precise description of the function blocks listed above is provided in the documentation on the PLC
Open Function Library [4].
Additional function blocks:
-
_FB_Axis_jogPos: Using this function block it is possible to either continuously (closed-loop
position controlled) or incrementally move an axis in the jog mode.
-
_FB_Axis_reset: This function block sets an axis into a defined initial state.
A description of these blocks is provided in document [5].
3.2
Function elements and their integration
Source
--
Programming
language
Know-how protection
Library
L_AxFunc
L_SAxis
Program / function
Properties, features / function
--
--
ST
Yes
Must be adapted to
the application
--
Table 6: Program elements of the motion libraries
Version
Date
Page
V3.0
15.11.04
28
Document
User documentation
Copyright © Siemens AG 2003 All Rights Reserved
User_Manual_Simotion_Easy_Basics_V3_0.doc
For internal Use Only
Simotion Easy Basics
reviewed
4 Print mark correction with dynamic measuring range adaptation
Using the FBPrintmarkCorrection block, it is possible to measure the actual position of an axis using
an external signal (measuring probe). The measured value is compared with a setpoint. If there is a
setpoint – actual value deviation then this difference is corrected using a superimposed corrective axis
motion. The block supports the functionality "axis transports print mark" - this means the correction
value of the higher-level positioning function is reset. This function can be, when required, disabled in
order to use the block for other applications. When making a measurement with a defined validity
range (measuring range) an additional function of this block is to adapt this dependent on the drive
and velocity if the configuration data is not used in Simotion SCOUT that automatically updates the
measuring range (from Scout V3.1.1). A detailed description of this is provided in [13].
4.1
Function description
The function of the dynamic measuring range adaptation, measurement and print mark correction is
described in the following Sections.
A description of the input and output interface of the function block is described in Section 4.2.
4.1.1
Print mark correction
This block operates in several steps. Initially, an actual value is measured. This is compared to a
setpoint. If required, an appropriate setpoint – actual value change is made in the next operating step.
A measuring task is activated using a rising edge at the "boExecute" input. In this case a
measurement is made in the range specified using "rToleranceRangeStart" and
"rToleranceRangeEnd". If both values are set the same, then a measurement is made without
measuring range.
A trigger signal initiates the measurement. The "boEdge" input variable is used to define the trigger
edge. For TRUE, the trigger signal is the rising edge and for FALSE, the falling edge.
When the trigger condition occurs, a measurement is made and the measured value is output through
"rMeasuringValue". The "boNewMeasuringValue" output is simultaneously set.
A deviation is determined from the measured value "rMeasuringValue" and the reference position
"rTargetPosition". This is output using the variable "rMeasuringDifference" (difference = actual value –
setpoint). This value forms the basis for the higher-level motion command.
This deviation can be manipulated using a correction factor - "rCalculationFactor". The difference that
is determined is multiplied by this value.
The value can be inverted by setting the "boCorrectionInverter" input to TRUE (→ multiplied by –1).
This means that the correction direction is inverted.
A higher-level positioning command is started using the finally determined value. This motion
command is parameterized more accurately using the parameters "rCorrectionVelocity",
"rAcceleration" and "rDeceleration".
When selecting the bits "boCorrectCommandPos" (standard assignment=TRUE), the higher-level
position is reset after positioning has been completed.
A TRUE at the "boBusy" output indicates if a measuring task or corrective motion is active or the
higher-level position is reset.
Version
Date
Page
V3.0
15.11.04
29
Document
User documentation
Copyright © Siemens AG 2003 All Rights Reserved
User_Manual_Simotion_Easy_Basics_V3_0.doc
For internal Use Only
Simotion Easy Basics
reviewed
The processing of the function block can be interrupted in every processing step using a rising edge at
the "boStop" input.
If a block error occurs during processing, then the "boError" output variable is set and an error code is
output using "iErrorID".
Note
• When making a measurement without a range window, the input parameters "rToleranceRangeStart" and "rToleranceRangeEnd" are pre-assigned a value of "0".
4.1.2
Dynamic measuring range adaptation
The dynamic measuring range adaptation is necessary as there is a deadtime between the Simotion
platform and the drive at which the measurement is made. This is as a result of the system and must
be compensated in the application up to Simotion SCOUT V3.0 (a precise description of the problem
can be read about in [13]). Since Version 3.1.1, there is a configuration data in the system which
allows the update to be automated.
If Simotion SCOUT is used with a version higher than or equal to 3.1.1., then the compensation using
the configuration data is the preferred way!
4.1.2.1
Automatic measuring range adaptation (from V3.1.1 onwards)
The automatic measuring range updates is made by entering a type of deadtime in the configuration
data MeasuringRange.activationTime. You can find this if the input screen form "configuration" is
opened in the symbol browser of Simotion SCOUT under the appropriate measuring probe. The time
value can be entered in the field "activation time of the activated range at the measuring probe". This
is the time by which the command is brought forward that activates the measured value memory at the
drive.
In order to calculate the time, there is a tool that is provided when Simotion SCOUT is supplied on the
CD "Utilities / Addition free of charge“
(in the folder „..\4_TOOLS\MEASURING_INPUT_CALCULATION\”).
This determines, depending on the system clock cycles and the properties of the measuring probe in
the project the resulting deadtime by which the measuring range must be activated in advance.
If the Config data is used, when calling the FBPrintmarkCorrection, the input parameter eDriveType
may not be changed. It is pre-assigned the value eMeasTot_System. This means that within the block,
the measuring range update - implemented in the application - is not run-through.
Version
Date
Page
V3.0
15.11.04
30
Document
User documentation
Copyright © Siemens AG 2003 All Rights Reserved
User_Manual_Simotion_Easy_Basics_V3_0.doc
For internal Use Only
Simotion Easy Basics
4.1.2.2
reviewed
Measuring range adaptation in the application (to V3.0)
The interdependencies when calculating the deadtime compensation in the application are obtained
from the type of drive connected and the actual velocity of the appropriate axis.
Drives that are presently supported:
- Masterdrive MC
- Simodrive 611U
- analog drives (connected at the onboard interface)
The dynamic adaptation comprises a program (progMeasCorStartup) that is included in the StartUp
task and a calculation. This calculation is implemented in the function block FBPrintmarkCorrection.
Three response times for all of the drives supported in the program are calculated, that depend on the
system clock cycles that have been set. The time level in which the associated measuring probe is
calculated (servo, IPO or IPO2) defines which of the three response times is used when calculating
the measuring range shift (offset).
These times are saved in three global structures:
-
g_sReactTimeMDMC (response times for Masterdrive MC)
g_sReactTime611U (response times for Simodrive 611U)
g_sReactTimeOnbrd (response times for analog drives)
The dynamic adaptation of the measuring range is calculated in the FBPrintmarkCorrection function
block. The value, by which the range is shifted, depends on the velocity of the axis for which the
measurement was made and the appropriate response time.
Formula: Measuring range shift = response time ∗ actual velocity
Comment: Only the initial measuring range value is shifted in order that the measured value memory
in the drive is "activated" in time. It is not permissible to shift the end of the measuring range as there
can be configurations where the measuring range is shifted so far forwards that correct measurements
would be interrupted with an error signal.
Version
Date
Page
V3.0
15.11.04
31
Document
User documentation
Copyright © Siemens AG 2003 All Rights Reserved
User_Manual_Simotion_Easy_Basics_V3_0.doc
For internal Use Only
Simotion Easy Basics
4.2
reviewed
Input and output interface
When calling a block, the parameters, specified in the following table, can be supplied:
Name
P type 1)
Data type
P/O 2)
toMeasuringObject
toCorrectionAxis
eDriveType
IN
IN
IN
MIT
PosAxis
enumMeasTot
Drive
P
P
P
boExecute
boStop
rTargetPosition
boCorrectCommandPo
s
IN
IN
IN
IN
BOOL
BOOL
LREAL
BOOL
P
P
P
O
FALSE
FALSE
FALSE
TRUE
rToleranceRangeStart
IN
LREAL
O
0.0
rToleranceRangeEnd
IN
LREAL
O
0.0
boEdge
IN
BOOL
O
FALSE
rActualSpeed
rCorrectionVelocity
rAcceleration
rDeceleration
rCalculationFactor
boCorrectionInverter
IN
IN
IN
IN
IN
IN
LREAL
LREAL
LREAL
LREAL
LREAL
BOOL
P
O
O
O
O
O
0.0
10.0
1000.0
1000.0
1.0
FALSE
boBusy
boError
iErrorID
boNewMeasuringValue
OUT
OUT
OUT
OUT
BOOL
BOOL
DINT
BOOL
-
-
Initialization
value
eMeasTot_Sy
stem
rMeasuringValue
OUT
LREAL
rMeasuringDifference
OUT
LREAL
1)
Parameter types: IN = input parameters, OUT = output parameters
2)
Parameter types: P = mandatory parameters, O = optional parameters
Significance
Measuring probe object
Axis to be corrected
Drive to which the axis is
connected or use the
config data
Start block
Stop block
Target position
TRUE=functionality “axis
transports print mark" the higher-level
(superimposed) position is
reset
Start of the measuring
window
End of the measuring
window
Measuring edge of the
trigger signal
• FALSE = falling edge
• TRUE = rising edge
Actual axis velocity
Correction velocity
Acceleration
Deceleration
Correction factor
Direction change of the
correction (inversion)
Block active
Block error
Error ID
New measured value
present
Measured value
Measuring difference
Table 7: Input, output parameters of the "FBPrintmarkCorrection" function block
Note:
The user must supply all mandatory parameters (P).
All of the optional parameters (O) are initialized. The initialization values are constants that the user
cannot change. If your particular application requires other values, then you must supply the
parameters when calling. For additional calls, the values from the previously called instances of the
associated function blocks are effective. The initialization of the input variables does not increase the
performance in comparison to supplying parameters when the function block is called.
Version
Date
Page
V3.0
15.11.04
32
Document
User documentation
Copyright © Siemens AG 2003 All Rights Reserved
User_Manual_Simotion_Easy_Basics_V3_0.doc
For internal Use Only
Simotion Easy Basics
reviewed
FBPrintmarkCorrection
M.I.T.
PosAxis
EnumDrive
BOOL
BOOL
BOOL
LREAL
LREAL
LREAL
BOOL
LREAL
LREAL
LREAL
LREAL
LREAL
BOOL
toMeasuringObject
toCorrectionAxis
eDriveType
boExecute
boStop
boCorrectCommandPo
rTargetPosition
rToleranceRangeStart
rToleranceRangeEnd
boEdge
rActualSpeed
rCorrectionVelocity
rAcceleration
rDeceleration
rCalculationFactor
boCorrectionInverter
boBusy
boError
iErrorID
boNewMeasuringValue
rMeasuringValue
rMeasuredDifference
rMeasuredDifference
BOOL
BOOL
DINT
BOOL
LREAL
LREAL
LREAL
Fig. 7: Schematic representation of the input and output interface
Version
Date
Page
V3.0
15.11.04
33
Document
User documentation
Copyright © Siemens AG 2003 All Rights Reserved
User_Manual_Simotion_Easy_Basics_V3_0.doc
For internal Use Only
Simotion Easy Basics
4.3
reviewed
Signal timing diagram
A typical signal timing diagram is shown below. In addition to the input and output signals, the
associated motion sequence is also displayed. Print mark correction without resetting the
superimposed position:
F B P rin tm a rk C o rre c tio n
e s s ta s te r_ 1
to M e a s u rin g O b je c t
Achse_1
to C orre c tio n A x is
e D riv eT yp e
b o E x e c u te
b o S top
rT a rg e tP os itio n
rT o le ra n c e R a n g e S ta rt
rT o le ra n c e R a n g e E n d
b o E d ge
rA c tu alS p e e d
rC o rre c tio n V e loc ity
rA c c e le ra tio n
rD e c e le ratio n
rC a lc ula tio n F a c to r
b o C o rre c tio n In v e rte r
S ta rte n
S to p p e n
2 2 5 .0
2 2 ,5
1 0 0 0 .0
1 0 0 0 .0
1 .0
boB usy
b o E rro r
iE rro rID
b o N e w M e a s u rin g V a lu e
rM e a s u rin g V a lu e
rM e a s u re d D iffere nc e
T rue
F als e
n e u e r M e s s w e rt
M e s s w e rt
A b w e ic h u n g
1
Trigger signal
0
t
Block parameters
1
execute
(starting)
0
t
1
stop
(stopping)
0
t
1
busy
0
t
newMeasuringValue
1
0
t
360
measuringValue
(°)
180
0
t
measuredDifference
(°)
45
0
t
Motion sequence
360
Position s (°)
[modulo axis]
180
0
t
Fig. 8: Signal timing diagram without function "axis transports print mark"
Version
Date
Page
V3.0
15.11.04
34
Document
User documentation
Copyright © Siemens AG 2003 All Rights Reserved
User_Manual_Simotion_Easy_Basics_V3_0.doc
For internal Use Only
Simotion Easy Basics
reviewed
Sequence of the correction and the superimposed position value is reset:
1
Trigger
signal
0
t
Block parameters
1
boCorrectCommandPos
0
t
1
boexecute
(starting)
0
t
1
bostop
(stopping)
0
t
1
bobusy
(busy)
0
t
bonewMeasuringValue
(new measured
value)
1
0
t
360
rmeasuringValue
(measured
value) (°)
180
0
t
rmeasuredDifference
(deviation) (°)
45
0
t
Motion sequence
360
Position s (°)
[modulo axis]
180
0
t
Fig. 9: Signal timing diagram with function "axis transports print mark"
Version
Date
Page
V3.0
15.11.04
35
Document
User documentation
Copyright © Siemens AG 2003 All Rights Reserved
User_Manual_Simotion_Easy_Basics_V3_0.doc
For internal Use Only
Simotion Easy Basics
4.4
reviewed
Error description
If an error occurs while processing the function block, the output parameter "boError" is set to TRUE.
The error is specified in more detail using the "iErrorID" parameter. The significance of the individual
error codes can be taken from the following table.
errorID
0
1
2
3
4
5
6
7
8
9
10
11
12
13
14
15
16
17
18
19
20
21
22
23
24
25
10000
Significance
No error
Illegal command parameter
Illegal range data in the command parameters
Command interrupted
Unknown command
Command cannot be executed due to the actual object state
Command interrupted because the user task was cancelled/aborted
Command rejected because the command interpretation of the addressed
technology object was held
Command was interrupted because the command buffer was occupied
Lack of memory
A connection, to a technological object, required for this operation does not
exist
No object configuration
The resetting error cannot be reset because the way that it was configured
Axis is not referenced
Measuring task not possible at the virtual axis
Unclear 'commandId' [not unique]
Command has not been implemented
Read access rejected
Write access rejected
Command argument not supported
The already interpolated cam cannot be manipulated
The interpolation condition was violated
The programmed jerk is 0
The alarm to be deleted (cleared) is not present
The command is not possible at a virtual axis
A synchronous start of this command is not possible
(greater than or equal to) internal error
Table 8: Overview of the error codes
Version
Date
Page
V3.0
15.11.04
36
Document
User documentation
Copyright © Siemens AG 2003 All Rights Reserved
User_Manual_Simotion_Easy_Basics_V3_0.doc
For internal Use Only
Simotion Easy Basics
4.5
reviewed
Function elements and their integration
Source
MeasCor
library
--
Program / function
Properties, features / function
progMeasCorStartup
Calculates the drive response times.
Assigned to the startup task.
The print marks are measured, the difference
determined and the correction made.
Called in cyclic tasks.
FBPrintmarkCorrection
Programming
language
Know-how protection
ST
No
Must be
adapted to the
application
No
No
Table 9: Program elements of the print mark correction
Version
Date
Page
V3.0
15.11.04
37
Document
User documentation
Copyright © Siemens AG 2003 All Rights Reserved
User_Manual_Simotion_Easy_Basics_V3_0.doc
For internal Use Only
Simotion Easy Basics
reviewed
5 Generating cams using the _FB_AddSegmentToCam
In SIMOTION, cam can be generated in two ways:
•
•
While configuring the system using a cam editor (CamEdit or CamTool [9])
During the runtime using the system functions _addPointToCam, _addPolynomialSegmentToCam
or _addSegmentToCam.
The function block _FB_AddSegmentToCam inserts a segment of a cam (Cam technology object)
during the runtime. Contrary to the _addSegmentToCam system function, the polynomial coefficients
to not have to be specified. The new segment can be adapted to the limitations (e.g. position and
velocity) of the previous and subsequent segment in order to achieve a smooth motion transition.
The cam synchronous operation in SIMOTION is described in 7]; the use of the technology object cam
is explained in [8].
5.1
Description
Cam segments comprise effective ranges and motion transitions. Effective ranges are defined by the
technological sequence in the machine itself. A detailed explanation of the terminology used in the
following is provided in the Directive "VDI 2143 motion laws for cams" [6].
Effective range:
Rest
Constant
velocity
Reversal
Slave
Master
Motion transition
Fig. 15: Effective ranges and motion transitions for cams
The motion transitions between the effective ranges must fulfill certain limitations - e.g. constant
velocity and constant acceleration motion transition. This guarantees smooth drive operation, e.g. with
low jerk. The segments are defined using mathematical functions between the starting and end points,
e.g. polynomials.
Version
Date
Page
V3.0
15.11.04
38
Document
User documentation
Copyright © Siemens AG 2003 All Rights Reserved
User_Manual_Simotion_Easy_Basics_V3_0.doc
For internal Use Only
Simotion Easy Basics
reviewed
Limitations/secondary conditions:
Slave
End point:
Master and slave position
Velocity
Acceleration
yk
yi
xi
Starting point:
Master and slave position
Velocity
Acceleration
xk
Master
Fig. 16: Limitations/secondary conditions of a segment
If the useful ranges change while a machine is operational, e.g. because of a modified product length,
then the motion transitions must also be adapted. Useful ranges and motion transitions can be added
to a cam using the function block _FB_AddSegmentToCam. In so doing, the limitations of the previous
and subsequent segments can be taken into consideration. Contrary to the _addSegmentToCam
system function, it is not necessary to calculate the polynomial coefficients. Three different
mathematical functions can be applied to the segments. These will be known as profile types in the
following:
Profile type ("segmentProfile"
parameter)
PROFILE_LINEAR
PROFILE_POLYNOMIAL_ORDER_3
PROFILE_POLYNOMIAL_ORDER_5
Mathematical
function
Polynomial,
level 1 (straight
line)
Polynomial,
level 3
Polynomial,
level 5
Used to add
Effective range
(no motion and constant speed)
Motion transition
(constant-speed transition)
Motion transition
(constant-speed and constant-acceleration
transition)
Table 10: Using the various profile types
In order to calculate a segment, the position limitations/secondary conditions must be specified for all
profile types - refer to Fig. 13.
Version
Date
Page
V3.0
15.11.04
39
Document
User documentation
Copyright © Siemens AG 2003 All Rights Reserved
User_Manual_Simotion_Easy_Basics_V3_0.doc
For internal Use Only
Simotion Easy Basics
reviewed
Position limitations/secondary conditions:
y
Slave
followingRangeEndP
followingRangeStartP
Master x
leadingRangeStartP
leadingRangeEndP
Fig. 17: Assigning position limitations to block parameters
For segments with polynomial level 3, in addition to the starting and end points, the speeds at the start
and end of the segment must also be specified. The speeds are, e.g. determined from the rates of
change of the bordering segments (i.e. speed in the useful ranges).
For segments with polynomial level 5, in addition, the acceleration rates at the start and end of the
segment must be specified. The bordering segments have a constant speed which is why the
acceleration is zero (Fig. 12).
The speeds and acceleration rates are specified referred to the position of the master axis (not
referred to the time!) - this means y ′ =
dy
dy ′
or y ′′ =
.
dx
dx
y′ =
Speed
limitations
dy
dx
y ′′ =
Acceleration
limitations
dy ′
dx
y
Slave
followingRangeEndDerivation1
(speed)
followingRangeEndDerivation2
(acceleration)
followingRangeStartDerivation1
(speed)
Master
x
followingRangeStartDerivation2
(acceleration)
Fig. 18: Assigning limitations to block parameters
Every profile type requires a specific number of limitations - superfluous limitations are rejected.
Version
Date
Page
V3.0
15.11.04
40
Document
User documentation
Copyright © Siemens AG 2003 All Rights Reserved
User_Manual_Simotion_Easy_Basics_V3_0.doc
For internal Use Only
Simotion Easy Basics
segmentProfile
PROFILE_LINEAR
reviewed
Parameters required
Parameters not taken into
account
-
followingRangeStartDerivation1
followingRangeEndDerivation1
followingRangeStartDerivation2
followingRangeEndDerivation2
PROFILE_POLYNOMIAL_ followingRangeStartDerivation1
ORDER_3
followingRangeEndDerivation1
followingRangeStartDerivation2
followingRangeEndDerivation2
followingRangeStartDerivation1
PROFILE_POLYNOMIAL_ followingRangeEndDerivation1
followingRangeStartDerivation2
ORDER_5
followingRangeEndDerivation2
-
Table 11: Limitations required for the profile types
Up to and including Simotion Version 2.0, when calculating the curves in the standard range,
maximum values could be exceeded. This is the reason that an application-based calculation can be
carried-out.
Minimum and maximum values of the slave position and speed are calculated using the
“enableExtremeValues := TRUE” parameter. Additional runtime is required to calculate extreme
values. For "enableExtremeValues := FALSE", the extreme values, which are shown in Fig. 14, are
not calculated, and their value is set to zero.
Position
maxFollowingVal
minFollowingVal
Speed, slave
maxFollowingDerivati
Master
minFollowingDerivati
Fig. 19: Minimum and maximum of the position and speed
The _FB_AddSegmentToCam function block is started with the TRUE signal level at the "run" input
parameter.
With the value TRUE at the "done" output parameter and the value FALSE at "error" output parameter,
a segment is calculated and the segment is then successfully added to the cam specified at the "cam"
parameter. Different output parameters signal that the function block had not inserted the required
segment into the cam.
The "done" and "error" output parameters must be checked each time before calling the
_FB_AddSegmentToCam function block.
The calculated cam can be read back with a cam editor from SCOUT (CamTool or CamEdit) [10].
Version
Date
Page
V3.0
15.11.04
41
Document
User documentation
Copyright © Siemens AG 2003 All Rights Reserved
User_Manual_Simotion_Easy_Basics_V3_0.doc
For internal Use Only
Simotion Easy Basics
5.2
reviewed
Making calls
The _FB_AddSegmentToCam function block can be called in every task. If the extreme value
calculation function is activated (enableExtremeValues := TRUE), then the runtime increases.
In this particular case, the call should not be made in time-critical tasks, e.g. not in the task in
synchronism with the IPO.
5.3
Parameters
The block requires an instantiated cam object (camType). A description is provided in [9] on how to
set-up a cam in Scout and various cam modes are described in [8]. The cam object must be reset
using the system function _resetCam.
Name
P type
1)
Data type
P/O
2)
P
Initialization value
-
Significance
cam
IN
Cam object
run
IN
BOOL
P
FALSE
Starts the FB with signal level
enableExtremeValues
IN
BOOL
-
FALSE
Activates the calculation of the
extreme values in the value range
segmentProfile
IN
TypeSegme P
nt
Profile
PROFILE_ Selects the curve profile for the
LINEAR
segment
leadingRangeStartPoint
IN
LREAL
P
0.0
Starting point of the segment in
the master range
leadingRangeEndPoint
IN
LREAL
P
1.0
End point of the segment in the
master range
followingRangeStartPoint
IN
LREAL
P
0.0
Starting point of the segment in
the slave range
followingRangeEndPoint
IN
LREAL
P
1.0
End point of the segment in the
slave range
followingRangeStart
Derivation1
IN
LREAL
-
1.0
1 derivation at the starting point
of the segment (speed)
followingRangeEnd
Derivation1
IN
LREAL
-
1.0
1 derivation at the end point of
the segment (speed)
followingRangeStart
Derivation2
IN
LREAL
-
0.0
2 derivation at the starting point
of the segment (acceleration)
followingRangeEnd
Derivation2
IN
LREAL
-
0.0
2 derivation at the end point of
the segment (acceleration)
busy
OUT
BOOL
OUT
BOOL
error
OUT
BOOL
errorID
OUT
WORD
minFollowingValue
OUT
LREAL
maxFollowingValue
OUT
LREAL
minFollowingDerivation1
OUT
LREAL
-
-
Task being run
done
st
st
nd
nd
Task executed (has been run)
Error has occurred
Error type
Minimum position, slave
Maximum position, slave
Minimum speed, slave
maxFollowingDerivation1 OUT
LREAL
Maximum speed, slave
1) Parameter types: IN = output parameters, OUT = output parameters,
IN/OUT = throughput parameters
2) P = mandatory parameters
Table 12: Parameter _FB_AddSegmentToCam
Version
Date
Page
V3.0
15.11.04
42
Document
User documentation
Copyright © Siemens AG 2003 All Rights Reserved
User_Manual_Simotion_Easy_Basics_V3_0.doc
For internal Use Only
Simotion Easy Basics
5.4
reviewed
Timing diagram
Triggered
from the
signal level
run 1
(IN) 0
1st call
2nd call
with error
3rd call
Cycle
Cycle
4th call
busy 1
(OUT) 0
done 1
(OUT) 0
error 1
(OUT) 0
Cycle
Fig. 20: Timing diagram _FB_AddSegmentToCam
5.5
Error messages
When an error occurs in the function block, the “error” output parameter is set to TRUE. The “errorID”
output parameter specifies the error that occurred. The “error” and “errorID” output parameters are
reset at the start of the next function block instance call.
Error No.
(Hex)
Significance
Note
No error
-
69
Invalid TO instance
Check the block parameter supply "cam"(CamType)
70
Invalid TO state
75
The command was interrupted
because of an alarm present at the
technology object.
Invalid leading range
Check the state of the "cam" technology object (CamType) - the
object must be reset using _resetCam
While interpreting the command, an alarm occurred at the
technology object. Acknowledge the alarm.
0
80
>1000
Internal error
Check the supply of the block parameters
"leadingRangeStartPoint" and "leadingRangeEndPoint"
(both must have different values)
16#1011 - 16#1012; //division by zero
16#1021 - 16#1022; //determinant of quadratic equation < zero
16#1031 - 16#1037; //convergence error (max steps reached)
Table 13: Error messages _FB_AddSegmentToCam
Version
Date
Page
V3.0
15.11.04
43
Document
User documentation
Copyright © Siemens AG 2003 All Rights Reserved
User_Manual_Simotion_Easy_Basics_V3_0.doc
For internal Use Only
Simotion Easy Basics
5.6
reviewed
Example
Let us assume the following motion task. The useful ranges 1 and 3 have been specified (fixed), the
motion transition 2 must be adapted to the speeds of the bordering useful range. Further, the
acceleration at the start and end of the motion transition must match the acceleration rates of the
useful ranges.
Slave
220
3
150
2
1
50
0
100
200
300 Master
Fig. 21: Motion task for the cam to be created
A cam (in the example Kurvenscheibe_1 [Cam_1]) must be provided in the Scout project. The libraries
must have been downloaded and the _FB_AddSegmentToCam must have been instanced.
INTERFACE
USEPACKAGE CAM;
USELIB L_Cam; //library including _FB_AddSegmentToCam
VAR_GLOBAL
g_sFbAddSegmentToCam : _FB_AddSegmentToCam; //instantiate FB
END_VAR
END_INTERFACE
To start, the cam must be reset in the program.
_resetCam(cam:=Kurvenscheibe_1);
Then, the segments are added one after the other to the cam.
5.6.1 Segment 1
The useful range is a straight line. This is the reason that the PROFILE_LINEAR profile type must be
used.
g_sFbAddSegmentToCam (cam:=Kurvenscheibe_1
,run := TRUE
,segmentProfile
:= PROFILE_LINEAR
,leadingRangeStartPoint
:= 0
,leadingRangeEndPoint
:= 100
,followingRangeStartPoint := 50
,followingRangeEndPoint
:= 50
);
Version
Date
Page
V3.0
15.11.04
44
Document
User documentation
Copyright © Siemens AG 2003 All Rights Reserved
User_Manual_Simotion_Easy_Basics_V3_0.doc
For internal Use Only
Simotion Easy Basics
reviewed
5.6.2 Segment 2
Speeds and acceleration rates are specified at the start and end of the segment for the motion
transition. For this task, the following profile type must be used PROFILE_POLYNOMIAL_ORDER_5.
The speeds at the beginning and end of segment 2 are calculated from the speeds of the bordering
segments.
• Speed at the start of segment 2 = speed in segment 1 = 0
•
Speed at the end of segment 2 = speed in segment 3 =
220 − 150 70
=
= 0.7
300 − 200 100
The acceleration rates in both segments 1 and 3 are both 0 - therefore the following applies:
• Acceleration at the start of segment 2 = 0
•
Acceleration at the end of segment 2 = 0
g_sFbAddSegmentToCam (cam:=Kurvenscheibe_1
,run := TRUE
,segmentProfile
:= PROFILE_POLYNOMIAL_ORDER_5
,leadingRangeStartPoint
:= 100
,leadingRangeEndPoint
:= 200
,followingRangeStartPoint
:= 50
,followingRangeEndPoint
:= 150
,followingRangeStartDerivation1 := 0
,followingRangeEndDerivation1
:= 0.7
,followingRangeStartDerivation2 := 0
,followingRangeEndDerivation2
:= 0
);
5.6.3 Segment 3
The useful range is a straight line. This is the reason that the PROFILE_LINEAR profile type must be
used.
g_sFbAddSegmentToCam (cam:=Kurvenscheibe_1
,run := TRUE
,segmentProfile
:= PROFILE_LINEAR
,leadingRangeStartPoint
:= 200
,leadingRangeEndPoint
:= 300
,followingRangeStartPoint := 150
,followingRangeEndPoint
:= 220
);
The cam can be used in the program after interpolation.
_interpolateCam(cam:=Kurvenscheibe_1);
The cam created can be read-back (downloaded) into SCOUT using a cam editor (CamEdit or
CamTool).
Version
Date
Page
V3.0
15.11.04
45
Document
User documentation
Copyright © Siemens AG 2003 All Rights Reserved
User_Manual_Simotion_Easy_Basics_V3_0.doc
For internal Use Only
Simotion Easy Basics
5.7
reviewed
Function elements and their integration
Source
--
Programming
language
Know-how protection
Library
L_Cam
Program / function
Properties, features / function
_FB_AddSegmentToCam
Calculates individual curve segments.
The function block is called sequentially.
ST
Yes
Must be
adapted to the
application
No
Table 14: Program elements to create a cam
Version
Date
Page
V3.0
15.11.04
46
Document
User documentation
Copyright © Siemens AG 2003 All Rights Reserved
User_Manual_Simotion_Easy_Basics_V3_0.doc
For internal Use Only
Simotion Easy Basics
reviewed
6 Alarm and message handling
The following techniques are provided in the "Simotion Easy Basics" for alarm and message handling:
handling system-related alarms and messages in the Technological Fault Task
handling configured alarms using _alarmS and _alarmSq
handling messages using the bit signaling technique
-
6.1
System message handling in the Technological Fault Task
The concept to handle alarms and references of the technological objects (TO) in SIMOTION is based
on a central alarm handling. All of the alarms initiated from the TOs cause the Technological Fault
Task to be started.
A fault and / or object-specific message handling of the user application can be started from this task.
A basic program for the fault handling in the Technological Fault Task as well as a function to
acknowledge faults of all of the technological objects is provided as basis to create applications.
This program makes it easier to enter the world of application-specific fault handling.
6.1.1
Sequence when handling an alarm or message that has occurred
If the Technological Fault Task is initiated as a result of an alarm or a reference, then the
progTechFault program from the TechF unit is run. This program runs the following functionality
-
manages a global fault counter.
determines the object type of the technological object that issued the alarm/message.
manages a chronological fault buffer with a buffer size that can be configured.
using a fault number as interface, branches to a fault-specific handling.
Optionally, faults can be directly acknowledged when processing TechfaultTask.
Alarm or
reference
Technological Fault Task
progTechFault
CASE iHelp OF
1: //toDriveAxis
2: //toPosAxis
3: //toCam
.
.
.
END_CASE;
FCResetError
CASE TSI#AlarmNumberOF
30002: ...
50006: ...
.
.
.
END_CASE;
CASE toType OF
1,2,3://_resetAxisError
.
5://_resetCamError
.
.
END_CASE;
Fig. 22: Message handling structure
Version
Date
Page
V3.0
15.11.04
47
Document
User documentation
Copyright © Siemens AG 2003 All Rights Reserved
User_Manual_Simotion_Easy_Basics_V3_0.doc
For internal Use Only
Simotion Easy Basics
6.1.1.1
reviewed
progTechFault program
The progTechFault program should be included in the Technological Fault Task and is run-through
once each time a system error (e.g. 20001) or a system message (e.g. 30002) occurs.
The program contains the following processing steps
Step 1: Message counter
A global counter (g_iTechFaultCounter) is incremented at each call. When required, the user can
evaluate the counter and reset it.
Step 2: Determining the object type
The type of the technological object initiating the error is determined and deposited in variables
iTOType. The variable is a type INT variable and can be further evaluated (e.g. general)
acknowledgement of all of the alarms of a specific object type).
The following assignment applies
Object type
DriveAxis
PosAxis
FollowingAxis
FollowingObjectType
CamType
MeasuringInputType
OutputCamType
ExternalEncoderType
TemperatureControllerType
Value
1
2
3
4
5
6
7
8
9
Note:
The processing of the "TemperatureControllerType" object type is commented-out in the template, as
the program can only be compiled error-free when using the TControl technological package. When
required the comments can be removed.
Step 3: Entry into the chronological error buffer
Every alarm is entered into an alarm buffer together with the alarm number, time and initiating object.
This buffer is structured as an ARRAY (g_asAlarmList). The most recent entry is always in the first
element. The buffer depth can be adapted using the constant (iMAX_NR_OF_ALARM_LIST). The
user can evaluate the buffer.
Step 4: Specific error handling
In the last step, a branch is made using the alarm number in the form of a CASE instruction.
Application-specific error handling routines can be programmed in this area.
2 responses have been programmed as example:
1. Response to individual messages
2. Response to all of the message
To 1)
Depending on the message number TSI#AlarmNumber the existing reference or alarm is cleared at
the TO in a case evaluation. This is realized by calling the function FCResetError.
Version
Date
Page
V3.0
15.11.04
48
Document
User documentation
Copyright © Siemens AG 2003 All Rights Reserved
User_Manual_Simotion_Easy_Basics_V3_0.doc
For internal Use Only
Simotion Easy Basics
reviewed
//Example: select alarm number for selective alarm handling
CASE TSI#AlarmNumber OF
30002 : // command aborted
// Example : Quit all occasions of alarm 30002
iReturnValue := FCResetError(toObject
:= TSI#toInst,
iToType
:= iToType,
iAlarmNumber := TSI#AlarmNumber);
ELSE
;
END_CASE;
Fig. 23: Example for the reset of reference 30002 without response
To 2)
All alarms and references are reset without any response by calling the FCResetError function.
//Example: quitt all technological errors
iReturnValue := FCResetError(toObject
:= TSI#toInst,
iToType
:= iToType,
iAlarmNumber := TSI#iAlarmNumber);
Fig.23: Example for the reset of all alarms/references without response
6.1.1.2
FCResetError function
The FCResetError functions supports the acknowledgement of individual technological alarms of any
TOs from the user program.
When called, the technological object, the alarm number and the type of the technological object are
transferred. This means that the user does not have to select the object-specific _resetTypeError
command.
This function can be used in the program to acknowledge individual faults associated with any object.
6.1.2
Function elements and their integration
Source
TechF
Library
--
Program / function
Properties, features / function
progTechFault
Determines a help variable as a function of the
initiating TO and response to alarms.
The program is assigned to the
TechnologicalFault task.
Resets fault messages that have occurred.
Called from the progTechFault program.
FCResetError
Programming
language
Know-how protection
ST
No
Must be
adapted to the
application
Yes
No
Table 15: Program elements of the alarm handling in the TechFault task
Version
Date
Page
V3.0
15.11.04
49
Document
User documentation
Copyright © Siemens AG 2003 All Rights Reserved
User_Manual_Simotion_Easy_Basics_V3_0.doc
For internal Use Only
Simotion Easy Basics
6.2
reviewed
Alarm_S technique
SIMOTION allows users to configure their own fault/error messages and references. Using the
Alarm_S technique, it is possible to initiate this and to make the appropriate displays on the HMI.
Further, the Alarm_S technique allows the user to classify the faults/errors and references that he
configured into fault/error categories. He can then individually respond to these in his particular
application.
The technique, its sequence and its handling are explained in the following Sections.
6.2.1
Assigning categories and acknowledging faults
After the user has configured the messages in SCOUT, he must assign his alarms and messages to a
category and must define the acknowledgment type which is used to acknowledge these categorized
faults.
This assignment or definition is made by appropriately allocating variables in a structure
(StructAlarms) which is set-up for each individual fault using an array having the type of this structure.
6.2.1.1
Fault categories
There are a total of six different categories available to classify the various alarms:
A, B, C, D, E and NotDef as default.
The category is assigned in the StructAlarms structure in the eCategory element. This element is an
enum with the following values: NotDef, Category_A, Category_B, Category_C, Category_D and
Category_E.
If an alarm having a specific category is initiated in the application, then a so-called global category
signal is set.
Example: If a Category B type fault occurs, then a global category signal is set
(g_sActCatStateAlarmS.boB).
A response can be made to this variable in the application. The programmer is responsible in defining
how the system responds to the individual category signal.
It is also possible to individually respond to single alarms without any prior categorization. In this case
the category must be assigned NotDef. If a fault belonging to this "Category" occurs, then a global
category signal is not set.
The global category signal is acknowledged and reset depending on the selected acknowledgement
type (refer to the next Section).
Version
Date
Page
V3.0
15.11.04
50
Document
User documentation
Copyright © Siemens AG 2003 All Rights Reserved
User_Manual_Simotion_Easy_Basics_V3_0.doc
For internal Use Only
Simotion Easy Basics
6.2.1.2
reviewed
Acknowledgement types of the fault categories
The acknowledgement type is decisive when resetting category signals. There are three different
types available that are assigned in the StructAlarms structure in the eModeAcknowledge element:
ErrorHMI, Error and None.
ErrorHMI:
When selecting ErrorHMI, the fault message is generated using the _alarmSq
system function. This means that the message must be acknowledged on the HMI.
In order to reset the global category signals, on one hand the alarm-initiating fault
must disappear - and on the other hand the message must be acknowledged on
the HMI. In order to detect this, the actual state of the message is read-out using
the _alarmSc system function.
Error:
order to
Just the same as for ErrorHMI, also here, the message is initiated via _alarmSq. In
reset the global category signal, in this case it is sufficient if the alarm-initiating
signal disappears. The message however remains on the HMI until it is acknowledged
by the operator. This ensures that the operator still has time to register that a fault
occurred and has already disappeared again.
None:
When this type is selected, the associated message is generated using the _alarmS
system function. Just as Error, in order to reset the category signal,
it is sufficient to just reset the fault-generating signal. However, in this case, the
display on the HMI disappears automatically if the fault is no longer present - it does
not have to be acknowledged.
6.2.2
Principle of the AlarmS technique
In order that this technique functions correctly, the alarm messages and references must have been
appropriately configured in SCOUT (for a description, refer to [12]).
The Alarm_S technique works as follows:
To start, when the operating state of the controller is changed from stop to run all relevant data is
initialized in the StartUp task.
An alarm or reference can then be initiated using the FCAlarmSRequest function. This function has
two input parameters; on one hand, the fault-initiating signal, and on the hand the fault number. When
the function is called with a positive, fault-initiating signal, the category signal, matching the fault, is
set. Further, the fault number is entered into a FIFO buffer.
Using the function FCAlarmSDisplayAlarm, the progAlarmSBackground program cyclically checks, in
the background task, this FIFO buffer for new entries; it reads these out and initiates the appropriate
fault message on the HMI corresponding to the new fault.
An additional function in the program (FCAlarmSStatesBG) cyclically checks the current state of the
fault-initiating signals and the generated messages on the HMI.
The global project category signals are formed, as a function of the relevant states (fault-generating
signal and message state on the HMI) in the progAlarmSActualState program. This program
(progAlarmSActualState) can be integrated in every cyclic task.
A diagram of the principal mode of operation and the task structure for the Alarm_S technique is
subsequently shown.
Version
Date
Page
V3.0
15.11.04
51
Document
User documentation
Copyright © Siemens AG 2003 All Rights Reserved
User_Manual_Simotion_Easy_Basics_V3_0.doc
For internal Use Only
Simotion Easy Basics
reviewed
Stop
StartUp Task
progAlarmSStartUp
Motion Task X
Background Task
FCAlarmSStartUp
progAlarmSBackground
FCAlarmSRequest
FCAlarmSRequest
A
uf
ufr
Aufruf
.
.
.
Run
FCWriteErrorInFIFO
f
f ru
Au
FCAlarmSRequest
f
fru
Au
Motion Task Y
Aufruf
FCReadErrorOutOfFIFO
FCAlarmSDisplayAlarm
Ipo, Ipo_2 oder Background
FCAlarmSRequest
Au
progAlarmSActualState
FCAlarmSStatesBG
FCAlarmSActCatCycle
fr u
f
Aufruf
FCCallSysFuncGetState
Fig. 25: Principal of operation of the Alarm_S technique
6.2.3
Structure of the Alarm_S technique
For the user, the Alarm_S technique comprises a function that he uses to initiate the messages that
he has configured - and three programs which he must include in the task sequence system:
-
progAlarmSStartUp
progAlarmSBackground
progAlarmSActualState
FCAlarmSRequest
In turn, the programs use additional functions which, for example, are used to enter and retrieve new
fault messages in a FIFO buffer. These include the following:
-
FCAlarmSStartUp
FCAlarmSActCatCycle
FCCallSysFunctGetState
FCAlarmSDisplayAlarm
FCAlarmSStatesBG
FCReadErrorOutOfFIFO
FCWriteErrorInFIFO
In the sources used, the programmer only has to make supplements and adaptations for his
generated alarms. Changes as a function of the application or functional changes should not be made
in the individual programs and functions.
This is the reason that in the documentation, a description will only be provided on how to add
configured alarms and integrate the technique into an application.
Version
Date
Page
V3.0
15.11.04
52
Document
User documentation
Copyright © Siemens AG 2003 All Rights Reserved
User_Manual_Simotion_Easy_Basics_V3_0.doc
For internal Use Only
Simotion Easy Basics
6.2.3.1
reviewed
Function and integrating the FCAlarmSRequest
As part of the AlarmS technique, the FCAlarmSRequest function has two distinct functions. On one
hand, these are used to request that a message is generated, and on the other hand, they are
required to again reset the status of an error.
It has two input variables: boSignal and iErrorNumber.
The function of the error-generating signal is transferred using the boSignal variable and the error
number is transferred using iErrorNumber. The error number is the same as the alarm number that the
configured message in SCOUT has.
If this function is called using a positive signal, the transferred error number is entered into an FIFO
buffer and using an edge detection, an error status is formed. The reason for this is that when the
error is present for a longer period of time, the error number is only written once into the FIFO buffer.
The error status generated is again reset by a call with a negative edge.
The function can be called from every task level. This means that the function can be called both from
cyclic as well as also sequential tasks.
When cyclically called - e.g. from the background task - the function is permanently called. This means
that when the error occurs or disappears, the message is automatically generated or the error state is
again automatically reset.
If the function is called once with a positive signal when executing a motion task, the programmer
must ensure that the error status is again acknowledged at another location in the program by again
calling the function with a negative signal level.
6.2.3.2
Function and integrating the progAlarmSStartUp
The progAlarmSStartUp program is integrated in the startup task and initiates, by calling the function
FCAlarmSStartUp, all of the relevant data of the AlarmS technique.
Further, in this program, the properties of the individual errors are defined (error category and
acknowledge mode).
Example:
6.2.3.3
g_asAlarmS[1].eCategory
:= Category_A;
g_asAlarmS[1].eModeAcknowledge := ErrorHMI;
Function and integrating the progAlarmSBackground
The progAlarmSBackground program is, as the name already suggests, is integrated in the
background task and processes almost all of the cyclic processes that are required for the Alarm_S
technique.
To start, the FCAlarmSDisplayAlarm function is called. This checks the FIFO buffer for new entries
and outputs the appropriate alarm on the HMI system using the error numbers that have been
entered. This is realized when calling the functions FCReadErrorOutOfFIFO and
FCCallSysFunctGetState.
In the program, the FCAlarmSStatesBG function is then called. This permanently scans all of the
states of the error signals as well as all of the states of the messages from the HMI system. This is
implemented using a loop that scans all errors. The number of errors per background cycle, whose
states are to be scanned, is limited by the constant NUMBER_OF_ALARMS_PER_CYCLE. This
ensures that the load on the background task as a result of the loop function isn't too high.
Example: The number of errors whose status is interrogated per cycle, is limited to 10
(→NUMBER_OF_ALARMS_PER_CYCLE := 10;), a total of 100 errors are configured. This means
that it takes a total of 10 background cycles until a complete scan has been made of all of the error
states.
Version
Date
Page
V3.0
15.11.04
53
Document
User documentation
Copyright © Siemens AG 2003 All Rights Reserved
User_Manual_Simotion_Easy_Basics_V3_0.doc
For internal Use Only
Simotion Easy Basics
6.2.3.4
reviewed
Function and integrating the progAlarmSActualCycle
The progAlarmSActualCycle program is responsible for updating the global category signals:
-
g_sActCatStateAlarmS.boA
g_sActCatStateAlarmS.boB
g_sActCatStateAlarmS.boC
g_sActCatStateAlarmS.boD
g_sActCatStateAlarmS.boE
The programmer can globally access these in the application, and evaluate them.
The update is realized by logically combining errors that have just occurred with errors that are still
present and messages on the HMI signal that have still not been acknowledged.
The updated variables, depending on the application, should be available at different speeds. This is
the reason that this program can be integrated in one of the following cyclic tasks:
Background task, IPO task or IPO2 task.
6.2.4
Inserting and parameterizing a new alarm
In order that new alarms and references are successfully incorporated, messages must be configured
in SCOUT (refer to [12] for the appropriate procedure). The following setting should be made: The
"Print-out at the OP" option must be activated!
The following steps must be made in the application:
1) Set-up a constant in the INTERFACE area of the "AlarmS" unit in the variable declaration
VAR_GLOBAL CONSTANT. In this case, the name of the constant must be the symbol name of
the message in Simotion and the value of the constant must match the message number.
Example: The message symbol in Simotion is called "Fehlerxy" and the error number is 2. In this
case the declaration of the constant is given by: FEHLERXY : INT := 2;
This procedure ensures a certain degree of transparency in the message handling system.
2) Adapt the constants NUMBER_OF_ALARMS. This should always be set to the value of the total
number of message configured.
Example: If a total of 50 messages have been configured, then the value of the constants should
be set to 50: NUMBER_OF_ALARMS : INT := 50;
3) Define the alarm attributes in the progAlarmSStartup program in the unit "AlarmS". The attributes
are defined by declaring two enum variables in an array - structure type structError. The array
index is the same as the value of the associated constant of the alarm. The following are defined on one hand, the category to which the alarm should belong, and on the other hand, the mode to
acknowledge the category signal.
Example: An alarm (error number 5) should belong to error category C and in order to reset the
category signal, the actual error in the application should disappear and the associated message
should be acknowledged on the HMI.
g_asAlarmS[5].eCategory
:= Category_C;
g_asAlarmS[5].eModeAcknowledge := ErrorHMI;
Version
Date
Page
V3.0
15.11.04
54
Document
User documentation
Copyright © Siemens AG 2003 All Rights Reserved
User_Manual_Simotion_Easy_Basics_V3_0.doc
For internal Use Only
Simotion Easy Basics
reviewed
4) Extend the case instruction in the function FCCallSysFunctGetState in the "AlarmS" unit. In order
to extend the case instruction, the following block must be inserted or copied for each alarm. The
number in the case instruction corresponds to the error number (the instruction block for error
number 2 is shown in Fig. 21). The appropriate symbol name of the message, the same as the
name of the appropriate constants, must be entered in the system function calls _alarmSq,
_alarmS and _alarmSc (in this case: error 2). This is necessary as Simotion can only output
messages using the symbol names.
Fig. 26: Program section in the case instruction
5) After new messages have been set-up in Simotion, the ProTool configuring must again be
downloaded into the HMI. Otherwise the new messages would not be displayed on the HMI
system.
Once the described steps have been completed, then messages can be generated by calling the
FCAlarmSRequest function.
Version
Date
Page
V3.0
15.11.04
55
Document
User documentation
Copyright © Siemens AG 2003 All Rights Reserved
User_Manual_Simotion_Easy_Basics_V3_0.doc
For internal Use Only
Simotion Easy Basics
6.2.5
reviewed
Examples in the "AlarmS" unit
There are a total of three alarms as example in the "AlarmS" unit. The following messages must be
configured in Simotion in order that these alarms function:
Symbol
Message
number
Error1
Error2
Error3
1
2
3
Message text
Fault
Print-out
Opermessage (on the
ating
OP)
message
Error 1 has occurred
Error 2 has occurred
Error 3 has occurred
No
No
No
Yes
Yes
Yes
Yes
Yes
Yes
Table 16: Messages to be configured in Simotion
Once these have been configured, messages can be initiated with the following properties/features:
Error 1: Error 1 is assigned Category A. The acknowledge mode for the category signal is defined as
ErrorHMI.
Error 2: Error 2 is assigned Category B. The acknowledge mode for the category signal is defined as
Error.
Error 3: Error 3 is assigned Category C. The acknowledge mode for the category signal is defined as
None.
The alarms / messages are initiated using the three device global variables fehler1, fehler2,and
fehler3 [error1, error2 and error3]. These represent the error-generating signals. If they are set to the
value TRUE, then the three messages are displayed and the global category signals are set.
The FCAlarmSRequest functions to generate the messages are cyclically called in the
progAlarmsBackground program.
The following conditions must be fulfilled in order that the category signals
(g_sActCatStateAlarmS.boA, g_sActCatStateAlarmS.boB, g_sActCatStateAlarmS.boC) are again
reset:
g_sActCatStateAlarmS.boA: The error, which set this category signal, has been defined with the
acknowledge type ErrorHMI. This means that the actual error itself must disappear and the message
must be acknowledged on the HMI. If the error-generating variable fehler1 [error 1] is again set to
FALSE and the message acknowledged, then the category signal is again reset.
g_sActCatStateAlarmS.boB: Error 2, which set this signal has been defined with the acknowledge type
error. In order that the category signal is reset, in this case it is sufficient if the error disappears in the
application (→ fehler2 [error2] = FALSE). However, the message on the HMI remains until it is
acknowledged by the operator. This means that the operator certainly knows that this error had
occurred.
g_sActCatStateAlarmS.boC: The message-initiating error 3 is assigned None. Contrary to the two
other errors, this means that the system function _alarms is used and not _alarmSq. This also means
that the generated message does not have to be acknowledged. If the error is no longer present in the
application, the category signal is again reset and the message on the HMI automatically disappears.
Version
Date
Page
V3.0
15.11.04
56
Document
User documentation
Copyright © Siemens AG 2003 All Rights Reserved
User_Manual_Simotion_Easy_Basics_V3_0.doc
For internal Use Only
Simotion Easy Basics
6.2.6
reviewed
Function elements and their integration
Source
AlarmS
Library
--
Program / function
Properties, features / function
progAlarmSStartup
Initializes all data.
Integrated in the StartUp task.
Checks the states of the errors and messages.
Integrated in the background task.
Forms the global category signals.
Integrated in the IPO, IPO_2 or background task.
Initiates a request for an error message.
The call can be made both cyclically as well as
also from sequential tasks.
progAlarmSBackground
progAlarmSActualState
FCAlarmSRequest
Programming
language
Know-how protection
ST
No
Must be
adapted to the
application
Yes
No
No
No
Table 17: Program elements of the AlarmS technique
Version
Date
Page
V3.0
15.11.04
57
Document
User documentation
Copyright © Siemens AG 2003 All Rights Reserved
User_Manual_Simotion_Easy_Basics_V3_0.doc
For internal Use Only
Simotion Easy Basics
6.3
reviewed
Bit signaling technique
The bit signaling technique allows the user to initiate messages independently of the connected HMI.
In this case, individual bits are set in a WORD array. The connected HMI can access these individual
bits. Messages can either be acknowledged from the HMI or through the application.
Further, the bit signaling technique, just like the AlarmS technique, allows errors to be classified into
various categories. The user can then respond to these in the application.
The technique itself, its handling and sequence are explained in the following sections.
Comment:
6.3.1
The technique described here is 100% supported in this form from HMI systems
configured using ProTool/Pro. If another HMI system is used, then under certain
circumstances, it maybe necessary to adapt the standard application.
For several HMI devices, the memory is too small to use the bit signaling
technique (e.g.: OP170, TP170, Mobile170).
Allocating categories and acknowledging errors
After the messages have been configured in the HMI, the user must assign his messages to a
category and must define how the appropriately set global category signals are acknowledged.
This assignment or definition is realized by appropriately assigning variables in a structure
(StructBitError) that is set-up for individual error using an array having the type of this structure.
6.3.1.1
Error categories
There are a total of six different categories to classify the various alarms:
A, B, C, D, E and NotDef as default setting.
The categories are allocated in the StructBitError structure in the eCategory element. This element is
an enum with the following values: NotDef, Category_A, Category_B, Category_C, Category_D and
Category_E.
If an alarm having a specific category is initiated in the application, then a so-called global category
signal is set.
Example: If an error, Category C occurs, then a global category signal is set
(g_sActCatStateBitError.boC).
In the application, a response can be made to this variable. The programmer defines how the system
should respond to the individual categories.
Further, it is still possible to individually respond to single alarms without allocating categories. To do
this, the category must be assigned NotDef. A global category signal is not set if an error of this
"Category" actually occurs.
The acknowledgement or the reset of the global category signal depends on the selected
acknowledgement type (refer to the next Section).
Version
Date
Page
V3.0
15.11.04
58
Document
User documentation
Copyright © Siemens AG 2003 All Rights Reserved
User_Manual_Simotion_Easy_Basics_V3_0.doc
For internal Use Only
Simotion Easy Basics
6.3.1.2
reviewed
Acknowledgement types of the various error categories
The acknowledgement type is decisive when it comes to resetting global category signals. Two
different types are available. These are assigned in the StructBitError structure in the
eModeAcknowledge element: ErrorHMI and None.
ErrorHMI:
None:
6.3.1.3
When ErrorHMI is selected, the error message is generated by setting the appropriate
error bit and the global category signal is set. In order to reset the global category
signal, the error that initiated the alarm must disappear and the message on the HMI
must be acknowledged. In order to detect this, the appropriate bit in the acknowledge
area of the HMI and the bit in the acknowledge area of the PLC are interrogated.
When this type is selected, although the associated error bit is set, the message is
automatically and simultaneously acknowledged from the PLC acknowledge area.
This means that on the HMI there is only note that there is an error present.
The actual message can only be viewed in the fault message buffer. If the error in
the application disappears, then the reference is also withdrawn. The same effect
as for an _alarmS command can be achieved in this way.
Acknowledging error messages via the PLC or HMI
The error messages can either be acknowledged from the HMI or from the program and the PLC.
There are two acknowledge areas that are represented by WORD arrays:
-
acknowledge area of the PLC: Second halves of the error array g_abSetBitError.
acknowledge area of the HMI: g_abAckBitError.
If an error message is acknowledged via the HMI, the message on the HMI is deleted (cleared) and
the bit in the array g_abAckBitError, corresponding to the error, is set to the value TRUE.
By setting the appropriate bits in the second halves of the error array g_abSetBitError, the message
on the HMI can be acknowledged from the application itself.
Example: An error array with 4 words is specified. This means that the first 2 words are available for
errors (32 errors) and the last two words can be used to acknowledge the associated error messages
from the application itself. The acknowledge area of the HMI corresponds to the size of the error
messages (2 words).
Error number 4 has occurred! This means that in the array g_abSetBitError, in word 1, bit number 3 is
set.
In order to acknowledge the error message using the PLC, in the array g_abSetBitError, bit number 3
must be set in word number 3.
If the message is acknowledged using the HMI, in array g_abAckBitError, bit number 3 in word 1 is
set.
Comment:
The programmer himself must implement the function to acknowledge errors from the
PLC in his application.
Version
Date
Page
V3.0
15.11.04
59
Document
User documentation
Copyright © Siemens AG 2003 All Rights Reserved
User_Manual_Simotion_Easy_Basics_V3_0.doc
For internal Use Only
Simotion Easy Basics
6.3.2
reviewed
Principle of operation of the bit signaling technique
In order that the bit signaling technique functions correctly, the appropriate fault messages must be
configured in the HMI and the appropriate area (range) pointers must be linked into the HMI (refer to
Section 6.3.4).
The bit signaling technique works as follows:
To start, when the operating state of the controller changes from stop to run, all of the relevant data is
initialized in the StartUp task.
A message can be initiated using the FCBitErrrorRequest function. This function has two input
parameters - on one hand the error-initiating signal, and on the other the error number. When the
function is called using a positive, error-initiating signal, the global category signal, matching the error,
is set. Further, the error number is entered into a FIFO buffer.
Using the function FCBitErrorDisplayAlarm, the progBitErrorBackground program cyclically checks, in
the background task, this FIFO buffer for new entries; it reads these out and sets, for the new error,
the appropriate bit in the error array. The individual bits are assigned as a function of the error number
using an algorithm in the FCBitErrorSelectBit function. This is realized automatically. The message is
output on the HMI using the bit that is set.
An additional function in the (FCBitErrorStatesBG) program cyclically checks the actual state of the
error-initiating signals and the acknowledge status of the messages generated on the HMI.
The global project category signals are formed in the progBitErrorActualState program as a function of
the relevant states (error-generating signal and message state on the HMI). The
progBitErrorActualState can be incorporated in every cyclic task depending on the application.
Below, a graphic representation of the principle of operation and the task structure for the Alarm_S
technique.
Stop
StartUp Task
progBitErrorStartUp
Motion Task X
Background Task
FCBitErrorStartUp
progBitErrorBackground
FCBitErrorRequest
f
f ru
Au
FCBitErrorRequest
Aufruf
.
.
.
Run
FCWriteErrorInFIFO
Au
f
fr u
FCBitErrorSRequest
f
fru
Au
Aufruf
Motion Task Y
FCReadErrorOutOfFIFO
FCBitErrorDisplayAlarm
Ipo, Ipo_2 oder Background
FCBitErrorRequest
Au
fru
f
progBitErrorActualState
FCBitErrorStatesBG
FCBitErrorActCatCycle
FCBitErrorSetBitError
Fig. 27: Function principle of the bit signaling technique
Version
Date
Page
V3.0
15.11.04
60
Document
User documentation
Copyright © Siemens AG 2003 All Rights Reserved
User_Manual_Simotion_Easy_Basics_V3_0.doc
For internal Use Only
Simotion Easy Basics
6.3.3
reviewed
Structure of the bit signaling technique
For the user, the bit signaling technique comprises a function which is used to initiate the configured
messages, and three programs that it must integrate into the task sequence system:
-
progBitErrorStartUp
progBitErrorBackground
progBitErrorActualState
FCBitErrorRequest
In turn, the programs use additional functions which are used, for example, to enter and withdraw new
error messages in an FIFO buffer. These are:
-
FCBitErrorStartUp
FCBitErrorSelectBit
FCBitErrorActCatCycle
FCBitErrorSetBit
FCBitErrorDisplayAlarm
FCBitErrorStatesBG
FCReadErrorOutOfFIFO
FCWriteErrorInFIFO
The programmer does not have to make any changes in the sources being used - neither applicationdependent nor functional.
This is the reason that in this documentation, a description is only provided on configuring the size of
the error and acknowledge range array and integrating the technique into an application.
6.3.3.1
Function and integrating the FCBitErrorRequest
Within the scope of the bit signaling technique, the FCBitErrorRequest function has two distinct
functions. On one hand, this generates a request to display a message, and on the other hand it is
required to again reset the status of an error.
It has two input variables: boSignal and iErrorNumber.
Using the boSignal variable, the function of the signal generating the error is transferred and using
iErrorNumber, the error number. The error number is the same as the message number which the
configured message has in the HMI.
If this function is called using a positive signal level, the transferred error number is entered into an
FIFO buffer and using an edge detection function, an error status is formed. This means that when the
error is present for a longer period of time, the error number is only written once into the FIFO buffer.
The error status is again reset by calling the function with a negative edge.
The function can be called from every task level. This means that the function can be called, both
cyclically as well as also from a sequential task.
When cyclically called, e.g. from the background task, the function is permanently called. This means
that when the error occurs or disappears, the message is automatically generated and the error state
is again reset.
If the function is called once with a positive signal when running-through a motion task, the
programmer must ensure that, at another position in the program, the function is again called with a
negative signal and the fault status is again reset.
Version
Date
Page
V3.0
15.11.04
61
Document
User documentation
Copyright © Siemens AG 2003 All Rights Reserved
User_Manual_Simotion_Easy_Basics_V3_0.doc
For internal Use Only
Simotion Easy Basics
6.3.3.2
reviewed
Function and integrating the progBitErrorStartUp
The progBitErrorStartUp program is integrated in the StartUp task and initializes all of the relevant
data of the bit signaling technique by calling the function FCBitErrorStartUp.
Further, the properties of the individual errors are defined in this program (error category and
acknowledge mode).
Example:
6.3.3.3
g_asBitError [ 1].eCategory
:= Category_A;
g_asBitError [ 1].eModeAcknowledge := ErrorHMI;
Function and integrating progBitErrorBackground
The progBitErrorBackground program is integrated in the background task and processes all of the
cyclic processes that are necessary for the bit signaling technique.
Firstly, the FCBitErrorDisplayAlarm function is called. This checks the FIFO buffer for new entries and
arranges that the appropriate alarms are displayed on the HMI using the error numbers that have
been entered. This is realized by calling the functions FCReadErrorOutOfFIFO and FCBitErrorSetBit.
Then, the FCBitErrorStatesBG function is called in the program. This permanently scans all states of
the error signals as well as all acknowledge states of the messages in the HMI system. This is
implemented using a loop that scans all of the errors. The number of errors per background cycle
whose states are scanned, is limited by the constant NUMBER_OF_BIT_ERRORS_PER_CYCLE.
This ensures that the loop doesn't excessively load the background task.
Example: The numbers of errors per cycle whose status is interrogated is limited to 16
(→NUMBER_OF_BIT_ERRORS_PER_CYCLE:= 16;). This means that the error is checked wordwise
each cycle. If an error array of 5 words is set-up, it will take a total of 5 background cycles until all of
the errors have been completely scanned.
6.3.3.4
Function and integrating progBitErrorActualCycle
The progBitErrorActualCycle program is responsible for updating the project-global variables of the
category signals:
-
g_ sActCatStateBitError.boA
g_ sActCatStateBitError.boB
g_ sActCatStateBitError.boC
g_ sActCatStateBitError.boD
g_ sActCatStateBitError.boE
The programmer can globally access these in the application and evaluate them.
The update is made by linking errors that have just occurred with the still existing errors as well as
messages on the HMI that have still not been acknowledged.
As the updated variables are available at different speeds depending on the application, this program
can be incorporated in one of the following cyclic tasks:
Background task, IPO task or IPO2 task.
Version
Date
Page
V3.0
15.11.04
62
Document
User documentation
Copyright © Siemens AG 2003 All Rights Reserved
User_Manual_Simotion_Easy_Basics_V3_0.doc
For internal Use Only
Simotion Easy Basics
6.3.4
reviewed
Configuring the messages and connecting the area pointer
The following information regarding configuring the messages and linking the area pointer refer to the
ProTool/Pro system.
6.3.4.1
Configuring messages
The messages are configured as follows in ProTool/Pro:
The window to set-up Messages is opened by double clicking on the Alarm Messages symbol.
Fig. 28: Screenshot 1 from ProTool/Pro
The message texts can now be configured in the table that opens. The consecutive numbers at the
lefthand edge of the table correspond to the error number that is used to call the function to initiate the
message (FCBitErrorRequest) in the application.
Fig. 29: Screenshot 2 from ProTool/Pro
Version
Date
Page
V3.0
15.11.04
63
Document
User documentation
Copyright © Siemens AG 2003 All Rights Reserved
User_Manual_Simotion_Easy_Basics_V3_0.doc
For internal Use Only
Simotion Easy Basics
6.3.4.2
reviewed
Linking the area pointer for the error messages
The area pointer is linked by double clicking on the Area Pointer symbol. A window opens in which an
area pointer can be selected.
In this case, the Alarm Messages area pointer.
Fig. 30: Selecting the area pointer for error messages
After acknowledging with OK, the appropriate WORD array from Simotion must be assigned
(g_abSetBitError) and the length of the acknowledge area from the PLC defined. This value
(Acknowledgem. length) is always set to the halves of the word array. When acknowledging with OK,
this window is closed and the area pointer is linked.
Fig. 31: Assigning the appropriate arrays
Version
Date
Page
V3.0
15.11.04
64
Document
User documentation
Copyright © Siemens AG 2003 All Rights Reserved
User_Manual_Simotion_Easy_Basics_V3_0.doc
For internal Use Only
Simotion Easy Basics
6.3.4.3
reviewed
Linking the area pointer for the acknowledge area of the HMI
The area pointer is linked by double clicking on the Area Pointer symbol. A window opens in which an
area pointer can be selected.
In this case, the AlarmAck.OP area pointer is selected.
Fig. 32: Selecting the area pointer for the acknowledge area of the HMI
After acknowledging with OK, the appropriate WORD array from Simotion must be assigned
(g_abAckBitError). When acknowledging with OK, this window is closed and the area pointer is linked
Fig. 33: Assigning the appropriate array
Version
Date
Page
V3.0
15.11.04
65
Document
User documentation
Copyright © Siemens AG 2003 All Rights Reserved
User_Manual_Simotion_Easy_Basics_V3_0.doc
For internal Use Only
Simotion Easy Basics
6.3.5
reviewed
Inserting and parameterizing new error messages
The following changes must be made in the application in order to set-up new error messages:
1) Specify the number of errors. The number of errors can only be specified down to a single word
resolution (word-granular). This means that the number of errors is always a multiple of 16. This is
necessary as the area pointer can only access WORD arrays. The constant in which the value is
entered is called NUMBER_OF_WORDS.
Example: 35 errors are to be configured. In order to realize this, it would be necessary to set-up a
3-word error array. All of the necessary arrays are automatically assigned the correct size by
setting the NUMBER_OF_WORDS constant to the value 3. The g_abSetBitError array is set-up
with a size of 6 words. As has already been described, the first halves are used to display the
error and the second halves to acknowledge messages via the PLC.
The g_abAckBitError array is set-up with 3 words for the acknowledge feedback signal from the
HMI.
2) Define the alarm attributes in the progBitErrorStartup program in the "BitError" unit. The attributes
are defined using the declaration of two enum variables in an array with the StructBitError
structure type. The array index is the same as the error message number. On one hand, the
category to which the error should belong, is defined and on the other hand, the mode to
acknowledge the category signal.
Example: An error (error number 5) should belong to error category C. In order to reset the
category signal, the actual error in the application should disappear and the associated message
should be acknowledged on the HMI.
g_asBitError [ 5].eCategory
:= Category_C;
g_asBitError [ 5].eModeAcknowledge := ErrorHMI;
3) Updating the links of the area pointer in the HMI and downloading the configured software again.
After these changes have been made, the messages can be initiated by calling the appropriate
functions FCBitErrorRequest.
Version
Date
Page
V3.0
15.11.04
66
Document
User documentation
Copyright © Siemens AG 2003 All Rights Reserved
User_Manual_Simotion_Easy_Basics_V3_0.doc
For internal Use Only
Simotion Easy Basics
6.3.6
reviewed
Function elements and their integration
Source
BitError
Library
--
Program / function
Properties, features / function
progBitErrorStartup
Initializes all data.
Integrated in the StartUp task.
Checks the error and message states.
Integrated in the background task.
Forms the global category signal.
Integrated in the IPO, IPO_2 or background task.
Initiates a request for an error message.
The call can be cyclic or also can be made from
sequential tasks.
progBitErrorBackground
progBitErrorActualState
FCBitErrorRequest
Programming
language
Know-how protection
ST
No
Must be
adapted to the
application
Yes
No
No
No
Table 18: Program elements of the bit signaling technique
Version
Date
Page
V3.0
15.11.04
67
Document
User documentation
Copyright © Siemens AG 2003 All Rights Reserved
User_Manual_Simotion_Easy_Basics_V3_0.doc
For internal Use Only
Simotion Easy Basics
reviewed
7 DP slave diagnostics
Information about the various bus nodes is provided from the DP slave diagnostic function.
Diagnostics is carried-out from the application. It is then possible to individually respond to the
information.
In this case, the bus nodes are addressed using the diagnostics function and with the help of the
diagnostics address. These are determined from the Profibus address.
The DP slave diagnostics essentially comprises two components:
1. All of the DP slaves are "scanned" when the controller starts-up so that when the application
starts, information is already available about the configured/connected DP slaves.
2. DP slave errors that have occurred in the running program - and therefore initiate the
PeripheralFaultTask - are interrogated and evaluated.
Both components essentially use the FCDPSlaveDiag function. This function and both types of
diagnostics are described in more detail in the following text.
7.1
General information on DP slave diagnostics
The prerequisites and the significance of the DP slave diagnostics data according to EN 50170 are
explained in this Section.
7.1.1
Data management
Information from the DP slave diagnostics is saved in an array - type structRetValues. The number of
array elements corresponds to the number of slaves - whereby the index counts, for example, from
0..2 for 3 slaves. In this case, the following constant must be assigned the number of slaves:
-
NUMBER_OF_SLAVES
The structRetValues structure is as follows:
Element1: sDPSlaveInfo
The structure, type "structDPStationAddressType" comprises a "DPSegmentID" and
"dpSlaveAddress". In this case, "DPSegmentID" describes the Profibus line ("DP_2" or "DP_1")
and the Profibus address is entered into "dpSlaveAddress".
Element2: boDP_Slave_Defined
This type Bool variable specifies as to whether the addressed slave is configured in HW Config or not.
Element3: boDP_Slave_Ready
This variable provides information as to whether the slave is physically connected to Profibus and
is ready.
Element4: boDP_Slave_SFError
Here, it is displayed as to whether there is a group error for the diagnosed slave.
Element5: i32Diagnostic_Adress
Diagnostics address determined at startup
Element6: dtTimeOut
When a slave runs up a timer is started – this run-up operation is interrupted if a particular slave
has not signaled that it is ready within a specific time (timeout)
Element7: iFunctionResult
Corresponds to the return value of the system function _ReadDiagnosticData.
-
Version
Date
Page
V3.0
15.11.04
68
Document
User documentation
Copyright © Siemens AG 2003 All Rights Reserved
User_Manual_Simotion_Easy_Basics_V3_0.doc
For internal Use Only
Simotion Easy Basics
-
-
reviewed
Element8: uDataLength
This value specifies the number of bytes that the DP slave sent. The value depends on the DP
slave.
Element9: aDiagnostivBytes
This element is a byte array with six elements. Here, the first six of the maximum 240 bytes are
saved that a DP slave can supply. Only the first six bytes are evaluated as these are identical for
each DP slave (standardized in compliance with EN 50170).
The following variables must be initialized - for each slave - in the startup program
"progDPSlaveDiagStartUp":
−
−
−
SDPSlaveInfo[n].DPSegmentID
SDPSlaveInfo[n].dpSlaveAddress
SDPSlaveInfo[n].dtTimeOut
: Profibus line (DP_1, DP_2)
: Profibus address
: Time for abort at run-up
Example: Two slaves to be monitored: Slave 0 with address 32 at the “DP2/MPI” interface, slave 1
with address 11 at the “DP1” interface.
−
−
−
−
−
-
g_asDPSlaveInfo[0].sDPSlaveInfo.DPSegmentID := DP_2;
g_asDPSlaveInfo[0].sDPSlaveInfo.dpSlaveAddress := 32;
g_asDPSlaveInfo[0].dtTimeOut:= t#10s;
g_asDPSlaveInfo[1].sDPSlaveInfo.DPSegmentID := DP_1;
g_asDPSlaveInfo[1].sDPSlaveInfo.dpSlaveAddress := 11;
g_asDPSlaveInfo[1].dtTimeOut:= t#12s;
Version
Date
Page
V3.0
15.11.04
69
Document
User documentation
Copyright © Siemens AG 2003 All Rights Reserved
User_Manual_Simotion_Easy_Basics_V3_0.doc
For internal Use Only
Simotion Easy Basics
7.1.2
reviewed
Description of the DP slave information according to EN50170
The significance of the first six bytes of the DP slave diagnostics data is explained in the following as
these are identical for all DP slaves in compliance with EN50170:
Byte
Bit
Designation according to the Standard Cause / counter-measure
/ significance
1
0
Diag.Station_Not_Existent
1: The DP slave cannot be addressed
from the DP Master
1
Diag.Station_Not_Ready
2
1: The DP slave is still not ready
for data transfer.
Diag.Cfg_Fault
3
1: The configuring data sent to the DP slave
from the DP master do not match the
structure of the DP slave.
Diag.Ext_Diag
- has the correct PROFIBUS address
been set at the DP slave?
- has the bus connector
been connected?
- voltage at the DP slave?
- has the RS 485 repeater been
correctly set?
- has a reset been made at the DP
slave?
- wait as the DP slave is presently
running-up.
- has the correct station type or
correct DP slave structure been
entered into the configuring software?
4
Diag.Not_Supported
- evaluate the ID-related, the
module status and/or the
channel-related diagnostics.
As soon as all of the errors have
been removed, bit 3 is reset.
The bit is newly set if a new
diagnostics message is in the
bytes of the above mentioned
diagnostics.
- check the configuration.
5
1: The DP slave does not support the
requested function (e.g.
changing the PROFIBUS address via
the software).
Diag.Invalid_Slave_Response
- check the bus configuration/structure.
6
1: The DP master cannot interpret the
response of the DP slave.
Diag.Prm_Fault
7
1: The DP slave type does not match the
configured software.
Diag.Master_Lock
1: Is external diagnostics available.
(group diagnostics display)
1: The DP slave has been parameterized
from another DP master (not from
the DP master that presently has
access to the DP slave).
Version
Date
Page
V3.0
15.11.04
70
- has the correct station type been
entered in the configuring software?
- the bit is always 1 if, for example, you
are presently accessing the DP slave
from the PG or another DP master.
The PROFIBUS address of the DP
master, that parameterized the DP
slave, is in the "Master PROFIBUS
address" diagnostics byte.
Document
User documentation
Copyright © Siemens AG 2003 All Rights Reserved
User_Manual_Simotion_Easy_Basics_V3_0.doc
For internal Use Only
Simotion Easy Basics
reviewed
Byte
Bit
Designation according to the Standard / significance
2
0
Diag.Prm_Req
1: The DP slave must be re-parameterized.
Diag.Stat_Diag
1: A diagnostics message is present. The DP slave does not function
until the fault/error has been resolved (steady-state diagnostics message).
No designation
1: The bit in the DP slave is always at “1”.
Diag.WD_On
1: The response monitoring has been activated for this DP slave.
Diag.Sync_Mode
1: The DP slave has received the control command "FREEZE"1.
Diag.Freeze_Mode
1: The DP slave has received the control command”SYNC”1.
Reserved
0: The bit is always at “0”.
Diag.Deactivated
1: The DP slave has been de-activated, i.e. it has been withdrawn from current
processing.
Reserved
0: Bits are always at “0”.
Diag.Ext_Diag_Overflow
1: - There are more diagnostic messages present than the DP slave
can save.
- The DP master cannot send all of the diagnostic messages sent
from the DP slave in its diagnostics buffer (channel-related
diagnostics).
1
2
3
4
5
6
7
3
0-6
7
Table 19: Description of the first 3 bytes (station status)
Byte 4:
Master PROFIBUS address:
Definition: The PROFIBUS address of the DP master, that had parameterized the DP slave and that
has access - reading and writing - to the DP slave, is saved in the diagnostics byte, master Profibus
address.
Bytes 5 and 6:
Manufacturer's ID (the module/board can be precisely identified using this data).
Version
Date
Page
V3.0
15.11.04
71
Document
User documentation
Copyright © Siemens AG 2003 All Rights Reserved
User_Manual_Simotion_Easy_Basics_V3_0.doc
For internal Use Only
Simotion Easy Basics
7.2
reviewed
FCDPSlaveDiag function
The FCDPSlaveDiag function executes a system function (_ReadDiagnosticData) that after
completion provides information about the type and the state of the DP slaves. The system function
"_getLogDiagnosticAddressFromDpStationAddress" is executed to determine the diagnostics address
from the DP address.
The information for the DP slave is written into the array g_asDPSlaveInfo from type structRetValues
(for a description of the structure, refer to Section 7.1.2 Data management).
When the function is called, only one input parameter has to be supplied (iSlavenumber). The index of
the DP slave, whose actual state is to be read-out, is transferred in this input parameter.
This function can only be used in sequential tasks as the progress condition in the system function
ReadDiagnosticData is assigned with WHEN_COMMAND_DONE.
7.3
progDPSlaveDiagStartUp program
The progDPSlaveDiagStartUp program is incorporated in the start-up task. A loop runs in this
program. The number of times that the loop is run-through is specified by the NUMBER_OF_SLAVES
constant.
At each run-through, the FCDPSlaveDiag function is called with another input parameter. All of the DP
slaves configured in the array are scanned.
In so doing, the program takes into account the following situation: If a DP slave is presently runningup, then the diagnostics waits up until the timeout value, which can be individually entered for each
slave, or until the slave is ready. The scan is only continued after this has been completed.
The advantage of this scan at start-up is the fact that when starting the actual program, the system
has status information about the individual DP slaves.
For example, if a modular machine is involved, whose maximum expansion stage has been configured
in HW Config, and not all of the configured slaves are present, then after the start-up task, information
is available as to which slaves are physically present and those which are not.
7.4
progDPSlaveDiagPeriFault program
The progDPSlaveDiagPeriFault program is incorporated in the PeripheralFault task. This is run if one
of the connected DP slaves indicates an incorrect state.
In this case, all of the information that the PeripheralFaultTask supplies is saved in a diagnostics array
(g_asPeriFaultInfo). The most current information is saved in the first element of the array and all
additional information is pushed forwards. The size of this array can be set using the constant
progDPSlaveDiagPeriFault.
Further, the FCDPSlaveDiag function is called and the diagnostics data in it is entered into the global
array g_asDPSlaveInfo. In this case, a search is made in the appropriate diagnostics address for the
array.
Version
Date
Page
V3.0
15.11.04
72
Document
User documentation
Copyright © Siemens AG 2003 All Rights Reserved
User_Manual_Simotion_Easy_Basics_V3_0.doc
For internal Use Only
Simotion Easy Basics
reviewed
The following TaskStartInformation (TSI) is supplied from the PeripheralFaultTask and is written into
the g_asDPSlaveInfo array:
•
TSI#StartTime (DT): Instant that the task starts
•
•
•
•
•
•
•
•
•
•
•
•
TSI#logBaseAdrIn (DINT): Logical basis address if a process or diagnostics alarm was
triggered by an input area on the module, otherwise _SC_INVALID_ADDRESS ( = –1)
•
TSI#logBaseAdrOut (DINT): Logical basis address if a process or diagnostics alarm was
triggered by an output area on the module, otherwise _SC_INVALID_ADDRESS ( = –1)
•
•
TSI#InterruptID (UDINT) : Initiating event:
_SC_PROCESS_INTERRUPT ( = 200)
Process alarm occurred in the peripheral (I/O) module
_SC_DIAGNOSTIC_INTERRUPT ( = 201)
Diagnostics alarm occurred in the peripheral (I/O) module
_SC_STATION_DISCONNECTED ( = 202)
A DP slave station has failed
_SC_STATION_RECONNECTED ( = 203)
A DP slave station has returned
_SC_IMAGE_UPDATE_FAILED ( = 204)
Error when transferring the process image to the DP slave (in conjunction with
the station failure)
_SC_PC_INTERNAL_FAILURE ( = 205)
Only for P350: System error of the PC
_SC_DP_CLOCK_DETECTED ( = 207)
Clock cycle signal received for the first time and valid PRM telegram received
_SC_DP_SYNCHRONIZATION_LOST ( = 208)
Multiple cycle failure or PLL unlatched (in the internal state
DP_INTERFACES_SYNCHRONIZED). PLL switches into the uncontrolled mode
_SC_DP_SLAVE_SYNCHRONIZED ( = 209)
PLL in the controlled mode latched
_SC_DP_SLAVE_NOT_SYNCHRONIZED ( = 210)
Multiple cycle failure or PLL unlatched (in the internal state DP_SLAVE_SYNCHRONIZED).
PLL remains in the controlled mode
TSI#logDiagAdr (DINT): Diagnostics address of a DP slave if the alarm
was caused by:
• as a result of the failure of the associated DP slave station
(_SC_STATION_DISCONNECTED)
• the associated DP slave station returns (_SC_STATION_RECONNECTED)
• due to an error when transferring the process image (_SC_IMAGE_UPDATE_FAILED)
otherwise _SC_INVALID_ADDRESS ( = –1)
TSI#details (DWORD) detailed information (bit fields) contain diagnostics data (bytes 0 to 3) of
the module. The diagnostics data structure can be taken from the Manual on the module.
This type of error handling in the PeripheralFault task has the following advantages: You always have
information about the current states of the DP slaves using the information in the g_asDPSlaveInfo
array - and this information can be included in the application. It is also possible to immediately
respond to the error by running the PeripheralFault task.
Version
Date
Page
V3.0
15.11.04
73
Document
User documentation
Copyright © Siemens AG 2003 All Rights Reserved
User_Manual_Simotion_Easy_Basics_V3_0.doc
For internal Use Only
Simotion Easy Basics
7.5
reviewed
Function elements and their integration
Source
DP_Diag
Library
--
Program / function
Feature / function
FCDPSlaveDiag
Executes the DP slave diagnostics.
Called by the programs progDPSlaveDiagStartUp
and progDPSlaveDiagPeriFault.
"Scan" over all DP slaves.
Integrated in the StartUp task.
The global structure is updated when a DP slave
fault/error occurs.
Integrated in the PeripheralFault task.
progDPSlaveDiagStartUp
progDPSlaveDiagPeriFault
Programming
language
Know-how protection
ST
No
Must be
adapted to the
application
No
Yes
No
Table 20: Program elements of the DP slave diagnostics
Version
Date
Page
V3.0
15.11.04
74
Document
User documentation
Copyright © Siemens AG 2003 All Rights Reserved
User_Manual_Simotion_Easy_Basics_V3_0.doc
For internal Use Only
Simotion Easy Basics
reviewed
8 Function blocks for date and time
The FBs for the following functions are described in the next Chapters:
-
setting the system time and the system date from Simotion platforms via HMI
-
synchronizing the time and the date of a connected HMI to a Simotion platform
-
synchronizing the real time clock of several Simotion platforms with one another
Comment:
8.1
The HMI devices to which reference is made in this Chapter, are HMI devices that
are configured with ProTool/Pro (e.g. TP170, MP270, ...).
Setting the system time and the data of the controller
The system time and the date of a Simotion platform can be set using an HMI with the function block
FBSetSystemDateTime . This means that it is no longer necessary to use a computer with Simotion
Scout.
8.1.1
Mode of operation
The function block FBSetSystemDateTime converts a time and a date entry into a value for the real
time clock of a Simotion platform and sets this then to the new value.
The FB has two input parameters for this purpose - on one hand dDateFromHMI, with a DATE data
type and on the other hand tTimeFromHMI, TIME data type. These input parameters are supplied
from two global user variables via a connected HMI.
The FB then sets the two input values together to form a value using the system function
CONCAT_DATE_TOD. The real time clock is set to this value using the RTC system function.
8.1.2
Integrating into the application
A description is now provided as to which measures are required in order to successfully use the
function block.
To start, the user must set-up two global variables in Simotion SCOUT. One is a DATE type and the
other a TIME type. These are then connected to the appropriate inputs of the FB
FBSetSystemDateTime.
The FB can either be called sequentially or also in a cyclic task. The functionality of the FB is not very
extensive and no wait conditions are included.
In the ProTool/Pro configuration, two individual input fields must be set-up in a screen form. The two
global variables are written into this screen form.
Version
Date
Page
V3.0
15.11.04
75
Document
User documentation
Copyright © Siemens AG 2003 All Rights Reserved
User_Manual_Simotion_Easy_Basics_V3_0.doc
For internal Use Only
Simotion Easy Basics
reviewed
Comment: Both values from the HMI are combined to form a value for the real time clock using the
System function CONCAT_DATE_TOD. This is the reason that it must be observed that
if only one value is changed on the HMI (either date or time), then the currently correct
value is in the other input field. Otherwise, this would be set to an incorrect value.
8.1.3
Function elements and their integration
Source
DateTime
Programming
language
Know-how protection
Library
L_SEB
Program / function
Feature / function
FBSetSystemDateTime
Setting the real time clock of a Simotion
platform.
Recommendation: Call from a sequential task.
ST
No
Must be
adapted to the
application
No
Table 21: Program elements to set the system time
Version
Date
Page
V3.0
15.11.04
76
Document
User documentation
Copyright © Siemens AG 2003 All Rights Reserved
User_Manual_Simotion_Easy_Basics_V3_0.doc
For internal Use Only
Simotion Easy Basics
8.2
reviewed
Synchronizing the date and time of the HMI on the controller
The FB FBSyncHMIToSimotion allows users to automatically synchronize the HMI system time and
date to the Simotion platform.
8.2.1
Mode of operation
The system time and the date of a Simotion platform is transferred to the HMI using a so-called "task
slot" of ProTool/Pro. This provides a method of executing various tasks. The time and the date are
transferred consecutively (one after the other) as simultaneous transfer is not possible.
The data on the Simotion side still have to be specially conditioned in order to be able to correctly use
the "task slot".
A precise description of the task slot and the assignment is provided in [14].
When the FB is called, initially, the actual value of the real time clock (RTC) is read-out. The data to be
transferred to the HMI is conditioned as follows from this value:
1. The time is determined from the value of the RTC by converting the data type.
2. Individual values for hours, minutes and seconds are calculated from the time value.
3. These individual values are then conditioned binary-coded using bit-string functions
and written into the task slot.
4. Finally, the appropriate task number is entered and the time is transferred to the HMI
(task number = 14).
Once this task has been executed, the date is conditioned and transferred:
1. The data is determined from the value of the RTC by converting the data type.
2. An INT value is formed from the DATE type using the marshalling function. This defines
the number of days from the starting date (01.01.92) of the controller.
3. The date (year, month and day) is determined, taking into account leap years, from the
two values - starting date and the number of days.
4. These individual values are conditioned binary-coded again using bit - string functions and
written into the task slot.
The task number is again entered and the date is transferred (task number = 15).
Note: The FB runtime depends on the parameterized cycle time for communications between the HMI
and Simotion. This is defined when the HMI is configured/engineered. If the FB is used in a cyclic task
(BackgroundTask), then the runtime of this task can be increased by the communications time.
For instance, if this time is 500ms, then under worst case conditions, the runtime of the
BackgroundTask is increased by these 500ms. This is because the system waits in a WHILE loop until
the HMI empties the task compartment.
This is the reason that the communications time should be kept as short as possible. If this is not
possible due to the high data quantities that are exchanged between the HMI and Simotion, then the
FB should be used in a sequential task.
Version
Date
Page
V3.0
15.11.04
77
Document
User documentation
Copyright © Siemens AG 2003 All Rights Reserved
User_Manual_Simotion_Easy_Basics_V3_0.doc
For internal Use Only
Simotion Easy Basics
8.2.2
reviewed
Integration into the application
The following steps must be carried-out on Simotion and ProTool/Pro in order to be able to use the FB
FBSyncHMIToSimotion :
-
In Simotion: A global array, type WORD must be set-up with a size of 4 elements.
This represents the "task slot".
Example:
-
HMIJobBox : ARRAY[1..4] OF WORD;
In ProTool/Pro: The area pointer "task slot" must be linked with this global array in
ProTool/Pro.
Fig. 34: Screen form to insert the task slot into ProTool/Pro
Once these steps have been executed, the system time and the date of the HMI can be
synchronized/calibrated on the Simotion device.
The block can either be called cyclically or also in a sequential task.
8.2.3
Function elements and their integration
Source
DateTime
Programming
language
Know-how protection
Library
L_SEB
Program / function
Feature / function
FBSyncHMIToSimotion
The system time and date of an HMI is
synchronized to a Simotion platform.
The call can either be done sequentially or in
the form of a cyclic task.
ST
No
Must be
adapted to the
application
No
Table 22: Program elements to synchronize the system time of the HMI
Version
Date
Page
V3.0
15.11.04
78
Document
User documentation
Copyright © Siemens AG 2003 All Rights Reserved
User_Manual_Simotion_Easy_Basics_V3_0.doc
For internal Use Only
Simotion Easy Basics
8.3
reviewed
Synchronizing the real time clock between several controllers
If several Simotion controllers are coupled with one another via Profibus, then it makes sense to
ensure that the system times and the data are permanently synchronized with one another.
This can be implemented using the two function blocks FBSyncSimotionMaster and
FBSyncSimotionSlave.
8.3.1
Mode of operation
The controllers are synchronized with one another using the two FBs FBSyncSimotionMaster and
FBSyncSimotionSlave. One of these FBs is used on the master and the other on the slave controller.
8.3.1.1
FBSyncSimotionMaster
The function block FBSyncSimotionMaster is used on the master controller and ensures that the
actual value cyclically determines its real time clock (RTC), and is provided for transfer to the slave via
Profibus.
To do this, the value is read-out of the RTC and then is converted into an 8-byte byte array using the
marshalling function. The user must then locate the byte array in an address area, previously defined
in HW Config, in the communications interface of the two controllers.
8.3.1.2
FBSyncSimotionSlave
The FBSyncSimotionSlave function block runs on the slave controller. It reads a byte array from the
I/O area and converts this back into an RTC value using marshalling.
The FB then determines the RTC value of the slave.
The individual values of time and date are extracted from the two RTC values (master and slave
value) by converting the data type.
The times are again sub-divided into values for hours, minutes and seconds.
The following values are then compared with one another:
1. The seconds of the RTCs.
2. The total number of days (therefore indirectly, the date).
The RTCs cannot be 100% synchronized with one another (this is due to the deadtime on Profibus).
This means that a permissible tolerance can be entered using a constant
(DIFF_OF_SEC_TO_SYNC).
The pre-set (default) value is 1 second.
If the difference is greater than the specified tolerance, the RTC of the slave is set to a new value.
The RTC is also newly set if the date differs.
Version
Date
Page
V3.0
15.11.04
79
Document
User documentation
Copyright © Siemens AG 2003 All Rights Reserved
User_Manual_Simotion_Easy_Basics_V3_0.doc
For internal Use Only
Simotion Easy Basics
8.3.2
reviewed
Integrating into the application
Before the two function blocks can be used, initially, a data area in the communications interface
between the two controllers must be set-up in the hardware configuration.
Fig. 35: Setting-up the data area and assigning the addresses
If the area is correctly set-up, this is displayed under the properties tab of the slave controller.
Fig. 36: Properties tab of the DP slave
Version
Date
Page
V3.0
15.11.04
80
Document
User documentation
Copyright © Siemens AG 2003 All Rights Reserved
User_Manual_Simotion_Easy_Basics_V3_0.doc
For internal Use Only
Simotion Easy Basics
reviewed
In the next step, an I/O variable with a size of 8 bytes must be set-up on the two controllers. On the
master controller, this must be declared as output and on the slave as input.
Fig. 37: I/O declaration on the master side
Fig. 38 I/O declaration on the slave side
After the preparations have been made, the two function blocks can be implemented in the project.
Both must be used in a cyclic task.
The FB FBSyncSimotionMaster is, as the name already suggests, used on the master controller. The
output abSystemDateTime of the FB must now only be copied to the declared output (Fig. 32). This
means that the value of the RTC is cyclically transferred via Profibus.
The FB FBSyncSimotionSlave is used on the slave controller. It is called using the declared input (Fig.
33) at the input parameter abSystemDateTime.
This means that a cyclic check is carried-out with the necessary RTC adaptation.
Finally, the permissible tolerance value for the time difference can be adapted in constant
DIFF_OF_SEC_TO_SYNC. This represents a value in seconds by which the two RTCs can deviate as
a maximum.
8.3.3
Function elements and integration
Source
DateTime
Library
L_SEB
Program / function
Feature / function
FBSyncSimotionMaster
Determines the value of the real time clock and
provides this for transfer via Profibus.
It must be called from a cyclic task.
Reads the value of the master and compares with
that of its own real time clock. If the difference is
excessively large, an adaptation is made.
This must be called from a cyclic task.
FBSyncSimotionSlave
Programming
language
Know-how protection
ST
No
Must be
adapted to the
application
No
No
Table 23: Program elements for synchronizing the RTC
Version
Date
Page
V3.0
15.11.04
81
Document
User documentation
Copyright © Siemens AG 2003 All Rights Reserved
User_Manual_Simotion_Easy_Basics_V3_0.doc
For internal Use Only
Simotion Easy Basics
reviewed
9 Handling global unit data
Simotion allows users to save, download, delete etc. data sets that they have individually created.
A data set comprises global variables of a UNIT defined in the INTERFACE area.
Comment: Variables, that are declared with VAR_GLOBAL RETAIN, are not saved.
The following activities are available for the data:
-
Saving a data set (system function _saveUnitDataSet). In this case, the user can decide whether
the data set should be temporarily saved (RAM disk) or permanently saved (for C230-2 on the
MMC). Further, there is an option whether an existing data set may be overwritten or not.
-
Loading a data set (system function _loadUnitDataSet). This function downloads the values of
the saved unit variables into the interface section of an ST source.
-
Deleting an individual data set (system function _deleteUnitDataSet). This function deletes an
individual data set with the saved values of the unit variables.
-
Checking a data set (system function _checkExistingUnitDataSet). This function checks
whether the specified data set - with saved values of the unit variables - exists on the memory
medium.
-
Deleting all data sets of a unit (system function _deleteAllUnitDataSets). This function deletes
all data sets with the saved values of the unit variables of the interface section of an ST source.
A more detailed description of the system functions and how data from the user program is saved are
provided in [15].
Version
Date
Page
V3.0
15.11.04
82
Document
User documentation
Copyright © Siemens AG 2003 All Rights Reserved
User_Manual_Simotion_Easy_Basics_V3_0.doc
For internal Use Only
Simotion Easy Basics
9.1
reviewed
Description of the FBHandleUnitData
The function block FBHandleUnitData includes all of the possibilities that Simotion provides for
handling global unit data.
The parameterization of the input interface defines which action is executed with a particular data set.
9.1.1
Mode of operation
The FB mainly comprises a CASE instruction that in its selection contains the system function for data
handling from the user program. Depending on the parameterization of the input variables iActivity, a
data set is saved, downloaded, etc.
The corresponding values for the individual actions should be taken from the Table in Chapter 9.1.2.
The data set to be handled is transferred in the input variable uDataSetNr.
If a data set is to be saved, additional settings can be made using the input variables eStorageType
and boOverwriteDataSet.
eStorageType is used to define where the data set should be saved. The pre-assignment (default) of
these variables is PERMANENT_STORAGE. This means that the data set is retentively saved and is
even kept after a power failure. As an alternative, the variable can be assigned
TEMPORARY_STORAGE. The data set is then saved in the RAM disk and is lost after a power
failure.
boOverwriteDataSet is used to select as to whether a saved data set may be overwritten. If the value
is TRUE, then the data set can be overwritten; if the value is FALSE, the existing data set cannot be
overwritten.
The FB is programmed for use in a cyclic task (recommendation: Background task).
It can take several task cycles to process the FBs (this is, among other things, dependent on the size
of the data set). In order to be able to limit the processing time, a timer has been integrated that
interrupts the current action after this time expires. The time is transferred using the input variable
tTimeOut.
In order to be able to detect the status of the current processing, an additional system function is used:
_getStateOfUnitDataSetCommand. In each task cycle, it provides the current status of a function for
data save.
Before the FB can be used in the application, it must still be manually adapted. Simotion SCOUT
doesn't have any variables of the STRING type, but the system functions to handle unit data has an
input variable of the STRING type. This is the reason that the appropriate value must be directly
entered. This involves the name of the unit whose data is to be processed. This must be inserted in
the FB in the case instruction in every system function (5 times).
Unit name
CASE iActivity OF
//Save unit data set
1: sRetUnitDataSet := _saveUnitDataSet(unitName := 'DataSave',
id
:= uDataSetNr,
storageType := eStorageType,
//path
:= ,
overwrite
:= boOverwriteDataSet,
nextCommand := IMMEDIATELY);
uHandlingNr := sRetUnitDataSet.handle; //Get number of actual handling
boError := FALSE;
//Reset error
Fig.39: Example for the position of the unit name in the FB
Version
Date
Page
V3.0
15.11.04
83
Document
User documentation
Copyright © Siemens AG 2003 All Rights Reserved
User_Manual_Simotion_Easy_Basics_V3_0.doc
For internal Use Only
Simotion Easy Basics
reviewed
The FBs start using a positive edge at the input boExecute.
The current status of the FBs can be read-out at the outputs:
The current processing status of the block can be viewed at the boBusy output.
boDone indicates if an action has been completed - either with or without error.
boError indicates if an error has occurred. This can be specified in more detail using the two last
output parameters iErrorID and eErrorType.
IErrorID can have the values 1, 2 and 3:
-
1 means that an error has occurred for one of the system functions. This can then be read-out in
the eErrorType parameter.
2 means that a time out has occurred. This means that the time, set in input parameter tTimeOut
was exceeded while processing.
3 means that the iActivity input parameter was assigned an invalid value.
9.1.2
Input and output interface of the FBs
When calling the FB, the parameters, specified in the following table, can be supplied:
Name
P
type1)
Data type
P/O
2)
Initialization
value
boExecute
iActivity
IN
IN
BOOL
INT
P
P
FALSE
1
Significance
Unit data handling starts
Activity:
1: Data set is saved
2: Data set is downloaded
3: Individual data set
deleted
4: Data set is checked
5: All data sets selected
uDataSetNr
IN
UDINT
P
1
Number of the data set to
be processed
eStorageType
IN
enumDeviceStorag O
PermanentSt Type of data set storage
eType
orage
(temporary or permanent)
boOverwriteData IN
BOOL
O
TRUE
A data set may be
Set
overwritten
tTimeOut
IN
TIME
O
200ms
Time out if the data set
handling takes too long
boBusy
OUT
BOOL
FALSE
Data set being handled
boDone
OUT
BOOL
FALSE
Data set handling
completed
boError
OUT
BOOL
FALSE
Error has occurred
iErrorID
OUT
INT
0
Error number
eErrorType
OUT
EnumDeviceUnitD Error specification (system
ataSetCommand
input)
1)
Parameter types: IN = Input parameters, OUT = Output parameters, IN/OUT = Throughput
parameters
2)
Parameter type: P = Mandatory parameters, O = Optional parameters
Table 24: Input, output parameters of the function block "FBUnitDataHandling"
Version
Date
Page
V3.0
15.11.04
84
Document
User documentation
Copyright © Siemens AG 2003 All Rights Reserved
User_Manual_Simotion_Easy_Basics_V3_0.doc
For internal Use Only
Simotion Easy Basics
9.1.3
reviewed
Schematic LAD representation
FBHandleUnitData
BOOL
boExecute
INT
UDINT
Enum
BOOL
TIME
iActivity
uDataSetNr
eStorageType
boOverwriteDataSet
tTimeOut
boBusy
BOOL
boDone
boError
iErrorID
eErrorType
BOOL
BOOL
INT
Enum
Fig. 40: Schematic representation of the input and output interface
9.1.4
Function elements and integration
Source
UnitData
Programming
language
Know-how protection
Library
L_SEB
Program / function
Feature / function
FBHandleUnitData
Handling global unit data.
Integration into a cyclic task (recommendation:
Background task).
ST
No
Must be
adapted to the
application
Yes
Table 25: Program elements for handling unit data
Version
Date
Page
V3.0
15.11.04
85
Document
User documentation
Copyright © Siemens AG 2003 All Rights Reserved
User_Manual_Simotion_Easy_Basics_V3_0.doc
For internal Use Only
Simotion Easy Basics
reviewed
10 Functions for ASI modules
Function blocks for using ASI modules are described in the following Chapters.
10.1 Function block for ASI couplers
This block is intended to help SIMOTION and ASI-Link users when configuring and evaluating the
ASI-Link and additional ASI bus nodes.
This function block is used as communications interface between ASI-Link and SIMOTION, and sends
the specified command numbers to the connected ASI-Link.
The system then waits for the command to be processed and the response data is evaluated that, if
required, are written into an output parameter.
Comment: Only the ASI-Link20E is described in the following description. However, the FB
FBAsiLink20Econtrol can also be used for the CP343 ASI module as the
parameterization and diagnostics of both modules are the same.
10.1.1 Description of the function block FBAsiLink20EControl
The function block FBAsiLink20EControl includes input and output parameters that are, when a task is
initiated, either transferred to the ASI-Link or read-out of the ASI-Link20E. This means that the ASILink20E can be configured and its status read-out.
10.1.2 Input and output interface of the FBs
When calling the FB, the parameters, specified in the following table, can be supplied:
Name
P type
Data type
P/O
2)
Initialization
value
Significance
boExecute
boReset
IN
IN
BOOL
BOOL
P
P
FALSE
FALSE
iLAddr
IN
DINT
P
0
bStatNibIN
IN
BYTE
auSend
IN
uSendLen
IN
ARRAY [0..239] of
USINT
UDINT
A new task is initiated
New start bit; request to
send an "Init"
First address in the input
address area of the ASILink20E
First address in the input
address area of the ASILink20E
Data to be sent
1)
8#0
P
0
P
240
Length of the data to be
sent
boDone
OUT
BOOL
Task was processed errorfree
boError
OUT
BOOL
Error while processing a
task
auReceive
OUT
ARRAY [0..239] of
Data field for response
USINT
data
bStatus
OUT
WORD
Processing status
1)
Parameter types: IN = Input parameters, OUT = Output parameters, IN/OUT = Throughput
parameters
2)
Parameter type: P = Mandatory parameters, O = Optional parameters
Table 26: Input, output parameters of the function block "FBAsiLink20Econtrol"
Version
Date
Page
V3.0
15.11.04
86
Document
User documentation
Copyright © Siemens AG 2003 All Rights Reserved
User_Manual_Simotion_Easy_Basics_V3_0.doc
For internal Use Only
Simotion Easy Basics
Note:
reviewed
For error-free block functionality, the user must supply all of the mandatory
parameters (P).
It is up to the user to decide whether all of the optional parameters (O) are supplied.
10.1.3 Schematic LAD representation
FBAsiLink20EControl
BOOL
BOOL
DINT
BYTE
ARRAY
UDINT
boExecute
boDone
boReset
iLAddr
bStatNibIN
auSend
uSendLen
boError
auReceive
bStatus
BOOL
BOOL
ARRAY
WORD
Fig. 41: Schematic representation of the input and output interface
10.1.4 Input and output parameters
Description of the individual input and output parameters.
10.1.4.1 boExecute [BOOL]
If the variable boExecute = TRUE, then the user command from the data field auSend with length
uSendLen is sent to the ASI-Link20E. The command processing in the cyclic block call is tracked
(which commands can be executed, can be taken from [15]). If the command has been successfully
processed, the response is read-out and is returned in the data field auReceive or in the output
parameter bStatus.
The response is written into bStatus if it involves a command where no response data is returned or if
an error has occurred. In these cases, the ASI-Link20E issues a 2-byte response that provides
information about the processing of the sent command (also refer to [15]). Normally, bStatus is:
-
for error-free processing "0000H"
if a task is being processed "8181H"
after a reset "8182H".
If a command, returned for the response data, was successfully processed, the response of the ASILink20E is saved in auReceive.
Version
Date
Page
V3.0
15.11.04
87
Document
User documentation
Copyright © Siemens AG 2003 All Rights Reserved
User_Manual_Simotion_Easy_Basics_V3_0.doc
For internal Use Only
Simotion Easy Basics
reviewed
10.1.4.2 boReset [BOOL]
boReset = TRUE requests that a so-called "Init" 1) is sent.
This should be carried-out once when first executing the function block by setting boReset = TRUE, as
it is possible that the ASI-Link20E is still not ready (there could still be response data in the ASILink20E). If an error condition is present, the function block itself ensures that an "Init" is sent if this is
required.
Further, for boReset = TRUE, a task being executed can be interrupted. After this, the ASI-Link20E is
again ready to accept tasks.
After a reset, bStatus = 8182H.
1)
"Init" is a command with the command number 16#7777, that brings the ASI-Link20E back into a
readiness state after a new start or an error.
10.1.4.3 iLAddr [DINT]
Using the iLAddr variable, the first address of ASI-Link20E is defined in the SIMOTION address area
of the function block. When configuring Simotion, the start address of the module is defined in HW
Config.
This variable is used for system function calls within the FB, as these functions use an input
parameter, DINT data type.
10.1.4.4 bStatNibIN [BYTE]
The variable bStatNibIN is the start address of the ASI-Link20E in the SIMOTION SCOUT. This is
defined in the SIMOTION SCOUT in HW Config.
This variable is used as help variable. Addresses are directly used in the FB and Simotion has no
variables with the "Adresse" ["Address"] data type. This is the reason that a help variable must be setup in the I/O area of Simotion (BYTE data type), that has the value of the start address of the ASILink. This help variable is then transferred at the input bStatNibIN.
This means that the values of the two input variables iLAddr and bStatNibIN always match one
another.
10.1.4.5 auSend [ARRAY]
The send buffer refers to a memory area [0..239], in which the user must specify the command. Using
the various commands (refer to [15] ), the ASI-Link can be completely configured and read-out.
The structure of the send buffer for commands is subsequently specified in Table 26. The first byte of
the send buffer is reserved for the command number. All of the other bytes (with grey background) are
only relevant for specific commands.
Byte
q+0
q+1
q+...
Significance
Command number
Task data
Task data
Table 27: Structure of the send buffer
Note: q is the same as the start address of the send buffer
Version
Date
Page
V3.0
15.11.04
88
Document
User documentation
Copyright © Siemens AG 2003 All Rights Reserved
User_Manual_Simotion_Easy_Basics_V3_0.doc
For internal Use Only
Simotion Easy Basics
reviewed
10.1.4.6 uSendLen [UDINT]
Parameter uSendLen specifies the length of the data to be sent. The value may be a maximum of 240.
If it is too small, then this results in an undesirable command processing. This is noticeable in the fact
that no parameters are transferred. This means that all parameters are equal to 0. However if instead
an excessively high value is specified (e.g.: A maximum value of 240), this has no negative impact on
command processing.
10.1.4.7 boDone [BOOL]
The variable boDone provides information as to whether a task has been processed error-free. If
boDone = TRUE, then the task has been completed and processed without any error. For boDone =
FALSE, the task has either still not been completely processed or an error is present.
10.1.4.8 boError [BOOL]
Error is set to TRUE if an error has occurred while processing the task. If this occurs, then a more
detailed description of the error is generated in the form of an error code in the variable bStatus (refer
to 10.1.4.10). A reset is not required after an error. A new task can be immediately processed.
10.1.4.9 auReceive [ARRAY]
The receive buffer is only relevant for commands that supply response data (refer to [15]). The
parameter refers to a memory area [0..239], in which a command response is saved.
The structure of the response buffer is specified below in Table 27.
Byte
n+0
n+1
n+...
Significance
Response data
Response data
Response data
Table 28: Structure of the receive buffer
Note: n is the same as the start address of the receive buffer
10.1.4.10 bStatus [WORD]
The bStatus variable is a 2-byte response of the ASI-Link20E - whereby the first word specifies the
task status or the error code (refer to [15]). The second word is only required for internal purposes and
may not be changed.
Version
Date
Page
V3.0
15.11.04
89
Document
User documentation
Copyright © Siemens AG 2003 All Rights Reserved
User_Manual_Simotion_Easy_Basics_V3_0.doc
For internal Use Only
Simotion Easy Basics
reviewed
10.1.5 Signal characteristics of the parameters boExecute, boReset, boDone, boError and
bStatus
The ASI-Link20E is brought into a ready state with boReset = TRUE. After the reset, the first word of
bStatus has the value 8182H.
A commando call is started using boExecute = TRUE. While processing a task, the first word of
boStatus has the value 8181H. This status word indicates that a task is being processed. When a task
has been completed, the result is communicated to the user using parameters boDone and boError.
If no errors have occurred, boDone is set to TRUE. If a task includes response data from ASI-Link20E,
then this data is made available in auReceive in the receive buffer. In this case, in 0000H is entered
into boStatus .
If an error has occurred, boError is set to TRUE. For tasks with response data, receive data is not
made available. An error code is entered into the first word of bStatus in order to analyze the error that
has occurred (refer to Fig. 37).
1
boExecute
(IN) 0
boReset 1
(IN) 0
boDone 1
(OUT) 0
boError 1
(OUT) 0
bStatus
(OUT)
8182
8181
0000
8181
errorID
8181
0000 8181 80A2 8181 0000
Fig. 10: Signal characteristics of the various parameters
Version
Date
Page
V3.0
15.11.04
90
Document
User documentation
Copyright © Siemens AG 2003 All Rights Reserved
User_Manual_Simotion_Easy_Basics_V3_0.doc
For internal Use Only
Simotion Easy Basics
reviewed
10.1.6 Program example
The program, in which the function block FBAsiLink20EControl is called must be assigned a cyclic
task (e.g. background task).
In the project example, the ASI-Link20E has a Profibus address of 4. The I/O basis addresses occupy
the address range from 0..31.
INTERFACE
USES ASI_Link;
//---------- Export -----------------------------PROGRAM Background;
PROGRAM PeriF;
PROGRAM TechF;
//---------- Project Global Variables -----------VAR_GLOBAL
FBAsiLink : FBAsiLink20EControl;
TestRun
: BOOL := FALSE;
TestReset
: BOOL := FALSE;
TestLAddr
: DINT := 0;
TestSend
: ARRAY [0..239] OF USINT;
TestSendLen : UDINT := 100;
TestDone
: BOOL;
TestError
: BOOL;
TestReceive
: ARRAY [0..239] OF USINT;
TestStatus
: WORD;
END_VAR;
END_INTERFACE
IMPLEMENTATION
//---------- Programs ---------------------------PROGRAM Background
// Call the function block to project the asi-link20e
FBAsiLink(boExecute := TestRun,
boReset
:= TestReset,
iLAddr
:= TestLAddr,
auSend
:= TestSend,
uSendLen
:= TestSendLen,
bStatNibIN
:= eingang_0);
TestDone
:= FBAsiLink.boDone ;
TestError
:= FBAsiLink.boError ;
TestReceive := FBAsiLink.auReceive ;
TestStatus := FBAsiLink.bStatus ;
END_PROGRAM
// Start the function block
// Reset of the ASI-Link20E
// First address of the ASI-Link20E
// Data to be send
// Length of data to be send
// I/O variable
// Get output parameter of the ASI_Link20E
// Get output parameter of the ASI_Link20E
// Get output parameter of the ASI_Link20E
// Get output parameter of the ASI_Link20E
END_IMPLEMENTATION
Fig. 11: Program example for using FBs
Version
Date
Page
V3.0
15.11.04
91
Document
User documentation
Copyright © Siemens AG 2003 All Rights Reserved
User_Manual_Simotion_Easy_Basics_V3_0.doc
For internal Use Only
Simotion Easy Basics
reviewed
10.1.7 Function elements and their integration
Source
ASI_Link
Programming
language
Know-how protection
Library
--
Program / function
Feature / function
FBAsiLink20EControl
The selected ASI-Link20E is configured.
Assigned to the background task.
ST
Yes
Must be
adapted to the
application
No
Table 29: Program elements for configuring the ASI-Link20E
Version
Date
Page
V3.0
15.11.04
92
Document
User documentation
Copyright © Siemens AG 2003 All Rights Reserved
User_Manual_Simotion_Easy_Basics_V3_0.doc
For internal Use Only
Simotion Easy Basics
reviewed
10.2 Diagnostics of the ASI Safety Monitor
These diagnostic blocks are intended to help SIMOTION and AS-i Safety Monitors when evaluating
the AS-i Safety Monitor and its AS-i bus nodes.
This program is used as communications interface between the AS-i Safety Monitor and SIMOTION
and reads-in diagnostics data into SIMOTION using a DP/AS-Interface link.
10.2.1 Description of the function block FBAsiMonDiag
The function block FBAsiMonDiag contains input and output parameters that are continuously readinto and read-out of the monitor. The operating mode and the status of the AS-i Safety Monitor can
therefore be enabled after its two enable circuits (1;2). In addition, the correct setting for the
diagnostics type must be configured in the ASIMON configuration software (this is not part of this
documentation).
10.2.2 Input and output interface of the FBs
When the FB is called, the parameters specified in the following Table can be supplied:
Name
P type 1)
Data type
P/O 2)
InitializaSignificance
tion value
Enable
IN
BOOL
P
FALSE
Resets the FB
InBit0
IN
BOOL
P
FALSE
Input bit
InBit1
IN
BOOL
P
FALSE
Input bit
InBit2
IN
BOOL
P
FALSE
Input bit
InBit3
IN
BOOL
P
FALSE
Input bit
Data
IN/OUT
StructDataASi P
Data structure to save the
Mon
diagnostics information
Busy
OUT
BOOL
FALSE
Status, diagnostics
OutBit0
OUT
BOOL
FALSE
Output bit
OutBit1
OUT
BOOL
FALSE
Output bit
OutBit2
OUT
BOOL
FALSE
Output bit
OutBit3
OUT
BOOL
FALSE
Output bit
ErrorK1
OUT
BOOL
FALSE
Status, enable circuit 1
ErrorK2
OUT
BOOL
FALSE
Status, enable circuit 2
SumK1
OUT
USINT
0
Number of tripped devices in
enable circuit 1
SumK2
OUT
USINT
0
Number of tripped devices in
enable circuit 2
ErrorMonitor
OUT
BYTE
0
Status, safety monitor
ErrorFB
OUT
WORD
0
Errors in the block
1)
Parameter types: IN = Input parameters, OUT = Output parameters, IN/OUT = Throughput
parameters
2)
Parameter type: P = Mandatory parameters, O = Optional parameters
Table 30: Input, output parameters of the function block "FBAsiMonDiag"
Note:
For error-free block functionality, the user must supply all of the mandatory
parameters (P).
It is up to the user to decide whether all of the optional parameters (O) are supplied.
Version
Date
Page
V3.0
15.11.04
93
Document
User documentation
Copyright © Siemens AG 2003 All Rights Reserved
User_Manual_Simotion_Easy_Basics_V3_0.doc
For internal Use Only
Simotion Easy Basics
reviewed
10.2.3 Schematic LAD representation
FBAsiMonDiag
BOOL
Enable
BOOL
BOOL
BOOL
BOOL
InBit0
InBit1
InBit2
InBit3
StructData
Busy
OutBit0
OutBit1
OutBit2
OutBit3
ErrorK1
ErrorK2
SumK1
SumK2
ErrorMonitor
ErrorFB
Data
Data
BOOL
BOOL
BOOL
BOOL
BOOL
BOOL
BOOL
USINT
USINT
BYTE
WORD
StructData
Fig. 12: Schematic representation of the input and output interface
10.2.4 Input parameters
The input parameters are individually described in the following.
10.2.4.1 Enable [BOOL]
If the Enable parameter = TRUE, then diagnostics data is continually read-out of the monitor.
For Enable = FALSE, FBAsiMonDiag is initialized. This means that internal data of the FB is set to
initial values. Diagnostics data is no longer transferred and diagnostics data that is already saved is
not changed.
Enable = FALSE, is, e.g. only practical after powering-up the SIMOTION device and after
communications have been interrupted.
Comment:
If the variable continually changes between TRUE and FALSE, this prevents
diagnostics data being correctly transferred.
10.2.4.2 InBit0, InBit1, InBit2, InBit3 [BOOL]
These parameters are interlocked with the AS-i input bits of the AS-i Safety Monitor.
Version
Date
Page
V3.0
15.11.04
94
Document
User documentation
Copyright © Siemens AG 2003 All Rights Reserved
User_Manual_Simotion_Easy_Basics_V3_0.doc
For internal Use Only
Simotion Easy Basics
reviewed
10.2.5 Output parameters
The output parameters are individually described in the following.
10.2.5.1 Busy [BOOL]
If Busy = TRUE, then a diagnostics sequence is still being evalauted. The data in the monitor are now
no longer consistent and can be read-in.
If the variable Enable = FALSE, then Busy = TRUE, until Enable =TRUE and a new diagnostics
sequence was completed.
If Busy = FALSE, then the evaluation of a diagnostics sequence was completed. Diagnostics data is
now consistent and can be processed in the additional program.
For Enable = TRUE, immediately after the end of a diagnostics sequence evaluation, at the next FB
call, Busy is again TRUE. This means that the state Busy = FALSE is only present for one cycle.
10.2.5.2 OutBit0; OutBit1; OutBit2; OutBit3 [BOOL]
These parameters are inter-linked with the AS-i input bits of the AS-i Safety Monitor.
10.2.5.3 ErrorK1 [BOOL]
If ErrorK1 = TRUE, then enable circuit 1 is shutdown.
If ErrorK1 = FALSE, then enable circuit 1 is switched-in.
10.2.5.4 ErrorK2 [BOOL]
If ErrorK2 = TRUE, then enable circuit 2 is shutdown.
If ErrorK2 = FALSE, then enable circuit 2 is switched-in.
10.2.5.5 SumK1 [USINT]
The number of devices in the enable circuit 1 that have tripped when an error occurred is specified
here - i.e. the value of the device status (refer to Point 2.3.5) is not equal to 0. In the diagnostics
window of the ASI-Mon PC program, this corresponds to a device color symbol that is not green.
The value range of SumK1 extends from 0 to 7.
If SumK1 = 7, then the actual number of tripped devices is at least 7 or more.
10.2.5.6 SumK2 [USINT]
The number of devices in the enable circuit 2 that have tripped when an error occurred is specified
here - i.e. the value of the device status is not equal to 0. In the diagnostics window of the ASI-Mon
PC program, this corresponds to a device color symbol that is not green.
The value range of SumK2 extends from 0 to 7.
If SumK2 = 7, then the actual number of tripped devices is at least 7 or more.
Version
Date
Page
V3.0
15.11.04
95
Document
User documentation
Copyright © Siemens AG 2003 All Rights Reserved
User_Manual_Simotion_Easy_Basics_V3_0.doc
For internal Use Only
Simotion Easy Basics
reviewed
10.2.5.7 ErrorMonitor [Byte]
If the Safety Monitor is in the standard safety mode, then ErrorMonitor = 0.
If the Safety Monitor is in the configuring mode, then ErrorMonitor contains a copy of the
bStatusMonitor byte from the diagnostics data block.
10.2.5.8 ErrorFB [WORD]
The value of variable ErrorFB is always 0.
10.2.5.9 Data [StructDataASiMon]
Data is the interface to the data area of data type StructDataASiMon. The structure of the data type is
described under bStatusMonitor r 2.5.
Version
Date
Page
V3.0
15.11.04
96
Document
User documentation
Copyright © Siemens AG 2003 All Rights Reserved
User_Manual_Simotion_Easy_Basics_V3_0.doc
For internal Use Only
Simotion Easy Basics
reviewed
10.2.6 Data structure
The Library L_AsiMon includes the protected AsiMon unit that, in addition to the FB, also defines the
data type (StructDataAsimon). A variable is set-up from the data type that is assigned to the in/out
parameter Data of FB. Diagnostics data that is received from the Safety Monitor is saved in the
variable. The index (iIndex), status (iStatus), monitor status (bStateMonitor), channel status
(abStateChannel) and the number of tripped devices (abQuantity) are managed here.
The following data are included in this block:
Reserved - may not be changed
The monitor status is displayed here
Status of enable circuit 1
Status of enable circuit 2
Number of tripped devices of enable circuit 1
Number of tripped devices of enable circuit 2
Number of the devices in the monitor, if <> 0
Status of the devices in the monitor, if <> 0
Fig. 13: Data structure
Version
Date
Page
V3.0
15.11.04
97
Document
User documentation
Copyright © Siemens AG 2003 All Rights Reserved
User_Manual_Simotion_Easy_Basics_V3_0.doc
For internal Use Only
Simotion Easy Basics
reviewed
10.2.6.1 bStateMonitor [byte]
The data byte bStateMonitor describes the overall state of the Safety Monitor.
This can have values between 8 and 15. The significance of the values is described in the following
Table:
bStateMonitor
Value,
decimal
8
9
10
11
Value, binary (d3 d2 d1
d0)
1 0 0 0
1 0 0 1
1 0 1 0
1 0 1 1
12
1 1 0 0
13
14
1 1 0 1
1 1 1 0
15
1 1 1 1
Significance
Both circuits switched-in
Circuit 1 off / circuit 2 on
Circuit 1 on / circuit 2 off
Both circuits off
Configuration mode (power on / reset)
Configuration mode (stop state, processing with the
PC program possible)
Configuration mode (reserved)
Configuration mode (fatal device fault, reset or
replacement required)
Table 31: State table for the Safety Monitor
10.2.6.2 abStateChannel [1] / abStateChannel [2]
The data bytes abStateChannel [1] and abStateChannel [2] describe the state of enable circuit 1 and
enable circuit 2.
It can have values between 0 and 7. The significance of the values is described in the following Table:
Value,
decimal
0
1
2
3
4
5
6
7
AbStateChannel [1] / abStateChannel [2]
LED state at the
Value, binary (d3 d2 d1
Significance
monitor
d0)
0 0 0 0
Circuit is switched-in
Green
0 0 0 1
Circuit is ready to be switchedYellow + red
in, waiting for a start condition
0 0 1 0
Circuit is switched-out
Red
0 0 1 1
Circuit is off,
Red flashing
service button required.
0 1 0 0
Reserved
0 1 0 1
Reserved
0 1 1 0
Reserved
0 1 1 1
Reserved
Table 32: State table for enable circuits 1 and 2
Version
Date
Page
V3.0
15.11.04
98
Document
User documentation
Copyright © Siemens AG 2003 All Rights Reserved
User_Manual_Simotion_Easy_Basics_V3_0.doc
For internal Use Only
Simotion Easy Basics
reviewed
10.2.6.3 abQuantity [1] / abQuantity [2]
Data bytes abQuantity [1] and abQuantity [2] specify the number of tripped devices in enable circuit 1
and enable circuit 2.
These data bytes correspond to function parameters SumK1 and SumK2.
The value range of the two data types extends from 0 to 7. For abQuantity = 7, the actual number of
tripped devices is at least 7 or more.
10.2.6.4 aaChannel [x].abDevice[y].iIndex
These 2 x 48 data bytes have the value iIndex = 0, if the associated status byte aaChannel
[x].abDevice[y].iIndex has the value status = 0.
If the associated status byte aaChannel [x].abDevice[y].iIndex <> 0, then iIndex contains the number
of the device, i.e. iIndex = y, with a value range m between 32 and 79.
These data bytes exist for compatibility reasons. The contents do not have to be evaluated as the
assignment of the particular status value is uniquely defined in the data block.
10.2.6.5 aaChannel [x].abDevice[y].iState
These 2 x 48 data bytes separately specify the state of the individual devices for both enable circuits
(x = 1;2). There is a data byte iState for every device (m = 32 to 79).
Data byte iState can have values between 0 and 7. The significance of the values is described in the
following Table:
Value,
decimal
0
1
2
3
4
5
6
7
aaChannel [x].abDevice[y].iState
Color display in the
Value, binary (d3 d2 d1
Significance
AsiMon PC software
d0)
0 0 0 0
Device is switched-in
Green
Device
is
on,
shutdown
0 0 0 1
Green flashing
timer started
Device waits for local
0 0 1 0
acknowledgement or start
Yellow
condition
Device (dependent on twochannels) was actuated through
Yellow flashing
one channel; test (off -> on)
0 0 1 1
required, also for the starting
test
Device has shutdown (normal
Red
0 1 0 0
shutdown)
Device (positively driven) has
shutdown through one channel
Red flashing
0 1 0 1
or fault when checking the
contactor.
Service button
required
Device communications error
0 1 1 0
Grey
between the AS-i module and
the Safety Monitor
Safety Monitor is in the
--0 1 1 1
configuration mode
Table 33: State table for the devices in the enable circuits
Version
Date
Page
V3.0
15.11.04
99
Document
User documentation
Copyright © Siemens AG 2003 All Rights Reserved
User_Manual_Simotion_Easy_Basics_V3_0.doc
For internal Use Only
Simotion Easy Basics
reviewed
10.2.7 Runtime of the diagnostics block
The FB FBAsiMonDiag requires several cycles for a complete diagnostics sequence.
While a sequence is being executed, Busy = TRUE.
Busy = FALSE when the sequence is completed.
Depending on the state of the Safety Monitor, the following number of call cycles are required:
a) 2 calls are required for the monitor state "both circuits switched-in" or "configuration mode".
2 cycles "base load"
b) For all other monitor states, the number of calls depends on the number of devices that have
been tripped.
The number of calls can be calculated as follows:
2 cycles "base load"
+
2 cycles to read-in the states of the two enable circuits
+
Y x 4 cycles Y is the number of devices actually tripped in enable circuit 1.
If the number of tripped devices is ≥ 7 in enable circuit 1, then
Y = the actual number + 1.
+
Z x 4 cycles Z is the number of devices actually tripped in enable circuit 2.
If the number of tripped devices is ≥ 7 in enable circuit 2, then
Z = the actual number + 1.
When a shutdown edge of an enable circuit is detected, under certain conditions (① refer below), an
additional diagnostics sequence is automatically executed. This allows contact bounce effects to be
filtered-out. This can cause the number of calls to be doubled.
However, the Safety Monitor has two enable circuits - this may mean that the diagnostics sequence
must be executed three times. If, for the first interrogation of a shutdown only one enable circuit had a
shutdown edge and a second shutdown edge in the other enable circuit was detected during the
second diagnostics sequence, then, under certain conditions (① refer below), the diagnostic sequence
is automatically executed a third time.
Busy only = FALSE after the second or third execution of the diagnostics sequence (interrogation).
Condition for the second and third interrogation:
At the instant of the shutdown, a value aaChannel [x].abDevice[y].iState = 1, 2 or 3 was readin for the channel status. As this value could have been able to stabilize – for example - to the
value 4 in the next diagnostics sequence (contact bounce), the interrogation is automatically
repeated.
Version
Date
Page
V3.0
15.11.04
100
Document
User documentation
Copyright © Siemens AG 2003 All Rights Reserved
User_Manual_Simotion_Easy_Basics_V3_0.doc
For internal Use Only
Simotion Easy Basics
reviewed
10.2.8 Program example
The program, in which the function block FBAsiMonDiag is called, must be assigned a cyclic task (e.g.
background task).
In the project example, the AS-i Safety Monitor has the AS-i address 28. This means that if the Dp /
AS-Interface Link20E has the I/O basis address =0, the Safety Monitor occupies input bits E14.4 to
E14.7 and output bits A14.4 to A14.7
The ASI slave information is written into the structure AsiDiagData, type StructDataASiMon.
INTERFACE
USELIB L_SAFunc;
//----------- Export ----------------------------------------------------------------PROGRAM ProgAsiCall;
// ----------- Project Global Variables --------------------------------------VAR_GLOBAL
AsiDiagData
: StructDataASiMon;
//Struct for Diagnostic data
MyFBAsiMonDiag : FBAsiMonDiag;
//FB-instance
END_VAR
END_INTERFACE
IMPLEMENTATION
//---------- Programs ------------------------------------------------------------PROGRAM ProgAsiCall
//Call the function block to read the diagnostic data from safety monitor
MyFBAsiMonDiag ( Enable := startasimon
, InBit0 := in_0
, InBit1 := in_1
, InBit2 := in_2
, InBit3 := in_3
, Data := AsiDiagData
);
out_0 :=
out_1 :=
out_2 :=
out_3 :=
MyFBAsiMonDiag .OutBit0;
MyFBAsiMonDiag .OutBit1;
MyFBAsiMonDiag .OutBit2;
MyFBAsiMonDiag .OutBit3;
//start the function block
//Input Bit 0 AS-i safety monitor (PI14.4)
//Input Bit 1 AS-i safety monitor (PI14.5)
//Input Bit 2 AS-i safety monitor (PI14.6)
//Input Bit 3 AS-i safety monitor (PI14.7)
//In/OutStruct for Diagnostic data
//Output Bit0
//Output Bit0
//Output Bit0
//Output Bit0
AS_i Safety Monitor (PQ14.4)
AS_i Safety Monitor (PQ14.5)
AS_i Safety Monitor (PQ14.6)
AS_i Safety Monitor (PQ14.7)
END_PROGRAM
END_IMPLEMENTATION
Fig. 14: Program code of the program example
Version
Date
Page
V3.0
15.11.04
101
Document
User documentation
Copyright © Siemens AG 2003 All Rights Reserved
User_Manual_Simotion_Easy_Basics_V3_0.doc
For internal Use Only
Simotion Easy Basics
reviewed
10.2.9 Function elements and their integration
Source
ASI_Mon
Programming
language
Know-how protection
Library
L_SAL
Program / function
Feature / function
FBAsiMonDiag
Executes the diagnostics of the selected ASI
Safety Monitor.
Assigned to a background task.
ST
Yes
Must be
adapted to the
application
No
Table 34: Program elements for the diagnostics of the Safety Monitor
Version
Date
Page
V3.0
15.11.04
102
Document
User documentation
Copyright © Siemens AG 2003 All Rights Reserved
User_Manual_Simotion_Easy_Basics_V3_0.doc
For internal Use Only
Simotion Easy Basics
reviewed
11 Clock memory
The clock memory is a function block that has eight boolean outputs that change their binary state –
according to permanently set frequencies – periodically in the pulse - pause ratio (mark-space ratio of
1:1.
11.1 Integration into the application and mode of operation
Using the clock memory, it is possible to control flashing indicator lights or trigger periodic operations
in the user program.
The function block FBClockMemory is included in the unit ClockMem. In turn, this is part of the library
L_SEB.
The function block must be used in a program that is incorporated in one of the cyclic tasks - i.e. in the
IPO, IPO_2 or background task.
It is not necessary to supply the block via input parameters as the flash frequencies are permanently
entered.
Eight different frequencies are automatically available at outputs "boQ1 ... boQ8". These can be used
to control periodic processes.
11.2 Frequencies
The following frequencies are available at the outputs:
Output
boQ1
boQ2
boQ3
boQ4
boQ5
boQ6
boQ7
boQ8
Period duration [s] Frequency [Hz]
2.0
1.6
1.0
0.8
0.5
0.4
0.2
0.1
0.500
0.625
1.000
1.250
2.000
2.500
5.000
10.00
Table 35: Frequencies of the FB "FBClockMemory"
Comment:
The accuracy of the frequencies is specified by the selected system clock cycles.
If the FB is, for example, incorporated in the IPO task, and this is defined with a system
clock cycle of 4ms, then the accuracy with which the frequencies can be generated is
+/- 4ms.
Version
Date
Page
V3.0
15.11.04
103
Document
User documentation
Copyright © Siemens AG 2003 All Rights Reserved
User_Manual_Simotion_Easy_Basics_V3_0.doc
For internal Use Only
Simotion Easy Basics
reviewed
11.3 Function elements and their integration
Source
ClockMem
Programming
language
Know-how protection
Library
L_SEB
Program / function
Feature / function
FBClockMemory
The periodic binary signals are formed.
Assigned to a cyclic task (Ipo, Ipo_2 or
background).
ST
No
Must be
adapted to the
application
No
Table 36: Program elements of the clock memory
Version
Date
Page
V3.0
15.11.04
104
Document
User documentation
Copyright © Siemens AG 2003 All Rights Reserved
User_Manual_Simotion_Easy_Basics_V3_0.doc
For internal Use Only
Simotion Easy Basics
reviewed
12 Controlling the Active Line Module
An Active Line Module (known as ALM in the following) can be powered-up or powered-down and
faults acknowledged using the function block MC_HandleALM.
12.1 Calling type
The function block MC_ HandleALM has been designed/programmed to be integrated/
incorporated into cyclic tasks and should be called in one of these tasks (background, IPO or IPO_2
task).
12.2 Parameter MC_HandleALM
Data type
P/O
2)
BOOL
P
FALSE
ALMQuitError IN
BOOL
P
FALSE
PZDReceive
ALMOn
ALMError
PZDSend
WORD
BOOL
BOOL
WORD
P
-
16#0000
-
Name
ALMEnable
P
type
1)
IN
IN
OUT
OUT
OUT
Initialization value
Significance
Powers-up / powers-down ALM
(TRUE = power-up, FALSE =
power-down)
Acknowledges a fault with a pos.
edge at the ALM
Status word of the ALM
Operating state of the ALM
Fault state of the ALM
Control word of the ALM
Table 37: Parameters of the MC_HandleALM
1) Parameter types: IN = Input parameters, OUT = Output parameters
2) P = Mandatory parameters, O = Optional parameters
Note: The user must supply all mandatory parameters (P).
Version
Date
Page
V3.0
15.11.04
105
Document
User documentation
Copyright © Siemens AG 2003 All Rights Reserved
User_Manual_Simotion_Easy_Basics_V3_0.doc
For internal Use Only
Simotion Easy Basics
reviewed
12.3 Schematic LAD representation
MC_HandleALM
BOOL
BOOL
WORD
ALMEnable
ALMQuitError
PZDReceive
ALMOn
ALMError
PZDSend
BOOL
BOOL
WORD
Fig. 15: LAD representation of the MC_HandleALM
12.4 Function description
An Active Line Module can be powered-up and powered-down using this function block. Further, faults
present at the Active Line Module can be acknowledged.
In order to use the function block MC_HandleALM, it is necessary to configure the Active Line Module
in the hardware configuration of Simotion using the standard telegram 370 (PZD 1/1).
To do this, two WORD type variables must be set-up in the I/O area of Simotion SCOUT; one of these
as output variable at the address range of the control word and the other as input variable at the
address range of the status word. The address ranges can be taken from the hardware configuration.
Example:
Name
ALM_PZD_Send
ALM_PZD_Receive
I/O address
PQW 256
PIW 256
....
....
....
Data type
WORD
WORD
....
....
....
Table 38: Example for declaring I/O
The defined I/O variables should then be permanently soft-wired to the following input and output of
the FB:
Status word of the ALM → PZDReceive
Control word of the ALM → PZDSend
The ALM is powered-up and powered-down using the input variable ALMEnable.
The ALM is powered-up for a positive signal level. This is under the assumption that there is no fault
present. If there is a fault, for a positive signal level, the ALM remains powered-down (off) until the
fault has been acknowledged (refer to the signal flow diagram, Fig. 1-2). If ALMEnable and
ALMQuitError are simultaneously set, then initially a fault acknowledgement is executed and then the
ALM is powered-up.
The ALM is powered-down by again setting input ALMEnable to FALSE.
The ALM is controlled by parameterizing the control word.
The actual status of the ALM (on or off) is displayed at output ALMOn. If the ALM is in the "run" state,
the value of the output is TRUE; in all other states, the value of the output is FALSE. If the ALM briefly
exits the run mode due to an alarm (overvoltage, overtemperature), then the ALMOn bit is also
FALSE.
The information regarding the status is read-out using the ALM status word.
Version
Date
Page
V3.0
15.11.04
106
Document
User documentation
Copyright © Siemens AG 2003 All Rights Reserved
User_Manual_Simotion_Easy_Basics_V3_0.doc
For internal Use Only
Simotion Easy Basics
reviewed
12.5 Signal flowchart
MC HandleALM - Example
MC_HandleALM
ON/OFF
Acknowledge
Power-up/
power-down
ALMEnable
ALMQuitError
PZDReceive
ALMOn
ALMError
PZDSend
1
ON/Off
0
t
1
ALMOn
0
t
1
ALMError
0
Fault
status
t
1
ON
0
t
1
Acknowledge
0
t
1
ALMOn
0
t
1
ALMError
0
t
Delay, e.g. due to PROFIBUS
(dependent on the DP cycle)
Fig. 16: Signal flowchart MC_HandleALM
12.6 Fault description
The fault status is read-out using the status word of the ALM and is displayed at the output ALMError.
If this has the value TRUE, then a fault is present; for FALSE, then the ALM is fault-free.
ALM faults can be acknowledged using a positive signal edge at input ALMQuitError.
If the status of input ALMOn is not reset to FALSE before an acknowledgement, the ALM is
immediately powered-up after the acknowledgement.
Version
Date
Page
V3.0
15.11.04
107
Document
User documentation
Copyright © Siemens AG 2003 All Rights Reserved
User_Manual_Simotion_Easy_Basics_V3_0.doc
For internal Use Only
Simotion Easy Basics
reviewed
12.7 Function elements and their integration
Source
ALMOnOff
Programming
language
Know-how protection
Library
L_SEB
Program / function
Feature / function
MC_HandleALM
FB to control and acknowledge the Active Line
Module.
Assigned to a cyclic task (Ipo, Ipo_2 or
background).
ST
No
Must be
adapted to the
application
No
Table 39: Program elements to control the ALM
Version
Date
Page
V3.0
15.11.04
108
Document
User documentation
Copyright © Siemens AG 2003 All Rights Reserved
User_Manual_Simotion_Easy_Basics_V3_0.doc
For internal Use Only
Simotion Easy Basics
reviewed
13 Standard "winder" application
It is possible to implement closed-loop tension control for continuous material webs using blocks from
the "L_Winder" library.
This application covers the following functionality:
•
•
•
•
•
•
•
•
•
Direct closed-loop tension control using speed correction and a dancer roll
Direct closed-loop tension control using speed correction and a tension transducer
Direct closed-loop tension control using torque limiting and a tension transducer
Roll diameter calculation
Winding hardness characteristic
Adaptation of the controller gain of the dancer roll position controller or the tension controller
Adaptation of the speed controller gain as a function of the moment of inertia
Moment of inertia calculation
Torque pre-control
The following winder settings can be made:
• Winder or unwinder
• Winding from either the bottom or the top
Vset
++
Winding from the top
+
+
Winding from the bottom
-
Winder
Unwinder
Fig. 49: Possible winder settings
The winder application comprises several blocks that the user must inter-connect. The preinterconnections for closed-loop tension control with speed correction and dancer roll is implemented
in a program example. The following blocks are provided:
•
WindLib1 / WindLib2
o FB_Control_WithSpeedSetpointChange
o FB_Control_WithTorqueLimitation
o FB_GainAdapter
o FB_DiameterCalculator
o FB_TensionTaper
o FB_Setpoint_RFG
o FB_Inertia
o FC_TorquePrecontrol
•
L_BaCtrl
o FB_basiscontrol_pid
•
ToolLib
o WORD_to_LREAL
o WORD_to_REAL
o FB_LowPassFilter
Version
Date
Page
V3.0
15.11.04
109
Document
User documentation
Copyright © Siemens AG 2003 All Rights Reserved
User_Manual_Simotion_Easy_Basics_V3_0.doc
For internal Use Only
Simotion Easy Basics
reviewed
13.1 Function description
Three closed-loop tension control techniques are described in the following Chapters. These can be
implemented in the standard winder application.
13.1.1 Direct closed-loop tension control with dancer roll using speed correction
Vconst
F
n+
Dancer
Diameter
sensor
speed controller
Diameter
calculator
Dact
power unit
ControlWord
N_set
M_Limit_pos
M_Limit_neg
Add_Torque
InertiaRatio
DRIVE
InertiaRatio
Add_Torque M_Limit_Pos
M_Limit_Neg
Nset correction
Dancer position controller
Pos act
Profibus
Pos set
Dact
AdaptionMode
T set
Gain
adapter
1
Dact
Dact/2
Tset RFG for analog
out
Torque
Precont.
AccelMaster
Dmax
Dact
current controller
Nset
Nset line
Vact
Nact
CalcMode
D_Reset
D_init
WebThickness
SamplingTime
M
Analog input
SIMOTION
Vset
M+
StatusWord
N_actual
Diameter_measured
Dancer-position_measured
Torque_actual
Add_Torque
Inertia
calculator
InertiaRatio
Fig. 50: Direct closed-loop tension control with dancer roll using speed correction
For direct closed-loop tension control with dancer roll, the tension is set using the dancer roll. This
means that the tension in the material web depends on the operating point of the dancer roll that has
been set. If the tension of the material web is to be changed, the counter pressure for the dancer roll
must be influenced.
The SIMOTION control on the other hand reads-in the position of the dancer roll.
When the dancer roll moves towards too little tension, the unwinder must operate slower or the winder
faster.
This ensures that the dancer roll is always operated in the required operating range and is not pressed
against the endstop.
Generally, the position controller is a P controller with D component. Under certain circumstances, the
controller can be implemented as PID controller; however, as a result of several integral components
in the system this could cause the system to oscillate!
The resulting material web speed setpoint is converted into a speed setpoint with the actual diameter.
Version
Date
Page
V3.0
15.11.04
110
Document
User documentation
Copyright © Siemens AG 2003 All Rights Reserved
User_Manual_Simotion_Easy_Basics_V3_0.doc
For internal Use Only
Simotion Easy Basics
reviewed
A controller gain can be adapted in order to adapt the controller to the different roll diameters (gain
adapter).
The winding hardness can be influenced during winding using a winding hardness characteristic. This
characteristic can, for example, be provided as a setpoint at an analog output, that determines the
counter (opposing) pressure of the dancer roll (this is generally a pneumatic system). A downstream
ramp-function generator prevents setpoint steps in the system. The inertia of the roll can be calculated
that influences the torque pre-control.
In addition to the setpoint speed, the torque ratio between the empty and wound roll, the positive and
negative limiting torque as well as the additional supplementary torque are transferred to the drive.
The actual speed and the actual torque are received from the drive. Depending on the particular
application, the sensors for the roll diameter and the dancer roll position can be connected to the
controls either via the drive or directly to the control.
13.1.2 Direct closed-loop tension control using speed correction and a tension transducer
Vconst
F
n+
Load cell
Diameter
sensor
speed controller
T act
T set
Diameter
calculator
current controller
power unit
Nset
Nset line
Vact
Nact
CalcMode
D_Reset
D_init
WebThickness
SamplingTime
M
Analog input
SIMOTION
Vset
M+
ControlWord
N_set
M_Limit_pos
M_Limit_neg
Add_Torque
InertiaRatio
Dact
DRIVE
InertiaRatio
Add_Torque M_Limit_Pos
M_Limit_Neg
Nset correction
Tension controller
Profibus
1
Dact
Dact
Dact/2
AccelMaster
Torque
Precont.
Dmax
Dact
Inertia
calculator
StatusWord
N_actual
Diameter_measured
Tension_measured
Torque_actual
Gain
adapter
AdaptionMode
Add_Torque
InertiaRatio
Fig. 51: Direct closed-loop tension control using speed correction and a tension transducer
For the winding mode "direct closed-loop tension control using speed correction and a tension
transducer", instead of the dancer roll position, the material web tension, determined directly using a
tension transducer, is read-in. In this case, the PID controller in SIMOTION does not operate as
position controller as is the case for the dancer roll, but as tension controller. The controller P gain
must be appropriately selected so that the controller output can be used as correction speed. Also in
this case, the tension in the system is set by modifying the winder shaft speed. In this mode, the
tension setpoint and therefore the winding hardness characteristic act directly on the tension controller
in the system.
Version
Date
Page
V3.0
15.11.04
111
Document
User documentation
Copyright © Siemens AG 2003 All Rights Reserved
User_Manual_Simotion_Easy_Basics_V3_0.doc
For internal Use Only
Simotion Easy Basics
reviewed
13.1.3 Direct closed-loop tension control using torque limiting and a tension transducer
Vconst
F
M+
n+
Load cell
Diameter
sensor
SIMOTION
speed controller
Tset
current controller
power unit
Nset
Nset line
Vset
Vact
Nact
CalcMode
D_Reset
D_init
WebThickness
SamplingTime
M
Analog input
Diameter
calculator
ControlWord
N_set
M_Limit_pos
M_Limit_neg
Add_Torque
InertiaRatio
Dact
Nset correction
DRIVE
InertiaRatio
M_Limit_Pos
M_Limit_Neg
Dact/2
Profibus
1
Dact
Tension controller
M_Limit_Pos
M_Limit_Neg
Tact
Dact
AdaptionMode
Gain
adapter
Inertia
calculator
Dmax
Dact
InertiaRatio
StatusWord
N_actual
Diameter_measured
Tension_measured
Torque_actual
Torque
Precont.
AccelMaster
Fig. 52: Direct closed-loop tension control using torque limiting and a tension transducer
For this control technique, the material tension is measured using a tension transducer. The tension
controller corrects deviations to the entered tension setpoint (tension reference value). The tension
controller is set-up as a PI controller. During winding, the tension setpoint can be influenced using the
winding hardness characteristic as a function of the diameter. The tension controller component that is
obtained is added to the tension setpoint (tension reference value) and weighted with diameter D.
The resulting torque acts as limiting torque at the speed output. The material web speed setpoint is
converted into the appropriate speed using the actual diameter. In order that the torque limiting can be
effective when tension is being established, an additional material web speed setpoint is entered. This
results in the speed controller being over-controlled. In order to slowly establish tension in the
material, a low overcontrol value should be selected. The tension is directly set using the torque
limiting.
Winding configuration
Winder type
Torque limit
Overcontrol value
Winding from the top
Winding from the top
Winding from the
bottom
Winding from the
bottom
Unwinder
Winder
Lower
Upper
Upper
Negative
Positive
Unwinder
Winder
Lower
Positive
Negative
Table 40: Sign of the overcontrol value dependent on the winding configuration and winder
type
Version
Date
Page
V3.0
15.11.04
112
Document
User documentation
Copyright © Siemens AG 2003 All Rights Reserved
User_Manual_Simotion_Easy_Basics_V3_0.doc
For internal Use Only
Simotion Easy Basics
reviewed
In this case, the winding hardness characteristic acts directly in the system. The reason for this is that
this tension setpoint (tension reference value) is directly compared to the tension actual value. The
torque limits are determined by the tension pre-control, the tension controller and the inertia
compensation.
For the direct closed-loop tension control using torque limiting, the same data is transferred to the
drive as for closed-loop tension control with dancer roll.
Version
Date
Page
V3.0
15.11.04
113
Document
User documentation
Copyright © Siemens AG 2003 All Rights Reserved
User_Manual_Simotion_Easy_Basics_V3_0.doc
For internal Use Only
Simotion Easy Basics
reviewed
13.2 Selecting the control concept
The most important criteria to select a control concept are listed in the following Table:
Control concept
Direct tension
control with dancer
roll
Direct tension control with a tension
transducer
Version
Correction using
speed
Correction using torque
limiting
Information regarding
the tension actual value
sensing
Intervenes in the
material web routing,
storage capability
Sensitive to overload;
generally does not
intervene in the material
web routing
Diameter ratio Dmax/Dcore
Approx. 15:1
Approx. 15:1, accelerating
torque must be well
compensated
Tension ratio Fmax/Fmin
Can be changed for
an adjustable dancer
roll support
Approx. 20:1 when the
accelerating torque is well
compensated
Torque ratio Mmax/Mmin
Approx. 40:1,
dependent on the
type of dancer roll
support
Approx. 100:1 dependent on the quality
of the actual value signal
Web speed
Up to over
2000m/min
Up to 2000m/min when
the accelerating torque is
well compensated
Applications
Rubber, cables, wire,
textiles, foils, paper
Paper, thin foils
Practical for elastic,
materials that can be
significantly
stretched
Nip position
Required
Required
Required
Correction using
speed
Table 41: Selection criteria for closed-loop tension control with a dancer roll and a tension
transducer
When a dancer roll is used as actual value transmitter this has the advantage that the dancer roll
(when the stroke is selected appropriately high) simultaneously functions as storage system for the
material web. This means that it is already a "tension controller".
Although closed-loop dancer roll control systems are quite complex, they offer unsurpassed control
characteristics.
The material web storage function has a damping effect for
•
•
•
Unround (eccentric) rolls of material
Jumps from layer to layer - e.g. when winding cable
Roll changes
Version
Date
Page
V3.0
15.11.04
114
Document
User documentation
Copyright © Siemens AG 2003 All Rights Reserved
User_Manual_Simotion_Easy_Basics_V3_0.doc
For internal Use Only
Simotion Easy Basics
reviewed
13.3 Description of the blocks
The following Chapter will describe the individual function blocks that are used for the "winder"
function.
13.3.1 FB_Control_WithSpeedSetpointChange
Calculating the velocity setpoint for direct closed-loop tension control
This FB is used if the tension is to be set by changing the drive speed.
The FB includes a PID position controller that, for example, reads-in the actual position of the dancer
roll (rControlled_Value_actual_Filtered) and e.g. compares this with the dancer roll setpoint
(reference) position (rControlled_Value_set).
The PID controller generates a speed setpoint (N_set), that can be used in a _move command in
order to operate the drive in the closed-loop speed controlled mode.
The speed setpoint is generated depending on the winding mode.
Winding mode:
The block can be operated in various modes.
In the winder/unwinder mode from the top or bottom, the material web speed (N_set_line) and the
equalization/correction motion from the position controller are taken into account (N_set_correction):
Winder from the top:
Winder from the bottom:
Unwinder from the top:
Unwinder from the top:
N_set = N_set_line +
N_set = -N_set_line N_set = N_set_line N_set = -N_set_line +
N_set_correction
N_set_correction
N_set_correction
N_set_correction
When the closed-loop dancer roll position control is switched-out, using these modes, only the
material web speed can be taken into account. The dancer roll position is not corrected!
Only speed, pre-control, top:
Only speed, pre-control, bottom:
N_set = N_set_line
N_set = -N_set_line
If the material web speed is not to be taken into account, but only the correction movements of the
position controller, then these modes can be used:
Only tension control, winder from the top:
N_set = N_set_correction
Only tension control, winder from the bottom: N_set = -N_set_correction
Only tension control, unwinder from the top:
N_set = -N_set_correction
Only tension control, unwinder from the bottom: N_set = N_set_correction
The appropriate settings can be made in the parameter uWindingMode.
Version
Date
Page
V3.0
15.11.04
115
Document
User documentation
Copyright © Siemens AG 2003 All Rights Reserved
User_Manual_Simotion_Easy_Basics_V3_0.doc
For internal Use Only
Simotion Easy Basics
reviewed
13.3.1.1 Schematic LAD representation
FB_Control_WithSpeedSetpointChange
LREAL
rV_set
LREAL
USINT
LREAL
LREAL
LREAL
LREAL
DINT
DINT
DINT
BOOL
BOOL
REAL
rD_actual
uWindingMode
rSamplingTime
rControlled_Value_set
rControlled_Value_actual_Filtered
rPID_P
iPID_I
iPIP_D
iPID_DelayTime
boPID_D_Set
boPID_Reset
rPID_OUT_LIMIT
N_set
LREAL
N_set_Correction
N_set_Line
LREAL
LREAL
Fig. 53: Schematic representation of the input and output interfaces
Version
Date
Page
V3.0
15.11.04
116
Document
User documentation
Copyright © Siemens AG 2003 All Rights Reserved
User_Manual_Simotion_Easy_Basics_V3_0.doc
For internal Use Only
Simotion Easy Basics
reviewed
13.3.1.2 Input and output interfaces of the FBs
When calling the block, the parameters specified in the following Table can be supplied:
Name
P type 1) Data type P/O 2) Initialization Significance
value
rV_set
IN
LREAL
P
Master/material web speed
[m/min]
D_actual
IN
LREAL
P
Actual roll diameter [m]
uWindingMode
IN
USINT
P
10
Winder mode:
rSamplingTime
IN
LREAL
P
6
rControlled_Value_set
IN
LREAL
P
-
rControlled_Value_actual IN
_Filtered
rPID_P
IN
LREAL
P
-
LREAL
P
2
iPID_I
IN
DINT
P
500
iPIP_D
IN
DINT
O
1000
iPID_DelayTime
IN
DINT
O
1000
boPID_D_Set
boPID_Reset
rPID_OUT_LIMIT
N_set
N_set_Correction
IN
IN
IN
OUT
OUT
BOOL
BOOL
REAL
REAL
REAL
O
O
O
-
FALSE
100
-
N_set_Line
OUT
REAL
1)
Parameter types: IN = Input parameters, OUT = Output parameters
2)
Parameter type: P = Mandatory parameters, O = Optional parameters
3)
Initialization values from the Win_Var unit
10: Winder from the top
11: Winder from the bottom
20: Unwinder from the top
21: Unwinder from the bottom
30: Only speed pre-control, from
the top
31: Only speed pre-control, from
the bottom
40: Only tension control, winder
from the top
41: Only tension control, winder
from the bottom
42: Only tension control,
unwinder from the top
43: Only tension control,
unwinder from the bottom
Sampling time of the task in
which the FB is called (IPO or
IPO2) [ms]
Setpoint (reference) position of
the dancer roll or tension setpoint
[%]
Actual position of the dancer roll
or tension actual value [%]
P gain of the PID position
controller of the dancer roll
Integral component of the PID
controller
Differential component of the PID
controller
Delay time of the PID controller
(filter, D component)
Enable, D component
Reset PID controller output
Controller output limit [rpm]
Speed setpoint for the drive [rpm]
Speed correction value from the
position controller [rpm]
Material web speed [rpm]
Table 42: Input, output parameters of the function block
"FB_Control_WithSpeedSetpointChange"
Version
Date
Page
V3.0
15.11.04
117
Document
User documentation
Copyright © Siemens AG 2003 All Rights Reserved
User_Manual_Simotion_Easy_Basics_V3_0.doc
For internal Use Only
Simotion Easy Basics
reviewed
13.3.2 FB_Control_WithTorqueLimitation
Function block to calculate the speed setpoint for direct closed-loop tension control with
torque limiting
This function block is used in the winding mode "direct closed-loop tension control with torque limiting".
A tension controller is implemented in this block. The actual tension from a tension transducer is readin and compared to the tension setpoint (tension reference value).
Each time that the FB is processed, a speed setpoint and the positive and negative torque limiting are
generated. The speed setpoint is selected so that the drive goes to the torque limit and therefore the
speed controller is operated overcontrolled. Depending on the winder mode, either the positive or
negative torque limit is effective. If the material web breaks the drive accelerates - but only to the set
speed setpoint plus the overcontrol setpoint. The overcontrol setpoint can be specified using
i_Offset_ratio as a ratio to the rated speed. This can prevent that the motor accelerates in an
uncontrolled fashion possibly causing mechanical damage.
Warning: When using the torque limit function, the output words must be carefully selected. If the
positive torque limit (TorqueLimit_Pos) is less than the negative limit (TorqueLimit_Neg), then the
drive accelerates up to the maximum speed and either the material could be damaged or a material
web breakage. Before making the appropriate connections in the drive it should be ensured that the
Profibus input words are correctly connected (assigned) for the torque limits. We recommend that the
free blocks in MASTERDRIVES are used to ensure that the positive torque limit is greater than the
negative limit
13.3.2.1 Schematic LAD representation
FB_Control_WithTorqueLimitation
LREAL
rV_set
LREAL
USINT
LREAL
LREAL
LREAL
LREAL
DINT
DINT
DINT
BOOL
BOOL
REAL
LREAL
INT
rD_actual
uWindingMode
rSamplingTime
rControlled_Value_set
rControlled_Value_actual_Filtered
rPID_P
iPID_I
iPIP_D
iPID_DelayTime
boPID_D_Set
boPID_Reset
rPID_OUT_LIMIT
rN_nominal
i_Offset_ratio
N_set
LREAL
TorqueLimit_Pos
TorqueLimit_Neg
LREAL
LREAL
Fig. 54: Schematic representation of the input and output interfaces
Version
Date
Page
V3.0
15.11.04
118
Document
User documentation
Copyright © Siemens AG 2003 All Rights Reserved
User_Manual_Simotion_Easy_Basics_V3_0.doc
For internal Use Only
Simotion Easy Basics
reviewed
13.3.2.2 Input and output interfaces of the FBs
When calling the block, the parameters specified in the following Table can be supplied:
Name
P type 1)
rV_set
rD_actual
uWindingMode
IN
IN
IN
Data type P/O 2) Initialization
3)
value
LREAL
P
LREAL
P
USINT
P
10
Significance
Master speed [m/min]
Actual roll diameter [m]
Winder mode:
10: Winder from the top
11: Winder from the bottom
20: Unwinder from the top
21: Unwinder from the bottom
30: Only speed pre-control, from
the top
31: Only speed pre-control, from
the bottom
rSamplingTime
IN
LREAL
P
6
rControlled_Value_set
IN
LREAL
P
-
rControlled_Value_actual IN
_Filtered
rPID_P
IN
iPID_I
IN
LREAL
P
-
LREAL
DINT
P
P
2
500
iPIP_D
IN
DINT
O
1000
iPID_DelayTime
IN
DINT
O
1000
boPID_D_Set
boPID_Reset
rPID_OUT_LIMIT
rN_nominal
i_Offset_ratio
IN
IN
IN
IN
IN
BOOL
BOOL
REAL
LREAL
INT
O
O
O
P
P
FALSE
100
-
rN_set
OUT
REAL
TorqueLimit_Pos
OUT
REAL
TorqueLimit_Neg
OUT
REAL
1)
Parameter types: IN = Input parameters, OUT = Output parameters
2)
Parameter type: P = Mandatory parameters, O = Optional parameters
3)
Initialization values from the Win_Var unit
Sampling time of the task in
which the FB is called (IPO or
IPO2) [ms]
Tension setpoint (reference
setpoint) [%]
Tension actual value [%]
P gain of the tension controller
Integral component of the PID
controller
Differential component of the PID
controller
Delay time of the PID controller
(filter, D component)
Enable, D component
Reset PID controller output
Controller output limiting [rpm]
Rated speed, winder motor
Overcontrol setpoint as ratio to
the rated speed [%]
Speed setpoint [rpm]
Positive torque limit [%]
Negative torque limit [%]
Table 43: Input, output parameters of the function block "FB_Control_WithTorqueLimitation"
Version
Date
Page
V3.0
15.11.04
119
Document
User documentation
Copyright © Siemens AG 2003 All Rights Reserved
User_Manual_Simotion_Easy_Basics_V3_0.doc
For internal Use Only
Simotion Easy Basics
reviewed
13.3.3 FB_GainAdapter
Function block to adapt the speed controller gain as a function of the roll diameter
During the winding process, the roll diameter changes. The change in the diameter has an influence
on the tension or the efficiency of the dancer roll position or tension control. In order to compensate a
change in the diameter, the controller gain can be varied. Two different adaptation techniques can be
selected.
1. Linear adaptation: a table with 4 points specifies the gain as a function of the diameter.
2. Inverse adaptation: Normally, the controller gain is set to a specific diameter (Gtuned for Dtuned).
Using the minimum and maximum diameter of the roll and the linear interrelationship between the
quantities, gain Gact can be calculated.
Gact Gtuned
D
=
⇒ Gact = Gtuned ⋅ act
Dact Dtuned
Dtuned
PID GAIN ADAPTION
AdaptionMode
0
PID_Gain
Gain_EndAdaption
Diameter_Actual
1
Gain_StartAdaption
Gain
Diameter_StartAdaption
Diameter_EndAdaption
2
Gain_tuning
Diameter_Actual
Diameter_tuning
Fig. 55: Principle mode of operation of the gain adaptation
Version
Date
Page
V3.0
15.11.04
120
Document
User documentation
Copyright © Siemens AG 2003 All Rights Reserved
User_Manual_Simotion_Easy_Basics_V3_0.doc
For internal Use Only
Simotion Easy Basics
reviewed
13.3.3.1 Schematic LAD representation
FB_GainAdapter
USINT
uAdaptionMode
PID_P
LREAL
LREAL
LREAL
LREAL
LREAL
LREAL
LREAL
LREAL
rD_actual
rD_StartAdaption
rD_EndAdaption
rGain_StartAdaption
rGain_EndAdaption
rd_Tuned
rGain_Tuned
PID_P
LREAL
Fig. 56: Schematic representation of the input and output interfaces
13.3.3.2 Input and output interfaces of the FBs
When calling the block, the parameters specified in the following Table can be supplied:
Name
P type 1)
uAdaptionMode
IN
Data type P/O 2) Initialization value3)
USINT
P
0
rD_actual
IN
LREAL
O
rD_StartAdaption
IN
LREAL
O
rD_EndAdaption
IN
LREAL
O
rGain_StartAdaption
IN
LREAL
O
rGain_EndAdaption
IN
LREAL
O
rd_Tuned
IN
LREAL
O
rGain_Tuned
IN
LREAL
O
PID_P
IN/OUT LREAL
1)
Parameter types: IN = Input parameters, OUT = Output parameters
2)
Parameter type: P = Mandatory parameters, O = Optional parameters
3)
Initialization values from the Win_Var unit
Significance
Mode:
0: No adaptation
1: Linear adaptation with table
2: Inverse adaptation
Actual roll diameter [m]
Starting value, diameter
Final value, diameter
Starting value, gain
Final value, gain
Set diameter
Set gain
Gain, PID controller
Table 44: Input, output parameters of the function block "FB_GainAdapter"
Version
Date
Page
V3.0
15.11.04
121
Document
User documentation
Copyright © Siemens AG 2003 All Rights Reserved
User_Manual_Simotion_Easy_Basics_V3_0.doc
For internal Use Only
Simotion Easy Basics
reviewed
13.3.4 FB_DiameterCalculator
Function block to calculate the roll diameter
There are different techniques to determine the roll diameter:
0. Using a sensor:
The analog signal of a sensor transfers the roll diameter to the drive or directly to the control.
Generally, the sensor must be calibrated.
1. Using the ratio between the actual speed and circumferential velocity:
In this mode, during the acceleration and deceleration phases, the diameter calculation is not
reliable. Further, the diameter calculation is only enabled above a specific minimum speed. The
minimum speed is specified as the ratio to the rated speed with iStart_Calc_Ratio as a %.
2. By incrementally adding the material thickness for the specified speed:
The results obtained using this mode are extremely accurate when the precise material thickness is
known, the winding hardness does not influence the material thickness and there are no significant
inclusions.
3. Using the ratio of the web length of one or several revolutions of the winder:
Especially in the accelerating and deceleration phases as well as at low speeds, this mode is more
accurate than mode 1. The parameter iRevolNumber determines the number of revolutions from
which the diameter is then calculated. An interpolation is made between the old and new values.
If the input bit boD_hold is set to TRUE, then the last calculated diameter value is kept. This can be
selected independently of the set calculation mode and at any time.
It is possible to toggle between the modes. For example, this means that the starting diameter can be
sensed using a sensor or entered at the HMI. When required it is possible to toggle between the
modes when required.
Version
Date
Page
V3.0
15.11.04
122
Document
User documentation
Copyright © Siemens AG 2003 All Rights Reserved
User_Manual_Simotion_Easy_Basics_V3_0.doc
For internal Use Only
Simotion Easy Basics
reviewed
DIAMETER CALCULATION
DiameterCalcMode
0
D_sensor
1
V_Master_set
Nact
D_Reset
D_init
1
Nact
0
2
1
D_max
SamplingTime
D_calculated
0
WebThickness
D_min
2
Rev. number
for Reset
D_hold
>
Pi
1
3
Nact
0
SamplingTime
Fine
interpolator
V_Master_set
Fig. 57: Principle mode of operation of the diameter calculation
13.3.4.1 Schematic LAD representation
FB_DiameterCalculator
LREAL
LREAL
LREAL
LREAL
LREAL
UINT
BOOL
LREAL
LREAL
LREAL
INT
LREAL
BOOL
LREAL
INT
rV_actual
rN_actual
rD_sensor
rD_min
rD_max
uCalcMode
boD_Reset
rD_Init
rWebThickness
rSamplingTime
iRevolNumber
rD_calculated
boD_hold
rN_n
iStart_Calc_Ratio
rD_calculated
LREAL
Fig. 58: Schematic representation of the input and output interfaces
Version
Date
Page
V3.0
15.11.04
123
Document
User documentation
Copyright © Siemens AG 2003 All Rights Reserved
User_Manual_Simotion_Easy_Basics_V3_0.doc
For internal Use Only
Simotion Easy Basics
reviewed
13.3.4.2 Input and output interfaces of the FBs
When calling the block, the parameters specified in the following Table can be supplied:
Name
P type 1)
Data type P/O 2)
rV_actual
IN
LREAL
P
Initializa3)
tion value
-
rN_actual
IN
LREAL
P
-
rD_sensor
IN
LREAL
O
-
rD_min
rD_max
uCalcMode
IN
IN
IN
LREAL
LREAL
UINT
P
P
P
0
boD_Reset
IN
BOOL
O
-
rD_init
IN
LREAL
O
0,05
rWebThickness
IN
LREAL
O
-
rSamplingTime
iRevolNumber
IN
IN
LREAL
INT
O
O
2
boD_hold
rN_n
IN
IN
BOOL
LREAL
O
P
-
iStart_Calc_Ratio
IN
INT
P
-
rD_calculated
IN/OUT LREAL
1)
Parameter types: IN = Input parameters, OUT = Output parameters
2)
Parameter type: P = Mandatory parameters, O = Optional parameters
3)
Initialization values from the Win_Var unit
Significance
Actual speed of the
master/material web [m/min]
Actual speed of rotation of the
winder [rpm]
Diameter measured by the
sensor [m]
Minimum diameter [m]
Maximum diameter [m]
Calculation mode:
0: Sensor
1:Vactual/Nactual
2: Addition, material thickness
3: Integration over revolutions
For mode 2: Enable set initial
value: D=D_init
For mode 3: Initialization
parameter D_init
For mode 2: Material
thickness [mm]
For mode 2: Clock cycle time
For mode 3: Number of
revolutions for the calculation
The last value is kept
Rated winder motor speed
[rpm]
Speed ratio to NN - where the
diameter calculation is started
in mode 1
Calculated diameter
Table 45: Input, output parameters of the function block "FB_DiameterCalculator"
Version
Date
Page
V3.0
15.11.04
124
Document
User documentation
Copyright © Siemens AG 2003 All Rights Reserved
User_Manual_Simotion_Easy_Basics_V3_0.doc
For internal Use Only
Simotion Easy Basics
reviewed
13.3.5 FB_TensionTaper
Function block to calculate the winding hardness characteristic as a function of the roll diameter
The winding hardness characteristic can be used to determine with which tension the material in the
process should be wound as a function of the roll diameter.
It only makes sense to use the winding hardness characteristic while winding. The characteristic is
dependent on the actual roll diameter. Various modes can be selected:
0.
1.
2.
3.
The selected set tension value is switched-through independent of the diameter
Hyperbolic winding hardness characteristic
Linear winding hardness characteristic
Linear interpolation in a table with 10 operating points
The D_Start_Taper variable can be used to determine from which diameter the winding hardness
characteristic should be affected. Then, as a function of the mode (uTaperMode), the input value is
reduced either as a hyperbolic function, linearly or using values in a table. This reduction is made up
to the entered maximum diameter (rD_max). If the roll diameter is at its maximum, then the input
setpoint (reference value) is reduced by the factor rTaperRatio.
Tension Taper
Taper mode
T set
0
D_actual
D_min
⎛
T _ set ⎜⎜1 −
⎝
⎞⎞
Taper _ Ratio ⎛ D _ actual − D _ Start _ Taper ⎞⎛
D _ max
⎜⎜
⎟⎟⎜⎜
⎟⎟ ⎟⎟
100
D _ actual
⎝
⎠⎝ D _ max − D _ Start _ Taper ⎠ ⎠
1
Tension_Set
D_max
D_Start_Taper
⎛ Taper _ Ratio ⎛ D _ actual − D _ Start _ Taper ⎞ ⎞
⎜⎜
⎟⎟ ⎟⎟
T _ set ⎜⎜1 −
100
⎝ D _ max − D _ Start _ Taper ⎠ ⎠
⎝
2
Taper_Ratio
3
Diameter_Tab
ARRAY[0..9] OF LREAL
Tension_Tab
ARRAY[0..9] OF LREAL
Fig. 59: Principle mode of operation of the winding hardness characteristic
Version
Date
Page
V3.0
15.11.04
125
Document
User documentation
Copyright © Siemens AG 2003 All Rights Reserved
User_Manual_Simotion_Easy_Basics_V3_0.doc
For internal Use Only
Simotion Easy Basics
reviewed
Fig. 60: Comparison between linear and hyperbolic winding hardness characteristics
13.3.5.1 Schematic LAD representation
FB_TensionTaper
USINT
LREAL
LREAL
LREAL
LREAL
LREAL
LREAL
ARRAY [0..9] of LREAL
ARRAY [0..9] of LREAL
uTaperMode
rD_actual
rd_min
rd_max
rd_StartTaper
rTaperRatio
rSet_Value_in
aD_Tab
aSet_Tab
Set_Value
LREAL
Fig. 61: Schematic representation of the input and output interfaces
Version
Date
Page
V3.0
15.11.04
126
Document
User documentation
Copyright © Siemens AG 2003 All Rights Reserved
User_Manual_Simotion_Easy_Basics_V3_0.doc
For internal Use Only
Simotion Easy Basics
reviewed
13.3.5.2 Input and output interfaces of the FBS
When calling the block, the parameters specified in the following Table can be supplied:
Name
P type
Data type
P/O 2)
InitializaSignificance
3)
tion value
uTaperMode
IN
USINT P
0
Mode:
0: No characteristic selected
1: Hyperbolic characteristic
2: Linear characteristic
3: Linear interpolation using a
table
rD_actual
IN
LREAL O
Actual roll diameter [m]
rd_min
IN
LREAL O
Minimum diameter [m]
rd_max
IN
LREAL O
Maximum diameter [m]
rd_StartTaper
IN
LREAL O
Starting diameter [m]
rTaperRatio
IN
LREAL O
Ratio of the tension reduction
[%]
rSet_Value_in
IN
LREAL O
Tension setpoint (reference
value) for modes 1, 2 and 3
aD_Tab
IN
ARRAY [0..9] of O
0.01,0.02,0. Tabular values, diameter
LREAL
03,0.04,0.05
,0.06,0.07,0.
08,0.09,0.1
aSet_Tab
IN
ARRAY [0..9] of O
30.0,30.0,29 Tabular values, setpoint
LREAL
.0,28.0,27.0,
26.0,25.0,25
.0,26.0,30.0
Set_Value
OUT
LREAL Tension setpoint (tension
reference value) for
connection to the rampfunction generator
1)
Parameter types: IN = Input parameters, OUT = Output parameters
2)
Parameter type: P = Mandatory parameters, O = Optional parameters
3)
Initialization values from the Win_Var unit
1)
Table 46: Input, output parameters of the function block "FB_TensionTaper"
Version
Date
Page
V3.0
15.11.04
127
Document
User documentation
Copyright © Siemens AG 2003 All Rights Reserved
User_Manual_Simotion_Easy_Basics_V3_0.doc
For internal Use Only
Simotion Easy Basics
reviewed
13.3.6 FB_Setpoint_RFG
Function block to calculate a ramp-function generator to avoid setpoint steps
This ramp-function generator can be connected after (downstream) from the winding hardness
characteristic in order to avoid setpoint steps in the system.
An interpolation is made between the last and the new setpoint. The ramp generator is calculated
using the variable UnwinderAxis.rControlledValue_RampTime (8s is pre-set as default value). This
variable specifies the time to reach the maximum setpoint (UnwinderAxis.rControlled_Value_Max)
from 0.
Setpoint
Ramp Function Generator
T max
TMAX
T set RFG
T set
0%
s
TRFG
TRFG
TRFG
Fig. 62: Principle mode of operation of the ramp-function generator
Version
Date
Page
V3.0
15.11.04
128
Document
User documentation
Copyright © Siemens AG 2003 All Rights Reserved
User_Manual_Simotion_Easy_Basics_V3_0.doc
For internal Use Only
Simotion Easy Basics
reviewed
13.3.6.1 Schematic LAD representation
FB_Setpoint_RFG
LREAL
rTensionSet
rTensionSet_RFG
LREAL
LREAL
LREAL
rTensionSetMax
rTensionSetRampTime
rSamplingTime
LREAL
Fig. 63: Schematic representation of the input and output interfaces
13.3.6.2 Input and output interfaces of the FBS
When calling the block, the parameters specified in the following Table can be supplied:
Name
P type 1)
Data type
P/O 2)
InitializaSignificance
tion value
rTensionSet
IN
LREAL P
Tension setpoint [%]
rTensionSetMax
IN
LREAL P
Maximum tension setpoint [%]
rTensionSetRampTime
IN
LREAL P
Ramp time, ramp-function
generator
rSamplingTime
IN
LREAL P
Sampling time of the task in
which the FB is called (IPO or
IPO2) [ms]
rTensionSet_RFG
OUT
LREAL Output, tension setpoint
1)
Parameter types: IN = Input parameters, OUT = Output parameters
2)
Parameter type: P = Mandatory parameters, O = Optional parameters
Table 47: Input, output parameters of the function block "FB_Setpoint_RFG"
Version
Date
Page
V3.0
15.11.04
129
Document
User documentation
Copyright © Siemens AG 2003 All Rights Reserved
User_Manual_Simotion_Easy_Basics_V3_0.doc
For internal Use Only
Simotion Easy Basics
reviewed
13.3.7 FB_Inertia
Calculating the moment of inertia
The moment of inertia has to be calculated in order to operate with widely varying moments of inertia
while winding. The moment of inertia can be used for the KP adaptation and the torque pre-control. For
the Kp adaptation, the drive is sent a ratio between the actual torque and the maximum torque at the
full roll via the Profibus protocol.
13.3.7.1 Schematic LAD representation
FB_Inertia
LREAL
rJMotor
LREAL
LREAL
LREAL
LREAL
LREAL
LREAL
LREAL
LREAL
rJGear
rJCore
rDiameter
rDiameterMax
rWidth
rDensity
rDiameterCore
rGearRatio
rInertia
LREAL
rInertiaRatio
LREAL
Fig. 64: Schematic representation of the input and output interfaces
13.3.7.2 Input and output interfaces of the FBS
When calling the block, the parameters specified in the following Table can be supplied:
Name
P type
Data type
P/O 2) InitializaSignificance
1)
tion value
rJMotor
IN
LREAL P
Moment of inertia, motor
[kg*m2]
rJGear
IN
LREAL O
Moment of inertia, gearbox
[kg*m2]
rJCore
IN
LREAL P
Moment of inertia, roll core
[kg*m2]
rDiameter
IN
LREAL P
Roll diameter [m]
rDiameterMax
IN
LREAL P
Maximum roll diameter [m]
rWidth
IN
LREAL P
Width of the roll [m]
rDensity
IN
LREAL P
Density [kg/m3]
rDiameterCore
IN
LREAL P
Roll core diameter [m]
rGearRatio
IN
LREAL O
Gearbox ratio
rInertia
OUT
LREAL P
Moment of inertia [kg*m2]
rInertiaRatio
OUT
LREAL P
Ratio [%]
1)
Parameter types: IN = Input parameters, OUT = Output parameters
2)
Parameter type: P = Mandatory parameters, O = Optional parameters
Table 48: Input, output parameters of the function block "FB_Inertia"
Version
Date
Page
V3.0
15.11.04
130
Document
User documentation
Copyright © Siemens AG 2003 All Rights Reserved
User_Manual_Simotion_Easy_Basics_V3_0.doc
For internal Use Only
Simotion Easy Basics
reviewed
13.3.8 FC_Pre_Control
Torque pre-control
In order to keep the deviations in the tension of the material web as low as possible while accelerating
and decelerating, the torque pre-control can be activated.
In the speed setpoint mode, an additional torque pre-control is sent to the drive via Profibus.
In the closed-loop tension control with torque limiting mode, the pre-control is switched to the torque
limit value that was calculated by the PID controller.
13.3.8.1 Schematic LAD representation
FC Pre Control
LREAL
rAccelMaster
LREAL
LREAL
LREAL
rInertia
rDiameter
rNominalTorque
FC_Pre_Control
LREAL
Fig. 65: Schematic representation of the input and output interfaces
13.3.8.2 Input and output interfaces of the FBs
When calling the block, the parameters specified in the following Table can be supplied:
Name
P type Data type
P/O 2)
Initializa- Significance
tion value
rAccelMaster
IN
LREAL P
Acceleration of the master
[m/s2]
2
rInertia
IN
LREAL P
Moment of inertia [kg*m ]
rDiameter
IN
LREAL P
Roll diameter [m]
rNominalTorque
IN
LREAL P
Rated motor torque [Nm]
FC_Pre_Control
OUT
LREAL P
Setpoint, torque pre-control
[Nm]
1)
Parameter types: IN = Input parameters, OUT = Output parameters
2)
Parameter type: P = Mandatory parameters, O = Optional parameters
1)
Table 49: Input, output parameters of the function block "FC_Pre_Control"
Version
Date
Page
V3.0
15.11.04
131
Document
User documentation
Copyright © Siemens AG 2003 All Rights Reserved
User_Manual_Simotion_Easy_Basics_V3_0.doc
For internal Use Only
Simotion Easy Basics
reviewed
Inertia and Torque Precontrol
JMotor
JGear
JCore
D_actual
D_max
D_core
Width
EmptyInertia
Inertia (kgm2)
:= rJMotor+rJGear+rJCore/rGearRatio**2;
FullMaterialinertia := PI*rWidth*rDensity*(rDiameterMax**4-rDiameterCore**4)/32/rGearRatio**2;
Materialinertia
:= PI*rWidth*rDensity*(rDiameter**4-rDiameterCore**4)/32/rGearRatio**2;
Inertia
:= (Emptyinertia + Materialinertia);
InertiaRatio
:=(Emptyinertia + Materialinertia)/(Emptyinertia + FullMaterialinertia)*100.0 ;
InertiaRatio (%)
Density
GearRatio
AccelMaster (m/s)
TorquePrecontrol = Inertia
Inertia
Diameter
AccelMaster
D _ Actual
2
TorquePrecontrol
(Nm)
Fig. 66: Principle calculation of the pre-control torque
Version
Date
Page
V3.0
15.11.04
132
Document
User documentation
Copyright © Siemens AG 2003 All Rights Reserved
User_Manual_Simotion_Easy_Basics_V3_0.doc
For internal Use Only
Simotion Easy Basics
reviewed
13.4 Integrating the functions into the project
Depending on the particular winder application, function blocks are called that are required. All FBs
should be principally called from a deterministic task (task in synchronism with IPO). The FBs should
not be assigned to a motion or background task.
The selection of the sampling time of the task in synchronism with the IPO depends on the number of
axes and the actual scope of the application.
In order to reduce the call time of the global variables and to make it easier to re-use the application, a
local variable is defined that is called in the various FBs.
As shown in Fig. 62, at the start of the unit, the global variable "WinderAxis" is copied into the local
variable "toWindAxis". The local variable is used for all of the following FB calls. At the end of the unit,
the contents of the local variable are re-written into the global variable.
In order to operate a winder axis, it is sufficient to parameterize a closed-loop speed controlled axis. A
program example with attached blocks (Wind_IPO) is integrated into the SEB.
In some cases, the blocks are already pre-assigned; however, various inputs must still be
parameterized. The parameterization of the individual functions is explained in the following Chapters.
Fig. 67: Calling the functions in the program example for a task in synchronism with IPO
Version
Date
Page
V3.0
15.11.04
133
Document
User documentation
Copyright © Siemens AG 2003 All Rights Reserved
User_Manual_Simotion_Easy_Basics_V3_0.doc
For internal Use Only
Simotion Easy Basics
reviewed
13.4.1 Reading-in values and filtering
The drive must read-in data on the Profibus. Data is then normalized, the type converted and filtered.
Data can be filtered using low-pass filters from the SFL.
If the drive is not connected to the clock-synchronous bus, then we recommend that the data for the
drive actual speed is manually entered onto Profibus and then filtered.
This has been taken into account in this example.
Fig. 68: Program example to read-in and convert actual values
After reading-in, data is
Variable
toWindAxis.rN_actual
toWindAxis.rDiameter_sensor
toWindAxis.rControlled_Value_Actual
toWindAxis.rTorque_Actual
g_rV_Master_set
g_rV_Master_act
toWindAxis.rN_actual_Filtered
toWindAxis.rDiameter_Filtered
toWindAxis.rControlled_Value_Actual_Filtered
Expression
Actual speed, winder axis
Diameter from sensor 1
Dancer roll position from sensor 2
Actual torque of the winder axis
Setpoint (reference) speed, master
Actual speed, master
Filtered actual speed of the winder axis
Diameter from sensor 1, filtered
Dancer roll position from sensor 2
Units
rpm
m
m
Nm
m/min
m/min
m/min
m
m
Table 50: Overview of the FB assignment
The filters must be supplied (assigned) the sampling time (rSamplingTime) as well as the smoothing
time (rSmoothingTime). These parameters are assigned variables SamplingTime = 6ms and
SmoothingTime = 12ms (from the WindVar unit).
Version
Date
Page
V3.0
15.11.04
134
Document
User documentation
Copyright © Siemens AG 2003 All Rights Reserved
User_Manual_Simotion_Easy_Basics_V3_0.doc
For internal Use Only
Simotion Easy Basics
reviewed
13.4.2 Diameter computer FB_DiameterCalculator
The FB to determine the diameter is now calculated.
Fig. 69: Calling the function block FB_DiameterCalculator
Version
Date
Page
V3.0
15.11.04
135
Document
User documentation
Copyright © Siemens AG 2003 All Rights Reserved
User_Manual_Simotion_Easy_Basics_V3_0.doc
For internal Use Only
Simotion Easy Basics
reviewed
The assignment of the FB parameters is documented in Table 50. The parameters in bold
(highlighted) must still be assigned or their initialization values must be checked.
Parameter FB
diameter
calculation
rv_actual
rn_actual
rd_sensor
rd_min
rd_max
uCalcMode
boD_reset
rD_init
rwebthickness
rsamplingtime
irevolnumber
boD_hold
rn_n
iStart_Calc_Ratio
rD_calculated
Assigned variable
g_rV_Master_set
toWindAxis.rN_actual_Filtered
toWindAxis.rDiameter_Filtered
Diameter_min
Diameter_max
toWindAxis.DiameterCalculation
Data.uDiameterCalculationMode
toWindAxis.DiameterCalculation
Data.boD_Reset
toWindAxis.DiameterCalculation
Data.rD_init
WebThickness
SamplingTime
toWindAxis.DiameterCalculation
Data.iRevolNumber
FALSE
3000
3
toWindAxis.DiameterCalculationDat
a.rDiameter_Calculated
Description
Actual speed of the master [m/min]
Speed of the winder shaft [rpm]
Diameter sensor [m]
Minimum diameter of the roll
Maximum diameter of the roll
Calculation mode
Set initial value D=D_init with TRUE
Initial value, diameter [m]
Material thickness in [mm]
Clock cycle time, IPO task
For mode 3: Number of revolutions
Keep old values: Dact = Dold for TRUE
Rated winder motor speed
Ratio to the rated speed for starting
calculation mode 1 in [%]
Calculated diameter
Table 51: Overview of the FB assignment
The material thickness only has to be parameterized if the associated mode 2 is used where the
material thickness is integrated-up. The diameter calculation mode can be selected using uCalcMode.
The actual diameter value is held with a TRUE signal level at boD_hold - and this is independent of
the operating mode that has been selected. The initial value of the diameter can be set in rD_init using
a TRUE signal edge at boD_reset. The operating mode can be selected from the user program using
uCalcMode. The ratio to the rated speed of the winder motor is selected using iStart_Calc_Ratio
where the diameter calculation is started in mode 1. Until this speed is reached, the following applies:
rD_calculated=rD_init.
Version
Date
Page
V3.0
15.11.04
136
Document
User documentation
Copyright © Siemens AG 2003 All Rights Reserved
User_Manual_Simotion_Easy_Basics_V3_0.doc
For internal Use Only
Simotion Easy Basics
reviewed
13.4.3 Torque calculation
The FB to determine the moment of inertia of the roll must be supplied with the dimensions of the roll
and the fixed moment of inertia. All of the parameters in bold - such as the fixed moments of inertia of
the mechanical system as well as the data regarding the material, the roll and the gearbox - must be
appropriately supplied.
The moment of inertia ratio, calculated as a function of the roll diameter (rInertiaRatio) is
interconnected to the drive. There, when required, the controller gain can be adapted.
Fig. 70: Calling the function block FB_Inertia
Parameter FB
inertia
calculator
rjmotor
rjgear
rjcore
rdiameter
rdiametermax
rwidth
rdensity
rdiametercore
rgearratio
rinertia
rinertiaratio
Assigned variable
toWindAxis.DiameterCalculationData.
rDiameter_Calculated
Diameter_Max
WebWidth
WebDensity
toWindAxis.rDiameterCore
toWindAxis.rGearRatio
toWindAxis.rInertia
toWindAxis.rInertiaRatio
Description
Moment of inertia, motor [kg*m2]
Moment of inertia, gearbox [kg*m2]
2
Moment of inertia, roll core [kg*m ]
Actual roll diameter [m]
Maximum diameter [m]
Roll width [m]
Material thickness [kg*m3]
Roll core diameter [m]
Gearbox ratio
Output, moment of inertia
Output, ratio between the actual moment
of inertia and the maximum moment of
inertia of the roll [%]
Table 52: Overview of the FB assignment
Version
Date
Page
V3.0
15.11.04
137
Document
User documentation
Copyright © Siemens AG 2003 All Rights Reserved
User_Manual_Simotion_Easy_Basics_V3_0.doc
For internal Use Only
Simotion Easy Basics
reviewed
13.4.4 Torque pre-control
The torque pre-control is effective while accelerating and for the closed-loop control techniques with
speed correction, transfers an additive torque setpoint to the drive. For the closed-loop control
techniques with torque limiting, the torque limit in the drive is increased. The torque pre-control
depends on the acceleration of the winder shaft, the moment of inertia of the roll and its diameter and
the rated motor torque. If torque pre-control is used, then the function fc_pre_control must be
incorporated in the IPO task. A pre-control value as a % of MN is the output of the function.
Depending on the closed-loop control technique, the output of the function must be connected (interconnected) differently.
For closed-loop control techniques with speed correction, the pre-control value from the ramp-function
generator is added to the setpoint from the torque pre-control before this is sent to the drive.
The user must make this interconnection!
T set
1
Dact
Dact/2
Torque
Precont.
AccelMaster
Tset RFG for analog
out
Add_Torque
Fig. 71: Schematic integration of the torque pre-control for speed correction
For closed-loop control techniques with torque limiting, in addition to the pre-control value from the
ramp-function generator being added, the output of the tension controller must also be added to the
torque pre-controlled value! The user must also make this interconnection!
Dact/2
Tset
1
Dact
Tension controller
M_Limit_Pos
M_Limit_Neg
Tact
Dact
AdaptionMode
Dmax
Dact
Gain
adapter
Inertia
calculator
AccelMaster
InertiaRatio
Torque
Precont.
Fig. 72: Schematic integration of the torque pre-control for torque limiting
After the data has been converted, the result of the addition can be output onto the Profibus. The
variable o_winder_add_torque is, in the I/O browser, already connected to Profibus and can be used.
Version
Date
Page
V3.0
15.11.04
138
Document
User documentation
Copyright © Siemens AG 2003 All Rights Reserved
User_Manual_Simotion_Easy_Basics_V3_0.doc
For internal Use Only
Simotion Easy Basics
reviewed
For operation with torque limiting, the supplementary torque is added to the positive and negative
torque limit (at P493 and P499 in the VC). The return value of function fc_pre_control must therefore
be added to the outputs of the FB_Control_WithTorqueLimitation, TorqueLimit_Pos and Torque
Limit_Neg. The variables o_winder_torquelimit_pos and o_winder_torquelimit_neg are available for
this purpose and appropriately configured on Profibus.
Parameter FC
pre-control
raccelmaster
rinertia
rdiameter
rnominaltorque
FC_Pre_Control
Assigned variable
Master.motionstatedata.command
acceleration
toWindAxis.rInertia
toWindAxis.DiameterCalculationData.
rDiameter_Calculated
-
Description
Acceleration of the master [m/s2 ]
Moment of inertia, roll [kg*m2]
Roll diameter [m]
Rated motor torque [Nm]
Setpoint, torque pre-control
Table 53: Overview of the FB assignment
The acceleration rate of the master, the rated motor torque and the output of the Pre_Control function
must still be assigned!
Version
Date
Page
V3.0
15.11.04
139
Document
User documentation
Copyright © Siemens AG 2003 All Rights Reserved
User_Manual_Simotion_Easy_Basics_V3_0.doc
For internal Use Only
Simotion Easy Basics
reviewed
13.4.5 Commissioning the winding hardness characteristic
The effect of the winding hardness characteristic is effective, depending on the winding mode, at
different locations. For closed-loop tension control with dancer roll and speed correction, the tension is
set at the dancer roll using a pneumatic or hydraulic adjusting mechanism. In order to adjust the
tension, the counter-pressure (opposing pressure) of the dancer roll must be set. For closed-loop
tension control with torque limiting, the tension is directly set in the SIMOTION system by adding an
additional tension setpoint.
The winding hardness characteristic is implemented using the FB_Tensiontaper. Various modes can
be selected to condition the characteristic. The output of the FB (set_value) is a tension setpoint
(tension reference value) that should always be followed (downstream) by a ramp-function generator
(FB_Setpoint_RFG) in order to avoid setpoint steps in the system.
For the closed-loop control technique using a dancer roll, this setpoint should be switched, for
example, to the pneumatic actuator of the dancer roll through an analog output. This sets the counter
pressure (opposing pressure) at the material web and has to be weighted according to the dancer roll.
For this closed-loop control technique with torque limiting, the output of the ramp-function generator is
compared to the actual tension value and the result is switched to the tension controller (Fig. 47).
Even if a winding hardness characteristic is not used, this can be included in the sequence program.
This is because mode 0 can be set, where the setpoint is switched-through, using the input variable
uTaper Mode at the FB Tension Taper.
Dact/2
Tset
1
Dact
Tension controller
Tact
Fig. 73: Signal interconnection of the winding hardness characteristic for the torque limiting
mode
Version
Date
Page
V3.0
15.11.04
140
Document
User documentation
Copyright © Siemens AG 2003 All Rights Reserved
User_Manual_Simotion_Easy_Basics_V3_0.doc
For internal Use Only
Simotion Easy Basics
Parameter FB
Tension Taper
uTaperMode
rD_actual
rd_min
rd_max
rd_StartTaper
rTaperRatio
rSet_Value_in
aD_Tab
aSet_Tab
Set_Value
reviewed
Assigned with variable
toWindAxis.TaperData.uTaperMode
toWindAxis.DiameterCalculationData.r
Diameter_Calculated
Diameter_Min
Diameter_Max
toWindAxis.TaperData.rD_StartTaper
toWindAxis.TaperData.rTaperRatio
Wind_Set
toWindAxis.TaperData.aD_Tab
toWindAxis.TaperData.aSet_tab
rSetpoint_RFG_Input
Description
Mode:
0: No characteristic selected
1: Hyperbolic characteristic
2: Linear characteristic
3: Linear interpolation using a table
Actual diameter of the roll [m]
Minimum diameter [m]
Maximum diameter [m]
Starting diameter [m]
In modes 1 and 2: [%]
Tension setpoint
Tabular values, diameter
Tabular values, setpoint
Tension setpoint output to assign to the
ramp-function generator
Table 54: Overview of the FB assignment
The parameters of the FB are pre-assigned corresponding to the table. The tension setpoint
(rSet_Value_in) and the mode of the winding hardness characteristic calculation (uTaperMode) should
be assigned from the user program. When using calculation mode 3, further, tabular values are
required (aD_Tab and aSet_Tap).
Version
Date
Page
V3.0
15.11.04
141
Document
User documentation
Copyright © Siemens AG 2003 All Rights Reserved
User_Manual_Simotion_Easy_Basics_V3_0.doc
For internal Use Only
Simotion Easy Basics
reviewed
13.4.6 Ramp-function generator
The ramp-function generator is connected after the winding hardness characteristic and prevents
setpoint steps in the system. The input rTensionSet is already connected to the output of the winding
hardness characteristic. When the other parameters are assigned, the appropriate checks must be
made and if required changed.
The user must connect the output of the ramp-function generator rTensionSet_RFG depending on the
winding mode!
Parameter FB
SetPoint RFG
rTensionSet
rSetpoint_RFG_Input
rTensionSetMax
rTensionSetRamp
Time
rSamplingTime
toWindAxis.rControlled_Value_Max
ToWindAxis.rControlled_Value_RampTim
e
SamplingTime
rTensionSet_RFG
ToWindAxis.rControlled_Value_Set_RF
G
Assigned with variable
Description
Tension setpoint input from the
Tension Taper
Maximum tension setpoint
Ramp time, ramp-function
generator
Sampling time of the task in
which the FB is called (IPO or
IPO2) [ms]
Output, tension setpoint
Table 55: Overview of the FB assignment
Version
Date
Page
V3.0
15.11.04
142
Document
User documentation
Copyright © Siemens AG 2003 All Rights Reserved
User_Manual_Simotion_Easy_Basics_V3_0.doc
For internal Use Only
Simotion Easy Basics
reviewed
13.4.7 Adaptation of the controller gain
In order to modify the controller gain of the tension controller as a function of the roll diameter,
FB_GainAdapter is used.
Parameter FB Gain
Adapter
uAdaptionMode
rD_actual
rD_StartAdaption
rD_EndAdaption
rGain_StartAdaption
rGain_EndAdaption
rd_Tuned
rGain_Tuned
PID_P
Assigned with variable
toWindAxis.GainAdaptionData.uGainAdaptio
nMode
toWindAxis.DiameterCalculationData.rDiamet
er_Calculated
toWindAxis.GainAdaptionData.rD_StartAdapt
ion
WinderAxis.GainAdaptionData.rD_endAdapti
on
WinderAxis.GainAdaptionData.rGain_StartAd
aption
toWindAxis.GainAdaptionData.rGain_End_A
daption
toWindAxis.GainAdaptionData.rD_Tuned
toWindAxis.GainAdaptionData.rGain_Tuned
toWindAxis.PID_Data.rPID_P
Description
Mode:
0: No adaptation
1: Linear adaptation with
table
2: Inverse adaptation
Actual diameter of the roll
[m]
Starting value, diameter
Final value, diameter
Starting value, gain
Final value, gain
Set diameter
Set gain
Gain, PID controller
Table 56: Overview of the FB assignment
The adaptation mode can be selected from the user program. The starting diameter and final diameter
as well as the starting and final values of the controller gain must be adapted. The output of FB
(PID_P) is already connected to the tension controller blocks with the variable to
WindAxis.PID_Data.rPID_P .
Version
Date
Page
V3.0
15.11.04
143
Document
User documentation
Copyright © Siemens AG 2003 All Rights Reserved
User_Manual_Simotion_Easy_Basics_V3_0.doc
For internal Use Only
Simotion Easy Basics
reviewed
13.4.8 Tension controller
Depending on the closed-loop control mode, either closed-loop control with torque limiting or with
speed correction is activated in the uControlMode variable.
Fig. 74: Excerpt of the program to changeover the operating mode
Closed-loop control with torque limiting:
Block FB_Control_WithTorqueLimitation has, as output parameter, in addition to the speed setpoint,
also the upper and lower torque limit for the drive. The block uses the PID controller from the SFL.
The actual tension value from the tension transducer and the tension setpoint
(r_Controlled_Value_actual_Filtered and r_Controlled_Value_Set) is made available to this block. The
tension setpoint is received directly from the ramp-function generator - that is either directly connected
with the tension setpoint or it receives its values via the winding hardness characteristic.
The tension controller itself is configured as a PID controller. This must be appropriately set for both
blocks.
Version
Date
Page
V3.0
15.11.04
144
Document
User documentation
Copyright © Siemens AG 2003 All Rights Reserved
User_Manual_Simotion_Easy_Basics_V3_0.doc
For internal Use Only
Simotion Easy Basics
Parameter
rV_set
rD_actual
uWindingMode
rSamplingTime
reviewed
Assigned with variable
g_rV_Master_set
toWindAxis.DiameterCalculationData.rDiamet
er_Calculated
toWindAxis.uWindingMode
SamplingTime
rControlled_Value_s
et
rControlled_Value_a
ctual_Filtered
rPID_P
toWindAxis.rControlled_Value_set_RFG
iPID_I
toWindAxis.PID_Data.iPID_I
iPIP_D
toWindAxis.PID_Data.iPID_D
iPID_DelayTime
toWindAxis.PID_Data.iPID_D_DelayTime
boPID_D_Set
boPID_Reset
toWindAxis.PID_Data.boPID_D_Set
toWindAxis.PID_Data.boPID_Reset
rPID_OUT_LIMIT
toWindAxis.PID_Data.rPID_OUT_LIMIT
toWindAxis.rControlled_Value_Actual_Filtere
d
toWindAxis.PID_Data.rPID_P
rN_n
i_Offset_ratio
rN_set
TorqueLimit_Pos
TorqueLimit_Neg
toWindAxis.rN_set
toWindAxis.rTorqueLimit_Pos
toWindAxis.rTorqueLimit_Neg
Description
Master speed [m/min]
Actual roll diameter [m]
Winder mode
Sampling time of the task in
which the FB is called (IPO
or IPO2) [ms]
Tension setpoint from the
ramp-function generator
Tension actual value [%]
P gain of the tension
controller
Integral component of the
PID controller
Differential component of the
PID controller
Delay time of the PID
controller (filter, D
component)
Enable D component
Reset PID controller output
Limits the controller output
[%]
Rated speed, winder motor
Overcontrol setpoint as a
ratio to the rated speed [%]
Speed setpoint [rpm]
Positive torque limit [%]
Negative torque limit [%]
Table 57: Overview of the FB assignment
The parameters of the FB in bold (highlighted) must be adapted to the user program. The
uWindingMode variable is one of these variables that controls the winding mode. The controller data
of the PID controller must also be set. Further, the user must connect the outputs of the function block
and the positive and negative torque limits. The speed setpoint r_Nset is transferred to the drive via a
_move command.
Version
Date
Page
V3.0
15.11.04
145
Document
User documentation
Copyright © Siemens AG 2003 All Rights Reserved
User_Manual_Simotion_Easy_Basics_V3_0.doc
For internal Use Only
Simotion Easy Basics
reviewed
Fig. 75: Excerpt of the program, closed-loop control mode, torque limiting
Closed-loop control with speed correction
The FB_Control_WithSpeedSetpointChange block controls the tension in the material web by
controlling the winder speed.
The block calculates a speed setpoint as a function of the dancer roll position. If the tension in the
system drops, then the drive is accelerated and establishes a higher tension (winder). For an
unwinder, the drive would decelerate when the tension drops in order to establish the tension.
uWindingMode parameters are used to set the modes. This allows either a winder or unwinder mode
to be set (10+11 or 20+21), winding from either the bottom or top (10+20 or 11+21), whether the
closed-loop tension control is de-activated (30+31) or only the tension control should effective (40-43).
The web speed is read-in with rV_set, N_set outputs the speed setpoint for the drive. This value is
used as speed setpoint for the subsequently connected _move command.
Fig. 76: Excerpt of the program, closed-loop control mode with speed correction
Version
Date
Page
V3.0
15.11.04
146
Document
User documentation
Copyright © Siemens AG 2003 All Rights Reserved
User_Manual_Simotion_Easy_Basics_V3_0.doc
For internal Use Only
Simotion Easy Basics
reviewed
Parameter
rV_set
Assigned with variable
g_rV_Master_set
Description
Master/web speed [m/min]
rD_actual
toWindAxis.DiameterCalculationData.rDiamet
er_Calculated
toWindAxis.uWindingMode
Actual roll diameter [m]
uWindingMode
rSamplingTime
SamplingTime
rControlled_Value_set
toWindAxis.rControlled_Value_set_RFG
rControlled_Value_act
ual_Filtered
toWindAxis.rControlled_Value_Actual_Filtere
d
rPID_P
toWindAxis.PID_Data.rPID_P
iPID_I
toWindAxis.PID_Data.iPID_I
iPIP_D
toWindAxis.PID_Data.iPID_D
iPID_DelayTime
toWindAxis.PID_Data.iPID_D_DelayTime
boPID_D_Set
boPID_Reset
rPID_OUT_LIMIT
toWindAxis.PID_Data.boPID_Reset
toWindAxis.PID_Data.boPID_Reset
toWindAxis.PID_Data.rPID_OUT_LIMIT
N_set
toWindAxis.rN_set
N_set_Correction
toWindAxis.rControllerOutput
N_set_Line
toWindAxis.rN_setWithoutCorrection
Winding mode:
10: Winder from the top
11: Winder from the bottom
20: Unwinder from the top
21: Unwinder from the
bottom
30: Only speed pre-control,
from the top
31: Only speed pre-control,
from the bottom
40: Only tension control,
winder, from the top
41: Only tension control,
winder, from the bottom
42: Only tension control,
unwinder, from the top
43: Only tension control,
unwinder, from the bottom
Sampling time of the task in
which the FB is called (IPO
or IPO2) [ms]
Setpoint (reference) position
of the dancer roll [%]
Actual position of the dancer
roll [%]
P gain of the PID position
controller of the dancer roll
Integral component of the
PID controller
Differential component of the
PID controller
Delay time of the PID
controller (filter, D
component)
Enable D component
Reset PID controller output
Limits the controller output
[rpm]
Speed setpoint for the drive
[rpm]
Speed correction value from
the position controller [rpm]
Material web speed [rpm]
Table 58: Overview of the FB assignment
Version
Date
Page
V3.0
15.11.04
147
Document
User documentation
Copyright © Siemens AG 2003 All Rights Reserved
User_Manual_Simotion_Easy_Basics_V3_0.doc
For internal Use Only
Simotion Easy Basics
reviewed
13.4.9 Converting and the output of values
Before the task with the winder functions can be exited, the data determined for the torque limiting and if activated - also the additive torque and the Kp adaptation must be converted and output. After
converting from type LREAL to DINT, the particular value is written to the variable, configured in the
I/O browser and therefore made available to the drive via Profibus.
Fig. 77: Excerpt of the program to output the calculated data at the drive
Version
Date
Page
V3.0
15.11.04
148
Document
User documentation
Copyright © Siemens AG 2003 All Rights Reserved
User_Manual_Simotion_Easy_Basics_V3_0.doc
For internal Use Only
Simotion Easy Basics
reviewed
13.5 Communications, Simotion ÅÆ drive with extended Profibus protocol
In order to use the winder application, various pieces of data must be read-in from the drive and from
the I/O. Depending on the particular application and winder type, the dancer roll position, the
measured roll diameter, the actual motor torque and the actual speed are required.
The sensors can be directly connected to the SIMOTION I/O via Profibus. However, it is not possible
to connect to the analog inputs of the drive.
If the analog inputs of the drive are used, then these must be appropriately connected-up in the drive
(refer to Chapter 13.6, Commissioning the drive)
Additional data can be transferred via Profibus by extending the standard telegram.
Fig. 78: Telegram properties using an application example of MASTERDRIVES VC
Version
Date
Page
V3.0
15.11.04
149
Document
User documentation
Copyright © Siemens AG 2003 All Rights Reserved
User_Manual_Simotion_Easy_Basics_V3_0.doc
For internal Use Only
Simotion Easy Basics
reviewed
Input words can be configured in SIMOTION. These are then assigned to data from the drive using the
I/O browser (refer to Fig. 74).
Fig. 79: Declaring variables in the I/O browser of SIMOTION for Profibus
The information is supplied in the form of words; this means that in some instances it is necessary to
convert data types.
In this case, the WORD_TO_LREAL function can be used in order to convert input words into LREAL
data types and then use them in SIMOTION.
Version
Date
Page
V3.0
15.11.04
150
Document
User documentation
Copyright © Siemens AG 2003 All Rights Reserved
User_Manual_Simotion_Easy_Basics_V3_0.doc
For internal Use Only
Simotion Easy Basics
reviewed
13.6 Drive commissioning
In order to use Masterdrives VC with a SIMOTION control as winder, the following steps must be
carried-out:
1
Carry-out prompted commissioning:
Prompted commissioning should be carried-out using the Drive Monitor, whereby it must be
ensured that Profibus is selected as the communications path
2
Connecting the motor actual speed to the PZD part (word 2)
Interconnect P734, index 02 (SrcCB/TBTrnsData) to K151 (n/f(act,smo´d))
3
Connect the torque actual value to the PZD part
Interconnect P734, index 05 (SrcCB/TBTrnsData) to K241 (Torque(act))
4
Connect the upper torque limit
Interconnect P493, index 01 (Src FixTorque1) to K3003 (CB/TB Word 3)
5
Connect the lower torque limit
Interconnect P499, index 01 (Src FixTorq 2) to K3004 (CB/TB Word 4)
6
Connect the supplementary torque setpoint
Interconnect P506, index 01 (Src Torq Add) to KK3005 (CB/TB Word 5)
7
Connect KP-adaptation
Interconnect P232, index 01 (Src n/f RegAdapt) to K3006 (CB/TB Word 6)
8
Set the reference speed
Set P353 (Ref Speed) (e.g. 3000 rpm)
9
Enable positive direction of rotation
Connect P571, index 01 (Src FWD Speed) to B 1 (FixBinector 1)
10
Enable negative direction of rotation
Connect P572, index 01 (Src REV speed) to B 1 (FixBinector 1)
11
No increase, motorized potentiometer
Interconnect P573 (Src MOP UP) to B0 (FixBinector 0)
12
No decrease, motorized potentiometer
Interconnect P574 (Src MOP Down) to B0 (FixBinector 0)
13
Initiate an external fault
Interconnect P575, index 01 to B1 (FixBinector 1)
If the drive analog inputs are to be used, then these must also be connected to Profibus:
14
Connect analog input 1 (for example, the sensor roll diameter)
Interconnect P734, index 03 (SrcCB/TBTrnsData) to K11 (AI1 Setpoint)
15
Connect analog input 2 (for example, the sensor dancer roll position)
Interconnect P734, index 04 (SrcCB/TBTrnsData) to K13 (AI2 Setpoint)
Version
Date
Page
V3.0
15.11.04
151
Document
User documentation
Copyright © Siemens AG 2003 All Rights Reserved
User_Manual_Simotion_Easy_Basics_V3_0.doc
For internal Use Only
Simotion Easy Basics
reviewed
After this, the Profibus assignment looks like this:
Send data from the drive
Word 1
Status word
Word 2
Nact
Word 3
Analog input1
Word 4
Analog input2
Word 5
Torque
Word 6
Free
Word 5
Add. torque
Word 6
Inertia ratio
Table 59: Profibus configuration, send data from the drive
Receive data from the drive
Word 1
Control word
Word 2
Nset
Word 3
Mlimit+
Word 4
Mlimit-
Table 60: Profibus configuration, receive data from the drive
Version
Date
Page
V3.0
15.11.04
152
Document
User documentation
Copyright © Siemens AG 2003 All Rights Reserved
User_Manual_Simotion_Easy_Basics_V3_0.doc
For internal Use Only
Simotion Easy Basics
reviewed
13.7 Systematically commissioning the winder
Prerequisites
•
•
•
•
•
The drive was connected-up/wired-up corresponding to Chapter 13.6 and Profibus was
appropriately configured
The current and speed controller in the drive were optimized
The tension transducer and/or the dancer roll were adjusted and calibrated
The control sense of the dancer was checked - and when required changed
The blocks have been appropriately incorporated and interconnected in the SIMOTION project
Speed calibration
The winder speed must be checked and if required calibrated. To do this, de-activate the closed-loop
tension control (uWindingMode = 30/31). Operate the winder with the minimum diameter and enter the
diameter. Inhibit the diameter computer or maintain the minimum diameter (boD_hold). Enter a speed
setpoint (approx. 20% of Vmax ); either directly via rV_set or via the channel winding hardness
characteristic ramp-function generator (rSet_Value_in). To do this, the winding hardness control must
be de-activated (uTaperMode = 0).
Measure the speed using a handheld tachometer. Check at the maximum speed. This operation
should be repeated for larger diameters.
Inertia compensation: Constant moment of inertia
In order to check the constant moment of inertia, the empty winder with the diameter value held is
accelerated and decelerated. The pre-control must be activated (ensure the corresponding
wiring/connections). The speed controller output of the winder axis should be minimal. This should be
checked in the drive. If this is not the case, then the values of the moment of inertia calculation must
be checked and if required adapted
(FB_Inertia_Calculation: Trägheitsmoment Rollenkern/Getriebe/Motor: rJCore/rJGear/rJMotor).
[(FB_Inertia_Calculation: Moment of inertia, roll core/gearbox/motor: rJCore/rJGear/rJMotor)].
Inertia compensation: Variable moment of inertia
After the constant moment of inertia has been calibrated, repeat the measurements. To do this, wind a
roll with ½ of the maximum diameter. Enter the diameter and hold and then accelerate and decelerate
the winder via the ramp-function generator. The speed controller output must again be minimal.
Otherwise, check the values of the moment of inertia calculation that are variable - this means, for
example, the specific density of the material, width of the roll (rDensity, rWidth).
Repeat the operation with a roll at the maximum diameter.
Check the tension pre-control (with a direct closed-loop tension control with tension
transmitter)
Thread and clamp the material web. The diameter must be checked and if required corrected. The
tension controller limits must be set to zero (rPID_OUT_LIMIT = 0). At standstill, switch-in the closedloop tension control (uWindingMode = 40-43). The pre-control must set the required tension actual
value - otherwise check the scaling.
Commissioning the closed-loop tension control
Start with extremely slow controller settings and limited tension controller output (for example, 10% at
rPID_OUT_LIMIT).
Version
Date
Page
V3.0
15.11.04
153
Document
User documentation
Copyright © Siemens AG 2003 All Rights Reserved
User_Manual_Simotion_Easy_Basics_V3_0.doc
For internal Use Only
Simotion Easy Basics
reviewed
The output of the tension controller should never exceed more than 5-7% (TorqueLimit_Pos /
TorqueLimit_Neg).
The tension controller can be optimized using setpoint steps (setpoint jumps).
13.8 Function elements and their integration
The user can interconnect the function blocks depending on the particular application. The blocks
themselves cannot be modified. Depending on the particular application, interconnections must be
made according to the block diagrams shown in Chapter 13.1.
Source
ToolLib / WindLib1 /
WindLib2
L_Winder
Feature / function
Library
Program / function
FB_Control_WithSpeedSetpo
intChange
FB_Control_WithTorqueLimit
ation
FB_GainAdapter
FB_DiameterCalculator
FB_TensionTaper
FB_Setpoint_RFG
FB_Inertia
FC_TorquePrecontrol
WORD_to_LREAL
WORD_to_REAL
FB_LowPassFilter
Programming
language
Know-how protection
ST
No / No / Yes
Must be
adapted to the
application
Function block to calculate the speed setpoint for
direct closed-loop control with dancer roll
Function block to calculate the speed setpoint for
direct closed-loop tension control with torque
limiting
Function block to adapt the speed controller gain
as a function of the roll diameter
Function block to calculate the roll diameter
Function block to calculate the winding hardness
characteristic as a function of the roll diameter
Function block to calculate a ramp-function
generator to avoid setpoint steps
Function block to calculate the changing moment
of inertia of the roll while winding
Function to generate the torque pre-control value
Data conversion, from word to LREAL
Data conversion, from word to REAL
Low-pass filter from the SIMOTION Function
Library
Source
--
Programming
language
Know-how protection
Library
Program / function
L_BaCtrl
Feature / function
FB_basiscontrol_pid
PID controller from the SIMOTION Function
Library
Source
--
Library
Program / function
-Feature / function
Unit Wind_Var
Programm Wind_IPO
Declaration of variables for the program example
Program example for closed-loop tension control
with speed correction and dancer roll
Programming
language
Know-how protection
Yes
Yes
No
No
No
No
No
No
No
No
No
ST
No
Must be
adapted to the
application
No
ST
No
Must be
adapted to the
application
Yes
Yes
Table 61: Program elements of the winder function
Version
Date
Page
V3.0
15.11.04
154
Document
User documentation
Copyright © Siemens AG 2003 All Rights Reserved
User_Manual_Simotion_Easy_Basics_V3_0.doc
For internal Use Only
Simotion Easy Basics
reviewed
14 Standard application "Simotion Easy Pos"
Today, SIMOTION still does not have a basic and fast way of positioning axes in the 'automatic
mode' (similar basic positioning functions are available in Simodrive 611U and SIMOVERT
Masterdrives MC). The objective of the basic positioning function for SIMOTION is to implement
an easy to use interface in ProTool/Pro to commission axes (configuration and manual operation)
as well as to configure automatic operation. This means that after the system has been
commissioned for the first time, Simotion Scout is no longer required to modify axis data (load
gearbox, dynamic values, ...) or automatic traversing sets/blocks. In addition, a program manager
is provided to manage automatic programs, print axis settings and programs and archive axis
data and programs on external data medium. This will support users for series commissioning as
well as documenting the plant or system.
The basic positioning function for SIMOTION encompasses up to 12 axes and can run on C2302, P350 and D435 (future platforms are not excluded). Numerous drives can be connected - e.g.
Simodrive 611U, Posmo C/S, SIMOVERT Masterdrives MC, Sinamics S, analog drives, etc.
The automatic sequence comprises a maximum of 128 traversing sets/blocks. Functions such as
absolute or relative positioning, the speed, wait for input, set output, block cascading, 'block
suppressed/skipped' and if required delay time can be entered for each traversing block.
Version
Date
Page
V3.0
15.11.04
155
Document
User documentation
Copyright © Siemens AG 2003 All Rights Reserved
User_Manual_Simotion_Easy_Basics_V3_0.doc
For internal Use Only
Simotion Easy Basics
reviewed
14.1 Hardware and software requirements
14.1.1 Engineering PC
•
•
MS Windows XP or 2000
Minimum:
PG or PC with Pentium processor III (500 MHz)
256MB RAM
1024x768 pixel
Step7 V5.3
Simotion Scout V3.1.1
HMI software:
ProTool/Pro V6.0 Sp2
Configuration software for drives:
Simodrive: SimoComU V07.02.06 611U or DriveES Basic V5.3
Masterdrives: Simovis V5.4 or DriveES Basic V5.3
Sinamics S Simotion Scout or Simotion Starter V3.1.1
Micromaster MM4: Simotion Scout or Simotion Starter V3.1.1
•
•
•
•
14.1.2 Motion controller
•
C230-2 with Simotion Kernel V3.1.1 (or higher),
or
P350 with Simotion Kernel V3.1.1 (or higher),
or
D435 with Simotion Kernel V3.1.1 (or higher)
•
•
14.1.3 Drives
•
•
•
•
•
•
Simodrive 611U from V07.02.06
Masterdrives MC from firmware V1.64 and CBP2 from firmware V2.23
Sinamics S
Posmo C/S
Analog drives
...
Also refer to the appropriate SIMOTION documentation.
Version
Date
Page
V3.0
15.11.04
156
Document
User documentation
Copyright © Siemens AG 2003 All Rights Reserved
User_Manual_Simotion_Easy_Basics_V3_0.doc
For internal Use Only
Simotion Easy Basics
reviewed
14.2 Commissioning
1 up to a maximum of 12 axes can be handled. 128 traversing blocks are possible for each automatic
program.
All of the position data is transferred via the interface as DINT (4 bytes) in micrometers or
Degrees/1000 for rotary axes. Speed/velocity data is transferred as DINT multiplied by a factor of
100% in 10 micrometer/s or Degrees/100s. In this case, for position, axes must be configured with mm
as units and for speed with mm/s in Simotion.
In order to create the basic positioning function for a different platform than the C230-2, the simplest
approach is to selectively export the C230-2 'device' and then import this into the new project.
Advantage: The EPos programs and axes are then also imported and the execution level settings are
already pre-configured.
When printing, the numerical format settings are used according to the system control (control panel)
Æ regional options.
14.2.1 Configuring the axes
For the basic positioning function, the axes must be set-up as linear axes with the units mm for
position and mm/s for speed. Also refer to the SIMOTION documentation.
In the project example, the negative hardware limit switch is pre-assigned with address 501.0 for the
first axis (axis_X), the positive hardware limit switch with address 501.1 and the input of the Bero
when referencing with address 501.2. Corresponding to the modules of an ET200S, the second axis
(axis_Y) is assigned the neg. HW limit 501.4, pos. HW limit 501.5 and Bero 501.6, etc.
This means that for platforms other than the C230-2 the simplest approach is to copy - in Scout - the
axes into the new project and if Simodrive is not used, to assign the axes to the new drive in the axis
Wizard (assistant) in Scout.
Comment: The encoder can only be correctly configured when using Scout. The values displayed at
the operator interface presently cannot be changed.
The additional axis configuration is set using the ProTool operator interface and is activated at the
STOP/RUN transition of the Simotion control.
In RUN, the following axis settings are made online:
•
•
•
•
•
•
•
•
•
Manual and automatic speed
Manual and automatic acceleration/deceleration
Manual and automatic jerk
Following error monitoring
Standstill monitoring
Positioning monitoring
Gain factor Kv
Pre-control component Kpc
Time constant, speed controller vTC
The software limit switches are re-accepted at each referencing operation.
Comment: If the axis is traversed with less than 0.5*Vmax in the automatic mode, then slow
acceleration, jerk and declaration are used in order to avoid (optically visible) vibration of the axis at
low speeds.
Version
Date
Page
V3.0
15.11.04
157
Document
User documentation
Copyright © Siemens AG 2003 All Rights Reserved
User_Manual_Simotion_Easy_Basics_V3_0.doc
For internal Use Only
Simotion Easy Basics
reviewed
Fig. 80: Configuration screen in ProTool/Pro
Version
Date
Page
V3.0
15.11.04
158
Document
User documentation
Copyright © Siemens AG 2003 All Rights Reserved
User_Manual_Simotion_Easy_Basics_V3_0.doc
For internal Use Only
Simotion Easy Basics
reviewed
14.2.2 I/O coupling
8 inputs and 8 outputs are soft-wired to byte 500 (C230-2: Byte 66 OnBoard) (if these inputs/outputs
are not able to be accessed, then the CPU goes into the STOP state according to the IO
configuration):
i_estop_ok
PI500.0 (1 = no Emergency Stop present)
i_safetyGate_ok
PI500.1 (not used)
i_airPressure_ok
PI500.2 (not used)
i_axisEnable
PI500.3 (1 = enable axes)
i_startHoming
PI500.4 (1 = start homing (referencing))
i_startAuto
PI500.5 (1 = start automatic sequence)
i_stop
PI500.6 (1 = stop axis in manual or stop in automatic)
i_safetySwitch PI500.7 (not used)
q_simotionReady_1
PQ500.0 (1 = close Emergency Stop circuit 1)
q_simotionReady_2
PQ500.1 (1 = close Emergency Stop circuit 2)
q_homingActive
PQ500.2 (1 = homing (referencing) is active)
q_withHandling PQ500.3 (1 = minimum 1 axis is in closed-loop position control)
q_alarmRed
PQ500.4 (1 = fault present - e.g. a limit switch is actuated)
q_alarmYellow PQ500.5 (1 = alarm is present - e.g. an axis is not referenced)
q_userMessage
PQ500.6 (not used)
q_autoActive
PQ500.7 (automatic mode is active)
From byte 501 onwards, for each nibble (corresponding to ET200S modules) 3 bits (= one axis) are
connected for positive and negative hardware limit switch input and a Bero input for referencing (if
these inputs/outputs are not able to be accessed, then the CPU goes into the STOP condition
according to the IO configuration):
Axis_X_negHwLimit
Axis_X_posHwLimit
Axis_X_bero
Axis_Y_negHwLimit
Axis_Y_posHwLimit
Axis_Y_bero
Axis_Z_negHwLimit
...
PI501.0
PI501.1
PI501.2
PI501.4
PI501.5
PI501.6
PI502.0
From address 512, the drives are connected in 32-byte steps; 4 words for PKW data exchange (these
variables are configured with 'last value') and 10 words for telegram 105 to the drive:
PKW_in_Axis_X
PKW_out_Axis_X
PKW_in_Axis_Y
PKW_out_Axis_Y
...
PIW512 to PIW 518
PQW512 to PQW 518
PIW544 to PIW 550
PQW544 to PQW 550
If bus error flashing can be tolerated at the system, then it is not necessary to delete the I/O variables
that are not required and to remove the ET200S with address 41 (= collector for addresses that are
not required) in the example project. Advantage: A standard is created for series machines and the
Simotion project is always the same. This means that the operator interface can always correctly
access the Simotion control without having to be re-generated - as the global addresses in the project
have shifted.
Version
Date
Page
V3.0
15.11.04
159
Document
User documentation
Copyright © Siemens AG 2003 All Rights Reserved
User_Manual_Simotion_Easy_Basics_V3_0.doc
For internal Use Only
Simotion Easy Basics
reviewed
14.2.3 HMI coupling
The ProTool operator interface is configured in the standard using the Ethernet coupling to the control.
In order that the operator interface can run without being connected to the control, the PG/PC
interface must also be connected to Ethernet (TCP/IP) (otherwise the script errors contained will be
output).
The file settings.txt must be copied to C:\ in order to commission the operator interface. This file
contains global settings, e.g. the path to the axis data and programs. In the standard, these refer to
paths in C:\Siemens. Please copy the contents of the Siemens directory in the software that has been
supplied to C:\Siemens.
The active axis in the manual mode is selected in the variables 'Opaxis' in EPosLib. If a manual
function is still active - e.g. jog forwards - then the axis cannot be changed; the axis may only be
changed after the function has been exited/stopped.
Active functions are visualized using a knob/button with a green background, e.g. OPjogForwardSlow
=1 results in OPjogForwardSlowActive=1 and is displayed in the operator interface with a green
background.
OPoverride acts both on the speed as well as on the acceleration/deceleration.
The axis values - actual position, actual speed, referenced yes/no, motor current and motor
temperature are available in the variables OPaxesActualPosition[],
OPaxesActualVelocity[],OPaxesHomed[], OPaxesActualCurrent[] and OPaxesActualTemperature[].
Axis data is directly changed in Retain_V.gAxisDataArray[0.. MAX_NUMBER_OF_AXES-1].
The traversing blocks are written into Retain_V.gDatasetArray[0.. MAX_NUMBER_OF_DATASETS1]. If the automatic mode is active, in a traversing block, only changes of +- 10% may be made
regarding the wait (delay) time, speed and position. In the automatic mode, it is neither permissible to
change functions, insert new blocks nor delete blocks (the operator interface identifies these attempts
and blocks then).
The online state is formed in the control using a counter (OPplcAlive). If the operator interface
identifies the same value in two consecutive cycles, then the operator interface is switched into the
offline mode. This means that program changes in the Editor are no longer written online in the control
- instead, the program must be completely re-transferred using 'load program' as soon as the control is
online again and program changes are displayed online ≠ offline.
Fig. 81: "Manual" screen in ProTool/PRO
Version
Date
Page
V3.0
15.11.04
160
Document
User documentation
Copyright © Siemens AG 2003 All Rights Reserved
User_Manual_Simotion_Easy_Basics_V3_0.doc
For internal Use Only
Simotion Easy Basics
reviewed
14.2.4 Structure of the traversing blocks of an automatic program
Each of the 128 traversing blocks comprises:
•
•
•
•
•
•
•
•
•
Language-dependent comments that are also printed-out for 'print program'
ID, block suppressed/skipped (title, Off:)
Input condition (enable signal): The number is compared with the state at input word; 0
means no check; the function is started without a prior check. Values not equal to 0 mean
that the system waits until the numerical value is present at the input; e.g. for a value 1 until a
1 is precisely in the least significant bit and the rest is 0.
Function: Absolute/relative positioning, homing (referencing), check of the axis position <=, =,
>= and waiting/delay time
Axis selection: Axis 1..12 (not for waiting/delay time)
Parameter 1: For axis functions, position in mm or Degrees - otherwise not used
Parameter 2: For positioning commands, speed as a ‰ of Vmax or waiting/delay time in ms
Output status to be set after the block has been successfully executed
Progression condition (Title, Asyn:): As standard, the system waits until the block has been
successfully completed before a change is made to the next block. However, if a checkmark
is entered into the check box, then the next block is immediately started (asynchronously) (if
required, also several). This block cascading can be realized up to a total of 10 cascaded
blocks.
Comment: The axis position is always synchronously checked; a change is not made to the
next block as long as the check result is 'incorrect'; the next block is only selected if the result
of the check is 'true'.
This can be used, for example, to bypass a protective zone using several axes.
The automatic mode can be started in any block number. If the automatic mode is stopped and again
continued, then when the sequence is continued, the input condition is not re-checked. If the
sequence runs to an empty block (with no assigned function), then it is exited.
Fig. 82: Screen to edit traversing blocks
Version
Date
Page
V3.0
15.11.04
161
Document
User documentation
Copyright © Siemens AG 2003 All Rights Reserved
User_Manual_Simotion_Easy_Basics_V3_0.doc
For internal Use Only
Simotion Easy Basics
reviewed
14.2.5 Calling the basic positioning function (FB_EPosCmd)
Refer to the EposProg program:
In order to enable an axis, a value of 1 is required at the input parameter 'emergencyStop'.
The axis is enabled at the input parameter 'enableAxes'. A value of 1 corresponds to an enable signal
for all of the configured axes; a value of 0 withdraws all of the axis enable signals - taking into account
a possible motor brake (brake sequence control: Controller enable immediately withdrawn and the
power is withdrawn with a time delay).
Input parameters are available for slow/fast jogging, forwards/reverse. With the rising edge, the axis
starts (refer to OPAxis) in the appropriate direction - and with the falling edge, the axis stops again.
The configured homing (referencing) operation is started using a rising edge at 'startReferencing'.
Manual positioning to an absolute position according to the value in 'OpmanualPosition' with velocity
'OpmanualVelocity' (‰ of Vmax) is started with a rising edge at 'startManualPos'.
Automatic operation can be started from block 'OpstartDatasetNumber' with a rising edge at
'startAuto'. If the automatic sequence was stopped and the axes were subsequently not manually
moved, then the sequence can be continued at the interruption point using a rising edge at
'continueAuto' (comment: The input condition is not re-checked at the active block). If the axes were
manually moved, then a 'homing travel' is required = new start from line xy.
With a rising edge at 'stopIt', the manual functions and automatic mode are stopped before the normal
completion.
Queued alarms are acknowledged using a rising edge at 'resetError'. If the axes have been enabled
and all of the operating conditions are present, then the axes automatically go into closed-loop
position control after the fault has been acknowledged.
At run-up 'InitFlag' is set to 1 for one clock cycle in order to initialize the basic positioning function.
The input state for the start condition of a traversing block is transferred at parameter 'InputData'. The
state to be set is returned to the outputs at 'OutputData'.
myFB_EPosCmd(jogForwardSlow
,jogBackwardSlow
,jogForwardFast
,jogBackwardFast
,startReferencing
,startManualPos
,startAuto
,continueAuto
,stopIt
,resetError
,enableAxes
,emergencyStop
,initFlag
,InputData
,OutputData
);
:=
:=
:=
:=
:=
:=
:=
:=
:=
:=
:=
:=
:=
:=
:=
OPjogForwardSlow
OPjogBackwardSlow
OPjogForwardFast
OPjogBackwardFast
OPstartReferencing
OPstartManualPos
OPstartAuto OR i_StartAuto
OPcontinueAuto OR i_ContinueAuto
OPstop OR i_Stop
OPresetError
i_AxisEnable
i_EStop_ok
init
myInputData
myOutputData
Fig. 83: Calling the FB_EPosCmd
State values of the basic positioning function can be directly taken from the OP variables - e.g.
OPautoActive, OPreferencingActive, ...
14.2.6 Changes in EposProg
Version
Date
Page
V3.0
15.11.04
162
Document
User documentation
Copyright © Siemens AG 2003 All Rights Reserved
User_Manual_Simotion_Easy_Basics_V3_0.doc
For internal Use Only
Simotion Easy Basics
reviewed
EPosProg.StartupProg:
The axis names are communicated in the array gAxisArray[]; this means that if axis descriptors
(names) are changed, then the new axis name must be specified here.
Comment: Axes that are not present can be pre-set with TO#NIL in gAxisArray[]. This can be used, for
example, to save (reduce) the system runtime.
EPosProg.EPosProg:
The call for the basic positioning FB is located here. Further, the I/O are also handled here. This
means, for example, reading the I/O, transferring to the FB and writing the return values back to the
I/O. In this case, the input and output word of the traversing blocks is important (In_Word, Out_Word).
In order to be able to move the axis away in the case that when homing, the axis is positioned at the
Bero/hardware limit switch, the corresponding inputs are read here and transferred to the basic
positioning function using gAxisHomingData[].
The active traversing block (also if the automatic mode was only interrupted) is located in
OPdebugData.datasetNo[0] (array 0.. MAX_NUMBER_OF_SYNCHRONOUS_COMMANDS-1). This
can be provided to a higher-level control using I/O coupling (Out_datasetNumber).
The most recent alarm is located in OPmessages.number[0] (array
0..MAX_NUMBER_OF_MESSAGES-1).
If a PKW interface is not to be used (e.g. Sinamics), the source Dummy_V can be incorporated so that
the PKW variable names can be used by the compiler. Alternatively, the PKW lines can be deleted in
EPosProg.
Version
Date
Page
V3.0
15.11.04
163
Document
User documentation
Copyright © Siemens AG 2003 All Rights Reserved
User_Manual_Simotion_Easy_Basics_V3_0.doc
For internal Use Only
Simotion Easy Basics
reviewed
14.2.7 Integration into the SIMOTION task system
For the basic positioning function, the following program assignment to the task levels in Simotion is
used:
- EPosProg.StartupProg must be incorporated in the StartupTask (initialization)
- EPosProg.EPosProg must be incorporated in the BackgroundTask
- EPosLib.TechnologicalFaultProg must be incorporated in the TechnologicalFaultTask
- EPosLib.PeripheralFaultProg must be incorporated in the PeripheralFaultTask
- EPosLib.ShutDownProg must be incorporated in the ShutdownTask (Emergency Stop of the axes)
Comment: A tolerance of 2 IPO overflows has proven itself in practice.
Comment 2: EPosProg.EposProg cannot run in the IPOsynchronousTask (level overflow).
Comment 3: The system variable device._startupData.operationMode should be set to RUN. This is
because the STOP switch-off state, the CPU does not run-up to RUN with the AN main switch if the
Simotion control does not run-up.
Fig. 84: Task system in Simotion SCOUT
Version
Date
Page
V3.0
15.11.04
164
Document
User documentation
Copyright © Siemens AG 2003 All Rights Reserved
User_Manual_Simotion_Easy_Basics_V3_0.doc
For internal Use Only
Simotion Easy Basics
reviewed
14.3 Comparison of the basic positioning function in Simodrive and
Masterdrives
A comparison of the functionality between the "basic positioning function" standard application and the
integrated basic positioning functions in the Simodrive 611U and Masterdrive MC drives is provided in
the following table.
Requirements / functions
Simodrive 611U
Simovert MD MC
Simotion EPos
All of the traversing data can be simply and easily
entered, preferably via PROFIBUS
x
x
No axis coupling/no synchronous operation
No programming (only parameterization)
No interpolation between axes
Parameterizable traversing blocks - either
selected via Profibus or terminal
Target position can be entered - v, acc, dec, j,
progress condition, delay time, suppress/skip
block
Progression condition for PEH (end, continue with
stop, continue flying, wait for rising edge at input,
go to)
Variable traversing block, i.e. inputs can be
changed online (flying)
Replacing motion (i.e. pos, v, acc, dec, j of the
new command is immediately accepted)
Relative (incremental) and absolute positioning
Homing (active, flying, to hardware limit switch, to
endstop) to Bero, Bero&zero mark, zero mark,
actual value setting; approach direction, v;
reversing the direction at the end, ...
x
x
x
64
x
x
x
64
x
today, only
ProTool
x
x
x
128
x
x
x
x
x
x
x
x
x
x
x
x
x
x
x
x
Rotary/linear axis including modulo
positive, negative, shortest distance
Gearbox (motor, load)
Spindle pitch, actual value evaluation (IBF)
Software limit switch
Hardware limit switch
Motor encoder, external encoder
Resolver, sin/cos, EnDat, SSI, EQN, EN, TTL
Jerk limiting
Backlash compensation
Traverse to fixed endstop with torque limiting
x
x
x
x
not hardware
limit switch; no
direction
reversal
x
x
x
x
x
x
x
x
x
x
x
x
x
x
x
x
(x)
x
-
x
x
x
x
x
x
x
x
x
x
x
x
Absolute encoder with encoder adjustment
Override (v, a)
No approximate positioning
No protective zones
No teach-in
Setting-up/manual/jogging, block
operation/automatic
Parameterizable following error monitoring on/off
Parameterizable standstill monitoring on/off
Version
Date
Page
V3.0
15.11.04
165
x
x
x
x
x
x
x
x
x
not via EPos
x
x
x
x
x
x
x
x
Document
User documentation
Copyright © Siemens AG 2003 All Rights Reserved
User_Manual_Simotion_Easy_Basics_V3_0.doc
For internal Use Only
Simotion Easy Basics
reviewed
State values: Actual position, referenced, v,
(current, temperature), Ref/Pos/Move active,
acc/const/dec phase active, residual distance,
target position
Fault/error messages
Setpoint/actual value inversion
Number of axes
No encoder changeover
No engineering system required for
service/troubleshooting
Brake handling, suspended/vertical axes
Control signals: Start homing, block operation,
block selection, jog, cancel, ...
With/without DSC
With/without pre-control
Bits to control the traversing block number
x
x
x
x
x
1
x
x
1
x
x
x
x
12
x
x
x
x
x
x
x
x
x
x (6 bits)
x
x (6 bits)
x
x
x (7 bits)
Table 62: Comparison of the functions
Version
Date
Page
V3.0
15.11.04
166
Document
User documentation
Copyright © Siemens AG 2003 All Rights Reserved
User_Manual_Simotion_Easy_Basics_V3_0.doc
For internal Use Only
Simotion Easy Basics
reviewed
14.4 Function elements and their integration
Source
Dummy_V
Library
Program / function
-/Feature / function
-/-
Declares help variables.
Source
EPosLib
Library
Program / function
-/Feature / function
ShutDownProg
ChangeConfigdata
RaiseMessage
FB_EPosCmd
-/-/-/-/-
Source
EPosProg
Library
Program / function
-/Feature / function
Programming
language
Know-how protection
ST
No
Must be
adapted to the
application
Yes
Programming
language
Know-how protection
ST
Programming
language
Know-how protection
ST
Programming
language
Know-how protection
ST
Yes
Must be
adapted to the
application
No
No
No
No
StartupProg
No
Must be
adapted to the
application
The basic positioning function is called – FBs and
No
handling of the I/O variables.
Initialization of the axis arrays.
Yes
Source
Retain_V
Library
-/-
-/-
The retain variables are declared.
EPosProg
Yes
No
Table 63: Program elements of the basic positioning function
Version
Date
Page
V3.0
15.11.04
167
Document
User documentation
Copyright © Siemens AG 2003 All Rights Reserved
User_Manual_Simotion_Easy_Basics_V3_0.doc
For internal Use Only
Simotion Easy Basics
15
reviewed
Temperature controller
15.1 General description of the TO temperature channel
Closed-loop temperature control functions can be configured in SIMOTION using the TO temperature
channel. This covers the actual value sensing (actual value acquisition) through the closed-loop
control up to generating the actuating signal - all of the basic functions of closed-loop temperature
control including the identification of the temperature control loops and calculating the resulting
channel parameters.
The FB_TempControl function block simplifies the handling of the technological object. This function
block provides the user with an interface that allows him to parameterize a temperature channel and
control it. The FB handles the internal coordination with the technological object.
A detailed description of the temperature channel is provided in the Manual SIMOTION Motion Control
"Supplementary technological functions". This includes an overview of all of the system variables and
configuration data in the "Technological package Tcontrol" List Manual.
15.1.1 Configuration
The user can access all of the data belonging to the TO by selecting the expert list. Basic settings are
directly saved in this expert list. Only data required for ongoing operation is supplied via the interface.
A precise description of the interface is provided at the end of the Chapter.
Note: The complete functionality of the temperature channel is not described in this Chapter. The
description refers to the functionality of a standard PID controller with auto tuning (loop identification
routine).
A detailed description including limit values, fault messages and configurations – is part of the
standard SIMOTION documentation (refer above).
Version
Date
Page
V3.0
15.11.04
168
Document
User documentation
Copyright © Siemens AG 2003 All Rights Reserved
User_Manual_Simotion_Easy_Basics_V3_0.doc
For internal Use Only
Simotion Easy Basics
reviewed
15.1.2 Auto tuning
In the Identification mode, the temperature of the control loop is changed by entering a constant
control output (value of manipulated variable). The process parameters are determined from the delay
time and the rate at which the temperature changes. The controller parameters are then calculated
from the process parameters of the loop identification.
To do this, the modified tangent technique is applied. The loop is excited with the maximum (100 %)
actuating signal until the reversal point is identified. The delay time (TU) and the maximum
temperature increase Smax(100 %) referred to a 100 % control output signal are determined from the
step response. However, using these parameters it is only possible to roughly determine the loop
parameters. The advantage with respect to the standard tangent technique is the significantly shorter
identification time.
KS*control
Actual value
Reversal point
Actuating signal
Time
Fig. 17: Representation of the modified tangent technique
The phases of the self-setting routine are monitored for their runtime; when the time is exceeded
(timeout), the self-setting routine is interrupted with an alarm. The times can be set using the
appropriate configuration data.
The auto tuning for the temperature channel is started using the positive signal edge of the boSelftune
input variables.
It should be noted that when configuring the technological object, the configuration data
identification.modifiedTangentMethod.transitionMode must be set to AUTOMATICALLY.
With auto tuning, the following phases are then run through "Setting Up" (initialization),
"Search_Startpoint" (wait for steady-state condition), heating and "Search_InflectionPoint". When auto
tuning can be ended, then the system goes into the "Finished" state (the loop identification routine has
been completed). However, if errors occur, then a change is made into the "Aborted" state (the loop
identification routine is aborted).
Version
Date
Page
V3.0
15.11.04
169
Document
User documentation
Copyright © Siemens AG 2003 All Rights Reserved
User_Manual_Simotion_Easy_Basics_V3_0.doc
For internal Use Only
Simotion Easy Basics
reviewed
The following limit values are defined in the system for the times associated with the auto tuning
phases:
Optimization state
Limiting the time of the state
SETTING_UP
10 * max. controller sampling time
(limits.controller.maxControllerCycle)
Maximum stabilizing time (TA)
(limits.process.maxRiseTime)
5x maximum delay time (TU)
(limits.process.maxDelayTime)
SEARCH
STARTPOINT
HEATING
SEARCH
INFLECTIONPOINT
Maximum stabilizing time (TA)
(siehe Search_StartPoint)
System default
setting
600 seconds
86400 seconds
(24h)
5 x 7200 seconds =
36000 seconds =
10h
86400 seconds
(24h)
Table 65: System-related runtime monitoring functions for the self-optimization routine
15.1.3 Actual value monitoring by defining tolerance bandwidths
The actual values of each channel are checked to observe whether they remain within an inner and an
outer tolerance bandwidth. The inner and outer tolerance bandwidth can be defined independently of
one another: The technological object offers the possibility of an absolute or relative tolerance
bandwidth. The relative tolerance bandwidth is used in FB_TempControl.
2nd upper tolerance (outer, upper tolerance)
1st upper tolerance (inner, upper tolerance)
Actual value
Setpoint
1st lower tolerance (inner, lower tolerance)
2nd lower tolerance (outer lower tolerance)
Time
Fig. 18: Inner and outer tolerance bandwidth
•
For the absolute tolerance bandwidth, the limit values are not a function of the setpoint - they
are fixed.
•
The relative tolerance bandwidth is always defined as a function of the actual setpoint - it
changes as the setpoint changes.
Version
Date
Page
V3.0
15.11.04
170
Document
User documentation
Copyright © Siemens AG 2003 All Rights Reserved
User_Manual_Simotion_Easy_Basics_V3_0.doc
For internal Use Only
Simotion Easy Basics
reviewed
Responses when the tolerance bandwidths are exceeded:
•
An alarm is output when the inner tolerance bandwidth is exceeded.
•
When the outer tolerance bandwidth is exceeded, then the system automatically changes over
into a safety-relevant mode. An alarm (fault) is output and the heating output is switched to 0.
15.1.4 Interface to the TO
The temperature channel is controlled using the following system functions in the FB_TempControl.
An overview of all of the system functions available is provided in the List Manual, Technology
package TControl.
Name
Function
_settcontrollerdpidparameter
_setTControllerInputLimitCheckParameter
_setTControllerOperatingMode
_settcontrollersetpoint
Sets the controller parameters
Sets the tolerance bandwidths
Sets the controller mode
Sets the setpoint temperature
_calculatecontrolerparameter
This function calculates new controller
parameters from the loop parameters
determined using the self-setting
routine. This function should be started
after the self-optimization routine.
Table 64: System functions used to control the TO
15.1.5 Activating in the execution system and setting the clock cycles
In the execution system, the TO temperature channel uses its own tasks. These must be activated
when the temperature channels are used by selecting "Use system tasks for TControl". The setting is
made in the screen RUN SYSTEM > Experts > SET SYSTEM CLOCK CYCLES > TCONTROL.
Task
Significance
TCInput_Task_1
TCTask_1
TCPWM_Tasks
Senses the actual value sensing
Closed-loop temperature control
Clock cycle time of the pulse width
modulation at the digital output
Table 65: Significance of the temperature channel tasks
Version
Date
Page
V3.0
15.11.04
171
Document
User documentation
Copyright © Siemens AG 2003 All Rights Reserved
User_Manual_Simotion_Easy_Basics_V3_0.doc
For internal Use Only
Simotion Easy Basics
reviewed
Fig. 19: System clock cycles for the closed-loop temperature control
Two speed classes are available starting from the required pulse-width modulation(PWM). The speed
class defines which time grid is used as basis for the controller cycle time. The speed class is set
using the configuration data controller.execution.executionlevel.
Speed class
FAST (T1)
SLOW (T2)
Assignment
Input1
Control1
Input 2
Control 2
= reads the actual values
= controller cycle
= reads the actual values
= ler cycle
Table 66: Assignment of the speed classes
These times define the cyclic task start times (system grid ) for the pulse-width modulation, controller
and actual value processing.
In order to distribute the system load when a high number of temperature channels are being used,
the system allows groups to be formed.
Version
Date
Page
V3.0
15.11.04
172
Document
User documentation
Copyright © Siemens AG 2003 All Rights Reserved
User_Manual_Simotion_Easy_Basics_V3_0.doc
For internal Use Only
Simotion Easy Basics
reviewed
The following configuration data from the expert list are available to do this:
Configuration date
controller.standard.
cycleParameter
Input.analog
.relationControllerCy
cletoInputCycle
Significance
This time defines the actual call time of the
controller.
Ratio between the controller and actual value
processing. The actual value processing runs
faster by the selected factor.
Table 67: Description of the configuration data
Note: Set integer multiples of the basic clock cycle. If you enter a controller cycle time that is not in the
appropriate grid, then the system rounds-off to the next grid step (refer to the example). This applies to
all controller instances.
The ratio, selected in the configuration data Input.analog.relationControllerCycletoInputCycle should
be in the same ratio as the times control1 / input1 in the system clock cycles screen.
Example:
PWM task:
40 ms
System grid of the controller (control 1):
800ms
System grid of the actual value sensing (input 1): 200 ms
Ratio between the controller &
actual value processing:
4
Significance
Cycle time of the controller - set
using the config data
Resulting cycle time of the
temperature controller
Resulting cycle time of the actual
value sensing
Time
Time
800 ms
1000 ms
800 ms
1600 ms
200 ms
400 ms
Table 68: Example of the resulting cycle time
Note: The resulting clock cycle time of the controller is displayed in the system variables
actualcycledata.controllercycletime.
Version
Date
Page
V3.0
15.11.04
173
Document
User documentation
Copyright © Siemens AG 2003 All Rights Reserved
User_Manual_Simotion_Easy_Basics_V3_0.doc
For internal Use Only
Simotion Easy Basics
reviewed
15.1.6 Configuring a temperature channel
The parameters of the TO temperature channel (configuration data and system variables) are already
pre-assigned default values. The following parameters must be adapted:
Parameters, hardware configuration:
•
•
Analog input (input.device.logicAddress)
Digital output (output.out.PWM_binaryDevice.logicAddress)
15.2 Tips and tricks
Before commissioning the temperature channels, the following configuration data still have to be
adapted at the technological object to the specific properties and features of the project.
The pre-setting (default) of the configuration data under
TO_Temperature.identification.modifiedTangentMethod.startCondition are set conservatively. This is
the reason that the self-optimization routine only starts if the temperature doesn't change by more than
0.2 K within 30 seconds. This is the reason that the system should be in a stable state. For auto
tuning, a stable temperature state also provides the best results.
If a temperature TO is re-inserted, then the configuration data
identification.modifiedTangentMethod.transitionMode must be changed from the default value
"BY_COMMAND" to "AUTOMATICALLY". For auto tuning, when the appropriate condition is reached,
then the system automatically advances (progresses) to the next state.
For auto tuning, it is also important to additionally check the step height of the setpoint (setpoint step
amplitude). The setpoint must be entered and must have as a minimum a delta difference to the actual
temperature as is saved in the configuration data
identification.modifiedTangentMethod.minimumStepSize. In this case, 60 Degrees K is the default
setting.
15.3 FB_TempControl function block
A check is made in the FB as to whether a setting value for this temperature channel has changed:
−
controller gain
−
integration time
−
differentiation time
−
tolerance limits
−
temperature setpoint
If at least one value for the temperature channel changes, then the FB supplies the associated
technological object with this value.
The IDENTIFICATION mode is selected by setting the input parameter "boSelftune" (in this particular
state, the technological object calculates the control loop of the temperature channel).
If the technological object is in the correct state, a check is also made as to whether the control loop is
still being actively computed. The reason for this is that new values cannot be accepted while a
computation run is being executed.
If all of the prerequisites for a new computation with the new values are available, this is carried-out
and the new controller parameters are activated.
Version
Date
Page
V3.0
15.11.04
174
Document
User documentation
Copyright © Siemens AG 2003 All Rights Reserved
User_Manual_Simotion_Easy_Basics_V3_0.doc
For internal Use Only
Simotion Easy Basics
reviewed
15.3.1 Input and output interface of the FB
Name
P
type 1)
Data type
Significance
toTempController
IN
boEnable
boSelftune
iFirstErrorNumber
IN
IN
IN
rTempSetpoint
IN/OU LREAL
T
rPID_Gain
IN/OU LREAL
T
P component
rPID_IntegTime
LREAL
I component
LREAL
D component
LREAL
Outer, upper tolerance
LREAL
Inner, upper tolerance
LREAL
Inner, lower tolerance
LREAL
Outer, lower tolerance
rActualTemp
rOutputValue
boAboveUpperLimit2
boBelowLowerLimit2
IN/OU
T
IN/OU
T
IN/OU
T
IN/OU
T
IN/OU
T
IN/OU
T
OUT
OUT
OUT
OUT
LREAL
LREAL
BOOL
BOOL
Actual temperature
Output value of the temperature controller
Outer, upper tolerance exceeded
Outer, lower tolerance fallen below
eSelfTuningState
OUT
uErrorState
OUT
BoError
IErrorID
OUT
OUT
rPID_DerivTime
rHighLimit2
rHighLimit1
rLowLimit1
rLowLimit2
TemperatureCo
ntrollerType
BOOL
BOOL
DINT
Technological object, Temperature channel
Switches-in the closed-loop control
Selects the self-setting routine
Value is added to the output faults, for
example, in order to display faults/errors for
each TO in a coded form
Setpoint temperature (reference temperature)
enumtcontrolleri State of the loop identification routine
dentificationmo according to the modified tangent technique
difiedtangentme
thodstage
UDINT
Feedback signal of the TO system variables
"actualinputdata.state"
BOOL
DINT
Fault/error display
Specific fault/error number, formed from the
return value of the called system function +
"iFirstErrorNumber"
1)
Parameter types: IN = input parameters, OUT = output parameters,
IN/OUT = throughput parameters
Table 69: Description of the parameters of FB_TempControl
Version
Date
Page
V3.0
15.11.04
175
Document
User documentation
Copyright © Siemens AG 2003 All Rights Reserved
User_Manual_Simotion_Easy_Basics_V3_0.doc
For internal Use Only
Simotion Easy Basics
reviewed
15.3.2 Schematic LAD representation
FB_TempControl
temperaturControllerType
BOOL
BOOL
DINT
LREAL
LREAL
LREAL
rActualTemp
toTempController
boEnable
rOutputValue
boSelftune
boAboveUpperLimit2
iFirstErrorNumber boBelowLowerLimit2
eSelfTuningState
rTempSetpoint
rPID_Gain
uErrorState
rPID_IntegTime
boFBError
rPID_DerivTime
iErrorID
rHighLimit2
rHighLimit1
rLowLimit1
rLowLimit2
LREAL
LREAL
LREAL
LREAL
LREAL
REAL
REAL
BOOL
BOOL
ENUM
UDINT
BOOL
DINT
Fig. 20: LAD representation of the FB_TempCtrl
15.4 Function elements and their integration
Source
TempCtrl
Programming
language
Know-how protection
Library
--
Program / function
Properties / function
FB_TempCtrl
Handling the technological object, temperature
channel.
Call from a cyclic task.
ST
No
Adaptation to
the application
required
No
Table 70: Program elements of the print mark correction
Version
Date
Page
V3.0
15.11.04
176
Document
User documentation
Copyright © Siemens AG 2003 All Rights Reserved
User_Manual_Simotion_Easy_Basics_V3_0.doc
For internal Use Only
Simotion Easy Basics
reviewed
16 Graphic representation of the position profile of a cam
In order to graphically display cams that were generated while a project was running (project runtime),
up until now, the only way of doing this was to go online with a computer in which Simotion SCOUT
was installed and then read-out the cam from the controller.
The FBGetCamValueForHMI allows position profiles of cams to be displayed on an HMI based system
on ProTool-Pro.
16.1 FBGetCamValueForHMI function block
The FBGetCamValueForHMI block, contained in the HMICam unit - that is a part of the L_SEB library
- includes the conditioning of data that is used to graphically display the position profile on the HMI
system.
In addition, a configuration is required in ProTool/Pro.
Before calling the FB, the cam must have been interpolated using the system function
_interpolateCam.
The number of points displayed on the HMI system is defined in the constants NR_OF_SET_POINTS.
The slave values are saved in an array. The maximum length is 999 points - i.e. the constant
NR_OF_SET_POINTS may not exceed a value of 999. If the constant is changed from its default
value, the ProTool configuring must be adapted. The output in ProTool Pro is in the form of a line-type
representation.
The block reads-out the slave values associated with fixed master values and writes these into an
array. The distance between master values is calculated from the system variables of the cam
("leadingrange.start"-"leadingrange.end") /NR_OF_SET_POINTS - whereby the
"leadingrangesettings.offset" is taken into consideration. The system function _getcamfollowingvalue
is used to read-out the slave position values.
Note: Due to the high system load, the block should be sequentially called in a motion task.
16.2 Calling the FB
The FB can be called after the cam has been interpolated.
To do this, the Trend Transfer1 pointer must be set-up in ProTool. In this, in Simotion the "trend group
bit" and the bit assigned to the cam are set. This triggers the cam display in ProTool. In this particular
example, the cam is selected using bit 0 of the pointer - the group bit is the last bit of the pointer.
The "Trend Request" pointer to be set-up in ProTool, signals the cam to be currently displayed at the
control - represented bit-serially.
Example: In the following example, after the FB is called, the cam is triggered on the HMI if the image
is to be displayed with the display function:
− g_HMICamSend : Pointer "Trend Transfer1"
− g_HMICamCall : Pointer "Trend Request" is set by the HMI
The cam is assigned bit 0. For a positive edge, i.e. selecting the display on the HMI, the display on the
HMI is triggered by setting bit 0 (i.e. cam1) and bit 15 (this must always be set). The instance
"myCallCamtoCam1" is an edge evaluation, system function block "R_TRIG".
Version
Date
Page
V3.0
15.11.04
177
Document
User documentation
Copyright © Siemens AG 2003 All Rights Reserved
User_Manual_Simotion_Easy_Basics_V3_0.doc
For internal Use Only
Simotion Easy Basics
reviewed
Fig. 21: Example for transferring the cam values into the HMI
16.3 HMI configuring in ProTool
The "cam display" functionality is used for visualization in ProTool.
A cam requires a "cam buffer" - in this case the array that is filled by the INOUT variable
"aSlaveValues" of the FB. In addition, the cam display must be triggered by a pointer.
The following pointers have been set-up in the configuring example:
− "Trend Request", logically combined with the variables g_HMICamCall (unit "GlobVari")
− "Trend Transfer1", logically combined with the variables g_HMICamSend (unit "GlobVari")
Fig. 22: Pointers that are required
When parameterizing the cam display, a cam "toCam" was set-up:
Fig. 23: Setting the general characteristics of the cam
Version
Date
Page
V3.0
15.11.04
178
Document
User documentation
Copyright © Siemens AG 2003 All Rights Reserved
User_Manual_Simotion_Easy_Basics_V3_0.doc
For internal Use Only
Simotion Easy Basics
reviewed
In the cam settings, the number of measured values must correspond to the array length:
Fig. 24: Setting the number of cam points (samples)
In the "Trend Buffer", the array in SIMOTION should be selected with the slave positions. The
triggering is realized in this case from the 0 bit of the pointer "Trend Transfer1".
Fig. 25: Setting the cam buffer
Version
Date
Page
V3.0
15.11.04
179
Document
User documentation
Copyright © Siemens AG 2003 All Rights Reserved
User_Manual_Simotion_Easy_Basics_V3_0.doc
For internal Use Only
Simotion Easy Basics
reviewed
16.4 Input/output interface of the FB
Name
toCam
eCamType
aSlaveValues
rMinSlaveValue
rMaxSlaveValue
rMinMasterValue
P type
1)
Data type
IN
IN
CamType
EnumCamPos
itionMode
IN/OUT aSlaveCamVa
lue
OUT
REAL
OUT
REAL
OUT
REAL
Significance
Cam that is to be displayed
Display without or with scaling
(BASIC / ACTUAL)
Array with the determined slave
position
Starting value, slave position
End value, slave position
Starting value, master position
rMaxMasterValue
OUT
REAL
End value, master position
Parameter types: IN = input parameters, OUT = output parameters,
IN/OUT = throughput parameters
1)
Table 71: Description of the FBGetCamValueForHMI parameters
16.5 Schematic LAD representation
FBGetCamValueForHMI
CamType
EnumCamPositionMode
aSlaveCamValue
toCam
eCamType
aSlaveValues
rMinSlaveValue
rMaxSlaveValue
rMinMasterValue
rMaxMasterValue
REAL
REAL
REAL
REAL
Fig. 26: LAD representation of the FBGetCamValueForHMI
16.6 Function elements and their integration
Source
HMICam
Programming
language
Know-how protection
Library
L_SEB
Program / function
Property / function
FBGetCamValueForHMI
Determining the values for the display of the
cam profile.
Called from a sequential task.
ST
No
Adaptation to
the application
required
No
Table 72: Program elements of the print mark correction
Version
Date
Page
V3.0
15.11.04
180
Document
User documentation
Copyright © Siemens AG 2003 All Rights Reserved
User_Manual_Simotion_Easy_Basics_V3_0.doc
For internal Use Only
Simotion Easy Basics
reviewed
17 Literature
[1]
Machine Modes Definition Document, Version 0.3 - 31st December 2002
OMAC Packaging Workgroup - PackMLTM Subteam - Machine Modes Technical Subteam
(TST) http://www.omac.org/wgs/GMC/Machine_Modes_Definition_Document_V0.3b.pdf
[2]
Guidelines for Packaging Machinery Automation, Version 2.0 – 24th April 2002
OMAC Packaging Workgroup
http://www.omac.org/wgs/GMC/Deliverables/GuidelinesV2.03.pdf
[3]
Guidelines for Packaging Machinery Automation, Version 3.0 – 22nd October, 2004,
Attachment IID; OMAC Packaging Workgroup
http://www.omac.org/Deliverables/OMACDeliverdflt.htm
[4]
PLC – Open Dokumentation „Standardfunktionen zum Ansteuern von Achsen nach
PLCopen Norm „ (SingleAxis_Handbuch_SIMOTION_de.pdf)
[PLC Open Documentation "Standard functions to control axes according to the
PLCopen Standard" (SingleAxis_Handbuch_SIMOTION_de.pdf)]
[5]
PLC – Open Dokumentation „Standardfunktionen zum Ansteuern von Achsen“
(AxisFunctions_Handbuch_SIMOTION_de.pdf)
[PLC Open Documentation "Standard functions to control axes"
(AxisFunctions_Handbuch_SIMOTION_de.pdf)]
[6]
VDI 2143, Bl. 1: Bewegungsgesetze für Kurvenscheiben - Theoretische Grundlagen
[VDI 2143, Sheet 1: Motion laws for cams - theoretical basics]
7]
Funktionsbeschreibung Kurvengleichlauf:
Doku „SIMOTION Motion Control Technologieobjekte Gleichlauf, Kurvenscheibe: 1.3.2
Kurvengleichlauf“
[Function description, synchronous cams:
Documentation "SIMOTION Motion Control Technology Object Synchronous, Cam: 1.3.2
Synchronous cam"]
[8]
Funktionsbeschreibung Technologieobjekt Kurvenscheibe:
Doku „SIMOTION Motion Control Technologieobjekte Gleichlauf, Kurvenscheibe: 3.3
Funktionsbeschreibung“
[Function description, technology object cam:
Documentation "SIMOTION Motion Control Technology Object Synchronous, Cam: 3.3
Function description"]
[9]
Kurvenscheibe in SCOUT-Projekt einfügen:
Doku „SIMOTION SCOUT: 6.6.4 Kurvenscheibe editieren“
[Inserting a cam in the SCOUT project:
Documentation "SIMOTION SCOUT: 6.6.4 Edit cam"]
[10]
Kurvenscheibe aus Zielgerät lesen:
Doku „SIMOTION SCOUT: 6.6.13 Kurvenscheibe aus Zielsystem lesen“
[Read cam from the target device:
Documentation "SIMOTION SCOUT: 6.6.13 Read the cam from the target system"]
[11]
Beschreibung Systemfunktion _addSegmentToCam:
Doku „SIMOTION Technologiepaket Cam Systemfunktionen: 7 camType“
[Description system function _addSegmentToCam:
Documentation "SIMOTION Technology Package Cam System Functions: 7 camType"]
Version
Date
Page
V3.0
15.11.04
181
Document
User documentation
Copyright © Siemens AG 2003 All Rights Reserved
User_Manual_Simotion_Easy_Basics_V3_0.doc
For internal Use Only
Simotion Easy Basics
reviewed
[12]
Dokumentation „SCOUT.pdf“, Kapitel 8.6 „Alarme und Meldungen konfigurieren“
[Documentation "SCOUT.pdf", Section 8.6 "Configuring alarms and messages"]
[13]
FAQ für Messtaster: „Reaktionszeiten in Verbindung mit der Funktion Messen“ in der Rubrik
„Tipps und Tricks“ für Simotion im Intranet http://apc.erlf.siemens.de/de/index.asp
[FAQ on measuring probes: "Response times in conjunction with the measuring function"
under the subject "Tips and Tricks" for Simotion in the Intranet
http://apc.erlf.siemens.de/de/index.asp]
[14]
Kommunikationshandbuch „SIMATIC HMI, Kommunikation für Windows-basierte Systeme“,
Teil X, Anhang B
[Communications Manual "SIMATIC HMI, Communications for Windows-based Systems",
Part X, Attachment B]
[15]
Beschreibung der Datensicherung aus dem Anwenderprogramm:
Doku Simotion „Programming language ST“, Kapitel 7.5.4 „Datensicherung aus
Anwenderprogramm“
[Description of data save from the user program:
Simotion documentation "ST programming language", Chapter 7.5.4 "Data save from the
user program"]
Beschreibung der Systemfunktionen:
Doku Simotion „Programming language ST“, Kapitel 5.15 „Datensicherung aus
Anwenderprogramm“
[Description of the system functions:
Simotion documentation "ST programming language", Chapter 5.15 "Data save from the
user program"]
[16]
SIMATIC NET DP/AS-Interface Link 20E Handbuch (Link20E_d.pdf) Ausgabe 11/2002
[SIMATIC NET DP/AS-Interface Link 20E Manual (Link20E_d.pdf) Edition 11/2002]
Version
Date
Page
V3.0
15.11.04
182
Document
User documentation
Copyright © Siemens AG 2003 All Rights Reserved
User_Manual_Simotion_Easy_Basics_V3_0.doc
For internal Use Only