1
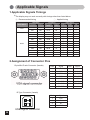
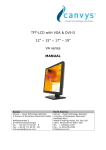
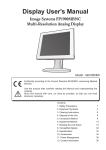
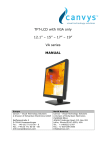
Display User's Manual
RAP950AM-ERDR
Model: RAP1900AM
Thank you for purchasing our color LCD
Display.
◆Carefully read this User's Manual and use
the product properly. Before using it, also
read "Safety Precautions."
◆Keep this User's Manual in a safe place for
quick future reference.
◆If you have lost the manual, contact
Canvys. We will reissue a replacement
manual.
◆The names of companies and products are
registered brand names.
Contents
1.Safety Precautions......................................2
2.Equipment Symbols....................................5
3.Auxiliaries...................................................7
4.Application & Function Description..............8
5.Features......................................................9
6.Connection Method...................................10
7.How to Operate.........................................12
8.Applicable Signals.................................... 20
9.Failure Diagnosis......................................22
10.Cleaning..................................................23
11.Specifications..........................................24
12.Technical Support....................................26
13.Contact Information.................................27
I CAUTION
Symbol Description
Caution!-This symbol alerts you to important operating
considerations or a potential operating condition that
could damage equipment. Refer to user's manual or
operation's manual for precautionary instructions.
*The device could be sent back to the manufacturer for recycling or proper disposal after their
useful lives. Alternatively the device shall be disposed in accordance with national laws after
their useful lives.
Cleaning:
Gently wipe the screen with a clean camel hair lens brush, or a soft, clean, lint-free
cloth. This removes dust and other particales that can scratch the screen.
1
Safety Precautions
I CAUTION
Symbol Description
Caution!-This symbol alerts you to important operating
considerations or a potential operating condition that
could damage equipment. Refer to user's manual or
operation's manual for precautionary instructions.
II CLASSIFICATION
Class I:
No applied parts
Protection against harmful ingress of water is IPX0
Not suitable for use in the presence of flammable anesthetic's or oxygen.
Mode of operation: Continuous.
III External Equipment
External equipment intended for connection to signal input / output or other connectors, shall
comply with UL/EN 60601-1 for medical electrical equipment. In addition, all such combination
system shall comply with the standard IEC 60601-1-1, Safety requirements for medical electrical
systems. Equipment not complying with UL/EN/IEC 60601-1 shall be kept outside the patient
environment, as defined on the systems standard.
IV Intended Use
The equipment is intended to be used as a component of a medical patient monitoring system.
2
V FCC
FCC Information
FCC (U. S. Federal Communications Commission)
This equipment has been tested and found to comply with the limits for a Class B digital
device, pursuant to part 15 of the FCC Rules. These limits are designed to provide reasonable
protection against harmful interference in a residential installation. This equipment generates,
uses, and can radiate radio frequency energy, and if not installed and used in accordance with
the instructions, may cause harmful interference to radio communications. However, there is
no guarantee that interference will not occur in a particular installation. If this equipment does
cause unacceptable interference to radio or television reception, which can be determined by
turning the equipment off and on, the user is encouraged to try to correct the interference by one
or more of the following measures:
● Reorient or relocate the receiving antenna.
● Increase the separation between the equipment and receiver.
● Connect the equipment into an outlet on a circuit different from that to which the receiver
is connected.
● Consult Canvys for any help.
FCC Warning:
To assure continued FCC compliance, the user must use a grounded power supply cord and
the provided shielded video interface cable with bonded ferrite cores. Also, any unauthorized
changes or modifications to this monitor would void the user's authority to operate this device.
VI Precautions
● Make sure to carefully read the Operating Manual prior to using the monitor in order to
properly use the monitor.
● Note that, excluding those cases where a responsibility for legal compensation is
recognized, the manufacturer shall bear absolutely no responsibility for damage to this
product by a customer or a third party that results from the ignoring of contents entered in
this Operating Manual and mistaken use.
● Follow the instructions below for safety use of the LCD Monitor.
- To avoid electric shock, do not attempt to remove any cover or touch the inside of the
monitor. Only a qualified service technician should open the monitor case.
- Do not insert metal objects or spill liquid into the LCD monitor through cabinet slots. They may cause accident fire, electric shock or failure. If a foreign object inserted or water
penetrated, unplug the AC cable and have the monitor serviced.
- Do not cover or block the vent holes in the case.
- Disconnect the power plug from the AC outlet if you will not use it for an indefinite period of time.
- Do not touch the screen directly with your fingers. You may damage the screen, and oil
from your skin is difficult to move.
- Do not apply pressure to the screen (Glass). The LCD is very delicate.
3
● If your LCD monitor uses an AC/DC Adapter: Only use the Adapter, which accompanied
with this device. Use of another AC/DC Adapter may cause a malfunction or danger.
● If your LCD monitor does not operate normally-in particular, if there are any unusual
sounds or smells coming from it-unplug the AC cable immediately and contact the
manufacturer, authorized or service center.
VII Environment
- Place the monitor on a flat and leveled surface.
- Place the monitor in a well-ventilated place.
- Keep the monitor away from:
overly hot, cold or humid places, places directly under sunlight, dusty surroundings,
equipment that generate strong magnetic fields.
4
Equipment Symbols
Electrical and Electronic Equipment Symbols
In addition to the equipment symbols described in your user's manual, the following symbols
may be appear on the monitor.
Alternating current (AC).
Direct current (DC).
European Union Declaration of Conformity.
FCC. USA only. Complies with applicable US government (Federal Communications
Commission) radio-frequency interference regulations.
Fragile. Handle with care.
Indicates front.
Keep dry. Protect from rain.
Mercury. This product consists of devices that may contain mercury, which must be
recycled or disposed of in accordance with local, state, or country laws.
ON. Power connection to the mains.
Recycled materials or may be recycled.
Box Stacking limit by number.
Standby or power indicator.
This way up.
USB connector port.
5
This symbol indicates that the waste of electrical and electronic equipment must not
be disposed as unsorted municipal waste and must be collected separately. Please
contact an authorized representative of the manufacturer for information concerning
the decommissioning of your equipment
ATTENTION: Consult accompanying documents.
DANGER - Shock Hazard. Dangerous voltage. To reduce the risk of electric shock,
do not remove cover. Refer servicing to qualified service personnel.
6
Auxiliaries
Check List
Before operating this monitor, please make sure that all items listed below are present in
your package:
• LCD monitor
• User manual
• CD –with touch drivers
• 15 pin D-sub VGA video cable
• DVI video cable
• DP video cable
• USB cable for USB touch
• 9 pin D-sub RS232 cable for serial touch
• AC power cord 110V
• AC/DC power supply adapter
Optional Items
These are optional items and can be ordered by contacting Canvys directly.
•*¹ DVI/DP cable
•VESA® standard wall/arm mount kits
•*² Audio Cable
If any of the above items are found missing or if you wish to order the optional items,
please contact Canvys.
*¹ For the Display unit with the DVI / DP input connector
*² For the Display unit with the Audio function
NOTES
*We recommend you to keep the original packing box and material for transportation.
*In case of transporting and packing the display in the packing box, carefully place it in box,
keeping its panel from touching any objects.
Product name
RAP 19
Power supply
Delta Elec.
Type: MDS-060AAS12 B, Delta
Electronics, 100-250VAC 1.5-0.75A,
12VDC 5A.
Panel
AUO
7
Application and Function Description
●Some Basic Facts
The medical safety approved RAP model is a versatile monitor designed for ergonomic
and easy handing. The liquid-crystal display (LCD) monitor supports the most common
resolutions from 640x480 (VGA) up to 1280x1024 (SXGA) and presents sharp,
low-radiation images.
With the OSD wheel knob on the bottom right side of the display leaves ample space on
your desk for other peripheral equipment.
An VESA 100 adapter according to VESA standard is available on the rearcover for wall or
swivel-arm mounting.
●Function Description
The medical flat-screen display is built into a slim and ergonomic housing. The monitor
displays 16.7 Million colors with a resolution of 1280x1024 pixels.
The signal is equivalent to the analog and digital standard signals of your PC.
After connection of the signal the flat-screen display automatically adapts, as far as
possible, to the VGA signal and presents a stable and centered image. Additional
display parameters, such as brightness and contrast, can be adjusted via the on-screen
menu. The equipment supplied includes the signal cables, the medical-grade power
supply with power cord and this user manual.
8
Features
●19-inch LCD display with 1.3 million pixels
This color LCD display has a multi-scanning function corresponding to the resolution from
VGA 640x400 to SXGA 1280x1024.This is also compliant with VESA standard display
mode.
●Power management
This unit has loaded the power management system. The power management mode
functions when either horizontal or vertical signals or both disappear and it reduces
power consumption to less than 5W.
●PIVOT (combined vertical / horizontal display function)
The LCD panel can be used to display images in a vertical position by turning the
panel 90 degrees from the horizontal position.
●VESA® standard wall / arm mountings
The unit is compliant with VESA's 100mm-pitch hanging tools. The tilt stand is
detachable; the unit can be set for wall-hanging or arm according to users' environment.
●Security device slot for Kensington® security system
Anti-theft security device slot has been loaded to correspond to MicroSave® security
system of Kensington®.
Note 1) PACS: Picture Archive & Communication System
9
Connection Method
No tools are required to set up the LCD monitor. Simply follow the instructions outlined
in the next few pages.
Connectors for the signal cables, power are located on the back of the panel behind the
cover door. Please refer to the diagram on this page for the connector configuration.
Connect Signal Cable (VGA)
Attach the VGA signal cable end, which has the ferrite core furthest away from the plug,
to the monitor and attach the other end to the graphics card adapter on your computer.
Be cautious in in serting the cable properly into both connectors. If the cable does not
seem to fit it may be facing the wrong direction. Turn the cable over and try to match the
shape of the connector with that of the graphics adapter.
Connect Power Adapter and Cable
Connect the round shape plug end of the AC/DC adapter to the DC Power input
connector of the LCD monitor. Connect the female end of the poor cable to the AC
power input receptacle on the AC/DC adapter. Then, plug the male end of the
power cable into an AC outlet.
CAUTION: Make sure you use the auxiliary AC adapter.
*¹Connect DVI/DP Cable
If you have a DVI/DP digital graphics card adapter and a DVI/DP cable, connect it to the
DVI/DP connector of the monitor. The optional DVI/DP graphics adapter and the DVI/DP
cable can be ordered by contacting Canvys directly or your local media store.
*²Connect Audio Cable
Connect Audio In connector of the LCD monitor and an Audio Out device (PC. DVD,
CD...) with the attached stereo mini cable.
CAUTION: When you disconnect the cord /cables, be sure to hold the connector
and not the cable itself.
10
Cable Management
The LCD monitor has built-in cable guides and cover to help you organize and route the cables
neatly on your desktop space. The cable cover is located on the back of the monitor standand
it is opened by gently pulling it off the stand. Under the cover, the cables can be held in
position by numerous clips.
There are several ways to route the cables and you may use any way you find suitable for your
situation. However, the routing method illustrated by the drawing on the right is recommended
to give the best result in most situations both aesthetically and functionally. Once the cables
are in position, gently snap the cover back on to the stand.
Anti-Theft Security Lock Slot
The LCD monitor is equipped with a security lock slot compatible to Kensington® security
lock type. The security cable lock maybe available thru your Canvys or it can be purchased
at most computer peripheral stores near you.
Wall/arm VESA mounting the Monitor If you intend
to mount the monitor on the wall/arm, we strongly
recommend that you use only UL approved wall/
arm mount kits with attached M4*10mm screws
and can load more than monitor weight, that you
ensure it is securely and safely installed. (VESA
mounting for 100 x 100mm).
If you use a non-UL approved wall/arm mount kits,
there is a safety risk that the Monitor may fall from
the wall/arm due to an improper attachment through
the use wrong or length screws.
Power cord
(accessory)
To power outlet
11
How to Operate
Names and Functions of Each Part
Control Dial
The Control Dial is a multi-functional device located behind the LED Indicator on the right
side of the front bezel.It has three movements-rotate upward, rotate downward and press
inward as a button.
1.Power On/Off
Press the Control Dial to power the unit on from the off stage (the LED is off). To turn the
power off, press the Control Dial and hold for at least 1 second until the LED turns off.
2.OSD Control
While the monitor is on (green LED and image on the screen), Pressing on the Control Dial
activates the OSD. While the OSD menu is active, use the three way movements of the
Control Dial to adjust the monitor.
Rotate Downward: Move Up/Right, Increase, Larger, More
Rotate Upward: Move Down/Left, Decrease, Smaller, Less
Button Press: Execute, Do, Save
LED Indicator
This LED indicator turns green when the power is switched ON and the power cord is
properly attached. It turns amber when the monitor goes into a power saving mode (Active
Off). Please refer to the Power Management section of thid manual for more information.
12
* Used in analog source input.
Auto Setup*
Automatically adjust the size, position, contrast, and the like of the screen.
Is this image displayed properly?
Yes: Return to Main Menu
No: Return to Clock/Phase (Change manually)
Brightness
Adjust brightness of the screen. The larger the value is, the screen is , and vice
versa. Brightness control range is from 0 to 100, with two step increments.
Contrast
Adjust contrast of the screen. The larger the value is, the screen is , and vice
versa. Contrast control range is from 0 to 100, with two step increments.
13
Display*
Exit
Return to Main Menu.
H. Position*
Adjust the horizontal position of the display. When rotating control dial clockwise, the
display moves to the left, and vice versa. This function is not available with DVI digital input.
V. Position*
Adjust the vertical position of the display. When rotating control dial clockwise, the
display moves to the left, and vice versa. This function is not available with DVI digital input.
14
Color Mode
User can make tone adjustments and settings.
• Cool: Bluish white for general use and CAD / CAM.
9300K is a fixed value by the manufacturer; User cannot
change the setting value.
• Neutral: White close to natural light used for publishing trade.
6500K is a fixed value by the manufacturer; User cannot change the setting value.
• Warm: Reddish white mainly suited for photo modification. 5400K is a fixed value by the
manufacturer; User cannot change the setting value.
• User: User can adjust and set tones.
• Red: Adjust red and equivalent colors at the range from 0 to 100.
• Green: Adjust green and equivalent colors at the range from 0 to 100.
• Blue: Adjust blue and equivalent colors at the range from 0 to 100.
15
Clock / Phase*
Exit
Return to Main Menu.
Clock*
When operating "Auto adjustment" and if any partially phased screen, make fine adjustments on
video signal position to horizontally synchronized signals by rotating the control knob. As the
value gets larger, the screen moves to the right, and vice versa. Adjustable range is from 0 to
100. This function is not available with DVI digital input.
Phase*
Make "Phase " adjustments, if any flickers, blurs, or horizontal stripes on screen. Adjustable
range is from 0 to 63. This function is not available with DVI digital input.
16
Management
OSD Display
Exit
Return to Main Menu.
OSD H. Pos
Adjust the horizontal position of OSD. When rotating control dial clockwise, OSD moves to the
right, and vice versa.
17
OSD V. Pos
Adjust the vertical position of OSD. When rotating control dial clockwise, OSD moves to the
right, and vice versa.
Language
Selecting this control to select the language you want.
• English: Display OSD in English.
• Francais: Display OSD in Francais.
• Deutsch: Display OSD in Deutsch.
• Espanol: Display OSD in Espanol.
• Italiano: Display OSD in Italiano.
•
: Display OSD in Japanese.
18
Source
Selecting this control allows you to manually select VGA or DVI to automatically detect input
sources all.
• Exit: Return to Main Menu.
• VGA: Display signal from VGA connector (15-pin Mini D-sub).
In VGA input, it supports Sync-on green and interlace timings.
• DVI: Display signal from DVI connector. (24-pin DVI)
• Displayport: Display signal from Displayport connector.
Recall
Initialize the data such as display position and automatic adjustment date to factory default.
After initailization, perform "Auto Adjustment" again.
19
Applicable Signals
1.Applicable Signals Timings
※The display may not work correctly with timings other than listed below.
◎ : Recommended timing
Mode Name
VGA
VESA
○ : Applied timing
Resolution
Frequency
Horizontal
Vertical
(kHz)
(Hz)
31.47
70
Horizontal
Vertical
720
400
640
480
31.47
60
640
480
37.86
72
640
480
37.50
75
800
480
35.16
56
800
600
37.88
60
800
600
48.08
72
800
600
46.88
75
1024
768
48.36
60
1024
768
56.48
70
1024
768
60.02
75
1280
1024
63.98
60
1280
1024
79.98
75
Input Signal
Analog
Digital
DP
○
○
○
○
○
○
○
○
○
○
○
◎
○
○
○
○
○
○
○
○
○
◎
◎
2.Assignment of Connector Pins
15-pin Mini D-sub Connector (female)
Pin#
Signal
Pin#
Signal
1
S1 (R:Red)
9
-
2
S2 (G:Green)
10
HS-GND
3
S3 (B:Blue)
11
VS-GND
4
GND
12
DDC,SDT
5
GND
13
HS
6
S1-GND
14
VS
7
S2-GND
15
DDC,SCK
8
S3-GND
Pin#
Signal
1
VCC
2
D-
3
D+
4
GND
B-Type Connector (female)
USB signal connector
20
RS232 signal connector
Pin#
Signal
1
T.M.D.S. Data2-
2
T.M.D.S. Data2+
3
T.M.D.S. Data 2/4 Shield
4
NC
5
NC
6
DDC Clock
7
DDC Data
8
NC
9
T.M.D.S. Data1-
10
T.M.D.S. Data1+
11
T.M.D.S. Data 1/3 Shield
12
NC
13
NC
14
+5V Power
15
Ground
16
Hot Plug Detect
17
T.M.D.S. Data0-
18
T.M.D.S. Data0+
19
T.M.D.S. Data0/5 Shield
20
NC
21
NC
22
T.M.D.S. Clock Shield
23
T.M.D.S. Clock +
24
T.M.D.S. Clock -
Pin#
Signal
1
NC
2
TXD
3
RXD
4
NC
5
GND
6
NC
7
NC
8
NC
9
NC
21
Failure Diagnosis
Symptom
Power doesn't turn on!
(POWER indicator doesn't
light!).
The screen is not
displayed!*
(POWER indicator lights
up).
a: Is the power cord
connected?
b: Is the power ON?
a: Is the system on?
b: Is contrast or
brightness adjustment
at minimum?
c: Is the signal cable
properly connected?
d: Is the signal input an
applicable one within
the stipulated frequency
range?
Countermeasure
a: Connect the power
cord (see pg.10) b:
Turn the power on.
a: Turn the system on.
b: Adjust contrast and
brightness (See p.13).
c: Properly connect the
appropriate signal cable
(see page.10).
d: Input the applicable
signals within the
frequency range.
Display size and position
are not appropriate!
a: Is the preset adjusted to
comply with input signals?
a: Make display adjustments
(See page.14~19).
The display vibrates!
a: Is the signal that is out of
the set frequency range
input?
a: Input applicable signals
within the frequency range.
a: Are you not rotating the
dial so fast?
a: Rotate the dial slowly.
Control dial doesn't work!
Note
Verify
*: When Computers Power management is enabled computers signals will be
disabled meaning it will not display video.
● Canvys Recommends the use of Computer power management & Screensaver to reduce any
chances of Image Retention (Image sticking), Image Retention will not be covered under warranty.
22
Cleaning
Cleaning the Cabinet and the Color LCD Display
W
cleaning, disconnect AC adapter from the LCD display for safety.
● When
● Gently wipe off dirt from cabinet and LCD panel surface with a clean lint-free cloth.
in a neutral cleaning solution. Follow its instruction when using a disposable cloth.
● Do not use thinner, benzine, alcohol or such on the cabinet that is made of plastic. These can
damage the cabinet, alter its quality and cause the paint to peel off.
● Do not apply insecticides and other volatile items to the cabinet. Also do not leave rubber and
vinyl products or such in contact with it for long hours. This can cause the quality to alter and
the paint to peel off.
● Cleaners usable for the LCD panel are isopropyl alcohol (without abrasive), non-ammonic glass
cleaner, and watered-down neutral cleaning solution. Do not use organic solvent such as
acetone and toluene.
● When the screen has dust on the LCD panel surface, wipe it off with soft moist cloth.
● Treat the LCD panel wit care. Do not rub the LCD panel surface with a rough item or hit it on
the surface. Also, do not press on the LCD panel surface. This can lead to unevenness in
the screen and also could cause a failure.
23
Specifications
Product name: 19"Color LCD Display
Specifications
Items
LCD display device
49cm (19inch) Color TFT Normally Black
Pixel pitch
Horizontal 0.294mm x Vertical 0.294mm
Display area
Horizontal 376.32mm x Vertical 301.056mm
Pixel
1280 x 1024 pixels
Display gradation
16.77 million (8 bit each)x3
Standard viewing
angle
Horizontal: 178 deg.
Vertical: 178 deg.
Input signal
(1) VGA (15-pin Mini D-sub) connector: 0.7Vpp/75 Ohm, separate TTL level (Analog).
(2) DVI (24-pin) connector (Digital).
(3) Display port connector (Digital).
Temperature
On
Temperature
: 10~40°C
Humidity(non-condensation) : 30~75%
Air pressure
: 700~1060hPa
Power Supply
DC 12V, 4.5A; (Provided Adapter: Delta Elec., Type: MDS-060AAS12 B,
Delta Electronics,100-250VAC 1.5-0.75A, 12VDC 5A.
Consumption current
Approx 45W Max./Less than 2.5W when power management is on
External dimensions
Width 432mm x Depth 251mm x Height 469mm (landscape)
Mass
Approx9.6kg (net weight)
International standards
UL/CUL (ANSI/AAMI ES 60601-1(2005, 3rd ed) and CAN/CSA C22.2 No.60601-1
(2008, 3rd ed) CE, FCC-B
Off
-20~60°C
10~90%
500~1060hPa
●The specifications and appearance could change for improvements without notice.
24
External Dimensions Landscape
(longer side at the top)
25
Technical Support
Requesting Repair
1 Read "Failure Diagnosis (Pg.22)" carefully and check them yourself.
2 If you experience any problems with this display, power display down, disconnect
AC adapter from the outlet, and Contact Canvys. Do not repair on your own.
3 Consult Canvys for repairs.
4 Use the original displays packing and packing materials when shipping. Carefully
place the unit in the packing, and keep the face from touching any packing materials.
The panel surface touching the materials during transportation will cause damage on
the panel surface; this type of damage is not covered under warranty.
Contact Technical Support
Consult Canvys for technical support.
Notes for User's Manual
●It is prohibited that copying any part or all of this manual without authorization.
●The content of this manual will be subject to change without notice.
●This wsa made carefully. Please contact us if any unclear points, mistakes ,or parts left out.
26
Contact Information
1.Contact Information
Technical Support and Sales – Contact:
TekLink Website at (http://teklink.canvys.com)
Support Phone Toll Free at (800) 235-2125
Sales Phone Toll Free at (888) 735-7373
2.Copyright Notice
This document is copyrighted. All rights are reserved. Neither this document, nor any part of it,
may be reproduced or copied in any form or by any means-graphical, electronic, or
mechanical including photocopying, taping or information storage and retrieval systems
without written permission of Canvys a division of Richardson Electronics
© 2013 Canvys a division of Richardson Electronics. All rights reserved..
27
This page left blank
MD056PR010