1
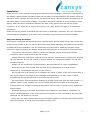
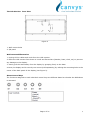
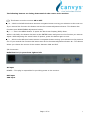
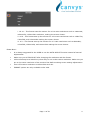
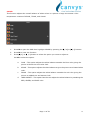
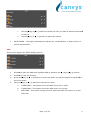
User Manual of PD-AD-24CH-MO
Date : 2009/02/02
Version: 1.00
Prepare by :
Check by :
REVISION HISTORY
Version
Date
Page
Section
1.0
2009/02/02
ALL
ALL
Description
New Release
CONTENTS
ver 1.0
The LCD monitor ................................................................................................ 2
Introduction ...................................................................................................... 2
Package Contents .............................................................................................. 2
Specifications..................................................................................................... 2
Installation......................................................................................................... 3
Important Safety Guidelines .............................................................................. 3
Identifying Components .................................................................................... 5
-
The LCD Monitor-Rear View ............................................................................. 6
The LCD Monitor Front View............................................................................. 5
Wall-mounted Illustration ................................................................................. 6
About Control Keys ............................................................................................ 6
Using the monitor .............................................................................................. 8
OSD (On Screen Display) Menu........................................................................... 8
AUTO ADJUST..................................................................................................... 8
LUMINANCE........................................................................................................ 9
GEOMETRY......................................................................................................... 10
COLOR ............................................................................................................... 12
OSD ……………………………………………...………………………………………………………..13
LANGUAGE......................................................................................................... 14
RECALL.............................................................................................................. 14
MISCELLANEOUS............................................................................................... 16
EXIT …………………………………………………………………………………………………..…..16
Appendix........................................................................................................... 17
-
Appendix B-Supported PC Timing..................................................................... 17
Appendix C-Troubleshooting ........................................................................... 18
Appendix A TFT LCD Monitor Specifications..................................................... 17
CE mark for Class B ITE .................................................................................... 19
Radio Frequency Interference Statement.......................................................... 19
Page 1 of 21
1
The LCD monitor
Introduction
This 24” LCD monitor is mainly designed for the public information display. With
its high resolution LCD panel and a wide variety of I/O ports, this monitor works
perfectly with various devices and applications.
Package Contents
After unpacking LCD monitor, make sure the following items are included in the
box and are in good condition:
Monitor Display x 1
User Manual x 1
Power Cord x 1
VGA Cable x 1
If you find that any item to be missing or appear to be damaged, contact your
dealer immediately. DO NOT throw away the packing material or shipping
carton in case you need to ship or store the LCD monitor in the future.
Specifications
24” WUXGA (1920X1200)
Item
Specifications
Active Area / Screen Size
518.4(H) × 324(V)mm
Aspect Ratio
16:10
Pixel Number
1920 × 3(RGB) × 1200
Display Colors
16.7Mcolors (RGB 6-bits+FRC data)
Pixel Pitch
0.270(per one triad) × 0.270
Brightness
250 cd/m2 (Typical)
Contrast
1000:1 (Typical)
Response Time
5 ms
Viewing Angle
160/160
Lamp Life of Backlight
> 50,000hrs(Typical)
Page 2 of 21
2
Installation
Please read the user’s manual carefully before performing the installation. The power consumption of
the display is approximately 50 watts. Please use the power cord designated for the product. When an
extension cord is required, use one with the correct power rating. The cord must be grounded and the
grounding feature must not be defeated. The product should be installed on a flat surface to avoid
tipping. Space should be maintained between the back of the product and the wall for proper
ventilation. If you would like to mount the monitor to the wall, please see page 6, for additional
information.
Please ensure the product is installed with the screen in landscape orientation. Any 90° clockwise or
counterclockwise installation may induce poor ventilation and successive component damage.
Important Safety Guidelines
This product is designed and manufactured to operate within defined design limits, and misuse may
result in electric shock or fire. To prevent the product from being damaged, the following rules should
be observed for the installation, use and maintenance of the product. Read the following safety
instructions before operating the display. Keep these instructions in a safe place for future reference.
To avoid the risk of electric shock or component damage, switch off the power before
connecting other components to the LCD monitor.
Unplug the power cord before cleaning the LCD monitor. A damp cloth is sufficient for cleaning
the LCD monitor. Do not use a liquid or a spray cleaner for cleaning the product. Do not use
abrasive cleaners.
Always use the accessories recommended by the manufacturer to insure compatibility.
When moving the LCD monitor from an area of low temperature to an area of high
temperature, condensation may form on the housing.
Do not place the LCD monitor on an unstable cart, stand, or table. If the LCD monitor falls, it
can injure a person and cause serious damage to the appliance. Use only a cart or stand
ecommended by the manufacturer or sold with the LCD monitor.
Any heat source should maintain a distance of at least 5 feet away from the LCD monitor, i.e.
radiator, heater, oven, amplifier etc. Do not install the product too close to anything that
produces smoke or moisture. Operating the product close to smoke or moisture may cause fire or
electric shock.
Slots and openings in the back and bottom of the cabinet are provided for ventilation. To
ensure reliable operation of the LCD monitor and to protect it from overheating, be sure these
openings are not blocked or covered.
Never push any object into the slot on the LCD monitor cabinet. Do not place any objects on the
top of the product. It could short circuit parts causing a fire
Page 3 of 21
3
or electric shock. Never spill liquids on the LCD monitor.
The LCD monitor should be operated only from the type of power source indicated on the label.
The LCD monitor is equipped with a three-pronged grounded plug, a plug with a third
(grounding) pin. This plug will fit only into a grounded power outlet as a safety feature. If your
outlet does not accommodate the three-wire plug, have an electrician install the correct outlet, or
use an adapter to ground the appliance safely. Do not defeat the safety purpose of the grounded
plug.
Only the marked power source can be used for the product. Any power source other than the
specified one may cause fire or electric shock.
Do not touch the power cord during lightning. To avoid electric shock, avoid handling the power
cord during electrical storms.
Do not attempt to repair or service the product yourself. Opening or removing the back cover
may expose you to high voltages, the risk of electric shock, and other hazards. If repair is
required, please contact your dealer and refer all servicing to qualified service personnel.
Do not use the product if any abnormality occurs. If any smoke or odor becomes apparent,
unplug the power cord and contact your dealer immediately. Do not try to repair the product
yourself.
Do not install the product in an area with heavy dust or high humidity. Operating the product
in environments with heavy dust or high humidity may cause fire or electric shock.
To avoid risk of electric shock, do not touch the connector with wet hands.
Insert batteries in accordance with instructions while using the remote control. Incorrect
polarities may cause damage and leakage of the batteries, operator injury and contamination the
remote control.
Operating environment: Temperature: 0°C ~ 40°C, Humidity: 10% to 90% non-condensing,
Altitude: 0~10,000 ft.
Page 4 of 21
4
Identifying Components
-
The LCD Monitor Front View
Figure 1
1. LCD Screen
Page 5 of 21
5
-
The LCD Monitor Rear View
Figure 2
1. Wall-mount holes
2. I/O panel
Wall-mounted Illustration
1. Unplug all the cables and cords from the LCD monitor.
2. Place the LCD monitor face down on a soft and flat surface (blanket, foam, cloth, etc) to prevent
any damage to the display.
3. Gently pull the stand away from the display by grasping firmly to the base.
4. Now, the display can fit securely to a mount (sold separately) by utilizing the mounting holes in the
center of the back panel of the display (see Figure 2).
About Control Keys
The functions assigned to each individual control keys are different based on whether the OSD Menu
is activated.
Page 6 of 21
6
The following buttons are facing downwards in the center of the monitor.
– This button turns the monitor ON or OFF.
▲/ + – While in the OSD this button acts as a navigation button moving your selection to the next one.
If you entered the function this button acts as the increase adjustment button. This button also
functions as a BRIGHTNESS adjustment hotkey.
M / – This is the MENU button. It opens the On Screen Display (OSD) Menu.
While in the OSD, this button also acts as the ENTER button and goes into the function you want to
adjust. While adjusting the actual value of options, press this button again to exit.
▼/ – – While in the OSD this button acts as a navigation button moving your selection to the previous
one. If you entered the function this button acts as the decrease adjustment button. S – This button
allows you choose the source of the monitor between VGA and DVI.
I/O Connectors
Definition for I/O ports from right to left:
AC input
POWER – This plug is responsible for providing power to the monitor.
DVI input
VGA input
Page 7 of 21
7
Using the monitor
OSD (On Screen Display) Menu
The OSD menu of the monitor provides various adjustments for the monitor such as color, brightness,
contrast, screen settings…..etc. The OSD Menu varies based on different input signal sources. The
OSD menus provide different control functions which allow users to optimize the picture performances
for each of the input signal sources.
When you press the M button on the side of the monitor, the OSD screen will appear. Select each of
the functions with the (▲/+) or (▼/–) buttons. Use the M button to enter each of the function or
when you’re in the function already, use the M button to select the option you want to adjust. Use the
(▲/+) or (▼/–) buttons to adjust each option’s values.
AUTO ADJUST
This function auto adjusts the clock and phase of the monitor when using VGA cable so the monitor
will sync better with the video card and produce a clearer picture.
1.
You can use this function by pressing M, then press (▲/+) or (▼/–) to select Auto Adjust.
2.
Once Auto Adjust is highlighted, press M again to use the function.
Please Note :
•
This function is only available under VGA.
Page 8 of 21
8
LUMINANCE
This function adjusts the brightness and contrast of the LCD.
1.
To use this function, press M to open the OSD then highlight LUMINANCE function by pressing
the (▲/+) or (▼/–) button.
2.
Press M to enter the function.
3.
Press (▲/+) or (▼/–) button to select BRIGHTNESS or CONTRAST to adjust.
4.
Press M to select the option you want to adjust.
5.
Use the (▲/+) or (▼/–) button to adjust the values.
Please Note :
•
BRIGHTNESS adjusts the black level in a picture. If the value is adjusted too high, the
picture will look washed out. If too low, the picture will not have much detail in dark colors.
•
CONTRAST adjusts the white levels in a picture. If the value is adjusted too high, the picture
will not have any details in bright parts of the picture. If set too low, the picture will looked
washed out.
•
While DCR is turned on, BRIGHTNESS adjustments will be disabled. If you see
BRIGHTNESS function grayed out, you will not be able to adjust it.
Page 9 of 21
9
GEOMETRY
This function adjusts the screen’s image quality manually.
1.
Press M to open the OSD then highlight GEOMETRY by pressing the (▲/+) or (▼/–) buttons.
2.
Press M to enter the function.
3.
Press the (▲/+) or (▼/–) buttons to select the option you want to adjust. Use M to enter the
option and (▲/+) or (▼/–) buttons to adjust the values.
a.
H-POSITION – This option moves the picture left or right.
b.
V-POSITION – This option moves the picture up or down.
c.
PIXELCLOCK – This option adjusts the video signal in a large increment to sync with the
PC.
d.
PHASE – This option adjusts the video signal in a small increment to sync with the PC.
e.
FORMAT – This option adjusts the signal syncing compatibility of the LCD to different
types of resolutions while using VGA connection. When using VGA connection, you
need to use this option for changing the resolutions below then use AUTO
ADJUST after changing the format option.
Page 10 of 21
10
i. 16:10 – This format sets the monitor for 16:10 ratio resolutions such as 1440x900,
1680x1050, 1920x1200 resolution, making the screen clearer.
ii. 16:9 – This format sets up the monitor for 16:9 ratio resolutions such as 1280x720,
1360x768, and 1920x1080 making the screen clearer.
iii. 4:3 – This format sets up the monitor for 4:3 ratio resolutions such as 800x600,
1024x768, 1280x1024, and 1600x1200 making the screen clearer.
Please Note :
•
It is always suggested for the USER to use the AUTO ADJUST function instead of manual
adjustments.
•
Make sure you AUTO ADJUST after changing the resolution and the format.
•
LCDs will always be a little blurry when they’re not in their native resolution. Make sure you
are in the native resolution of the monitor first before making screen setting adjustments.
•
This LCD’s native resolution is 1920x1200 at 60 Hz.
•
FORMAT options are only available under VGA.
Page 11 of 21
11
COLOR
This function adjusts the overall balance of white colors in a picture in large increments. Color
temperature consists of 6500K, 7500K, and 9300K.
1.
Press M to open the OSD then highlight COLOR by pressing the (▲/+) or (▼/–) buttons.
2.
Press M to enter the function.
3.
Press (▲/+) or (▼/–) button to select the option you want to adjust to.
Use M to select the option.
a.
300K – This option adjusts the white balance towards the blue color giving the
picture a bluish tint and cooler look.
b.
6500K – This option adjusts the white balance to give the picture a no biased white
color.
c.
5800K – This option adjusts the white balance towards the red color giving the
picture a reddish tint and warmer look.
d.
USER PRESET – This option lets the user adjust the white balance by tweaking the
RED, GREEN, and BLUE color.
Page 12 of 21
12
i.
Use the (▲/+) or (▼/–) buttons to select the color you want to adjust and press M
to select it.
ii.
e.
Use the (▲/+) or (▼/–) button to adjust the values.
AUTO COLOR – This option automatically adjusts the overall balance of white colors in a
picture automatically.
OSD
This function adjusts the OSD’s display options.
1.
Press M to open the OSD then highlight OSD by pressing the (▲/+) or (▼/–) buttons.
2.
Press M to enter the function.
3.
Press the (▲/+) or (▼/–) buttons to select the option you want to adjust and press M to
enter the option.
4.
Use the (▲/+) or (▼/–) buttons to adjust the values.
a.
H-POSITION – This option moves the OSD menu left or right.
b.
V-POSITION – This option moves the OSD menu up or down.
c.
OSD TIME – This option change the time which the OSD will remain on screen
while idle.
Page 13 of 21
13
LANGUAGE
This function allows you to change the language of the OSD.
1.
Press M to open the OSD then highlight LANGUAGE by pressing the (▲/+) or (▼/–)
buttons.
2.
Press M to enter the function.
3.
Press the (▲/+) or (▼/–) buttons to select the language you want to change to and press
M to finalize the change.
Please Note :
•
Changing the language of the OSD will alter all the messages and OSD language of
the monitor. There is no reset for this function.
RECALL
This function recalls adjustments to the monitor.
1.
Press M to open the OSD then highlight RECALL by pressing the (▲/+) or (▼/–) buttons.
2.
Press M to enter the function.
3.
Press the (▲/+) or (▼/–) buttons to select the option you want to recall.
4.
Press M to enter the option and with the (▲/+) or (▼/–) buttons select
Yes to recall.
Page 14 of 21
14
a. COLOR RECALL – recalls all settings of COLOR function.
b. RECALL ALL – recalls all settings besides COLOR function.
Page 15 of 21
15
MISCELLANEOUS
This function adjusts many loose options inside the monitor.
1.
Press M to open the OSD then highlight MISCELLANEOUS by pressing with the (▲/+) or
(▼/–) buttons.
2.
Press M to enter the function.
3.
Press with the (▲/+) or (▼/–) buttons to select the option you want to adjust and press M
to adjust the function.
4.
Press the (▲/+) or (▼/–) buttons to adjust the value of the option.
i.
SHARPNESS – This option adjusts the sharpness of the graphics and text.
ii.
INPUT SELECT – This option lets you select the input you want.
iii.
OVER DRIVE – This option helps increase pixel response time reducing
ghosting effects.
iv.
DCR – This option turns dynamic contrast on or off.
v.
DISPLAY INFORMATION – This option shows the monitor’s information such as
resolution and refresh rate.
Please Note :
•
You can switch sources easily by using the SOUCE button on the side of the monitor.
•
The DCR function automatically controls the BRIGHTNESS of the monitor,
therefore, when this function is enabled, you will not be able to adjust the
values in the BRIGHTNESS function.
EXIT
This function exits the OSD menu.
1. Select the EXIT function with the (▲/+) or (▼/–) buttons and press M to exit.
Page 16 of 21
16
Appendix
-
Appendix A TFT LCD Monitor Specifications
Appendix B
-Supported PC Timing
Page 17 of 21
17
Appendix C
-Troubleshooting
This LCD monitor comes pre-adjusted with standard VGA timing. Due to output timing differences
among various VGA cards, you may initially experience an unstable or unclear display when a new
display mode or new VGA card is selected.
Before applying any of the following troubleshooting procedures, you should first apply the Auto
Adjust option in the OSD menu.
Problem
Possible solutions
Display is unclear
To stabilize and clarify your display, open the OSD and adjust
and unstable
the clock and phase to obtain a clear display or change the
resolution to the display’s optimal setting 800 x 600 at 60Hz.
Make sure you use auto adjust function after changing the
resolution.
There is no LCD
If there is no display on the LCD, refer to the following:
display
1. Make sure that the power indicator on the LCD monitor is
lit, that all connections are secure, and that the system is
running on the correct timing. Refer to Appendix B for
information on timing.
2. Turn off the LCD monitor and then turn it back on again.
Press the OSD Menu button (refer to OSD Menu page 9)
once and then press one of the Adjustment Control buttons
several times. If there is still no display, press the other
Adjustment Control button several times.
3. If step 2 does not work, connect your PC system to another
external CRT. If your PC system functions properly with
a CRT monitor but it does not function with the LCD monitor,
Page 18 of 21
18
the output timing of the PC’s VGA card may be out of the
LCD’s synchronous range. Change to one of the alternate
modes listed in Appendix B, or replace the VGA card and
repeat steps 1 and 2.
4. check that the DC power connector is securely connected.
The LCD displays
1. If you have a CRT monitor, please connect the CRT
“signal out of range”
monitor to the computer and change the refresh rate down
error message
to 60Hz via your video card’s display settings menu. After the
setting of 60Hz has been changed you can then use the LCD
on the computer.
2. If you do NOT have a CRT monitor, please make sure both
the LCD and your computer is turned off. Afterwards turn on
the LCD and the computer.
3. While the computer is turned on, press the “F8” key on
your keyboard continuously until a selection menu appears
and select the “Safe Mode” option.
4. When you’ve entered Safe Mode please uninstall any video
card driver and monitor driver by using either the “Add /
Remove Programs” icon or going into “System Properties”
and manually removing anything under “Monitors” and
“Display Adapters”.
5. After removing all the drivers, please reboot your
computer and you should be able to see windows. Please
then proceed to install your monitor driver first, then your
video card driver. Please remember to make sure your
refresh rate should be at 60Hz.
CE mark for Class B ITE
CE mark for Class B ITE (Following European standard EN55022:2006;
EN61000-3-2:2000+A2:2005; EN61000-3-3:1995+A1:2001+A2:2005,
EN55024:1998+A1:2001+A2:2003, EN60950-1:2001+A11:2004)
Radio Frequency Interference Statement
Warning:
This is a Class B product. In a domestic environment, this product may cause radio interference in
which case the user may be required to take adequate measures
Page 19 of 21
19
Vendor:
Europe:
Headquarter (North America):
canvys
A Division of Richardson Electronics GmbH
Raiffeisenstraße 5
D-78166 Donaueschingen
canvys
A Division of Richardson Electronics GmbH
40W267 Keslinger Road
PO Box 393
LaFox IL 60147-0393 USA
Internet: www.canvys.com
Tel.: +49 (0) 771 83 00 – 0
Fax.: +49 (0) 771 83 00 – 80
VAT-No.: DE128240232
WEE-Reg.-Nr.: DE64678500
Page 20 of 21
20