1
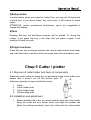
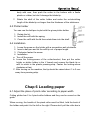
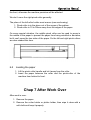
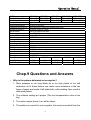
Operation Manual Cutting Plotter User Manual Thank you for choosing our cutting plotter: Before using the plotter, we suggest you read this user manual first. We will guide you how to use your plotter easily, how to keep your plotter with very strong and good condition. When you have trouble in using cutting plotter, please turn off the machine's power, then look for the resolution in this manual; or connect to the machine dealer who will help you to resolve problems; or send E-mail to us. Attention Please read the attention carefully before using the machine. Ensure the supply voltage varying within the range of ±10%, otherwise a voltage stabilizer must be used. Please don’t place any small iron-magnetic subject near the carriage. Prevent from dropping foreign matters into cracks such as pins, little screws, etc. Please pull down the power plug if not using during a long time. Don’t pull the cable with power when it is connected to the computer. Don’t press the pinch roller on the grit roller, if it is not used. Always connect the power cord to a grounded outlet. Don’t push the carriage. Don’t contact the carriage or the roller when the machine is working. Factory Remark: 1 -- Operation Manual It is possible that our factory will change the cutting plotter setup later. We will repair your cutting plotter immediately, if your machine has something wrong. But we have no responsibility to pay for the damage caused by your misoperation. Chap 1 Installation 1-1 Packing-box Please carefully check up the goods after opening the packing box, and in every box there should be as following: 1. A main machine. 2. A packet of accessories. 3. A set of parts of machine stand. 1-2 Accessories NO. Item Quantity 1 Power cord 1 2 Serial communication cable 1 3 USB communication cable 1 4 Operation manual 1 5 Cutter holder 1 6 Cutter 3 7 Plotter holder 1 8 Artcut Software 1 9 USB driver disc 1 1-3 Parts of stand NO. 1 2 Item Left Leg Right Leg 2 Quantity 2 2 -- Operation Manual 3 4 5 Crossbeam Paper roller Connection board 1 2 2 1-4 Assembly of machine stand Referring to the following drawing: Step 1: Connect the left and right legs with screws respectively. Step 2: Connect the crossbeam to left and right legs with screws. Step 3: Join the connection board to the top of the left and right legs with screws. Step 4: Place the paper-roller on the roller of connection board. 3 -- Operation Manual Chap 2 Components 2-1 Components 1. Left cover 2. Cutter bracket 3. Cutter holder 4. Carriage of cutter-bracket 5. Cover of guide 6. Pinch roller 7. Pressure setting knob 8. Controlling panel 9. Right cover 10. Fixed Base 11. Socket of serial port 12. Socket of USB port 13. Power socket 14. Power switch 15. Pinch roller handle 4 -- Operation Manual 16. Introduction panel Chap 3 Trouble shooting 3-1 Installation Place the machine on a horizontal place, adjust the height of the machine legs to make it stable. Do keep enough room in front and behind of the machine. And prevent from laying it in a place of quack, strong electromagnetic disturbance or thick dirt-powder. To ensure the machine work safely and reliably, please connect to the ground effectively. Plug the power cord in the power socket of the machine and a 220V/110V AC power outlet, and turn on the switch, and the red light lights up. Now the carriage can move to the right side and the roller rotates automatically, thus complete the automatic reset. If it fails to reset, press the “RESET” key please. If all goes on as the above, that proves the machine operation properly. 3-2 Remote The machine can be communicated with computer by serial port (COM1, 2, 3, 4) or USB port , but can’t use them at the same time. Using USB port can reduce communication time and improve the efficiency of computer. Remote steps: A. Connect the machine and the computer with serial communication cable or USB communication cable. B. Turn on the computer and the machine, and wait for the machine correctly resetting. C. Start cutting software after confirming the software setting (interfaces, baud-rate and commands sets) matched to the machine. Output graphical data to the machine, and it will begin to 5 -- Operation Manual cut. Chap. 4 Operation 1.State lights: Red light: directive of power, when it is on means to be on power. 2.Function keys: A. Reset key: The carriage returns to the original point after press this key. B. Setup key: pressing it can setup the Baud rate, usually we use 9600 in memory( no need to change this rate). C. Test key: pressing it, the self-check program will be started. D. Origin key: can exchange between the remote state and the local state, and make the cutter or plotter back to the origin when the local state is over. E. Offline keys: If you want the machine to cut from appointed location or check the quality during the cutting, press the “offline” key, you can press P+ or P- to move the carriage, V+ or V-to move the media. Then press “origin” key, the machine will work at the point of blade’s location. Or press “offline” again, it will continue to work. F. V+,V- can change the cutting speed. G. P+,P- can adjust the cutting force. 3.Functions realization 1. Plotting function: in the static or dynamic screen state, the machine will start to cut after computer outputs graphical data to it. 2. Speed regulation: adopts the mode of bi-direction circle, and speed can be regulated grade-by-grade by “V+” or “V-” key. In the state of the static or dynamic screen, first pressing the “V+”or “V-” key can check up current speed state. Afterwards, before automatically returning to the last screen, pressing “V+” once can increase speed one grade and if 6 -- Operation Manual keeping pressing it, speed will be increased quickly. When speed reaches to the highest value, pressing “V+” key will make it be the lowest. On the contrary, it is to be. After the regulation, system will return to the last screen automatically. 3. Pressure regulation: also adopts the mode of bi-direction circle and pressure can be adjusted grade-by-grade by “P+”or “P-” key. In the static or dynamic screen state, first pressing “P+” or “P-” key can check up current cutter pressure state. Afterwards, before automatically returning to the last screen, pressing “P-” key once will increase pressure one grade and keeping pressing it can rapidly increase pressure. When reaching to the highest value, pressing “P-” key will make pressure be the lowest .On the contrary, it is to be. After the regulation, system will return to the last screen. 4.Local functions 1)Reset Status: When you turn the power on, the machine can automatically reset .When it is working, if you press ”reset” key, the machine will return to reset---clear up all information, and get ready for new work. ”welcome to use” will appear on the LCD, that means the machine intend to receive the data from the computer. 2)Offline: Under online status, press ”offline” key, and you will enter offline status. Meanwhile, ”X=xxx, Y=yyy” will appear on LCD, which shows the coordinates location of the blade at the moment. If cutting plotter is at work, it will stop working, and the blade will be lifted up. Then the cutting plotter can not receive data transmitted from the computer, but you may operate as follows: a. X represent the carriage moving from left and right. You can move it by “V”+ or “V-“. b. Y represent the main roller, you can move it by “P+” or “P-“. c. When you press the key ”origin”, the current location of the blade will be defaulted as new work point. 7 -- Operation Manual 3)Setup status: In online status, when you press the “setup” key, you may set the baud rate of serial port. If you press “setup” key once more, it will restore to online status. ATTENTION: unless professional technicians, you’re not suggested to change this setting. 4)Test: Pressing this key, the self-check program will be started. Or during the cutting, if you press this key, it can stop until you press it again, it will continue to finish the work. 5)Origin functions: Press this key, can exchange between the remote state and the local state, and make the cutter or plotter back to the origin when the local state is over. Chap 5 Cutter / plotter 5-1 Structure of cutter holder and items of components Rotate the cutter holder to adjust the out-stretching length of the cutter as to ensure that it doesn’t cut off the bottom layer of stickiness (consists of upper and bottom layer). 1. 2. 3. 4. Cutter Cutter holder shell Cutter holder body Cutter-exiting staff 5-2 Installation and adjustment 1. Before installing the cutter, you must carefully clean the cutter holder body, the cutter and your hands. Even very slight dirt powder can affect the rotating sensitivity. Insert the cutter into the cutter holder 8 -- Operation Manual body with care, then push the cutter to the bottom with a flexile plastic or rubber, but don’t damage the blade tip. 2. Rotate the shell of the cutter holder and make the out-stretching length of the blade tip not larger than the thickness of the stickiness. 5-3 Plotter holder You can use the ball-pen to plot with the given plotter holder. 1. Rotate the lid. 2. Install the refill with the spring. 3. Cover the refill with the lid then rotate them into the shelf. 5-4 Installation 1. Loose the screw on the holder with a screwdriver anti-clockwise. 2. Insert a ball-pen and let the refill tip out of proper length. 3. Clockwise fasten the screw. 4. Installation a. Turn off the power b. Loose the locking-screw of the cutter-bracket, then put the cutter holder or plotter holder in the V breach and ensure the blade tip or refill to reach to the plastic pressing-strip. Fasten the locking-screw clockwise at last. C. After turning on the machine, the tip should be raised about 1 to 2 mm away from pressing-strip. Chap 6 Loading paper 6-1 Adjust the place of pinch-roller according to paper-width Cutting plotter has 2 to 4 pinch-roller holders and they can be moved on the guide. When moving, the handle of the pinch-roller must be lifted, hold the back of the holder and push it to the left or the right. Please don’t pull the roller bar in 9 -- Operation Manual the front, otherwise the machine precision will be affected. We don’t move the right pinch-roller generally. The place of the left roller holder must ensure (see as showing): 1. Pinch-roller is in the place out of the scope of the pattern. 2. Pinch-roller is 10 to 50mm away from the edges of the paper. On some special situation, the middle pinch roller can be used to press in the middle of the paper to prevent the paper from being wrinkled or deviation, but it can’t press the two sides of the paper. So the left and right pinch rollers are also needed this time. 6-2 Loading the paper 1. Lift the pinch-roller handle and let it away from the roller. 2. Insert the paper between the roller and the pinch-roller of the machine from behind to front. Chap 7 After Work Over After work is over: 1. Remove the paper. 2. Remove the cutter holder or plotter holder, then wipe it clean with a soft-cloth and keep it properly. 10 -- Operation Manual 3. Turn off the power, and pull the power cord out if not using during a long time. Chap 8 Using life of the cutter Cutter is the most expensive consumption for this machine. And its using life is also limited, but you can use it as long as possible. Note: 1. More longer the out-stretching length of the cutter, more shorter the using life. Please avoid cutting off the bottom layer during the process of cutting. 2. The more cutting force, the shorter the using life. 3. As for different materials, the requirement to the cutter sharpness is different. 4. Set the cutting force as little as possible; only increase it when the cutter feels blunt. 5. As for the cutters from different factories, the using life is also very different. 6. Renew the cutter timely when it blunt in case of affecting the machine performance. As an urgent method, a piece of leather can be used to sharpen the blade tip just like sharpening a razor 11 -- Operation Manual MODEL Max Media Enter Width Max Cutting Width Motor(Imported) Cutting pressure/Speed Cartriage(Whole Aluminum) Mechanical Resolution Special Setting Stands Interface/EMS-memory Control language Cutting test Curve flat cutting Power Supply Cutting knife soft loading Working temperature Working humidity Repeatable Precision: Type of cutter Drawing instruction Packing Size (cm) Weight By Regular Air Door to Door Courier CTK-360C CTK-720C CTK-870C CTK-1100C 360mm(14") 720mm(28" ) 870mm(24" ) 1100mm(43") 300mm(12") 630mm(24" ) 780mm(30" ) 960mm (38" ) Original imported high speed stepper Motor (Made In Japan) 50-500g / 50-800mm/s Whole aluminum Cartriage with Imported Gear inside. 0.0254mm / Step(0.001"/step) Dual Cutter holders,Dual strips Yes ( CTK-360C without stand) Serial+USB / 4M DMPL/HPGL Yes Yes AC90V--240V 50HZ-60HZ Yes 5C°-35C° 5%-95% (Non Condensing) <+ -0.1mm Long longevity high-speed carbon alloy-steel cutter PL/HT-GL(TM) 65*32*45 96*32*45 108*32*45 132*32*45 16Kg 19Kg 23Kg 28Kg 26Kg 31Kg CTK-1350C 1350mm(53" ) 1210mm(48" ) 150*32*45 32Kg 38Kg 36Kg 44Kg Chap.9 Questions and Answers Why is the pattern deformed or incomplete? 1. More pressure or too long blade tip or too dirty platen or too soft stickiness, all of these factors can cause more resistance to the two faces of paper and make it fall behind the roller rotating, thus result in deformed pattern. 2. The software setting isn’t proper. (The tool compensation value is too big) 3. The motor maybe doesn’t run all the steps. 4. The pattern is normal but not complete, this may be resulted from the 12 -- Operation Manual too small tool compensation value. Why does the machine plot abnormally? 1. Software setting is not matched to the machine, so you must adopt proper commands sets or set proper tool compensation value. 2. The plotting software is suddenly broken up. 3. Plotting software has been damaged or there is virus in computer. Why does the paper run deviation? 1. The stickiness isn’t placed right. 2. The platen is too dirty so that the resistance from two sides can’t be balanced when the paper is moving. 3. The pressure of the pinch roller is a little smaller and the paper is very sensitive to the external force. 4. The balance of the stickiness weight isn’t very good. 13 --