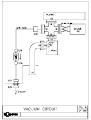
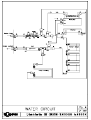
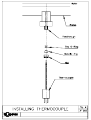
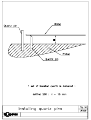
1
University of Texas
JetFirst 200
User’s Manual
CN040085
2.4
Update
May, 2004
Jetfirst200_standard_en_v24.doc
Version
Modification
Date
File
Advanced solutions for thin film deposition
www.jipelec.com
CONSTRUCTOR'S FOREWORD
The Jipelec system can be used in R&D. It is obvious that all gases have not been tested and
that, consequently, the user must take all the necessary precautions to prevent certain
mixtures occurring.
The constructor declines all responsibility for any incidents caused by insufficient
precautions or handling errors, and their consequences.
The constructor specifies that the Jipelec system has no protection against any possible toxic
emanations.
The responsibility for installing the machine in an environment which complies with the
relating legislation is left entirely to the initiative and charge of the user, who is considered
to be aware of the effects of the gases that he uses, as well as those of the decomposition
products and gases generated by the processes in operation.
The user shall be responsible for connecting the exhaust line and the pump exhausts of the
system to a gas scrubbing installation which is compatible with the process gases and gas
flows and that complies with local regulation.
The constructor also specifies that the quartz tube and all parts in contact with vacuum or
process gases must only be handled with gloves to avoid any pollution.
All maintenance and servicing work should be carried out by skilled personnel and, where
specified, in relation with QUALIFLOW Service Department.
QUALIFLOW Service Department and Process Department will provide additional
information or recommendation upon request.
www.jipelec.com
Advanced solutions for thin film deposition
User’s Manual
JetFirst 200
Constructor’s Foreword
TABLE of CONTENTS
1.
GENERAL INFORMATION .......................................................................................................................1
1.1
1.2
GENERAL DATA CONCERNING THE SYSTEM ...............................................................................................1
MANUFACTURER WARRANTY ...................................................................................................................1
1.2.1
Warranty conditions.........................................................................................................................1
1.2.2
Liability and Warranty.....................................................................................................................1
1.3 SAFETY INSTRUCTIONS .............................................................................................................................2
1.3.1
User’s manual pictogram definitions...............................................................................................2
1.3.2
Personnel qualifications...................................................................................................................2
2.
SYSTEM OVERVIEW..................................................................................................................................3
2.1
2.2
3.
GENERAL OVERVIEW ................................................................................................................................3
PERFORMANCES ........................................................................................................................................6
SYSTEM DESCRIPTION ............................................................................................................................7
3.1
3.2
3.3
3.4
3.5
3.6
3.7
3.8
FURNACE ..................................................................................................................................................7
REACTOR ..................................................................................................................................................7
VACUUM CIRCUIT .....................................................................................................................................8
GAS CIRCUIT .............................................................................................................................................9
VACUUM AND GAS DIAGRAM ..................................................................................................................10
WATER CIRCUIT ......................................................................................................................................10
TEMPERATURE CONTROL ........................................................................................................................11
COMMANDS ............................................................................................................................................11
3.8.1
PC and Programmable Logical Controller (PLC).........................................................................11
3.8.2
Front panel.....................................................................................................................................11
3.8.3
Electricity/Electronics....................................................................................................................11
3.9 DIMENSIONS AND FOOTPRINT..................................................................................................................12
3.10
OPTIONAL FEATURE ............................................................................................................................12
4.
INSTALLATION PROCEDURE...............................................................................................................12
4.1
4.2
4.3
4.4
4.5
4.6
HANDLING AND INSTALLATION SYSTEM..................................................................................................12
ELECTRICITY...........................................................................................................................................12
LAMP VENTILATION FAN .........................................................................................................................14
WATER CIRCUIT ......................................................................................................................................14
VACUUM AND GAS CIRCUIT.....................................................................................................................14
ADJUSTMENTS ........................................................................................................................................15
4.6.1
Adjust the inlet gas flow for each MFC..........................................................................................15
4.6.2
Adjust the relief valve.....................................................................................................................15
4.6.3
Adjusting the water flow controller................................................................................................16
4.6.4
Equilibrate the current in the zones ...............................................................................................16
4.6.5
Adjustment of the pyrometer emissivity..........................................................................................17
5.
UTILISATION .............................................................................................................................................19
5.1
5.2
6.
BEFORE START-UP ...................................................................................................................................19
START-UP ................................................................................................................................................19
SOFTWARE CONTROL - PIMS ..............................................................................................................20
www.jipelec.com
Advanced solutions for thin film deposition
User’s Manual
JetFirst 200
i
6.1
CREATE / EDIT RECIPES ...................................................................................................................21
6.1.1
Managing the recipe ......................................................................................................................22
6.1.2
Create a recipe...............................................................................................................................23
6.1.3
Copy a recipe .................................................................................................................................23
6.1.4
Enter parameters............................................................................................................................24
6.1.5
Display a recipe .............................................................................................................................27
6.1.6
Modify a recipe ..............................................................................................................................28
6.1.7
Delete a recipe ...............................................................................................................................28
6.2 RUN PROCESS.....................................................................................................................................29
6.2.1
Download recipes ..........................................................................................................................29
6.2.2
Process monitoring ........................................................................................................................31
6.2.3
Save Process ..................................................................................................................................32
6.3 MAINTENANCE MODE......................................................................................................................33
6.3.1
Manual heating ..............................................................................................................................34
6.3.2
Manual control...............................................................................................................................36
6.3.3
Gases control .................................................................................................................................37
6.3.4
Inputs / Outputs..............................................................................................................................38
6.4 PARAMETERS .....................................................................................................................................39
6.4.1
Thermocouple calibration..............................................................................................................40
6.4.2
Pyrometer calibration ....................................................................................................................41
6.4.3
Temperature compensation............................................................................................................43
6.4.4
Configuration .................................................................................................................................45
6.4.5
Language........................................................................................................................................48
6.4.6
Change password...........................................................................................................................48
6.5 HISTORICAL ............................................................................................................................................49
6.5.1
Available functionality ...................................................................................................................49
6.5.2
Alarms ............................................................................................................................................50
6.6 SAFETY FEATURES ..................................................................................................................................51
6.6.1
Water failure ..................................................................................................................................51
6.6.2
Air failure.......................................................................................................................................52
6.6.3
Fan failure......................................................................................................................................52
6.6.4
Furnace overheating ......................................................................................................................52
6.6.5
Lamp failure...................................................................................................................................52
6.6.6
TC failure .......................................................................................................................................52
6.6.7
Pyrometer failure ...........................................................................................................................53
6.6.8
Temperature control failure...........................................................................................................53
6.6.9
Primary pump failure.....................................................................................................................53
7.
SENSORS AND CONTROLLERS ............................................................................................................54
7.1
7.2
7.3
TEMPERATURE CONTROL ........................................................................................................................54
CONDITIONS OF USE ................................................................................................................................54
TEMPERATURE CONTROL OF SUSCEPTORS ...............................................................................................55
7.3.1
How to reduce the overshoot?........................................................................................................56
7.4 THERMOCOUPLES....................................................................................................................................56
7.4.1
Why thermocouple calibration?.....................................................................................................56
7.4.2
Enter thermocouple calibration table ............................................................................................57
7.5 OPTICAL PYROMETERS ............................................................................................................................58
7.5.1
Why pyrometer calibration? ..........................................................................................................58
7.5.2
Enter pyrometer calibration table..................................................................................................59
7.6 CALIBRATION PROCEDURE ......................................................................................................................60
7.6.1
Conditions ......................................................................................................................................60
7.6.2
Calibration recipe ..........................................................................................................................60
7.6.3
Proceeding .....................................................................................................................................61
www.jipelec.com
Advanced solutions for thin film deposition
User’s Manual
JetFirst 200
ii
8.
MAINTENANCE.........................................................................................................................................70
8.1
PERIODICITY OF MAINTENANCE OPERATION ............................................................................................70
8.1.1
Reactor ...........................................................................................................................................70
8.1.2
Furnace ..........................................................................................................................................70
8.1.3
Electricity .......................................................................................................................................71
8.1.4
Gas and vacuum.............................................................................................................................71
8.1.5
Water and compressed air .............................................................................................................71
8.1.6
Safety..............................................................................................................................................71
8.2 CHANGING LAMPS ...................................................................................................................................71
8.3 CHANGING THE WINDOW.........................................................................................................................72
8.4 INSTALLING THE THERMOCOUPLES .........................................................................................................72
8.5 CHANGING TYPE OF PYROMETER (HT <-> BT) .......................................................................................73
8.6 CLEANING THE REACTOR ........................................................................................................................74
8.7 CHANGING CONTROLLER BATTERIES.......................................................................................................74
9.
SOFTWARE.................................................................................................................................................75
9.1
9.2
10.
PIMS SOFTWARE INSTALLATION ............................................................................................................75
SOFTWARE INFORMATION .......................................................................................................................75
GRAPHITE PARTS – INFORMATION...............................................................................................76
10.1
10.2
10.3
10.4
10.5
10.6
INTRODUCTION ...................................................................................................................................76
THE SIC COATED SUSCEPTOR ..............................................................................................................76
THE SIC COATING ...............................................................................................................................77
PINHOLE FORMATION ..........................................................................................................................77
OVER-ETCHING ...................................................................................................................................77
PREVENTION OF PINHOLES BY THE USER .............................................................................................77
10.6.1 Unpacking ......................................................................................................................................77
10.6.2 General...........................................................................................................................................77
10.7
TEMPERATURE GRADIENTS .................................................................................................................78
USE OF SUSCEPTORS IN PROCESS ATMOSPHERE ...................................................................................78
10.8
11.
RECOMMENDED SPARE PARTS FOR JETFIRST 200 ..................................................................79
12.
APPENDIX...............................................................................................................................................80
FIG. 1
FIG. 2
FIG. 3
FIG. 4
FIG. 5
FIG. 6
FIG. 7
FIG. 8
FIG. 9
FIG. 10
FIG. 11
FIG. 12
FIG. 13
REACTOR GENERAL VIEW ...................................................................................................................80
REACTOR ARTICULATION ...................................................................................................................80
CONTROL FRONT PANEL .....................................................................................................................80
REAR UTILITY PANEL..........................................................................................................................80
VACUUM CIRCUIT ...............................................................................................................................80
GAS CIRCUIT ......................................................................................................................................80
AIR CIRCUIT .......................................................................................................................................80
WATER CIRCUIT .................................................................................................................................80
INSTALLING THERMOCOUPLE .............................................................................................................80
INSTALLING QUARTZ PINS ..............................................................................................................80
DIMENSIONS ...................................................................................................................................80
FOOTPRINT .....................................................................................................................................80
HEAT EXCHANGER .........................................................................................................................80
www.jipelec.com
Advanced solutions for thin film deposition
User’s Manual
JetFirst 200
iii
1. GENERAL INFORMATION
1.1 GENERAL DATA CONCERNING THE SYSTEM
The following manual relates to the Jipelec JetFirst 200 system.
Contact manufacturer:
QUALIFLOW
Tel: +33 (0) 4 67 99 47 47
Web site: www.jipelec.com
395, rue Louis Lépine – BP7
Fax: +33 (0) 4 67 99 47 48
Email: [email protected]
34935 MONTPELLIER Cedex 9 - FRANCE
1.2 MANUFACTURER WARRANTY
1.2.1 Warranty conditions
The JIPELEC JetFirst 200 systems have been manufactured and tested with the use of selected and reliable
equipments.
QUALIFLOW gives a 12 months warranty on the equipment from date of shipment. Consumables are not
covered by the warranty (quartz, graphite or SiC coated graphite parts, thermocouples, lamps, cooling fluids,
…).
The warranty is valid only if the equipment has been used according to QUALIFLOW instructions.
1.2.2 Liability and Warranty
All obligations of J.I.P.ELEC under this warranty shall cease if the end-user or third parties:
• Disregard the information contained in the manuals provided with JetFirst 200;
• Use the product in a non-conforming manner;
• Make any kind of changes (modifications, alterations, use of other gases than those
specified by Qualiflow for this JetFirst machine, …);
• Use the product with accessories, not listed in the corresponding product
documentation.
Reasonable care must be used to avoid hazards. QUALIFLOW expressly disclaims responsibility for loss or
damage caused by use of its products other than in accordance with proper operating procedures.
www.jipelec.com
Advanced solutions for thin film deposition
User’s Manual
JetFirst 200
1
1.3 SAFETY INSTRUCTIONS
1.3.1 User’s manual pictogram definitions
Burn hazard while touching hot parts.
This label prevents the user from eventual burning
hazards.
Damage hazard to the system.
This label prevents the user from eventual hazards
that can damage the system.
Electrical shock hazard.
This label prevents the user of eventual electrical
hazards.
Mechanical pinch hazard.
This label prevents the user of eventual mechanical
hazards.
Toxic and/or corrosive gases and chemicals.
This label warns the user from the danger and lethal
risks involved when using toxic or corrosive
chemicals.
1.3.2 Personnel qualifications
All installing or maintenance operations and procedures described in this manual may only be carried out by
persons who have suitable technical training and the necessary experience or who have been instructed by
JIPLELEC Technical Support Department.
www.jipelec.com
Advanced solutions for thin film deposition
User’s Manual
JetFirst 200
2
2. SYSTEM OVERVIEW
2.1
GENERAL OVERVIEW
The Jipelec JetFirst has been specially developed to meet the requirements of small-scale production,
universities and research laboratories. The high reliability and high performance characteristics of the
JetFirst enable small-scale production up to 5000 wafers per year.
The JetFirst systems are available with process chambers for samples up to 4'', 6'' and 8'' (substrate diameter:
100mm, 150mm and 200mm).
JetFirst 100 and 150 are top bench systems. A 150 P version (production dedicated version) and the JetFirst
200 are bigger and installed on the floor.
The temperature measurement and the control system provide accurate and repeatable thermal control across
the temperature range.
The lamp array, upper flange and quartz window are mounted in a rotating top lid giving full access to the
chamber for easy loading and unloading of the wafers.
Silicon carbide coated graphite susceptors are available for processing of compound semiconductors and
small samples. JetFirst 200 version is specially dedicated to processes using susceptors.
Spare chambers can be provided upon request to avoid cross contamination if several processes have to be
performed in the same equipment.
The PIMS PC control allows full process
Applications:
• RTA:
Annealing for silicon and compound semiconductor wafers
• RTO:
Rapid Thermal Oxidation
• RTN:
Rapid Thermal Nitridation
• RTD:
Rapid Thermal Diffusion from spin-on dopant
• Crystallization
• Contact Alloying
• And more….
www.jipelec.com
Advanced solutions for thin film deposition
User’s Manual
JetFirst 200
3
JetFirst 200
www.jipelec.com
Advanced solutions for thin film deposition
User’s Manual
JetFirst 200
4
Specifications
Features
JetFirst 200
Number of lamps
16
Number of zones
4
Max. Substrate diameter
8"
Purge gas line
Yes
Process gas lines with MFC
1 to 4
Temperature range
up to 1200°C
Width (mm)
1050
Depth (mm)
820
Height (mm)
1500
Weight (Kg)
~ 300
Max. power
63 kW
Control panel
See fig. 3 appendix for front face representation.
Including:
• ON/OFF push buttons;
• Alarm light;
• EMERGENCY STOP button.
Electrical part
Including:
• Power Converters (IR lamp power supply);
• Power Converters Boards (PCBs);
• Contactors;
• Circuit breaker;
• Transformer;
• Terminals.
The different components are industrial and are easily available. PCBs and lamp control are made by
QUALIFLOW.
www.jipelec.com
Advanced solutions for thin film deposition
User’s Manual
JetFirst 200
5
Equipment
Upper part, includes the following components:
• Furnace and lamps;
• Lamp air-cooling system;
• Reaction chamber;
• Quartz window, upper platen.
Lower part, includes the following components:
• Platen, quartz pins and thermocouples;
• Optical pyrometer;
• Gas panel;
• Water circuit;
• Air circuit;
• Vacuum valve and capacitive jauge;
• Flexible pipe to connect the vacuum pumping unit;
• Fan.
See fig 1 in appendix for main components localization.
Rear Side
See fig 4 in appendix for rear face representation.
All connections (power supply, water, air, gases and vacuum) are available on the rear face.
2.2 PERFORMANCES
These performance characteristics are given for standard silicon wafers (standard thickness).
Performances:
• Max substrate diameter
Up to 8'';
• Temperature range
Ambient to 1200°C;
• Thermocouple control range
Ambient to 1000°C;
• High temperature pyrometer control range (standard)
400°C to 1300°C;
• Low temperature pyrometer control range (optional)
150°C to 1000°C;
• Control of up to 4 gas lines and one purge line;
• Recipe control:
Multistep (ramp or dwell heat up)
• Vacuum: Designed to connect a pumping unit to the reactor. System is provided with a
vacuum valve.
www.jipelec.com
Advanced solutions for thin film deposition
User’s Manual
JetFirst 200
6
3. SYSTEM DESCRIPTION
3.1 FURNACE
See fig. 1 and 2 in appendix for general overview and fig. 11 and 12 for dimensions and footprint.
Two configurations are available:
• Stainless steel manufacturing;
• Aluminum manufacturing.
The furnace is located in the upper part of the system. It is installed in a rotating top lid with the upper part of
the process chamber. The furnace can rotate on the backside to allow sample loading and full access to the
process chamber.
The 16 tubular infrared heating lamps are installed inside a water-cooled and mirror-polished aluminum
reflector. Two tubes (supporting the lamps), supplied with water, cool down the lamps furnace.
On its upper side, you find electrical connections for lamps and safety heat sensor. The stainless steel box of
the furnace is cooled down by a fan, located in the lower part of the system. It evacuates the hot air through
the exhaust pipe with an output situated at the back of the system.
Special power converters had been developed by Qualiflow to control the halogen lamps in order to provide
accurate power control and fast response time.
It is possible to lift-up the lamp furnace thanks to a hinge (useful for maintenance operations). For servicing,
the furnace is fully accessible once you remove the white metallic box.
3.2 REACTOR
See fig. 1 and 2 in appendix for general overview.
Halogen lamps
Reflector
Quartz window
Process chamber
Substrate
Platen
Thermocouple
Pyrometer
Exhaust
or
Two configurations are available:
• Stainless steel reactor;
• Aluminum reactor.
The process chamber is a cold-wall chamber with water-cooled and mirror-polished metal walls. An infrared
window stanched with Viton O-ring separates the chamber from the furnace.
www.jipelec.com
Advanced solutions for thin film deposition
User’s Manual
JetFirst 200
7
Infrared halogen lamps heat the substrate through a quartz window located on the topside of the process
chamber.
Two gas jacks permit to open manually the reactor and to load the wafer on the platen easily. Three beveled
quartz pins installed in the platen hold the sample. They can be change in a minute to switch to other size of
sample.
Gas injection
The gas inlets are located in the platen or below the quartz window depending on the version. Gas is injected
under the wafer. It circulates around the wafer and the exhaust is done through the flexible pipe.
There is no risk of contamination by the reaction chamber because of the water-cooled walls.
Temperature control
The temperature control thermocouple is installed under the wafer through an O-ring connector located
under the platen. Another thermocouple for temperature reading only, located on the edge of the platen, is
installed likewise.
The optical pyrometer looks at the center of the wafer backside.
3.3 VACUUM CIRCUIT
See fig. 5 in appendix for vacuum and gas circuit.
The JetFirst system has vacuum capability down to 10-2 mbar using optional vacuum pump.
System is provided with:
• QF16 vacuum valve (recipe controlled);
• Constraint vacuum gauge (1000 mbar full range);
• Stainless steel flexible hose for vacuum pump connection.
A 3/8" stainless steel exhaust line allows atmospheric pressure processes and avoids any over pressure inside
the chamber.
System can be equipped with the following optional devices:
• Vacuum pump;
• Oil mist filter;
• Alumina trap.
www.jipelec.com
Advanced solutions for thin film deposition
User’s Manual
JetFirst 200
8
3.4 GAS CIRCUIT
See fig. 6 in appendix for vacuum and gas circuit.
The system is provided with a standard purge gas line. Up to three optional process gas lines with mass
flow controllers can be installed.
Features of a process gas lines:
• Polished stainless steel components;
• Swagelok fitting.
Purge gas line:
• Manual shut off valve;
• 0.22 µm filter;
• Ball flowmeter;
• Solenoid valve.
Process gas line (optional):
• Manual shut off valve;
• 0.22 µm filter;
• Mass flow controller;
• Solenoid valve.
The system can perform both atmospheric and vacuum processes:
• During vacuum processes, gases are pumped down through the vacuum valve and the
stainless steel hose. A check valve avoids back stream from the gas exhaust line;
• During atmospheric processes, gases go out of the chamber by the gas exhaust line.
The valves and mass flow controllers are fully controlled by the system. Gas flow can be changed at each
step of a recipe.
www.jipelec.com
Advanced solutions for thin film deposition
User’s Manual
JetFirst 200
9
3.5 VACUUM AND GAS DIAGRAM
Constraint
gauge
Lamps
Window
optional
MFC3
MFC2
MFC1
Check
valve
Filter
Vacuum
valve
To vacuum pump
Exhaust
Purge
Gas 1
Gas 2
Gas 3
3.6 WATER CIRCUIT
See fig. 8 in appendix for water circuit representation.
The JetFirst 200 is equipped with a water cooling circuit. This allows to cool down the main parts of the
furnace as well as power blocks.
The circuit is fully controlled by the PIMS.
Parts cooled by the water circuit:
• Lamps reflector;
• Reactor chamber;
• Platen;
• Power converters.
Features of the water circuit:
• Water relief valve;
• Solenoid valve;
• Flowmeter and filter.
www.jipelec.com
Advanced solutions for thin film deposition
User’s Manual
JetFirst 200
10
3.7 TEMPERATURE CONTROL
JetFirst is provided with closed loop temperature control set by thermocouple or optical pyrometer. The
system can also be used in power mode (open loop).
• Optical pyrometer:
BT or HT range;
• Thermocouple:
2 K type (Chromel/Alumel), ∅ 0.127 mm;
• Control:
Fast response temperature control board.
3.8 COMMANDS
3.8.1 PC and Programmable Logical Controller (PLC)
The JetFirst is provided with the Jipelec Process Image Management System (PIMS). It enables creation of
recipes, display of parameters and data acquisition during the process. Another module allows pyrometer
calibration.
An optional printer allows paper edition of curves. The PC provides full control over system and optional
features to purchase if required.
SAIA programmable controller providing detailed control over subsystems, processes and safeties. Another
PLC controls temperature compensation and lamps failure.
3.8.2 Front panel
See fig. 3 in appendix.
Features:
• A ON push-button (green);
• A OFF push-button (red);
• An emergency stop button.
3.8.3 Electricity/Electronics
Electricity
• A circuit breaker on the rear side protects the furnace;
• Circuit breakers inside the equipment protect the different subsystems;
• A power contactor supplies the furnace during process.
The user must provide a general circuit breaker to protect the supply line of the system and the furnace (see
installation procedure).
Electronics
Qualiflow made Power Converters Boards (PCBs) which are designed for:
• Electronics supply
CI 155;
• Temperature control
CI 134;
• Temperature transformer card
CI 149.
www.jipelec.com
Advanced solutions for thin film deposition
User’s Manual
JetFirst 200
11
See the Technical Manual for information about the electrical configuration.
3.9 DIMENSIONS AND FOOTPRINT
The Jipelec JetFirst system has been designed to get the most appropriate dimensions and footprint in order
to facilitate the operator's work and position:
• Dimensions:
1050 (L) x 820(W) x 1500 (H).
See Fig. 11 and 12 in appendix.
3.10 OPTIONAL FEATURE
The system can be equipped with a heat exchanger to cool down the lamps within a closed loop air circuit as
required in a clean room environment.
See fig. 7, 11 and 13 in appendix.
4. INSTALLATION PROCEDURE
4.1 HANDLING AND INSTALLATION SYSTEM
IMPORTANT NOTE
The JetFirst system must be installed on a stable flat surface otherwise the frame of the system can be
warped and lead to reactor leaks.
The vacuum pump must be installed in a way that avoid vibration from the JetFirst.
The system is mounted on four bevel wheels for easy moving. Once the JetFirst at the required position in
your room, use the threaded feet to lift the machine so the wheel don't touch the ground. Your system is now
fixed.
The last step consist in stabilizing the system by making it level. This is very important during process to
provide a good and uniform gas injection. Use a standard vertical level and use the threaded feet of the
system to make it level.
4.2 ELECTRICITY
JetFirst 200
Voltage
Power
Frequency
Current
3 x 400V + N + GND
63 kW
50 Hz
90 A
3 x 220V + GND
63 kW
60 Hz
165 A
The Jipelec JetFirst is provided with a circuit breaker to protect the system.
The user must use a circuit breaker to protect the mains power cable according to the following table.
JetFirst 200
Voltage
Circuit breaker
Power cable
3 x 400V + N + GND
100 A
5 x 35 mm²
www.jipelec.com
Advanced solutions for thin film deposition
User’s Manual
JetFirst 200
12
3 x 220V + GND.
250 A
4 x 70 mm²
Use the big gland to connect the mains power cable to system terminals.
www.jipelec.com
Advanced solutions for thin film deposition
User’s Manual
JetFirst 200
13
4.3 LAMP VENTILATION FAN
See fig. 7 in appendix for air circuit.
The rotating direction of lamp ventilation fan must be check before running any process. The fan is
controlled by the PIMS and can be started using manual mode.
• Flow:
300 l/min. (for a sufficient air cooling of the lamps);
• Connection to fan:
Ø160;
• Exhaust pipe:
∅100 (or Ø160 with heat exchanger).
4.4 WATER CIRCUIT
Features:
• Water inlet/outlet:
Rubber pipe, ∅16;
• Water flow:
≈ 20 lit/min;
• Maximum pressure at water inlet:
6 bars;
• Max pressure at water outlet:
1 bar;
• Minimum inlet temperature
2°C over the dew point;
• Maximum inlet temperature
25°C;
• Maximum outlet temperature
60°C.
A relief valve controls the water pressure. This pressure must never exceed 3 bars and must be checked
before any new start-up. See fig. 8 in appendix.
CAUTION
Water pressure must not exceed 3 bars inside the system. A relief valve controls the pressure. This
pressure must not exceed 3 bars and should be controlled each time you start the equipment. Water
flow is around 20 l/min.
4.5 VACUUM AND GAS CIRCUIT
The machine is delivered with Swagelok fittings:
• Polished stainless steel 316L pipe (inner ∅6,35) are recommended;
• Pumping by QF 16 stainless steel pipe connected under the platen;
• Exhaust by a 3/8" stainless steel pipe with Swagelok fittings.
The vacuum valve and the gas valves are recipe-controlled and can be opened or closed at each step of a
recipe.
See fig. 4, 5 and 6 in appendix for vacuum and gas circuit.
www.jipelec.com
Advanced solutions for thin film deposition
User’s Manual
JetFirst 200
14
4.6 ADJUSTMENTS
CAUTION
Some subsystems are powered inside the system. Factory-trained technicians should carry out these
operations.
4.6.1 Adjust the inlet gas flow for each MFC
The inlet gas flow for each MFC must be adjusted according to the ∆P specified on the calibration
datasheet. A higher or lower inlet gas flow could result in instability of gas regulation.
Information on inlet gas flow is given in the calibration certificate of the MFC, which is provided with the
system documentation.
4.6.2 Adjust the relief valve
See fig. 8 in appendix for water circuit representation.
Adjusting the water pressure
Prior to any start-up or whenever the machine has been stopped for an extended period of time, it is
necessary to check and adjust the water pressure in the water circuit.
To get the best running conditions, the water pressure droop in the system (between water inlet and outlet)
must be about 2 bars.
If the water outlet is at atmosphere, follow this procedure:
• Unscrew completely the pressure-reducing valve placed at the rear of the machine;
• Supply the water on the cooling circuit;
• Tighten the screw of the pressure-reducing valve till you achieve 3 bars pressure on the
manometer.
If the equipment is connected to a cold water network:
• Unscrew completely the relief valve placed at the rear of the machine;
• Supply the water on the cooling circuit;
• Tighten the screw of the relief valve till you achieve 3 bars pressure on the manometer;
• Water outlet must not exceed 1 bar to be sure the water flow will be sufficient.
CAUTION
If water outlet pressure exceeds 1 bar please contact QUALIFLOW.
www.jipelec.com
Advanced solutions for thin film deposition
User’s Manual
JetFirst 200
15
4.6.3 Adjusting the water flow controller
IMPORTANT
Adjust the airflow switch before water flow controller.
• Remove the metallic panel on the low left side of the system (fixation by magnets). The
water flow controller is the brass box with black connector;
• Supply the system with air;
• Power on the system;
• Select maintenance mode, and then valves control;
• Press F1 to open the water valve;
• Check that Led n°3 on controller is ON when water is flowing. If not, adjust the
position of the black connector until the Led lights;
• Check that water flow is around 5 and 10 l/min;
• Tighten the 2 screws of connector;
• Re-install the metallic panel.
4.6.4 Equilibrate the current in the zones
The temperature uniformity is very important during process.
A good uniformity will result in a good balance of the current between the 2 (JetFirst 100) or 3 (JetFirst
150) lamp zones. The adjustment is different depending of the voltage of the converter: 220V or 400V.
Proceeding:
• Remove the metallic covers on the top of the furnace;
• Remove the metallic panel on the bottom right side. The electronic boards of the power
converters are now accessible;
• Switch on the system;
• Select manual heating from the PIMS. See section 6.3.1 for further details;
• Set power to 10%;
• The balance between the zones can be adjusted with the potentiometers which are on
each power converter board;
• Measure the voltage on the lamps on each zone and adjust the corresponding
potentiometer to have 22Volts (220V converter) or 40Volts (400V converter);
• Repeat the procedure for 20% to get 44Volts (220V converter) and 80Volts (400V
converter);
• Switch off the system;
• Re-install the metallic panel and the covers.
www.jipelec.com
Advanced solutions for thin film deposition
User’s Manual
JetFirst 200
16
4.6.5 Adjustment of the pyrometer emissivity
The JetFirst system can be equipped with pyrometers from different suppliers. Whatever the pyrometer,
IMPAC or IRCON model, the adjustment of the pyrometer emissivity needs to be done physically on the
device. The difference appears on the way to do it.
For further explanations on pyrometer settings, refer to IRCON or IMPAC user's manual provided with
your system.
IRCON pyrometer:
This pyrometer has a cover at the bottom. Unscrew it and you will see the buttons that will let you setting the
emissivity of the pyrometer.
IMPAC pyrometer:
This pyrometer has a cover at the bottom, set with two CHC screws. Unscrew them and you will have the
following configuration that will let you setting the emissivity of the pyrometer. Be careful when you take
the cover out of the pyrometer as the cover is connected to 10-pin plug.
To set the ε emissivity
10-pin plug
CHC screws
www.jipelec.com
Advanced solutions for thin film deposition
User’s Manual
JetFirst 200
17
www.jipelec.com
Advanced solutions for thin film deposition
User’s Manual
JetFirst 200
18
Procedure:
• To perform the adjustment, enter the Manual Heating mode (see section Erreur !
Source du renvoi introuvable.);
• Heat up to 900°C, using thermocouple readout;
• Pick up the pyrometer value (mV) at 900°C and then adjust the emissivity as described
in the pyrometer user's manual.
Standard values:
These values are given below as an example only. Nevertheless, the final actual setting should keep close
from these values.
High Temperature
pyrometer
Low Temperature
pyrometer
T°
900°C
900°C
mV
6800mV
8000mV
5. UTILISATION
5.1 BEFORE START-UP
CAUTION
Before start-up, read the whole user's manual.
Procedure:
• Before start-up, read the whole user's manual;
• Check all connections: Electricity, gases, air, water;
• Select the required quartz pins;
• Lift-up the reactor box, the platen appears. Place the quartz pins with a tweezers or with
fingers (using gloves). See fig. 10 in appendix;
• Install the sample on quartz pins.
Note: The JetFirst system is delivered with 3 sets of beveled quartz pins with different height. The system is
provided with special quartz pins to hold 4'' and 6'' wafers. Be careful, quartz pins are fragile.
5.2 START-UP
• Check electricity, water, air and gas supplies;
• Start the computer and run the JetFirst managing software;
• Power up the rear circuit breaker;
• Press the green button.
www.jipelec.com
Advanced solutions for thin film deposition
User’s Manual
JetFirst 200
19
6. SOFTWARE CONTROL - PIMS
The PIMS software provides easy programming control and monitoring of the JetFirst system.
To use the PIMS control, the operator must select this mode in the main JetFirst menu.
The computer is the interface between the system and the operator and allows:
• giving process parameter to the system controller;
• receiving data and getting visualization during process;
• storing process data and monitoring them after processing.
Software options can be chosen either with mouse and pressing the left button when key is selected on the
screen, or by using the keyboard by pressing key "Alt" and the underlined letter of the key in the same time.
The software is organized in menus and sub-menus.
The main menu offers 6 options:
• CREATE / EDIT RECIPES:
to create, modify, display or delete;
• RUN PROCESS:
to run a process;
• MAINTENANCE MODE:
• HISTORICAL:
• PARAMETERS:
• EXIT:
for manual control of the system;
to display saved processed and alarm events;
for calibrations and configuration parameters;
to return to "WINDOWS" and to terminal control.
www.jipelec.com
Advanced solutions for thin film deposition
User’s Manual
JetFirst 200
20
The operator needs to enter a password to access to RECIPES, MAINTENANCE, and
CONFIGURATION modes. At delivery, the password is "J".
When this password has been entered the system is in engineering mode and a message is displayed on the
main menu form. The system will remain under engineering mode until the operator will exit from the PIMS
software.
When the system is in the engineering mode the operator can access to all menu options.
If the password is "a" or "A" the PIMS software will automatically starts in engineering mode. For any other
password the operator will need to enter the password to go in the engineering mode.
6.1 CREATE / EDIT RECIPES
This mode is for creating, modifying, deleting or displaying recipes.
Each recipe can have up to 50 steps and it is possible to store many recipes in the system (the limitation is the
memory available on the hard disk).
When the EDIT mode is selected, the screen displays the recipe-programming screen.
www.jipelec.com
Advanced solutions for thin film deposition
User’s Manual
JetFirst 200
21
Each recipe is made of:
• A name (up to 10 characters);
• An associated calibration table to be chosen according to the sample to process;
• A comment;
• Fifty steps.
First the operator must create a recipe and then can enter the parameters for the different steps and the screen
displays the programming parameters screen.
For each step the operator can select:
• Temperature (dwell or ramp);
• Duration of step;
• Temperature control mode;
• To open or not vacuum and purge valves;
• To set the temperature alarm limit;
• To set the gas flow alarm limit;
• Gas line mass flow controller setpoint.
6.1.1 Managing the recipe
Selecting options
To select options, use the mouse and click with the left button. Click on to change the status of the option.
Click on once more to return to previous status.
Exploring the recipe
Click on "Next step" to go to the next step and key "previous step" to go to the previous step.
It is possible to insert or delete a step by using corresponding keys. When a step is inserted the following
steps will have their step number increased by 1 and a new step with all parameters equal to zero is inserted
(step 30 is deleted).
When a step is deleted, the next step takes its number and all the followings have a step number decreased by
1.
When pressing one of the keys "Next step", "Previous step", "Insert step" or "Exit", the parameters of the
displayed step are automatically saved.
www.jipelec.com
Advanced solutions for thin film deposition
User’s Manual
JetFirst 200
22
6.1.2 Create a recipe
Each recipe has a name and several parameters:
• An associated calibration table;
• A comment;
• Fifty steps.
When creating a new recipe, some parameters have to be entered and others are optional.
Non optional parameters are:
• Recipe name;
• Calibration table name.
Create a new recipe
• Select "New recipe". The screen will erase the old parameters and place the cursor on
the recipe name (Icon in the upper left side of the tool bar);
• Enter recipe name;
• Select a calibration table in the list;
• Enter others parameters if needed (they are optional);
• Save the recipe (key "Save recipe");
• If the recipe is not saved, it is not possible to display the steps and the screen will
display a message.
6.1.3 Copy a recipe
You can create a recipe by saving an existing recipe file under a new name. Use the command button "Save
recipe" to do so.
Proceeding:
• Load the recipe to save with a new name;
• Click on "Save recipe" button;
• Enter the new name;
• Press OK.
All parameters will remain the same as in the first recipe except the name.
www.jipelec.com
Advanced solutions for thin film deposition
User’s Manual
JetFirst 200
23
6.1.4 Enter parameters
Steps
When the new recipe has been saved, it is possible to go to enter for each step the process parameters. The
screen will display step 1 parameters.
Entering parameters
The temperature may change in ramps or stay on steady steps. For each step, only the ending temperature is
entered. The initial temperature of the step is the ambient temperature for step one, and it is final temperature
of the previous step for others.
It is also possible to choose some other parameters:
• Temperature control mode: closed loop or open loop (no temperature control);
• Temperature control sensor: pyrometer or thermocouple;
• Time base (1 second or 1/10 second);
• Gas line 1 mass flow controller setpoint;
• Gas line 2 mass flow controller setpoint;
• Gas line 3 mass flow controller setpoint;
• To open or not the purge valve;
• To open of not the vacuum valve;
• To activate the temperature alarm limit;
• To activate the gas flow alarm limit.
When no temperature control mode is chosen, the system will run in power mode without any feedback from
temperature sensors. Power setpoint can be set from 0% to 100%.
CAUTION
When using power mode there is no temperature control and you may damage your samples, or melt
them in a few seconds if power is too high.
The ranges for parameters are:
• Temperature:
0-1300°C;
• Time:
0-9999 s;
• Gas setpoint:
up to MFC full range.
www.jipelec.com
Advanced solutions for thin film deposition
User’s Manual
JetFirst 200
24
Temperature
During process temperature can be ramping or dwell. The initial temperature is the final temperature of the
previous step or ambient temperature for first step. The step’s final temperature is the displayed temperature.
Time
Step duration from 0 to 9999 seconds.
It is possible to reduce the step time base by a factor of ten: see parameter "Tenth".
Temperature control
In standard mode the system is in temperature control mode .It is possible to choose the open loop mode
without temperature , select the option “NO TEMPERATURE CONTROL”.
CAUTION
Using the open loop mode temperature can reach high level and damage or destroy the sample. At 100
% a silicon wafer will melt in a few seconds.
Tenth
This mode allows counting down step duration 10 times faster. (Example: if duration is 15 s the actual step
duration will be 1,5 s).
www.jipelec.com
Advanced solutions for thin film deposition
User’s Manual
JetFirst 200
25
TC (Thermocouple or Pyrometer control)
This mode allows choosing the sensor for the temperature control mode: thermocouple or pyrometer.
The thermocouple is used for low temperature processes and to perform the pyrometer calibration. The
thermocouple cannot be used with active gases (H2) because they reduce its lifetime.
The pyrometer is usually used for most of the processes.
During process, the system will display the temperature from the control sensor.
Gas flow setpoint
The gas 1, 2 or 3 solenoid valve allowing or not the gas to enter the chamber will open if the mass flow
controller setpoint is different from zero. The mass flow is set to the required value for the step.
Vacuum valve
The vacuum valve can be opened at each step of a recipe for purge or vacuum process. If the vacuum valve
is closed the gas will go out of the chamber through the exhaust line.
Purge valve
The purge valve can be opened at each step of a recipe for purge or vacuum process. If the purge valve is
closed the gas will go out of the chamber through the exhaust line.
To enter numerical values, use the keyboard. If the value is out of range, the screen will display a message
with the correct range for the parameter.
www.jipelec.com
Advanced solutions for thin film deposition
User’s Manual
JetFirst 200
26
Temperature alarm limit
The temperature alarm limit can be set from 0 to 50°C in the parameters configuration mode.
If the temperature alarm limit is activated for a step and if the difference between the setpoint and the
temperature from the temperature sensor is over the temperature alarm limit the system will display an alarm
message. The temperature alarm limit must be activated for each step.
The configuration mode also allows configuring the software in order to stop the system if there is a
temperature alarm limit.
Gas alarm limit
The gas alarm limit can be set from 0 to 20% in the parameters configuration mode.
If the gas flow alarm limit is activated for a step and if the difference between the setpoint and the gas flow is
over the alarm limit the gas name will flashing in yellow color. The gas flow alarm limit must be activated
for each step.
CAUTION
During the different recipes, the user take care that:
- One step which use H2 injection has to follow with one pump step (30 sec), a purge step(30 sec), or a
new H2 injection and not with a O2 injection.
- One step which use O2 injection has to follow with one pump step (30 sec), a purge step(30 sec), or a
new O2 injection and not with a H2 injection.
The user must connect a pump, the pumping time must be less than 30 seconds to reach the pressure
of 1 Torr and the gas purge flow must be 15 l/min
6.1.5 Display a recipe
Choose the EDIT RECIPES mode.
Select the recipe with arrow keys or use the "find" option.
Then you can display the steps of the recipe by using keys "step" and then "next step" and "previous" to go
to a step to an other. The "First step" key will display step 1.
"Exit" will return to the menu.
www.jipelec.com
Advanced solutions for thin film deposition
User’s Manual
JetFirst 200
27
A command of the center toolbar allows to get a graphic representation of the recipe. Click on "Display
recipe", the following window appears:
6.1.6 Modify a recipe
Choose and select the recipe, following procedure described above in § 6.2.1.
If you change comments or another parameter of the first page (recipe), you must save it by pressing key
"Save".
If you need to change a parameter in a step, display this step, change the parameter and exit (step parameter
will be saved automatically).
6.1.7 Delete a recipe
Select EDIT RECIPES mode and then select the recipe to delete in the tool bar.
Press key "Delete". The computer will ask to confirm. Press "Delete" to confirm. The recipe is now deleted.
Press "Cancel" if you do not want to delete the recipe.
www.jipelec.com
Advanced solutions for thin film deposition
User’s Manual
JetFirst 200
28
6.2 RUN PROCESS
Before running a process, check:
• Water supply;
• Compressed air supply;
• Gas supply;
• Vacuum pump.
Select process mode with key "RUN PROCESS”.
6.2.1 Download recipes
All the recipes are stored on the computer's hard disk. It is necessary to send the parameters to the system
controller before starting the process.
When the operator chooses process mode, the system will display the Start Process form, it will ask to
download a recipe and then begin a process.
www.jipelec.com
Advanced solutions for thin film deposition
User’s Manual
JetFirst 200
29
If the process to perform is the same as the last one that was downloaded to the system (displayed on the top
of the form), the operator can start process immediately. Caution: if a parameter of the step has been changed
the recipe must be downloaded once more.
If the recipe to process, is different from the last recipe downloaded, then, downloading must be done before
operation.
To download a recipe:
• Select a recipe to download in the list with the mouse;
• Select key "Download".
The associated calibration tables are also downloaded.
It is possible to return to the main menu by using key "Exit".
When downloading has been performed, press key "Start Process".
When "Start Process" is selected once more, the screen will display the process form and process starts
immediately.
During the process, the chamber is locked and its remains locked until the temperature has reached
the opening threshold (see configuration mode).
www.jipelec.com
Advanced solutions for thin film deposition
User’s Manual
JetFirst 200
30
6.2.2 Process monitoring
During process, the screen displays all the parameters:
• Recipe name;
• Current step;
• Calibration table name;
• Setpoint;
• Temperature from pyrometer and thermocouple;
• Power to the lamps;
• Valves status;
• Gas flow readings.
On the left part of the screen, a plotter monitors the curves of the setpoint, temperature sensors and the power
to the lamps.
The color of the curve is the same color as the displayed value of the parameter:
• White:
Setpoint;
• Green:
Pyrometer;
• Red:
TC1;
• Magenta:
TC2;
• Yellow:
Power to the lamps.
Valves status indicators:
• White:
the valve is not provided on this system;
• Red:
the valve is closed;
• Green:
the valve is open.
The screen also displays the temperature alarm limit, checking status and the temperature alarm limit
message is the temperature which is outside the limit when this function is activated.
Process can be stopped at any time by using key "Stop".
In case of gas alarm, the backside of the gas flow display will be yellow flashing.
www.jipelec.com
Advanced solutions for thin film deposition
User’s Manual
JetFirst 200
31
6.2.3 Save Process
At the end of the process, the system is being cooled down for 3 minutes. After this time, it is possible to
save the process monitoring as a historical file.
To save the process:
• Enter a historical name (up to 10 characters);
• Enter a comment (optional);
• Press the key "Save".
The historical is saved on the hard disk in the directory "Historical". They can be saved on floppy disk or in
other directories by using Windows facilities. It will be possible to read the historical from any directory or
driver in the historical mode. The name of "Historical" directory must not be changed, because it is the
default directory used by the software.
When the process has been saved, or if saving is not needed, press key "Exit" to return to the main menu.
www.jipelec.com
Advanced solutions for thin film deposition
User’s Manual
JetFirst 200
32
If a gas alarm or a temperature alarm limit has occurred during the process it will be displayed on the save
process form.
6.3 MAINTENANCE MODE
This mode is dedicated to maintenance operations and adjustments.
The password must be entered to access this mode.
When the MAINTENANCE mode is selected, the screen displays the MAINTENANCE form:
The maintenance mode allows:
• setting the lamps at a fixed power;
• controlling some valves;
• controlling mass flow controllers;
• displaying controller inputs status.
www.jipelec.com
Advanced solutions for thin film deposition
User’s Manual
JetFirst 200
33
6.3.1 Manual heating
The manual heating mode allows powering the lamps at a fixed setpoint.
During manual heating, the screen displays the calibration table which is loaded in the controller and:
• Temperature from pyrometer according to calibration table;
• Temperature from TC1;
• Temperature from TC2;
• Power (feedback from system).
When manual heating mode is selected, the system closes the chamber and sets cooling.
The manual heating mode enables the user to turn the lamps on at a specific set point.
www.jipelec.com
Advanced solutions for thin film deposition
User’s Manual
JetFirst 200
34
When this mode is selected, the power switch is thrown if the water flows are sufficient. The system closes
the chamber and activates the cooling process.
In this mode, the user can test the heating in power or temperature control mode (2 possibilities):
• to go to power mode, the user selects "power mode" and enters a set point between 0
and 100 %;
• in temperature control mode, the user enters a temperature set point between 0 and
1000°C.
The power is balanced via the compensation table displayed. It can be selected when a recipe is downloaded
with the appropriate table in “process” mode. It is not necessary to launch the process.
The pyrometer is calibrated in accordance with the calibration table displayed. To select another table, the
user must download a recipe with the required table in “process” mode. He is not obliged to launch the
process.
To start heating, enter a power setpoint (0 to 100%) and press key "Start heating". The heating will start
immediately.
CAUTION
At full power (100%) or even less, you can damage your substrate in a few seconds. The manual
heating must be used only for adjustments and with low power. Some safeties are activated (water, air,
overheating) but in case of failure, nothing will be displayed. The user must check himself that
everything is correct.
Press "Stop heating" to stop heating.
Heating must be stopped prior to change to power setpoint.
"Exit" will return to the maintenance mode menu after a cooling cycle.
www.jipelec.com
Advanced solutions for thin film deposition
User’s Manual
JetFirst 200
35
6.3.2 Manual control
This mode is used to:
• open and close the chamber;
• open or close the water valve (same key): click once and the valve opens if it is closed
(red indicator); click again and the valve closes;
• turn the lamp fan on or off to cool them down;
• open and close the gas vacuum valve (purges the gas panel);
• open and close the purge valve;
• display input and output status.
The chamber can not be opened if the pressure inside is not the same as, or greater than, the atmospheric
pressure.
www.jipelec.com
Advanced solutions for thin film deposition
User’s Manual
JetFirst 200
36
6.3.3 Gases control
This mode allows having a direct control on the mass flow controllers.
This mode enables the user to directly control gas mass flow regulators.
The gas flows are displayed on “bar graphs” and the user can read the values. The line gas valve opens if
the line mass flow controller setpoint is not null.
The gas vacuum valve is open whilst the chamber remains closed. The gases are pumped through the primary
pump.
Just enter a setpoint to activate the controller. Nevertheless, some gaseous mixes, especially H2 and O2, are
forbidden to prevent explosions.
“Exit” will return to the maintenance mode menu, reset all setpoints and close the gas valves.
www.jipelec.com
Advanced solutions for thin film deposition
User’s Manual
JetFirst 200
37
6.3.4 Inputs / Outputs
This option displays the inputs and outputs status of the controller.
www.jipelec.com
Advanced solutions for thin film deposition
User’s Manual
JetFirst 200
38
6.4 PARAMETERS
CAUTION
Changing value of parameters may have important consequences on the behavior of the system. The
operations must be carried out very carefully.
The parameters menu allows entering in the system. The password must be entered to access to this mode.
When PARAMETERS mode is selected, the screen displays the following form:
Options:
• Pyrometer calibration table;
• Thermocouple calibration table;
• Configuration;
• Language;
• Change password.
www.jipelec.com
Advanced solutions for thin film deposition
User’s Manual
JetFirst 200
39
6.4.1 Thermocouple calibration
The temperature can be controlled either by the optical pyrometer or by a thermocouple. The calibration
tables give the temperature from the sensor in relation with the voltage.
To install the thermocouple, see section 8.4 in this manual. To calibrate the thermocouple, go to section 7.6
in this manual. A fully described procedure is available to perform the thermocouple calibration.
The calibration curve for the K thermocouple is known and it cannot be modified. The equation is:
Temperature (°C) = Voltage (Volts) x 130.
Because of temperature control system, a difference appears between the setpoint and the actual
measurement. The calibration mode permits to compensate this difference.
Operator has to calculate the error percentage (0 to 200 ‰ - zero to two hundreds per thousand) between the
setpoint and the actual temperature and enter this value in the calibration table. This value must be added to
the existing correction value.
For the thermocouple, the software only allows entering and saving the setpoint correction for different
levels of temperature.
www.jipelec.com
Advanced solutions for thin film deposition
User’s Manual
JetFirst 200
40
Proceeding:
• Select thermocouple calibration, and save the values when they have been changed;
• "Delete Table" key allows resetting all the correction parameters;
• "Print" key will print the thermocouple calibration table;
• "Exit" will return to the parameters menu.
6.4.2 Pyrometer calibration
The temperature can be controlled either by the optical pyrometer or by a thermocouple. The calibration
tables give the temperature from the sensor in relation to the voltage.
For the pyrometer, the voltage is function of the temperature and of the emissivity of the substrate. So the
calibration curve depends on substrate materials and on the layers on its surface.
The software allows entering several calibration tables that may be used to process substrates of different
nature.
To calibrate the pyrometer, go to section Erreur ! Source du renvoi introuvable. in this manual. A fully
described procedure is available to perform the pyrometer calibration.
When the Pyrometer calibration mode is selected, the screen displays the Pyrometer calibration form:
www.jipelec.com
Advanced solutions for thin film deposition
User’s Manual
JetFirst 200
41
Each calibration table is made of 30 temperature / voltage couples. The calibration curve will be made by
interpolation between 2 couples of values. The operator has to enter 2 to 29 couples of values. The
thermocouple is difficult to use up to 1300°C to record a calibration curve. The calibration curve is usually
linear at high temperature and the computer will calculate the voltage value for 1300°C by prolongation of
the last part of the curve that has been entered by the operator.
Setpoint correction
Because of the temperature control the system used in the JETFIRST, there is an offset between the
temperature setpoint and the actual temperature that the system will reach during the process. This offset can
be set to zero by using the setpoint correction.
Like for the thermocouple, because of temperature control system, a difference appears between the setpoint
and the actual measurement. The calibration mode permits to compensate this difference.
During the process, the operator has to calculate the error percentage (0 to 200 ‰ - zero to two hundreds per
thousand) between the setpoint and the actual temperature and then to enter this value in the calibration table.
This value must be added to the existing correction value.
Example
If process is performed at 850°C (under pyrometer temperature control) and if the actual temperature is only
847°C, the setpoint correction for this part of the curve must be increased by 3/850 = 3‰.
By this way, it is possible to adjust the temperature control very accurately.
To enter a new table
Select «New Table» and enter a name (up to 10 characters).
You can enter a comment (optional).
If you use a low temperature pyrometer, you must select “low temperature” in order to have the right
calculation for the max. temperature.
Then you have to enter the values for recording thermocouple and pyrometer signals at the same time. The
thermocouple gives the wafer temperature for a voltage of the pyrometer. The operator must perform a multistep process (50°C by 50°C for example) in thermocouple control mode in order to get the actual calibration
parameters (see § Erreur ! Source du renvoi introuvable.).
Each couple temperature/voltage must be entered in the calibration table so that the controller can make the
right setpoint calculation.
The correction factor may vary from 0 to 200.
Other functions available
• Save as:
• How to save?
To save a compensation table with a new name;
Press "Save as", enter a new name, press "Save".
• Delete:
To delete a compensation table;
• Print:
To print the compensation table parameters on the color printer;
• Exit:
To return to the parameters menu.
www.jipelec.com
Advanced solutions for thin film deposition
User’s Manual
JetFirst 200
42
6.4.3 Temperature compensation
With the temperature compensation module, it is possible to modify the distribution of power within the
chamber so that the temperature is consistent over the substrate’s surface.
The furnace is made up of 4 independent heating zones and the user may choose, for each of them, a power
ratio with a 1000 reference corresponding to 200 Volts.
To access the temperature compensation mode, click on “Compensation table”. A diagram representing the
heating zones will be displayed on the screen. The compensation parameters can either be entered on the
right hand side of the screen.
The distribution of power in the furnace depends on the temperature. The compensation differs according to
the level of power.
There are 13 compensation lines per table, allowing the operator to accurately control power distribution.
On the left-hand side of the screen, a diagram of the lamps corresponding to each zone is displayed. Select
the zone and the lamps will be displayed in yellow.
To enter the parameters, select “New table” first.
www.jipelec.com
Advanced solutions for thin film deposition
User’s Manual
JetFirst 200
43
Instructions:
Select “New table” and enter a name;
The user can enter a comment (optional);
Then he must enter the following on each line:
• the power level (from 0 to 1000);
• the balance for each zone.
Zones 1 and 4 are on the edge of the furnace. They are supplied with a higher voltage (400V compared to
200 V for the other zones). Therefore the power ratio is different.
Enter the parameters and save the values (“Save”).
IMPORTANT
For the last line, the power value must always be activated for 1000. Otherwise, the heating may be
stopped when too much power is requested.
Example:
Power (‰)
250
1000
Zone 1
2000
1500
Zone 2
1000
1000
Zone 3
900
1000
Zone 4
2000
1500
From 1 to 25% the coefficients from line 1 will be applied.
For example, if the system gives a 20% set point, line 1 is selected. Remember that the zone coefficient is
determined in relation to 1000 (i.e. 200V for 1000‰). We therefore supply zone 1 with 2000 ‰ (the set
point multiplied by two), zone 2 with 1000 ‰ (the same as the set point) and zone 3 with 900 ‰ (9/10 of the
set point). Zones 4 is same as zone 1.
If we calculate in terms of voltage, 20% of 200 V equals 40 V. We will therefore supply zone 1 with 80V,
zone 2 with 40 V and zone 3 with 36 V. Zones 4 is handled in the same way.
Other available functions:
• Save as:
• How to save?
this key is used to save a compensation table under a new name;
Press "Save as", enter a new name, press "Save".
• Delete:
Deletes a compensation table;
• Print:
Parameters of the current compensation table are sent to printer;
• Exit:
Used to return to the parameters menu.
www.jipelec.com
Advanced solutions for thin film deposition
User’s Manual
JetFirst 200
44
6.4.4 Configuration
When the CONFIGURATION mode is selected, the screen displays the Configuration form:
www.jipelec.com
Advanced solutions for thin film deposition
User’s Manual
JetFirst 200
45
6.4.4.1 Gases
If the gas flow alarm limit is activated for a step and if the difference between the setpoint and the gas flow is
over the alarm limit, the gas name will flash in yellow color. The gas flow alarm limit must be activated for
each step.
In this mode, the operator can also determine the pressure unit and set the “Demonstration mode” on.
Mass flow controllers
The names of the gases and the flow ranges should only be changed if a flow controller is changed.
Click on “configuration” and enter the new values. The flow meter range should be expressed in sccm.
If the gas alarm limit is set to a value other than zero, the system will display an alarm during the process
when the gas flow goes beyond its range.
For example:
If the gas alarm limit is set at 5 %, an alarm is engaged if the difference between the mass flow readout and
the set point for this gas line is greater than 5%.
The gas alarm limit is only active if it has been activated for the step (see “Recipe” mode).
When an alarm is engaged, a yellow light flashes on the process screen. At the end of the process, a message
comes up on the screen to remind the operator that an alarm was engaged during the process.
Note: the gas alarm limit does not stop the process.
Capacitance manometer range
This menu option allows the user modifying the capacitance manometer range when the latter has been
changed.
It is also possible to select an alarm limit for each gas line in order to check during the process that the flow
remains inside this limit. The gas flow alarm limit can be set from 0 to 20%.
If the gas flow alarm limit is activated for a step and if the difference between the setpoint and the gas flow is
over the alarm limit, the gas name will flash in yellow color. The gas flow alarm limit must be activated for
each step.
In this mode, the operator can also determine the pressure unit and set the “Demonstration mode” on.
IMPORTANT NOTICE
When gas name is entered, the system will set the corresponding valve status indicator. It is important
to set one gas name for each gas line actually provided on the system.
www.jipelec.com
Advanced solutions for thin film deposition
User’s Manual
JetFirst 200
46
Temperature alarm limit
The temperature alarm limit can be set from 0 to 50°C in the parameters configuration mode.
If the temperature alarm limit is activated for a step and if the difference between the setpoint and the
temperature measured is over the temperature alarm limit, the system will display an alarm message. The
temperature alarm limit must be activated for each step.
The configuration mode also allows configuring the software in order to stop the system if there is a
temperature alarm limit.
Example
• Temperature alarm limit
20°C;
• Setpoint
700°C;
• Temperature control
Pyrometer.
A message will come up if the pyrometer temperature is greater than 720°C or less than 680°C. The
temperature alarm limit does not stop the process.
When the process is complete, a message appears to remind the operator that an alarm was engaged during
the process.
It is possible to stop the process as soon as the temperature alarm limit occurs. Just select temperature alarm
limit stops process.
Opening temperature
During process, the chamber is locked for safety reasons (gas in the chamber, hot samples).
The chamber remains closed during cooling sequence until the temperature is upper the opening temperature.
The default value for the opening temperature is 80°C. It can be set to any value between 0 and 999°C.
Pressure unit
The operator can chose to display the pressure in Torr or mbar. Just select the right option in the
configuration mode.
Demo mode
This mode allows running the software without running the JetFirst system.
It can be used for operator training or to install the software or an other computer to display process
historical.
When the Demo mode is selected a red bar message is displayed on the main menu screen.
www.jipelec.com
Advanced solutions for thin film deposition
User’s Manual
JetFirst 200
47
6.4.5 Language
This option allows changing the new language for the PIMS control software. When the Language mode is
selected, the screen displays the Language form:
When the language is selected, the program is stopped and must be restarted.
6.4.6 Change password
This option allows changing the password which is needed to access to Recipe, Maintenance and
Configuration modes.
When the Change password mode is selected, the screen displays the following
www.jipelec.com
Advanced solutions for thin film deposition
User’s Manual
JetFirst 200
48
6.5 HISTORICAL
This mode allows:
• displaying historical records of processes which have been saved;
• displaying the list of alarm events.
Select "Historical" and the screen will display a new form asking for "Historical" (Process records) or
"Alarms" (alarm events).
“Exit” will return to the main menu.
6.5.1 Available functionality
By default, historical are saved in the “Historicals” directory.
To select the historical corresponding to the required process, just click on “Load”, select the file from the
list by clicking on it and press “Enter”. The temperature and power curves will come up in the plotter
window.
Once the historical has been loaded, the 3 first minutes of the process are displayed. You may use the “zoom
+” key to expand the time scale and the “zoom – ” key to compress this axis. These keys can be used several
times to attain the zoom required, according to the software’s capabilities. The “zoom” key takes you back to
the original size.
www.jipelec.com
Advanced solutions for thin film deposition
User’s Manual
JetFirst 200
49
Use the “Next” and “Previous” keys to continue viewing the historical or to view the previous parameters.
The “Print” key enables the user to print the current page on the color printer.
“Option” is used to change the color and style of the curves and to select another scale for the Y axes (power
is displayed proportionately to temperature).
A cursor is available and may be moved rapidly using the "<<" or ">>" keys (blue) or more slowly using
"<−" or "−>". You may also enter the cursor’s step size by keying a number (of seconds) into the white space
between the "<" and ">" keys. The cursor’s current value is displayed in the upper part of the window along
with the values for all the process parameters (i.e. thermocouples, pyrometers, gas flow, etc.).
If you click on “calibration”, the value of the pyrometers is displayed in terms of voltage rather than
temperature, at the cursor point. The main purpose of this is to create the pyrometer calibration table by
noting the voltage / temperature ratio.
Clicking on “alarm” gives you access to the list of alarms (see how to use it below).
6.5.2 Alarms
The "Alarms" key in historical menu allows displaying the list of all alarm events that have appeared during
processing.
www.jipelec.com
Advanced solutions for thin film deposition
User’s Manual
JetFirst 200
50
The list of all alarms is displayed on this page. The time, date and alarm type are specified.
The background color of each line depends on the type of alarm:
• red:
alarms that require system reset;
• yellow:
for alarms that require the process to be stopped.
The alarms may be displayed over several pages. Use the “Previous page” and “Next page” keys to view
them.
Use "Delete" key to reset the alarm event list.
Use "Print" key to print alarm events list.
"Exit" will return to historical menu.
6.6 SAFETY FEATURES
During process the system checks:
• Water flow;
• Air pressure;
• Fan unit;
• Furnace temperature;
• Lamps filaments;
• Thermocouple;
• Pyrometer;
• Temperature control;
• Primary pump (optional).
If any utilization condition is not fulfilled, the system is protected by an alarm and safeties.
The screen displays the failure origin. The alarm relay is activated.
Press “Reset”
to stop the alarm, the safety cycle starts. Follow the instructions displayed on the screen
to unload the wafer.
Prior to any new process, solve the problem.
6.6.1 Water failure
The water flow sensors detects a low flow. The system stops.
Possible causes:
• The water supply tap is off;
• The water pressure is not sufficient;
• The water flow sensor is not well adjusted;
• A water leak in the circuit.
www.jipelec.com
Advanced solutions for thin film deposition
User’s Manual
JetFirst 200
51
6.6.2 Air failure
The air pressure switch detects an air failure and stops the system.
Possible causes:
• No compressed air supply;
• Compressed air pressure is below 6 bars;
• The pressure switch is not well adjusted.
6.6.3 Fan failure
The fan circuit breaker has been cut off. The “Initialization” process must be launched.
Possible causes:
• Motor is overloaded;
• Circuit breaker has been cut off.
6.6.4 Furnace overheating
Temperature switch on furnace has detected an overheating.
Possible causes:
• Water flow is not sufficient;
• Too long processes.
6.6.5 Lamp failure
The controller detects a bad balance between the current of the four zones. The system stops.
Possible causes:
• One lamp filament is broken;
• One power fuse is burned;
• One power block does not work.
6.6.6 TC failure
Thermocouple failure. The system stops.
Using thermocouple temperature control, the thermocouple is broken. Change either the thermocouple or the
temperature control mode.
www.jipelec.com
Advanced solutions for thin film deposition
User’s Manual
JetFirst 200
52
6.6.7 Pyrometer failure
The system receives no signal from the pyrometer.
Possible causes:
• Pyrometer disconnected;
• Pyrometer failure;
• CI 149 failure.
6.6.8 Temperature control failure
Temperature control failure. The system stops.
Difference between the temperature readout and the setpoint.
Possible causes:
• No wafer in the chamber;
• Pyrometer failure;
• CI 134 Power Converter Boards (PCB) failure;
• Lamps supply failure.
6.6.9 Primary pump failure
The primary pump is powered off. Its circuit breaker is open. The system must be reset.
Possible causes:
• Pump motor is overloaded;
• Circuit breaker is open.
www.jipelec.com
Advanced solutions for thin film deposition
User’s Manual
JetFirst 200
53
7. SENSORS AND CONTROLLERS
7.1 TEMPERATURE CONTROL
The Jipelec RTP systems are provided with closed loop temperature control with thermocouple or optical
pyrometer. The system can also be used in power mode (open loop).
Temperature control devices:
• One optical pyrometer for process temperature measurement;
• Two K type thermocouples for pyrometer calibration and low temperature
measurement;
• CI 134 Control board for fast response temperature control.
7.2 CONDITIONS OF USE
Thermocouples:
Lead free thermocouples can be used from ambient temperature up to 1000°C and only with non-active
gases. When they are used under other conditions, their lifetime is much shorter and in some cases, it is
impossible to use them (reducing atmosphere for example). Sheathed thermocouples can be supplied for
special applications. The sheathed thermocouples are strongly recommended for temperature control of
susceptors.
The lifetime of the thermocouple is really reduced in reducing atmosphere if you use a lead free
thermocouple as the welding has some oxide that protects it and that will be removed in reducing
atmosphere. The lifetime can be as short as few process cycles. If you use a sheathed thermocouple it has an
Inconel sheath with good resistance to different type of gas atmospheres.
For the susceptor temperature control, use a sheathed thermocouple installed in the small hole of the
thermocouple on the edge of the susceptor (and even more if you have a reducing atmosphere). We have
performed some pyrometer control in some cases. First case is control of a sample on a susceptor but without
cover and if the ramp rate is not too high. We also have a system with a pyrometer on the edge (JetFirst
150P) in order to allow pyrometer temperature control with the susceptor. Anyway for most of the
applications with susceptors use the sheathed type thermocouples. The central TC (on backside) will limit the
temperature control capabilities because of the thermal inertia of the system and the response time.
The temperature uniformity is another issue and cannot be measured by thermocouples installed outside the
susceptor. The susceptor with a large edge allows reducing the edge effect on the sample and getting a
good uniformity on the sample to be processed inside the box.
Pyrometer:
The system is usually provided with one optical pyrometer for high or low temperature control range
depending on the application. The pyrometer looks at the rear side of the substrate and only receives signal
from the substrate and not from the lamps. See section 7.5 for further information.
www.jipelec.com
Advanced solutions for thin film deposition
User’s Manual
JetFirst 200
54
7.3 TEMPERATURE CONTROL OF SUSCEPTORS
The temperature control of susceptor is more complicated than with a single wafer because the thermal
system (susceptor, sample and cover) is much more complicated and has a much bigger thermal inertia. This
leads to lower ramp rates for both heating and cooling and to some big overshoot when using fast heating
rates. Hereafter are some recommendations to improve the temperature control with a susceptor.
The drawing hereunder describes the heating exchanges between the lamps, cover, sample and susceptor:
• On the edge, the lamps heat the cover from the upper side. The heat is directly
transferred from the cover to the susceptor;
• In the middle the lamps heat the cover and then the cover heats the sample by radiation
(with much less power than the lamps); then the sample heats the susceptor.
The thermal exchanges are much faster on the edge than in the center and for this reason it will be much
easier to control the temperature measuring the temperature on the edge because the response time is much
faster. This is especially interesting when high heating rates are required.
The edge temperature measurement methods are:
• Edge pyrometer from the backside (On some RTP systems only);
• Sheathed thermocouple in the special hole on the edge of the susceptor. This allows
measuring the temperature very close to the sample. This method is recommended as
the temperature is close to the sample temperature and the response time is short;
• Lead free thermocouple installed between the susceptor and the cover).
Infrared radiation
from halogen lamps
Lead free
Thermocouple
Sheathed
Thermocouple
Lead free
Thermocouple
Fast thermal transfer
Edge pyrometer
Central pyrometer
Slow thermal transfer
www.jipelec.com
Advanced solutions for thin film deposition
User’s Manual
JetFirst 200
55
7.3.1 How to reduce the overshoot?
A better temperature control method as described above can reduce the overshoot as the control system may
have a better response time. For example a sheathed thermocouple installed in the hole on the edge of the
susceptor will have a much shorter response time than a lead free thermocouple installed in the backside and
center of the susceptor because here the thermal exchanges are much faster.
If there is still high overshoot for the heating ramp there is another way to overcome this problem or at least
to reduce the overshoot using a two step ramp. The method is described in the drawing hereafter. This
requires some process engineering but as the reproducibility of the system is good the method can be of
some interest for a better process control.
Two step ramp
One step ramp
Temperature
Temperature
Actual temperature
Temperature setpoint
Actual temperature
Temperature setpoint
Time
Time
7.4 THERMOCOUPLES
Thermocouples: Chromel/Alumel - Type K
Thermocouples can be used from ambient temperature up to 1000°C and only with non-active gases. When
they are used under other conditions, their lifetime is much shorter and in some cases, it is impossible to use
them (reducing atmosphere for example).
One thermocouple can be used for temperature control (TC1) the second one can only be used for
temperature measurement (TC2).
See fig. 6 in appendix.
7.4.1 Why thermocouple calibration?
The calibration curve for the K thermocouple is known and it cannot be modified. The equation is:
Temperature (°C) = Voltage (Volts) x 130.
The setpoint correction parameter allows reducing the offset between the setpoint and the actual temperature
from the thermocouple which is used for the temperature control. It will not have any effect on the second
thermocouple which is used for temperature measurement only. The control thermocouple is connected to
the CONTROL cable and the other one to the READ cable. If you use a lead free thermocouple or a sheathed
www.jipelec.com
Advanced solutions for thin film deposition
User’s Manual
JetFirst 200
56
one should not affect the setpoint correction procedure. The adjustment might be a little bit different as the
thermocouples are not used exactly in the same conditions and at the same position.
For thermocouple, the software only allows entering and saving the setpoint correction for different levels of
temperature. See section 7.6 below for a full explanation of the calibration procedure.
7.4.2 Enter thermocouple calibration table
Select the thermocouple calibration table in the parameter mode.
The operator must calculate the percentage of error (from 0 to 200%) between the set point and the readout
for each temperature dwell of the process historical, then enter this value in the calibration table. This value
must be added to the correction value already displayed.
The following equation is used to calculate this coefficient:
Corrector coefficient =1000 x (set point-readout)/readout
For thermocouple, the software only allows the user correcting the set point and saving the correction for
different temperature levels.
See section 7.6 below for a full explanation of the calibration procedure.
www.jipelec.com
Advanced solutions for thin film deposition
User’s Manual
JetFirst 200
57
7.5 OPTICAL PYROMETERS
System is provided with one optical pyrometer for high or low temperature control range. The pyrometer
looks at the rear side of the substrate (JetFirst and JetStar) and only receives signal from the wafer and not
from the lamps.
For accurate and repeatable regulation, check the pyrometer calibration regularly. A six-month period
appears to be the average reliability of the calibration. However, if the system is often used at high
temperature (over 1000°C), it is recommended to calibrate the pyrometer more frequently.
High temperature pyrometer specifications (spare part reference PT012):
• Wavelength:
4.8 to 5.2 µm;
• Type:
HT (high temperature);
• Temperature range:
400°C to 1300°C.
Low temperature pyrometer specifications (spare part reference PT013):
• Wavelength:
8 to 14 µm;
• Type:
BT (low temperature);
• Temperature range:
Note:
150°C to 1000°C.
Above temperature range values are given for silicon wafer or SiC coated susceptor only.
Pyrometer calibration is made according to the K thermocouple. The calibration tables are saved on the
computer hard disk. It is possible to save different tables for different substrate materials and to associate
them to process recipes.
7.5.1 Why pyrometer calibration?
Pyrometer calibration is an essential operation. A good temperature measurement will result from the quality
of calibration. The pyrometer measures a quantity of infrared radiation. The quantity of radiation depends on:
• Substrate nature (Silicon, GaAs, Graphite, etc.);
• Nature of layers on substrate surface;
• Temperature of substrate.
Some substrates, especially GaAs, may have their optical properties definitely changed if they reach some
temperature levels. The calibration must be always performed with a substrate with the same "thermal past"
than the substrates that have to be processed in the system.
Notice that Silicon and GaAs are transparent for infrared at low temperature. In the same way the
thermocouple can see the lamps through the wafer at low temperature.
Usually the calibration does not change for the same type of substrate. If calibration changes check that the
pyrometer window is clean, and that the pyrometer emissivity has not been changed.
Like for the thermocouple, because of the temperature control system (Proportional type), a difference
appears between the setpoint and the actual measurement. The calibration mode permits to compensate this
difference by the setpoint correction parameters. See thermocouple calibration.
The calibration has to be performed whenever the type of substrate or the process conditions are changed.
www.jipelec.com
Advanced solutions for thin film deposition
User’s Manual
JetFirst 200
58
7.5.2 Enter pyrometer calibration table
Select pyrometer calibration in the parameter mode. The calibration table gives the temperature of the
pyrometer according to its voltage.
As far as the pyrometer is concerned, the voltage depends on the substrate’s temperature and emissivity.
Therefore, the calibration curve depends on the substrate materials and on the structure of the layers at the
substrate’s surface.
The software allows the user saving several pyrometer calibration tables which can be used to process
different types of substrate.
Each calibration table provides for 30 temperature / voltage couple of values per pyrometer calibration table.
The calibration curve is created by interpolation between 2 couples of values. The operator may therefore
enter values into lines 1 to 30.
WARNING
Do not use thermocouples for temperature over 1000°C. The probe can be damaged.
The pyrometer calibration curve is linear at high temperatures and the computer will calculate the
pyrometer’s temperature for the maximum voltage by extending the last part of the curve entered. For low
temperature pyrometers, the temperature limit is 1000°C for high temperature ones it is 1200°C.
www.jipelec.com
Advanced solutions for thin film deposition
User’s Manual
JetFirst 200
59
See below for a full explanation of the calibration procedure.
7.6 CALIBRATION PROCEDURE
7.6.1 Conditions
The calibration procedure must be performed:
• at atmospheric pressure to get a better thermal contact between the thermocouple and
the substrate;
• under air as the thermocouple lifetime is reduced under reduced atmosphere;
• without gas flow in order to avoid any cooling effect of the thermocouple during the
calibration process.
7.6.2 Calibration recipe
Calibration is performed for each temperature controller: the thermocouple and the low temperature
pyrometer or high temperature pyrometer. Each device has a specific recipe to run calibration.
For thermocouple and low temperature pyrometer (BT), the recipe is set with temperature ranged from 0°C
to 1000°C with even steps of 50°C.
For the high temperature pyrometer, the furnace needs to be heated to 450°C before starting any
measurement:
• First step:
1sec at 30% of power;
• Second step:
• Then, heating:
30sec at 30% of power;
from 450°C up to 1000°C with even steps of 50°C.
The recipe is limited to 1000°C, in the first time, in order to be able to use the thermocouple for regulation.
Once the pyrometer is calibrated at 1000°C, take the thermocouple probe out of the furnace and perform
pyrometer calibration up to 1200°C.
www.jipelec.com
Advanced solutions for thin film deposition
User’s Manual
JetFirst 200
60
7.6.3 Proceeding
• Install a substrate in the chamber and the thermocouple in the center (as described in the
manual in section 8.4);
• Check there is contact between thermocouple and wafer. Connect thermocouple to
controller cable (TC1);
• Download the existing recipe called "tc". The temperature is ranged with steps of 50°C
under thermocouple regulation control. (see section 6.2 for recipe downloading);
• Run the process and save the process historical as TC01 (see section 6.2.3);
• Go to “Historical” menu and click on “Historical” to display the graphical
representation of the process. From the thermocouple curve, note down the main
thermocouple values according to each set point;
www.jipelec.com
Advanced solutions for thin film deposition
User’s Manual
JetFirst 200
61
• With this list of readout and setpoint values, calculate the setpoint correction factor for
each temperature as follows:
Current Correction + (
Note:
Setpoint − Readout
* 1000) = New correction
Readout
An example is given for line n°12, with a setpoint temperature of 600°C.
600 - 612
* 1000 = −20
612
The new correction factor is: 86 + (– 20) = 66
• Select “thermocouple calibration” from the "Parameter menu";
www.jipelec.com
Advanced solutions for thin film deposition
User’s Manual
JetFirst 200
62
• Change the correction factor for each temperature setpoint as follows:
• Once the table is modified, save it and exit from the parameter menu;
www.jipelec.com
Advanced solutions for thin film deposition
User’s Manual
JetFirst 200
63
• Run the same process again to check the accuracy of the calibration. Save the process
historical as TC02;
• If values are still out of range, run a process and calibrate the thermocouple again
following the previous steps;
Note:
The difference between setpoint and thermocouple temperature values must not exceed ±
2°C. You can see in the above historical graphic that the TC1 readout value matches the setpoint
value.
• If the thermocouple calibration is correct, you can follow the procedure and calibrate
the pyrometer according to the thermocouple calibration;
• From this point, thermocouple has to be already calibrated. If not, go back to the
top of this section to calibrate the thermocouple;
• Now switch to mV for pyrometer unit. The pyrometer readout value is now expressed
in mV:
www.jipelec.com
Advanced solutions for thin film deposition
User’s Manual
JetFirst 200
64
• From the pyrometer curve, note down the pyrometer voltage value for each
thermocouple temperature according to setpoint;
WARNING
Note down voltage for a temperature setpoint of 1000°C. This value allows checking the emissivity of
the pyrometer. Pyrometer voltage range is 0 – 10V, it will measure 1300°C for a voltage of 10000mV
(theorical values).
• As the thermocouple doesn't measure temperature above 1000°C, you have to do an
extrapolation of the temperature curve for setpoint values up to 1300°C;
Temperature
setpoint value (°C)
950
1000
1050
1100
1150
1200
1250
1300
Voltage (mV)
Voltage value type
Extrapolation (mV)
5800
6099
6398
6697
6996
7295
7594
7893
Readout value
Readout value
Extrapolated value
Extrapolated value
Extrapolated value
Extrapolated value
Extrapolated value
Extrapolated value
0
+299
+299
+299
+299
+299
+299
+299
www.jipelec.com
Advanced solutions for thin film deposition
User’s Manual
JetFirst 200
65
• Select “pyrometer calibration” from the "Parameter menu" and choose the HT150
table. Fill the voltage column with the values picked up from the historical graphics
and the extrapolated values for temperature setpoint values above 1000°C;
• Save the pyrometer calibration table and start again the same process under
thermocouple regulation in order to check that the pyrometer is corresponding to the
thermocouple. If needed, change values of pyrometer voltages;
• Once this is done, start the process under pyrometer calibration. For recipe ranged to
1000°C, you do not need to take the thermocouple probe out of the furnace;
• Save historical to PYR01 at the end;
www.jipelec.com
Advanced solutions for thin film deposition
User’s Manual
JetFirst 200
66
• Go to “Historical” menu and click on “Historical” to display the graphical
representation of the process. Display historical file and choose calibration mode to
get the temperature value from the pyrometer for each setpoint;
• From the pyrometer curve, note down the pyrometer temperature value for each
setpoint temperature value;
• Calculate the correction factor for each temperature setpoint as follows:
An example is given for line 6, with a temperature of 600°C.
600 - 605
* 1000 = −8
605
So the new correction factor is: 85 – 8 = 77
• As described previously, for temperature setpoint values above 1000°C, you have to
extrapolate the last readout values;
www.jipelec.com
Advanced solutions for thin film deposition
User’s Manual
JetFirst 200
67
• Select “pyrometer calibration” from the "Parameter menu" and enter the new
correction factors:
• Once the table is modified, save it and exit from the parameter menu;
• Run the process under pyrometer regulation control;
• Save the historical as PYR02;
www.jipelec.com
Advanced solutions for thin film deposition
User’s Manual
JetFirst 200
68
• Open the PYR02 historical file to check the accuracy of the pyrometer calibration:
•
Note:
The difference between setpoint and pyrometer temperature values must not exceed ± 2°C.
You can see in the above historical graphic that the TC1 readout value matches the setpoint value.
• If values are still out of range, run a process and calibrate the pyrometer again.
www.jipelec.com
Advanced solutions for thin film deposition
User’s Manual
JetFirst 200
69
8. MAINTENANCE
8.1 PERIODICITY OF MAINTENANCE OPERATION
Respect the periodicity of maintenance operations. The periodicity of operation is strongly linked with
process applications and must be adapted to the application.
The metallic housing protects the operator form contacts with powered parts.
During maintenance or adjustments, the system must be powered off.
CAUTION
Some parts inside the system may remain powered-up. These operations must be carried out only by
factory, trained technicians.
Feel free to contact Qualiflow engineers for more details about servicing and maintenance operations.
8.1.1 Reactor
Operation
Periodicity
Cleaning the reactor windows
Comment
6 months
Cleaning the processing chamber
When needed
Cleaning the pyrometer window
1 year
Calibrating the pyrometer
Depends on process
2 months
Controlling the platen "O-ring
1 year
8.1.2 Furnace
Operation
Replacing lamps
Cleaning the reflector
Comment
When 1 filament is
bowing or broken
Recommended to change
all the lamps
When changing lamps
Check balance between power converters
2 months
Control of the electrical connections
1 year
www.jipelec.com
Advanced solutions for thin film deposition
User’s Manual
Periodicity
JetFirst 200
70
8.1.3 Electricity
Operation
Periodicity
Comment
Replace the SAIA controller battery
1 year
8.7
Control of the electrical connections
1 year
8.1.4 Gas and vacuum
Operation
Periodicity
Check gas panel and gas line tightness
1 year
Change gas filters
1 year
Perform a leak test of the process chamber
1 year
Comment
8.1.5 Water and compressed air
Operation
Periodicity
Check water circuit tightness
1 year
Check air circuit tightness
1 year
Comment
8.1.6 Safety
Operation
Periodicity
Check safety interlocks and sensors adjustments
1 year
Comment
8.2 CHANGING LAMPS
See fig. 1 in appendix.
• Disconnect all power from the system;
• Remove the metallic reactor box;
• Remove the stainless steel furnace protection;
• Remove electrical connections of lamps and gently remove lamps (using gloves);
• Never touch the lamps with bare fingers, otherwise clean them with alcohol;
• Re-install lamps using the same procedure in reverse order;
• Do not forget the isolating sheath on each lamp wire.
www.jipelec.com
Advanced solutions for thin film deposition
User’s Manual
JetFirst 200
71
8.3 CHANGING THE WINDOW
See fig. 1 in appendix.
Dismantling the window:
• Disconnect all power from the system;
• Lift-up the reactor;
• Unscrew the CHC M5 screws;
• Remove the chamber flange;
• Remove the window.
Installing the window:
• Check the cleaning of all the pieces otherwise clean them with alcohol;
• Place the window on the chamber flange (check there is the Viton O-rings);
• Lift-up the reactor;
• Connect the chamber flange with the upper flange;
• Place the screws and tighten them carefully. Do not forget to put handle axis in its hole;
• Open the water circuit and test tightness (manual mode);
• If necessary, re-tighten the screw.
8.4 INSTALLING THE THERMOCOUPLES
See fig. 9 in appendix.
• Switch off the machine;
• Remove the left metallic panel (fixation by magnets);
• Under the platen is situated 2 stainless steel feed through with Viton O-ring;
• Remove the nut, the small metallic ring and the two O-ring;
• Take the thermocouple place primary the nut, then, the ring and finally the two O-ring;
• Place this assembly inside the feed through very carefully;
• Push this till the welding threads touch the wafer installed on the quartz pins;
• Screw the nut to have the tightness.
It is possible to readjust the thermocouple position to have a good contact with the wafer.
Follow the same procedure in reverse order to remove the thermocouples.
www.jipelec.com
Advanced solutions for thin film deposition
User’s Manual
JetFirst 200
72
8.5 CHANGING TYPE OF PYROMETER (HT <-> BT)
See fig. 1 and 11 in appendix and below for pyrometer location:
Platen
Tube of sight
Pyrometer
Procedure:
• Disconnect all power to the system;
• Remove the left metallic panel (fixation by magnets);
• Open the pyrometer box and disconnect its power supply;
• Unscrew the two CHCs that supports the pyrometer;
• Unscrew the gas connection which is mounted on the tube of sight;
• Unscrew the tube of sight (6 CHC screws) and take off the Viton O-rings;
• Mount back the joints on the new tube, proper to the pyrometer used (HT or BT);
• Proceed in reverse order to mount the tube of sight and the pyrometer.
Once the pyrometer is changed, perform the pyrometer calibration. For further information, see section 7.5.
www.jipelec.com
Advanced solutions for thin film deposition
User’s Manual
JetFirst 200
73
8.6 CLEANING THE REACTOR
• Disconnect all power to the system;
• Lift up the chamber;
• Clean the chamber and the window with a lint free duster and alcohol or freon. Never
use acetone because of the Viton O-ring;
• Pull the thermocouples and the quartz pins to clean the platen.
8.7 CHANGING CONTROLLER BATTERIES
CAUTION
We recommend to change batteries every year.
The SAIA PCD2 controller uses two 1.5 V batteries to save user's recipe, and calibration tables in RAM.
Batteries can be replaced without any risk to loose your data until controller is supplied.
Batteries are normalized type:
• LR03 (IEC), AAA, MICRO.
Use industrial batteries with minimum capacity of 1000 mA like:
• DURACELL
MN2400;
• UCAR
E92AM4.
Proceeding:
• Remove the right side metallic panel;
• Remove the SAIA controller cover just by pulling at the four corners;
• Batteries are in front of you. Remove the old ones and installed the new one in the same
direction;
• Reinstall controller cover and metallic panel.
www.jipelec.com
Advanced solutions for thin film deposition
User’s Manual
JetFirst 200
74
9. SOFTWARE
9.1 PIMS SOFTWARE INSTALLATION
The minimum requested configuration is:
• Pentium II PC or more 15” or more monitor;
• Windows 98.
To install the software:
• Insert disk in the CD-Room drive;
• Run using Windows "CD-Rom a:\setup".
9.2 SOFTWARE INFORMATION
The software uses some files which are saved in the directory "Data".
Recipes are in the file: starbase.mbd.
Historical are in the directory "Historical".
It is recommended to make a back up of the "Data" directory once a month.
www.jipelec.com
Advanced solutions for thin film deposition
User’s Manual
JetFirst 200
75
10. GRAPHITE PARTS – INFORMATION
Qualiflow can provide graphite susceptors to work with. If you choose to purchase graphite susceptors,
please read the following section. This presents the material features and how to work with graphite
susceptors.
CAUTION
The SiC coated graphite susceptors and covers are sensitive to temperature gradients. These parts
should not be used with temperature ramp rates over 50°C/s. The user must be aware that the gas
injection (specially from reactor bottom side) can lead to high temperature gradient and breakage in
susceptor and cover. Qualiflow strongly recommends using small gas flow for processes with susceptor
especially if temperature exceeds 600°C. Qualiflow will not give any warrantee on the susceptor and
covers. Contact Qualiflow for further information.
10.1 INTRODUCTION
Qualiflow provides SiC (silicon carbide) coated susceptors for heat treatment of small samples or compound
semiconductors as well as for CVD processes.
SiC coated susceptors have a limited lifetime.
The most common phenomenon limiting the use of the susceptor is the occurrence of pinholes in the SiC
coating. The susceptor cannot be used any more because of the contamination level or the formation of spots
on the backside of the wafer. Recommendations are given to reduce pinhole formation.
The susceptors are also sensitive to temperature gradients.
10.2 THE SIC COATED SUSCEPTOR
Susceptors are made out of graphite because of:
• Good mechanical properties at high temperature;
• Good thermal conductivity for homogeneous temperature;
• Excellent resistance to thermal shock;
• Low thermal mass for fast heat-up rate;
• Low level of metallic impurities.
Graphite however is porous and releases graphite dust. In order to prevent this and to further increase purity,
the susceptor is coated with a Silicon Carbide layer, by a CVD process. Proper selection of the graphite
ensures a good adhesion of the coating and resistance to thermal shock.
www.jipelec.com
Advanced solutions for thin film deposition
User’s Manual
JetFirst 200
76
10.3 THE SIC COATING
Silicon carbide is a hard and inert ceramic material. The chemical resistance of SiC is extremely good. The
SiC is resistant to oxidation in air up to a temperature of 1800 C. During HCl etching, SiC is not
thermodynamically stable. The kinetics however are such that even after thousands of etch cycles, no
reduction of the SiC coating thickness can be measured. Conditions that enhance etching of the SiC coating
are reduced pressure and the presence of metals.
10.4 PINHOLE FORMATION
In spite of the inertness of SiC, small and large holes can develop in the SiC coating. Pinholes have a size in
the order of 0.1 mm.
The pinholes are often visible by a gray or yellow discoloration around a hardly visible hole. In virtually all
cases, the presence of metals is responsible for the creation of the pinholes. As an example, the use of
stainless steel tweezers for loading and unloading susceptors leads to a rapid formation of holes on the places
where the SiC has been touched. Metallic residue, or particles will react with HCl and form a product that
will react with the SiC.
10.5 OVER-ETCHING
Corrosion of the SiC only takes place during the HCl cleaning step. In the initial stage of the cleaning step,
the whole susceptor is covered with Silicon. The recesses are covered with the silicon layer from the pre-coat
step.
The first part of the SiC coating that becomes exposed is the wafer recess. During the rest of the cleaning
step, there is no layer of Si over the recess. This is why pinholes are usually first observed in the recess.
Whenever there is silicon present on the susceptor, the HCl mixture will etch the silicon, forming silicon
chlorides. Formation of these chlorides leads to a reaction equilibrium which means that the etch activity of
HCl on silicon free parts is reduced. When over etching, pure HCl reacts strongly with the weak spots in the
SiC coating. Reducing the over-etch time is essential in improving the lifetime of susceptors.
10.6 PREVENTION OF PINHOLES BY THE USER
10.6.1 Unpacking
• Take the susceptor in the sealed bag into the clean room.
• Carefully open, do not touch the susceptor with knife.
• Handle with plastic or rubber gloves.
• Do not place on a metal table! Use clean room wipes/tissues.
• Make sure not to touch metal parts of the reactor when installing the susceptor.
10.6.2 General
After a reactor has just been installed, there is a high risk of contamination. Use an old susceptor during
start-up and tune-in. This susceptor will catch the initial contamination. A new susceptor can be used to
qualify low resistivity processes and start production.
Also use an old susceptor after a major modification on the reactor has been done.
www.jipelec.com
Advanced solutions for thin film deposition
User’s Manual
JetFirst 200
77
10.7 TEMPERATURE GRADIENTS
The SiC coated graphite susceptors and covers are sensitive to temperature gradients. These parts should not
be used with temperature ramp rates over 50°C/s. The user must be aware that the gas injection (specially
from reactor bottom side in some JetFirst systems) can lead to high temperature gradient and breakage in
susceptor and cover. Qualiflow strongly recommend using small gas flow for processes with susceptor
especially if temperature exceeds 600°C. Qualiflow will not give any warrantee on the susceptor and covers.
Conclusion
Pinhole formation is the predominant cause of susceptor failure. The main cause is metal contamination in
the graphite or from the outside of the susceptor, as metals cause pinhole formation. The lifetime of
susceptors can be extended by preventing any kind of metal contamination of the SiC coating. Careful
handling will extend the lifetime of the susceptors.
Contact Qualiflow for further information.
10.8 USE OF SUSCEPTORS IN PROCESS ATMOSPHERE
Uncoated graphite:
• In reducing atmosphere (H2):
up to 2500°C;
• In oxidizing atmosphere:
up to 400°C.
SiC coated graphite:
• In reducing or inert atmosphere:
up to 1600°C;
• In oxidizing atmosphere:
up to 1800°C.
www.jipelec.com
Advanced solutions for thin film deposition
User’s Manual
JetFirst 200
78
11. RECOMMENDED SPARE PARTS FOR JETFIRST 200
Description
Part number
Quantity
Quartz window ∅292 x 10
PQW043
1
Set of 3 quartz pins for 6” wafer H=15
PQP046
1
Set of 3 outer quartz pins H=20.5
PQP057
1
Set of 3 quartz pins H=25
PQP058
1
Set of 3 outer quartz pins H=27
PQP059
1
Thermocouple lg 76/10 with connector
PT018
2
Thermocouple lg 99/35 with connector
PT023
2
Viton O-ring for chamber
PJ3780V
1
Viton O-Ring for Quartz window
PJ3770V
1
Viton O-ring for upper flange
PJ3730V
1
Viton O-ring for pyrometer window
PJ2130V
3
PL007
16
PQW005
1
Tubular halogen lamp 6000W – 480V
BAF2 window for optical pyrometer
Set of 10 Viton O-rings for thermocouple feedthroughs
PV007
1
Half electronic bus
CI 114
1
Interface for 3 mass flow controllers
CI 119
1
Pyrometer – thermocouple electronic board
CI 149
1
Temperature control board
CI 134
1
Electronics DC supply
CI 155
1
Gas filter ¼ SW
PG011
1 to 4
Double power converter 400/440 – 15kW
PEE053
1
Fuse 660V 22x58 32A with striker
PEF019
4
Fuse 660V 22x58 50A with striker
PEF020
2
PQS048
1
PQS049
1
3x400V JetFirst
Susceptor for samples
SiC coated graphite susceptor 150mm diameter for 4x2"
substrates
SiC coated graphite susceptor 150mm diameter for 3" substrates
www.jipelec.com
Advanced solutions for thin film deposition
User’s Manual
JetFirst 200
79
12. APPENDIX
FIG. 1
REACTOR GENERAL VIEW
FIG. 2
REACTOR ARTICULATION
FIG. 3
CONTROL FRONT PANEL
FIG. 4
REAR UTILITY PANEL
FIG. 5
VACUUM CIRCUIT
FIG. 6
GAS CIRCUIT
FIG. 7
AIR CIRCUIT
FIG. 8
WATER CIRCUIT
FIG. 9
INSTALLING THERMOCOUPLE
FIG. 10
INSTALLING QUARTZ PINS
FIG. 11
DIMENSIONS
FIG. 12
FOOTPRINT
FIG. 13
HEAT EXCHANGER
www.jipelec.com
Advanced solutions for thin film deposition
User’s Manual
JetFirst 200
80