1
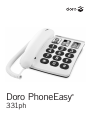
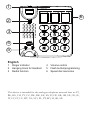
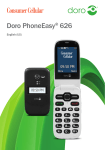
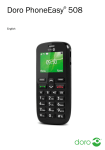
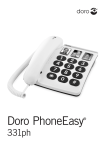
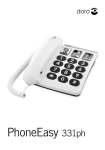
DORO PhoneEasy 331ph
SET UP & USER GUIDE
Find more user manuals and product information at www.liGo.co.uk/manuals/
OFF
GET £5 over £50
*
se
t purcha
your nex
r code:
e
h
c
with vou
www.liGo.co.uk
ard
liGo5rcoenjunwction
* Not in
with any
TELEPHONES | HEADSETS | TWO WAY RADIOS
PERSONAL CARE | BABY MONITORS | AND MUCH MORE
For all the latest product news, reviews and advice
from liGo, please visit www.liGo.co.uk/blog/
er
other off
Doro PhoneEasy
®
331ph
1
6
2
3
4
5
English
1 Ringer indicator
2 Hanging Hook for Handset
3 Redial function
4 Volume control
5 Flash button/programming
6 Speed dial memories
This device is intended for the analogue telephone network lines in AT,
BE, BG, CH, CY, CZ, DE, DK, EE, ES, FI, FR, GB, GR, HU, IE, IS,
IT, LV, LT, LU, MT, NL, NO, PL, PT, RO, SI, SK, SE.
English
Operation
Making a call
Regular dialling
1. Pick up the handset.
2.Enter the desired number.
Redial function
If a number was engaged or if you wish to redial the most recently
entered number, pick up the handset and press the redial button .
Memories
This telephone has 3 speed dial memories.
Once a number has been saved in a memory location, you only need to
press one button to make the call. A picture or symbol can be placed
under the transparent cover on the speed dial buttons so it is easy to see
who you are calling.
Dialling with speed dial
1. Pick up the handset and wait for the dialling tone.
2.Select required speed dial by pressing on the appropriate button.
Volume control
The handset earpiece volume may be adjusted during a call using
.
Hearing loop
The handset has a built-in hearing loop for those who wish to use their
hearing aids while using the telephone. Select the T mode on your hearing
aid to enable this feature.
Wall mounting
The telephone can be wall mounted by using the included wall mount bracket.
1. Secure two screws, vertically positioned 83 mm apart.
2.The screws should locate into the two keyholes on the back of the telephone.
3.Remove the hanging peg (located by the hook switch) by pushing it
upwards.
4.Rotate the hanging peg 180 degrees, and then replace it.
1
English
Settings
Connection
1. Connect the telephone cord to a network wall socket and to the T
socket on the back of the telephone.
2.Connect the curly cord to the handset and to the socket marked q
on the side of the telephone.
3.You will hear a click when the modular plug is correctly in place.
4.Set correct Flash button time to 100 (see Technical Information).
5.Lift the handset and listen for the dial tone.
Ring signal
The ringer volume can be adjusted using
.
Memories
Saving speed dial numbers
1. Make sure that the R/P switch on the base of the telephone is set to P.
2.Lift the receiver and press P ( R) (ignore anything you hear in the
earpiece).
3.Enter the phone number (up to 16 digits) using the keypad. Press P (R).
4.Select memory position by pressing the corresponding button.
5.Replace the handset. The number has now been saved.
Remember to return the R/P switch on the base of the telephone to the
R position when all the telephone numbers have been saved.
Press
if you want a pause in the telephone number.
Technical Information
There are several switches on the base of the telephone.
These switches set technical parameters.
Flash button time (100/300/600)
100 is the standard setting for most countries.
300 for France/Portugal.
600 for New Zealand.
2
English
Troubleshooting
Check that the telephone cord is undamaged and properly plugged in.
Disconnect any additional equipment, extension cords and other phones.
If the problem is resolved, the fault is with some other equipment.
Test the equipment on a known working line (e.g. at a neighbour’s house).
If the equipment works there the fault is probably with your telephone
line. Please report this to your network operator.
If you are still experiencing difficulties, contact the place of purchase.
Guarantee
This product is guaranteed for a period of 12 months from the date of purchase. If
you experience any problems please contact the place of purchase. Proof of purchase
is required for any service or support needed during the guarantee period.
This guarantee shall not apply to a fault caused by an accident or a similar
incident or damage, liquid ingress, negligence, abnormal usage or any other
circumstances on the purchaser’s part. Furthermore, this guarantee will not
apply to any fault caused by a thunderstorm or any other voltage fluctuations.
As a matter of precaution, we recommend disconnecting the telephone
during a thunderstorm.
Declaration of conformity
Doro hereby declares that the product Doro PhoneEasy 331ph conforms
to the essential requirements and other regulations contained in the
directives 1999/5/EC (R&TTE), 2002/95/EC (ROHS).
A copy of the manufacturer’s declaration is available at
www.doro.com/dofc
3
English
Version 2.2