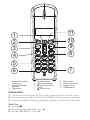
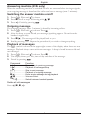
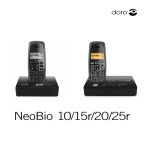
1
doro 615r
1
2
3
11
1
2
3
4
10
9
8
5
6
7
Speed dial number/
internal call
Delete/answering
machine
Talk button
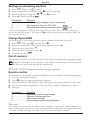
4
5
6
7
Speaker phone
Disconnect/Redial
* and ringer signal
on/off
# and key lock
Connection
8
9
10
11
Flash button
Disconnect button
Programming
UP/Missed no.
1. Connect the mains adapter (6V DC) and the telephone cord to the wall sockets.
2. Insert the batteries (AAA 1.2V 600 mAh NiMH) with plus-/minus as indicated.
3. Charge the handset with the keypad facing outwards (for 24 hours the first time).
Date/Time
4. Press º 1.
5. Enter time of day (HH MM). Press º .
6. Set date (DD.MM.YY). Press º .
English
Battery
Because batteries only have a certain lifespan it is quite normal that call time and
standby time will decrease somewhat compared to the specifications when the
telephone is used regularly.
Fully charged batteries (10 hours charging) will last for approx. 100 hours standby time
or approx. 10 hours call time. These times apply at normal room temperature.
Full battery capacity will not be reached until the batteries have been charged 4-5 times.
The base unit has an automatic charging mechanism that prevents the batteries from
being overcharged or damaged due to prolonged charging.
Battery LED
When the batteries are running low, the indicator will show
and a warning tone
will be heard once when the indicator drops to its lowest level during a call.
Please note that the battery indicator in the display will flash as long as the handset is
located in the base unit, and will not stop/go out even when the battery is fully charged.
Making a call
1. Enter required telephone number ( C=delete).
2. Press O , and the number will be dialled. Press L to terminate the call.
Receiving a call
1. Wait for the handset to ring. Lift the handset.
2. Press O to answer. Press L to terminate the call.
Please note!
To switch between handset/speaker press O / . Please remember that in speaker mode, it is only
possible for one person at a time to talk.
When the battery is low or when there is too great a distance to the base unit the telephone will be
unable to connect to a line.
The base unit should not be located close to other electrical equipment, in direct sunlight or near any
other strong heat source! This is to minimize the risk of any interference.
It is normal for the device to become warm during charging and this is not dangerous.
Use only original batteries. The guarantee does not cover any damage caused by incorrect batteries.
Range
The telephone’s range depends on whether or not the radio waves carrying the call are
restricted by obstacles in their path, and is usually between 50 and 300 metres. Coverage
can be improved by turning one’s head so that the handset is aligned with the base unit.
Sound quality declines as the limit is reached until the call is finally interrupted.
The symbol is shown when the phone is within range and goes out/flashes when it
is out of range.
Volume control
The volume may be adjusted during a call using {/}.
Call Back
Scroll among the 5 most recently dialled numbers with r . Press O .
English
Mute button
The microphone may be muted/switched on during a call by using C ( z =off).
KeyGuard
The keyguard is turned on/off by pressing down # ( N=on).
Paging
The handset will ring when J (on the base unit) is pressed. The signal will stop
automatically after a while or if the L button on the handset or the J button on the
base unit is pressed.
Memory
This telephone has 10 speed dial memory locations.
A stored phone number can be dialled using fewer keystrokes.
If you want a pause in the telephone number, press and hold 0 until the display shows P.
Storing speed dial memory locations
1. Press º b .
2. Select a memory location (0-9) using b .
3. Enter telephone number (up to 20 digits). Press º ( C=delete).
Dialling using speed dial memories
1. Scroll among the speed dial positions using b . You can also enter the memory
position directly using 0 - 9.
2. Press O , and the number will be dialled.
Erasing all speed dial numbers
Press º, 0 , b , º .
Incoming numbers (Caller ID)
The display shows you who is calling and the 10 most recent incoming numbers.
New numbers are indicated by -CALL – in standby mode and n- in the list.
If one and the same number calls in more than once it will be saved as only one entry.
This function requires a subscription from your service provider.
Retrieving and dialling incoming numbers
1. Press { .
2. Scroll to the required entry using {/}. Press # for time/date.
3. Press O to dial, C to delete or L to return to standby mode.
Erasing all numbers
Press º, 0 , { , º .
Caller identification messages
In addition to number display, sometimes the following message is shown:
-O-
Unknown number, e.g. international call (not stored).
-P-
Anonymous number. Number withheld (not stored).
_
The number is longer than the display can show (>12 digits).
English
Settings
1. Press º . Press commands as listed below, e.g. ringer signal volume.
2. The display shows the current status, e.g. P-5
2-5 means command 5, current
setting 2 of 5 positions.
3. Scroll to desired setting with {/}, e.g. 5 for max. Press º .
Command
Function
2..........................Time
format (24=24-hr, 12=12-hr)
signal type (1=type 1....6=type 6)
5..........................Ringer signal volume (1=min....5=max)*
6..........................Key beep (On=On, OFF=Off)
7..........................Tone/Pulse (1=tone/normal, 2=pulse)
8..........................Auto Answer, i.e. the handset responds to incoming calls
when it is lifted from the base (On=On, OFF=Off)
9..........................Resetting (Enter PIN code, 0000 when supplied)
R..........................Flash time (100=standard, 300=France/Portugal)
4..........................Ringer
*Ringer signal can be connected/disconnected in standby mode with * (
=off).
PIN code
The PIN code (four digits) provides protection against unauthorised use of certain
functions.
1. Press º *.
2. Enter the current PIN code (0000 when supplied). Press º .
3. Enter the new code. Press º .
4. Enter the new code again. Press º .
Expanded system (only +1…)
The handset number used for internal calls is shown in the display on standby mode.
The base unit should be positioned centrally so that the coverage area is roughly equal
for all handsets.
It is not possible to add extra handsets at a later point.
INT calls
1. Press I until the display shows int.
2. Enter the allocated number of the handset that you wish to call, 1 - 4.
A tone will be heard if an external call comes in while an internal call is in progress.
Terminate the internal call by pressing L before receiving the external call with O .
Transferring calls/Conference between handsets
1. An external call is connected.
2. Initiate an internal call as described above.
3. Press L to transfer the call or press O for conference.
English
Answering machine (615r only)
When the answering machine is switched on calls are answered after six ringer signals,
your outgoing message is heard and the caller can leave a message (max. 3 minutes).
Switching the answer machine on/off
1. Press a . Wait until is shown.
2. Press 0. Scroll to required setting with {/}.
3. Press º . Finish by pressing L .
Outgoing message
The outgoing message (max. 3 minutes) is heard by incoming callers.
1. Press a . Wait until is shown. Press 9.
2. After the beep you can record your message (speaking approx. 30 cm from the
handset’s upper side).
3. Press 5 ( 9 ). The message will be played back to you.
4. End by pressing L . Repeat the procedure if you wish to change anything.
Playback of messages
The a symbol is shown in the upper right corner of the display when there are new
messages. Playback always starts with new messages. A beep is heard between old and
new messages.
1. Press a . Wait until is shown. Press 5.
2. The display shows position, time of day and date of the message.
3. Finish by pressing L .
Command
Function
4 (| 8 )....................Repeat/skip to previous message
5 ( 9).....................Playback of messages/Stop
6 ( 9 |)....................Skip to next message
7............................Playback of outgoing message
# (x).....................Erase single message during playback
{ / }....................Volume control
O / .................Switch between handset/speaker
Delete all old messages
Press º, 0 , # , º .
English
Settings in answering machine
1.
2.
3.
4.
Press a . Wait until is shown.
Press commands as listed below, e.g. 3 for Call screening.
Scroll to desired setting with {/}, e.g. On for On.
Press º . End by pressing L .
Command
Function
2............................Select outgoing message (various languages)
3............................Call screening* (On=On, OFF=Off)
0............................Switching the answering machine On/Off ( =On)
*The call screening function (will only work with handset 1) means callers who leave a message are
heard in the handset’s speaker . You can press O or lift the handset of another phone to talk to the
caller if you wish to do so.
Change RemotePIN
The Remote PIN (four digits) protects against unauthorised remote control.
1. Press a . Wait until is shown. Press *.
2. Enter the current PIN code (0000 when supplied). Press º .
3. Enter the new code. Press º .
4. Enter the new code again. Press º .
5. Finish by pressing L .
F
Out
of memory
The memory will store a total of 8 minutes of messages (including the outgoing message).
F flashes in the display if the memory is full, and no new messages can be received
until the old ones have been played back and erased.
PLEASE NOTE! Remember to delete messages regularly!
Remote control
This machine can be remote controlled using the keys of an ordinary tone dialling telephone.
1. Call your own phone number.
2. Press * when the outgoing message is played.
3. Enter the Remote PIN code (see previous page). One beep confirms correct code.
4. Any new messages are played, or you can select a remote command, see below.
5. Hang up.
Command
Function
4............................Repeat/skip to previous message
5............................Playback of messages/Stop
6............................Skip to next message
#............................Erase single message during playback
Please note!
If the machine doesn’t respond to the remote control commands, try pressing the telephone buttons for a
longer or shorter time. In normal cases, the answering machine should react to tones approximately 0.5
– 1 seconds in length, but longer tones may be necessary in certain telephone networks.
English
Troubleshooting
Check that the telephone cord is undamaged and correctly plugged in. Disconnect any
additional equipment, extension cords and other phones. If the problem is resolved, the
fault is with some other equipment. Test the equipment on a known working line (e.g.
at a neighbour’s house). If the equipment works there then the fault is probably with
your telephone line. Please inform your network operator.
Check the charge status of the handset batteries.
If the telephone still does not work, contact the place of purchase. Don’t forget the
receipt or a copy of the invoice.
Specific Absorption Rate (SAR)
This device meets approved international safety requirements for exposure to radio
waves. This telephone measures 0.04 W/kg (measured over 10g tissue).
The max. limit according to WHO is 2W/kg (measured over 10g tissue).
Guarantee
This product is guaranteed for a period of 12 months from the date of purchase. In
the unlikely event of a fault occurring during this period, please contact the place of
purchase. Proof of purchase is required for any service or support needed during the
guarantee period.
This guarantee shall not apply to a fault caused by an accident or a similar incident or
damage, liquid ingress, negligence, abnormal usage, non-maintenance or any other
circumstances on the user’s part. Furthermore, this guarantee shall not apply to a fault
caused by a thunderstorm or any other voltage fluctuations. As a matter of precaution,
we recommend disconnecting the device during a thunderstorm.
Batteries are consumables and are not included in any guarantee.
This guarantee does not apply if other batteries than DORO original batteries have
been used.
Declaration of conformity
Doro hereby declares that the Doro 615r conforms to the essential requirements and
other relevant regulations contained in the Directives 1999/5/EC and 2002/95/EC.
A copy of the manufacturer’s declaration is available at www.doro.com/dofc
UK
If you cannot resolve the fault using the faultfinder section, technical support is
available by email on [email protected] or via a premium rate telephone number:
0905 895 0854, calls cost 50 pence per minute (prices correct at the time of
publication).
You can also contact us in writing: Customer Services, Doro UK Ltd, 1 High Street,
Chalfont St Peter, Buckinghamshire, SL9 9QE (regarding any Spares or Technical query).
Further contact details are available on our website: www.doro-uk.com.
English
Australia and New Zealand
Products permitted for connection to the telephone network are marked with in Australia and
in New Zealand. These marks indicate the
products comply with the regulations and can be used without concern in the country
of purchase.
If you believe this product is malfunctioning, please refer to the relevant section and/or
consult the troubleshooting guide in this manual to ensure that you have followed the
instructions carefully. As an alternative you can visit our web site for FAQ’s or send an
e-mail for a prompt reply.
Guarantee
This product is guaranteed for a period of 12 months from the date of purchase.
Should you experience difficulties with the product, please contact us for assistance.
If the product is then found to be faulty you will be asked to return it directly to us
with a copy of the purchase receipt. This guarantee shall not apply to a fault caused
by an accident or a similar incident or damage, liquid ingress negligence, abnormal
usage, not reasonably maintained or any other circumstances on the purchaser’s part.
Furthermore, this guarantee shall not apply to a fault caused by a thunderstorm or
lightning, excessive or any other voltage fluctuations or faults on the telephone line.
(As a matter of precaution, we recommend disconnecting the telephone during a
thunderstorm).
This guarantee does not affect your statutory rights.
AUSTRALIA
DORO Australia Pty Ltd
PO Box 6760
Baulkham Hills BC NSW 2153 Australia
Consumer Support
Ph: Ph: 1300 885 023 Fax: (02) 8853-8489
Email: [email protected]
Web site: www.doro.com.au
NEW ZEALAND
Atlas Gentech (NZ) Limited
Private Bag 14927
Panmure
Auckland
New Zealand
Consumer Support
Ph: 0900-500-25 (Toll Call)
Fax: (09) 574-2722
Email: [email protected]
English
REN (RN for New Zealand)
The REN (Ringer Equivalence Number) or (RN) is of significance only if you wish to
connect more than 1 telephone to your telephone line. A standard telephone line has a
maximum REN capacity of 3 (RN of 5). It is possible to connect 3 devices with a REN
of 1 (RN of 1) with no degradation to the product’s performance. Exceeding this limit
may cause the volume of the ringer in any phone to decrease or not ring at all.
ALL PRODUCTS
The grant of a Telepermit for any item of terminal equipment indicates only that
Telecom has accepted that the item complies with the minimum conditions for
connection to its network. It indicates no endorsement of the product by Telecom, nor
does it provide any sort of warranty. Above all, it provides no assurance that any item
will work correctly in all respects with another item of Telepermitted equipment of a
different make or model, nor does it imply that any product is compatible with all of
Telecom’s network services.
This equipment shall not be set to make automatic calls to the Telecom “111“
Emergency Service.
This equipment may not provide for the effective hand-over of a call to another device
connected to the same line.
This equipment should not be used under any circumstances that may constitute a
nuisance to other Telecom Customers.
CND PRODUCTS
If a charge for local calls is unacceptable, the “DIAL’’ button should NOT be used for
local calls. Only the 7 digits of the local number should be dialled from your telephone.
DO NOT dial the area code digit or the “0’’ prefix.
English
Version 1.0