1
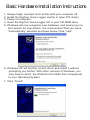
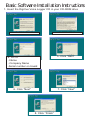
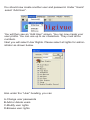
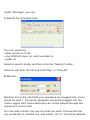
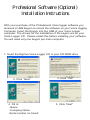
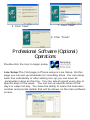
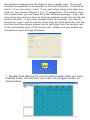
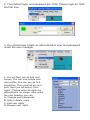
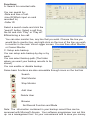
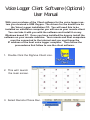
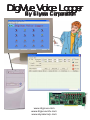
DigiVue Voice Logger
By Elyssa Corporation
By Elyssa Corporation
www.digivue.com
www.digivuecctv.com
www.elyssacorp.com
Basic Hardware Installation Instructions
1. Always begin a project such as this with your computer off.
2. Install the DigiVue Voice Logger card(s) in open PCI slot(s)
3. Power on computer.
4. Insert the DigiVue Voice Logger CD in your CD-ROM drive
5. Windows will now recognize new hardware, and prompt you to
let it search for new drivers. It is recomended That you leave
“Automatically” selected as shown below. Click “next”
6. Windows XP will find the correct driver and install it without
prompting you further. With other versions of Windows, you
may have to direct the Wizard to the folder that corresponds
to your Operating System.
7. Click “Finish”
Basic Software Installation Instructions
1. Insert the DigiVue Voice Logger CD in your CD-ROM drive
2. Click “Next”
3. Click “Yes”
4. Fill in:
-Name
-Company Name
-Serial number on board
5. Click “Next”
6. Click “Next”
7. Click “Next”
8. Click “Finish”
Basic Software Operations
Double-click the icon to start the program.
You will then see the main Voice Logger screen as shown below
Your default Login and password is 1234.
Please login the first time as 1234.
You should now create another user and password. Under “Users”
select “Add User”.
You will then see an “Add User” screen. You can now create your
user profile. You can use up to six characters. They must all be
numbers.
Next you will select User Rights. Please select all rights for administrator as shown below.
Also under the “User” heading, you can
A-Change user passwords
B-Add or delete users
C-Modify user rights
D-Browse user rights
Under “Manage”, you can:
A-Search for recorded calls.
You can search by
--date and time of call
--line id:Which input on card recorded to.
--caller id
Select a search mode, and then click the “Search” button.
Select a call from the list and click”Play” or “Play All”.
B-Monitor
Speaker line is the card that your speakers are plugged into. Line 1
would be card 1. Computer speakers should be plugged into the
Voice Logger card. Recorded calls can not be played through the
computer’s sound card.
You can also monitor live any line that you wish. Choose the line
you would like to monitor live, and select “ok” or “cancel”as desired.
C-Set: Setting the function of each line.
The Voice Logger card will recognize the different types of modules
plugged into it as a recording module, or an extension module for
remote listening, or a CO module for remote listening.
When using an analog telephone system
The “Mode” should be voltage active for CO lines and extensions
of analog systems, or pbx extensions.
When using a digital telephone system
The “Mode” should be voltage active for all CO extensions, and
voice active for all handsets. You can not record the extension of a
digital system. You can record the CO line or the handset.
Double-clicking on an individual line will bring up the “Set Record
Function” window. Here you can enable/disable record. You may
also choose voice or voltage activation.
*Sensitivity and delay are preset and cannot be changed
System: Here is where you set your record path. It defauts to the
“Record” folder on your “C” drive. You may change it as desired.
Some basic functions are also accessible through icons on
the tool bar
Search
Start Monitor
Stop Monitor
Add User
Delete User
Browse
Set Record Function and Mode
Professional Software (Optional)
Installation Instructions
With your purchase of the Professional Voice logger software you
received a USB Keypro to unlock the software on your Voice logging
Computer. Insert the Keypro into the USB of your Voice Logger
computer. The drivers for the installation of the keypro are on your
Voice Logger CD. Please install this before installing your software.
You will need only one keypro per main computer.
1. Insert the DigiVue Voice Logger CD in your CD-ROM drive
2. Click “Next”
4. Fill in:
-Name
-Company Name
-Serial number on board
3. Click “Yes”
5. Click “Next”
6. Click “Next”
7. Click “Next”
8. Click “Finish”
Professional Software (Optional)
Operations
Double-click the icon to begin setup.
Line Setup:The First page in Phone setup is Line Setup. On this
page you can set up schedules for recording times. You can setup
each line individually or after setting one up you can save all
parameters same as this line. You can select record every day or
specific days of the week. You can set up specific times of the
day’s or select all day. You have the ability to name the extension
number and provide details that will be shown on the main software
screen.
Hard Disk Setup: Please select drive or drives you want to record
your Voice Logger files to. Select a drive and choose “record” from
the drop-down menu.
Color Setup: Here you can change the backround and text color for
the software interface. You may also choose how many lines to view per
page on your main software screen 9,16,36 or 64. This is for multiple
card installations.
Other Setup:
A)Start number is the number you want your sequence of records to
begin with.
B)Setting the record code alows you to use different type of compressions allowing the use of more or less hard drive space. You can choose
from 64Kbits ,32Kbits,16Kbits or 8Kbits per second. A full one minute
recording on 64Kbit mode will be approximatelly 1/2 a megabyte. A one
minute recording on 8Kbit is aproximately1/16th of a megabyte.
C)Listen Channel: In order to play back records locally you must have
the speakers plugged into the Digivue Voice Logger card. The Local
channel corresponds to the speaker at the host computer. It should be
set to 1 if you are using 1 card. If you wish when using more than one
card you can choose channel 1,9 or 17 respectively. The remote channel is used when you purchase the client software package. If you are
only using one card you have to chooose between local and remote and
cannot use both. If you have multiple cards for example you should
choose for local 1 and for remote 9 and plug the local speakers into the
first card and then plug a stereo mini to mini plug from the second card
to the microphone input of the sound card. Make sure you enable the
microphone input through Windows.
1. Double-Click DigiVue VL Icon to start program after you have
finished setup. You will then see main voice logger screen as
shown below.
2. Your default login and password are 1234. Please login as 1234
the first time.
3. You should now create an administrative user and password
under the user manager.
4. You will then see an add user
screen. You can now create your
user profile. You can use up to 6
characters. They must all be numbers. Next you will select “User
rights”. Please select all rights for
administrator as shown. Also under
the user heading you can:
A- Change user passwords
B- Add or delete users
C- Edit user rights
D- Browse user rights
Functions:
A: Search for recorded calls.
You can search by:
-Date and time of call.
-Line ID(Which input on card
recorded to)
-Caller ID
Select a search mode and click the
“search” button. Select a call from
the list and click “Play” or “Play all”.
B:Monitoring a live call:
You can also monitor live, any line that you wish. Choose the line you
would like to monitor live, and right-click on the icon of the line you wish
to monitor in the main Voice Logger screen. You can then ether Monitor,
or Cancel Monitor
C: Setup auto backup:
You can setup auto backup by day or by
week.
You can select backup path.(The folder
where you want your backup records to be
stored)
You can enable or disable backup.
Some basic functions are also accessible through icons on the tool bar
Search
Start Monitor
Stop Monitor
Add User
Delete User
Browse
Set Record Function and Mode
Note: The information contained in your backup record files can be
accessed with Microsoft Access. Your software programmer can set this
up as a management tool for your convenience and to save you money.
Voice Logger Client Software (Optional)
User Manual
With your purchase of the Client software for the voice logger system you received a USB Keypro. The drivers for the device are on
the Voice Logger installation CD. You will need this to be
installed on whichever computer you will use as your remote client.
You can take it with you with the software and install it on any
Windows based PC. Once you have installed the keypro install the
software on your remote machine. Your remote and host computers
must be connected to the internet and you must know the
IP address of the host voice logger computer. Then follow the
proceedures that follow to use the client software.
1. Double Click the DigiVue Client icon.
2. This will l launch
the main screen.
3. Select Remote Phone Rec.
4. Select add remote IP
5. Enter the name of the host
computer or the name you
want to call your connection.
The enter the remote host
IP address.
6. Right click on your new
connection name and select
connect.
7. You can then enter your login ID
and Password. The default was
setup as 1234 and can be used.
The same login cannot be used
at the host computer. The host
does not need to be logged in for
this to work. The Host program
must be running and can be
minimized.
8. You will see the main screen
and then you can select Query
under Function. This is the
same search as on the host
with the same functions only
you can now replay and review
on your client computer with the
screen below.
9. You can also monitor any line
by left clicking on the line on the
main screen of the Voice Logger
Client program. You can select
monitor or stop monitor.
10. When finished using the client
software you can disconnect by
selecting your connection with
the right mouse button and
selecting disconnect..
Other Fine DigiVue Products
By Elyssa Corporation
DigiVue
EDV-004
EDV-009
EDV-016
DigiVue brings the ease and
convenience of digital storage and
management to video observation.
Four, nine, & sixteen channel models
with remote monitoring capability
provide flexibility of configuration &
permit tailoring of the system to your
particular needs.
REPLACE OUTDATED TIME LAPSE
RECORDERS WITH STATE OF THE ART
COMPUTER STORAGE. MULTIPLEX
RECORDING RIGHT TO YOUR
COMPUTER’S HARD DRIVE.
30 fps
Boards
PSTN
ISDN
ADSL
T1
LAN
WAN
DIAL-UP
INTERNET
• Time/Date Stamp
• Scheduled Recording
Compatible With:
• Digital Freeze & Zoom
Windows 98/ME,
• Video Image Enhance Mode
2000, XP, NT
• Time-Lapse Recording - Multiple Cameras
Voice Dial Alerts
• Real Time Recording - Single Camera Only
• Sequential Switching Option With Adjustable Dwell Time
Get A Call With Your Own Recorded
• Instant Access - Rapid Image Retrieval By Camera, Date, Or Time
Message When Video Is Lost, Or
• Video Motion Detection Featuring: • Multiple Masking • Sensitivity Adjustment
When Someone Enters A Protected
• Event Buffer Allows You To Record & Save Pre-Alarm Image “Before” Event Takes Place
Area *
• Virtual VCR Functions - Easy On-Screen Menus: VCR Play, Record, Fast Forward, & Rewind
• Full Duplex Multiplex Recording • Multi-Screen Or Single Camera Viewing • Record & Playback Simultaneously
• Voice Dial Alerts Sends Recorded WAV File Message* • When Camera Video Fails • When A Protected Area Is Violated
(*Requires 2-Way Voice Modem)
• Remote Viewing • Over Web • Over Standard Phone Lines • Over LAN (Local Area Network) • Over WAN (Wide Area Network)
• View, Playback, & Print Digital Images With Greater Clarity Than Video Tape • Save Video In AVI Format, Still Pictures In JPEG Format
• Adjustable Compression Rate • Image Export & Printing
DigiVue High Speed
EDV-416HS
120 fps
Board
ALL THE FEATURES OF THE
STANDARD DIGIVUE BUT IN
A 16 CHANNEL, 120fps
BOARD.
PSTN
ISDN
ADSL
T1
LAN
WAN
DIAL-UP
INTERNET
DigiVue With
MPEG4
Audio &
Video
EDV-4AV
PSTN
ISDN
ADSL
T1
LAN
WAN
DIAL-UP
INTERNET
•Enhanced MPEG4 Format
•Watermark By Date & Time
•Up To 16 Video & 16 Audio
Channels With 4 Cards Installed
•Support Multi-Resolution QCIF-VGA
•4 Channel Real Time Video With Audio
•Support Real Time Internet Monitoring
DigiVue Xview
EDV-XVIEW4
•60 fps Per Card
PSTN
•Enhanced MPEG4 Format
ISDN
ADSL
•4 Channel Video 1 Channel Audio
T1
•Support Multi-Resolution QCIF-VGA
•16 Video & 1 Audio Channel W/ 4 Cards
•Watermark By Date and Time (Pro-Option)
•Support Real Time Internet Monitoring (Pro-Option)
LAN
WAN
DIAL-UP
INTERNET
Elyssa Corporation
P.O. Box 138 • Briarcliff Manor, NY 10510
www.elyssacorp .com • www.digivue.com • www.digivuecctv.com