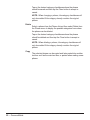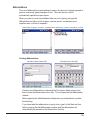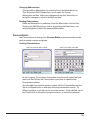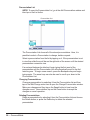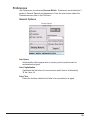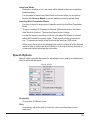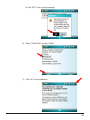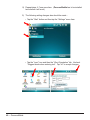
1
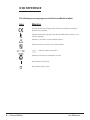
ZYGO Industries, Inc.
PO Box 1008
Portland, OR 97207-1008
TEL: (503) 684-6006
FAX: (503) 684-6011
U.S.A. / Canada : (800) 234-6006
E-mail: [email protected]
http://www.zygo-usa.com
USER GUIDE
070-0079-00
First Edition
First Printing:
18 JAN 2009
JUL 2008
Published by:
ZYGO Industries, Inc.
PO Box 1008
Portland, OR 97207-1008, U.S.A.
TEL: (503) 684-6006
FAX: (503) 684-6011
E-mail: [email protected]
Web: http://www.zygo-usa.com
COPYRIGHT:
©2008 By ZYGO Industries, Inc.
All rights reserved. No part of this publication may be
reproduced without prior permission of ZYGO Industries, Inc.
Trademark Notices: The following are trademarks of ZYGO Industries, Inc.
ZYGO®
Persona
AbEx
SpEx
DECtalk is a trademark of Digital Equipment Corporation.
Windows, Pocket Word and ActiveSync are registered
trademarks of Microsoft Corporation.
NOTICE:
2 — Persona Mobile
ZYGO Industries, Inc. reserves the right to make improvements or changes in the product described in this manual at
any time without notice.
WARRANTY
REGISTRATION
Dear ZYGO Customer:
We're pleased to be of service! Every effort has been made to assure that the enclosed merchandise meets our rigorous manufacturing, testing and packaging standards. But just in case . . .
INSPECT YOUR NEW MERCHANDISE IMMEDIATELY
DAMAGED GOODS CLAIMS
1. Always accept the shipment.
2. Note the damage on the delivery freight bill and have the carrier sign it, acknowledging the damage (i.e., "crushed, smashed, bent, torn carton," etc.). Send a
copy of the notated freight bill to ZYGO Industries, Inc., Portland, Oregon.
3. When damage is not always obvious, call the carrier, report the damage and request an inspection WITHIN 15 DAYS OF DELIVERY. Save the container that
held the damaged item(s), along with the merchandise for the carrier's inspection.
4. Forward the carrier’s inspection report and your description of the damage to
ZYGO in Portland.
5. Hold the shipment awaiting disposition, as claims may be disallowed by the carrier.
6. If a replacement is required, enter a new, separate purchase order.
RETURNED GOODS POLICY
1. Items may be accepted for credit only if accompanied by our billing reference or
Invoice number. ALL ITEMS BEING RETURNED MUST HAVE PRIOR APPROVAL
FROM ZYGO Industries, Inc., PORTLAND, OREGON.
2. Returned merchandise must be in new and resaleable condition. Returned items
may not include ‘opened’ bulk packages or kits.
3. All returns are subject to a 15% re-stocking charge.
4. I t i s t h e a c c o u n t ’ s r e s p o n s i b i l i t y t o r e v i e w t h e S A L E S O R D E R
ACKNOWLEDGEMENT and advise ZYGO of any corrective action necessary. The
re-stocking fee of 15% will apply on standard units and parts ONLY. Custom and/
or special units may be returned subject to re-stocking standard components only.
5. Quantity/Term Discounts, as shown on the original Invoice, are subject to being
deducted from the credit issued.
6. If unit(s) return disqualifies the original Invoice quantity for Quantity/Term Discount, the entire Quantity/Term Discount will be subtracted from allowed credit.
7. All merchandise must be returned Pre-Paid unless otherwise instructed by ZYGO.
8. ZYGO Industries, Inc. will not be liable for goods damaged in transit unless
ZYGO in Portland is notified within 10 days of delivery date.
9. Goods may not be returned for credit after 60 days from Invoice date.
— continued —
3
COMPLAINT HANDLING
Any complaint should be sent promptly to ZYGO’s Customer Service Department with all
pertinent information (including Purchase Order Number, Invoice number, carrier’s inspection report, etc., as appropriate). ZYGO will take action to correct the cause of the complaint.
LIMITED PRODUCT LIABILITY
ZYGO Industries, Inc. warrants its products against defects in materials and workmanship
for one (1) year from the date of shipment from our factory.
EXCEPTIONS
1. Some products distributed by ZYGO Industries, Inc. carry the respective manufacturer’s
warranties.
2. Other companies’ commercially available products, incorporated into ZYGO-manufactured devices, carry the respective manufacturer’s warranties. The modification(s) made
by ZYGO are covered by the one (1) year Warranty.
3. Perishable and external accessories and batteries are excluded from this Warranty.
4. This Warranty does not apply if, in the opinion of ZYGO’s Service Department, the product has been damaged by accident, abuse, misuse or misapplication, or as a result of
service or modification by other than our factory.
REPAIR SERVICE
1. Products covered under Warranty will be serviced at no charge for parts, labor or return
shipping/insurance. However, shipping and insurance charges to the repair service
facility must be prepaid.
2. Repair not covered under Warranty is charged at the following rates:
a) Incoming inspection and labor is charged at the value equal to one (1) hour of current
hourly repair service rate.
b) Major parts/accessories replacements are charged at the current published retail price.
c) Excessive labor for nonstandard repairs is charged at the current hourly repair service
rate and any quarter-hour fractions thereof.
d) Repair service estimates are charged at the current hourly repair service rate and
applied toward the ultimate overall charges.
NOTE: It is advisable to call the factory prior to processing repair service to assure the
most expedient, cost-effective action to be taken.
PRODUCT MODIFICATIONS
Desired modifications may be requested and will be quoted prior to initiating any such work.
This may include engineering design fees as well as standard factory labor and parts/accessories.
PLEASE COMPLETE AND RETURN THE WARRANTY REGISTRATION PROMPTLY!
Retain this portion for your reference and files.
MODEL #____________ SERIAL #____________ DATE RECEIVED________________
4 — Persona Mobile
Contents
WARRANTY ................................................................................... 3
TABLE
OF
CONTENTS ...................................................................... 5
IMPORTANT: READ THIS FIRST ............................................ 7
ICON REFERENCE ........................................................................... 8
UNPACKING ................................................................................... 9
INTRODUCTION ..................................................................... 11
MAIN SCREEN LAYOUT & DESCRIPTION ............................................
START MENU ........................................................................
STATUS ICONS .......................................................................
OK BUTTON ...........................................................................
TEXT BOX .............................................................................
MAIN MENU ..........................................................................
FILE .................................................................................
EDIT .................................................................................
TOOLS ..............................................................................
CLEAR ..............................................................................
PHRASES ..........................................................................
SPEAK ..............................................................................
ON-SCREEN KEYBOARD ..............................................................
SPECIAL KEYS .......................................................................
NAVIGATOR ...............................................................................
SYSTEM KEYBOARDS .................................................................
WORD BAR ..............................................................................
PHRASES .................................................................................
[ALL] BUTTON NOT SELECTED ................................................
CATEGORY MENU ...............................................................
PHRASE MENU ...................................................................
[ALL] BUTTON SELECTED .......................................................
CATEGORY MENU (NOT ACCESSIBLE) .....................................
PHRASE MENU ...................................................................
ABBREVIATIONS .........................................................................
CREATING ABBREVIATIONS .......................................................
ABBREVIATION LIST ................................................................
CHANGING ABBREVIATIONS .......................................................
DELETING ABBREVIATIONS ........................................................
12
13
13
13
13
13
13
13
13
13
13
13
14
14
15
15
16
16
17
18
19
20
21
21
23
23
24
25
25
Table of Contents
5
PRONUNCIATIONS ......................................................................
CREATING PRONUNCIATIONS .....................................................
PRONUNCIATION LIST ..............................................................
CHANGING PRONUNCIATIONS ....................................................
DELETING PRONUNCIATIONS .....................................................
SHORT MESSAGING SERVICE (SMS) ...........................................
SENDING MESSAGES ..............................................................
RECEIVING MESSAGES ............................................................
PREFERENCES .............................................................................
GENERAL OPTIONS ....................................................................
AUTO SPACE .........................................................................
AUTO CAPITALIZATION .............................................................
AUTO CLEAR .........................................................................
BACKUP AND RESTORE ...........................................................
MEMORY AND BATTERY ...........................................................
SELECT KEYBOARD ................................................................
LEARN NEW WORDS ..............................................................
IMPORTING WORD COMPLETION WORDS ....................................
SPEECH OPTIONS .........................................................................
PERSONALITY ...........................................................................
PITCH .....................................................................................
SPEECH RATE ..........................................................................
TEST .......................................................................................
AUTO SPEAK ............................................................................
CHARACTER .............................................................................
WORD .....................................................................................
SENTENCE ...............................................................................
PARAGRAPH .............................................................................
SPEAK SYSTEM MESSAGES ........................................................
APPEARANCE OPTIONS ..................................................................
FONT ......................................................................................
SIZE .......................................................................................
COLOR ....................................................................................
TEXT SELECTION RATE ..............................................................
TELEPOHONE ...............................................................................
RESTORING PERSONA MOBILE ........................................................
REINSTALLING PERSONA MOBILE SOFTWARE FROM FLASH DISK ........
UPGRADING PERSONA MOBILE SOFTWARE FROM MEMORY CARD ......
UPGRADING PERSONA MOBILE SOFTWARE VIA ACTIVESYNC .............
UPGRADING PERSONA MOBILE SOFTWARE VIA E-MAIL .....................
6 — Persona Mobile
25
25
26
26
26
27
27
28
29
29
29
29
29
30
30
30
31
31
31
31
31
32
32
32
32
32
32
32
32
33
33
33
33
33
35
37
37
43
51
54
Table of Contents
IMPORTANT:
READ THIS FIRST
The Persona Mobile is shipped from ZYGO Industries, Inc. complete with the
following items:
• HTC Advantage Smart Phone with Persona Mobile
• Includes:
Persona Mobile Software, installed
• 061-0010-10 ZYGO’s Warranty Registration Card
• 070-0079-00 Persona Mobile User Guide
Optional accessories and replacement parts are available from ZYGO Industries,
Inc.
To assure full warranty of the ZYGO Persona Mobile, please review the ZYGO
WARRANTY REGISTRATION CARD procedures and return the mail-back
section to ZYGO Industries, Inc. TODAY!
IMPORTANT: READ THIS FIRST
7
ICON REFERENCE
The following icons may appear on the Persona Mobile’s labels.
Icon
Meaning
Indicates that the units bearing this mark have met the European Community’s
Declaration of Conformity.
Indicates that the units bearing this mark meet the Medical Device Directives for
electrical equipment.
Indicates a CAUTION to a General Hazard condition.
Indicates that the port is NOT to be used for telephones.
Notation for Direct Current (DC).
Indicates an item that can, and should be recycled.
Power Switch to ON position.
Power Switch to OFF position.
8 — Persona Mobile
Icon Reference
Unpacking
HTC Advantage
The Persona Mobile is an HTC Advantage consumer smart phone modified to
function as an augmentative communication device by the addition of Persona
Mobile software. In most respects, the characteristics of the HTC Advantage are
intact and the instruction manuals and flyers that are provided with the unit should
be followed.
One exception to the setup instructions relates to the battery installation. The
Persona Mobile is shipped from ZYGO Industries, Inc. with the battery installed
and fully charged.
For assistance, consult ZYGO’s Customer Service Department or your local
dealer or agent.
ZYGO CUSTOMER SERVICE
Toll Free (U.S.A./Canada):
TEL:
FAX:
E-mail:
(800) 234-6006
+1 (503) 684-6006
+1 (503) 684-6011
[email protected]
Unpacking
9
10 — Persona Mobile
User Guide
Introduction
Persona Mobile is a speaking aid that makes communication easy by providing
features to assist with text entry. This guide presents an overview of the features
and explains how to use them.
Introduction 11
Main Screen Layout & Description
Status Icons
With On-Screen Keyboard
Start Menu
Ok Button
MainText
Box
Word Bar
On-screen
Keyboard
System
Keyboards
Menu
Without On-Screen Keyboard
Status Icons
Start Menu
Ok Button
MainText
Box
Word Bar
System
Keyboards
Menu
With Navigator
Status Icons
Start Menu
Ok Button
MainText
Box
Navigator
Menu
12 — Persona Mobile
System
Keyboards
Start Menu
The Start Menu displays a list of other Pocket PC applications on the device.
Status Icons
Status icons include volume control, time and date, telephone and more.
ok Button
The ok button is inoperative—nothing happens when it is tapped.
To end Persona Mobile, click on the File/ Exit Persona menu item.
Text Box
This is where text is displayed as you type. The font type, size and color can be
adjusted for a specific need or aesthetic preference.
Main Menu
FILE
- Create, open or save documents, change settings, find help and
exit the application
EDIT
- Cut, copy, paste or undo text
TOOLS
- Create or access abbreviations and pronunciations
- Display on-screen keyboard
- Navigate and select text
- Send SMS (Text) messages
CLEAR
- Clears the text box (can be undone with Edit/Undo)
PHRASES - Access commonly used phrases
SPEAK
- Speak the text. Press button again to stop speaking
13
On-Screen Keyboard
The on-screen keyboard (OSK) is handy for when an external keyboard is not
available or desired. It can be enabled or disabled by choosing the Tools/Show
(Hide) Keyboard menu item.
There is a choice of QWERTY and Alphabetical keyboard arrangements, which
consist of 3 sub layouts: lower case, upper case and numbers/symbols. The
keyboard arrangements are selectable from Preferences/General.
QWERTY Arrangement
Alphabetical Arrangement
Special Keys
BS
- Backspace
ABC - Selects upper-case letters
abc - Selects lower-case letters
123
- Selects numbers and symbols
<<
- Moves text caret backwards one character at a time
>>
- Moves text caret forward one character at a time
14 — Persona Mobile
Navigator
Navigator is handy for selecting portions of text to be spoken or edited. It
provides additional text-caret movements of letter-to-letter, word-to-word,
sentence-to-sentence or paragraph-to-paragraph.
Navigator can be enabled or disabled by choosing the Tools/Show (Hide)
Navigator menu item.
Word
Letter
Paragraph
Sentence
All
Go to
Beginning
Go
Backwards
Go
Forward
Select
Text
Go to
End
Choose the desired navigation mode by tapping one of the L, W, S, P or A
buttons. Now press the < or > buttons to move the text caret left or right. The left
and right arrow keys on an external keyboard can also be used to move the caret.
Tap the SEL button to select a portion of text. Use the < or > buttons to move the
selection right or left. In this mode the text is also spoken when moving forward
or backward. This can be handy for giving presentations where it would be
possible to speak sentence-by-sentence or paragraph-by-paragraph. The
Selection mode can be cancelled by tapping the SEL button again.
Press and hold down the < or > buttons to see the highlight move left or right
automatically. The speed at which the highlight moves is determined by the Text
Selection Rate control located in Preferences/Appearance.
System Keyboards
System keyboards are keyboards that have been preinstalled by the manufacturer
of the device or have been installed by a user. They are not part of the Persona
Mobile application but can be used. One of the preinstalled keyboards supports
Handwriting Recognition.
15
Word Bar
The Word Bar is located below the text box. It suggests words as you type.
Suggested words can be used to complete a partially typed word. Or, suggested
words can be used as the next word in the sentence.
To save time and effort, tap on the desired word in the Word Bar to insert it into
the text box.
If a word is not suggested, it means that the word is not in the word library. Finish
typing the word to add it to the word library so that it will be available in the future.
Persona Mobile remembers the words that are typed. The words are prioritized
based upon how often they are used. If a word is used frequently, it will move
towards the top of the list and become easier to access later. Less frequently
used words are bumped down and will eventually disappear. So, if a word was
typed by mistake, it will eventually be eliminated.
Unwanted words appearing on the Word Bar can be removed manually by
pressing and holding the word on the Word Bar (about 6 seconds) until a
message box appears asking if the word should be removed. Choose Yes to
remove the word.
Phrases
Phrases are commonly spoken portions of text.
Simply tap on the desired category and the desired phrase to speak the phrase
aloud.
If the external keyboard is attached, begin typing the first word of the phrase and
the Phrase list will automatically scroll to the first matching phrase. Begin a new
search by pressing the Backspace key and typing again. The arrow keys can
also be used to scroll up or down within the Phrase list.
NOTE: If a portion of text in the Main text box is highlighted before tapping the
Phrase button, a window will appear offering a choice of categories for which to
add the new phrase. That makes it easy to create phrases on the fly.
Persona Mobile can have up to 10 categories of phrases, with up to 100 phrases
per category, for a total of 1,000 phrases.
16 — Persona Mobile
Category
List
[ALL]
Button
Phrase
List
Category
Menu
Phrase Speak
Exit
Menu Phrase Phrases
There are two modes of interaction
depending upon the setting of the
[ALL] button.
[ALL] Mode
Not Selected
[ALL] Mode
Selected
When the [ALL] button is not selected, it is possible to select individual categories
from the Category list, edit categories or edit phrases within the selected category.
When the [ALL] button is selected, it is possible to work with all of the phrases in
all of the categories but it is not possible to select a category from the Category
list or to edit categories.
[ALL] Button Not Selected
This is the default mode. Categories can be chosen from the Category list and
phrases can be chosen from the Phrase list.
Only phrases
from the selected
category are
shown
Categories
can be
selected
Category menu is
enabled
17
Category Menu
New
Select New from the Category menu and enter a name
for the new category. Then tap the Close button to
accept or cancel.
NOTE: It is possible to create up to 10 categories.
Rename
Select a category from the Category List and then select
Rename from the Category menu. Enter the new name
and tap the Close button to accept or cancel.
Delete
Select a category from the Category list and then select
Delete from the Category menu.
Move Up
Select a category from the Category list and then select
Move Up from the Category menu. Select the Move Up
menu item as many times as necessary until the
category is positioned where you want it.
Move Down
Select a category from the Category list and then select
Move Down from the Category menu. Select the Move
Down menu item as many times as necessary until the
category is positioned where you want it.
18 — Persona Mobile
Phrase Menu
New
Select a category from the Category list and then select
New from the Phrase menu. Type a phrase up to 250
characters long. Tap the Close button to accept or
cancel.
NOTE: It is possible to create up to 100 phrases per
category.
Add New Phrase Without OSK
Add New Phrase With OSK
Change
Select a category from the Category list and then select
the desired phrase. Select Change from the Phrase
menu and type a phrase up to 250 characters long. Tap
the Close button to accept or cancel.
Change Phrase Without OSK
Change Phrase With OSK
Delete
Select a category from the Category list and then select
the desired phrase. Select Delete from the Phrase
menu.
Copy
The selected phrase can be copied and later pasted into
another text box such as the main text box, or it can be
pasted when making a new phrase.
19
[ALL] Button Selected
In this mode, all of the phrases from all of the categories are displayed
alphabetically in the Phrase list. This global mode makes it possible to
create phrases, change phrases or delete phrases in multiple categories.
Tap on a phrase to see which category(s) it is located in and to speak it.
In this mode it is not possible to select a category from the Category list
or to edit a category.
Phrases
from all of
the
categories
are shown
Categories
cannot be
selected
Category menu is disabled
Select or
unselect
categories
individually
Select or unselect all
categories
20 — Persona Mobile
Category Menu (not accessible)
Phrase Menu
New
Select New from the Phrase menu and then type a
phrase up to 250 characters long. Tap the Close button
to display the possible categories where the phrase can
be saved.
Add New Phrase Without OSK
Add New Phrase With OSK
Tap on the desired category checkboxes where the phrase
should be saved and then tap the Close button to accept or
cancel.
NOTE: When making a new phrase, the category checkboxes
will only be enabled if the category doesn’t already contain the
proposed phrase and if the category is not already full.
Change
Select a phrase from the Phrase list and then select Change from
the Phrase menu. Type a phrase up to 250 characters long. Tap
the Close button to display the possible categories where the
phrase can be saved.
Change Phrase Without OSK
Change Phrase With OSK
21
Tap on the desired category checkboxes where the phrase
should be saved and then tap the Close button to accept or
cancel.
NOTE: When changing a phrase, the category checkboxes will
only be enabled if the category already contains the original
phrase.
Delete
Select a phrase from the Phrase list and then select Delete from
the Phrase menu to display the possible categories from where
the phrase can be deleted.
Tap on the desired category checkboxes where the phrase
should be deleted and then tap the Close button to accept or
cancel.
NOTE: When deleting a phrase, the category checkboxes will
only be enabled if the category already contains the original
phrase.
Copy
The selected phrase can be copied and later pasted into another
text box such as the main text box, or pasted when making a new
phrase.
22 — Persona Mobile
Abbreviations
The use of abbreviations can significantly reduce the amount of typing required to
produce commonly typed passages of text. They can also be used to
automatically capitalize proper names.
When you want to use a stored Abbreviation as you’re typing, just type the
Abbreviation and follow it with a space, comma, period, exclamation point,
question mark, or Enter to expand it.
Abbreviation as typed…and then…expanded when followed by a space, punctuation, or Enter
Creating Abbreviations
Add Abbreviation without OSK
Add Abbreviation with OSK
Create a new Abbreviation by selecting the Tools menu (Main screen) and
then choose the Abbreviation menu item. This will open the Add Abbreviation
window.
Before opening the Add Abbreviation-Expansion as just described, consider
the following:
If you know what the abbreviation is going to be, type it in the Main text box
before opening the Add Abbreviation window, and the abbreviation will
automatically be pasted into the Abbreviation text box.
23
If you just typed a portion of text that you want to save as an AbbreviationExpansion, highlight it and then open the Add Abbreviation window and the
highlighted text will automatically be pasted into the Expansion text box.
The Abbreviation text box will only accept letters and numbers (as long as the
number is not the first character). The Expansion text box can accept up to 250
characters.
Once the Add Abbreviation window is open, edit the text as desired and tap on
the Close button accept the Abbreviation or cancel the operation.
NOTE: It is important not to use actual words for the abbreviation, because the
expansion would occur whenever the word was typed for normal use.
Abbreviation List
NOTE: To open the Abbreviation List, go to the Add Abbreviation window and
then tap on the List button.
Abbreviation List
The Abbreviation List shows all of the stored Abbreviations. From here, it is
possible to select an Abbreviation to be changed, deleted or spoken.
Select an abbreviation by tapping on it. If the Abbreviation is not in view then
slide the scroll bar on the right side of the screen until the desired
abbreviation becomes visible.
If an external keyboard is attached, begin typing the first word of the
abbreviation and the Abbreviation List will automatically scroll to the first
matching abbreviation. To begin a new search, press the Backspace key and
begin typing again. The arrow keys can also be used to scroll up or down in
the Abbreviation List.
24 — Persona Mobile
Changing Abbreviations
Change (edit) an Abbreviation by selecting it from the Abbreviation List.
Then choose the Edit/Change menu item to open the Change
Abbreviation text box. Make your changes and tap the Close button to
accept the changes or return to the Main text box.
Deleting Abbreviations
Delete an Abbreviation by selecting it from the Abbreviation List and then
choosing the Edit/Delete menu item or by pressing the Delete key on an
external keyboard to delete the selected Abbreviation.
Pronunciations
Use Pronunciations to change how Persona Mobile pronounces certain words,
such as people’s names and places.
Creating Pronunciations
Add Pronunciation without OSK
Add Pronunciation with OSK
As you’re typing, if you want to change how a word sounds, select the Tools
menu and then choose the Pronunciation menu item to open the Add
Pronunciation window.
Once the Add Pronunciation window is open, edit the Pronunciation text box.
Tap on the Speak button to hear how the new pronunciation sounds. Try
different spellings to get the word to sound as desired. Once satisfied, tap on
the Close button to accept the new pronunciation, or cancel the operation.
25
Pronunciation List
NOTE: To open the Pronunciation List, go to the Add Pronunciation window and
then tap on the List button.
Pronunciation List
The Pronunciation List shows all of the stored pronunciations. Here, it is
possible to select a Pronunciation to change, delete or speak.
Select a pronunciation from the list by tapping on it. If the pronunciation is not
in view then slide the scroll bar on the right side of the screen until the desired
pronunciation comes into view.
If an external keyboard is attached, begin typing the first word of the
pronunciation and the Pronunciation List will automatically scroll to the first
matching one. To begin a new search, press the Backspace key and begin
typing again. The arrow keys can also be used to scroll up or down in the
Pronunciation List.
Changing Pronunciations
Change a pronunciation by selecting it from the Pronunciation list and then
tap on the Edit/Change menu item to open the Change Pronunciation window.
Make your changes and then tap on the Speak button to hear how the
changes sound. Once satisfied, tap on the Close button to accept the
changes or cancel operation.
Deleting Pronunciations
Delete a pronunciation by selecting it from the Pronunciation List and choose
the Delete button, or press the Delete key to delete the selected
pronunciation.
26 — Persona Mobile
Short Messaging Service (SMS)
With a SIM card installed, it is possible for Persona Mobile to send short
text messages to a cell phone.
Sending Messages
Open the SMS Send screen from the Persona Mobile Main menu by
choosing Tools and then SMS Send.
From the SMS screen it is possible to choose a recipient and type a
message up to 160 characters long.
Tap the Send button to send the message to the recipient. A message
box will appear after a few seconds indicating whether or not the
message was sent successfully.
New Recipients can be added to the Recipient drop-down list by selecting
Recipient and then New from the menu. Similarly, a recipient’s name and
cell phone number can be edited by selecting Recipient and then Change.
27
NOTE: Persona Mobile’s Recipient drop-down list is not integrated with
any other contact lists that are part of the HTC computer. It is only
intended for use with Persona Mobile software.
Receiving Messages
Persona Mobile software does not support receiving SMS messages.
However, when an SMS message is received, it will be displayed on the
screen as shown below.
There are a few ways to respond to a received message.
1) Respond right away by using Persona Mobile’s own SMS Send
capabilities as previously mentioned.
2) Respond right away by tapping on the Reply button. Refer to the
HTC user manual for more information.
3) Respond at a later time by choosing Tools and then SMS
Messaging. Refer to the HTC user manual for more information.
Options 2 and 3 will take you out of the Persona Mobile software
environment and into the HTC computer environment. It is your
responsibility to learn how to use SMS Messaging if you want to respond
to received messages.
You can return to the Persona Mobile software at any time by selecting it
from the Start menu located in the upper left corner of the display.
NOTE: Persona Mobile’s Recipient list is not integrated with any other
contact lists that are part of the HTC computer. It is only intended for use
with Persona Mobile software.
28 — Persona Mobile
Preferences
Use Preferences to customize Persona Mobile. Preferences are divided into 3
sections: General, Speech and Appearance. From the main screen select the
Preferences menu item in the File menu.
General Options
General Options
Auto Space
Automatically adds a space when a comma, period, question mark or
exclamation are typed.
Auto Capitalization
Capitalizes the first letter of a new sentence and I when it is followed by
’ll, ’ve, ’m or ’d.
Auto Clear
Clears the text box when the first letter of a new sentence is typed.
29
Backup and Restore
Backup and Restore
Use the Backup/Restore utility to transfer or retrieve user files to and from a
safe place. The Backup/Restore utility saves files to a memory card that is
inserted in the storage card slot. Only files that have been backed up can be
retrieved.
Use the Default button to replace the current user files with the original factory
files.
NOTE: Preferences are not saved to a memory card but are saved in the
Registry instead.
NOTE: The user files in use at the moment when the Restore button is
pressed will be replaced by the backed up files. Similarly when the Default
button is pressed, the current user files will be replaced by the factory
defaults.
Memory and Battery
The memory indicator should be less than about 40% otherwise the device
may become unstable and need a soft reset. Try closing other applications if
they are running.
The battery indicator shows the remaining capacity.
Select Keyboard
Choose between QWERTY or Alphabetical OSK arrangements.
30 — Persona Mobile
Learn New Words
Determines whether or not new words will be added to the word completion/
prediction library.
It is advisable to leave Learn New Words unchecked while you are getting
familiar with Persona Mobile to prevent adding incorrectly spelled words.
Importing Word Completion Words
It is easy to import a large group of specific words into the Word Completion
library.
To import words go to Preferences/General Options and ensure that Learn
New Words is checked. Then tap the Import button to begin.
In order for Import to work there must be a file called WCImport.txt located
within the Persona Documents folder. There should only be one word per
line. The maximum length of the file should be less than 1000 words.
Either import the words to the existing library which contains all of the learned
words to date or restore the Word Prediction to its original factory defaults for
a fresh start before importing the new words.
Speech Options
Speech Options provide the means for adjusting the voice quality and determines
when to automatically speak.
Speech Options
Personality
Choose from 9 different voices.
Pitch
If necessary, adjust the pitch to make the voice more feminine or more
masculine.
31
Speech Rate
180 (WPM) is the default rate. Slowing it down can make the voice more
intelligible.
Test
Tap the Test button to hear how the customized voice sounds.
The text on the Test button can be changed by tapping on the button and then
typing up to 20 characters of new text.
Auto Speak
Auto Speak makes it possible to automatically speak as you type.
Character - Each character is spoken as it is typed.
Word
- Each word is spoken as it is completed. A word is completed
when it is terminated with a space, comma, period, exclamation
point or question mark.
Sentence - Sentences are spoken when the last character is a period,
exclamation point or question mark.
Paragraph - Paragraphs are spoken when terminated with Enter.
Speak System Messages - Determines whether or not message boxes will be
spoken.
32 — Persona Mobile
Appearance Options
Appearance Options adjust the text appearance and more.
Speech Options
Font
Choose from a variety of fonts.
Size
Font Size adjusts the size of the text in the text boxes.
Color
Tap on the Color button to change the text color and text box background
color.
Text Selection Rate
This setting determines the speed at which the main text highlight will move
from selection to selection when the Left “<” or Right “>” buttons of the
Navigator are used.
Press and hold down the Left or Right buttons on the Navigator to see the
selection move left or right automatically.
33
34 — Persona Mobile
Using the Phone Feature with
Persona Mobile
•
Make sure your device is setup and ready to be used as a
phone.
•
Run “Persona Mobile”.
•
Select “Phone” from the “Start” menu.
•
Set the Phone volume all the way down (right slider).
•
Set the device volume all the way up (left slider).
•
Dial number and tap on the “Talk” button to begin the call.
•
Select Persona Mobile from the “Start” menu.
Now you should hear the person you are conversing with and they
should be able to hear you when you type and talk.
35
36 — Persona Mobile
Restoring Persona Mobile
(Software Re-installation)
There are several reasons why Persona Mobile software may need to be
reinstalled.
- Persona Mobile’s battery has lost its charge
- Persona Mobile is experiencing a problem and requires a Hard Reset
- Persona Mobile requires a software upgrade
Reinstalling Persona Mobile Software from Flash Disk
The Flash Disk is an internal memory area that retains it’s contents even if the
unit’s battery goes completely dead. The Flash Disk is where user documents
and settings are stored. It also stores the Persona Mobile’s software installation
file so that the application can be restored at any time.
1) Connect Persona Mobile to the charger.
2) Tap the “Start” button and then tap the “Programs” menu item.
37
3) Tap the “File Explorer” icon.
4) Find the “Persona Mobile.Arm 1100 (4K) v3.00.CAB” file which is
located in the
“\Flash Disk\
Persona Backup”
folder.
Tap on the file
to begin the
installation.
5) Tap “Yes” to trust the publisher.
38 — Persona Mobile
Or, tap “OK” if you see this message.
6) Select “\Flash Disk” and tap “Install”.
7) Click “ok” to end installation.
39
8) Repeat steps 4–7 one more time. (Persona Mobile has to be installed
twice before it will work.)
9) The following setting changes also should be made…
• Tap the “Start” button and then tap the “Settings” menu item.
• Tap the “Input” icon and then the “Word Completion” tab. Uncheck
“Suggest words when entering text”. Tap “ok” to accept changes.
40 — Persona Mobile
• Tap the “Menus” icon and add Persona Mobile to the Start menu.
• Tap the “Today” icon and select “Windows Default” from the list.
Tap “ok” to accept changes.
10) Tap the “Start” button and then tap the “Persona Mobile” menu item to
run Persona Mobile.
41
If Persona Mobile is not shown in the Start menu, then…
• Tap the “Start” button and then tap the “Programs” menu item.
• Tap the Persona Mobile icon to run the program.
42 — Persona Mobile
Upgrading Persona Mobile Software from Memory Card
This upgrade process is nearly identical to the “Reinstalling Persona Mobile
Software from Flash Disk” instructions above. The main difference is that the
new installation file will come from an external memory card that has been sent
to you by ZYGO Industries, Inc.
1) Look at the bottom edge of the unit. Find the battery/memory cover. Slide
the cover downward to open it.
Slide cover
Slide
downward
to
cover
unlatch it.
downward
2) Find the memory card slot. If a card already is in the slot, remove it by
carefully pushing it inward until it is unlatched.
Empty Slot
43
3) Carefully insert the memory card with the top side facing up.
Label
Labelfacing
facingupward
towards the
display
upwards
towards
side
of
the
unit.of
the display side
4) Carefully push the memory card in until it is latched and seated as shown.
Notice that the exposed edge of the memory card is just beneath the edge of
the surrounding plastic.
5) Connect Persona Mobile to the charger.
44 — Persona Mobile
6) Tap the “Start” button and then tap the “Programs” menu item.
7) Tap the “File Explorer” icon.
45
8) Find the “PersonaMobile.Arm 1100 (4K) v.3.00.CAB” file that should be
located in the “\Storage Card” folder. Tap on the file to begin the installation.
9) Tap “Yes” to trust the publisher.
46 — Persona Mobile
Or, tap “OK” if you see this message.
10) Select “\Flash Disk” and tap “Install”.
47
11) Click “ok” to end the installation.
12) Repeat steps 8–11 one more time. (Persona Mobile has to be installed twice
before it will work.)
13) The following setting changes also should be made…
• Tap the “Start” button and then tap the”Settings” menu item.
48 — Persona Mobile
• Tap the “Input” icon and then the “Word Completion” tab. Uncheck
“Suggest words when entering text”. Tap “OK” to accept changes.
• Tap the “Menus” icon and add Persona Mobile to the Start menu.
• Tap the “Today” icon and select “Windows Default” from the list.
Tap “ok” to accept changes.
49
14) Tap the “Start” button and
then tap the “Persona
Mobile” menu item to
run Persona Mobile.
If Persona Mobile is not shown
in the Start menu, then…
• Tap the “Start” button
and then tap the
“Programs” menu item.
• Tap the Persona Mobile
icon to run the program.
50 — Persona Mobile
Upgrading Persona Mobile Software via ActiveSync
ActiveSync can be an effective means of transferring files between a PC and
Persona Mobile. For example: If an upgrade file was e-mailed to your PC,
ActiveSync could be used to transfer it from the PC to the Persona Mobile.
If ActiveSync is not installed already on your PC, then you’ll need to uinstall it
from the “Getting Started Disk” that came with the Persona Mobile or go to
Microsoft.com to download it and install it onto your PC.
Note:
The following instructions only demonstrate how to transfer files from a
PC to the Persona Mobile as a “Guest”. Refer to ActiveSync Help for
information regarding additional capabilities.
Once ActiveSync has been installed onto the PC, connect the Persona Mobile to
the PC using the supplied USB cable. You should hear the PC make a
confirming sound when it connects successfully. Also, you should see the
following message on the PC screen. Tap “OK” to continue.
Tap “OK” to continue.
Tap “Cancel” to continue.
Tap the “Explorer” icon.
51
Now you can view Persona Mobile’s memory contents from the PC using the
“Explorer”.
Find the “Persona Backup” folder by tapping on “My Windows Mobile-Based
Device”. Then tap on “Flash Disk” and then tap on the “Persona Backup” folder.
Start
by tapping
tappingonon“My
Start by
“My
Windows
Windows
Mobile-Based
Device”.
Mobile-Based
Once you have found the “Persona Backup” folder, find the Persona Mobile
upgrade file (“PersonaMobile.Arm 1100 (4K) v3.00.CAB”) that you received via email.
Copy the upgrade file and past it into the “Persona Backup” folder.
This message will be
displayed on the PC.
Tap “OK” to continue.
52 — Persona Mobile
Tap “Yes” to continue.
At this point, the installation file has been transferred from the PC to the Persona
Mobile device.
To complete the upgrade process, follow the follow the steps in “Reinstalling
Persona Mobile Software from Flash Disk” (Page 37).
53
Upgrading Persona Mobile Software via E-mail
If you are able to receive e-mail on your Persona Mobile, then it is possible for
ZYGO to send the upgrade installation file directly to your Persona Mobile via
e-mail.
For the most part, you will need to follow the instructions: “Upgrading Persona
Mobile Software from Memory Card”, with the exceptions that you will start from
Step 5 and, instead of the installation file (“PersonaMobile.Arm 1100 (4K)
v3.00CAB”) being found on a memory card, it will be found where you
downloaded it.
54 — Persona Mobile