1
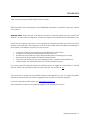
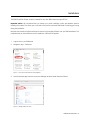
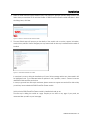
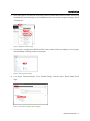
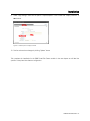
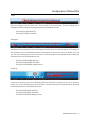
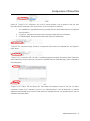
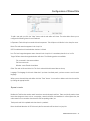
DNN Pinned Site Creator User Manual v1.0 Eclo Mobile © ECLO LDA. 2012 All rights reserved. Windows and Internet Explorer are registered trademarks of Microsoft. Other names and brands are property of their respective owners. DNN Pinned Site Creator - 1 Table of Contents INTRODUCTION ...........................................................................................................................................3 PREREQUISITES ..........................................................................................................................................4 INSTALLATION ............................................................................................................................................5 CONFIGURATION OF PINNED SITE .........................................................................................................9 SUPPORT ....................................................................................................................................................18 DNN Pinned Site Creator - 2 Introduction Thank you for purchasing the DNN Pinned Site Creator module! DNN Pinned Site Creator was designed to assist DotNetNuke webmasters to provide IE9 “pinned site” features in their portals. Important notice: Please note that a full featured “pinned site” experience requires that users have IE9 and Windows 7 as their minimum configuration. A limited user experience is available with IE9 and Windows Vista. Pinned sites can provide your end users a more compelling user experience and make your site feel more like a Windows native application. After pinning your web site to their taskbar and/or Start Menu and depending on what features you’ve added to your portal, your users can have: A static list of tasks for fast navigation to common destinations within the site. A dynamic list of destinations personalized and relevant to the user. Be draw back to the website by seeing a flashing taskbar button or displaying an icon overlay. Remote controls and commands to the taskbar's preview window. The browser look and feel like your site by changing the color of the Back and Forward buttons. A high-resolution site icon that extends your site's brand outside the browser. If you want to get familiarized with pinned sites available features, we suggest you read all about it in the IE9 web site. There is also a presentation video and a demo web site. You can find it all here. This manual aims to provide you with detailed instructions and explanations on how to configure all possible pinned sites features to help you provide an engaging web site and offer a friendly user experience. If you have any questions please contact us at [email protected]. Also we would love to hear from you regarding suggestions and comments you may have. DNN Pinned Site Creator - 3 Prerequisites The DNN Pinned Site Creator requires DotNetNuke 5.x or 6.x. DNN Pinned Site Creator - 4 Installation The DNN Pinned Site Creator module is installed like any other DNN module through a ZIP file. Important notice: We recommend that you backup your portal installation folder and database previous installing this module. This allows you to roll back to the previous functional DNN install if anything goes wrong during the installation. Note that the instructions bellow and the print screens may be slightly different from your DNN installation. This maybe because you have a different version installed or a different skin applied. 1. Login as host in your DNN portal 2. Navigate to Host – Extensions Figure 1 – Host menu with Extensions item highlighted 3. At the Extensions page hover the mouse over Manage and select Install Extension Wizard Figure 2 – Manage Extensions menu DNN Pinned Site Creator - 5 Installation 4. When the Install Extension Wizard windows open, click Select File. With the Open file dialog browse to the folder where you saved the ZIP file with the installer of DNN Pinned Site Creator module and select it. After the dialog closes, click Next Figure 3 – Browse to select file with module installer 5. The next Wizard steps will present you the details of the module such as version, support information, version history and User License. Navigate your way forward until the last step is reached and the module is installed. Figure 4 – Successful installation of module In case there is an error during the installation you’ll see a failure message and the error that caused it will be highlighted in red. Try to understand what the problem is and, if possible, correct it. Common issues are related with folder and files permissions. In case you get stuck here and require assistance, please contact our support team and we’ll be able to help you with any issues related with DNN Pinned Site Creator module. At this point the DNN Pinned Site Creator module is installed and ready to use. The next step is adding the module to a page. Despite you can add it to any page of your portal; we recommend that you add it to your home page. DNN Pinned Site Creator - 6 Installation 6. At the home page (or any other that you choose to add it to) add the DNN Pinned Site Creator module using the Add Module menu. Depending on your DotNetNuke version you may have to change the category filter to “All Categories”. Figure 5 – Adding the module to a page 7. The next step is configuring the DNN Pinned Site Creator module visibility and adding it to all site pages. Open the Manage or Settings window for the module. Figure 6 – Accessing module settings 8. In the section “Advanced Settings” for the “Module Settings”, select the option “Display Module On All Pages”. Figure 7 – Check option to display module on all pages DNN Pinned Site Creator - 7 Installation 9. Under “Page Settings” make sure the options “Collpase/Expand” is set to None and “Display Container” is not checked. Figure 8 – Uncheck option to display container 10. Confirm and save these changes by clicking “Update” button. This completes the installation for the DNN Pinned Site Creator module. In the next chapter we will deal the specifics of the pinned sites features configuration. DNN Pinned Site Creator - 8 Configuration of Pinned Site The DNN Pinned Site Creator module provides a detailed level of configuration to provide webmasters to tweak all details of pinned sites features and possibilities. They are divided in 4 sections: Module general settings Look and feel of the shortcut icon and browser window; Fixed tasks list; Dynamic tasks list. In particular for the task lists the possibilities are endless and they should be built to fit the purpose of your web site. We’ll be providing some generic examples that you should modify according to your own requirements. The DNN Pinned Site Creator module fully supports Portal localization. All strings and URLs allow for different settings/inputs for each language available in the Portal. General overview of a pinned site look and feel Figure 9 – Overview of pinned sites features in Windows 7 taskbar Feature Taskbar button Overlay icons Jump List Jump List category Jump List tasks Thumbnail Toolbar Description When you click a Pinned site button on the taskbar, the website launches in a new browser window that has been customized specifically for the site. The site icon is visible on the taskbar button. A 16x16 pixel notification icon that appears on top of the normal site icon. This notification indicates that something has changed in the website, such as new mail arriving, receiving a chat request, or being outbid in an auction. The notification is visible only when the site is running. The Jump List can contain static and dynamic tasks that act as shortcuts into the Pinned site. A user can further customize their experience by pinning these items to the Jump List. A Pinned site can create and fill a single custom Jump List category by using script in the webpage. This list is dynamic. In addition to the Jump List category, a Pinned site can predefine a list of tasks in metadata. This list is static. A Pinned site can create up to seven buttons that appear on the taskbar thumbnail window. These buttons can be visible or hidden, active or inactive, or toggle between different button states. DNN Pinned Site Creator - 9 Configuration of Pinned Site At the very least, Pinned sites should define a list of tasks for the most frequently used features of the website. Beyond that, webmasters can create a custom Jump List category for additional tasks and user-specific destinations. More advanced sites can provide icon overlays to notify their users about the status of a website, such as the number of new messages in their Inbox, the number of unread messages in a forum, etc. Finally, some sites might also benefit from remote controls on the Thumbnail Toolbar. Pinned site shortcut settings Note: The following elements are used only when the Pinned site shortcut is created on the Start menu and on the Windows 7 taskbar. All these elements are optional, but highly recommended. After that, changes to these values do not have any effect on the Pinned site shortcut. These may be seen as “install-time” settings. Application name. Defines the name of the Pinned site application instance. This is the name that appears in a tooltip when hovering over the Pinned site button on the Windows 7 taskbar. The application name is also appended to the window title of the Pinned site application instance. Application tooltip. Defines additional tooltip text that appears when hovering over the Pinned site shortcut in the Windows Start menu or on the desktop. Application start URL. This contains the root URL of the application. Only HTTP and HTTPS protocols are allowed. If this element is missing, the address of the current page that the user was visiting when pinning the site is used instead. The start URL creates a common entry point to a website. When present, the Pinned site launches the start URL instead of the page that was originally dragged to the taskbar. Windows size. This sets the initial size of the Pinned site window when it is launched for the first time. However, if the user adjusts the size of the window, the Pinned site retains the new dimensions when it is launched again. Both width and height are required and values are pixels. The minimum value for width is 800px. The minimum value for height is 600px. DNN Pinned Site Creator - 10 Configuration of Pinned Site Unlike the previous install-time values, the following values are read each time the user launches the Pinned site. Because of that, webmasters can use these values to modify the user experience over time. These elements are optional. Color for navigation bar buttons. Define the custom color of the Back and Forward buttons in the Pinned site browser window. If this element is absent, the default color is based on the color palette of the portal icon (also known as favicon). Module settings Enable. This setting allows you to turn-off the DNN Pinned Site Creator module and no code will be injected. This may become handy if you want to disable the pinned sites features from your website temporarily for any reason (for example when debugging an issue with a skin or another module). Automatic detection. This setting allows you to enable/disable the automatic detection of support for Pinned site at the user PC. When this feature is enabled, the user will be prompted to pin the site to their taskbar in case they haven’t done yet and providing their browser/OS supports Pinned sites. Option for “Prompt To Pin”. You can select any of the 3 available controls to prompt your users to pin your site. Another option would be to design your own control to achieve the same result. As this is an “advanced feature” it will be described in a separate application note available at our web site. The 3 controls can be further customized by changing the resource strings and/or the respective CSS file. DNN Pinned Site Creator - 11 Configuration of Pinned Site Top bar Basic bar showing at the top of the form. The icon there is the Portal favicon. The text showing can be changed/localized by editing the following resources in the module Edit.resx file: - lblPromptToPinTopBar.MainText lblPromptToPinTopBar.LearnMore Branded bar Branded bar showing a preview of the Internet Explorer top left corner as it would show the site as Pinned site. It also includes a picture of the Windows taskbar and instructions to drag the site icon to the taskbar to pin the site. The icons showing there are the Portal favicon. The text showing can be changed/localized by editing the following resources in the module Edit.resx file: - lblPromptToPinBrandedBar.MainText lblPromptToPinBrandedBar.LearnMore lblPromptToPinBrandedBar.DragInstructions Double bar Large size bar showing a picture of the Windows taskbar and instructions to drag the site icon to the taskbar to pin the site. The icon showing there is the Portal favicon. The text showing can be changed/localized by editing the following resources in the module Edit.resx file: - lblPromptToPinDoubleBar.MainText lblPromptToPinDoubleBar.LearnMore lblPromptToPinDoubleBar.DragInstructions DNN Pinned Site Creator - 12 Configuration of Pinned Site Option for “Prompt To Pin” instructions. Any of the 3 controls provides a link to present to the user more information about Pinned sites or how to pin the site. There are 3 options to show this: 1. An “expanded bar” that slides down and up, pushing the site content and that shows an image with more information. 2. A “light box” that pops at the screen centre showing an image with more information. 3. A “dedicated page” with more information where the user is redirected to. “Prompt To Pin” instructions image. The URL of an image that will be used in the “expanded bar” and “light box” option above. “Prompt To Pin” instructions URL. The URL of a dedicated page that provides information about Pinned sites and/or instructions on how to pin a site. This option is available when the “dedicated page” option is selected on the setting above. “Prompt To Pin” Control, CSS and jQuery URL. These editor and settings are there for the user to create a customized “prompt to pin” experience. As this is an “advanced feature” it will be described in a separate application note available at our web site. These options are available when the “user provided control” option is selected on the setting above. DNN Pinned Site Creator - 13 Configuration of Pinned Site In order for the settings or any changes you made are applied you have to click the “Update” button at the bottom right of this section. Note: when performing the initial configuration for the module the “Update” button is replaced by a “Add” button. Tasks list Tasks are static items, site specific, that are shown in a jump list of a pinned site. These jump list items act as entry points into the website even when the browser is not running. You can add here destinations for relevant pages on your portal: support page, forum, login page, web shop, etc. Follows some examples from well know sites. If you want to add items based on recent activity, Role or user preferences this will be covered on the next section “Dynamic tasks”. Note: the default behaviour for IE9 is that only the first ten tasks will be shown in a jump list. DNN Pinned Site Creator - 14 Configuration of Pinned Site To add a new task you click the “New” button and the task editor will show. The tasks editor allows you to configure the following items for each fixed task. Is Separator: Check this option to make this task a separator. This will place a visible line in the Jump List menu. Name: The task name that appears in the Jump List. URI: The address that is launched when the item is clicked. Icon: The icon image that appears next to the task in the Jump List. It is mandatory that this is an .ico file. Target: Defines where the target destination will show. The following options are available: Tab: a new tab in the current window. Self: the current tab. Window: a new Pinned site window. Order: The order of this task in the list. The list is ordered with the lowest index at the top. Language: The language for this task. Note that if you have a localized portal, you have to enter a task for each language. When you are done with the task edition click the “Save” button. You can edit or delete a task from the task list by clicking the appropriate link. Dynamic tasks Besides the Task list that contains static items there are also dynamic task lists. There are tipically used to show items that change over time, such as: a campaign, a search result/link, the headlines for a news/sports site, the order status for an e-commerce site when the user has pending orders, etc. The dynamic task list is updated each time there is a postback. Note: the default behaviour for IE9 is that only the first ten tasks will be shown in a jump list. DNN Pinned Site Creator - 15 Configuration of Pinned Site Follows some examples from well know sites. To add a new task you click the “New” button and the task editor will show. The dynamic tasks editor allows you to configure the following items for each dynamic task. Name: The task name that appears in the Jump List. List: The list to which the task belongs to (you have to previously create a list on a separate editor). URI: The address that is launched when the item is clicked. Icon: The icon image that appears next to the task in the Jump List. It is mandatory that this is an .ico file. Target: Defines where the target destination will show. The following options are available: Tab: a new tab in the current window. Self: the current tab. Window: a new Pinned site window. Order: The order of this task in the list. The list is ordered with the lowest index at the top. Show to Roles: List of the portal Roles to which this task is visible to. DNN Pinned Site Creator - 16 Configuration of Pinned Site Show only to registered Users: Check this option to show the task only to registered users (that have login at the Portal). Show only to unregistered Users: Check this option to show the task only to unregistered users (those who have not login at the Portal). Show only to Users: List of the portal Users to which this task is visible to. If no users are added the task is made visible to all users. From/To date: The date interval when this task should be visible. If there is no interval just these fields empty. The same applies if you want to set a start date without an end date, or the reverse with an end date without a start date. Language: The language for this task. Note that if you have a localized portal, you have to enter a task for each language. When you are done with the task edition click the “Save” button. You can edit or delete a task from the task list by clicking the appropriate link. Jump lists The Jump lists are used to group the dynamic task. Before adding a dynamic task, you have to create a Jump list to assign that task. The editor is quite straightforward with option for the task list name and the language. Overlay icons This feature is currently under development. Thumbnail Toolbar This feature is currently under development. . DNN Pinned Site Creator - 17 Support If you have any questions please contact us at [email protected]. We also welcome your feedback so we are eager to hear your suggestions and comments. DNN Pinned Site Creator - 18