1
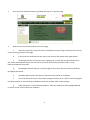
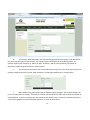
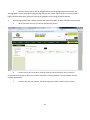
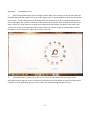
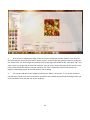
 MyFarmersMkt.com User Manual And Bid To Grow Manager’s Guide A manual for the everyday user Consolidated By Dan Robinson Table of Contents Preface………………………………………………………………………………………….. ii Credits…………………………………………………………………………………………… iii Getting Started………………………………………………………………………………. 1 Navigation Bar………………..……………………..………………………………….…... 3 Search and Advanced Search…………………………………………………….……. 7 Bid To Grow……………………………………………………………….…………………… 8 Creating a Contract Bid Request……………………..……...……………………… 10 Managing the Bid/Approval Process.……………………….….………………….. 13 Tracking Active Contracts……..………………………………….……………………… 15 Appendix 1 Photoscape Tutorial…………………………….……………………….. 17 i Preface This is a guide for the average computer user. We find ourselves more and more connected to technology these days, but the technology piece, for most folks, has stopped at the younger set and hasn’t found its way into our daily routines. We have attempted to develop a step‐by‐step guide to fill the void left by the software developer. Developers don’t see their sites as regular folks see their sites, so hopefully we do a good job putting together this walk through for you. This guide will help you understand how to set up a user account, add profile information, use the advanced search feature, manage your account and make purchases from farmers and crafters in your community. If you are a business or facility that prepares food, eg a restaurant, elderly care facility, school etc, This guide will help you understand how to place contracts for goods in an auction type environment for producers to bid for. You as the business have complete control over which producer or producers you award the winning bid or bids to. MyFarmersMkt.com helps you manage the listing by notifying producers of posted contract for bid, but the business is the ultimate decision maker. Thank you for choosing MyFarmersMkt.com and best of luck in your market experience. Dan Robinson [email protected] & the MyFarmersMkt.com Team ii Credits This guide was consolidated by the MyFarmersMkt.com site administrator, Dan Robinson using screen captures of the actual website. The software used for the screen captures was Photoscape available for download free at www.photoscape.org. The images captured were all edited using Photoscape. The MyFarmersMkt.com website is a customized product of iScripts.com. Concept of Bid To Grow, MyFarmersMkt.com and the website customization are the intellectual property of David and Jennifer Bone, 23 Stone Road, South Ryegate, Vermont 05061. References to such are used with permission. iii 1. Getting Started: In order to purchase items onMyfarmersmkt.com you must create a User account. User accounts are free of charge and easy to accomplish. a. To get started, select “Register Now” under User Login. b. This will bring you to the create account page. Fill in all of the areas marked with an asterix. If you are participating in Bid To Grow, check the box to receive updates/newsletters. Then select Create Account. 1. 2. Once you have created the account, go ahead and login in on the main page. 3. Now we can have a look around the user’s main page. a. Across the top of the screen on the left is the Myfarmersmkt.com logo. Clicking on this from any screen will bring you back to this page. b. In the center are the buttons to take you to your account information and a logout button. c. On the right are links to take you to your shopping cart, a search bar to help you find items in the market and an Advance Search bar that will let you search for items from producers with in a user determined radius of a zip code. d. The Navigation Bar will take you to various pages on the site we will look at these individually throughout the manual. e. The New Products button will show you the latest items posted on the market. f. on the left side of the screen is the product category window. This is a quick list of the categories that have products for sale and can be expanded to show the products listed in each category. g. Under the banner is a list of featured products. These are products we have highlighted based on season and/or value priced by our producers. 2. 4. Let’s start with the Navigation Bar. The navigation buttons change to a different shade of green to indicate the page you are on. This will help you out if you lose track of where you are on the web site. You can return to the home page by clicking on the “My Farmers Market” logo in the upper left hand corner. a. Catalog: This is the page where you can view all of the products available on the market. You can also shop from this page. If you don’t see a category listed here, that indicates there are no items available in that category. c. View Cart: Selecting this will show you the items in your shopping cart, quantity, and total. 3. d. Vendors: Clicking the Vendors button will display the profiles of all of the vendors/farmers registered on the site. e. About Us: The About Us button gives to the site’s basic information, Privacy info as well as the membership terms and conditions. 4. f.
FAQ: Frequently Asked Questions currently is some basic information pertaining to what the site can and can’t do. As we utilize the site and troubleshoot and resolve problems experienced by our members, we will update the FAQ’s. g. Site Feedback: Site Feedback is where Users can submit feedback about their experiences using the site. All feedback is submitted here and moderated by the administrator before it is posted. 5. Help: selecting Help will give you a page showing a wire diagram of all the Help topics for the website and by clicking on those topics, you will get tips to help you use the site. For more in depth help, contact the Site Administrator. 5. New Products: By Selecting the new products icon, you will see images of all of the new products that have been added to the Market. 6. Down the left side of your Home Screen is the Categories Sidebar. The Categories Sidebar is present no matter what screen you are on. 6. This will allow you to navigate around the site and when you are ready to return to the market, you can do so simply by selecting a product from the Categories Sidebar. The sidebar will only list categories that have products for sale and the number in parenthesis is the number of products listed in that category. 7. In the upper right hand corner is the Market search bar. Here you can search the whole market or by category for products. 8. Under the Market Search Bar is the Facebook icon which will take you to our Facebook page. Next to that is our Advance Search Icon. The Advanced Search Feature will allow you to search for products from a predetermined radius of a zip code entered by the user. This ensures that you are always selecting products from vendors and farmers in your area. Select Advanced Search, a window will pop up asking you to input your zip code, the desired radius, the product category, and the farming method. Once you have filled in this information and selected Search, you will see the following screen. Here you can select for the products listed or refine your search. 7. 9. Bid To Grow: All contracts placed in Bid To Grow, are done so through the User interface. Businesses wishing to Use Bid To Grow only need to create a User Account. Producers/Farmers wishing to place quotes in Bid To Grow, will do so through their Vendor’s Admin Dashboard. a. To get started, login to the User account. b. Under “Welcome User”, Select “My Account”. c. This will bring you to your User Account management screen which will look like this: 8. d. Down the right side of this screen is the User Navigation Sidebar. We’ll go over these briefly. 1.) The first selection allows you to change your password. Your password can be changed as often as you like. If you place your account in an inactive status and reactivate it at a later time, you will be asked to change your password. 2.) This selection allows you to update your profile information. 3.) This is where you can track your orders and review past orders. 4.) Account Balance allows you to check the balance of any Store Credit or Gift Certificates you may have in the system. As purchases are made and you enter a credit/certificate control number, the amount of purchase is deducted from the available balance of the credit/certificate control number used. 5.) Store Credit History shows the purchases that you have made using Store Credit/Gift Certificates. This provides you with checks and balances to track your account usage. 6.) This is where you track payment for items you may have returned to a vendor/producer. 7.) Create New Contract Bid Request is where businesses/schools, etc place contracts for bid. We will cover this menu item in more detail later. 8.) Bid Waiting for Responses (0) is a list organized but date/time placed, of Contracts that have yet to have a Bid Quote placed. This allows you to monitor Contracts that have no bids so that they can be re‐
listed or sourced in another way. 9.) Bid Responses for Approval (2) shows you the bid quotes that have been made on the contract listed with the most recent one on top. 10.) My Running Contract Bids (0) is… 11.) My Contract History (0) is a list of all of the contracts you have awarded to Farmers/Producers. 12.) My Old Contract Bid Requests (0)is a list of all the Bids you have had on the Contracts you have listed. This is a valuable bit of information because if you have a Farmer/Producer that cannot for some reason fulfill your contract, you can go to the next bidder and offer them the contract. You may also choose to re‐list the contract, based on time and circumstance, you may simply wish to relist the contract. 13.) At the very bottom is Messages from Admin, this is where the Admin will send you notifications. 9. 2. Bid To Grow: a. In this section we will take a deeper look into each of the Bid To Grow menu items on the User Navigation Sidebar. There are 6 items pertaining to Bid To Grow. These items are designed to help you manage your contracts and bids submitted to service those contracts. b. The bottom six items on the User Navigation Sidebar are dedicated to Bid To Grow operations. c. The first menu item is “Create New Contract Bid Request”. Selecting this item will take you to the contract description screen as seen below 10. d. The contract name and number are automatically generated by the system. In the description box, enter the description of the contract. This should contain a description of the product/produce, the quantity required, the frequency or “deliver by date” of delivery, and any other pertinent information or disclosures to help the producer/farmer make a fair bid. e. The contract can be listed in one of two modes, Recurring or One Time. Recurring contracts are typically used by restaurants, schools, elder residences, etc that require deliveries on a regular basis. f. Select the Recurring radio button and the frequency options appear. The contract duration can be set to either yearly or monthly. If Monthly is selected, the second box will allow you to select the number of months desired. If yearly is selected, then the second box will display 1 Year. A contract’s maximum duration is 1 year and may either be renewed between parties or re‐listed on Bid To Grow. 11. g. Under Duration is Frequency. If Monthly is selected then the frequency options are Weekly or Daily. If yearly is selected then the Frequency options are Monthly, Weekly or Daily. h. The Start Date and Expiration Date are the dates that you want the contract listed for bids. The default is 30 days, but you may set whatever time period suits your needs. Click on the calendar to open it and click the date desired. The contract start and end dates should be listed in the Contract Description. i. Once you are satisfied that you have all the information you want in the contract, select “Send Bid Request To All Farmers”. You will see this warning message: Select “OK” to continue and submit your contract bid request. All farmer/producers in the system will receive a notice that a new bid request has been posted, so bids can be placed immediately. Once you have selected “OK” you will see the “Success” notice on your account page: j. Farmer/producers will get this email, (you will also if you have a vendor/farmer account): 12. k. Sample Farmer/Business agreement and text box content: Sample Agreement (Farmer) I _________________________ from ________________Farm agree to provide clean quality produce by the dates specified in the contract. I declare my farming methods to be accurate and up to date in my profile. I understand that my product and farm are subject to a rating system set up my MyFarmersMkt.com. As farming can sometimes be unpredictable I agree to keep my buyer up to date on timing and maturity within reasonable time to repost the contract or find equal replacement through the online market. Sample Agreement (Business) I ___________________________from ___________________ agree that upon accepting a bid from a farmer will pay the agreed upon price in the increments and at the time specified in the contract as listed. I expect to get quality produce grown according to description included in said farmer’s profile. I understand that farming can be unpredictable and am will to be flexible by accepting new bids or filling the void by purchasing from the online market section of MyFarmersMkt.com. Specifics of the contract should be listed in the text section of the Request For Bids. This should include as a minimum: Delivery time of day, payment break down, specific farming method, and anything not covered in the list section of the contract area. j. All that’s left is to approve a winning bid and manage the contract. 2. Now that you have a contract posted, you will see it listed in the “Bids Waiting For Response” on the Navigation Sidebar as indicated by the number 1 in parenthesis. If you select this it will show you all contracts you have posted that do not have any bids made. a. The example above shows the contract that we just listed. As long as no one has entered a bid on this contract it can be edited or deleted by selecting that option to the right of the contract. If you edit the contract, the system generates a notification email and sends it to all the farmers/producers in the system. If you choose to delete the contract, be careful because once a contract is deleted, it cannot be undone. 13. 3. The next item on the User Navigation Sidebar is Bid Responses For Approval. Selecting this will display all of the Bids you have received for contracts listed. 14. a. If you select Approve, a window will open and ask if you are sure. Select “Yes” to approve bid or “Cancel” to return to the Awaiting Approval screen. You should only Approve Bids, once the listing date has expired. b. contract: By selecting “View”, you will be able to see the full content of the bid placed for the listed 15. c. From this screen you be able to navigate back to the listing page, Approve and inform the winning bidder, or print the page. Printing the page will give you a paper copy to retain in your files which is highly recommended. Again, approvals shall not be granted until the listing period has expired. 3. My Running Contract Bids is where you track the status of the bids you have selected to contract with. a. When you select this item you will see the following screen: b. On this screen you can cancel or view the contract. This should occur only in extreme circumstances on the part of either the contract originator or farmer/producer. The cancellation must be mutually agreed upon. c. You may also view the contract. This will bring up a printable screen for you to review. 16. Appendix 1. Photoscape Tutorial 1. After installing Photoscape, open the program. Select “Edit” from the menu. On the left hand side, find the folder that holds your images. Click once on the image to open it . On the tabbed bar under the edit window, select “Crop”. Click and drag a box over the image. Once you release the click, you can drag the little boxes on the outside edge of the crop area to increase or decrease the size of the box. Once you have the box where you want it, select the “Crop” button to cut away the un‐wanted part of the photo. If it doesn’t come out the way you like, click “Undo” on the right side of the screen to start over. Square images are represented the best on the website, so try to keep your image crop as square as you can. 2. Photoscape uses a circular menu as you can see. There are many features of this program worth exploring and I encourage you to do so. Originals of all photos that you manipulate are stored in a folder called “originals” so if you goof something up, you can restore your original photograph and start over. 17. 3. Once you have cropped your image, select the “Home” tab beneath the edit window. In the center of the Home tab area you will see the “Resize” button, select it. In the window that opens put the size you want in the “width” block. For small images that would be 183, for big images that would be 283. Then select “OK”. Then select “Save” on the right side of the screen, and then “Save As” on the screen that pops up. Give the file a new name, select JPEG as the format or file type, and then click “Save”. Repeat this process until you have an original, small and big copy of each of the products you are selling. 4. You can also add text to your images by selecting the “Object” tab and the “T” icon on the left side of that tab. Bear in mind use of color combinations to keep the text readable and professional looking and the size of the text doesn’t over take the view of your products. 18.