1
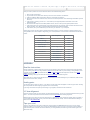
10/24/12 2:11 PM
Troubleshooting Your Thing-O-Matic
This troubleshooting page is for the MakerBot Thing-O-Matic. For help with
The Replicator, go to The Replicator Troubleshooting page on MakerBot.com
Table of Contents
This troubleshooting page is for the MakerBot Thing-O-Matic. For help with The Replicator, go to The Replicator Troubleshooting
page on MakerBot.com
Basic Rules
TESTING
Here is the basic method for testing your bot to make sure that you're OK to print.
ASSEMBLY
Read the instructions.
Sanding parts.
X/Y Axes Alignment
Tape your nuts!
ELECTRONICS/FIRMWARE
"I'm having trouble connecting to my Motherboard. I continue to get the 'Null version reported!' error."
Connect to the Internet while using ReplicatorG right before updating board firmware
Calibrate your Stepper Driver Boards
"My Thermocouple / Heater Board Thermistor reads '1024'"
No matter what I do, I cannot get my Power Supply Unit to turn on!
SOFTWARE / REPLICATORG
"Where do I get the software I need to run my bot/slice my models?"
"What software can I use to create models?"
Where can I get models?
"I'm uploading a model to my SD card — why is this taking so long?"
"My copy of ReplicatorG is not behaving as described elsewhere in the wiki — cannot generate G-code or gives file access errors."
PRINTING
I just started my first print, and my toolhead started printing above the platform!
One of my Thing-O-Matic's X, Y, or Z axes is moving twice as far as I want it to!
My model will not stick to the platform
The corners of the raft curl up, or the part curls.
I've set my z-height, but I'm tearing up my platform
I tore up my Automated Build Platform belt or it's really warped from printing so many awesome things!
How do I change my filament?
Extrusion problems
Software and firmware problems
General printing problems
Basic Rules
1.
2.
3.
4.
Don't panic. Nothing is ever FUBAR.
Sleep on it. Frustration will only compound mistakes.
Persistence and patience debugs all things.
You are not alone. Others can help you.
TESTING
Here is the basic method for testing your bot to make sure that you're OK to
print.
1. Turn on the PSU.
2. Connect in ReplicatorG
You should see a message like this:
[17:12:00] Motherboard firmware v2.8 ( Thing-O-Matic )
[17:12:00] Toolhead 0: Extruder controller firmware v2.8 (Extruder)
If you see a line like this:
Toolhead 0: Not found.
Make sure the toolhead is connected, the power supply is plugged in and turned on, and the power switch
Then you have a problem. Go to the electronics section for troubleshooting advice.
1.
2.
3.
4.
5.
6.
7.
8.
Open up the Control panel.
Jog the axes around; make sure that they move the correct direction and distance.
Test the endstops. Make sure that they stop the correct axis and direction.
Now let's move on to the extruder. First, look at the current temperature. Is this something reasonable? (around
20-30 C)?
If this is OK, try heating your hot end — enter 225 as your target temperature and watch to see if the
temperature rises.
Do these last two steps for the heated platform as well, but use 120 as your target temperature there.
If this is all working, do a test extrusion at the proper speed for your extruder. This should be 255 for DC motorbased extruders, and 1.98 for a stepper-based extruder like the Stepstruder MK6.
If this works, then you've tested all of your axes and your extruder — try a test print!
Another way to verify if a part is good is to test the electrical circuitry. This only works for a handful of parts on the
Thing-O-Matic, but it can be helpful in diagnosing your current problems. You will need a multimeter to test the below
values:
Component
Sub-Component
Resistance (Ω)
Wires
≈ 0.02
Heater Cartridge
≈ 3-5
Thermostat (Room Temp.)
≈ 0.02
Thermocouple
≈ 20-22
NEMA Motors
Heater Board
Red to Gray Leads
≈ 30
Green to Yellow Leads
≈ 30
+12V to HEAT Pins
≈2
SIG to 5V Pins
≈ 4.6k
5V to GND Pins
≈ 115k
SIG to GND Pins
≈ 115k
MOT to MOTOR - Pins
≈ 0.02
ASSEMBLY
Read the instructions.
Having trouble with a certain step? Do you think you are missing a part? Take care to check which build instructions
you are reading. Start here for Thing-O-Matic or here for the Cupcake CNC. If you're building a Thing-O-Matic, make
sure that you're building the right Plastruder for your bot, MK5 or MK6 and also keep track of which of the X-axis
options you've chosen.
Is there something missing in the instructions? Drop us a message to update the guide.
Quick test: did you notice that the left side of the Y-axis doesn't use linear bearings? If you missed that, read over the
instructions one more time, carefully.
Sanding parts.
You shouldn't have to force any parts — ever. When in doubt, grab some sandpaper or a file and get to work. Usually,
just a few passes will make things go together much more smoothly.
If you begin to wonder if the parts you're working on go together, double-check the instructions.
X/Y Axes Alignment
Check to make sure that you have aligned your Self-Aligning Bearings. The X- and Y-axes should slide with only a little
effort — it's best if they slide when the bot is tilted. Check out this video about bearing alignment.
Belts should not have slack, but they also shouldn't be so tight that you can't press them together with your fingers. If
your X-stage belt is too tight, you may need to slit the belt between the clamps. There's a demonstration starting at
about 2:07 in this youtube video.
Tape your nuts!
This is an old chestnut for the T-slot construction used throughout the MakerBot kits: tape in the m3 nuts. This is
especially useful if you think that you're going to be disassembling part of your bot. For example, it's almost always a
good idea to tape the nuts that hold on the bottom of your Thing-O-Matic, because it's good to be able to get to the
electronics easily.
10/24/12 2:11 PM
ELECTRONICS/FIRMWARE
"I'm having trouble connecting to my Motherboard. I continue to get the 'Null
version reported!' error."
Most communication errors can be solved by repatching power and data connections and making sure you are using
the latest firmware for both Motherboard Stack and Extruder Controller.
Some customers find they have more luck connecting to their MakerBot control boards by downloading the FTDI
drivers directly from the manufacturer. (Particularly customers running Windows XP.)
Connect to the Internet while using ReplicatorG right before updating board
firmware
ReplicatorG needs to connect to the Internet to download the latest firmware for uploading to your bot. Don't skip over
the Thing-O-Matic Firmware Installation section of the instructions — you want to make sure that your control boards
are already running the latest firmware before you attach them to your MakerBot.
Calibrate your Stepper Driver Boards
The Thing-O-Matic Calibration stage has a number of important features, not the least of which are instructions how to
use a multimeter to tune the REF settings of your Stepper Driver Boards. Should you overlook this stage, your stepper
motors will run using undesired settings (you may notice loud "struggling" noise or other sounds) that at worst can
overheat to create damage to themselves, the operator, or the bot as a whole.
"My Thermocouple / Heater Board Thermistor reads '1024'"
1024 is a built in error message coded into the toolhead firmware that means "this sensor is not connected correctly."
First thing to check is whether your thermocouple/thermistor is patched correctly into your Extruder Controller (check
the Electronics Installation page) for cable routing diagrams). The Heater Board plug can easily be pulled out of the A6
port of a Gen4 Extruder Controller when closing your bot — check carefully for that one!
Once you have your boards correctly re-patched, make sure to reset the boards and close and re-open ReplicatorG
before testing again for a 1024 message. In particular, the thermistor will always return 1024 until the toolhead is
*booted* with the thermistor plugged into port A6 the correct way!
No matter what I do, I cannot get my Power Supply Unit to turn on!
Check the brand of power supply included with your kit. If you have a Sparkle or a Coolermaster, then you will need to
make sure that a jumper is soldered across two of the pins on the back of your MakerBot Motherboard so that the
board provides a strong enough voltage trigger back to the PSU to kick it into life. The details are listed here.
SOFTWARE / REPLICATORG
"Where do I get the software I need to run my bot/slice my models?"
We use ReplicatorG as the application to control your MakerBot. Included within this software are the Skeinforge
scripts that you will use to translate your STL model into a linear toolpath for printing, written as G-code.
"What software can I use to create models?"
You need a solid, manifold (“watertight”) STL-formatted file for importing into ReplicatorG. Many if not all solid CAD
tools offer an .STL export option. If your tool doesn't offer this, then you can search for 3rd party export plugins or use
MeshLab and similar 3D swiss army knife tools to open and convert dozens of file formats into an STL file.
For design software, start here. There are a host of powerful free and open source design tools available. Favorites
include 3dtin.com, Sketchup, OpenSCAD, Wings3D, and Blender. We have heard about but not experimented much
with FreeCAD, HeeksCAD, POVray and Art of Illusion — apps that have serious fans in the 3D printing world.
For commercial solid CAD apps: Rhino, Autodesk Autocad and Inventor, Creo, and SolidWorks are expensive industry
standard options, while Alibre Personal Edition, Cheetah, and bonzai3D are more affordable (but capable)
modeling/CAD tools.
Where can I get models?
There are a number of places online that allow you to search for and download printable models. The best option is to
visit Thingiverse.com where MakerBot Operators share and download MakerBot printable objects as well as other
projects, models, and files.
"I'm uploading a model to my SD card — why is this taking so long?"
The data transfer speed to your bot's SD card is infernally slow. This is why most of us at the BotCave will go ahead
and eject the SD card from the bot and copy the .s3g files for printing directly from a computer. How you do this is to
generate the G-code for your print, double-check that the z-height maximum in the Homing section of the G-code is
10/24/12 2:11 PM
correct, and then click the button "Build to File."
The resulting .s3g file can be dragged from wherever you have saved it directly to your SD card attached to your
computer. Then eject the SD card, re-insert it into your bot, and use the ReplicatorG command "Build from SD card" to
print your item.
It might help to create an S3G folder on your computer so that you can quickly load your favorite models to your SD
card for using the "Build from SD Card" button or selecting with your Gen4 Interface Board Kit.
"My copy of ReplicatorG is not behaving as described elsewhere in the wiki —
cannot generate G-code or gives file access errors."
Are you running the application from a disk image (mac) or unextracted zip file (pc)? Investigate how you can create a
local copy of the entire contents of the ReplicatorG file, not just the ReplicatorG.app or executable file. The other
folders include the drivers, example files, and other references that you will need to print and tune your bot.
PRINTING
I just started my first print, and my toolhead started printing above the
platform!
You've skipped a very important step: setting your Z-height. Make sure to measure your bot's Z-height with a script,
and then insert it into the line like this in the proper start.gcode:
G92 Z80 ( ---=== Set Z axis maximum ===--- )
Change Z80 to ZWhatever you measured. If you don't want to add that to the start.gcode, you can also add that into
your gcode for each item you print. [WHERE?] Either way works.
One of my Thing-O-Matic's X, Y, or Z axes is moving twice as far as I want it
to!
It sounds like one of your stepper driver boards might have switched to 1/4 stepping from our default 1/8 stepping. If
your bot is brand new, get in touch with us about this. If it's been in service for awhile (more than a month of printing)
then your board may have been damaged by static electricrity or hard use, and we won't be able to send you a free
replacement. However, all is not lost: you can adjust your configuration and you'll be back up and running.
Open the thingomatic.xml file in the "machines" folder in replicatorg. Find the entry for the driver that you're using. That
will look something like this:
<name>Thingomatic w/ ABP and Stepstruder MK6</name>
Now let's make one small change to the line in question for the affected axis. For example if it's your X axis, it'll be this
line:
<axis id="x" length="106" maxfeedrate="4000" stepspermm="47.069852" endstops="min"/>
<!-- Pulley dia:
In this case, we're going to cut that stepspermm number in half, changing it from 47.069852 to 23.534926. If this were
the Z-axis, the numbers would be slightly different, but you'd still divide it in half.
My model will not stick to the platform
No problem! Most likely your Z-height is just a bit too high. Once again find this line in your start.gcode:
G92 Z80 ( ---=== Set Z axis maximum ===--- )
And then increase it by about .2 mm. You can also do this in the gcode you've generated for printing — this is actually
a good way to test. Keep in mind that the MakerBot's lasercut plywood will change shape just slightly with temperature
and humidity conditions.
The corners of the raft curl up, or the part curls.
When building on a raft, the first line segment is the most critical point of time during the build. If the first line segment
adheres nicely to the build area, you're pretty much guaranteed that the rest of the build will go smoothly (if your object
is buildable). On larger parts, if the first and last segments of the raft are too loose, the part will warp and peel off much
sooner than if they were flatter.
To control this, you'll need to readjust your Z-height. This is how to do it on a Thing-O-Matic.
10/24/12 2:11 PM
On a Cupcake, you can adjust the Z stage height while it is building the raft to fine tune it and get it exactly right. Do
this by turning the Z pulley or moving the Z belt (or build a crank or knobfor
this).
In this image, note from the left)
The second and third loops are way too loose, and are nearly lifting off
the build platform already; If the entire part is built this way, it may slip
off the platform during build, or warp and peel off, or the first few layers
may be too loose and not adhere to each other.
The next several loops are too flat and are overlapping; if things are left
this way too long the pressure in the nozzle will build up and the
filament will strip and jam. Even if it doesn't jam, a raft this thin will be
difficult to remove from the platform.
The loops on the right are just about perfect — somewhat flattened, but
not overlapping.
Working without a raft
Curl is tricky, says Emmett in a forum post, and gives these suggestions. A heated build platform (HBP) will be a help.
If the plastic is curling off of the build platform,
Make sure the build platform is as level and sticky as possible (kapton tape makes a great surface, especially if
cleaned with rubbing alcohol).
It can help to blow on the print for the first few layers; it can help break the warpage cycle. You shouldn't have to
[blow] any more once the corners have stopped curling.
Failing that, you might need to change the temp settings of your nozzle and HBP.
Foxdewayne adds
You are probably not smashing your first layer down onto the platform hard enough. You want a nice wide
extrusion. (However, making it too thin and flat causes other issues as mentioned above)
Another thing you can try is to sand your platform so that it is rough.
I highly recommend that you get a heated bed and you will have little trouble with curling, and wont even need a
raft.
For more answers, check the forum.
I've set my z-height, but I'm tearing up my platform
OK, no problem! Just reduce that number by .2 or .3mm, the opposite of the above item.
I tore up my Automated Build Platform belt or it's really warped from printing
so many awesome things!
Don't worry! You can get replacements in the store or you can make your own belt like this or this.
How do I change my filament?
To remove the current filament and start a new filament feed, first heat the chamber of the hotend to 220 degrees
Celsius so that you can easily pull the filament back out of the chamber. If you have just completed a print, the
chamber might be warm enough for quick removal, otherwise open the Control Panel to manually set the hotend to 220
- 225 degrees Celsius.
Additionally, for 3mm MK5 and MK6 toolheads, you will want to loosen the bolt pressing the Delrin plunger against the
filament. The MK6 toolhead with 1.75mm plates does not have a plunger.
Pull out the filament by hand or set the extruder motor to reverse to advance the filament back out of the thermal
chamber. Next, insert the new filament and drive it forward into the thermal chamber, pre-heated to 225 degrees
Celsius.
If you are changing colors, it might be a good practice to print a noodle of filament for long enough for the color to shift
from previous color to the new color.
Extrusion problems
The plastic isn't going into the extruder. I can hear the motor turning, but nothing comes out!
See Flossing Teeth
Burning Plastic
Insane plastruder controller
Plastruder temperature is not stable or not heating
Misadjusted Idler Wheel Tension
Filament Slipping Off Idler Wheel
Software and firmware problems
10/24/12 2:11 PM
Unable to program v1.1/v1.2 motherboard
Firmware Compilation Errors
General printing problems
Printing Pause (But extruder keeps Extruding)
Extrusion Stops (But Build Surface keeps Moving)
10/24/12 4:59 PM
Troubleshooting
MakerBot Industries Thing-O-Matic 3D Printer » Thing-O-Matic Assembly Instructions / User Manual » Troubleshooting
Table of Contents
Stepper Motion
My axes won't move!
There's a grinding noise when my axes move/I'm losing steps!
Automated Build Platform
I can turn the belt on from the control panel, but the belt doesn't move when I turn on the build platform heater (or the belt turns
on and off intermittently)
Where to Get Help
Stepper Motion
My axes won't move!
1. Shut down ReplicatorG and turn off power to the bot.
2. Try moving the problematic axis by hand. (If it's the Z axis, turn the screw by hand.) It should move without too
much force being applied. If it doesn't:
1. check that your belt isn't super-tight.
2. apply machine oil to the bearing rods on that axis.
3. try wiggling the platform to align the bearings. See the "align the bearings" section of the body assembly
page.
3. If the axis moves freely, then:
1. check that your stepper motor for that axis is plugged into a stepper controller
2. check that there is a power connector plugged into the stepper controller
3. check that there is a 6-pin ribbon cable connected from the stepper controller to the appropriate socket on
the motherboard
You may want to try swapping cables with another axis to make sure your cable is good.
4. If you're still having trouble, see the next item.
There's a grinding noise when my axes move/I'm losing steps!
1. Shut down ReplicatorG and turn off power to the machine.
2. Try oiling and aligning the bearings, as in the previous item.
3. Try increasing the power on the offending axis by following the directions on the calibration page.
Automated Build Platform
I can turn the belt on from the control panel, but the belt doesn't move when I turn on
the build platform heater (or the belt turns on and off intermittently)
The most likely cause is that you've hooked up your heated build platform backwards. See the heated build platform
heater section of the electronics installation document for an illustration of the correct connections.
Where to Get Help
There are a few different places where people can help you out.
The Thing-O-Matic support forum is a good place to start, or you can email [email protected] if you need
immediate, personalized help.
10/24/12 5:18 PM
Flossing Teeth
Troubleshooting Your Thing-O-Matic » Flossing Teeth
The plastic isn't going into the extruder. I can hear the motor turning, but nothing comes out!
Sometimes after some printing, the teeth of the extruder pulley inside Plastruder accumulate some plastic. This
prevents the pulley from gripping the plastic filament and pushing it into the heater barrel.
Problems elsewhere in the plastruder can cause the filament to jam, which then increases the pressure until the
extruder pulley strips the filament. This is the most common way plastic accumulates. Once this happens, future
stripping can be caused by the accumulated plastic itself.
To repair this issue follow these steps:
1. Move the Z-axis platform as high as it will go so the Plastruder sticks out the top.
2. If the circuit board is mounted in front of the Plastruder remove it but don't disconnect the wires. You can safely
re-mount it to the left and this allows you to see the Idler wheel.
3. If you have the fourth screw attaching your motor to the Plastruder, you must disassemble the Plastruder. Don't
use that screw when you reassemble the Plastruder. Make sure during reassembly that you are careful not to
over-tighten the hex nuts and crack any acrylic components.
4. Otherwise turn on heater element to 240 (220 may work too) and set the motor to reverse to back out the
filament. Set temperature back to zero. Cut off and discard the mangled filament.
5. Unscrew the idler wheel and move it to the left. The extruder pulley isn't blocked by the idler wheel or filament.
6. Unscrew the motor.
7. Check to make sure the extruder pulley really is free, as you can easily pull it apart if it is not.
8. Remove the motor and place it on the z stage. You shouldn't have to disconnect it even.
9. Use a pin, a small pointed knife, dental pick, or other fine object to clean the extruder pulley.
10. Re-insert motor, and fasten.
11. Use rod to reposition idler wheel.
12. Turn up temperature to 240.
13. Set motor to run forward
14. Insert filament
10/25/12 9:16 AM
Burning Plastic
Troubleshooting Your Thing-O-Matic » Burning Plastic
If the ABS plastic burns inside the Plastruder, it can create an oxidized ABS plastic byproduct that will occlude the
Plastruder print head. This is difficult to repair, and can be caused by setting the temperature of your Plastruder too
high.
The ideal temperature for melting ABS plastic is around 220 degrees-C.
Avoidance
To avoid this condition:
Every time you remove the ceramic tape, visually inspect your nozzle and make sure the thermistor is well placed and
not peeling off.
Validate that your thermocouple works. You should see the thermocouple reading change soon after turning on the
heating element. Be suspicious if your thermocouple reading does not change.
Don't set the target temperature for the Plastruder higher than 225.
Hypothetically, the ABS plastic could get scorched if the plastic filament feed gets stuck, and the same chunk of plastic
heats in the print head for too long a time. In practice, however, we've cooked ABS plastic in the print head for
extended periods (10-20 minutes) without adverse effect. But: don't run this risk unnecessarily.
Repair
This can be fixed by totally disassembling the heater barrel and nozzle and cleaning out all plastic and other debris
from the nozzle and barrel.
And remember that if your repair doesn't go well, you can always buy separate replacement parts from the Makerbot
store.
Gentle manual cleaning
If you are lucky, You can get a large amount of the plastic out of the barrel using the heater itself. Carefully unmount
the extruder head from the drive assembly and then remove the PTFE insulator from the barrel. Place the whole
assembly on a heat resistant surface and connect it back to the plastruder controller. Carefully bring it up to
temperature to melt the plastic and then gently push a rod down the barrel (a 3mm bamboo stick for instance),
manually extruding the contents of the barrel out. This might be easier if you hold the assembly by the retainer washer
with a pliers or something.
Note that if this is easy, you probably didn't have a blockage and may not have needed to do this. If it is difficult, you
may have a blockage. If this is very difficult, this method might not get you anywhere at all.
If this doesn't seem to be getting anywhere, try removing the nozzle from the barrel. First, remove the thermistor to
prevent it from being damaged. Then put two M6 nuts on the barrel, tighten them together so they grip the barrel well.
Heat the barrel up carefully and use an M10 wrench to hold the nuts, and an M8 wrench to hold the nozzle, and
carefully unscrew the nozzle. This will become easier as the nozzle approaches the plastic's melting point, but note
that the wrench will cool the nozzle while they are in contact.
Dissolving the plastic chemically
If you use this method, you almost certainly will need to totally remove and later replace your heating element and
rebuild the entire extrusion head. Also note that most solvents are highly flamable, and you should only start this after
the parts are all cool.
Acetone and several other solvents dissolve ABS, but very slowly and only with some physical help. This may take
several hours to a day with frequent agitation and prodding. It helps if you can get most of the plastic out via a manual
method first.
More violent methods
Other more violent methods (including drilling and blow torches) are known to work but should be taken at your own
risk.
If the threads of the nozzle are clogged with plastic, use an M6 thread tap to make the threads perfect again. This
works quite well and, as long as you're careful, it should be very safe for your nozzle.
If the barrel is clogged with plastic, drilling works well to get the plastic out. Just make sure the drill is spinning fast
enough at the beginning to make sure the drill bit doesn't get stuck. Also, as long as you are careful with this method
10/25/12 9:16 AM
and TAKE THE NOZZLE OFF FIRST you should have no problems. You may have to heat the assembly up first to get
the nozzle off.
Using a blowtorch to clean the nozzle is dangerous. as the point of it is to burn all the plastic out of the nozzle. This
should not be done inside, and even if done outside, you should avoid breathing the toxic smoke.
10/24/12 5:18 PM
Insane Plastruder Controller
Troubleshooting Your Thing-O-Matic » Insane Plastruder Controller
Occasionally, the plastruder goes insane, possibly because it loses its firmware. This is characterized by messages in
ReplicatorG like "Error: Payload is not big enough." and the temperature reading in the control panel is zero even when
the thermistor has the correct resistance. Other more subtle signs may occur before this, like the control pannel
extruder stop button not exactly stopping the motor.
There are two ways to fix corrupted firmware. The hard way is to follow the Plastruder Firmware Update instructions.
You could also update your thermistor table or firmware version at the same time. The easy way is to use ReplicatorG
itself to update the firmware as follows:
Power off your cupcake and disconnect the ethernet cable from the plastruder controller
Connect the usb-ttl cable directly to the plastruder controller
In ReplicatorG, choose Machine—>Upload new Firmware
choose Extruder Controller and click Next
Choose the version of the firmware you want to load from the list
Choose the serial port
You may need to mess with the reset sequence, same as listed in the (hard) firmware update procedure above.
If ReplicatorG fails to load the firmware, and the reset sequence doesn't help, you may have to reload the bootloader
too with the programing cable included in the delux kit.
also it's a good idea to switch to using shielded cat5e cable to help keep the firmware from becoming corrupted in the
first place.
10/25/12 9:19 AM
Plastruder Temperature Is Not Stable Or Not Heating
Troubleshooting Your Thing-O-Matic » Plastruder Temperature Is Not Stable Or Not Heating
Signs of this could be subtle, but the most obvious is that immediately after aborting a build due to a stalled extruder,
the temperature in control panel is much lower than it should be for the cooling time between abort and opening the
panel. The wires on your nozzle may be damaged. To test this, turn off the system and measure both the thermistor
and the nicrhome heater.
The heater can be measured easily without disconnecting it. Turn off the machine, and measure the voltage across the
nicrhome terminals. (It should be zero with the machine off, but there may be some residual voltage for a short while.)
If the voltage is zero, switch to resistance, and check if the nichrome measures around 6-8 ohms, as it did when it was
built. (You can also disconnect the wires and measure it, which may be a bit safer.) After you've initially measured,
gently wiggle the wires from the loose ends to the nozzle and make sure that the reading doesn't fluctuate. If the
resistance jumps higher, you have a intermittent connection somewhere. As the nichrome doesn't solder, the joint
between the wires and the nichrome is a likely spot. If the resistance drops lower, the insulation has probably flaked off
the nichrome and it is shorting against itself or the heater barrel. Either problem will require a rebuild of the heating
element.
The easiest way to test the thermistor is to check the control panel with the power on. Check if the temperature reading
is reasonable. If the nozzle is cool, heat the thermistor directly with your finger (not on a hot nozzle!!) and see if you
can get the temperature to change by a degree or so. Gently wiggle the wires and see if the temperature jumps. If it
does, you have an intermittent connection somewhere.
If the thermistor temperature is not reasonable, with the machine off, disconnect the wires for the thermistor and check
the resistance directly. A room temperature nozzle should be 90k-110k ohms. If it reads as open circuit or short circuit,
your thermistor could be damaged or the leads to it touching, etc. If it looks ok when measured directly but wrong in the
control panel, your extruder controller might be damaged or insane — try reflashing it. (See Insane Plastruder
Controller.)
10/24/12 5:19 PM
Misadjusted Idler Wheel Tension
Troubleshooting Your Thing-O-Matic » Misadjusted Idler Wheel Tension
It's easy to get the tension in the Idler Wheel wrong. If the Idler Wheel is too loose, the drive pulley won't grab and push
the filament.
We had difficulty with our Idler Wheel tension because we tried to adjust the tension after fully assembling our
Plastruder, with the Plastruder electronics in place. It turns out that it's hard to get a wrench in the right place if the
Plastruder is fully assembled. Instead, it was useful to adjust the Idler Wheel tension with the Plastruder on a benchtop,
with the electronics off to the side.
Initially, our team was concerned that making the Idler Wheel too tight might be problematic. We found that we were
able to fix the Idler Wheel at its closes position to the drive pulley, and everything worked great. The plastic filament
was crushed between the pulley and idler wheel, but this turned out to be a good thing. The pulley applied good,
constant pressure to the filament.
One word to the wise: do be careful when tightening down the nuts holding the Idler Wheel in place: acrylic cracks
easily under pressure. Using washers to properly fill the space along the Idler Wheel bearing is crucial to having a snug
fit without breaking the acrylic.
10/24/12 5:15 PM
Filament Slipping Off Idler Wheel
Troubleshooting Your Thing-O-Matic » Filament Slipping Off Idler Wheel
On one Plastruder, we observed the plastic filament slipping to the side of the Idler Wheel. The filament would then be
pushed against the wall of the Plastruder, where it would jam.
Some customers were able to adjust the position of the Idler Wheel by moving washers from one side of the wheel to
the other. However, my team resolved this problem by taking two Idler Wheels and super-gluing them together,
creating a two-panel-thick Idler Wheel. This Idler Wheel was easier to position and worked perfectly the first time. Note:
we don't recommend using this technique on mk4 or later extruders! See a more detailed discussion of this technique
here:
DoubleIdlerWheelDiscussion
10/24/12 5:20 PM
Unable To Program V1 1 V1 2 Motherboard
Troubleshooting Your Thing-O-Matic » Unable To Program V1 1 V1 2 Motherboard
When you attempt to program the Sanguino-based generation 3 motherboard, you may see an error like this:
avrdude: stk500_getsync(): not in sync: resp=0x48
avrdude: stk500_disable(): protocol error, expect=0x14, resp=0x48
Due to a problem with these boards, the Sanguino does not always automatically reset itself when programming
begins. To get around this, you'll have to reset the Sanguino manually when programming. It can be a little tricky to get
right; you'll need to reset it just as it begins programming the chip. Since the Arduino environment recompiles
everything from scratch every time you try to program a chip, this means you'll have to wait about two or three seconds
after hitting the build button, and then hit the motherboard's reset button. It will probably take a few tries to get this
right.
If you're running the Arduino software from a console, you'll usually see a message like this:
Binary sketch size: 13180 bytes (of a 63488 byte maximum)
after hitting the build button in the Arduino software. This indicates that the build is done; when you see this message
you should hit the motherboard's reset button.
10/24/12 5:16 PM
Firmware Compilation Errors
Troubleshooting Your Thing-O-Matic » Firmware Compilation Errors
When I first attempted to compile the MakerBot controller software, I encountered compilation errors similar to this:
sd_raw.cpp: In function 'uint8_t sd_raw_init()':
sd_raw.cpp:165: error: 'DDRA' was not declared in this scope
sd_raw.cpp:165: error: 'DDA7' was not declared in this scope
sd_raw.cpp:166: error: 'DDA3' was not declared in this scope
sd_raw.cpp: In function 'uint8_t sd_raw_available()':
sd_raw.cpp:265: error: 'PINA' was not declared in this scope
sd_raw.cpp:265: error: 'PC7' was not declared in this scope
sd_raw.cpp: In function 'uint8_t sd_raw_locked()':
sd_raw.cpp:276: error: 'PINA' was not declared in this scope
sd_raw.cpp: In function 'uint8_t sd_raw_write(uint32_t, const uint8_t*, uint16_t)':
sd_raw.cpp:587: error: 'PINA' was not declared in this scope
It turned out that the issue was that I had downloaded and installed the Arduino development kit from http://arduino.cc
— however, the MakerBot motherboard is an Ardiuno-derived board called Sanguino. I found instructions at
http://sanguino.cc for downloading and installing some patches to the Arduino kit that enable it to support the Sanguino
hardware — and then everything compiled perfectly.
When compiling the extruder controller firmware (e.g. to drive a stepper driven extruder, you may see errors like this:
o: In function ‘vector_11’:
C:\DOCUME~1\HENRIK~1\LOKALE~1\Temp\build6615072793951871476.tmp/
Timer1.cpp:9: multiple definition of ‘vector_11’
C:\DOCUME~1\HENRIK~1\LOKALE~1\Temp\build6615072793951871476.tmp\Servo
\Servo.cpp.o:C:\Programmer\arduino-0018\libraries\Servo/Servo.cpp:103:
first defined here
This occurs with arduino-0018 and later, and a workaround (since we are not using servo motors) is to find the
following section of code (at about line 100 of Servo.cpp) and comment out the underlined portion:
#ifndef WIRING // Wiring pre-defines signal handlers so don't define
any if compiling for the Wiring platform
// Interrupt handlers for Arduino
#if defined(_useTimer1)
SIGNAL (TIMER1_COMPA_vect)
{
handle_interrupts(_timer1, &TCNT1, &OCR1A);
}
#endif
Other Compilation errors
error: stdint.h: No such file or directory
This means you are missing some core libraries required for compilation. Simply run apt-get install avr-libc to install
them.
10/24/12 5:20 PM
Printing Pause But Extruder Keeps Extruding
Troubleshooting Your Thing-O-Matic » Printing Pause But Extruder Keeps Extruding
This is commonly thought to be a communication error on the Motherboard. There a couple of methods to fix this:
Swap ethernet cables
Switch out the ethernet cable to the extruder with another one.
Better yet, use shielded cat5e cable instead.
It'll save you a lot of headache trying to figure out why everything is behaving so weirdly.
Print from an SD card
Information can run into a bottleneck thru the FTDI chip going into the Motherboard. Having the gcode loaded onto a
card in the SD slot on the Motherboard will prevent this.
Turn off the Control Panel when Printing
Having the Control Panel open when printing causes more information to be sent back and forth to the computer.
Which can slow down the info sent to the Cupcake.
Reduce EMI
Use shielded cat5e cable.
Physically separate and isolate communication wires and sensing wires from power wires and motor wires.
Twist related wires together in pairs (thermistor, motor, heater).
Add noise reduction circuitry to the motors.
Electromagnetic interference may be leaking into the communication cables. Compact fluorescent lights are rumored to
cause this. The motors themselves generate a lot of noise. Try to separate communications cables from motor cables
and other noise sources. Twist together pairs of feed wires going to the same device where possible. This helps both
the communications cables from receiving noise and the motor cables from emitting it. (i.e., twist both.) (The ethernet
cables are already constructed this way internally.)
10/24/12 5:14 PM
Extrusion Stops (But Build Surface Keeps Moving)
Troubleshooting Your Thing-O-Matic » Extrusion Stops (But Build Surface Keeps Moving)
When it stops extruding, one of a few things could be happening.
1. Heat settings or nichrome not adjusted right. Did you measure the Ohms of your nichrome? If it's too long it won't
heat the plastic up fast enough to continue printing, it will heat it up slowly so you'll get a bit of extrusion and then won't
be able to keep up with it. You may also need to increase your temperatures in the raft settings. Make sure you're
heating it up for a good 5-10 minutes before do your first print of the day. Also try running the extruder and running
plastic through it for 10-15 minutes to get everything warmed up and happy.
2. Gear and Idler wheel adjustment. At this point you'll need to floss the teeth and clean the gears in the extruder since
it will have worn a groove in the plastic. That could also be the problem you're facing. If the plastic doesn't get a good
enough grip, then it won't extrude reliably. Did you use the measuring stick to set your idler wheel?
3. Height of extrusion. It looks like your levels are just a bit too low and the build surface may be blocking the nozzle.
Print with a raft and lift up your nozzle just a small bit. I always adjust it a bit when I get started. Getting this right takes
practice.
4. Wrong version of Skeinforge. If your bot goes through the motions but nothing is extruded, check GCode > Choose
GCode Generator and try a different version of Skeinforge. Start with Standard. Click the Model tab then click the
Generate GCode button at the bottom right. If that doesn't work, move down the list to Skeinforge(40), Skeinforge(35)
and so on. Each time you try a new skeinforge, go back to the model and regenerate the GCode each time –
otherwise, you'll just be using the same old code.
10/24/12 5:19 PM
Overheating The Stepper Driver
Troubleshooting Your Thing-O-Matic » Overheating The Stepper Driver
MakerBot 000001 experienced an issue during fabrication where sometimes the X-axis stepper motor would fail to fully
complete a motion, causing the print head to be displaced, ruining fabrication. It turned out that this problem was
caused by the stepper driver chip overheating.
Jas diagnosed this failure by (first grounding herself by touching the metal power supply and then) touching the back of
the driver chip on the stepper controller board. The chip was noticeably hot to touch during operation.
We resolved this issue in two ways:
First, we adjusted the drive strength of the stepper driver by adjusting the potentiometer on the stepper driver board. It
turned out that we had the drive strength set too high, causing the overheating.
Second, we lubricated the rods of the MakerBot with a dry silicone grease, to reduce the amount of work done by the
stepper motors.
This completely resolved this issue for our MakerBot.
10/24/12 5:20 PM
Troubleshooting The Stepper Motor Drivers V2 3
Troubleshooting Your Thing-O-Matic » Troubleshooting The Stepper Motor Drivers V2 3
Symptom: Your stepper motors are unresponsive. When you go into the control panel, one or more of them do not
respond.
1. Restart ReplicatorG. Make sure that it indicates that it has connected to the bot.
2. Open the control panel and press then "enable steppers" and "disable steppers" buttons. Watch the stepper
drivers. If green and red lights turn on when you press "enable" and off when you press "disable", the problem is
probably related to the endstops.
1. If you are using the v2 firmware or later, open the "Machine>Onboard Preferences" menu. Select the
correct endstop type (or "No endstops") for your machine. Click "commit", and then reset your bot.
2. Make sure that the endstops on the axis you're using are not triggered.
3. If the lights do not light up, the problem may be related to the connection between the motherboard and the
stepper driver.
1. Visually examine your cords and cables. Are plugs are attached and seated snugly? Each Stepper Driver
should be connected from the socket marked INTERFACE on the Stepper Motor Driver board to the
sockets on the Motherboard labeled X AXIS,Y AXIS, and Z AXIS respectively with a rainbow ribbon cable.
The Power cords from the corresponding axis' motor should be connected to the socket on each board
labeled ABCD. And the main power from the PSU should be connected from the large narrow socket with
"Stepper Motor Driver" written above it.
2. Examine the rainbow ribbon cables, power cords, and motor cables.
Are the connectors on both ends attached the same way? When you hold the connector on either
end with the alignment tab facing up, are the colors on the cable in the same sequence?
Do they seem damaged, or are the heads loose?
Is there any visible wear, exposed/melted wiring, or discoloration around the plugs heads?
The number one problem people have with stepper motor response is they have either put their
rainbow cables together wrong or they look right but there are connections missing. Replacing the
rainbow cables solves most problems.
4. Start alternating the connections on the Stepper Motor Board. If you have one axis which is giving you trouble,
try switching in the cables and cords from an axis that is working, and try triggering the stepper Motor with those
parts connected. Continue alternating the available cables until you identify in what combination the part fails.
This process of elimination can help identify a bad cable, motor, or board in not much time.
5. Visually inspect the Stepper Motor Driver PCB. Remove the attached cords and cables, loosen and remove the
hex nuts. Once you can take the board off the botcase, look at it under some bright light. If you have a
magnifying glass or loop, get it and start examining the boards. Look for solder bridges, discolorations, missing
or broken solder joints, burnt chips, or any other visible abnormality. Examine the SMD solder joints on the pins
of the chips for solder bridges.
6. If you see any unsoldered joints, you can try soldering them yourself. If you see joints that look strange or
discolored, too small or uneven, that could be a problem. Carefully reheat and melt the solder, or add more
solder to close any gaps. You may want to push the item you are soldering to seat it better while you solder the
joint on the other side.
This is a known problem and an unfortunate consequence of soldering, sometimes solderjoints fail or
there are "bridges." Finding and fixing solder joints and bridges has saved many boards from the garbage
pile!
7. Try upgrading the firmware to the latest version, if you haven't already.
10/24/12 5:18 PM
Lube Rods And Adjust Stepper Driver Trimpots
Troubleshooting Your Thing-O-Matic » Lube Rods And Adjust Stepper Driver Trimpots
Overheating the Stepper Driver
MakerBot 000001 experienced an issue during fabrication where sometimes the X-axis stepper motor would fail to fully
complete a motion, causing the print head to be displaced, ruining fabrication. It turned out that this problem was
caused by the stepper driver chip overheating.
Jas diagnosed this failure by (first grounding herself by touching the metal power supply and then) touching the back of
the driver chip on the stepper controller board. The chip was noticeably hot to touch during operation.
We resolved this issue in two ways:
First, we adjusted the drive strength of the stepper driver by adjusting the potentiometer on the stepper driver
board. It turned out that we had the drive strength set too high, causing the overheating.
NOTE from Bre: I found that the optimal position for my trimpot is just past the center of it's travel. So if you find the
middle and call that 12 o'clock, go to between 1 and 2 o'clock and start there.
Second, we lubricated the rods of the MakerBot with a dry silicone grease, to reduce the amount of work done
by the stepper motors.
NOTE from Bre: Lubrication is one of the main causes of frustration. You can also use 3 in 1 oil. Be warned that if you
travel with your MakerBot in the USA, the TSA will take your bottle of 3 in 1 oil. Luckily it is available at most drug
stores.
This completely resolved this issue for our MakerBot.
10/24/12 5:19 PM
Maintenance and Upkeep
Keep your Bot Running
The Thing-O-Matic does not require much maintenance. Once you have it built and running, it will provide you with
many hours of hands-off printing. However, some of the Thing-O-Matic's mechanical parts, especially the ones in
constant movement, are subject to wear and should be tuned from time to time. The following list are things you should
be mindful of while using your machine.
Belt Tension
If the belts curve down and the sides flatten, they are likely too loose.
Symptoms of loose belts may include skipped steps, 'backlash' (see below), or infill that doesn't reach a printed object's
inner shell surface.
When the motor switches directions, there is a certain amount of movement it must do in order to pick up the slack on
the other side before it can actually move the axis. This 'backlash' causes the constructed part to be inaccurate.
For more information on tightening belts, see the proper belt tensioning page.
Keep X,Y, and Z Rods Lubricated
If your machine is very loud and seems to vibrate a lot when moving, you probably need to lubricate the rods.
All three Thing-O-Matic axes rely on 3/8" diameter precision rods to ensure smooth linear travel without any wobbling.
Adding lubrication will clean the rods, reduce friction and minimize long-term wear on the bushings as they slide along
these rods.
Grab a clean rag, apply some lubricant to the rag, and run the rag up and down each rod.
Tighten Your Bolts
The bolts on your machine can vibrate loose over time. This is particularly true on the X, Y, and Z axes. Loose bolts
can lead to failures or extra noise. If this happens, take your hex key out and tighten any bolts that feel loose.
Upgrade Your Bot
One of the great things about a 3D printer is that it can print its own upgrades, and the Makerbot community is
constantly producing designs to improve your bot. You will find a big list of ToM upgrades at
http://www.thingiverse.com/thing:6443
10/25/12 9:24 AM
Coolermaster Power Supply Fix
Note: The MakerBot Motherboard v2.5 does not require this fix. This issue affected v2.4 boards only.
The Problem:
The recent batches of CoolerMaster and Sparkle ATX power supplies (as well as some others, if you're using a
different PSU) don't like the way our motherboards tell the board to turn on. But don't worry — we've got a solution.
Check your board to make sure that we've already applied this fix for you. Some of the 2.5 boards do - check the
resistance between pins 13 and 14 before you start.
The solution:
Here is our beloved motherboard. We are going to be making a modification near the white ATX power connector on
the right-hand side in this picture.
We are going to connect two pins (numbers 13 and 14) on the motherboard with a small piece of wire and some solder.
Here's the thing: we are going to make the connection on the back of the board.
Solder a small bridge between two of the pins on the power supply connector. Looking at the motherboard from the
back, the pins we want will be the 3rd and 4th pins from the right on the inside row, which are circled in red. Use a
piece of tinned wire or a small piece of solid wire to make the connection.
10/25/12 9:24 AM
Now you're good to go — connect your electronics up normally!