1
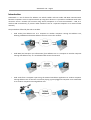
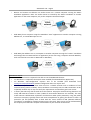
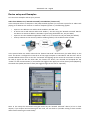
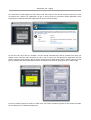
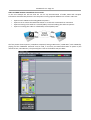
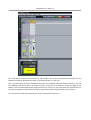
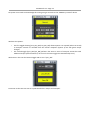
AuNetTools J74 – Page 1
User Manual
AuNetTools J74 – Page 2
Introduction
AuNetTools is a set of devices for Ableton Live which enables real-time audio and MIDI communication
between computers across a TCP/IP network. By using these devices it is possible to collaborate with other
musicians across a network (for instance using several computers on a Local Area Network – LAN, on a
wireless LAN environment), to process audio outside of Live on a separate computer or to monitor audio
remotely.
The possibilities offered by the tool set include:
•
Send audio from Ableton Live on a computer to another computer running also Ableton Live,
allowing collaboration between Ableton Live users across the network.
•
Send MIDI (and transport sync information) from Ableton Live on a computer to another computer
running also Ableton Live, as a virtual MIDI cable across the network.
•
Send audio from a computer input using the AuSend standalone application to another computer
running Ableton Live: for instance a musician playing a guitar plugged to computer A can send audio
to an another computer B running Ableton Live.
AuNetTools J74 – Page 3
•
Receive and monitor an Ableton Live audio session on a remote computer running the AuRcv
standalone application. Note: the audio cannot be routed by the AuRcv standalone to another
application on the same computer, only to the computer soundcard output.
•
Send MIDI from a computer using the standalone “send” application to another computer running
Ableton Live, as virtual MIDI input to Live.
•
Send MIDI from Ableton Live on a computer to another computer running the “receive” standalone
and through this to a MIDI interface or application (in this case using a computer internal MIDI bus,
such as the IAC bus on a Mac or MIDI Yoke on Windows)
IMPORTANT NOTES:
• A Max for Live license is required to be able to use the AuNetTools devices.
• On Windows it is required to have Quick Time installed (free download from Apple.com).
• On Windows auto-configuration requires Java to be installed (free download from
www.java.com/en/download). Manual configuration does not require Java.
• The devices operate at their best when used on a reliable network and in conditions of low
network latency (20 ms or below). These conditions are normally met in a LAN environment. A WiFi (WLAN) network may or may not satisfy this requirement and therefore give lesser results.
• In theory the tools may also be used across the Internet. Anyway be aware that long distances can
easily add latencies of 50ms or more (>100ms if international distances are involved). This may
make real-time collaboration unpleasant and decrease audio quality. Moreover, using the public
Internet as transport, typically comes with some complications in getting the devices to work. In
particular you will probably have to deal with the issues related to NAT (Network Address
Translation), as applied by network elements across the path. These issues can be workarounded,
but require you to add some complex customization to your network environment.
AuNetTools J74 – Page 4
Table of Contents
Introduction ................................................................................................................................1
The AuNetTools J74 devices ......................................................................................................4
Quality, Latency and Network setup ..........................................................................................5
Device setup and Examples .......................................................................................................7
AuNetTools J74 – Page 5
The AuNetTools J74 devices
The following characterizes the devices included in this tool set:
•
“AuSend J74.amxd”. This device sends incoming audio to another system on the network. The
remote system could be running either another Ableton Live instance (with the companion “AuRcv
J74.amxd” device) or to the standalone little application “AuRcv J74”program, which enables
monitoring outside Live. This device is an audio effect device in Live.
◦ In the case of Ableton to Ableton a simple form of collaborative jamming over the net is
possible, with signals routed within the Live applications and between them across the net.
◦ In the case Ableton to standalone “AuRcv J74” you have a simple way to perform audio
monitoring across the network.
•
“AuRcv J74.amxd”. Companion of the previously mentioned device, allows you to receive audio
from another system in the network, a system running either another Ableton Live instance (with
the companion “AuSend J74.amxd” device) or the standalone little application “AuSend J74”for
sending incoming audio from the system OS. This device is an audio effect device in Live.
◦ The first case is identical to the first case already reported in the topic above in the case of
Ableton to Ableton network collaboration.
◦ The second case allows you to have a network collaboration between a musician plugging audio
to the OS/audio interface and working as a virtual input to the remote Ableton Live session.
•
“MIDISend J74.amxd”. sends incoming MIDI to another system AND Live transport information on
the network, system either running another Ableton Live instance and using the companion device
“MIDIRcv J74.amxd” for receiving the MIDI signal or to the standalone little application “MIDIRcv
J74”program, which enables routing of MIDI outside Live. This device is a MIDI effect device in Live.
•
“MIDIRcv J74.amxd”. Companion of the “MIDISend J74.amxd” device, it allows you to receive MIDI
and Live transport information from another system in the network, a system running either
another Ableton Live instance (with the companion “MIDISend J74.amxd” device) or running the
standalone little application “MIDISend J74”program for sending MIDI directly from the system OS.
This device is a MIDI effect device in Live.
•
“AuSend J74” (standalone). The standalone application can be used as a remote audio plug for
sending audio to an Ableton Live remote computer (running the “AuRcv J74.amxd” device). The
standalone AuSend device will be limited to the inputs available on your sound card. Sending audio
from an application through the standalone AuSend on the same computer is not possible (there is
no way to route this in input to the AuSend standalone).
•
“AuRcv J74” (standalone). Standalone application which allows you to receive audio from another
system in the network such as one running Ableton Live with the companion “AuSend J74.amxd”
device. Output on the AuRcv standalone can only be routed to your soundcard output.
•
“MIDISend J74” (standalone). This standalone little application can be used to route incoming MIDI
to another system on the network, running another Ableton Live instance (and using the companion
device “MIDIRcv J74.amxd”) or to the standalone little application “MIDIRcv J74”program.
•
“MIDIRcv J74” (standalone). Standalone little application able to receive MIDI from another system
in the network, either sent by an Ableton Live instance (with the companion “MIDISend J74.amxd”
device) or by the standalone little application “MIDISend J74”.
AuNetTools J74 – Page 6
About Quality, Latency and Network setup
Audio Quality (compression of audio)
The devices sending/receiving audio use a form of compression to keep bandwidth usage limited and allow
efficient transmission of the audio signal (incoming samples are grouped in a numeric buffer of a few bytes
for transmission). Once on the receiving side the process is reverted, rebuilding the audio signal from the
group of numbers received through the packets. In terms of audio quality / manipulation this process
somehow resembles a MP3-like compression process, with quality varying depending on the network
conditions (such as stability of the latency, which as we will see requires some buffering to work properly).
Network Latency and Latency Adaptation Buffer on the Receiver's end
Apart from specifying the actual network parameters for transmission (as the target IP address - to be
specified on the sender side only - and the used TCP port - on both sender and receiver sides), an additional
parameter can be configured on the Audio Receiver end to tune the device: the Latency Adaptation buffer.
This parameter influences the way the receiving side does “buffering”: by holding the output for a little
amount of time the receiver side can compensate latency fluctuations (jitter) in the transmission and avoid
clicks and/or artifacts in audio reproduction. This buffer, though, will add as much additional latency as its
configured buffer length (the parameter is expressed in ms).
As a generic guideline the Latency Adaptation parameter should be normally set to match at least the same
value of the network latency involved and anyway to be set as the best compromise possible for your
specific setup (e.g. capacity of the sender and receiver to process packets at constant pace). The Latency
Adaptation buffer should be long enough to avoid clicks and artifacts, but also be as low as possible to limit
additional latency.
In ideal network conditions, as often matched by a LAN environment, the latency of the network will be
small and practically constant. In this case even a latency estimate buffer as low as 5ms could do a good job.
In most LAN conditions a value of 10-15ms should produce smooth, high quality reproduction.
Instead, when using the application through the Internet, you should expect much longer latencies and
consequently higher levels of latency fluctuation. Therefore buffers may even need values as high as 100ms
or more.
Important: Be aware that some latency will always be present using these devices.
In the case of MIDI, latency will be in general comparable to the network latency (if your network has
10ms of latency, so MIDI communication will have).
In the Audio case latency will be given by the sum of the network latency and of the Latency Adaptation
buffer you configured (if your network has 5ms of latency and the Latency Adaptation buffer works fine at
10ms, the result will be a total Audio latency of 5+10 = 15ms).
Note: Best audio quality results are achieved at low latency (< 20ms), with negligible jitter (latency
fluctuation) and with 100% reliability (no packet drops). A LAN environment based on wired Ethernet
100Mbps or higher UTP normally satisfies these conditions.
AuNetTools J74 – Page 7
About Internet as transport and the effect of NAT (Network Address Translation)
AuNetTools is not optimized for Internet usage. Apart from the very high latency involved, you will
practically always have to deal with Network Address Translation (NAT) issues. To explain what NAT is in
detail goes far beyond the scope of this manual. Anyway some advices are collected in the next paragraphs.
For who wants to know what NAT does: In short the purpose of NAT is to hide the local IP addresses of you
computer behind a public IP address, as assigned by your Internet provider and in use on the router which
connects you to the Internet. This router, doing the NAT, will translate (dynamically) the source IP address in
packets you generate with the public IP address of the router. In this way any web server which receives
your data packets will see in the packet envelope (header) that this packet was generated by the router. The
web server will then be able to route back the required answer using the public IP as destination of the
response packets. These will arrive to your Internet router, which will translate the IP back to your local IP
address reversing the NAT done in first place. So NAT is good if you go to the Internet for browsing or
downloading (it protects your computer and allows many computer in the same LAN to share a single
Internet connection) but blocks communication if initiated by the “outside” (public side of the NAT
boundary). To make this long story a short one, NAT on the receiving side will hide the local address of the
receiving computer from the sending one.
The negative side effects of NAT to the communication path required by the AuNetTools can be
workarounded only by creating a static NAT opening (sometimes called static TCP/UDP port translation) on
the receiving side. This could be done, in most cases, directly on the internet router facing the receiving
computer. The configuration typically requires you (or the administrator of your network) to enter the NAT
setup on the Internet router and specify that a given set of protocols and ports (for the audio application in
the AuNetTools the defaults are protocol/port TCP/5001 for audio and UDP/6001 for MIDI) and add a
“mapping” for these to a given computer local IP address.
Example:
• Let's say the receiving side computer has local IP 192.168.1.22
• The Internet router of the receiving side has public IP address is 123.34.56.67
• The protocol/port combination for sending audio is TCP/5001 (default on the audio send devices)
• The protocol/port combination for sending MIDI is UDP/6001 (default on the MIDI send devices)
The configuration you need involves:
• Set up the Internet router NAT table to have these mapping:
◦ TCP port 5001 mapped to IP 192.168.1.22 (keeping the same protocol/port as TCP port 5001)
◦ UDP port 6001 mapped to IP 192.168.1.22 (keeping the same protocol/port as UDP port 6001)
• Set up the sending devices / applications to use as target the public IP on the receiving side
(123.34.56.67 in this example) with as protocols/ports the same as set on the receiver side and
opened in the NAT table (TCP/5001 for audio devices, UDP/6001 for MIDI devices in this example).
OS permissions for network connectivity to the applications
You may be prompted by your Operative System (OS) to allow a device in the AuNetTools set the use of the
network. Some OS, such as Windows Vista, ask you this as they apply a standard firewall to applications and
require your explicit approval when the applications are launched. Moreover if you use a local firewall on
your computer be sure the protocol/port combinations required (by default TCP port 5001 and UDP port
6001) are not blocked.
Just to know: unicast only, no multicast (streaming) possible
The applications in the AuNetTools set allow you only to communicate with a single receiver per sending
device (so called unicast communication). Multicast audio streaming is not supported.
AuNetTools J74 – Page 8
Device setup and Examples
Let's see some examples and set up in practice.
Audio from Ableton Live (“AuSend J74.amxd”) to Standalone (“AuRcv J74”)
In this setup we will use a computer in the (LAN) network (System 2) as a monitor system for an audio track
playing on an Ableton Live instance on another computer (System 1). The following applies:
•
•
•
•
System 1 runs Ableton Live and has local IP address 192.168.1.41
In the live set we will monitor audio track “Audio 1”, sent out using the “AuSend J74.amxd” Max for
Live device to remote IP address 192.168.1.5 (port being the default one, TCP port 5001).
System 2 runs the standalone application “AuRcv J74”, set to listen to TCP port 5001 (the default)
Latency estimate on the receiver (used for buffering audio) is left to default value of 50ms
In the picture below the sender side with the “AuSend J74.amxd” device directly (as audio effect) on the
track. The device is configured to have the IP of the target computer as 192.168.1.5 and the TCP is left to
the 5001 default value. Once we see the “connected” box lighting up this means the connection is ready to
be used (it signals the fact the other side, the “AuRcv J74” device, has received and accepted the TCP
“socket” for the communication). If we activate the toggle in the upper part of the device [Closed/Opened],
the actual data (audio) will start to flow (the toggle changes in this case to “Opened”).
Note: In this setup the monitored track gets muted by the “AuSend J74.amxd” device (it has no local
output). If you require local monitoring for this track, use Live built in I/O audio routing to have another
audio track monitoring the audio locally.
AuNetTools J74 – Page 9
Let's now look on what happens on the receiver side. First of all, on this second computer (System 2), when
we opened the “AuRcv J74” application we got a pop-up from the operative system (Windows Vista)
requiring us to explicitly allow the application for the use of the network:
Do not miss this step! Click on “Unblock” and the TCP/IP communication will be enabled (next time you
should not be asked the same question). As this is the very first time we opened the application we also
need to setup the audio settings. We do this by clicking on the “Audio Setup” button, which opens up a new
pop-up window. We choose the audio interface and we activate audio by setting this “On”. Ready to go!
As soon as audio is played on System 1 audio track, the remote computer (System 2) will receive the audio
on the “AuRcvd J74” standalone application.
AuNetTools J74 – Page 10
Audio and MIDI between two Ableton Live sessions
In the next example we will see how we can set up communication of audio, MIDI and transport
information simultaneously between two computers running separate Ableton Live sessions. We have:
•
•
•
•
System 1 with a MIDI track sending MIDI to System 2
System 2 set to receive this MIDI information on a track with a Drum Rack as instrument
System 2 routing in live audio to a second (audio) track and sending this audio to System 1
System 1 receiving this audio on a dedicated, second (audio) track
The first picture shows System 1 (a Windows computer) having a MIDI track (“1 MIDI OUT”) with a MIDI clip
playing and the “MIDISend J74.amxd” used to send, in real time, this MIDI information to System 2 (the
remote IP host, 192.168.1.41). The protocol/port is left to the default UDP port 6001.
AuNetTools J74 – Page 11
The next picture shows System 2 (a Mac computer) having an instrument track (“1 DrRack”) hosting the
“MIDIRcv j74.amxd” device which receives the MIDI from System 2. The device is left on its default settings
(protocol/port combination UDP/6001, which matches the settings on System 1).
The received MIDI information is used to play a Drum-Rack (“Kit-808”), as it would be done by local MIDI
input. The audio produced in this case is further processed by an “EQ Eight” equalizer on the track. The
chain is therefore a normal MIDI->Instrument->AudioFX chain.
On the same computer System 2 an additional (audio) track, named “2 Audio OUT”, is used to monitor the
audio (through Live's I/O internal routing) as produced by the Drum-rack track. Using the “AuSend
J74.amxd” device on this track audio is sent to System 1.
The “AuSend J74.amxd” device is set with target IP address 192.168.1.5 (System 1) and uses the default TCP
port 5001. The next picture shows this audio track hosting the “AuSend J74.amxd” device.
AuNetTools J74 – Page 12
On System 1 an audio track (“2 Audio IN”) is used to receive the audio from System 2. On this track
the“AuRcv J74.amxd” device is hosted for receiving the information from the network and outputs the
audio signal further in the track. This is shown in the next picture.
Looking at this picture notice also the fact of having the Latency Adaptation changed to 10ms, which in this
conditions (a stable and quick LAN environment) still produce a good audio quality result but at a quite
tolerable (low) amount of total end-to-end latency.
AuNetTools J74 – Page 13
As a final step let's what we need to do to add transport and tempo synchronization between the two
Ableton Live livesets. We will have System 1 controlling System 2 in this case.
This is possible using the same “MIDISend J74.amxd” and “MIDIRcv j74.amxd” devices already in use. On
the “MIDISend J74.amxd” device, as placed on track 1 of the Live set of System 1, notice the toggle at the
bottom. Once activated (yellow) this toggle will show the “Send_Live_API_ON” label: this signifies that any
transport change done to the liveset on System 1 (including tempo settings) will be sent to System 2.
Let's see what we need to do to accept this control information on System 2.
AuNetTools J74 – Page 14
On System 2 we need to acknowledge this setting using th controls on the “MIDIRcv j74.amxd” device.
We have two options:
•
•
The first toggle showing [Live_API_OFF/Live_API_ON] allows System 2 to respond (when set to ON)
to transport controls as received from the remote computer (System 2) but will ignore tempo
changes;
The second toggle [Sync_OFF/Syn_ON] performs the same in terms of transport actions but with
additional tempo synchronization (if set on set's the other toggle also automatically to on).
We choose in this case the bottom toggle and set it to “Sync_ON”.
From now on the two Live sets are synchronized also in tempo and transport.