1
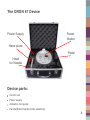
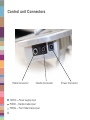
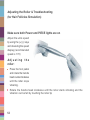
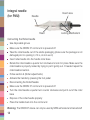
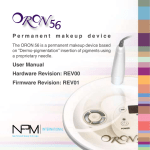
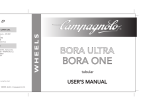
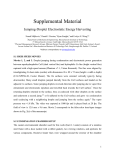
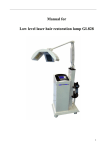
Permanent makeup and
hair follicles simulation
The ORON 57 is a permanent
makeup and micro pigmentation
device based on roller or needle
pigmentation insertion.
User Manual
Hardware revision: REV00
Firmware Revision: REV01
Table of Contents:
Content
Page
ORON 57-Device..................................................................... 3
Control unit............................................................................4-6
Device Parts (7-9):
Handle......................................................................................7
Foot Pedal................................................................................8
Power supply............................................................................9
Getting Started...................................................................10-11
Adjusting the Roller & Troubleshooting
(for Hair Follicles Simulation).............................................12-13
Integral Needle (for PMU).......................................................14
Warranty..................................................................................15
Service....................................................................................16
2
The ORON 57 Device
Power Supply
Power
Station
Hand piece
Head
for Needle
Pedal
Device parts:
Control unit
Power supply
Activation foot pedal
Handle(Roller/needle holder assembly)
3
Control unit
Handle Position
Decrease Speed
Speed Display
Electronic Ciruit
Increase Speed
Handle On/Off
Power On/Off
Model Name
Numerical display – Displays device speed
Piece key – Activities/Deactivates power to the Handle
Power key – Turns the control unit On or Off
4
Electronic circuit –Displays Device Status On/Activity
Control Unit
Weight: 950 grams
Speed display
The speed display range is 100-200
Speed control keys
Press the POWER
key
A LED light above the
key indicated control
unit power status
PIECE key –
enables handle
activation by pressing
the foot pedal
5
Control unit Connectors
Pedal Connector
Handle Connector
12VDC – Power supply input
PIECE – Handle Cable input
6
PEDAL – Foot Pedal Cable input
Power Connector
Device Parts:
Handle
Needle
Position
Cord
Hand piece
The roller is mounted on the handle
A cable connects the handle to the control unit
Cable length 180 cm
Handle weight 80 grams
The PIECE LED light indicates the unit’s power status
1. Needle holder
2. Power supply connector
3. Power supply cable
4. The handle is constructed from two parts, Handle base and Roller base.
The roller base can be sterilized (disconnect from handle base by rotating
counter clockwise.
Note:
While not in use keep the handle in a plastic wrap
Clean the handle gently using moistened wipes
7
Foot pedal
Cord
Pedal
Connector
to Power Station
Pressing on the foot pedal activates the handle motor
The foot pedal is connected to the control unit via a cable (180cm long)
Activating the foot pedal
Make sure the foot pedal connector is securely connected to the control unit
Press the foot pedal to activate the unit
Release the foot pedal to deactivate the unit
A second option is available for those who don’t want to use a foot pedal, a silver
connector is available to connect instead of the foot pedal. This connector will activate
the hand piece automatically as soon as you press the piece button. Press one time
to start and a second time to stop activation.
Warning
Do not place any objects on the foot pedal
Make sure the foot pedal location is completely dry
To keep the foot pedal clean, it is recommended to wrap it with plastic or plastic bag
8
If needed the foot pedal can be cleaned with moist wipes
Power supply
Cord
Electrical Plug
Connector
to Power Station
The power supply supplies electrical power to the control unit
Connect the power supply connector to the control unit
Connect the handle cable connector to the control unit
Connect the foot pedal connector to the control unit
Connect the power supply to the mains supply (When connected to power the
control unit’s LEDs blinks)
Note: Make sure the power supply cable is free of foreign objects
Specialized Training:
Training is done only by authorized NPM training guide
Training includes:
System operation
Troubleshooting
Permanent makeup and hair follicles simulation techniques
An NPM course completion certificate is given after successfully completing
the course
9
Getting Started
Before using the ORON 57 Device please follow the next steps:
Wear disposable gloves
Make sure all cables are securely connected
Power the base unit On and activate the Piece (make sure the Electronic Circuit
Led is blinking)
ORON 57 Power on:
Press the Power key
Press the Piece key
Press the foot pedal (the foot pedal is momentary action based. It will stop the Piece
activation as soon as it is released)
ORON 57 Power off:
Release the foot pedal
Press the Piece key
Press the Power key
Preparing the device for usage:
Connect the handle cable to the to the control unit connector labeled PIECE
Connect the foot pedal to the control unit connector labeled PEDAL
Connect the power supply cable to the control unit connector labeled 12VDC
Press the POWER key
Press the PIECE key
Select the integral needle suitable for the treatment
Place the needle in the handle head and rotate quarter turn clockwise to lock the
needle in position
Press the foot pedal
To adjust needle position, hold the handle base in your left hand (needle pointing
up). Turning the needle holder clockwise will decrease needle height. Turning the
needle holder counter clockwise will increase needle height.
10
The unit is now ready for permanent makeup and hair follicles
simulation implementation
Connect the handle cable to the to the control unit connector labeled PIECE
Connect the foot pedal to the control unit connector labeled PEDAL
Connect the power supply cable to the control unit connector labeled 12VDC
Press the POWER key
Press the PIECE key
While holding the PIEACE base in your left hand turn the handle head using your
right hand about two and a half turns counter clockwise
Place the roller or the needle in the handle head and lock into position by turning
is a quarter turn
11
Adjusting the Roller & Troubleshooting
(for Hair Follicles Simulation)
Make sure both Power and PIECE lights are on
Adjust the units speed
by using the (+) (-) keys
and observing the speed
display (recommended
speed is 170)
Adjusting the
roller:
Press the foot pedal
and rotate the handle
head counter clockwise
until the roller stops
vibrating.
Rotate the handle head clockwise until the roller starts vibrating and the
vibration can be felt by touching the roller tip
12
Troubleshooting:
Condition
Possible Causes
Roller not vibrating (foot pedal
activated)
Low roller speed – Adjust roller
speed
Roller not adjusted: Hold the handle
base with your left hand and with your
right hand rotate the tip part of the hand
piece and rotate it counter clockwise
until the roller stop to vibrate. Now
start turning the handle tip clockwise
until the roller starts vibrating.
Roller stops vibrating during work
Low roller speed – Adjust roller
speed
While pressing the foot pedal release
the roller tip by pulling it gently out
and releasing (Hold the roller from
its sides)
13
Integral needle
(for PMU)
Insert area
Needle
Head
Locking Mechanism
Connecting the Roller/needle
Use disposable gloves
Make sure the ORON 57 control unit is powered off
Take the roller/needle out of the sterile packaging (make sure the package is not
damaged prior to opening it, if it is, do not use it)
Insert roller/needle into the handle roller base
Rotate the roller/needle a quarter turn clockwise to lock it in place. Make sure the
roller/needle is properly locked by trying to pull it gently out. If needed repeat the
roller/needle insertion.
Follow section 9 (Roller adjustments)
Activate the handle by pressing the foot pedal
Disconnecting the Roller/Needle
Make sure the ORON 57 control unit is powered off
Turn the roller/needle a quarter turn counter clockwise and pull it out of the roller
base
Dispose of the roller/needle properly
Place the handle back into the control unit
Warning: The ORON 57 device can only be used by NPM authorized and trained staff
14
Warranty
Warning: Do not use or operate the unit without proper training
Repairs: Only NPM technicians are authorized to repair the unit
Do not attempt repairing the unit yourself
Packaging: The unit and accessories are supplied in a specially designed case
The unit is labeled with a serial number
Warranty:
Warranty period is 24 months from day of purchase (please keep all purchase
documentation)
Printed warranty card is supplied with the unit. Make sure it is included in the unit’s
documentation
The warranty card includes the following information:
NPM company information
Serial number
Purchase date
Customer information
Warranty is void in case the unit is not in its original casing and/or without a serial
number
Unit transportation only in its original case
Use only NPM parts
Do not use and rollers/needles other then NPM’s
Troubleshooting:
If the device fails to operate:
Make sure all cables are properly connected
Make sure it is properly connected to the mains supply and the Display LEDs are
blinking
Make sure the ‘POWER’ and ‘Piece’ LEDs are on
Make sure the roller/needle is connected
Make sure the foot pedal is activated
15
Service
For Repair services call +972-4-8702206 or e-mail us at: [email protected]
Classification:
The unit is classified as Class 1
Continues use, portable
Do not use near flammable material
Storage and operational environmental conditions:
10-40 degrees centigrade
30-75% relative humidity
700-1060 hPa atmospheric pressure
Warning:
Read instructions before use
Not reusable
Dispose of properly
Cleaning and sterilization
Use moist wipes to clean all working areas
Alcohol use is permitted
Use disposable gloves
Warning - Please read instructions
Not for reuse
BF applied part
Manufacturer name
Do not dispose
WWW.NPM-INTERNATIONAL.COM
Wish you
Successful perfomance!
NPM Ltd.