1
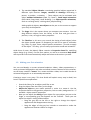
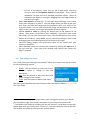
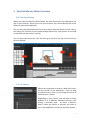
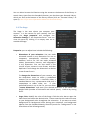
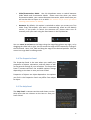
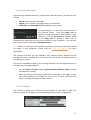
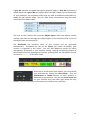
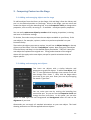
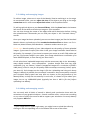
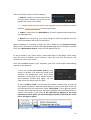
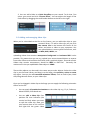
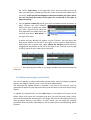
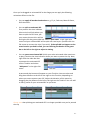
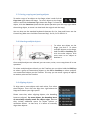
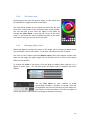
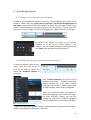
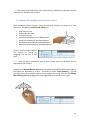
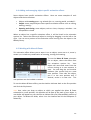
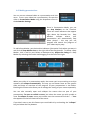
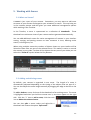
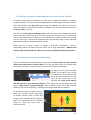
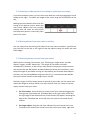
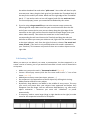
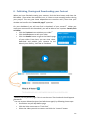
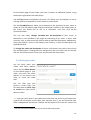
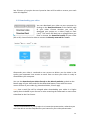
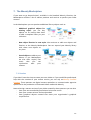
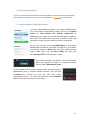
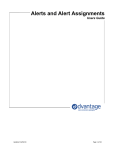
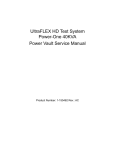
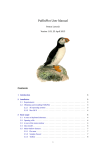
User Guide March 2015 Discover all Moovly Features and learn how to create videos like a Pro! Moovly.com 1. Getting Started ................................................................................................ 4 1.1. 1.2. 1.3. 1.4. Technical requirements ...................................................................................................................... 4 Moovly Editor Overview ..................................................................................................................... 4 Making your first animation ............................................................................................................. 5 Managing your moov ........................................................................................................................... 6 2. Detailed Moovly Editor Overview .................................................................... 7 2.1. 2.2. 2.3. 2.4. 2.5. 2.6. 2.7. Tool Organization .................................................................................................................................. 7 The Library ............................................................................................................................................... 7 The Stage ................................................................................................................................................... 8 The Properties Panel ............................................................................................................................ 9 The Help Panel ........................................................................................................................................ 9 The Personal Library ........................................................................................................................ 10 The Timeline ......................................................................................................................................... 10 3. Composing Content on the Stage ................................................................... 12 3.1. 3.2. 3.3. 3.4. 3.5. 3.6. 3.7. 3.8. 3.9. 3.10. 3.11. Adding and managing objects on the stage ............................................................................. 12 Adding and managing text objects .............................................................................................. 12 Adding and managing images ....................................................................................................... 13 Adding and managing sounds ....................................................................................................... 13 Adding and managing video clips ................................................................................................ 15 Adding and managing animated GIFs ........................................................................................ 16 Cutting, copying and pasting objects ......................................................................................... 18 Selecting multiple objects ............................................................................................................... 18 Aligning objects ................................................................................................................................... 18 The Color Panel ................................................................................................................................. 19 Managing object layers .................................................................................................................. 19 4. Animating Content ........................................................................................ 20 4.1. 4.2. 4.3. 4.4. 4.5. 4.6. 4.7. 4.8. Timing the overall appearance of objects ................................................................................ 20 Adding and managing standard animation effects .............................................................. 20 Adding and managing hand animation effects ...................................................................... 21 Adding and managing object-‐specific animation effects ................................................... 22 Working with Move & Zoom .......................................................................................................... 22 Making presentations ....................................................................................................................... 23 Playing your animation .................................................................................................................... 24 Other Timeline options .................................................................................................................... 24 5. Working with Scenes ..................................................................................... 25 5.1. What are Scenes? ................................................................................................................................ 25 5.2. Adding and deleting scenes ........................................................................................................... 25 5.3. 5.4. 5.5. 5.6. 5.7. 5.8. Cutting, copying and pasting objects and scenes on the Timeline ................................ 26 Saving scenes to your Personal Library ................................................................................... 26 Inserting or reducing time: increasing or reducing scene length ................................. 27 Moving objects from one scene to another ............................................................................. 27 Removing empty content from your video ............................................................................. 27 Creating “slides” .................................................................................................................................. 28 6. Publishing, Sharing and Downloading your Content ...................................... 29 6.1. Sharing your video ............................................................................................................................. 30 6.2. Downloading your video ................................................................................................................. 31 6.3. Publishing your video ....................................................................................................................... 32 7. The Moovly Marketplace ............................................................................... 33 7.1. Services ................................................................................................................................................... 33 7.2. External Contributors ....................................................................................................................... 34 7.3. Buying objects in the Marketplace .............................................................................................. 34 2 Note This document is an intermediate version of a User Guide for Moovly. Moovly is in full development and on a daily basis, features are added, bugs are fixed and improvements are done on tool interface and website. Because of these daily updates, the how-‐to’s and screenshots available in this document may differ slightly from the actual application or website. We update this document on a regular basis to reflect the latest changes in Moovly. If you experience problems, bugs or if you have suggestions to improve Moovly, please don’t hesitate to contact us using the Feedback & Support tab on our website. 3 1. Getting Started 1.1. Technical requirements Moovly is a browser-‐based platform that’s supported by the following browsers: Chrome, Firefox, Safari and Internet Explorer, running on Windows or MacOS. Older versions of these browsers or operating systems might not be fully supported. The Moovly Editor is Adobe Flash based, so be sure to update your Flash version regularly. The minimum version of Adobe Flash required is 11.1. Moovly is not yet available as an app for Android or IOS. If you would like to use the Moovly Editor on, for example, an iPad, you can do so using the Puffin browser. Downloaded or published Moovly videos can be viewed on any device. 1.2. Moovly Editor Overview Moovly is a tool that has been designed to be very user-‐friendly and straightforward. The following overview image shows its different components and application areas: More in detail, the Moovly Editor consists of the following areas: 4 1. The standard Object Libraries: containing graphical objects organized in different style libraries: images, cartoons or drawings illustrating a person, a product, a situation, … These objects can be animated with either standard animations (Fade, Fly, Draw…), hand based animations (Shift Hand, Drag Hand, Hand Drawing…) or object-‐specific animations, such as a turning world, a ticking clock, people talking, … Aside graphical objects, text objects can be put on the screen to support your story with keywords. 2. The Stage: this is the canvas where you compose your content. You can drag different objects from the library to this area and give them a position, a size, an angle or other properties 3. The Timeline: in this area, you control the timing of each object (when the object should appear or disappear) as well as its type of animation (e.g. fade, fly, wipe, zoom, object-‐specific animations…) to wish to apply to the object. This way, you can easily synchronize sound and animation. Aside these 3 areas, the Moovly Editor contains a Properties Panel for modifying object design (e.g. colors), for text font options, as well as a contextual Help Panel with tips and tricks that automatically adapt and relate to the actions you take. 1.3. Making your first animation You can use Moovly to create animated explainer videos, video presentations, e-‐ cards, animated infographics and other animated content. Because of this variation, we call these creations “moovs”. So a moov could be a video, but it could also be an animated infographic or an animated presentation. Creating a moov is very easy. This User Guide will explain every step in detail, but here’s a Quick Start explanation: • Search the library for an object you’d like to use • Drag the object from the Library to the Stage. • Adjust the object to your needs: position it, resize it or rotate it. Use the Properties Panel to change other properties, such as color, background or – if available -‐ object-‐specific properties • Now you can adjust the timing of your object: for every object you put on the Stage, a corresponding gray bar appears on the Timeline. There you can adjust the object’s timing and animation. • Drag the gray bar to the left or the right to change the object’s appearance and disappearance timing • Drag the edges of the gray bar inwards or outwards to make the appearance duration shorter or longer 5 In front of the object’s name, you can see a little arrow. Click that arrow to open the animation options of the object. Click “Choose Animation” to open the list of available animation effects. Select an animation and adjust its timing by dragging the small edge bullets to the left or the right. Add a Text object by clicking the “T” icon right above the Stage. Your mouse cursor then changes in a letter T. Click the Stage where you want to put your text. Enter your text and adjust the text properties (font, size, color) in the Properties Panel. You can now control the timing and animation of this Text object in the Timeline, in the same way you do for other objects. Upload sound or voice by clicking the Sound Icon at the bottom of the Library. Then select a sound file on your computer. If you don’t have sound files ready, you can also record your voice: click the Microphone Icon at the bottom of the Library. Once added, you can control the timing of your Sound by dragging the corresponding blue bar to the left or the right. Continue adding objects and synchronize them to the sound until your content is complete. When finished, make sure to save your content by clicking the Save Icon in the top blue bar. Then close your window and confirm the “Leave this page?” question. • • • • • 1.4. Managing your moov Every new moov you create gets a thumbnail1. Move your mouse over the thumbnail to see the following options: • Details: click this button to view your moov, share it, export it, change its title and description • Edit: click this button to edit your moov and make changes to the content • Trash: click this button to delete your moov2 We offer a more detailed overview of how to share and export videos in Chapter 6 of this User Guide. 1 If you don’t see the thumbnail right away, after closing your project, just refresh your My Moovs page. Your project will appear in your project list shortly after. 2 If you delete your video by accident you can still recover it: scroll down on your My Moovs page until you come across “Trash Can”, click the little arrow next to the title and restore your video by clicking on the restore button. 6 2. Detailed Moovly Editor Overview 2.1. Tool Organization When you open the Moovly Editor Mode, the tool dimensions are adjusted to the size of your browser. When you resize your browser, the relative dimensions of the different areas will be adjusted. You can also manually adjust the size of every panel: drag the borders of the Library, the Stage, the Timeline or the Properties/Help panels to a new position to increase or decrease the space they’re taking. You can also hide the panels: click the little gray arrow at the top of the panel you wish to collapse. 2.2. The Library Objects are organized in libraries, which you find in the left column of the application. You can drag any object from a library to the Stage and use it to compose your content. Depending on your license, you will have a choice between 2 to 4 different Standard Libraries, each having a particular style. To select a different library, select the library or libraries you want to use in the dropdown list and click the Close button. 7 You can either browse the libraries using the arrows at the bottom of the library or search them. Apart from the Standard Libraries, you also have your Personal Library, which you find at the bottom of the library column (click on “Personal Library” to open it). See 2.6 for more information about the Personal Library. 2.3. The Stage The Stage is the area where you compose your content. It is the canvas for your creation. You can adjust the Stage properties and configure the Animation Settings in the Properties Panel. You can view this panel by clicking in an empty area on or outside the Stage. Properties you can adjust here include the following: • Dimensions of your animation: You can make animated content in any dimension: for use on computers, smartphones, television screens, websites, and so on. You can make animated videos, presentation, banners, and infographics in any dimension. You can also make a first version of your content in one format, and then duplicate it and change the dimensions to derive a new format from it. To change the dimensions of your content, use the drop-‐down menu to select a predefined content size or resolution: a YouTube video, a standard banner size, a presentation slide size, a smartphone or tablet video, etc. If your preferred format is not in the list, you can select “custom dimensions” and enter your desired resolution in the Width and Height fields (number of horizontal and vertical pixels). Confirm by hitting Enter. • Stage Color: Modify the color of the Stage. Click the color box to open the Color Panel and select the desired color. Please note that this color will serve as your background color throughout the animation. If you want to switch backgrounds or background colors during your animation, use background objects from the Standard Moovly Libraries (search for “background” in the Search box to find all backgrounds). 8 • • Video/Presentation Mode: Use this dropdown menu to switch between Video Mode and Presentation Mode. Please note that when you select Presentation Mode, your content becomes interactive, which means that you will not be able to export it as an MP4. See section 4.6 for more info about creating presentations in Moovly. Autosave: By default, this option is switched on when you create your first video. Every 30 seconds, your work is automatically saved on the Moovly servers. If you prefer to switch the Autosave off, please make sure to manually save your work using the Save button in the top blue bar. You can zoom in and out on the Stage using the magnifying glasses top right, or by dragging the slider left or right. You can move the stage and its content by clicking on the little hand. Next, click, hold and drag the stage to the desired position. Click the arrow icon to go back to editing mode. 2.4. The Properties Panel The Properties Panel is the area where you modify the properties of objects, animations, and text items as well as the general settings of your animation. The Properties Panel is context-‐sensitive: the available options change depending on the item or area you have clicked. Properties of objects are object-‐dependent: the options you find in the Properties Panel may differ from object to object. 2.5. The Help Panel The Help Panel is context sensitive and shows you the Help items that are relevant to the item or area you have clicked. 9 2.6. The Personal Library Apart from the Standard Libraries, you also have a Personal Library, to which you can upload: • Sounds and voice-‐over recordings • Images, such as photos, drawings, scans or screenshots • Video clips and animated GIFs, depending on your license To upload objects, use the icons at the bottom of the Personal Library. Click the Image icon to upload an image and select it from a folder on your computer. Click the Sound icon to upload a sound or the Video icon to upload a video clips or animated GIFs and select the file from a folder on your computer. You can also record your voice by clicking the Microphone icon. Note: Make sure you possess the intellectual property rights of any media you upload for usage in your animation. Please read our Terms & Conditions for more information. The amount of objects you can upload to your Personal Library depends on the storage space that’s available for your license. You can expand the storage space by upgrading your license. Once you’ve uploaded an object, you can drag and drop it on the Stage and use it in the same way as standard objects: • You can resize and rotate images, apply standard animation effects to them and adjust their timing • When you drag a sound object (uploaded or recorded) to the Stage, it does not visually appear on the Stage but only on the Timeline: there you can adjust its timing and apply animation effects. 2.7. The Timeline The Timeline is where you synchronize the animation of your objects. When you select an object on the Stage, the corresponding object timeline is highlighted. 10 A gray bar indicates the global timing of a graphical object, a blue bar represents a sound object and a green bar will appear when you add a video clip or animated GIF to your animation. Per animation effect that you add, an additional sub-‐timeline is added for that specific effect. Your can hide these sub-‐timelines using the small arrow left of the object name. The lines on the Timeline also represent Object Layers: when two objects visually overlap each other on the stage, the object higher on the timeline will be in front of the object lower on the timeline. The thumbnails are miniature views of your content and are generated automatically. Thumbnails are part of the Scenes you create. By default, your content is organized in one scene. You can add additional scenes for easier management of content in your timeline: cutting, copying and pasting content to later moments in time, deleting entire scenes, inserting time, etc. We explain the use of scenes in chapter 5 of this User Guide. Once you’ve synchronized your objects, you can preview your animation by clicking the Play button. Click the fast-‐forward or rewind buttons to move forward or backward on the timeline. You can also zoom in and out on your timeline using the slider right below the Play buttons. This can help you to synchronize your content more precisely. 11 3. Composing Content on the Stage 3.1. Adding and managing objects on the stage To add an object from the Library to the Stage, click and drag it from the Library and put it in the desired position on the Stage. Once on the Stage, you can resize and rotate the object using the bounding box. Use the Properties Panel to change other properties, such as color, mirroring or – if available – set object-‐specific properties. You can easily replace one object by another while keeping its position, its timing and even its animation settings. To do that, first make sure you have the new object available in your library. If the new object is, for example, a picture, make sure you have uploaded it to your Personal Library. Then select the object you want to replace. You will see its Object Settings in the top right area of the Editor. Click the "Swap Object" option. Next, drag your new object from the library and drop it in the dashed object placeholder. That's all! Now your new object has replaced the original one. Timing and animation of the original object will also apply to the new object, except for special animations that are object-‐specific. 3.2. Adding and managing text objects Text items are objects with a similar behavior and properties as graphical objects. To add a Text object, click the “T” icon right above the Stage. Your mouse cursor will then change into a letter T. Next, click the Stage where you want to put your text. Enter your text by overtyping the words “Type Here”. You can resize your text by resizing the bounding box around the text. Or you can use the Properties Panel and change the font size there. In this panel, you can also adjust the font type, the text foreground and background colors as well as the alignment of your text. Afterwards you can apply all standard animations to your text object. The hand drawing animation can also be applied to these objects. 12 3.3. Adding and managing images To add an image, select one in one of the Moovly libraries and drag it to the stage. As mentioned earlier, you can adjust the size of the objects you drag to the stage, rotate them and in most cases adjust their colors in the Properties Panel. To add a graphical object to your Personal library, click the photo icon in the bottom left corner of the editor and select an image on your computer. You can then change the name of the object and add a description before clicking the upload button. Afterwards you can find your object in the “Personal Library”3 section. Once your image has been uploaded, you can use these images just like the Standard Moovly objects, and apply any of the standard animation effects to them: e.g. Fly in, Fade out, Move & Zoom, Shift Hand out... whatever makes sense to you. Please note that the quality of your video depends on the quality of these uploaded images. If you want to export your video in HD, your image resolution should also be HD quality. For example, if you intend to export your moov as an HD 720p video and you use a full-‐screen image in your video, your image should have a resolution of at least 1280x720 pixels, or even more if you zoom into it. On the other hand, uploaded images may also be unnecessary big in size. Nowadays, many digital cameras -‐ even smartphones -‐ produce images that have very high resolutions (e.g. an iPhone 5 shoots 8 megapixel images at a resolution of 3264 x 2448 pixels), which is even for HD quality video not always necessary (unless, again, you zoom in). Such images are also large in file size. Uploading and using such heavy images in Moovly is possible, but not always convenient: they unnecessarily consume your Personal Library space and may have an impact on the performance of the Moovly Editor, as they also use memory! In such case, it is better to first reduce your image size to e.g. 1600x1200 pixels (typically less than 1 MB in file size) before uploading it to Moovly. 3.4. Adding and managing sounds You can work with all kinds of sounds in Moovly and synchronize them with the animations of your graphical objects. Sounds could be music, a voice-‐over recording or any noise or effect you want to add to support your animation. Currently Moovly only supports MP3 files. 3 If your image doesn’t appear right away, you might have to reload the editor by clicking on the corresponding icon in the bottom left corner of the editor. 13 There are 3 ways to add a sound to Moovly: 1. Upload a sound to your Personal Library using the small speaker icon you find in the bottom left corner of the Editor. Note: Please make sure you possess the copyright of the sounds you upload! Read our Terms & Conditions for more information. 2. Import a sound from the Marketplace. All music samples and sounds there are copyright-‐free. 3. Record your sound (e.g. your voice) using the small microphone icon you find in the bottom left corner of the Editor. When uploading or recording a sound, the file is added to your Personal Library. When you’ve purchased a sound in the Moovly Marketplace you’ll be able to find the file in the “Marketplace objects” section of the Moovly Library. To use a sound in your video, select a sound and drag it to the Stage. You’ll notice that the sound is added to your Timeline: there you can shift its position and synchronize it with your visuals. Once you’ve added sound to your animation, you have a few simple sound editing options at your disposal: 1. You can modify the volume level of your sound. To do that, first select the sound in the Timeline (its background turns blue when selected). You will then see a Volume slider in the Properties window (top right). Use this slider to set the sound level you want. 2. You can split a sound: First position the timeline indicator (the vertical red line) where you want to split the sound. Next, put your mouse close to this red line and right-‐click the sound bar. Select “Split Sound” in the right-‐click menu and your sound will be split over two layers. (Double-‐click the sound names to rename the sounds if you wish). If the split did not happen at the exact location you had in mind, you can still drag the border of the blue bar to the left or the right to adjust. 14 3. You can add a Fade In or Fade Out effect to your sound. To do that, first select your sound and click “Choose Effect”. You can adjust the length of the Fade effect by dragging the small border bullets to the left or the right. 3.5. Adding and managing video clips When you’re subscribed to the Plus or Pro license, you can add video clips to your personal library. To add a video clip you just click the camera icon in the bottom left corner of the editor and select a video on your computer. You can upload videos in most typical file formats, such as MP4, MOV, WMV, etc. Uploading videos that contain a transparent background and animated GIFs is also possible. This means that you can e.g. upload your own animated objects or exports from After Effects and combine these with other graphical objects, text and sounds. Videos that contain transparency should be MOV or FLV files. Currently the maximum file size per uploadable video object is 50MB. These video objects can be used in the same way as other objects: Select the video clip in your Personal Library and drag it to the Stage, then position, resize or rotate the object. You can also add standard animation effects, such as Fade in/out, Hand shift/drag, Move & Zoom, to your video clips. Once you’ve dragged a video clip to the Stage you can apply the following animation effects to the file: • You can apply all standard animations to the video clip: e.g. Fly in, Fade out, Move & Zoom, Shift Hand out… • You can split a video clip: First position the time indicator (the vertical red line) where you want to split the video clip. Next, put your mouse close to this red line and right-‐click the green video 15 bar. Select “Split Video” in the right-‐click menu and your video clip will be split over two layers. (Double-‐click the file names to rename the video clips if you wish). If the split did not happen at the exact location you had in mind, you can still drag the border of the green bar to the left or the right to adjust its timing. • You can pause a video clip (while your other animated content continues to play): Position the time indicator where you want to pause the video clip. Next, right-‐click the video bar that represents the video clip on the Timeline and select “Add pause” in the right-‐click menu. A pause and play button will appear on your Timeline. You can select and drag these buttons to the left or the right on the Timeline, depending on where you want to pause your video. Adjust the duration of this pause by dragging the play button to the left or the right on the Timeline. You can add as many pauses to your video clip as you want. Please note that splitting your video is no longer possible once you’ve paused the video clip. 3.6. Adding and managing animated GIFs You can use Moovly to make multimedia content with a variety of objects: graphical objects, text objects, sounds, music, voice and even video objects. The Animated GIF upload feature is available in the Plus or Pro licenses. You can upload these objects to your Personal Library and use them in the same way as other objects. To upload an animated GIF, use the video icon in the bottom left corner of the Editor: Select a file from your computer and save it to your Personal Library. Next, select the Animated GIF and drag it to the Stage. GIFs can be animated just like any other graphical object in the Editor. In other words, you can apply all standard animation effects on these video objects, such as Fade in/out, Hand shift/drag, Move & Zoom... 16 Once you’ve dragged an animated GIF to the Stage you can apply the following animation effects to the file: • You can apply all standard animations: e.g. Fly in, Fade out, Move & Zoom, Shift Hand out… • You can split an animated GIF: First position the time indicator (the vertical red line) where you want to split the file. Next, put your mouse close to this red line and right-‐click the green video bar. Select “Split Video” in the right-‐click menu and your animated GIF will be split over two layers. (Double-‐click the file names to rename the clips if you wish). If the split did not happen at the exact location you had in mind, you can still drag the border of the green bar to the left or the right to adjust its timing. • You can pause an animated GIF (while your other animated video continues to play): Position the time indicator where you want to pause the clip. Next, right-‐click the video bar that represents the animated GIF on the Timeline and select “Add pause” in the right-‐click menu. A pause and play button will appear on your Timeline. You can select and drag these buttons to the left or the right on the Timeline, depending on where you want to pause your GIF. Adjust the duration of this pause by dragging the play button to the left or the right on the Timeline. You can add as many pauses to your animated GIF as you want. Please note that splitting your animated GIF is no longer possible once you’ve paused the clip. 17 3.7. Cutting, copying and pasting objects To make a copy of an object on the Stage, select it and click the Copy Icon right above the Stage. To cut an object on the Stage, select it and click the Cut Icon right above the Stage. To Paste the object, click the Paste Icon (note that the paste operation puts the copy right above the existing object, so move it to view both the original and the copy). You can also use the standard keyboard shortcuts for Cut, Copy and Paste: use the Control key (Mac users: hold the Command key): Ctrl-‐X, Ctrl-‐C and Ctrl-‐V. 3.8. Selecting multiple objects To select one object on the Stage, just click it. To select multiple objects on the Stage, hold the Ctrl or Cmd key and click the other objects. Click once more on an object to deselect it. Once multiple objects are selected, you can move, resize, cut or copy them all in one operation. To select multiple objects directly on the Timeline you can either hold the Shift key to select a group of consecutive objects or the Ctrl or Cmd key to select multiple, non-‐consecutive objects on the Timeline. This way you can move a group of objects to another point on the Timeline. 3.9. Aligning objects To align two or more objects with each other, first select these objects. Then click the Align Icon right above the Stage and choose your align option. Please note that, when aligning objects, the bounding boxes are aligned. For some objects, the bounding boxes do not always visually match the object edges, because they include additional space for object options or animation effects. In that case, it is better to manually align these objects. 18 3.10. The Color Panel Depending on the style and type of object, a Color Panel may be available to change the color of the object. The Color Panel enables you to choose any color you like, and saves your recent colors in the selected colors at the bottom. You can also pick a color from any object in the Editor by clicking the Color Picker in the top left corner of the Color Panel. If you know the exact hexadecimal code of the color you’d like to use, you can also enter the value. 3.11. Managing object layers When two objects overlap each other on the Stage, you may want to decide which one should be in front of the other. To do that, you need to use the Timeline. The lines on the Timeline represent Object Layers: when two objects overlap each other on the stage, the object higher on the timeline will be in front of the object lower on the timeline. To change the order of the layers, click and drag the object name and put it in a higher or lower layer. You can also insert the object layer in between two other objects. You can lock layers on your timeline to avoid unintended changes in position or timing. Click the little padlock icon next to the name of your object on the timeline to lock your object. Click the icon again to unlock the object if you still want to change its position or timing. 19 4. Animating Content 4.1. Timing the overall appearance of objects As soon as you’ve added an object on the scene, a corresponding line appears in the Timeline. Within that line, a gray, blue or green bar4 represents the appearance of the object: when you click the Play button, the object will be visible as long as the timeline indicator (the vertical red line) plays within the gray bar. You can move the gray bar and make it longer or shorter by dragging the edges to the left or the right. By default, the object bar snaps to the timeline indicator or to the start of other objects in the timeline. You can enable or disable snapping by ticking the “Snap” box right below the Play buttons. 4.2. Adding and managing standard animation effects To add an animation effect to your object, click the little arrow In front of the object’s name: this opens the animation options of the object. Click “Choose Animation” to open the list of available animations. Standard animation effects available for every object include Fade, Pop, Fly and Wipe. Some effects make an object appear, others make it disappear. Select an animation effect and adjust its timing by dragging it to the left or the right. For most animation effects, you can also change the speed of the effect by dragging the small edge bullets to the left or the right. 4 A gray bar represents a graphical object, while a blue bar represents a sound track or voice recording and a green bar a video clip. 20 Note that some of the animations have a fixed timing, adjusting the duration of these animations is therefore not possible. 4.3. Adding and managing hand animation effects Some animation effects include a hand that brings or removes an object to or from the scene. Examples of hand-‐based effects are: • Drag Hand In/Out • Present Hand In/Out • Shift Hand In/Out • Hand Push (available in the Marketplace) • Hand Tick (available in the Marketplace) • Hand Swipe (available in the Marketplace) • Hand Present (available in the Marketplace) Select a hand animation effect and adjust its timing by dragging it to the left or the right. Note: some of these animations have a fixed timing and can therefore not be adjusted on the Timeline. Objects in the Doodle Marker Style have an additional hand based animation option: the object can be drawn by a hand. This effect is called “Hand Drawing”. Choose this effect from the animation options list and adjust its timing. You can also change the drawing speed by dragging the small edge bullets to the left or the right. 21 4.4. Adding and managing object-‐specific animation effects Some objects have specific animation effects. Here are some examples of such objects and their animations: • Objects with rotating parts: e.g. wheels of a car, a turning world, a windmill… • People: some people objects have specific animation effects such as talking, walking, waving… • Opening and closing: some objects, such as a box, a laptop, a window… can be opened or closed When an object has a specific animation effect, it will be listed in the animation options list. Select the effect and adjust its timing by dragging it to the left or the right. You can see a preview of the animation when moving over the object in the Moovly library. 4.5. Working with Move & Zoom This animation effect allows you to zoom in on an object, zoom out on it, move it, rotate it, or include any combination of zooming, moving and rotating. To use the Move & Zoom animation for an object, select the effect from the animation options list. Your object will move and zoom from the current timing to a new moment in time. So now drag the red timeline indicator (the vertical line) to a new time position. Then take the object, put it in the new position and, if desired, resize it to new size. This new position can also include a rotation. To test the Move & Zoom effect, put the timeline indicator back to the first position and click the Play button. Note that, when you drag an object to which you applied the Move & Zoom animation to a new position, this position will be part of the path of your object. A new bullet will appear on your timeline to indicate the new (intermediate) position of your object. To delete the bullet, select it on the timeline and hit the backspace or delete key. 22 4.6. Making presentations You can use an animated video as a presentation and vice versa. To turn your video into a presentation, first put the video in Presentation Mode using the dropdown menu in the Animation Settings. Once in Presentation Mode, you can put Stop Markers on the Timeline. These are small indicators that appear right above the Seconds line. Stop Markers indicate where your presentation will automatically stop when played – this way you can program and control the progress of your video step by step. To add a Stop Marker, put the timeline indicator (the vertical line) where you want it and click the Stop Marker icon on the right side of the Play buttons. To delete a Stop Marker, click it and hit your Delete or Backspace key. Adjust the timing of a Stop Marker by selecting the marker and dragging it to the left or the right. When your video is in presentation mode, the scenes you’re not working on at that moment will collapse automatically. This way you can better focus on one specific slide and keep an overview of the progress of your presentation in the Editor. Enabling this feature also allows you to manage the timing of your scenes separately. You can also manually open and collapse the scenes that are part of your presentation: To open or unfold a scene, just select the scene you wish to edit or view. To collapse a scene, move your mouse over the scene and click the “ -‐ “ icon that appears on the left-‐hand side of the scene. If you don’t want to use this feature you can disable it by unchecking the “collapse” box just below the Play buttons. 23 To use the video as a presentation, you should download it as a Flash file (we're working on an HTML5 format). If you download your presentation as an MP4, the stop markers will not be included. When your presentation is ready and you play it full screen, you will be able to control progress using the arrow keys, the spacebar or the mouse, in the same way you use slide-‐based presentations. Note that, if you didn’t disable the collapse function and play your presentation in the Editor, it will only play (and loop) the selected scene. To watch your entire presentation you can disable the collapse function or play your video on the Details page of your presentation. 4.7. Playing your animation At any time, you can hit the play button to preview your animation. When your mouse cursor is in the Timeline, you can also use the Spacebar to start and stop playing. Click the fast-‐forward and rewind buttons to move forward or backward. Double-‐ click the fast-‐forward and rewind buttons to move immediately to the beginning or the end of your animation. You can make your animation loop by clicking the Loop Icon, which turns blue when enabled. Click it once more to disable looping. When you play your video in Presentation mode (if you didn’t disable the collapse function) it will only play (and loop) the selected scene. To watch your entire presentation you can disable the collapse function or play your video on the Details page of your presentation. 4.8. Other Timeline options • • Changing the name of an object: double-‐click it and enter the new name. Zooming in and out on the timeline: to fine-‐tune timing and synchronization of your objects, zoom in on time using the magnifying glasses or the slider right below the Play buttons. 24 5. Working with Scenes 5.1. What are Scenes? A scene is just a part of your content. Sometimes, you may want to add more structure to your content and organize your animation in scenes. This may help you in the creation process and also gives you some additional management options while working in the Timeline. In the Timeline, a scene is represented as a collection of thumbnails. These thumbnails are miniature views of your content and are generated automatically. You can add additional scenes for easier management of content in your timeline: cutting, copying and pasting content to later moments in time, deleting entire scenes, inserting time, etc. When using multiple scenes the number of objects shown on your timeline will be limited to those that are part of the selected scene. This makes it easier to control the content in your video. To show all the objects that are part of your video you can select the “Show all” option below the Play buttons. 5.2. Adding and deleting scenes By default, your content is organized in one scene. The length of a scene is automatically adjusted depending on the timing of the objects that are part of it. You can also adjust the scene length manually by dragging the edge to the left or the right. To add or delete a scene, click one of the thumbnails of an existing scene. The scene is highlighted and when you hold our mouse over it, two icons appear on the right side. Click the “+” icon to add a scene, click the trash icon to delete the selected scene. You can also split a scene: select and right-‐click a thumbnail and choose the option “Split scene”. 25 5.3. Cutting, copying and pasting objects and scenes on the Timeline An object, along with its animation, can be cut or copied and pasted on another timeline location. To do so, select the object (either on the Stage or on the Timeline) and click the Cut or the Copy Icon right above the Stage (or use Ctrl-‐X or Ctrl-‐C). To Paste the object, first move the timeline indicator to a new time location and click the Paste Icon (or Ctrl-‐V). You can also cut or copy a complete scene. Select the scene (by clicking a thumbnail within the scene), click the Cut or the Copy Icon (or use Ctrl-‐X or Ctrl-‐C). To Paste the scene, move the timeline indicator to the desired time location and click the Paste Icon (or use Ctrl-‐V). If you have multiple scenes, you can also drag a scene and drop them before, after or in between other scenes. When you cut or copy a scene, all objects – and their animations – that lie completely within the scene are part of the cut or copy operations. Objects that only partially overlap with the scene are not cut or copied but keep their position. 5.4. Saving scenes to your Personal Library If you’re subscribed to the Moovly Pro license, you can save scenes to your Personal Library and reuse them in other videos. This way you don’t have to recreate your transitions and intro or outro sections each time you create a new video. To copy a scene to your Personal Library, first select it by clicking its thumbnails. The scene border turns red and all objects that are part of the scene get a red timeline bar (only these objects will be copied to your Personal Library). Then right-‐click the thumbnail bar and select "Copy scene to Personal Library". Give a name to your scene and it will be added to your Personal Library, including all its objects and their animations. To reuse the scene in another project, open your Personal Library and open its Scenes section. Take a scene and drag it to the Timeline. All of its objects and their animations will be inserted before or after the scene that is currently active. 26 5.5. Inserting or reducing time: increasing or reducing scene length If you have multiple scenes, you can insert time before a scene by dragging the scene border to the right. To reduce the length of the scene, drag the scene border to the left. Moving the scene borders also shifts the timing of the objects that lie within the next scene. Objects that only partially overlap with the scene are not moved but keep their position, unless they start within this scene. 5.6. Moving objects from one scene to another You can easily move the timing of an object from one scene to another: just shift the gray time bar to the left or the right so that the object timing lies within the new scene edges. 5.7. Removing empty content from your video While you are creating your content, your Timeline gets longer when you add objects: images, sounds, video clips... The length of your Moov increases automatically. However, in the end you may decide to make your content shorter and remove the last few objects. As Moovly does not know your intentions, it will keep the length of your Moov as long as it was before you removed these objects. Likewise, you may have added a long music file of e.g. 3 minutes but later decide that your content should not be longer than 1 minute. How do you get rid of the empty space at the end of your video, cut the sound and reduce the length to exactly match your real content? Here are 3 ways to remove empty content from your video: 1. For short videos: Scroll all the way to the end of your video by dragging the little gray bar (just below the Thumbnail bar) to the right. Next, move over the right edge of the thumbnail bar (2 little arrows will appear) and drag the edge of the Thumbnail bar to the left until you reach the real end of your content. 2. For longer videos: Drag the red Time indicator (the red vertical line in the Timeline) to the end of your content (not the end of your video), right-‐click 27 the white thumbnail bar and select "split scene". Your video will then be split into two parts. Next, drag the little gray bar (just below the Thumbnail bar) all the way to the end of your video. Move over the right edge of the Thumbnail bar (a “+” icon and a trash can icon will appear) and click the trash can icon. The second (empty) scene you created will be deleted by this action. 3. If you're using a large sound file you can also remove empty content by following these steps: Make sure that your sound continues after the real end of your content (to be sure you can always drag the right edge of the sound bar to the right until the sound is about 10 seconds longer than your other video content). Then select the sound bar in the Timeline (the corresponding line will turn blue on the Timeline) and drag the red time indicator to where you want your video to end, right-‐click the sound bar close to the time indicator, and, from the right-‐click menu, choose "Cut sound and scene till end". (This menu is only available when the sound is selected on your Timeline.) This however only works if there are no other objects on the right side. 5.8. Creating “slides” When you want to use Moovly to create a presentation, the best approach is to create a series of scenes, just as you would create slides in tools such as PowerPoint or Keynote: • Make sure you put the tool in “Presentation Mode” (see 4.6) • Create a few empty scenes (click the first scene and hit the “+” icon a few times – see 5.2). • Add objects to every scene (text items, pictures, …) • Put sequence in the appearance of these objects by shifting their timing. • Add animation effects to every object • By default, Stop Markers are added in the middle of every scene. This way your scene will pause after your objects have appeared and before they disappear from the Stage. You can add more Stop Markers, e.g. after every object animation – wherever you want the “slideshow” to pause automatically. • If necessary, make a scene larger (drag its right border to the right) to make room for the sequential animation of all objects. 28 6. Publishing, Sharing and Downloading your Content When you have finished creating your content, click the Save button and close the Edit Mode. (Even when the autosave is on, it is best to save manually before closing your project. This way your latest adaptations are saved as well.) Then close your window and confirm the “Leave this page?” question. On your dashboard, you will now find a thumbnail of your content5. When you move your mouse over this thumbnail, you will be able to see 3 options: Details, Edit or Delete. • Click the Trashcan icon to delete your video.6 • Click the Edit button to edit your video • Click the Details button to go to the Details page of your video. From here, you can view, share, download and publish your content to the Moovly User Gallery, YouTube or Facebook. 5 Refresh your My Moovs page if this is not the case. The thumbnail should appear afterwards. 6 You can recover deleted projects (and edit them again) by following these steps: • Scroll down on your My Moovs page • Click the little arrow next to “Trash Can” • Select the video you wish to restore and click the “restore” button 29 On the Details page of your video, you have a number of additional options, using the buttons right below the video player: Use the Copy button to duplicate your moov. This allows you, for example, to use an existing moov as a template for a new video or presentation. The Set Thumbnail button allows you to determine the thumbnail of your moov as shown on your My Moovs page: drag the horizontal scrollbar in the video player to the frame you would like to use as a thumbnail, and then click the Set Thumbnail button. You can also easily change the name and the description of your moov. A description is not mandatory, but might be interesting if you share a moov with someone else, as that person will also be able to read that description. Additionally, when you publish a moov to the Moovly User Gallery, its title and description are published as well. To change the name and description of moov, click the pen icon next to the current title and description. Clicking that icon changes the view to 2 fields: one for the title and one for the description. Enter your text and click the Save button. 6.1. Sharing your video You can easily share your videos with other Moovly users: click the Share button on the Details page of your video and enter the email address of the person you want to share the video with7. You can then give that person a certain right: you can allow them to view, copy or co-‐edit the video you’re about to share. Note that you can’t work on one video with more than one person at the same time. If you’d edit the project at the same time someone else is, you will overwrite each other’s adaptations and all your changes will therefore be lost. We can recover the 7 You can share your videos with one or more than one person. 30 last 50 saves of a project but can’t promise that we’ll be able to recover your work when this happens. 6.2. Downloading your video You can download your video to your computer by clicking on the Download button on the Details page of your video. Choose whether you want to download your project as a video (.mp4) or flash (.swf)8. This action will lead you to a page where you have to choose the download quality of your video (SD or HD). You will also be able to remove the Moovly watermark or outro. Afterwards your video is rendered on our servers to deliver you the video in the quality you requested. You receive an email from us when your video is ready to download to your computer. You can also download your video directly on the Moovly website: go back to the Details page of your video and click the Download button, then select the most recent version of your video (e.g. download video, 2 hours ago). Note that a small fee will be charged when downloading your video in a higher quality than included in your license or when removing the watermark or outro when subscribed to the Free license. 8 Select Download flash if your project is an interactive presentation, otherwise you won’t be able to use the Stop Markers you inserted in your video presentation. 31 6.3. Publishing your video You can publish your video directly to YouTube, Facebook and the Moovly User Gallery. Click the Publish button and keep an eye on your YouTube or Facebook account. You will only be notified by e-‐mail when you publish your video to the Moovly User Gallery. 32 7. The Moovly Marketplace If you want to go beyond what’s available in the Standard Moovly Libraries, the Marketplace contains a lot of add-‐on products and services to perfect your video content. In the Marketplace you can purchase additional library objects such as: -‐ Additional graphical objects for existing styles: you can buy objects on an item-‐by-‐item basis or add a complete library to your collection. -‐ New object libraries in new styles: We continue to add new objects and libraries to the Moovly Marketplace. You can expand your Moovly library with these new objects at any time. -‐ Sound objects to add to your Moovs: in our Marketplace we also offer royalty free music that you can synchronize with your content. 7.1. Services If you don't have the time to create your own video or if you would like professional help with the creation of your master version, you can rely on Moovly Certified Partners. These partners are digital content specialists or communication agencies specialized in the production of animated videos made with Moovly. Next to having a master version of your video created by these partners you can also -‐ have your text recorded by professional voice-‐over artists -‐ have your content written and storyboarded -‐ have graphical objects created that meet your organization’s graphical requirements. 33 7.2. External Contributors If you are a freelance multimedia specialist, copywriter or voice-‐over talent and would like to offer your objects or services in our Marketplace, contact us for more details. 7.3. Buying objects in the Marketplace In order to buy additional objects in the Moovly Marketplace you need credits. With Moovly credits, you can also export videos in HD or remove the Moovly watermark or outro from your video. You can do these purchases in dollars, but credits are easier when you want to avoid a credit card transaction every time you want to purchase something. At any time, you can view your Credit Balance in the Moovly Marketplace. By default, 10 credits correspond to 1 US dollar. You can buy credits in packs of 50, 100, 200... When you buy larger credit packs, you get extra credits. This way, you can save up to 50% on the price per credit! Once you’ve bought new objects, you will find them when you reopen the Editor, in a separate Moovly Library called "Marketplace Items". If you already have an Editor window open and you import a Marketplace item in another browser window, you will have to refresh the libraries to view the new item under "Marketplace Items". To refresh the libraries, click the Refresh Icon in the bottom left corner of the Editor. 34 Moovly.com All rights reserved