1
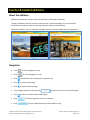
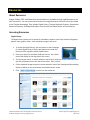
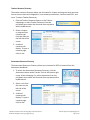
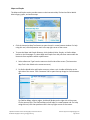
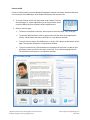
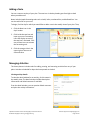
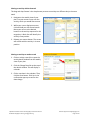
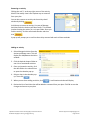
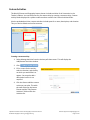
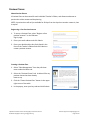
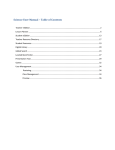
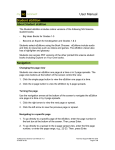
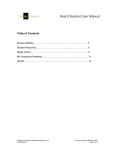
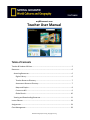
myNGconnect.com
Teacher User Manual
Table of Contents
Teacher & Student eEditions ........................................................................................ 2
Resources ...................................................................................................................... 6
Accessing Resources ................................................................................................. 6
Digital Library ....................................................................................................... 6
Teacher Resource Directory................................................................................. 7
Assessment Resource Directory .......................................................................... 7
Maps and Graphs ................................................................................................. 8
Connect to NG...................................................................................................... 9
Global Search ..................................................................................................... 10
Viewing and Downloading Resources .................................................................... 11
Lesson Planner ............................................................................................................ 14
Assignments ................................................................................................................ 24
Class Management ...................................................................................................... 28
© National Geographic Learning, Cengage Learning
Teacher & Student eEditions
About the eEditions
eEditions are electronic, online versions of the Teacher and Student textbooks.
To open an eEdition, select it from the carousel on the Teacher Homepage. You can access the
carousel from anywhere in the site with the pull-down menu on the Home tab.
Within the eEditions, you can add notes, highlight content, and open media assets and resources.
Teacher eEdition
Student eEdition
Navigation
•
Click
•
Click
•
Click
to enter full-screen mode (press escape to exit).
•
Click
to view the next page.
•
Click
to view the previous page.
•
Type a page number into the text box
•
Click
•
Click
•
Click
to view one page at a time.
to view two pages at a time.
and press return to view a specific page.
to return to the previously viewed page.
to select a page from a menu of contents.
to open a different book (Teacher eEdition only).
myNGconnect World Cultures and Geography Teacher User Manual
© National Geographic Learning, Cengage Learning
Technical Support [email protected]
Page 2 of 30
Adding Notes
1. Click
to add a new note (Teacher eEdition only). A pop-up displays.
2. Enter your text. Use the tools at the top to format
and print the note.
a. Undo last action
b. Redo last action
c. Format text
d. Create a bulleted or numbered list
e. Add a hyperlink
f. Print note
3. When your note is complete, click
. The note will display as an icon,
.
4. To edit the contents of a note, double-click the note icon.
5. To delete a note, double-click the note icon and click
Click
again to confirm.
.
Adding Highlights
1. To add a highlight, click
.
2. Click and drag your cursor across the area of the page you
wish to highlight.
3. To remove a highlight, hover over the highlighted area with
your mouse and click the x.
Search
1. To search within an eEdition, click
.
2. In the search pop-up, enter a word or short phrase and click
Search.
3. A list of pages containing your search term will display below.
Click a page number to open the eEdition page.
4. To close the search box, click the x.
myNGconnect World Cultures and Geography Teacher User Manual
© National Geographic Learning, Cengage Learning
Technical Support [email protected]
Page 3 of 30
Teacher eEdition Resource Hotspots
Links to resources are available throughout the Teacher eEdition. These are indicated by
clickable “hotspots.” When you mouse-over a hotspot, your arrow tooltip will change to a hand.
•
PDF Resources – opens the pictured PDF in a popup window.
•
Core Content Presentations – opens the teacher
resources tab, where you can access core content
presentations.
•
Maps and Graphs – opens the Maps and Graphs
tab.
•
Interactive Whiteboard – opens the Interactive
Whiteboard GeoActivities tab.
•
Digital Library – opens the Digital Library tab.
•
Connect to NG –opens the Connect to NG tab.
•
Interactive Map Tool– click this hotspot to open
the Interactive Map Tool in a pop-up window.
•
GeoJournal – click this hotspot to open the
GeoJournal PDF in a pop-up window.
myNGconnect World Cultures and Geography Teacher User Manual
© National Geographic Learning, Cengage Learning
Technical Support [email protected]
Page 4 of 30
Student eEdition Media Assets
Modified Text
English language learners and struggling readers can read a simplified version of the text. To view
modified text,
1. Click
in the upper right corner.
2. Click
next to a selected paragraph. A pop-up displays
with modified text. To navigate within the pop-up,
•
click and drag the pop-up to move it to a different part
of the screen.
•
click the arrow icon at the top of the pop-up to move it
to the top of the screen.
•
click Next to view the next paragraph of modified text
on the page or 2-page spread. Click previous to see the
modified text for the previous paragraph.
Playing Audio
Read Aloud audio is available for all main Student eEdition text and selected maps, charts, graphs,
and infographics. To play the audio,
1. Click
to start the audio for the text or resource. To adjust the sound level, use the volume
control on your computer.
2. Click the icon again to stop the audio.
Playing Video
1. To play video, click
automatically.
. The video will open in a pop-up window and begin to play
2. Use the video player controls to pause, jump, and adjust
volume and other video settings.
a. Click pause to stop the video.
b. Move the slider to play the video from another spot.
c. Click Captions On or Captions Off to show or
hide captions.
d. Click the full-screen icon to expand the video. Press
escape to exit full-screen mode.
e. Click the speaker icon to mute or unmute the volume.
f.
Move the volume bar to raise or lower the volume.
myNGconnect World Cultures and Geography Teacher User Manual
© National Geographic Learning, Cengage Learning
a b
c de f
Technical Support [email protected]
Page 5 of 30
Resources
About Resources
Images, Videos, PDFs, and PowerPoint presentations are available through myNGconnect to aid
your instruction. You can access these resources through directories and tools, which are linked
to the Teacher Homepage. They include: Digital Library, Teacher Resource Directory, Assessment
Resource Directory, and Maps and Graphs. You can also use Global Search to find resources.
Accessing Resources
Digital Library
The Digital Library allows you to browse for GeoVideos, explorer video clips, National Geographic
photos, maps, graphs, charts, visual vocabulary images, and music.
1. To access the Digital Library, click the button on the homepage.
Or, select Digital Library from the pull-down menu under the
Home tab from anywhere within myNGconnect.
2. Enter your term(s) in the Search field and click Go. Your search
results will display on the right side of the screen.
3. To narrow your search, or search without a search term, make one or more selections from
the filter pull-downs on the left side of the screen. Then, click Go.
4. Click a thumbnail image to open the resource details screen. See Viewing and Downloading
Resources below for the functionality associated with this screen.
5. Click
to return to the results list.
myNGconnect World Cultures and Geography Teacher User Manual
© National Geographic Learning, Cengage Learning
Technical Support [email protected]
Page 6 of 30
Teacher Resource Directory
The teacher resource directory allows you to browse for chapter and program-level resources.
You can access charts and infographics, core content presentations, resource bank PDFs, and
more. To access Teacher Resources,
1. Click the Teacher Resources button on the Teacher
Homepage, or select Teacher Resources from the
pull-down menu under the Home tab from anywhere
within myNGconnect.
2. Select a chapter
or program-level
resource type
from the menu on
the left side of the
screen.
3. A table of
resources will
display. To open a
resource page,
click its row.
Assessment Resource Directory
The Assessment Resources Directory allows you to browse for PDFs of material from the
Assessment Handbook.
1. To access the Assessment Resources Directory, click the
Assessment button under Teacher Tools in the bottom right
corner of the Homepage. Or, select Assessment from the
pull-down menu under the Home tab from anywhere within
myNGconnect.
2. Select a unit from
the menu on the
left side of the
screen.
3. A table of
resources will
display. To open a
resource page,
click its row.
myNGconnect World Cultures and Geography Teacher User Manual
© National Geographic Learning, Cengage Learning
Technical Support [email protected]
Page 7 of 30
Maps and Graphs
The Maps and Graphs section provides access to the Interactive Map Tool and to Online World
Atlas images, graphs, and outline maps.
•
Click the Interactive Map Tool button to open the tool in a new browser window. For help
using this tool, click the question mark in the top right corner of the screen.
•
To open the Maps and Graphs Directory, click the World Atlas, Graphs, or Outline Maps
button on the homepage. Or, select Maps and Graphs from the pull-down menu under the
Home tab from anywhere within myNGconnect.
1. Select a Resource Type from the menu on the left side of the screen. (The Interactive
Map Tool is also linked to the resource menus.)
2. For Online World Atlas and Graphs resources, select a unit. A table will display on the
right side of the screen. Click a resource link to open the map image in a new browser
tab.
For Outline Maps, select a region. A table will display on the right side of the screen.
Click a resource link. The Outline Map tool will open in a new browser tab. For help
using this tool, click the question mark in the top right corner of the screen.
myNGconnect World Cultures and Geography Teacher User Manual
© National Geographic Learning, Cengage Learning
Technical Support [email protected]
Page 8 of 30
Connect to NG
Connect to NG provides a portal to National Geographic explorer interviews, the World Almanac,
current events, the GeoBee Quiz, ePals Global Community, and research links.
1. To access Connect to NG, click the button under Teacher Tools on
the homepage. Or, select Digital Library from the pull-down menu
under the Home tab from anywhere within myNGconnect.
2. Select a resource type.
•
To listen to an explorer interview, select a portrait from the slider. Then, click play.
•
To view the World Almanac, select a region and a click the name of the appropriate
country. Details about the country will open in a new browser window.
•
To access current events, the GeoBee Quiz, or ePals, click a button at the bottom of the
page. The resource will open in a new browser window.
•
To access research links, click the button on the bottom of the screen. A table of links
will display. Select a unit from the menu on the left. Then, click the appropriate link.
The research link will open in a new browser window.
myNGconnect World Cultures and Geography Teacher User Manual
© National Geographic Learning, Cengage Learning
Technical Support [email protected]
Page 9 of 30
Global Search
The Global Search allows users to search for learning resources in the system using keywords,
resource types, or standards.
1. Select “Global Search” from the
pull-down menu under the
Home tab from anywhere
within myNGconnect.
2. Enter search terms in the text
boxes.
3. Select a resource type from the
pull-down menu to filter your
results.
4. Click
.
5. Your results will display in a
table.
•
Click an arrow in the top
right corner of the table to
view additional results.
•
Choose an option from the
pull-down menu to sort the
table.
•
Click a column header to
sort results.
6. To open a resource page, click its row in the results table.
7. Click
to return to the results list. Or, click
return to the search dialog.
myNGconnect World Cultures and Geography Teacher User Manual
© National Geographic Learning, Cengage Learning
to
Technical Support [email protected]
Page 10 of 30
Viewing and Downloading Resources
PDFs
When you open a PDF resource page, an information screen will display.
1. To download the PDF, click
The PDF will open in a new tab.
.
2. Depending on your browser, click
the save icon or right-click the PDF
and click “Save as…” to save the PDF
to your computer.
Core Content Presentations
When you open a Core Content Presentation resource page, an information screen will display.
Note: Microsoft PowerPoint is required to view presentations.
1. To download the presentation,
click
.
2. Depending on your browser, you
may choose to open or save the file.
Select Save to save the file to your
computer.
Images
When you open an image resource page, a
preview will display.
•
Information about the image
displays at the bottom of the page.
•
To launch an image in a larger
viewer, click
.
•
To download an image, click
.
The image will open in a new tab. If
you are using a PC, Right-click the
image. If you are using a Mac, hold
the control button on your keyboard
and click the image. Choose “Save
image as…” from the menu.
myNGconnect World Cultures and Geography Teacher User Manual
© National Geographic Learning, Cengage Learning
Technical Support [email protected]
Page 11 of 30
Audio and Videos
When you open an audio or video resource page, it will begin to play automatically.
a. Click pause to stop the audio or video.
b. Move the slider to play the audio or video
from another spot.
c. Click Captions On or Captions Off to show or
hide captions (videos only).
d. Click the full-screen icon to expand the audio
or video. Press escape to exit full-screen
mode.
e. Click the speaker icon to mute or unmute the
volume.
a
b
c d e f
f. Move the volume bar to raise or lower the
volume.
Adding a Resource to the Lesson Planner
You can add resources to any custom activity in your lesson plan. Custom activities display in the
Daily Planner with a star icon,
. For instructions on how to use the Lesson Planner, see page 14.
1. Open the appropriate resource page and click
.
2. A pop-up will display. Choose a lesson
plan from the pull-down menu in the
upper right.
3. Select the target custom activity from
the results table. Or, click Create
Custom Activity to add a new custom
activity to the table.
4. Click Add to add the resource to your
custom activity.
myNGconnect World Cultures and Geography Teacher User Manual
© National Geographic Learning, Cengage Learning
Technical Support [email protected]
Page 12 of 30
Adding a Resource to an Assignment
You can add resources to assignments for your students. For instructions on how to use
assignments, see page XX.
1. Open the appropriate resource
.
page and click
2. A pop-up will display with a list of
assignments. Click an assignment
title to add the resource to the
assignment. Or, click Create
Assignment to add the resource
to a new assignment.
3. Click OK to confirm. The resource
will be added as a link in your
students’ assignment.
myNGconnect World Cultures and Geography Teacher User Manual
© National Geographic Learning, Cengage Learning
Technical Support [email protected]
Page 13 of 30
Lesson Planner
About the Lesson Planner
The Lesson Planner organizes instruction into activities. World Cultures and Geography activities
have been preloaded into the planner. You can start with a premade plan and move activities as
needed. Or, you can start with a blank plan. You can also schedule events, create custom activities,
add notes for any day, and print your plan.
To open the lesson planner, click the link under Teacher Tools on the
myNGconnect homepage. Or, select “Lesson Planner” from the pulldown menu under the Home tab from anywhere within myNGconnect.
myNGconnect World Cultures and Geography Teacher User Manual
© National Geographic Learning, Cengage Learning
Technical Support [email protected]
Page 14 of 30
Creating, Navigating, and Removing Lesson Plans
Creating a new lesson plan
The World Cultures and Geography Lesson Planner offers a premade plan for each chapter of
the textbook.
After selecting a premade plan, you can move, add, or delete activities to suit your needs. You can
also start with a blank plan by selecting Build Your Own Plan.
To set up a new plan,
1. Click
.
2. In the pop-up, enter a plan
name and select a start date by
clicking the calendar icon. It's a
good idea to include the unit
and chapter number in your
plan name.
3. Select your Unit and Chapter.
Click Continue to go to the next
screen.
4. Step 3 offers the choice of
beginning with a premade plan
or building a plan from scratch.
•
Selecting "build your
own" will take you to a
blank plan screen
where you can begin
adding activities.
•
Starting with a
premade plan will take
you Step 4. Choose
Year-Long Plan. Then
click Save.
myNGconnect World Cultures and Geography Teacher User Manual
© National Geographic Learning, Cengage Learning
Technical Support [email protected]
Page 15 of 30
Navigating lesson plans
Your plans are listed in the My Plans menu in the Lesson Planner toolbar. To open a different plan,
click the My Plans pull-down menu and select the plan you wish to view.
Your plan will display by work week. Activities show in blocks for each day. A scrollbar may display
for days with multiple activities. Total activity duration for the day displays in the weekday headers.
You can select a different week within the plan by clicking the forward or back arrows next to the
date on the left side of the screen.
Removing a lesson plan
1. Select Remove Plans from the Actions pulldown menu. This will open the Remove
Lesson Plans window with of list of your plans.
2. Select one or more plans that you would like
to remove from the list.
3. Click Remove at the bottom of the window. A
confirmation pop-up will prompt you to
confirm removal.
myNGconnect World Cultures and Geography Teacher User Manual
© National Geographic Learning, Cengage Learning
Technical Support [email protected]
Page 16 of 30
Managing Events
Events allow you to schedule non-teaching days for one or all of your plans. You can move
activities forward by a day to accommodate an event, or remove them from your plan. Events
display in blue on your plans.
Scheduling an event
1. Select Manage Events from the Actions pulldown menu. This will display the My Events
window.
2. Click the day in the calendar on which you
would like to schedule an event.
3. Confirm the start date. If your event will last
more than one day, select an end date.
4. Input your event's name.
5. Identify which plans should display the event,
the current plan, all plans for the current class,
or all plans for all of your classes.
6. Identify whether you would like all activities moved ahead a day to accommodate the event.
You can also choose to remove the activities scheduled for the day of the event.
7. Click Save. You can either add another event or click Cancel to close the My Events window.
Removing a scheduled event
1. Select Manage Events from the Actions pulldown menu. This will display the My Events
window.
2. In the calendar, click the day of the event you
would like to reschedule.
3. Identify whether you would like all activities
moved back a day or left as is.
4. Click Remove. You can either add another
event or click Cancel to close the My Events
window.
myNGconnect World Cultures and Geography Teacher User Manual
© National Geographic Learning, Cengage Learning
Technical Support [email protected]
Page 17 of 30
Adding a Note
You can a note to any day of your plan. The note icon in the day header goes from light to dark
when you add a note.
Notes include simple formatting tools such as bold, italics, numbered lists, and bulleted lists. You
can also add a link to your note.
To begin, find the day for which you would like to add a note in the weekly view of your plan. Then,
1. Click the Note icon in the
day's header.
2. Click inside the text box and
input your note. Formatting
icons will display as soon as
the text box is activated. Click
one of these icons to activate
the formatting tool.
3. Click the orange circle in the
upper right of the note to
save and close.
Managing Activities
The lesson planner includes tools for adding, moving, and removing activities from any of your
plans. Activities scheduled for days that have passed are locked.
Viewing activity details
To view the detail window for an activity, click its name in
the weekly view. The detail window includes descriptive
information and linked resources if available.
From the detail window, you can preview linked resources
and print the activity information.
myNGconnect World Cultures and Geography Teacher User Manual
© National Geographic Learning, Cengage Learning
Technical Support [email protected]
Page 18 of 30
Moving an activity within the week
The drag and drop feature is the simplest way to move an activity to a different day in the same
week.
1. Navigate to the weekly view of your
plan. Put your mouse cursor over the
activity, which you would like to move.
2. While your cursor displays an arrow,
click and hold your left mouse button.
Move your cursor to the desired
location in the activity sequence for the
target day. A black line will identify the
activity's new position.
3. Release your mouse button. The screen
will refresh with the activity in its new
position.
Moving an activity to another week
1. Click an activity name link to open the
activity detail window from the weekly
view of your plan.
2. Click the Change Date link at the top of
the details window. This will display a
calendar.
3. Click a new date in the calendar. Then,
click the Save button. Click Yes in the
confirmation pop-up to confirm the
date change.
myNGconnect World Cultures and Geography Teacher User Manual
© National Geographic Learning, Cengage Learning
Technical Support [email protected]
Page 19 of 30
Removing an activity
Clicking the red "x" at the top right corner of the activity
block in the weekly view is the simplest way to remove it
from your plan.
You can also remove an activity via the activity detail
window by clicking
.
A third way to remove an activity is by way of Manage
Activities under the Actions pull-down menu. This method
involves locating the activity in a unit part folder. Once you
find the activity, click the associated calendar and then
click
.
A pop-up will prompt you to confirm the activity removal with each of these methods.
Adding an activity
1. Select Manage Activities from the
Actions pull-down menu. This will
display the Add/Remove Activities
window.
2. Click the desired chapter folder to
see a list of associated activities.
3. Once you locate the activity, click
the date field or the calendar icon
to open the calendar pop-up.
4. Select a date in the calendar popup. Then click
.
5. When you are done adding activities, click
. A confirmation window will display.
6. Review the list of activities that will be added or removed from your plan. Click OK to save the
changes and return to your plan.
myNGconnect World Cultures and Geography Teacher User Manual
© National Geographic Learning, Cengage Learning
Technical Support [email protected]
Page 20 of 30
Custom Activities
The World Cultures and Geography lesson planner includes activities for all instruction in the
Teacher's Edition. You can block time for your own activity by creating a custom activity. Custom
activity blocks display with a yellow sunburst and are saved in the Custom Activities folder.
Like the preloaded activities, custom activities include space for a name, description, and duration.
They can also be linked to an online resource.
Creating a custom activity
1. Select Manage Activities from the Actions pull-down menu. This will display the
Add/Remove Activities window.
2. Click
.
3. Fill in a name for the activity,
select its duration, and the day
on which you would like it to
appear. You may also add a
description but this is not
required.
4. Click the Save to add the custom
activity to your plan. This adds
the new activity to the Lesson
Planner and the “My Custom
Activities” folder within the
Activities list.
myNGconnect World Cultures and Geography Teacher User Manual
© National Geographic Learning, Cengage Learning
Technical Support [email protected]
Page 21 of 30
Adding a resource to a custom activity
Just as many preloaded World Cultures and Geography activities include resources, you can link an
online resource to your custom activity. To begin, click the activity name in the weekly view to
open the detail window.
•
If you would like to add a resource from
within myNGconnect, click Digital Library
or Resource Directory. The page will open
in a new myNGconnect tab. Navigate to
the appropriate resource page and
click
. You will be directed back to
the Lesson Planner tab and the resource
will be added activity.
•
If you would like to a resource from an
outside website, click My Web Links. In the
pop-up, enter a name and website address,
then click OK.
Editing a custom activity
You can edit the name, description, duration, and date of any custom activity. To begin, click the
activity name in the weekly view to open the detail window.
•
Click Change Date to reschedule the custom
activity.
•
Click Edit to change the description.
•
Select a new time from the pull-down menu
to change the duration.
•
Click the red "x" next to a resource to
remove it.
•
Click Save to save your changes and return
to the plan.
myNGconnect World Cultures and Geography Teacher User Manual
© National Geographic Learning, Cengage Learning
Technical Support [email protected]
Page 22 of 30
Printing and Saving a Plan
The Lesson Planner's printing feature offers two views. Week at a Glance prints summary
information for each week of your plan including total duration for each day, linked resources, and
where available, standards.
The detailed view includes detailed information for each scheduled activity. If you have Adobe
Reader, you can use the print feature to save a copy of your plan as a PDF.
1. Select Print/Save Plans from the
Actions pull-down menu.
2. In the pop-up, select a time period.
An end date is only needed if you
wish to print or save more than one
week of your plan.
3. Select the Week at a Glance or
Detailed print format.
4. Click Preview. Then, click Print to
activate your browser's print
function. Or, click Save to download
a PDF version of the plan.
myNGconnect World Cultures and Geography Teacher User Manual
© National Geographic Learning, Cengage Learning
Technical Support [email protected]
Page 23 of 30
Assignments
About Assignments
The Assignments tool allows you to create assignments that display on your student’s
myNGconnect homepages. You can add World Cultures and Geography resources and web links to
your assignments.
To open the Assignments tool, click the link under Teacher Tools on
the myNGconnect homepage. Or, select “Lesson Planner” from the
pull-down menu under the Home tab from anywhere within
myNGconnect. A list of assignments will display.
Using the Assignments Tool
Adding Assignments
1. To create a new assignment, click
.
2. In the pop-up, enter a title and description. Click calendar icons to select a start date and
end date. Then, click Next.
3. To add students to the assignment roster,
select the checkboxes next to the
appropriate student names and click Add.
When you are finished adding students,
click Next.
myNGconnect World Cultures and Geography Teacher User Manual
© National Geographic Learning, Cengage Learning
Technical Support [email protected]
Page 24 of 30
4. If desired, you can add resources from within myNGconnect or from an outside website to
the assignment.
• To add a resource from within
myNGconnect, click Teacher Resources,
Digital Library, or Global Search. The
page will open in a new myNGconnect
tab. Navigate to the appropriate
resource page and click
. You
will be directed back to the
assignments tab and the resource will
be added to the list.
• To add a resource from an outside
website, click Add Web Links. Enter the
name and website address. Then, click OK.
• Click the red X next to a resource to delete it from the list
5. When you are finished adding resources, click Save & Close. Your assignment will be
added to the Assignments list.
6. On the start date you indicated, the assignment will appear on the student’s homepage.
Viewing and editing assignments
To view or edit an assignment’s details for all associated students, click the assignment title. In the
pop-up, you can edit the title, description, start and end dates, the student roster, and associated
resources. When you are finished editing the assignment, click Save & Close.
myNGconnect World Cultures and Geography Teacher User Manual
© National Geographic Learning, Cengage Learning
Technical Support [email protected]
Page 25 of 30
Edit start and end dates for an individual student
1. To edit start and end dates for an individual student, locate the appropriate assignment in
the list. Click the number in the Assigned Students column.
2. The assignment roster displays. Locate the appropriate student in the roster. Click edit in
the Start Date or Due Date column.
3. In the pop-up, enter a new date and click Save.
Add Feedback for completed assignments
1. To add feedback for completed assignments, locate the appropriate assignment in the list.
Click the number in the Assigned Students column.
2. Locate the appropriate student name in the list. In the Feedback column, click Add.
3. In the pop-up, add your feedback. When you are finished, click Save. Your feedback will
display on your student’s assignments page.
•
To move the assignment to you student’s Done list,
click the checkbox.
•
You can select a full star, half star, or empty star to
indicate student performance.
•
Type written feedback in the box.
myNGconnect World Cultures and Geography Teacher User Manual
© National Geographic Learning, Cengage Learning
Technical Support [email protected]
Page 26 of 30
Assignments on the Student Homepage
To access assignments, students will click “my Assignments” under Student Tools on the
myNGconnect Student homepage.
A list of current assignments will display.
Students can click an assignment name to
view details and access resource links.
Students can view completed assignments
in the “Done” tab. Your feedback displays
next to the assignment details.
myNGconnect World Cultures and Geography Teacher User Manual
© National Geographic Learning, Cengage Learning
Technical Support [email protected]
Page 27 of 30
Class Management
Rostering
Rostering is the process of placing students into each Teacher's class for myNGconnect, and
assigning corresponding usernames and passwords.
When an order is placed, an NGSP support representative initiates Rostering by contacting the
district's "Subscriber Contact" (stated on the "eProducts Supplemental Order Form" which is part
of the purchasing paperwork). If the district's "Subscriber Contact" has not been in contact with an
NGSP support representative, then they should call NGSP Tech Support at 1-888-915-3276.
Using Class Management Tools
To access Class Management tools, click the link under Teacher Tools
on the myNGconnect Home page. Or, select “Class Management”
from the pull-down menu under the Home tab from anywhere
within myNGconnect.
Students Tab - Viewing Class Details
When entering Class Management, the Detail information for the current class appears by default
as the “Students” tab.
myNGconnect World Cultures and Geography Teacher User Manual
© National Geographic Learning, Cengage Learning
Technical Support [email protected]
Page 28 of 30
Changing classes
1. To change classes, click the class pull-down at the top right corner of the screen.
2. Select a class from the pull-down. myNGconnect will refresh and the homepage will display.
3. Re-open Class Management to view the details screen for that class.
Student Details
1. In the students tab, locate the appropriate student and click View Details.
2. To print the details, click the Print button, located in the top right corner of the screen.
•
Click
to print the student’s details. In the pop-up, click print to activate your
browser’s print dialog.
•
Click Print Password to print the student’s password. In the pop-up, click print to
activate your browser’s print dialog.
•
To change the student’s password, click Change Password. In the pop-up, ender a new
password and click Save.
myNGconnect World Cultures and Geography Teacher User Manual
© National Geographic Learning, Cengage Learning
Technical Support [email protected]
Page 29 of 30
Preview Classes
About Preview Classes
A Preview Class can be created for each individual Teacher’s Edition, and allows an educator to
preview the online content and do planning.
NOTE: A preview class will only be available for 30 days from the day that a teacher creates it, then
it expires.
Registering a Free Preview Account
1. To set up a Preview Class, select “Register a free
preview account!” on the Educator
Sign-in page.
2. Enter your email address and click Submit.
3. Enter your details and the Key-Code found in the
front of the Teacher’s Edition and click Submit to
create a preview account.
Creating a Preview Class
1. Select “Class Management” from the pull-down
menu under the Home tab.
2. Select the “Preview Classes” tab. A table will list any
preview classes that have already
been set up.
3. Click the “Create Preview Class” button in the upper
right corner of the table.
4. In the pop-up, enter your key code and click Submit.
myNGconnect World Cultures and Geography Teacher User Manual
© National Geographic Learning, Cengage Learning
Technical Support [email protected]
Page 30 of 30