1
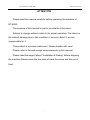
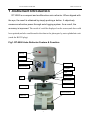
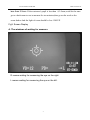
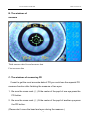
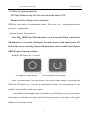
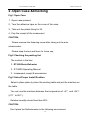
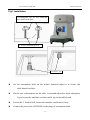
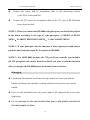
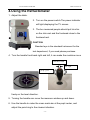
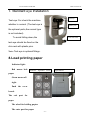
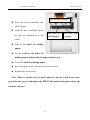
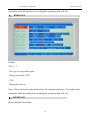
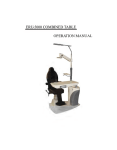
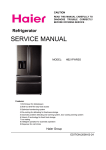
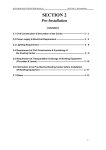
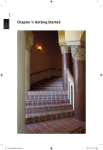
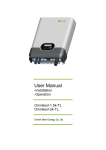
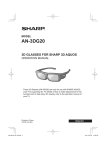
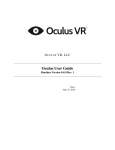
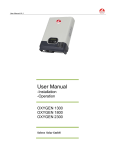
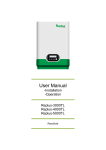
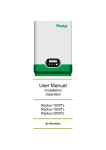
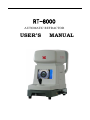
RT-8000 AUTOMATIC REFRACTOR USER’S MANUAL AUTO REFRACTOMETER USER’S MANUAL ATTENTION Please read this manual carefully before operating the machine of RT-8000. The purpose of this manual is just to provide the information. Subject to change without notice in the actual operation. The direct or the indirect damage due to this condition or concern about it, we are irresponsible for it. This product is a precise instrument. Please handle with care! Please refer to the safe usage announcements in this manual. Please read the page 6 about “Installation & Debug”,before shipping the machine.Please close the two bolts of back,the screw and the nut of front. 1 AUTO REFRACTOMETER USER’S MANUAL LIST Attention…………………………………………………………….1 1.Instrument introduction….…………………………………….3 2.Open & Checking………………………………………………8 3.Installation & Debug…………………………………………...9 4.Optometry………………………………………………………13 5.Technique Index……………………………………………….16 6.Security Proceeding &Maintenance…..……………………..17 7.Standard eye Installation………………………………………19 8.Display Screen Adjust………………………………………….19 9.Load printing paper…………………………………………….20 10.Function list and setup………………………………………..21 11.Link of RS232 plug……………………………………………25 2 AUTO REFRACTOMETER USER’S MANUAL 1 .Instrument Introduction RT-8000 is a compact and multifunction auto refractor. When aligned with the eye, the result is obtained by simply pushing a button. It objectively measures refractive power through auto-fogging system. As a result, the accuracy is improved. The result of could be displayed on the screen,and also could been printed,and also could transfer the data to the phoropter by auto ophthalmic unit (need the RS232 plug). Fig1. RT-8000 Auto Refractor Feature & Function Moving CRT Measurement key printer Function key 232 port fuse Power cord peg Power switch Forehead-rest measuring Chin-rest knob Chin-rest 3 AUTO REFRACTOMETER USER’S MANUAL Fig2. Measure Theory The eye adjusts its refraction power to focus the objects at different distances to the retina.But it may be nearsighted (myopia),or farsighted (hyperopia).A lens is needed to correct the refraction power. A Retina image is produced through projecting a standard image to the eye which is used to Point-ring analyze the refraction power. Point mark Besure the eight light point been lightest and smallest. Besure the eight light point aim at the “+” mark. The Refractometer projects a special infrared image (generally a point-ring with eight point) to the retina of an eye.By means of analyzing the image on the retina,it can measure hyperopia,myopia,astigmatism,and axis. In order to make precision measurement, a good alignment with the eye is essential.The refractometer provides a point ring to assist in operation.Pupil size smaller than the median ring means that its diameter is 4 AUTO REFRACTOMETER USER’S MANUAL less than 2.5mm. If the customer's pupil is less than ф2.5mm,could let the man go to a dark room to rest a moment for ten minutes,then go on the work.or the room darker.And the light of room should be less 150LUX Fig3. Screen Display A. The windows of waiting for measure R means waiting for measuring the eye on the right. L means waiting for measuring the eye on the left. 5 AUTO REFRACTOMETER USER’S MANUAL B. The windows of measure Third measure data Second measure data First measure data C. The windows of measuring PD If want to get the most accurate data of PD,you could use the especial PD measure function after finishing the measure of two eyes. 1. Be sure the cross mark (十) fit the center of the pupil of one eye,press the PD button. 2. Be sure the cross mark (十) fit the center of the pupil of another eye,press the PD button.. (Please don’t move the head and eyes during the measure ) 6 AUTO REFRACTOMETER USER’S MANUAL Fig.4 Function key & Lever Measure button RESET-Reset key :Make the machine back to begin state. PRINT -Print key: Print the result. VD-Select vertex distance key :VD=0 for Contact Lens; VD=12 or 7 AUTO REFRACTOMETER USER’S MANUAL 13.75mm for general glasses. PD-Pupil distance key:Get the most accurate data of PD Measure button :Begin once measures. CYL-the turn button of astigmatism mark:First press for + astigmatism,second press for – astigmatism. Measure button: Start measure. Note: PD、PRINT and VD button have several function.When you hold the PD button for 3 seconds,it will display the main menu.At this time,if press VD button,the cursor would up.If press PD button,the cursor would down.If press PRINT button,it means confirm. Hold the PD button for 3 second, A complete retina image An incomplete retina image After a measurement, you can observe the stored retina image by pressing the Hold the PD button for 3 second, an incomplete ciinG6e, the measurement is not reliable, and should be made once again. Incomplete retina images may be caused by eye blinking or by eye movement. Sometimes it is because the signal reflected from the retina is tod weak, or the pupil diameter is less than 2.5mm . 8 AUTO REFRACTOMETER USER’S MANUAL CAUTION: VD is the distance from the glass to the cornea. VD=12mm generally for the Asian ,VD=13.75mm for occident, VD=0mm for contact lens. 9 AUTO REFRACTOMETER USER’S MANUAL 2 .Open Case &Checking Fig.1 Open Case 1. Open case process: 2. Tear the adhesive tape on the cover of the case; 3. Take out the plastic thing for fill; 4. Pop the receipt of the incasement. CAUTION: Please unscrew the fastening screw after taking out the auto refractometer. Please keep the box and foam for future use. Fig.2 Checking the packing list The content in the box: 1. RT-8000Auto-Refractor 2. RT-8000 Operating Manual 3. Incasement receipt & accessories Fig.3 Select Proper Install Position Select a plane place to place the working table and put the machine on the table. You can use the machine between the temperature of +5℃ and +35℃ (41℉ to 95℉). Relative humidity should less than 80% . CAUTION: Don’t place the Refractometer in the following environment. - 10 - AUTO REFRACTOMETER USER’S MANUAL 1. Extremely hot or cold. 2. Temperature rapidly changes. 3. Damp and dirty. 4. Near electromagnetic facilities. 3.Installation &Debug Find a good place to set the machine. First find a place without sun shine to set the automatism table in your workroom.Then set the RT-5000 auto refractometer on the automatism table or auto ophthalmic unit.Please besure the brightness less 150LUX.And besure the temperature at +5℃ to +35℃.And the relative humidity should be less 80%. Please take attention, forbid: A:The temperature is too high or too low. B:The change of temperature is large. C:The room has a lot of dust. D:There is electromagnetism disturb machine on the round. E:The room is too bright. - 11 - AUTO REFRACTOMETER USER’S MANUAL Fig.1 Installation 2.Circumgyrate out for two round,and leave them on the base 1. Unscrew the fastening screw 3.Unscrew the z Set the automatism table on the aclinic floor,and adjust it to besure the table-board is aclinic. z Put the auto refractometer on the table –board,and adjust the shock absorption leg to besure the machine is aclinic,and 4 leg on the table-board. z Loosen the 3 fixation bolt, besure the machine could move freely. z Contact the power line of RT-8000 to the plugs of automatism table. - 12 - AUTO REFRACTOMETER z USER’S MANUAL Contact the power lind of automatism table to the alternating current (110V-220V)with earth line. z Contact the 232 faucet of automatism table to the 232 port of RT-8000,and screw down the bolt. NOTE 1: When you contact the RT-8000 with phoropter,you should first adjust in the menu according to the type of your phoropter. A: RESET & RS232 MENU;B: SHOW PRECISION MENU;C: BAUD RATE MENU. NOTE 2: If your phoropter has the function of data export,you could choose print the data from phoropter by the printer of RT-8000. NOTE 3: Not all RT-8000 includes the 232 port.If you want the type includes the 232 port,please ask details from the seller.If you want to add this function after you bought the RT-8000,please ask details from our factory. Debugging z First besure the machine could move freely on the base,when you pull the handle.And besure the machine could up and down freely,when you turn the handle. z Pown on the machine,besure the power light is all right,and the screen start displaying. z Put the test-eye on the jaw bracket,then peg it with plastic nail,and let the test people sit down. - 13 - AUTO REFRACTOMETER USER’S MANUAL z Adjust the knob of jaw bracket,besure the height of the test-eye and the pupil is same as measure window approximately. z Adjust the handle,besure the “+” mark on the center of 8 light point. z Adjust the handle front or back,besure the 8 light point focalize and clearest. z Press the measure botton,and just a moment,the result will display on the screen.When the VD=12,the result should be same as the number of test-eye. z Press the PRINT button,the result will be printed out. z If you press the RESET button,the screen will display “RT-8000”,all the data before will clean out,and then return to the work menu. z If the result above is same as test-eye (the accepted error is ±0.25D),and all function buttons are work well,this machine should be all right. Note: If the room is sun shine or high bright,it will have some error. - 14 - AUTO REFRACTOMETER USER’S MANUAL 4.Using the Refractometer 1. Adjust the table. 2. Turn on the power switch.The power indicator will light,displaying the TV screen. 3. The be measured people should put his chin on the chin-rest and the forehead close to the forehead rest. CAUTION: Standard eye is the standard Instrument for the test department, If you need please purchase. 4. Turn the handle front back right and left, it can make the machine move Advance--back Eft-- right go up-- go to freely on the level direction. 5. Turning the handle can move the measure window up and down. 6. Use the handle to make the cross mark aim at the pupil center, and adjust the point-ring to the clearest situation. - 15 - AUTO REFRACTOMETER USER’S MANUAL 7. Press the measure button to get the result of the first measurement. 8. After both of the left and right eyes are measured,pupil distance(PD) value will be displayed on the TV screen. 9. If want to get the most accurate data of PD, you could use the especial PD measure function.Aftert above operation,make the Measuring Window against to one eye,then press the PD butten,then turn another eye,press the PD butten.Then the most accurate data of PD will display.(This function could be used only for measuring PD too) 10. Press PRINT butten to print out the results. type day RT-8000 2007-01-10 9:35 custome r nane vetex distance right eye SPH NAME Left eye VD=12 PD=63 text pupil distance RIGHT S -3.75 -3.88 -3.75 C -0.62 -0.50 -0.50 A 165 168 164 CYL AX Right-eye results (last 3 results printed) * -3.75 -0.50 166 average LEFT S -4.25 -4.12 -4.38 C -0.75 -0.75 -0.62 A 24 26 23 left-eye results (last 3 results printed) * -4.25 -0.75 24 average is is CAUTION: z Strong light toward the measuring window will cause measurement error. - 16 - AUTO REFRACTOMETER USER’S MANUAL z Each eye should be measured at least three times. z The instrument should be regularly tested by the test-eye. Messages during measurement “ERROR” z Displayed when the eye blinks or moves. z Indicates that there is no eye to be measured or the cross mark is not well centered. z Displayed when pupil diameter is less than 2.5mm. z Indicates that the signal reflected from retina is too weak. “SPH OVER” z Indicates that spherical power exceeds the maximum. - 17 - AUTO REFRACTOMETER USER’S MANUAL 5.technique Index Measure Range Item Measure Range Degree SPH -20~+20D 0.125D CYL -8~+8D 0.125D AX 0~180° 1° PD 45~85mm 1mm z VD: 0mm,12mm,13.75mm z Minimum pupil diameter measurable:2.5mm z TV monitor: 7”LCD z Eye fixation:Atuo fogging system z Alignment:Pupil rings z Power supply: AC110V,120V,220V,or240V,50/60Hz,60VA z temperature:+5℃~+35℃ z Dimensions:480(L)260(W)470(H)mm z Weight:16kg(Automatic table not included) - 18 - Error 0 ~±10D: 0 25D 10D~±20D: 0.5D 0.25D AUTO REFRACTOMETER USER’S MANUAL 6.Security Proceeding &Maintenance Fig.1 Pay Attention z Power Supply: AC ,Range:100-250V z To avoid the damage of the machine shell Please don’t put the heavy thing on the instrument. z Please turn off the power supply for stop using long time. z Keep the machine and the around air cleaning. z Don’t put it under the sun. z Be careful when moving the machine. z Don’t use the chemistry reagent to wipe the surface of the machine. Fig.2 Maintenance z If the dust drops on the measurement window please clean it with the soft nap fabric or the blow auris ball. z If there are finger mark or lipin on the measure window please clean it with the fine haircloth or the lens paper. z If the surface of the machine is dirty, please cut off the power supply firstly, then clean it with the wet cloth or the suds. Please don’t use the gas 、solvent or chemistry liquid medicine. - 19 - AUTO REFRACTOMETER USER’S MANUAL Fig.3 Examine & Repair Power supply indicator light doesn’t work. z z z z Whether the jack has the electricity? Whether the power supply line is connected all right? Whether turn on the power supply switch? (4)Whether the fuse is broken? The fuse breaks after turn on the Examine whether the AC is between 100v to 240v power supply. The measurement value of the standard eye error is more higher. The standard eye fixes iniquity or not? The measure window is polluted or not? The standard eye surface is dirty or not? Astigmatism measurement value Whether the eye looks awry? more high. Whether nictation or move the eyeball. Whether aim at the pupil. Whether the eye has pathological change. Pupil dia. less than 2.5mm. Measure result always displays ”ERROR” or the eye ground circle isn’t complete. z z z z There is a slippage problem between the Mainframe and the Base. Whether the main machine is just to the base? The part between the machine and the base is too dirty? Lack paper. Add the thermal printer paper. If the above problems can’t be solved or have other new phenomenal please contact with us. - 20 - AUTO REFRACTOMETER USER’S MANUAL 7. Standard eye Installation Test-eye Test-eye: For check the machine whether in normal. (The test-eye is Plastic pins the optional parts,the normal type is not included) To avoid falling down,the Chin-rest knob test-eye should be fixed on the chin-rest with plastic pins. Note: Test-eye is optional fittings. 8.Load printing paper Indicator light: Red means lack Indicator Light:Red means paper. Green means all right. Push the cover board. The exit port for paper The wheel for holding papter The enter port for paper. - 21 - Open butten AUTO REFRACTOMETER USER’S MANUAL The exit port for paper z Press the cover board,then take off the board. z Load the new scroll,and besure The wheel for holding papter the face of sensitization to the The enter port for paper inside. z Take of the wheel for holding papter z Pin the scroll by the wheel for holding papter,and put out the paper from the top. z Fit on the wheel for holding papter z Insert the paper to the exit port on the cover board. z Resume the cover board. Note: These is another way to load paper.It is pin the scroll to the enter port,when the green is light,press the PRINT button,then the paper will go out from the exit port. - 22 - AUTO REFRACTOMETER USER’S MANUAL 9. Function menu and setting H old the PD button for 3 second, then the function menu will display. Then if press VD button,the cursor will up.If press PD button ,the cursor will down.Press PRINT button to confirm,and press EXIT button to exit menu. 1. VD MENU VD include 3 types: 1. VD=0 for using the contact lens. 2. VD-12 for Asian yellow race and the one with low bridge of the nose. 3. VD=13.75 for white race and the one with high bridge of the nose Note: The default of the VD is you could press VD choose the correct type. 2.DATE & TIME MENU For adjusting the time and date. Note: Please finish this enactment before the optometry.Because if you adjust this - 23 - AUTO REFRACTOMETER USER’S MANUAL enactment while the machine are working,the optometry data will lost. 3. PRINT & RS232 MENU 1、PRINT ONLY PRINT ONLY for printing only. 2、RS232 ONLY RS232 ONLY for transferring plug only. 3、PRINT AND RS232 PRINT AND RS232 for printing first,then transferring plug. Note: Please finish this enactment before the optometry.Because if you adjust this enactment while the machine are working,the optometry data will lost. 4.RS232BAUD RATE MENU 。According to the peripheral equipment,adjust the correct baud rate. Note: Please finish this enactment before the optometry.Because if you adjust this enactment while the machine are working,the optometry data will lost. 5. SHOW PRECISION MENU In normal,the show precision is 0.125. If contacted with phoropter,the show precision should be 0.25 Note: Please finish this enactment before the optometry.Because if you adjust this enactment while the machine are working,the optometry data will lost. 6. SCREEN PROTECT MENU Use the screen protect could protect the screen from the high bright rest character. Once you want to return work and quit the screen protect,just need to press RESET botton. Note: Please finish this enactment before the optometry.Because if you adjust this - 24 - AUTO REFRACTOMETER USER’S MANUAL enactment while the machine are working,the optometry data will lost. 7. XDEFAULT Default: VD=12 The type of export data: print Show precision:0.125D CYL:Show precision: no Note: Please finish this enactment before the optometry.Because if you adjust this enactment while the machine are working,the optometry data will lost. 8.INTERFACE Picture bid has three kinds: - 25 - AUTO REFRACTOMETER USER’S MANUAL 1 number picture bid , 2 numbers pictures bid, 3 numbers pictures bid Interface characters display has 2 kinds , 1 English shows, 2 Chinese demonstrates a final total but has the combination demonstrating an interface 6 kinds to be for a consumer's choosing. Set up in setting up , using process before should set up for the optometry, meeting clear away current optometry data. 10. The contact for RS232 port The RS232 port is used to contact auto refractometer to peripheral equipment.Please pay attention to that,this port is a nonstandard port,and there is only 3 lines for TXD,RXD,GND. 1. Export data RXD TXD After the measure by RT-8000,press button to GND PRINT print the result.After the print,the data will export from TXD,and this data is same of the - 26 - AUTO REFRACTOMETER USER’S MANUAL measure result. 2. Incept data If the phoropter or other peripheral equipments have export data function,the printer of RT-8000 aslo could print out the data from peripheral equipments. 3. Format of data The data format from RT-8000 is 10 bit per row frame. 4. The number of data Could export 345 data per time. 5. The setting of RS232 port Hold the PD botton for 3 seconds,then could display the function menu including the setting of RS232 port. - 27 -