1
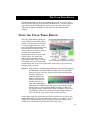
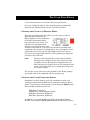
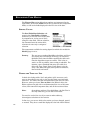
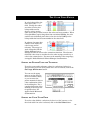
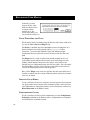
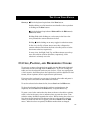
THE COLOR TABLE EDITOR
THE COLOR TABLE EDITOR
INTRODUCTION
This chapter explains the operation of Resorcerer’s Color Table Editor, which
lets you create and edit resources of type ‘clut’ and its synonyms, as well as
color palette (‘pltt’) resources, which have a very similar structure.
There are a number of standard synonyms of ‘clut’ resources: Window Color
Tables (‘wctb’), Dialog Color Tables (‘dctb’), Control Color Tables (‘cctb’), Font
Color Tables (‘fctb’), etc. Typically, each of these resources is a minor
resource for some other major resource (window, dialog, control, font, etc.),
and is edited in a simple way by the major resource’s Editor. If you want to
edit a ‘clut’ synonym by itself using the Color Table Editor, you may need to
enter the synonym type into Resorcerer’s synonym list (for more on this, see
the “Preferences” chapter). If there isn’t a synonym declaration, Resorcerer
will use one its templates to edit the resource with the Data Editor.
You should be familiar with general resource editing, as explained in the
“Editing Resources” chapter earlier in the manual.
TOPICS COVERED
•
•
•
•
•
•
Creating a color table
Opening a color table
Using the Color Table Editor
Cutting, pasting, and reordering colors
Screen copying colors
Decompiling the color table
119
RESORCERER USER MANUAL
CREATING A COLOR TABLE
If you are viewing ‘clut’ or ‘pltt’ resources in Resorcerer’s File Window, click
on the New button or choose New Resource from the File menu. If the
Types List is the Active List, Resorcerer will ask you to specify the resource
ID prior to creating the resource; otherwise, it will use the next free resource
ID available for ‘clut’ or ‘pltt’ resources. The resource ID at which the search
begins is specified in the Resource ID Preferences section of the
Preferences dialog (for more on this, see the “Preferences” chapter later in
this manual). Usually, the starting ID is 128.
If you are already viewing an open color table resource, you can choose New
Resource from the Resource menu. The next free ID is assigned
automatically.
Once the new, empty resource has been created, the Editor opens it for
editing so that you can add colors to it. New color tables are initialized to
contain two colors: white and black.
OPENING A COLOR TABLE
Select the ‘clut’ or ‘pltt’ resource you want to open in the Resources List of
your File Window and click in the Open button, or double-click on the
resource entry directly.
The fidelity with which you will be able to view the colors depends on the
type of screen that the editor opens its window on. You will not be able to
view full 256-color tables accurately on 16-color, gray scale, or monochrome
screens.
When you open a color table on an indexed screen, there is usually a short
time during which all windows flash suddenly in lots of strange colors. This
is normal and due to the Mac’s Palette Manager installing the colors from
your table into the screen device. The Editor asks the Palette Manager to
display the colors in your table as accurately as possible, and to give priority
to them in favor of any other colors in background windows.
Sorcery: By holding the Shift key down as you open your color table, you
turn the Palette Manager off. Colors in the table will be
displayed using the current device colors, which may be very
inaccurate. See the section, “Screen Copying Colors” later in this
chapter for more on why this may be useful.
120
THE COLOR TABLE EDITOR
The Macintosh keeps a variety of standard, hard-wired color tables in the
both the System file and in the machine’s ROM memory. You can open and
copy colors from the ROM tables as easily as from any other file (see the
“Opening the Macintosh ROM as a file” section in the “Opening Files”
chapter).
USING THE COLOR TABLE EDITOR
The Color Table Editor displays an
array of all the colors in the table or
palette. The first entry, with index
0, is in the upper left corner of the
grid. The Editor automatically sizes
the individual color boxes in the
array so that they will be as large as
possible at the same time as
ensuring that all colors in the table
will be visible. For small color
tables, this means that the color
boxes will be quite large. For large
color tables, you can click and drag
the small grow box at the lower right corner of the array to grow the array
bounds to suit your taste.
Sorcery: Most software, including Apple’s Monitors Control Panel, displays
the Macintosh’s standard 8-bit color table (‘clut’ 8 in the ROM)
using a 16 by 16 or an 8 by 32 grid, which looks something like
the above with lots of
confusing jagged runs.
However, the first 215
entries of the table are
actually a 6 by 6 by 6
color cube (minus black)
followed by three RGB ramps and a gray ramp ending in black),
and as such it is more naturally displayed using a width of 36.
The popup palettes in Resorcerer’s Color Icon Editor (which also
rearrange the order of the colors) are an interesting example of
how to do this in a way that is more useful for the user.
On the upper right side of the table are three boxes that let you choose the
background color for viewing the table colors: white, gray, or black. Gray is
usually best, although it may not be drawn gray if you are editing a nonstandard color table that is both full and has no gray entry.
121
RESORCERER USER MANUAL
Above the color array, you can see the number of entries in the table. For
standard tables, this will be 2, 4, 16 or 256.
Note:
Color QuickDraw does not support anything higher than 256
colors on an indexed device, so standard ‘clut’s, for instance, never
get larger than 256 entries. Both ‘clut’ and ‘pltt’ resources,
however, are 16-bit data structures, and there is nothing inherent
in the data structures themselves that says they can’t have more
than 256 entries. The Editor therefore does not enforce a limit of
256 entries, and can edit much larger arrays. Colors in such a
table cannot be displayed accurately on an indexed device, and
the Palette Manager ignores them. In this case, you should
probably edit the resource using the View as List option.
MAKING SELECTIONS
IN THE
ARRAY
On the left side above the array is a numeric field that lets you see the
zero-based index of any single selected table entry. You can also type
into the field to select a given color entry using its index.
To select a single entry in the color array, click and drag the mouse to it,
or enter its index in the Index field above the array. The editor shows
the current selection with a standard marching ants marquee. If you
select exactly one color, the Editor fills in the color component fields
with the color’s numeric values for you to change.
To extend the selection to include more than one color, click on an initial
color, hold the Shift key down, and click on the other color. This selects
all colors in the table from one to the other, inclusive.
You cannot make discontiguous selections while viewing the table as an
array. However, when you view it as a list, you can make arbitrary
selection. You can find further commands for specifying selections in
the Select sub-menu of Resorcerer’s Edit menu.
CREATING A NEW COLOR
To create a new color entry, use the New Color command in the
Editor’s menu. The position in the table that the new color, initially
black, is inserted depends on the type of view.
If you are viewing the table as an array of colors, the Editor appends
the new color at the end of the table unless there is a selection, in which
122
THE COLOR TABLE EDITOR
case it inserts the new color in front of the first selected color.
If you are viewing the table as a list, then Resorcerer’s standard list
insertion caret specifies where the new color will be inserted
CHANGING THE COLOR OF AN EXISTING ENTRY
To change an existing color, first click on it in the array to select it.
When one color is selected, the
Editor displays its color components
in the three component editing
boxes below the array or list. You
can enter the component values
directly, or change them up or down
using the arrow controls. You can set the amount to increment each
component in the second set of editing boxes. As you change the color’s
components, the color box on the right displays the current color (as
best it can) in the upper half of the box, while continuing to display the
old value in the lower half.
Note:
Because of the slowdown that occurs when the Palette
Manager tries to display the new color (which can cause
an update event to all windows in all applications), the
Editor doesn’t try to display the new color accurately until
about a half-second after you’ve stopped interacting with
the various controls.
You can also set the entire color using the Mac’s Color Picker package.
Just double-click on the righthand color box to bring it up.
CHANGING THE COLOR COORDINATE SYSTEM
Sometimes it is more useful to view color coordinates in other color
coordinate systems than the RGB one in which the actual color data is
stored. You can choose which system you want using the Model popup.
The available coordinate systems are:
RGB (Red, Green, Blue)
CYMK (Cyan, Yellow, Magenta, Black)
HSB (Hue, Saturation, Brightness)
HLS (Hue, Saturation, Lightness).
In addition, you can tell the Editor to display all numbers in either
decimal or hex using the Show as Hex command in the Editor’s menu.
123
RESORCERER USER MANUAL
The View as Hex option affects how numbers are interpreted in the
input fields, such as the Index field at the top and the color component
fields, as well as the fields displayed in the list view of the data.
SORTING COLORS
The Sort Table/Sort Selection submenu in the ColorTable or Palette
menu lets you sort the colors in the table
by component or, in the case of ‘clut’s,
using the value field. With no selection,
the command sorts the entire table;
otherwise it sorts only a contiguous
selection.
The components available for sorting depend on which color model the
Model popup is set to.
Sortery:
The sort uses a standard QuickSort algorithm, and if you
are viewing the color table as an array, you can watch
QuickSort work since the Editor updates the table each
time the algorithm swaps two entries. This is fun to
watch, as well as painless, since sorting is undoable. For
instance, open a standard 256 entry color table, do a
Select All, Copy, Paste, Paste, Paste, Paste, grow the
array a bit, Select All again, Sort by Blue or whatever,
then sit back and watch.
VIEWING THE TABLE
AS A
LIST
In both color lookup table (‘clut’) and palette (‘pltt’) resources, each
entry in the table has not only a color, but also data associated with
that color. You cannot see this associated data in the array of colors.
However, when you choose View as List in the Editor’s menu, the
Editor replaces the grid with a one-dimensional list view of the same
colors, their numerical component data, and all the associated data.
Note:
On machines without Color QuickDraw, the List View is
the only useful way you can edit a color table.
You need to use the list view if you want to make arbitrary,
discontiguous selections of color entries.
In list view, you can see which color entries you have changed, pasted,
or created. They have a small dot displayed to the left of their indices.
124
THE COLOR TABLE EDITOR
In color lookup tables, the
extra data is the value
field. Usually the values
are either all 0 for color
lookup tables used in
devices, or they are the
same as the entry’s index; however the value can be any number. When
Color QuickDraw copies image data from an indexed PixMap, the color
used for each individual pixel value is the color in the PixMap’s color
lookup table that has the same number in the value field.
In palettes, the extra data
consists of two fields, the
color’s usage and its
tolerance. The usage is a
word of flags that tell the
Palette Manager how to
manage the color in various color contention situations. The tolerance
field tells it how close to consider the color when trying to match it to a
color in the current device. For more on the meaning of the usage flags,
see Apple’s Inside Macintosh Palette Manager documentation.
SETTING
THE
PALETTE USAGE AND TOLERANCE
To set the usage and/or tolerance values for a selection of colors in a
‘pltt’ resource, or for the whole palette if no color is selected, click on the
Set Usage & Tolerance button.
You can use the popup
menu to set the usage to
the most common values,
or you can enter the
precise numerical value as
a hex combination of bits
in the editing box. For a
complete discussion of the
meaning of the usage bits
for palette colors, see
Apple’s Inside Macintosh
documentation.
SETTING
THE
COLOR V ALUE FIELD
To set the value field for a selection of colors in a ‘clut’ resource, or for
the whole table if no color is selected, click on the Set Value button.
125
RESORCERER USER MANUAL
Generally you will
want to set the value
fields for all the colors
to unique values,
starting at 0. For
device color tables, you
can set all the values to 0.
COLOR TABLE SEED
AND
FLAGS
When editing ‘clut’s, two fields along the bottom of the editor window let
you set the table’s Seed and Flags fields.
The Seed is a number that Color QuickDraw uses to distinguish (at a
glance) different color tables during calls to CopyBits or other
operations. To ensure that different ‘clut’s look different, Apple
recommends that you place the resource ID of the ‘clut’ into the seed
field.
The Flags field is a word of 16 bits that should normally be set to 0.
Color tables used in indexed devices have bit 15 of the flags word set
($8000), which indicates that each color entry’s value field is to be
ignored in favor of indexing directly into the color table. For color tables
used in PixMaps, this bit is clear and the value fields of each color are
used as the actual pixel values in the image data.
Bit 14 of the Flags word, when set, specifies that the value fields are to
be used as indices into the current window’s palette, where the eventual
color is to be found.
CREATING COLOR RAMPS
To set a selection of colors to a sequence of evenly spaced colors between
two given colors (in the current color coordinate system), select the first
color, Shift-select to extend the selection to the second color, and choose
Blend Selection in the Editor’s menu.
COMPLEMENTING COLORS
To set a selection of colors to their complements, use the Complement
Selection command in the Editor’s menu. Complements are computed
in the RGB color coordinate system.
126
THE COLOR TABLE EDITOR
Sorcery:
c N is the keyboard equivalent of the New button.
Double-clicking on a list insertion caret handle is also equivalent
to clicking on the New button.
c A is the keyboard equivalent of Select All in the Edit menu’s
Select sub-menu.
Holding Shift while clicking on a color entry in the list or the
array extends the current selection of colors.
Holding
c while clicking on an entry toggles its selection status.
In list view, the Up or Down Arrow cursor key collapses the
current selection and selects the first color entry above or below
the former selection, respectively.
In array view, the Right, Left, Up, and Down Arrow cursor keys
move the selection in those directions, respectively, if the
selection is of exactly one color.
CUTTING, PASTING, AND REORDERING COLORS
To copy one or more color entries from a table into the Macintosh clipboard,
select them and choose Copy from the Edit menu. If you are viewing the
table as a list, the selection can be any set of colors. If you are copying from
a ‘clut’ resource, the Editor places the copied colors into the clipboard in ‘clut’
format; if from a palette, then it copies them in ‘pltt’ format.
If just one color is selected, you can copy it from the color table and paste it
into any of the color boxes in other Resorcerer editors.
To cut the selected colors from the list, choose Cut from the Edit menu.
To clear the selected colors from the list without copying them to the
clipboard, choose Clear from the Edit menu, or tap the Delete key.
To paste a set of color entries that has been cut from a color table or palette,
select a color in the array view to indicate where to paste the colors. If no
selection exists, the Editor appends the colors. When viewing the colors as a
list, place the list insertion caret between the two color entries in the list
where you want the new ones to appear, and choose Paste from the Edit
menu. After the colors are pasted, the Editor marks them as changed.
127
RESORCERER USER MANUAL
To reorder any contiguous set of colors, select them in either the array or list
view, choose Reorder Selection from the Editor’s menu, and then click
sequentially on the colors in the order you want them.
SCREEN COPYING COLORS
If you would like to add a set of colors to your color table, and the colors you
want to add are part of a color picture displayed in another Resorcerer or
application background window, you can choose Copy from Screen to
attach Resorcerer’s standard marching ants marquee to the cursor. After
you click and drag the mouse to enclose the area of the image you want to
copy from, the Editor copies the screen colors into your table.
In array view, the Editor appends the new colors to the table if no selection
exists prior to the copy, or inserts the copied colors in front of the current
selection. In list view, it inserts the copied colors at the position of the list
insertion caret.
SUPPRESSING
THE
PALETTE MANAGER
The Editor copies colors directly from the screen device, whose colors
may have been swapped out in order to display your current color table.
To avoid this problem, you can hold the Shift key down when you open
your color table to keep the Editor from passing the colors to the Palette
Manager. After copying, you should close the color table, and then reopen it normally.
DECOMPILING THE COLOR TABLE
The Color Lookup Table Editor will decompile the table into a Rez language
declaration. It places the text directly in the clipboard so you can switch to
your development system’s text editor and paste the declaration into your
Rez file.
To do this, first ensure that no color entry is currently selected in the list.
Then choose Copy from the Edit menu to decompile the entire resource to
the clipboard.
128