1
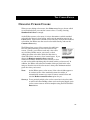
THE CURSOR EDITOR
THE CURSOR EDITOR
INTRODUCTION
This chapter explains how to use Resorcerer’s Cursor Editor to design either
black & white or color mouse cursor images. The Editor makes it easy to try
cursors out and to flip quickly back and forth between adjacent frames of an
animated cursor sequence.
The Cursor Editor uses the same painting tools that Resorcerer’s Color Icon
Editor uses, so you will want to read the “Color Icon Editor” chapter to
become more familiar with how they work, if you haven’t already. Like
other Resorcerer graphic editors, the Cursor Editor supports screen copying
so that you can use the tools in your favorite paint program to edit cursor
images and immediately copy them into your resource data.
You should also be familiar with general aspects of resource editing, as
explained in the “Editing Resources” chapter earlier in the manual.
TOPICS COVERED
•
•
•
•
•
•
•
Cursor resources
Creating a new cursor
Opening a cursor
Using the Cursor Editor
Screen copying
Decompiling your cursor
Closing the cursor
137
RESORCERER USER MANUAL
CURSOR RESOURCES
Black and white cursors are kept in a resources of type ‘CURS’. They consist
of three parts: a cursor image, the cursor mask, and the hotspot.
The two images are 16 by 16 bitmaps. Bits on the Mac screen are replaced
by bits in the cursor image if the corresponding bit in the mask is set (black).
The hotspot is a pair of coordinates giving the offset in pixels from the upper
left corner of the cursor image to the point that is bound to the mouse.
Color cursors are kept in resources of type ‘crsr’, and consist essentially of
the above three parts along with a color 16 by 16 pixmap and its color table.
You can see the exact structure of a ‘crsr’ resource by opening one with its
template using the File Window’s Data button.
CREATING A NEW CURSOR
If you are viewing resources in a File Window, click on the New button or
choose New Resource from the File menu. If the Types List is the Active
List, Resorcerer will ask you to specify the resource ID prior to creating the
resource; otherwise, it will use the next free resource ID available for cursor
resources. You can specify the resource ID at which Resorcerer’s search
begins in the Resource ID Preferences section of the Preferences dialog
(for more on this, see the “Preferences” chapter later in the manual).
Usually, the starting ID is 128.
OPENING A CURSOR
Select the cursor (‘CURS’ or ‘crsr’) resource you want to open in the
Resources List of your File Window and click on the Open button, or doubleclick directly on the resource entry.
Note:
138
When editing an animated cursor (‘acur’) resource, you can open
the individual cursors referenced within its list directly from its
editing window: just double-click on the cursor in the list. For
more information, see the “Animated Cursor Editor” chapter.
THE CURSOR EDITOR
USING THE CURSOR EDITOR
The Cursor Editor
displays a window that is
divided into various
parts: the snapshot list
on the left, the central
cursor image painting
area, the toolbar and
color and popup palettes,
and the try out and
information areas on the
right.
When editing black &
white ‘CURS’ resources, the color palette and popups are not shown.
You can grow the painting area and its window to any convenient pixel size
using the grow control attached to the lower left corner; or click in the Zoom
Box to use the largest size possible on your current display screen.
With the exception of the cursor-specific HotSpot tool described below, all of
the pixel-painting operation of the Cursor Editor is identical to that of the
Icon Editor. See the “Color Icon Editor” chapter for full details on
Resorcerer’s powerful pixel editing capabilities and editing tools.
The Cancel button throws away all changes you’ve made since opening the
cursor resource, and closes the editing window.
CHOOSING A CURSOR IMAGE TO E DIT
To the right of the painting area, the Editor displays the actual-sized
color , 1-bit, and mask images, surrounded by individual frames. To
install one of these cursor images or the mask into the painting area,
just click on it.
The color part of a ‘crsr’ is only used by the System when the mouse is
within a color display; otherwise, the 1-bit black & white image is used.
As a rule for new cursors, you should always design the 1-bit image
first, copy it to the color image and the mask, and then work on the
color image. You can copy one image to another by clicking and
dragging one images frame onto another.
139
RESORCERER USER MANUAL
Note: When you copy a color image to the 1-bit image, the Editor must
decide whether to map non-white, non-black colors to black or to
white. The Preferences… command in the Cursor menu lets
you tell the pixel-editing system whether to always map these
colors to white, to black, or to whichever is nearest.
CREATING A CURSOR MASK
Only pixels in the cursor image(s) that have corresponding set pixels in
the mask are going to be visible when you install the cursor.
Usually, you will want your cursor’s mask to have its interior areas
filled, which is the default behavior when you drag an image onto the
mask. However, you can modify how the mask is created by holding
the Option key and/or the Shift key down. The Shift key constrains the
copy so that no interior filling is performed. The Option key adds a 1pixel shadow border to the mask, which can make the cursor more
visible when placed over a dark background.
Note: The first time you create a mask, the Editor will remind you of
the above options. This only occurs if you have the Hints
preference set in Resorcerer’s General Preferences section of
the Preferences… command in the Edit menu.
SETTING
THE
CURSOR’S HOT SPOT
The cursor’s hotspot is the offset point from the upper left of
the cursor image that is logically attached to the mouse.
The Editor displays it both graphically as an X at its pixel
position, and numerically in the upper right hand corner.
You can change the hotspot graphically. First select the
HotSpot tool from the the Tool palette (the X-shaped one).
Then drag the X to any position in the image.
You can also make a selection of pixels that contains the
hotspot and drag the selection along with the hotspot to
some other position.
TAKING SNAPSHOTS
During editing, you can click on the Snapshot button to take a
snapshot of the current cursor image. The Editor adds the snapshot to
the list on the left side of the editing window, where you can view it.
140
THE CURSOR EDITOR
Sorcery:
You can also take a snapshot by tapping the Space Bar.
Snapshots are a good way of recording various ideas while you are
editing. To revert to any snapshot, scroll to it in the list and doubleclick on it to reset the cursor image to the value of that snapshot.
When you first open the cursor resource, the Editor automatically takes
initial snapshots of your cursor’s images.
The Snapshot list is editable, and you can delete, cut, and paste snaps
within it. If the Editor’s Preferences… dialog is set to Save
snapshots in a resource, then when you close the cursor resource, the
snapshots will also be saved in the same file as the cursor, in a resource
type of your choosing with the same ID as the cursor resource. The
default cursor snapshot list resource type is ‘CSNP’.
TRYING THE CURSOR OUT
The Try Out boxes to the right of the painting area contain various
gray-patterned or black backgrounds. When you place the mouse
within any of the four Try Out boxes, the Editor automatically attaches
the cursor you are currently editing to the mouse so that you can see the
effects of moving it over a patterned background. As you make changes
to the cursor, the try out samples are updated using the latest cursor
image(s) and mask.
To install the cursor more permanently, click on the Try Out button.
This lets you continue editing using the cursor image, mask, and
hotspot in effect after each change you make. The cursor returns to its
normal arrow form if you move the mouse outside of the editing window,
or if you click on the button a second time.
PEEKING
AT
ADJACENT F RAMES IN
AN
A NIMATED CURSOR
Typically, sequences of cursors in an animated cursor have adjacent
resource IDs, recorded in an ‘acur’ resource. Each cursor is a frame in
the animation. When designing the changes from one frame to the next,
it is important to be able to flip back and forth between the two images
to see how smoothly the incremental change will work.
To make this easy to do, the Editor provides a small arrow control to the
left of the Try Out button. When you click in the left arrow, the Editor
temporarily displays any cursor of the same type as the current cursor
141
RESORCERER USER MANUAL
with an ID 1 less than the current cursor. The right arrow is for
peeking at the cursor with an ID 1 more than the current cursor.
Note: If you are peeking at adjacent color cursors, the Editor does not
use the Palette Manager to install the adjacent cursor’s colors on
your indexed display screen. If the adjacent color cursor has a
wildly different color table, and you are editing on a 16-color
display device, you may not be able to see the other cursor’s colors
accurately. This should not be a problem, however, since all the
cursors in your animated cursor should be using the same colors
or the same standard color table.
For more on animated cursors, see the “Animated Cursor” chapter.
SCREEN COPYING
If you prefer to use a more sophisticated paint program or desk accessory
with which to design your cursor images, you can easily copy the image
directly from a background window into the pixel painting area.
To do so, choose the Copy from Screen command from the Cursor menu to
begin screen copying. The Editor replaces the current mouse cursor with the
standard selection (“marching ants”) marquee. The size of the marquee is 1
pixel larger than the 16 x 16 image rectangle, so that the movement of the
marquee will not hide the borders of the candidate image.
As you move the selection rectangle around on your screen, the Editor
constantly copies its contents into the editing box, so you can get a good idea
of what the cursor image will look like. If you have made a selection of
pixels in the editing box, only those pixels will be copied into. After you have
properly placed the selection rectangle, click the mouse button to make the
final copy. If you make a mistake, you can choose Undo.
Before doing the screen copy, you can choose Hide File Windows from the
File menu if you need to free up some screen space in order to see a
background paint window.
For more information on Screen Copying into a pixel painting area, see the
“Color Icon Editor” chapter.
142
THE CURSOR EDITOR
CHOOSING CURSOR COLORS
When you are editing color cursors, the Colors menu lets you choose which
set of standard colors you want the cursor to have. Usually, choosing
Standard 16 Colors is enough.
As the Editor opens a color cursor, it tries to determine to which standard
color table the cursor’s colors belong, and it sets the matching entry in the
Colors menu. If the cursor contains a color that isn’t in any of the standard
color tables, the Editor uses the cursor’s color table directly, and sets the
Custom colors entry.
The Editor places a copy of the current color table into
the ‘crsr’ data whenever you save the cursor for any
reason. Usually, you will have used only a few colors
out of all the possible ones in your cursor, so that
adding the entire color table (which for 256 colors is
about 2K of data) can mean a lot of wasted space. If you
choose the Remove unused colors command,
whenever the Editor builds the cursor resource, it does
so with a color table containing only the actual entries you have used. In
addition, the Editor will reduce the number of bits per pixel in the color
image so that the size of the color cursor is always the minimum needed
given the colors you’ve used.
Note:
As the Editor opens a color cursor, if the colors it finds appear to
be a subset of one of the standard system color tables, it
automatically assumes you want to remove unused colors and
sets the Remove unused colors option for you.
Sorcery: To see precisely which colors a color cursor has in its color table,
as well as all other PixMap values (such as the pixel depth), open
a color cursor resource with its template using the File Window’s
Data button.
143
RESORCERER USER MANUAL
DECOMPILING YOUR CURSOR
When you’ve finished designing your cursor, the Editor will decompile it into
Rez source text, placing the text directly in the clipboard so that you can
switch to your development system’s text editor and paste the resource
declaration in your Rez source file.
To do this, make sure that no bits are selected in the pixel painting area, and
choose Copy from the Edit menu.
CLOSING THE CURSOR
When you have finished editing your cursor, click in the editing window’s
GoAway box to close the cursor. This saves any changes you have made
back to Resorcerer’s in-memory copy of your file.
If you don’t want to save the changes you’ve made since opening the cursor,
click in the Cancel button in the lower right of the window.
Depending on how your preferences are set, Resorcerer may confirm with
you whether to save or discard your changes (for more on this, see the
“Preferences” chapter later in the manual).
144