1
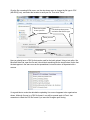
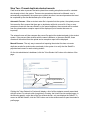
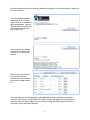
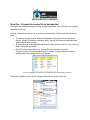
BATCH IMPORT STUDENTS Step One - Prepare the source file to be imported Although there are several ways to develop a comma separated value (CSV) file, this example uses Microsoft Excel. In Excel, create a three column list of students as shown below. Please keep the following in mind: The top row contains column headers that must be in the sequence and format as follows: StateID, FirstName, LastName. Note - StateID is the state-recognized/issued student identification number. All three columns of data must be populated for each student in the file. If any cell is left blank, the file will not upload. Do NOT include apostrophes (e.g. Thomas O'Leary should be entered as Thomas O Leary). Once the student record is created, it can be edited through the student profile and change to O'Leary if desired. Top row is highlighted in yellow in this example simply for demonstration purposes. When all the students are on the list, using the Office Button, select "Save As" Office Button Click "Save As" 1 Give the file a meaningful file name, use the drop down menu to change the file type to CSV (MS-DOS)(*csv), and select the location to save your file. Then click "Save." Select the location to save your file. Use the drop down menu and select the CSV file type. Name your file. Click Save Now you should have a CSV file that can be used for the batch upload. Using a text editor, like Microsoft Note Pad, open the file and it should look something like the image below. Notice that the data appear in the same rows as the spreadsheet, but each column is separated with a comma. It's a good idea to review the data before uploading it to ensure it appears to be organized as shown. Although it's now in a CSV file format, it can still be opened again in Excel. Just remember to retain the CSV file format if you save the file again upon closing. 2 Step Two - Prevent duplicate student records Care must be taken to prevent the batch upload from creating a duplicate record for a student who already exists in the system. There are two procedures that must be followed - one is automatically completed by the system upon upload, the other is a manual procedure that must be completed by the site administrator prior to the upload. Automatic Process - When a student roster file is imported into the system, the upload process first scans the file to ensure that there are no duplicates within the source file. If two or more records are found with the same StateID, or the same LastName, those records will be omitted from the upload and an exception report will be displayed (list of records that were not imported). The automatic scan will also compare the source file against the students already in the student system. If the process finds students with the same LastName, or the same StateID, those records will be omitted from the upload and an exception report will be displayed. Manual Process - The only way to ensure that importing the student list does not create duplicate records for students who are already in the system is to verify that the StateID is populated and correct for each existing student. On the site administrator's dashboard, click the "View Student List" button at the bottom of the page. View Student List Batch Import Students Clicking the "View Student List" button will display a list of all the students currently associated with this school. For schools with a long history of testing, the list will flow into several pages. In the following graphic, notice that of the five students shown, only one displays the StateID. To correct or add the StateID, click the "Edit" button next to the student name to open the student's profile page. 3 Click to edit. Click the Edit button to activate the screen for editing. Enter StateID, then click the save button above. Make the require edits to the student profile (e.g. StateID, Name, etc.), click "Save", then navigate back to the student list to continue your review. 4 Once the review and edit for all existing students is complete, you should be ready to import you list of new students. From the site administrator's dashboard, click on "Batch Import Student" to access the batch upload page. Use the "Browse" button to locate the source file for upload, then click "Import File". Once complete, the screen will display the results, and errors if any, of the upload process Return to the View Student List to confirm that the students are now included in the school's master student list. This import process can be repeated to add additional students in the future as needed. However, if only one or a small number of students need to be added after this process is complete, they can still be added one at a time by creating and adding students from the instructor's roster (see User's Manual). 5