1
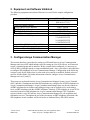
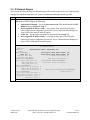
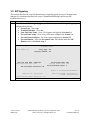
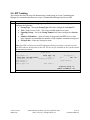
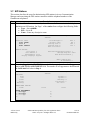
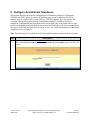
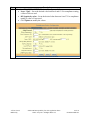
Avaya Solution & Interoperability Test Lab
Application Notes for the Grandstream Networks SIP
Telephones with Avaya Communication Manager 4.0.1 and
Avaya SIP Enablement Services 4.0 – Issue 0.1
Abstract
These Application Notes describe a solution comprised of Avaya Communication Manager
4.0.1, Avaya SIP Enablement Services 4.0, and Grandstream Networks SIP telephones.
Grandstream GXP2020 and GXP1200 are SIP-based VoIP telephones. Grandstream GXP2020
telephone is typically used in an enterprise or small business environment and Grandstream
GXP1200 telephone is used by residential or Small Office and Home Office users. During
compliance testing, Grandstream telephones successfully registered with Avaya SES, placed
and received calls to and from SIP and non-SIP telephones, and executed other telephony
features like three-way conference, transfers, holds, etc. Information in these Application
Notes has been obtained through compliance testing and additional technical discussions.
Testing was conducted via the DevConnect Program at the Avaya Solution and
Interoperability Test Lab.
AT; Reviewed:
RRR m/d/y
Solution & Interoperability Test Lab Application Notes
©2007 Avaya Inc. All Rights Reserved.
1 of 30
GrandstreamSIP.doc
1. Introduction
These Application Notes describe a solution comprised of Avaya Communication Manager
4.0.1, Avaya SIP Enablement Services (SES) 4.0, and Grandstream Networks SIP telephones.
Grandstream GXP2020 and GXP1200 are SIP-based VoIP telephones. Grandstream GXP2020
telephone is typically used in an enterprise or small business environment and Grandstream
GXP1200 telephone is used by residential or Small Office and Home Office (SoHo) users.
During compliance testing, Grandstream telephones successfully registered with Avaya SES,
placed and received calls to and from SIP and non-SIP telephones, and executed other telephony
features like three-way conference, transfers, holds, etc. Grandstream telephones can bridge
calls on a single line to establish a three-party conference. Grandstream GXP2020 supports up to
six and GXP1200 is a single line telephone. Grandstream telephones support IM and Presence
but no testing was done because of incompatibility with Avaya’s implementation.
Figure 1 illustrates a sample configuration consisting of a pair of Avaya S8710 Media Servers,
an Avaya G650 Media Gateway, an Avaya SIP Enablement Services (SES) server, and the
Grandstream telephones. Avaya Communication Manager is installed on the S8710 Media
Servers. The solution described herein is also extensible to other Avaya Media Servers and
Media Gateways. For completeness, Avaya 4600 Series SIP IP Telephones, Avaya 4600 Series
H.323 IP Telephones, and Avaya 6400 and 8400 Series Digital Telephones, are included in
Figure 1 to demonstrate calls between the SIP-based Grandstream telephones and Avaya SIP,
H.323, and digital telephones. The analog PSTN telephone is also included to demonstrate calls
routed by Avaya Communication Manager between the Grandstream telephones and the PSTN.
The Grandstream telephone originates a call by sending a call request (SIP INVITE message) to
the Avaya SES server. The Avaya SES server routes the call over a SIP trunk to Avaya
Communication Manager for origination services. If the call is destined for another local SIP
telephone, then Avaya Communication Manager routes the call back over the SIP trunk to Avaya
SES server for delivery to destination SIP telephone. Otherwise, Avaya Communication
Manager routes the call to the PSTN, a local Avaya H.323, digital, or analog telephone, an
adjunct, a vector, a hunt group, etc., depending on the destination number.
For a call arriving at Avaya Communication Manager that is destined for the Grandstream
telephone, Avaya Communication Manager routes the call over the SIP trunk to the Avaya SES
server for delivery to Grandstream telephone.
These application notes assume that Avaya Communication Manager and Avaya SES are already
installed and basic configuration steps have been performed. Only steps relevant to this
compliance test will be described in this document. For further details on configuration steps not
covered in this document, consult [3] and [4].
AT; Reviewed:
RRR m/d/y
Solution & Interoperability Test Lab Application Notes
©2007 Avaya Inc. All Rights Reserved.
2 of 30
GrandstreamSIP.doc
Figure 1: Sample configuration
AT; Reviewed:
RRR m/d/y
Solution & Interoperability Test Lab Application Notes
©2007 Avaya Inc. All Rights Reserved.
3 of 30
GrandstreamSIP.doc
2. Equipment and Software Validated
The following equipment and software/firmware were used for the sample configuration
provided:
Equipment
Avaya S8710 Media Server
Software/Firmware
Avaya Communication Manager 4.0.1
(R014x.00.1.731.2)
Avaya G650 Media Gateway
TN2312BP IP Server Interface
HW12, FW040
TN799DP C-LAN Interface
HW01, FW024
TN2302AP IP Media Processor
HW20, FW117
Avaya SIP Enablement Services Server
SES 4.0 (SES-4.0.0.0-033.6)
Avaya 4600 Series IP Telephones
2.2.3 (4610SW SIP)
2.3 (4602SW H.323)
2.6 (4610SW H.323)
2.5 (4625SW H.323)
Avaya 6400 and 8400 Series Digital Telephones
Avaya Analog Telephone
Grandstream Networks GXP2020 Telephone
1.1.5.15
Grandstream Networks GXP1200 Telephone
1.1.5.15
3. Configure Avaya Communication Manager
This section describes a procedure for setting up a SIP trunk between Avaya Communication
Manager and Avaya SES which includes steps for setting up a list of IP code set, an IP network
region, a signaling group and its interface. Before a trunk can be configured, it is necessary to
verify if there is enough capacity to setup an additional trunk. Also, a procedure is described here
to configure SIP telephones in Avaya Communication Manager. Configuration in the following
sections is only for the fields where a value needs to be entered or modified. Default values are
used for all other fields. For further information related to configure Avaya Communication
Manager refer to [1] and [2].
These steps are performed from the Avaya Communication Manager System Access Terminal
(SAT) interface. Grandstream and other SIP telephones are configured as off-PBX telephones in
Avaya Communication Manager. Avaya Communication Manager does not directly control an
off-PBX telephone but its features and calling privileges can be applied to it by associating a
local, on-PBX telephone with the off-PBX telephone. Similarly, a SIP telephone in Avaya SES is
associated with an on-PBX telephone on Avaya Communication Manager. SIP Telephones
register with the Avaya SES and use Avaya Communication Manager for call origination and
termination services. Throughout the rest of this document, on-PBX telephones associated with
SIP telephones in such a manner will be referred to as Outboard Proxy SIP (OPS) stations.
AT; Reviewed:
RRR m/d/y
Solution & Interoperability Test Lab Application Notes
©2007 Avaya Inc. All Rights Reserved.
4 of 30
GrandstreamSIP.doc
3.1. Capacity Verification
Step
Description
1. Enter the display system-parameters customer-options command. Verify that there are
sufficient Maximum Off-PBX Telephones – OPS licenses. If not, contact an authorized
Avaya account representative to obtain additional licenses.
display system-parameters customer-options
OPTIONAL FEATURES
G3 Version: V13
Location: 1
Platform: 8
1 of
10
RFA System ID (SID): 1
RFA Module ID (MID): 1
Platform Maximum Ports:
Maximum Stations:
Maximum XMOBILE Stations:
Maximum Off-PBX Telephones - EC500:
Maximum Off-PBX Telephones OPS:
Maximum Off-PBX Telephones - SCCAN:
2.
Page
44000
36000
0
5
200
0
USED
908
410
0
0
50
0
Proceed to Page 2 of OPTIONAL FEATURES form. Verify that the number of SIP
trunks supported by the system is sufficient for the number of SIP trunks needed. If not,
contact an authorized Avaya account representative to obtain additional licenses.
Note: Each SIP call between two SIP endpoints (whether internal or external) requires
two SIP trunks for the duration of the call. The license file installed on the system controls
the maximum permitted.
display system-parameters customer-options
OPTIONAL FEATURES
Page
IP PORT CAPACITIES
Maximum Administered H.323 Trunks:
Maximum Concurrently Registered IP Stations:
Maximum Administered Remote Office Trunks:
Maximum Concurrently Registered Remote Office Stations:
Maximum Concurrently Registered IP eCons:
Max Concur Registered Unauthenticated H.323 Stations:
Maximum Video Capable H.323 Stations:
Maximum Video Capable IP Softphones:
Maximum Administered SIP Trunks:
200
1000
0
0
0
0
0
0
200
2
of
10
USED
148
2
0
0
0
0
0
0
153
Maximum Number of DS1 Boards with Echo Cancellation: 0
0
Maximum TN2501 VAL Boards: 1
1
Maximum G250/G350/G700 VAL Sources: 0
0
Maximum TN2602 Boards with 80 VoIP Channels: 2
0
Maximum TN2602 Boards with 320 VoIP Channels: 2
1
Maximum Number of Expanded Meet-me Conference Ports: 0
0
(NOTE: You must logoff & login to effect the permission changes.)
AT; Reviewed:
RRR m/d/y
Solution & Interoperability Test Lab Application Notes
©2007 Avaya Inc. All Rights Reserved.
5 of 30
GrandstreamSIP.doc
3.2. IP Codec Set
This section describes the steps for administering codec set in Avaya Communication Manager.
This codec set is used in the IP network region for communications between Avaya
Communication Manager and Avaya SES.
Step
1.
Description
Enter the change ip-codec-set <c> command, where c is a number between 1 and 7,
inclusive. IP codec sets are used in Section 3.3 for configuring IP network region to
specify which codec sets may be used within and between network regions. For the
compliance testing, G.711MU and G.729AB were used and Media Encryption was set
to none as encryption is currently not supported for SIP telephony.
change ip-codec-set 2
Page
1 of 2
IP Codec Set
Codec Set: 2
Audio
Codec
1: G.711MU
2: G.729AB
3:
4:
5:
6:
7:
Silence
Suppression
n
n
Frames
Per Pkt
2
2
Packet
Size(ms)
20
20
Media Encryption
1: none
2:
3:
AT; Reviewed:
RRR m/d/y
Solution & Interoperability Test Lab Application Notes
©2007 Avaya Inc. All Rights Reserved.
6 of 30
GrandstreamSIP.doc
3.3. IP Network Region
This section describes the steps for administering an IP network region in Avaya Communication
Manager for communication between Avaya Communication Manager and Avaya SES.
Step
Description
1. Enter the change ip-network-region <n> command, where n is a number between 1 and
250 inclusive and configure the following:
• Authoritative Domain – Set to the devconnect.com. This should match the SIP
Domain value in Section 4, Step 2.
• Intra-region IP-IP Direct Audio – Set to yes to allow direct IP-to-IP audio
connectivity between endpoints registered to Avaya Communication Manager or
Avaya SES in the same IP network region.
• Codec Set – Set the codec set number as provisioned in Section 3.2.
• Inter-region IP-IP Direct Audio – Set to yes to allow direct IP-to-IP audio
connectivity between endpoints registered to Avaya Communication Manager or
Avaya SES in different IP network regions.
change ip-network-region 2
Page
1 of
19
IP NETWORK REGION
Region: 2
Location:
Authoritative Domain: devconnect.com
Name:
MEDIA PARAMETERS
Intra-region IP-IP Direct Audio: yes
Codec Set: 2
Inter-region IP-IP Direct Audio: yes
UDP Port Min: 2048
IP Audio Hairpinning? y
UDP Port Max: 65535
DIFFSERV/TOS PARAMETERS
RTCP Reporting Enabled? y
Call Control PHB Value: 46
RTCP MONITOR SERVER PARAMETERS
Audio PHB Value: 46
Use Default Server Parameters? y
Video PHB Value: 26
802.1P/Q PARAMETERS
Call Control 802.1p Priority: 6
Audio 802.1p Priority: 6
Video 802.1p Priority: 5
AUDIO RESOURCE RESERVATION PARAMETERS
H.323 IP ENDPOINTS
RSVP Enabled? n
H.323 Link Bounce Recovery? y
Idle Traffic Interval (sec): 20
Keep-Alive Interval (sec): 5
Keep-Alive Count: 5
AT; Reviewed:
RRR m/d/y
Solution & Interoperability Test Lab Application Notes
©2007 Avaya Inc. All Rights Reserved.
7 of 30
GrandstreamSIP.doc
Step
Description
2. Proceed to Page 3 of IP network region configuration and enable inter-region connectivity
between regions as per below. For this compliance testing, codec set was set to the IP
codec set configured in Section 3.2.
Page 3 of 19
Inter Network Region Connection Management
src
rgn
2
2
2
2
2
2
2
2
2
2
2
2
2
2
2
dst
rgn
1
2
3
4
5
6
7
8
9
10
11
12
13
14
15
codec
set
2
2
direct
Total
WAN WAN-BW-limits
y
:NoLimit
Video
Dyn
WAN-BW-limits Intervening-regions CAC IGAR
n
3.4. IP Node Names
This section describes the steps for setting IP node name for Avaya SES in Avaya
Communication Manager.
Step
Description
1. Enter the change node-names ip command and add a node name for Avaya SES along
with its IP address.
change node-names ip
Page 1 of 1
IP NODE NAMES
Name
CLAN-1A06
MEDPRO-1A13
SES
AT; Reviewed:
RRR m/d/y
IP Address
192.45 .100.147
192.45 .103.148
192.45 .52 .160
Solution & Interoperability Test Lab Application Notes
©2007 Avaya Inc. All Rights Reserved.
8 of 30
GrandstreamSIP.doc
3.5. SIP Signaling
This section describes the steps for administering a signaling group in Avaya Communication
Manager for communication between Avaya Communication Manager and Avaya SIP
Enablement Services.
Step
Description
1. Issue the command add signaling-group <s>, where s is an available signaling group and
configure the following:
• Group Type – Set to sip.
• Transport Method – Set to tls.
• Near-end Node Name - Set to CLAN name as displayed in Section 3.4.
• Far-end Node Name - Set to Avaya SES name configured in Section 3.4.
• Far-end Network Region - Set to the region configured in Section 3.3.
• Far-end Domain - Set to the devconnect.com. This should match the SIP
Domain value in Section 4, Step 2.
add signaling-group 10
Page
1
of
5
SIGNALING GROUP
Group Number: 10
Group Type: sip
Transport Method: tls
Near-end Node Name: CLAN-1A06
Near-end Listen Port: 5061
Far-end Node Name: SES
Far-end Listen Port: 5061
Far-end Network Region: 2
Far-end Domain:devconnect.com
Bypass If IP Threshold Exceeded? n
DTMF over IP: rtp-payload
Direct IP-IP Audio Connections? y
IP Audio Hairpinning? n
Session Establishment Timer(min): 120
AT; Reviewed:
RRR m/d/y
Solution & Interoperability Test Lab Application Notes
©2007 Avaya Inc. All Rights Reserved.
9 of 30
GrandstreamSIP.doc
3.6. SIP Trunking
This section describes the steps for administering a trunk group in Avaya Communication
Manager for communication between Avaya Communication Manager and Avaya SES.
Step
Description
1. Issue the command add trunk-group <t>, where t is an unallocated trunk group and
configure the following:
• Group Type – Set to the Group Type field value configured in Section 3.5.
• TAC (Trunk Access Code) – Set to any available trunk access code.
• Signaling Group – Set to the Group Number field value configured in Section
3.5.
• Number of Members – Allowed values are between 0 and 255. Set to a value
large enough to accommodate the number of SIP telephone extensions being used.
• Group Name – Enter any descriptive name.
Note: Each SIP call between two SIP endpoints (whether internal or external) requires
two SIP trunks for the duration of the call. The license file installed on the system controls
the maximum permitted.
add trunk-group 10
Page
1
of
21
TRUNK GROUP
Group Number:
Group Name:
Direction:
Dial Access?
Queue Length:
Service Type:
10
Group Type:
SIP-SES-DevCon1
COR:
two-way
Outgoing Display?
n
0
tie
Auth Code?
sip
1
n
TN: 1
CDR Reports: y
TAC: 110
Night Service:
n
Signaling Group: 10
Number of Members: 150
AT; Reviewed:
RRR m/d/y
Solution & Interoperability Test Lab Application Notes
©2007 Avaya Inc. All Rights Reserved.
10 of 30
GrandstreamSIP.doc
3.7. SIP Stations
This section describes the steps for administering OPS stations in Avaya Communication
Manager and associating the OPS station extensions with the telephone numbers of the
Grandstream telephones.
Step
Description
1. Enter the add station <s> command, where s is an available extension in the dial plan, to
administer an OPS station. On Page 1 of the station form configure the following fields:
• Type – Set to 6408D+.
• Port – Set to X.
• Name – Enter any descriptive name.
add station 54007
Page
1 of
4
STATION
Extension:
Type:
Port:
Name:
54007
6408D+
X
GXP2020
STATION OPTIONS
Loss Group:
Data Module?
Speakerphone:
Display Language:
Lock Messages? n
Security Code:
Coverage Path 1:
Coverage Path 2:
Hunt-to Station:
2
n
2-way
english
BCC:
TN:
COR:
COS:
0
1
1
1
Personalized Ringing Pattern: 1
Message Lamp Ext: 54007
Mute Button Enabled? y
Media Complex Ext:
IP SoftPhone? n
2.
Proceed to Page 3 of the STATION form and add the required number of call-appr
entries in BUTTON ASSIGNMENT field. The number of call appearances should match
the Call Limit field value in Step 4.
add station 54007
Page
3 of
3
STATION
SITE DATA
Room:
Jack:
Cable:
Floor:
Building:
Headset?
Speaker?
Mounting:
Cord Length:
Set Color:
ABBREVIATED DIALING
LIST1:
BUTTON ASSIGNMENTS
1: call-appr
2: call-appr
3: call-appr
4:
AT; Reviewed:
RRR m/d/y
List2:
n
n
d
0
List3:
5:
6:
7:
8:
Solution & Interoperability Test Lab Application Notes
©2007 Avaya Inc. All Rights Reserved.
11 of 30
GrandstreamSIP.doc
Step
Description
2. Enter the add off-pbx-telephone station-mapping command and configure the
following:
• Station Extension – Set the extension of the OPS station as configured above.
• Application – Set to OPS.
• Phone Number – Enter the number that the Grandstream telephone will use for
registration and call termination. In the example below, the Phone Number is the
same as the Station Extension, but is not required to be the same.
• Trunk Selection – Set to the trunk group number configured in Section 3.6.
add off-pbx-telephone station-mapping
Page
STATIONS WITH OFF-PBX TELEPHONE INTEGRATION
Station
Extension
54007
4.
Application
OPS
Dial
Phone Number
Prefix
- 54007
Trunk
Selection
10
2
Configuration
Set
1
Proceed to Page 2 of station mapping form and verify that the Call Limit field value
matches the number of call appearances configured in Step 2.
add off-pbx-telephone station-mapping 54008
STATIONS WITH OFF-PBX TELEPHONE INTEGRATION
3.
1 of
Page
Station
Extension
Call
Limit
Mapping
Mode
Calls Allowed
Allowed
Bridged
Calls
54008
2
both
all
both
2 of
2
1
Repeat Steps 1 and 2 as necessary to administer additional OPS stations and associations
for Grandstream telephones.
AT; Reviewed:
RRR m/d/y
Solution & Interoperability Test Lab Application Notes
©2007 Avaya Inc. All Rights Reserved.
12 of 30
GrandstreamSIP.doc
4. Configure Avaya SIP Enablement Services
This section describes the steps for creating SIP trunk between Avaya SES and Avaya
Communication Manager. Also, SIP user accounts are configured in Avaya SES and associated
with an Avaya Communication Manager OPS station extension. The Grandstream telephone
will register with Avaya SES using the SIP user accounts. For further information related to
configure Avaya SES refer to [5] and [6].
Configuration in the following steps is only for the fields where a value needs to be entered or
modified. Default values are used for all other fields.
Step
Description
1. Open a web browser, enter http://<IP address of Avaya SES server>/admin for the URL,
and log in with the appropriate credentials. Click on the Launch Administration Web
Interface link upon successful login.
2.
On the SIP Server Management page:
• Click the + sign to expand the options under Server Configuration.
• Click System Properties.
• Verify the SIP Domain matches the Far-end Domain field value configured for
the signaling group on Avaya Communication Manager in Section 3.5.
AT; Reviewed:
RRR m/d/y
Solution & Interoperability Test Lab Application Notes
©2007 Avaya Inc. All Rights Reserved.
13 of 30
GrandstreamSIP.doc
Step
Description
3. To enable secure SIP trunking between Avaya SES and Avaya Communication Manager,
add a media server corresponding to Avaya Communication Manager from the SIP
Server Management page:
• Click the + sign to expand the options under Media Servers.
• Click Add.
AT; Reviewed:
RRR m/d/y
Solution & Interoperability Test Lab Application Notes
©2007 Avaya Inc. All Rights Reserved.
14 of 30
GrandstreamSIP.doc
Step
Description
4. At the Add Media Server Interface page, provision SIP Trunk parameters as follows
for connectivity to Avaya Communications Manager:
• SIP Trunk Link Type - Set to the Transport Method field value in Section 3.5.
• SIP Trunk IP Address - Set to the CLAN IP address as displayed in Section 3.4.
• Click Add when finished and then click Continue on the confirmation page [not
shown].
AT; Reviewed:
RRR m/d/y
Solution & Interoperability Test Lab Application Notes
©2007 Avaya Inc. All Rights Reserved.
15 of 30
GrandstreamSIP.doc
Step
Description
5. In the left pane of the SIP Server Management page, expand Users and click Add.
AT; Reviewed:
RRR m/d/y
Solution & Interoperability Test Lab Application Notes
©2007 Avaya Inc. All Rights Reserved.
16 of 30
GrandstreamSIP.doc
Step
Description
6. At the Add User page, configure the following:
• Primary Handle – Enter the phone number of the Grandstream telephone. This
number was configured in Section 3.7, Step 3.
• User ID – Set to any descriptive name.
• Password and Confirm Password – Specify a password that the Grandstream
telephone will use to register with Avaya SES.
• Host – Select the IP address or Fully Qualified Domain Name (FQDN) of the Avaya
SES server.
• First Name and Last Name – Enter descriptive names.
• Check the Add Media Server Extension checkbox.
• Click Add when finished and then click Continue on the next page [not shown].
AT; Reviewed:
RRR m/d/y
Solution & Interoperability Test Lab Application Notes
©2007 Avaya Inc. All Rights Reserved.
17 of 30
GrandstreamSIP.doc
Step
Description
7. At the Add Media Server Extension page, configure the following:
• Extension – Set to Phone Number field value configured in Section 3.7, Step 3.
• Media Server – Set to the media server where this OPS station is configured.
• Click “Add” and then click Continue on the next page [not shown].
Note: Media Server was previously configured on SES
8.
Repeat Steps 5 – 7 as necessary to configure additional Grandstream telephones.
AT; Reviewed:
RRR m/d/y
Solution & Interoperability Test Lab Application Notes
©2007 Avaya Inc. All Rights Reserved.
18 of 30
GrandstreamSIP.doc
Step
Description
9. Click Update at the bottom of the left panel to save the configuration completed in the
above steps.
10. Click Continue at the bottom of the right panel.
AT; Reviewed:
RRR m/d/y
Solution & Interoperability Test Lab Application Notes
©2007 Avaya Inc. All Rights Reserved.
19 of 30
GrandstreamSIP.doc
5. Configure Grandstream Telephones
This section describes the steps for configuring the Grandstream telephones. Grandstream
GXP2020 and GXP1200 have similar configuration steps except Grandstream GXP2020
supports up to six separate SIP accounts whereas GXP1200 supports up to two separate SIP
Accounts. This section assumes that the Grandstream telephone’s IP address is already
configured. Configuration steps described in this section apply only to the fields where a value
needs to be modified or entered. Default values are used for all other fields. Screens shots shown
here are for GXP2020 but GXP1200 has similar screens. For further information on Grandstream
telephones refer to [5] and [6].
Note: Due to the page size, only the most relevant fields have been included in the screen shots.
Step
Description
1. Open a web browser and enter http://a.b.c.d for the URL, where a.b.c.d is the IP address
of the Grandstream telephone. Enter the password and click Login to proceed to the next
screen.
AT; Reviewed:
RRR m/d/y
Solution & Interoperability Test Lab Application Notes
©2007 Avaya Inc. All Rights Reserved.
20 of 30
GrandstreamSIP.doc
Step
Description
2. Select the BASIC SETTINGS tab and check the statically configured as option to
configure as follows:
• IP Address – Set the IP address.
• Subnet Mask – Set the subnet mask.
• Default Router – Set the default router.
• Click Update to modify the values.
AT; Reviewed:
RRR m/d/y
Solution & Interoperability Test Lab Application Notes
©2007 Avaya Inc. All Rights Reserved.
21 of 30
GrandstreamSIP.doc
Step
Description
3. Select the ADVANCED SETTINGS tab and configure as follows:
• Layer 3 QoS – Set to the desired value between 0 and 63. For compliance testing,
a value of 48 was used.
• 802.1p priority value – Set to the desired value between 0 and 7. For compliance
testing, a value of 6 was used.
• Click Update to modify the values.
AT; Reviewed:
RRR m/d/y
Solution & Interoperability Test Lab Application Notes
©2007 Avaya Inc. All Rights Reserved.
22 of 30
GrandstreamSIP.doc
Step
Description
4. Select the ACCOUNT1 tab and configure as follows:
• Account Name – Set to the Primary Handle field value configured in Section 4,
Step 6.
• SIP Server – Set to the SIP Domain field value configured in Section 4, Step 2.
• Outbound Proxy – Set to the Avaya SES server IP address.
• SIP User ID – Set to the User Id field value configured in Section 4, Step 6.
• Authenticate ID – Set to the User Id field value configured in Section 4, Step 6.
• Authenticate Password – Set to the Password field value configured in Section
4, Step 6.
• Name – Enter any descriptive name.
• SIP Transport – Set to UDP.
• Send DTMF – set to via RTP.
• Turn off speaker on remote disconnect – Set the value to Yes.
• Special Vocoder – This should have at least one of the codecs configured in
Section 3.2.
• Click Update.
• Repeat this step to configure additional accounts. For GXP2020, up to six
accounts can be configured and for GXP1200, up to two accounts can be
configured.
AT; Reviewed:
RRR m/d/y
Solution & Interoperability Test Lab Application Notes
©2007 Avaya Inc. All Rights Reserved.
23 of 30
GrandstreamSIP.doc
6. Interoperability Compliance Testing
The focus of the interoperability compliance testing was primarily on verifying call
establishment on the Grandstream telephones and operations such as dialing methods (manual,
re-dial, and phone book), hold, mute, transfer and conference. Grandstream telephones
interactions with SES, Avaya Communication Manager, and Avaya SIP, H.323, and digital
telephones were also verified.
6.1. General Test Approach
The general test approach was to place calls to and from the Grandstream GXP2020 and
GXP1200 telephones and exercise basic telephone operations. The main objectives were to
verify that:
•
•
•
•
•
•
•
•
•
•
Grandstream telephones successfully register with Avaya SES.
Grandstream telephones successfully establish calls with Avaya SIP, H.323, and digital
telephones attached to Avaya SES or Avaya Communication Manager.
Grandstream telephones successfully establish calls with PSTN telephones through
Avaya Communication Manager.
Grandstream telephones successfully handle concurrent calls.
Grandstream telephones successfully negotiate the right codec.
Grandstream telephones successfully shuffle for VoIP calls.
Grandstream telephones successfully transmit DTMF during a call.
Grandstream telephones successfully hold and transfer a call.
Grandstream telephones establish a three party conference call, and display calling party
number.
Grandstream telephones successfully tags layer-2 (802.1p) and layer-3 (DiffServ) QoS
packets.
For serviceability testing, failures such as cable pulls and hardware resets were applied. For
performance testing, a conference call involving two Grandstream telephones and two Avaya
telephones was formed as follows:
A call was established between an Avaya telephone and a Grandstream telephone. The
Grandstream telephone then used its second call appearance to establish a call with another
Grandstream telephone, and bridged the two lines together, forming a 3-party conference.
The second Grandstream telephone then used its second call appearance to establish a call
with another Avaya telephone, and bridged its two lines together, effectively forming a 4party conference.
AT; Reviewed:
RRR m/d/y
Solution & Interoperability Test Lab Application Notes
©2007 Avaya Inc. All Rights Reserved.
24 of 30
GrandstreamSIP.doc
6.2. Test Results
The test objectives of Section 6.1 were verified. For serviceability testing, the Grandstream
telephones operated properly after recovering from failures such as cable disconnects, and resets
of the Grandstream telephones, the Avaya SES server, and Avaya Communication Manager. For
performance testing, the conference call was successfully maintained for approximately two
hours. Grandstream telephones successfully shuffled to communicate directly with the other
telephones. Grandstream telephones successfully negotiated the codec to be used and properly
tagged layer-2 and layer-3 QoS packets.
The following observations were made during testing:
• Grandstream telephones cannot mute all parties if it initiates the conference. Only the last
party added is muted.
• Grandstream telephones only support UDP as SIP transport.
Grandstream Networks will address and attempt to resolve the above observations in future
firmware releases. Contact Grandstream Networks (www.grandstream.com) for further updates.
AT; Reviewed:
RRR m/d/y
Solution & Interoperability Test Lab Application Notes
©2007 Avaya Inc. All Rights Reserved.
25 of 30
GrandstreamSIP.doc
7. Verification Steps
The following steps may be used to verify the configuration:
• Verify that the Grandstream telephones successfully register with the Avaya SES server
by following the Users -> Registered Users links on the SES Administration Web
Interface.
• Place calls to and from the Grandstream telephone and verify that the calls are
successfully established with two-way talk path.
• From the Avaya Communication Manager System Access Terminal (SAT) interface,
perform the following steps to verify:
- Audio codec used between two telephones
- Shuffling between two telephones
Step
Description
1. Enter status trunk <t> command, where t is the SIP trunk configured in Section 3.6.
Note down the Member with Service State set to in-service/active. In this example,
0010/002 and 0010/006 are active and either member can be used to verify whether calls
shuffled and which codec was used.
Status trunk 10
TRUNK GROUP STATUS
Member
Port
Service State
Mtce Connected Ports
Busy
0010/001
0010/002
0010/003
0010/004
0010/005
0010/006
0010/007
0010/008
0010/009
0010/010
T00046
T00047
T00048
T00049
T00050
T00051
T00052
T00053
T00054
T00055
in-service/idle
in-service/active
in-service/idle
in-service/idle
in-service/idle
in-service/active
in-service/idle
in-service/idle
in-service/idle
in-service/idle
no
no
no
no
no
no
no
no
no
no
AT; Reviewed:
RRR m/d/y
T0051
T0047
Solution & Interoperability Test Lab Application Notes
©2007 Avaya Inc. All Rights Reserved.
26 of 30
GrandstreamSIP.doc
Step
Description
2. Enter status trunk <m>, where m is the member in active state as noted in the previous
step for verification of codec used and shuffling status:
• Codec – The codec used for Audio is G.711MU in this example.
• Shuffling - If the Near-end IP Addr and Far-end IP Addr for Audio are using
the same port and the Audio Connection Type is ip-direct, it signifies that
shuffling was successful. In this example, shuffling was successful.
status trunk 10/2
Page 1 of 2
TRUNK STATUS
Trunk Group/Member: 0010/002
Port: T00047
Signalling Group ID:
Service State: in-service/active
Maintenance Busy? No
Connected Ports: T0051
Port
Signaling: 01A0617
Near-end IP Addr
192. 45.100.147
: Port
: 5061
Far-end IP Addr
192. 45. 52.160
: Port
: 5061
G.711MU
192. 45. 53.101
: 34008
192. 45. 53.102
: 34008
Audio:
Video:
Video Codec:
Authentication Type: None
Audio Connection Type: ip-direct
AT; Reviewed:
RRR m/d/y
Solution & Interoperability Test Lab Application Notes
©2007 Avaya Inc. All Rights Reserved.
27 of 30
GrandstreamSIP.doc
Step
Description
3. Select the STATUS tab at the Grandstream Device Configuration screen and verify the
following:
• Verify the IP Address is correct.
• Verify the Software Version is correct.
• Verify the Accounts configured in Section 5, Step 3 are registered with Avaya
SES.
AT; Reviewed:
RRR m/d/y
Solution & Interoperability Test Lab Application Notes
©2007 Avaya Inc. All Rights Reserved.
28 of 30
GrandstreamSIP.doc
8. Support
For technical support on Grandstream Networks telephones, consult the support pages at
http://www.grandstream.com/contact_us.html or contact Grandstream Networks technical
support at:
•
•
Telephone: 1- (617) 566 9300
E-mail: [email protected]
9. Conclusion
These Application Notes describe a solution comprised of Avaya Communication Manager
4.0.1, Avaya SES 4.0, and Grandstream Networks SIP telephones. Grandstream GXP2020 and
GXP1200 are SIP-based VoIP telephones. Grandstream GXP2020 telephone is typically used in
an enterprise or small business environment and Grandstream GXP1200 telephone is used by
residential or SoHo users. During compliance testing, Grandstream telephones successfully
registered with Avaya SES, placed and received calls to and from SIP and non-SIP telephones,
and executed other telephony features like three-way conference, transfers, hold, etc. The
objective of Section 6.1 were met with some exceptions noted in Section 6.2.
10. Additional References
Product documentation for Avaya products may be found at http://support.avaya.com/.
[1] Administrator Guide for Avaya Communication Manager, Issue 2.1, May 2006, Document
Number 03-300509
[2] Administration for Network Connectivity for Avaya Communication Manager, Issue 11,
February 2006, Document Number 555-233-504
[3] SIP Support in Release 3.1 of Avaya Communication Manager, Issue 6, February 2006,
Document Number 555-245-206
[4] Installing and Administering SIP Enablement Services R4.0, Issue 2.0, August 2006,
Document Number 03-600768
Product documentation for Grandstream Networks products may be found at
http://www.grandstream.com.
[5] Grandstream GXP2020 user manual GXP2020UsersManual.pdf
[6] Grandstream GXP1200 user manual GXP1200UserManual.pdf
AT; Reviewed:
RRR m/d/y
Solution & Interoperability Test Lab Application Notes
©2007 Avaya Inc. All Rights Reserved.
29 of 30
GrandstreamSIP.doc
©2007 Avaya Inc. All Rights Reserved.
Avaya and the Avaya Logo are trademarks of Avaya Inc. All trademarks identified by ® and ™
are registered trademarks or trademarks, respectively, of Avaya Inc. All other trademarks are the
property of their respective owners. The information provided in these Application Notes is
subject to change without notice. The configurations, technical data, and recommendations
provided in these Application Notes are believed to be accurate and dependable, but are
presented without express or implied warranty. Users are responsible for their application of any
products specified in these Application Notes.
Please e-mail any questions or comments pertaining to these Application Notes along with the
full title name and filename, located in the lower right corner, directly to the Avaya DevConnect
Program at [email protected].
AT; Reviewed:
RRR m/d/y
Solution & Interoperability Test Lab Application Notes
©2007 Avaya Inc. All Rights Reserved.
30 of 30
GrandstreamSIP.doc