1
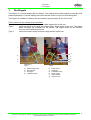
Pinguïn
Ventral walking aid
Postal address
Atlas Revalidatie Techniek BV
PO Box 106
5370 AC Ravenstein
Visiting address
Korte Stukken 7
5371 MN Ravenstein
The Netherlands
Phone: +31 (0)486-45 33 44
Fax: +31 (0)486-45 35 15
www.atlas-rehab.nl
[email protected]
April 2007
User guide
Foreword
Foreword
The Pinguïn provides the support the child needs to walk independently.
The walking aid has the CE mark, which indicates that it meets all the European safety
requirements.
The dealer sets up and delivers the Pinguïn. Refer to this manual to make any further important
adjustments to enable the child to make optimum use of the walking aid.
The manual includes numerous photographs and illustrations to make it easy to find information on
the possibilities for adjusting the walking aid.
Your experiences with the Atlas are important for its continual improvement. If you have remarks or
suggestions for improvement of this product, please contact us via:
Postal address:
Atlas Revalidatie Techniek BV
Antwoordnummer 3509
5370 ZX Ravenstein
The Netherlands
Internet:
www.atlas-rehab.nl
[email protected]
Read this user guide carefully.
No part of this manual may be reproduced, stored in a retrieval system, or published, in any form or by any means, electronic,
mechanical, photocopying, recording or otherwise, without the prior written permission of Atlas Revalidatie Techniek BV.
© 2004 Atlas Revalidatie Techniek B.V.
1
User guide
Contents
Contents
1.
The Pinguïn .................................................................................................................................................3
2.
Safety ...........................................................................................................................................................4
2.1
2.2
SAFETY INSTRUCTIONS ............................................................................................................................4
IMMEDIATE DANGER.................................................................................................................................4
3.
Initial use .....................................................................................................................................................4
4.
Operation.....................................................................................................................................................5
4.1
4.2
4.3
4.4
COLLAPSING THE FRAME .........................................................................................................................5
THE HEIGHT OF THE HANDGRIPS...............................................................................................................5
THE SLIPPER BRAKE (ON TYPES 2 AND 3)..................................................................................................6
THE DIRECTION LOCK (ONLY ON TYPE 3) ...................................................................................................6
5.
Maintenance ................................................................................................................................................7
6.
Repairs.........................................................................................................................................................7
7.
Warranty ......................................................................................................................................................7
8.
Technical data.............................................................................................................................................8
8.1
8.2
DIMENSIONS ...........................................................................................................................................8
OPTIONS ................................................................................................................................................8
No part of this manual may be reproduced, stored in a retrieval system, or published, in any form or by any means, electronic,
mechanical, photocopying, recording or otherwise, without the prior written permission of Atlas Revalidatie Techniek BV.
© 2004 Atlas Revalidatie Techniek B.V.
2
User guide
1. The Pinguïn
1.
The Pinguïn
The Pinguïn is a ventral walking aid for children. The walking aid provides support to help the child
walk independently. A ventral walking aid means that the frame is in front of the walking child.
The Pinguïn is suitable for children who are between approximately 65 and 120 cm tall.
Three versions of the walking aid are available:
Type 1:
has fixed wheels at the front and rubber-capped feet at the rear.
Type 2:
has fixed wheels at the front and wheels with a slipper brake at the rear. The slipper
brake increases the resistance on the wheels. The slipper brake can be removed
once the child's walking improves.
Type 3:
has swivel wheels at the front and a slipper brake at the rear.
c
c
d
d
b
e
g
f
a
b
Illustration 1:
Type 1:
a)
b)
c)
d)
Rubber-capped feet;
Fixed wheels;
Handgrips;
Collapsible frame.
Type 3:
b)
c)
d)
e)
f)
g)
Fixed wheels;
Handgrips;
Collapsible frame;
Slipper brake;
Swivel wheels;
Direction lock.
No part of this manual may be reproduced, stored in a retrieval system, or published, in any form or by any means, electronic,
mechanical, photocopying, recording or otherwise, without the prior written permission of Atlas Revalidatie Techniek BV.
© 2004 Atlas Revalidatie Techniek B.V.
3
User guide
2. Safety/ 3. Initial use
2.
Safety
Atlas has taken every care to ensure the child's safety; a great deal of attention has been paid to the
walking aid's design and Atlas makes expert adjustments for its initial use. However, it is essential
for the child's supervisors and parents to follow the safety instructions below to ensure that the
walking aid is used safely.
2.1 Safety instructions
a)
b)
c)
d)
e)
f)
g)
h)
i)
j)
First read the user guide and test the walking aid before it is used;
Never leave your child alone with the walking aid and always supervise its use;
Ensure that all adjustments and direction locks are properly tightened;
The walking aid should only be used on a flat surface that is free of obstacles;
Do not allow other children to play with the walking aid, ride on it or hang on the handgrips;
Only change the walking aid's settings when the child is not using it;
To avoid any risk of the walking aid tipping over, ensure that the basket is never overloaded;
To ensure that the handgrips can be fastened firmly in place, never set them to the maximum
possible height;
Do not exceed the maximum user weight of 30 kg;
Any service carried out by a person who has not been authorised by Atlas Revalidatie Techniek
will invalidate the warranty and Atlas Revalidatie Techniek will no longer be liable for injuries
and/or damage.
Safety instructions “b” and “c” are repeated on the walking aid in the form of a warning sticker (see
the figure below). Ensure that the text remains legible at all times. If necessary, request a new copy
of the sticker.
Ensure that all adjustments and
direction locks
are properly tightened.
Never leave your child alone with the
walking aid and always supervise its
use.
2.2 Immediate danger
•
3.
In case of immediate danger, do not allow the child to walk with the walking aid but carry
him/her.
Initial use
Before using the walking aid, check it for visible defects. Contact your supplier if you have any
doubts about the walking aid's safety. Ask your supplier to instruct you, if you are not yet familiar
with the use of the walking aid.
Before using the walking aid, read this user guide carefully and ensure that you understand the
purpose of all the parts. (Try everything before allowing the child to walk with the walking aid.)
Familiarise yourself with the safety instructions in chapter 2.
Your supplier can instruct you personally. In the event of problems, contact the therapist who is
providing treatment or the supplier of the walking aid.
Attention:
Read chapter 4 “Operation”, before using the walking aid for the first time.
No part of this manual may be reproduced, stored in a retrieval system, or published, in any form or by any means, electronic,
mechanical, photocopying, recording or otherwise, without the prior written permission of Atlas Revalidatie Techniek BV.
© 2004 Atlas Revalidatie Techniek B.V.
4
User guide
4. Operation
4.
Operation
No tools are required for the adjustment. The adjustments should be made when the child is not
holding onto the walking aid.
Attention:
Adopt a comfortable posture when fastening/unfastening the buttons and clamps. Ensure they are
retightened properly after making adjustments. Always turn the clamp inwards, so that clothing
cannot get caught on it. To do so, press in the button at the top and place the clamp in the required
position, while ensuring that you do not loosen the adjustment screw.
4.1 Collapsing the frame
•
•
•
The brackets for collapsing the frame are on each side of the walking
aid (see illustration 2).
With one hand, lightly push up the lip of the bracket and pull the
bracket upwards with the other hand. Then do the same with the other
bracket. The walking aid can now be folded. When folding out the
frame, ensure that the brackets are firmly in the right position again.
The walking aid is easy to store and transport when collapsed.
4.2 The height of the handgrips
•
•
•
Illustration 2:
Collapsing the frame.
The clamp for setting the height of the handgrips is at
the bottom of each handgrip bar (see illustration 3).
Hold the walking aid in place with one hand and, with
the other hand, turn the clamp handle anticlockwise
to loosen it. When loosened, the height of each
Tighten
handgrip bar can be adjusted independently. Tighten
the clamps again after making the adjustment and
check that the handgrips are firmly in place.
The height of the handgrips should be adjusted so
Loosen
that the handgrips provide support when the child's
elbows are slightly bent.
Illustration 3:
Adjusting the height of the handgrips.
Attention:
To ensure that the handgrips can be fastened firmly in place,
never set them to the maximum possible height.
No part of this manual may be reproduced, stored in a retrieval system, or published, in any form or by any means, electronic,
mechanical, photocopying, recording or otherwise, without the prior written permission of Atlas Revalidatie Techniek BV.
© 2004 Atlas Revalidatie Techniek B.V.
5
User guide
8. Technical data
4.3 The slipper brake (on types 2 and 3)
•
•
•
The adjustment knob at the top of the rear wheels is for adjusting the slipper brake (see
illustration 5A).
The rotatable knob for the slipper brake is located above each of the rear wheels. Hold the
walking aid in place with one hand and, with the other hand, turn the slipper brake knob. The
resistance is reduced by turning the knob anticlockwise and increased by turning it clockwise
(see illustration 5B). Ensure that both slipper brakes are set identically.
The slipper brake is adjustable; as the child's walking improves, the brake can be adjusted to
Lower resistance
Illustration 5A:
Adjusting the slipper brake.
Higher resistance
Illustration 5B:
Top view of the slipper brake adjustment knob.
reduce the braking resistance.
4.4 The direction lock (only on type 3)
•
•
•
The direction can be set using the adjustment knobs above the front
wheels (see illustration 6).
Hold the walking aid in place with one hand and, with the other hand,
turn the adjustment knob clockwise. Ensure that both direction locks
are set identically. Check that the direction locks are firm. To release
the direction locks again, turn the adjustment knob anticlockwise.
The direction lock can be used if the child has difficulty steering while
walking.
Illustration 6:
The direction lock.
No part of this manual may be reproduced, stored in a retrieval system, or published, in any form or by any means, electronic,
mechanical, photocopying, recording or otherwise, without the prior written permission of Atlas Revalidatie Techniek BV.
© 2004 Atlas Revalidatie Techniek B.V.
6
User guide
Appendix: User questionnaire
5.
Maintenance
The “Pinguïn” walking aid requires little maintenance:
• Check daily that all fastenings are tight;
• Attend to daily hygiene. The walking aid can be cleaned using general domestic cleaning agents
that do not contain chlorine. Ensure that no soap residues that could cause skin irritation are left
on the walking aid;
• Keep the walking aid clean: for instance, clean the wheels weekly, as hairs, for example, may
get trapped in them;
• Lightly spray the moving parts with silicon spray once a year. (Note: silicon spray may leave
stains on surfaces.)
6.
•
•
7.
Repairs
Contact the supplier immediately to arrange a repair in case of a defect that could endanger the
child.
If you are unsure about the correctness of the adjustments or the correct form and use of
accessories, contact the therapist or supplier about possible changes that may be required.
Warranty
The following warranty covers normal use:
• A warranty of 12 months from the delivery date of the “Pinguïn” walking aid. This warranty only
applies if original Atlas parts are used.
Exceptions:
• The warranty does not cover parts that are subject to normal wear;
• The metal framework is covered by a three-year warranty.
The warranty will be voided in case of:
• Damage as a result of misuse, neglect, an accident, incorrect repair, exposure to corrosive or
abrasive agents, walking with or storing the Pinguïn in damp conditions, any failure to follow
maintenance or safety instructions, or if replacements or modifications are made by anyone
other than a person authorised by Atlas Revalidatie Techniek.
In any correspondence, please state the name, address, type of walking aid, serial number and the
date of initial use.
No part of this manual may be reproduced, stored in a retrieval system, or published, in any form or by any means, electronic,
mechanical, photocopying, recording or otherwise, without the prior written permission of Atlas Revalidatie Techniek BV.
© 2004 Atlas Revalidatie Techniek B.V.
7
User guide
8. Technical data
8.
Technical data
8.1 Dimensions
Handgrip height:
Frame width:
Frame length:
Wheel diameter:
Max. user weight:
50 – 70 cm
50 cm
65 cm
14 cm
30 kg
Frame:
Frame colour:
coated metal with chromium-plated parts
apple green
8.2 Options
•
•
•
Handbrakes for types 2 and 3;
Anatomical handgrips;
Basket.
No part of this manual may be reproduced, stored in a retrieval system, or published, in any form or by any means, electronic,
mechanical, photocopying, recording or otherwise, without the prior written permission of Atlas Revalidatie Techniek BV.
© 2004 Atlas Revalidatie Techniek B.V.
8