1
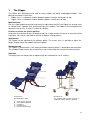
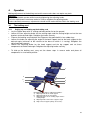
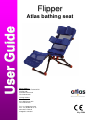
Flipper
Atlas bathing seat
Postal Address
Atlas Revalidatie Techniek BV
PO Box 106
5370 AC Ravenstein
The Netherlands
Visiting Address
Korte Stukken 7
5371 MN Ravenstein
The Netherlands
Tel: +31 (0)486-45 33 44
Fax: +31 (0)486-45 35 15
www.atlas-rehab.nl
[email protected]
May 2008
Foreword
This user guide is intended for parents and/or supervisors of children who use the Flipper.
The Flipper bears the CE marking, which indicates that it meets the European safety requirements.
The settings of the bathing seat are adjusted by the dealer prior to delivery. After this, the most
important settings can be changed without difficulty to ensure that the child derives optimal benefits
from the Flipper, by following the directions contained in this user guide.
The user guide contains a great many photographs that will facilitate finding the adjustment
facilities on the bathing seat.
Your experiences with the Flipper are important for its continual improvement. If you have remarks
or suggestions for improvement of this product, please contact us via:
Postal address:
Atlas Revalidatie Techniek BV
Antwoordnummer 3509
5370 ZX Ravenstein
The Netherlands
Internet:
www.atlas-rehab.nl
[email protected]
Read this user guide carefully.
No part of this User Guide may be reproduced, stored in a retrieval system, or published, in any
form or by any means, electronic, mechanical, photocopying, recording or otherwise, without
the prior written permission of Atlas Revalidatie Techniek BV.
© 2008 Atlas Revalidatie Techniek B.V.
1
Contents
1.
THE FLIPPER ......................................................................................................................................................... 3
2.
SAFETY.................................................................................................................................................................... 4
2.1
2.2
3.
INITIAL USE ........................................................................................................................................................... 5
3.1
3.2
4.
SAFETY INSTRUCTIONS ...................................................................................................................................... 4
IMMEDIATE DANGER .......................................................................................................................................... 4
LIFTING THE CHILD INTO THE BATHING SEAT ..................................................................................................... 5
LIFTING THE CHILD OUT OF THE BATHING SEAT ................................................................................................. 5
OPERATION ........................................................................................................................................................... 6
4.1
THE BATHING SEAT ............................................................................................................................................ 6
4.1.1
Setting up and folding up the bathing seat................................................................................................... 6
4.1.2
The seating angle and seating height........................................................................................................... 7
4.1.3
The angle of the leg support......................................................................................................................... 7
4.1.4
The angle of the back support ...................................................................................................................... 7
4.1.5
The angle of the head support...................................................................................................................... 7
4.1.6
Placing the bathing seat in the bathtub........................................................................................................ 7
4.2
THE SUBFRAME (OPTIONAL)............................................................................................................................... 8
4.2.1
The brakes.................................................................................................................................................... 8
4.2.2
Adjusting the height ..................................................................................................................................... 9
4.2.3
Adjusting the angle ...................................................................................................................................... 9
5.
MAINTENANCE ................................................................................................................................................... 10
6.
REPAIRS ................................................................................................................................................................ 10
7.
WARRANTY.......................................................................................................................................................... 10
8.
TECHNICAL DATA ............................................................................................................................................. 11
8.1
THE FLIPPER .................................................................................................................................................... 11
Size 1 ........................................................................................................................................................................ 11
8.2
THE SHOWER SUBFRAME .................................................................................................................................. 11
8.3
OPTIONS........................................................................................................................................................... 11
APPENDIX:
USER QUESTIONNAIRE .............................................................................................................. 12
2
1.
The Flipper
The Flipper was developed to be able to safely shower and bathe handicapped children. The
bathing seat comes in two sizes:
• Flipper size 1 is suitable for children between approx 3 months and 4 years of age.
• Flipper size 2 is suitable for children between approx 4 and 6 years of age.
Multifunctional
Due to its light-weight construction and extensive adjustment facilities, the Flipper can also be used
as a beach chair, a garden chair and for playing in the sandbox. The Flipper is fully collapsible and
therefore easy to carry. In short, it is ideal for vacation!
Features to secure the child in position
Aside from its functional design, the bathing seat has a large number of features to secure the child
in position. This makes it possible to achieve an optimal seating posture.
Adjustments
The Flipper can be adjusted at five different points. This means that it is possible to adjust the
height, seating angle, leg support and head support.
Standard model
The Flipper is covered with a soft, water permeable covering which is detachable and washable.
The standard Flipper comes with a leg harness and a chest band that secure the child in position.
Subframe
The bating seat also comes with an optional high-low subframe for use in showers.
a
b
c
d
Illustration 1A:
Standard Flipper model.
a)
b)
c)
d)
e)
Illustration 1B:
The standard Flipper model mounted on
a high-low shower subframe (optional).
Head support (optional)
Side supports (optional)
Leg harness
Red rubber legs
Chest band (not visible)
3
2.
Safety
It is imperative for the child’s attendants and parents to adhere to the following safety instructions
in order to safeguard the safe use of the Flipper.
2.1
a)
b)
c)
d)
e)
f)
g)
h)
i)
j)
k)
l)
m)
Safety instructions
First read the user guide and test the bathing seat before it is used;
Never leave your child alone in the bathing seat and always supervise its use;
Ensure that all fastenings and parts used to secure the child in position are properly tightened;
Adjustments may only be done by parents or carers. Unless absolutely necessary, this should
not be done with the child in the bathing seat;
Never place the bathing seat in a completely flat position (180°) in the bathtub;
Make sure that the bathing seat is supported by all four rubber legs when placing it in the
bathtub;
Make sure that the angle of the back support is never less than 60° relative to the base on
which it is resting;
Make sure that the bathing seat is placed in the bathtub in a stable position;
Make sure that the bathing seat cannot topple over when it is placed in the bathtub;
Do not allow other children to play with or on the bathing seat;
Avoid adopting an uncomfortable position for long periods of time while you are attending to a
child seated in the bathing seat;
Do not exceed the maximum permissible 30 kg user weight;
Any service carried out by a person who has not been authorised by Atlas will invalidate the
warranty and Atlas will then no longer be liable for injuries and/or damage.
Safety directives ‘b’ and ‘c’ are repeated on a warning sticker affixed to the bathing seat (see figure
below). Make sure that this text remains legible at all times. If necessary ask for a new copy of this
sticker.
Ensure that all fastenings and parts used to secure
the child in position are properly tightened.
Never leave your child alone in the bathing seat.
Always supervise its use.
2.2
Immediate danger
Practice the following steps designed to rapidly retrieve your child from the bathing seat in the
event of fire or other immediate danger, until you are able to carry them out quickly.
Acting quickly in the event of fire or other immediate danger:
a) Hold the child firmly and loosen the parts that secure the child in position (leg harness, chest
band, etc.);
b) Lift the child out of the bathing seat.
4
3.
Initial use
Before putting the bathing seat into use, inspect it for visible defects. In case of doubt consult the
supplier. Ask the supplier to instruct you, if you are not yet familiar with the use of this type of
bathing seat.
Please read this user guide carefully prior to making use of the bathing seat and verify that the use
and purpose of all components and accessories are clear to you (try everything out first, before
placing the child in the bathing seat). Familiarise yourself with the safety instructions in chapter 2.
Arrangements can be made to receive personal instruction from you supplier. In case of problems,
contact the treating therapist or the supplier of the bathing seat.
3.1
Lifting the child into the bathing seat
To lift the child into the bathing seat in a safe and responsible way it is important to carefully
adhere to the sequence of steps described below. Please refer to chapter 4, “Operation”, for the
bathing seat’s operating instructions.
a) Make sure that the bathing seat is placed in the bathtub in a stable position;
b) Loosen all of the parts that secure the child in position (leg straps, chest band, etc.);
c) Lift the child into the bathing seat;
d) Securely tighten all parts that secure the child in position;
e) Never leave your child alone in the bathing seat and always supervise its use.
3.2
Lifting the child out of the bathing seat
To lift the child out of the bathing seat in a safe and responsible way it is important to carefully
adhere to the sequence of steps described below. Please refer to chapter 4, “Operation”, for the
bathing seat’s operating instructions.
a) Hold the child firmly and loosen all of the parts used to secure the child in position (leg harness,
chest band, etc.);
b) Lift the child out of the bathing seat.
Attention:
Read chapter 4 “Operation” before using the bathing seat for the first
time.
5
4.
Operation
Making adjustments to the bathing seat and its accessories does not require any tools.
Attention:
Adopt a comfortable posture while loosening/tightening the adjusting knobs.
Once the adjustments have been made, be sure to retighten the adjusting knobs.
Unless absolutely necessary, adjustments should not be made with the child in the bathing seat.
4.1
The bathing seat
4.1.1
Setting up and folding up the bathing seat
• Lay the Flipper down with its seating and back portion flat on the ground.
• Loosen the four adjusting knobs for the seating angle and the seating height and set the two
brackets to the desired angle. Retighten the knobs securely.
• Flip over the bathing seat and place the Flipper on the ground with its four rubber legs.
• Loosen the knobs for adjusting the angle of the back support and set the back support to the
desired angle (minimum of 60° relative to the base on which it is resting). Retighten the
adjusting knobs securely.
• Loosen the adjusting knobs for the head support and the leg support and set these
components to the desired angle. Retighten the adjusting knobs securely.
•
To fold up the bathing seat, carry out the above steps in reverse order and place all
components in a horizontal position.
a
b
b
c
60°°
e
d
c
Illustration 2: The Flipper’s adjustment facilities.
a) Adjusting knob for the head support
b) Adjusting knob for the leg support
c) Adjusting knobs for the seating angle and the
seating height
d) Adjusting knobs for the back support’s angle
e) Angle of back support (always at least 60°)
6
4.1.2
The seating angle and seating height
• The four knobs for adjusting the seating angle are
located beside and to the back of the seat; bottom knobs
(see illustration 2, knob c).
• Loosen both adjusting knobs beside the seat and set the
front bracket to the desired angle. Retighten the knobs
securely. Loosen the adjusting knobs at the back of the
seat (see illustration 3) and set the back bracket to the
desired angle. Retighten the knobs securely. Verify that
the brackets have been securely tightened.
• Never place the bathing seat in a completely flat position Illustration 3:
(180°) in the bathtub and ensure that the four red rubber Adjusting seating angle and seating height.
legs all make solid contact.
4.1.3
The angle of the leg support
• The two knobs for adjusting the angle of the leg support
are located to the front of the seat; top knobs (see
illustration 2, knob b).
• Loosen both adjusting knobs (see illustration 4) and set
the leg support to the desired angle. Retighten the knobs
securely. Verify that the leg support is properly secured. Illustration 4:
Adjusting the angle of the leg support.
4.1.4
The angle of the back support
• The two knobs for adjusting the angle of the back
support are located beside the seat (see illustration 2,
knob d).
• Loosen both adjusting knobs (see illustration 5) and
set the back support to the desired angle. Retighten
the knobs securely. Verify that the back support is
properly secured.
• Make sure that the angle of the back support is never
less than 60° relative to the base on which it is resting
(see illustration 2e).
4.1.5
The angle of the head support
• The two knobs for adjusting the angle of the head
support are located near the top of the back support
Illustration 6:
Illustration 5:
(see illustration 2, knob a).
Adjusting the angle of Adjusting the angle
of the head support.
• Loosen both adjusting knobs (see illustration 6) and the back support.
set the head support to the desired angle. Retighten
the knobs securely. Verify that the head support is
properly secured.
4.1.6
Placing the bathing seat in the bathtub
• Once the seating angle and the angle of the back support have been properly set, the bathing
seat can be placed in the bathtub.
• Make sure that all four rubber legs are making solid contact and that the seat is in a stable
position in the bathtub.
7
4.2
The subframe (optional)
c
Illustration 7:
a)
b)
c)
The brakes
The height adjusting knob
The angle-setting clamp
b
a
4.2.1
The brakes
• The brakes on the bathing seat’s subframe can be engaged and released with the projecting
lips attached to each one of the four wheels.
• Engaging the brake:
Push the lip down with the front part of the shoe until it stays down (see illustration 8A).
• Releasing the brake:
Push up the lip with the front part of the shoe (see illustration 8B).
Illustration 8A:
Engaging the brake
Illustration 8B:
Releasing the brake
Attention:
Always use at least two of the four brakes.
8
4.2.2
Adjusting the height
• The knobs for adjusting the height of the seat are located at either side
of the sub-frame (see illustration 9).
• Hold the bathing seat with one hand so that the bathing seat cannot drop
down. Loosen both adjusting knobs, put one foot on the subframe and
set the bathing seat to the desired height. Securely tighten the knobs
and verify that the bathing seat is securely fastened by pushing down on
it.
• The height adjustment option allows the bathing seat to be placed at the
desired height for caring for the child.
Illustration 9:
Adjusting the height of
the subframe.
4.2.3
Adjusting the angle
• The clamps for adjusting the angle are located at either side of the
bathing seat (see illustration 10).
• Hold on to the bathing seat with one hand, loosen both clamps
and set the bathing seat to the desired angle. Securely tighten the
clamps and verify that the bathing seat is securely fastened by
pushing down on the backrest.
• Due to the fact that the knobs for adjusting the angle of the
backrest have been lengthened, it is impossible for the bathing
seat to tip over too far backwards. If it is absolutely necessary to
make this adjustment with the child placed in the bathing seat, Illustration 10:
make sure that the bathing seat does not tip over too far to the Adjusting the angle of the
subframe.
front.
Attention:
Never completely loosen the clamps when adjusting the angle.
9
5.
•
•
•
6.
•
•
7.
Maintenance
Check daily that all fastenings and adjusting knobs are properly secured.
Attend to daily hygiene. The bathing seat can be cleaned by washing out the seat’s covers and
parts used to secure the child in position in a lukewarm soap bath using a mild detergent.
Ensure that no soap residues that could cause skin irritation are left on the chair.
Lightly spray the moving parts with silicon spray once a year. (Note: silicon spray may stain
surfaces.)
Repairs
Contact the supplier immediately to arrange for repairs in case of defects that could endanger
the child.
If you are unsure about the correctness of the adjustments, the proper use of the parts for
holding the child in position or the correct form and use of accessories, contact the therapist or
supplier about possible changes that may be required.
Warranty
The following warranty covers normal use:
• A warranty of 12 months from the delivery date of the Flipper. This warranty only applies if
original Atlas parts are used.
Exceptions:
• The warranty does not cover parts that are subject to normal wear;
• Manufacturing defects in upholstery and parts used to secure the child in position are covered
by a three-month warranty.
The warranty will be voided in case of:
• Damage as a result of misuse, neglect, an accident, incorrect repair, exposure to corrosive or
abrasive agents, any failure to follow maintenance or safety instructions, or if replacements or
modifications are made by anyone other than a person authorised by Atlas Revalidatie
Techniek.
Please include your name, address, type of bathing seat, serial number and the date of initial use
in any correspondence.
10
8.
Technical data
8.1
The Flipper
Total length:
Total width:
Minimum – Maximum height:
Max. user weight:
Size 1
107 cm
43 cm
10 - 25 cm
30 kg
Frame:
Frame colour:
Upholstery colour:
aluminium with synthetic hinges
black
blue
8.2
The shower subframe
Length:
Width:
Caring height:
Titling adjustment:
8.3
•
•
•
•
•
Size 2
125 cm
43 cm
10 - 30 cm
30 kg
70 cm
95 cm
70 – 95 cm
horizontal - vertical
Options
Head support, removable;
Truncal support, width-adjustable;
Raised aluminium subframe with four locking wheels, height-adjustable;
Bathtub supports;
Custom modifications upon request.
11
Appendix: User questionnaire
Your experiences with our products are very important for helping us to make ongoing
improvements to our products. We therefore request that you complete this questionnaire and
return it to us postage free. This will enable us to optimise our products and services.
The user *
Name:
Address:
Town:
Date of birth:
* You may also return the questionnaire anonymously.
The product
Type: **
Seating / Standing / Walking / Lying / Transportation / Care / Work / School /
Therapy / Custom
Name:
Size:
Is the product user-friendly? **
Yes / No / Don’t know
What, if any, problems did you
experience?
Which improvements would you like to
see made to the product?
Other comments and suggestions:
The fitting
Were you as parent/supervisor present
during the fitting? **
Yes / No / Don’t know
Was the technical advisor of Atlas
present during the fitting? **
Yes / No / Don’t know
Were your questions answererd to your
satisfaction? **
Yes / No / Don’t know
Were there any problems during the
fitting? **
No / Don’t know
Yes, ………………
Other comments and suggestions:
** Circle the option that applies.
12
Our service
Was an appointment made to deliver
the product? **
Yes / No / Don’t know
Was the product delivered on the
agreed time? **
Yes / No / Don’t know
Was the product delivered to your
satisfaction? (neatness, settings, etc.)
**
Yes / Don’t know
No, ………………
Were there any problems? **
No / Don’t know
Yes, ………………
Was the user guide clear? **
Yes / Don’t know
No, ………………
Other comments and suggestions:
The Questionnaire
What would you improve?
Other comments:
** Circle the option that applies.
Thank you very much for your cooperation.
Atlas Revalidatie Techniek
Antwoordnummer 3509
5370 ZX Ravenstein
The Netherlands
13