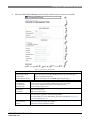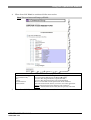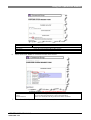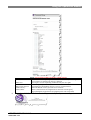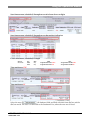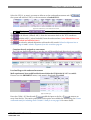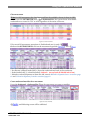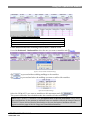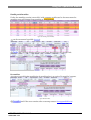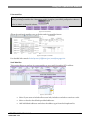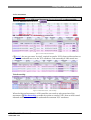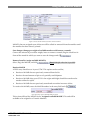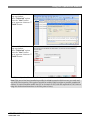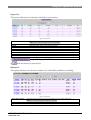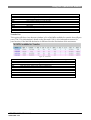
1
Central Database Tracing
Operations
IT Software Solutions
Contents
Contents
CENTRAL DATABASE TRACING OPERATIONS ................................................................... I
I
INTRODUCTION .......................................................................................................... 9
INTRODUCTION ....................................................................................................................................... 10
REQUIREMENTS ....................................................................................................................................... 10
HOW TO USE THIS MANUAL. .................................................................................................................... 10
Areas covered ................................................................................................................................ 10
Documentation conventions ....................................................................................................... 10
II
ACCESS THE ACG CENTRAL DATABASE TRACING .................................................. 11
User manual ................................................................................................................................... 12
Computer Access Request Form ................................................................................................. 13
Forgot your password ................................................................................................................... 18
Access blocked............................................................................................................................... 19
No access ........................................................................................................................................ 19
Access is disabled .......................................................................................................................... 20
LOG ON.................................................................................................................................................. 20
CENTRAL DATABASE TRACING MAIN MENU............................................................................................. 21
Administrative Tools...................................................................................................................... 21
Log out........................................................................................................................................ 21
Change password ..................................................................................................................... 22
Personal Info .............................................................................................................................. 22
Remember table sorting....................................................................................................... 23
Time preferences ................................................................................................................... 23
III
USE THE OPERATIONS MODULE ............................................................................. 24
ACCESSING THE OPERATIONS (TGV) MODULE ......................................................................................... 25
Menu bar ........................................................................................................................................ 26
EXPORT – OUTBOUND PROCEDURE ........................................................................................................... 26
Export: acceptance of ppw - freight and volumetric procedure ............................................ 26
Acceptance of paperwork ....................................................................................................... 26
Paperwork Entry .................................................................................................................... 27
Very important notes ............................................................................................................ 35
Acceptance of freight ............................................................................................................... 51
Check-in ................................................................................................................................. 51
Volumetric procedure ............................................................................................................... 52
Weigh and dimensions......................................................................................................... 52
Paperwork Entry - Volumetric Data (tab) .......................................................................... 55
ACS TGV MODULE V1.115
USER GUIDE V2.2
1
Contents
Export: outbound – manifest procedure ................................................................................... 60
Manually reload freight into an uld. ...................................................................................... 60
Warehouse ............................................................................................................................. 60
Link (allocate) a uld to a movement ....................................................................................... 64
New outbound ...................................................................................................................... 64
Outbound List ........................................................................................................................ 68
Load (allocate) uld from the TGV warehouse to the outbound movement ................ 69
Load mail bags to the outbound movement.................................................................... 70
Un-load (de-allocate) an uld from a movement............................................................... 71
Unload a shipment from the container ............................................................................. 71
Merge handling unit into other handling unit ................................................................. 72
Create pre-manifest .................................................................................................................. 73
TGV (OPS…….) ULD’s .......................................................................................................... 73
AHS (H………) ULD’s ........................................................................................................... 74
Close and create (final) manifest for a movement .............................................................. 74
Close movement ................................................................................................................... 75
Create outbound manifest for a movement .................................................................... 75
Create outbound manifest including mail CN38/AV7 load for a mvt .......................... 76
Handle partial manifest ........................................................................................................ 77
Re-manifest ............................................................................................................................ 77
Print manifest......................................................................................................................... 78
Send Manifest........................................................................................................................ 78
Depart ..................................................................................................................................... 80
Return to origin ..................................................................................................................... 80
Export: failed connection procedure .......................................................................................... 81
Failed connection of paperwork ............................................................................................. 81
Paperwork Left Behind ......................................................................................................... 81
Failed connection of freight .................................................................................................... 82
Freight on hold ...................................................................................................................... 82
Checkpoints .................................................................................................................................... 85
Checkpoint on mawb-hawb level. ......................................................................................... 86
Checkpoint on ULD level. ........................................................................................................ 86
TRANSIT: TRANSFER PROCEDURE .............................................................................................................. 89
Transit: acceptance of ppw procedure ...................................................................................... 89
Accept (transit) paperwork ...................................................................................................... 89
PPW acceptance at gateway ............................................................................................... 90
Paperwork Entry .................................................................................................................... 90
Transit: Outbound – manifest procedure .................................................................................. 91
Transfer transit ULD from inbound to outbound movement ............................................ 91
Inbound .................................................................................................................................. 91
Transfer transit freight to another commercial airline......................................................... 94
Inbound .................................................................................................................................. 95
Transit: failed connection procedure.......................................................................................... 99
Failed connection of transit paperwork ................................................................................. 99
Failed connection of transit freight ........................................................................................ 99
ACS TGV MODULE V1.115
USER GUIDE V2.2
2
Contents
Checkpoints .................................................................................................................................... 99
IMPORT: INBOUND PROCEDURE .............................................................................................................. 100
Import: acceptance of ppw procedure .................................................................................... 100
Accept (import) paperwork ................................................................................................... 100
PPW acceptance at gateway ............................................................................................. 100
Paperwork Entry .................................................................................................................. 100
Checkpoints .................................................................................................................................. 100
Import: proof of delivery - handover procedure..................................................................... 101
Create pod on mawb(s) – hawb(s) level .............................................................................. 101
New POD .............................................................................................................................. 101
Create pod for an entire ULD (+complete content) .......................................................... 106
Create POD for selected ULD(s) ........................................................................................ 106
Print a POD ............................................................................................................................... 107
Print/Save Changes (first print) ......................................................................................... 107
Close a POD ............................................................................................................................. 108
Finalize / Close POD ............................................................................................................ 108
Unsigned POD’s................................................................................................................... 110
USEFULL OPTIONS.................................................................................................................................. 111
Block/Unblock .............................................................................................................................. 111
Paperwork Notice ........................................................................................................................ 112
Mail ................................................................................................................................................ 113
Mail: how to add besides mawbs also the CN38/41/46/47-AV7 to a mfst? ................ 113
Create outbound manifest including mail CN38/AV7 load for a mvt ............................ 113
Outbound List .............................................................................................................................. 114
Create image file ..................................................................................................................... 114
Send ICS as CSV file - Import CSV file ................................................................................. 115
Merge movement.................................................................................................................... 118
Lookup ULD from previous movement................................................................................ 118
Hide (archive a movement/mfst) ........................................................................................... 120
Update outbound ................................................................................................................... 121
Manifest ........................................................................................................................................ 121
Search Manifest ....................................................................................................................... 122
Print layout of different (pre) manifests............................................................................... 123
POD................................................................................................................................................ 129
Select POD (search POD) ........................................................................................................ 129
Planning List (menu).................................................................................................................... 130
Import List................................................................................................................................. 130
Export List ................................................................................................................................. 131
Reload List ................................................................................................................................ 131
Transfer List .............................................................................................................................. 132
Print (menu) .................................................................................................................................. 133
Print label .................................................................................................................................. 133
Print Barcode ............................................................................................................................ 134
Hospital Area Label ................................................................................................................. 134
ACS TGV MODULE V1.115
USER GUIDE V2.2
3
List of figures
List of Figures
figure 1: User manual........................................................................................................ 12
figure 2: ACG Central Database Tracing ............................................................................. 13
figure 3: Computer Access Request Form ........................................................................... 14
figure 4: Forgot your password - Access blocked ................................................................ 18
figure 5: Userid and email do not match............................................................................. 19
figure 6: Userid has been blocked ...................................................................................... 19
figure 7: Unknown user ..................................................................................................... 19
figure 8: Userid has been disabled ...................................................................................... 20
figure 9: Main menu .......................................................................................................... 21
figure 10: Change password .............................................................................................. 22
figure 11: Personal information page.................................................................................. 22
figure 12: Password confirmation ....................................................................................... 23
figure 13: Operations (TGV) ............................................................................................... 25
figure 14: Menu bar ........................................................................................................... 26
figure 15: Ppw entry .......................................................................................................... 27
figure 16: Single MAWB ..................................................................................................... 32
figure 17: Disable HAWB input ........................................................................................... 33
figure 18: Remove single MAWB ........................................................................................ 33
figure 19: Enable HAWB input ........................................................................................... 33
figure 20: CCA................................................................................................................... 38
figure 21: Ignore CCA, check permission ............................................................................ 38
figure 22: Charges found in falcon ..................................................................................... 42
figure 23: Add HAWB ........................................................................................................ 44
figure 24: HAWB information ............................................................................................. 46
figure 25: MAWB Preview .................................................................................................. 47
figure 26: MAWB Back Preview .......................................................................................... 47
figure 27: Print Label .......................................................................................................... 48
ACS TGV MODULE V1.115
USER GUIDE V2.2
4
List of figures
figure 28: Error indications ................................................................................................. 50
figure 29: Check-in Input ................................................................................................... 51
figure 30: Weigh and dimensions ....................................................................................... 52
figure 31: Volumetric entry on MAWB level ........................................................................ 52
figure 32: Cumulated dimensions/scaled weight ................................................................. 53
figure 33: Update volumetric entry ..................................................................................... 54
figure 34: Delete volumetric entry ...................................................................................... 54
figure 35: Volumetric entry on HAWB level ......................................................................... 54
figure 36: Paperwork entry - Volumetric Data ..................................................................... 55
figure 37: Warehouse ........................................................................................................ 60
figure 38: create new ULD ................................................................................................. 61
figure 39: Reload a shipment in a container........................................................................ 61
figure 40: Re-name ULD ..................................................................................................... 63
figure 41: Change ULD destination .................................................................................... 63
figure 42: insert or change ULD description ........................................................................ 63
figure 43: Delete ULD from warehouse............................................................................... 64
figure 44: New Outbound .................................................................................................. 64
figure 45: Outbound list ..................................................................................................... 68
figure 46: Update movement details................................................................................... 68
figure 47: Set movement destination .................................................................................. 69
figure 48: Available containers in the warehouse ................................................................ 69
figure 49: Loaded ULD(s) of an outbound movement ......................................................... 70
figure 50: Mail input .......................................................................................................... 70
figure 51: Unload-offload ULD from movement .................................................................. 71
figure 52: Unload-remove-shipment from ULD ................................................................... 71
figure 53: Merge handling unit into other handling unit ..................................................... 72
figure 54: Create pre-manifest ........................................................................................... 73
figure 55: Close movement ................................................................................................ 75
figure 56: Create manifest.................................................................................................. 75
figure 57: Create manifest and add mail bags .................................................................... 76
figure 58: Select/add mail bags........................................................................................... 76
figure 59: Handle partial manifest ...................................................................................... 77
ACS TGV MODULE V1.115
USER GUIDE V2.2
5
List of figures
figure 60: Remanifest ......................................................................................................... 77
figure 61: Print manifest ..................................................................................................... 78
figure 62: example of a manifest ........................................................................................ 78
figure 63: Send manifest .................................................................................................... 78
figure 64: Depart movement .............................................................................................. 80
figure 65: Return movement to origin ................................................................................ 80
figure 66: Paperwork left behind ........................................................................................ 81
figure 67: Freight on hold .................................................................................................. 83
figure 68: ULD on hold....................................................................................................... 84
figure 69: Checkpoints ....................................................................................................... 86
figure 70: Inbound movements .......................................................................................... 89
figure 71: Inbound - MAWB - accept ppw .......................................................................... 89
figure 72: Arrive inbound movement .................................................................................. 92
figure 73: Inbound movement - take ownership ................................................................. 92
figure 74: Move ULD from inbound movement to TGV warehouse ..................................... 93
figure 75: Transfer ULD from inbound movement to outbound movement ......................... 94
figure 76: Assign MAWB to transfer to another commercial airline ..................................... 95
figure 77: Create transfer manifest to another commercial airline ....................................... 96
figure 78: Retrieve extra available MAWBs for transfer ........................................................ 96
figure 79: Print - Print&close transfer manifest .................................................................... 97
figure 80: DHL carrier selection for transfer manifest .......................................................... 97
figure 81: Air Cargo Transfer manifest................................................................................ 98
figure 82: Track&Trace application - transfer manifest ........................................................ 98
figure 83: New POD ......................................................................................................... 101
figure 84: Create POD ...................................................................................................... 101
figure 85: Update POD ..................................................................................................... 102
figure 86: POD show ATA ................................................................................................ 102
figure 87: Add MAWB to POD ......................................................................................... 102
figure 88: Update MAWB POD details .............................................................................. 103
figure 89: Delete-remove MAWB from POD...................................................................... 103
figure 90: Add HAWB to POD .......................................................................................... 104
figure 91: HAWB on POD ................................................................................................. 104
ACS TGV MODULE V1.115
USER GUIDE V2.2
6
List of figures
figure 92: Remove HAWB from POD ................................................................................ 105
figure 93: Search MAWBs available for POD ..................................................................... 105
figure 94: Create POD for select ed ULD(s) of the TGV warehouse .................................... 106
figure 95: MAWBs on this container are already on a POD, or container is empty ............. 106
figure 96: This container may contains MAWBs without paperwork .................................. 106
figure 97: Print POD ......................................................................................................... 107
figure 98: First print ......................................................................................................... 108
figure 99: POD after first print .......................................................................................... 108
figure 100: Close POD...................................................................................................... 109
figure 101: POD - add remarks after closure ..................................................................... 109
figure 102: Unsigned PODs .............................................................................................. 110
figure 103: Delete POD .................................................................................................... 110
figure 104: Block-Unblock shipments ............................................................................... 111
figure 105: Paperwork notification input .......................................................................... 112
figure 106: Paperwork notification ................................................................................... 113
figure 107: Mail input ...................................................................................................... 113
figure 108: Add mail bags to an outbound manifest......................................................... 113
figure 109: Select/add mail bags....................................................................................... 114
figure 110: Outbound movement - create image file ........................................................ 114
figure 111: Save or open image file .................................................................................. 115
figure 112: ZIP file ............................................................................................................ 115
figure 113: Import CSV file ............................................................................................... 115
figure 114: Merge movement........................................................................................... 118
figure 115: Outbound movement - lookup ULD on previous movement............................ 119
figure 116: Hide (archive) a movement-manifest ............................................................... 120
figure 117: Update an outbound movement .................................................................... 121
figure 118: Search a manifest ........................................................................................... 122
figure 119: Manifest list ................................................................................................... 122
figure 120: Print layout of different (pre) manifests ........................................................... 123
figure 121: Search POD .................................................................................................... 129
figure 122: Import list ...................................................................................................... 130
figure 123: Export list ....................................................................................................... 131
ACS TGV MODULE V1.115
USER GUIDE V2.2
7
List of figures
figure 124: Reload list ...................................................................................................... 131
figure 125: Transfer list .................................................................................................... 132
figure 126: Print label....................................................................................................... 133
figure 127: Print barcode ................................................................................................. 134
figure 128: Hospital Area print label ................................................................................. 134
ACS TGV MODULE V1.115
USER GUIDE V2.2
8
Introduction
I Introduction
This chapter describes the following:
• Introduction
• Requirements
• How to use this manual
ACS TGV MODULE V1.115
USER GUIDE V2.2
9
Introduction
Introduction
Operations, better known as TGV (Total Global Visibility), module has been developed to
replace the TotCon Operations module. The system will allow all GTW’s and HUBs to perform
and capture a number of operational actions and events.
Requirements
•
DHL intranet connection or an Internet connection (high bandwidth)
•
A user name and password to access ACG Central Database Tracing application
•
A printer
•
Internet Explorer 8
•
Adobe Acrobat Plug-in
How to use this manual.
Areas covered
This manual provides all the information required to use the Operations Module (TGV).
Chapter I – Introduction: describes the system requirements - documentation conventions.
Chapter II - Access to the ACG Central Database Tracing - Operations program. Describes
how to access ACG Central Database Tracing and go through to the Operations section.
Chapter III – System Menu. Describes how to use the several options of the Operations module.
Documentation conventions
Symbols and conventions used in this manual.
Note:
A note, displayed in this format, contains important additional or summary
information.
Select:
Point your mouse pointer on the item of choice and click once.
Enter clicking the mouse
A reference used to direct a reader elsewhere for additional information is written in bold-italic
blue
ACS TGV MODULE V1.115
USER GUIDE V2.2
10
Access the ACG Central Database Tracing Module
II Access the ACG Central
Database Tracing
This chapter covers the following topics:
- Consult user manual
- How to request access to the ACG Central Database (TGV) application
- What to do when you forgot your password
- What to do when your access is blocked
- What to do when your access is disabled
- How to log on to the ACG Central Database (TGV) application
- How to change your password
- How to set up your personal preferred sorting
- How to set up your personal time preference
ACS TGV MODULE V1.115
USER GUIDE V 2.2
11
Access the ACG Central Database Tracing Module
User manual
How can I consult the user manual?
On the logon screen a link to the TGV user manual is available.
figure 1: User manual
ACS TGV MODULE V1.115
USER GUIDE V 2.2
12
Using the Operations Module
Computer Access Request Form
How to request access to Central Database Tracing?
To access the Central Database Tracing, you need a user name and password. When you don’t
have a valid user name, you can request one by completing the Computer access request form.
Requesting a User Name and Password
1.
Open a web browser.
Intranet users: enter the URL http://www-acg.bru-hub.dhl.com/cdb/tracing/index.asp.
Internet user: enter the URL: http://aviationcargo.dhl.com/cdb/tracing/index.asp.
The Central Database Tracing Login screen will be displayed.
The on-line computer access request form is available on at the logon screen of the ACG/
Central Data Base Tracing.
figure 2: ACG Central Database Tracing
2.
Click the Computer Access Request Form link. The Login Request screen will be
displayed, and is divided in following sections:
•
•
•
•
•
•
•
•
HOD (Head Of Department) Authorization
User Details
TGV (operations) Module
Volumetric Data Entry
Cognos 8 reporting
Track&Trace (link to T&T3 application to request access)
Parameter Control (restricted only for system administrators)
Falcon (restricted only for finance related staff)
ACS TGV MODULE V1.115
USER GUIDE V 2.2
13
Using the Operations Module
3.
Fill in the HOD (Head Of Department details) authorization and your user details.
figure 3: Computer Access Request Form
Request Date
Requested by HOD
Department
E-mail address (HOD)
New User
Modify User/
re-enable User
Remove User
Username
First Name
Last Name
Full E-mail Address
Gateway
Function/Title
Tel Nr
ACS TGV MODULE V1.115
USER GUIDE V 2.2
HOD Authorization
Fill in the date
Fill in the name of your Head Of Department (supervisor/manager,..)
Fill in your department name
Fill the email address of your HOD (supervisor/manager,..)
User Details
You are a new user requesting access
You’ve got access but requesting modification of your user rights
Your access is disabled and needs to be re-enabled (active)
You no longer require access
Fill in your username
Fill in your first name
Fill in your family name
Fill in your own email address, or in case you’ve got no email address, then use
the one of your supervisor or Head of Department.
Use if possible your own e-mail address (important regarding the Forgot your
password?‘option page 18.)
Fill in the 3 letter IATA code of the gateway where you’re located/working
Fill in your function within the company
Fill in you complete telephone number
14
Using the Operations Module
4.
When done click ‘Next’ to continue with the next section.
Note: The reset button will empty all fields.
DHL staff or Handling agent
TGV permission only
Add
Remove
Roles/Permissions
Default Scheme
5.
TGV (Total Global Visibility) operations Module
Indication of DHL staff or acting as DHL handling agent
Access for Genera Sales Agent and Ground Handling
Access to this role(permissions is required/needed)
Access to this role(permissions is not required/needed)
Hover over the Roles and the permissions will be visualized
Select the measurement scheme you want to use in this application.
Metric: measurement based on kilogram and centimeters
Imperial: measurement based on lbs (short for pounds) and inches
When done click ‘Next’ to continue with the next section.
ACS TGV MODULE V1.115
USER GUIDE V 2.2
15
Using the Operations Module
Volumetric data clerk
Yes or No
Link
6.
Volumetric Data Entry
Access to volumetric verification
COGNOS 8 Reporting
Access Yes or No to the Cognos 8 ACS reports
Track&Trace
Link to T&T3 application where you can request access.
When done click ‘Next’ to continue with the next section.
Add
Remove
Roles/Permissions
Parameter Control (only granted to system administrators)
Access to this role(permissions is required/needed)
Access to this role(permissions is not required/needed)
Hover over the Roles and the permissions will be visualized
7. When done click ‘Next’ to continue with the next section.
ACS TGV MODULE V1.115
USER GUIDE V 2.2
16
Using the Operations Module
Falcon (only granted to billing and finance related persons)
You are a new user requesting Falcon access. You can do so by indicating same
access rights as an existing user such as a colleague
Modify User
You’ve got access but requesting modification of your user rights
Remove User
You no longer require Falcon access
Billing region selection
Specify/flag for which billing region(s) access is required/needed.
Default currency
Fill in the default currency you want to see in Falcon
Default scheme
Metric (measurement and weight based on the meter and the gram)
Imperial/English (measurement and weight based on inch and pound)
New User
8.
When done click ‘Submit’, the system will automatically send your access request.
ACS TGV MODULE V1.115
USER GUIDE V 2.2
17
Using the Operations Module
9. Once your access request has been processed you will receive following email.
Forgot your password
What to do when you forgot your password?
If you forgot your TGV password use the option: ‘Forgot your password?’ The option is
available on the logon page from the ACG CDB MAWB Tracing.
1.
Click on the
link, following screen will be displayed.
figure 4: Forgot your password - Access blocked
2.
Fill in your user name and email address, click ‘Get password’, the system will send your
TGV password to your email address.
ACS TGV MODULE V1.115
USER GUIDE V 2.2
18
Using the Operations Module
I’ve used the forgot your password option but I got an error message. What should I do?
If you don’t have an email address or at the time the access was requested a different email
address was used. you will need to use the email address which was filled in on your original
request. If this is the case you can always sent an email to: [email protected].
figure 5: Userid and email do not match
Access blocked
After 3 incorrect attempts to log on the system will block your access.
What to do when your user access is blocked?
If your user access has been blocked you will get following screen, after you tried to log on.
figure 6: Userid has been blocked
IMPORTANT: You can unblock your access yourself!
Use the : ‘Forgot your password? Access blocked?’ Consult: Forgot your password? Page 13.
Your TGV password is re-sent to your email address and access is un-blocked the same time.
No access
I‘m not allowed to access the Central Database Tracing. What should I do?
If you don’t have a valid username/password for the application you will get following screen.
figure 7: Unknown user
You can request access by completing the Computer access request form. For detailed
information consult: How to request access to Central Database Tracing? Page 13
ACS TGV MODULE V1.115
USER GUIDE V 2.2
19
Using the Operations Module
Access is disabled
Why is my access to the Central Database Tracing application disabled?
There is an automatic disable function, this is a job which runs everyday at 07:00 UTC, and looks
at the last login date of all users. Whenever the last login date is older than 3 months, the access
is automatically disabled but not deleted. An email is sent to those disabled users.
My access to the Central Database Tracing application is disabled. What should I do?
If the access of a user is no longer active and an attempt to log on is performed a clear message
will indicate the user-id is disabled
figure 8: Userid has been disabled
When your access needs to be re-enabled, use the Computer Access Request Form to ask for reactivation of your access. Refer to Computer Access Request Form--re-enable User page 14
Log on
The very first time when you log on, the personal information page is shown, and it is
recommended to verify/update your personal information. Consult: Personal Info page 22.
ACS TGV MODULE V1.115
USER GUIDE V 2.2
20
Using the Operations Module
Central Database Tracing main Menu
The separate applications: T&T3/CMS and COGNOS will open in a new separate window so you
can keep your ACG CDB access open.
figure 9: Main menu
Administrative Tools
Log out
How to log out from the Central Database Tracing?
Click on the ‘Log out’ listed under Administrative Tools, and the system will re-direct the user
back to the login screen.
ACS TGV MODULE V1.115
USER GUIDE V 2.2
21
Using the Operations Module
Change password
How can I change my password?
1.
From the main screen, select in the administrative tools the ‘Change Password’.
figure 10: Change password
2.
Fill in your old/valid password, submit a new password and re-type the new password.
3.
Click ‘Save new password’, following confirmation screen is shown.
4.
Continue with ‘Click here to login’ and the system will re-address the user to the log in
screen, where you now can log on with your new password.
Personal Info
1.
Verify and update your personal information.
figure 11: Personal information page
2.
When finalized click ‘Update data’.
ACS TGV MODULE V1.115
USER GUIDE V 2.2
22
Using the Operations Module
figure 12: Password confirmation
3. The system will request to re-enter your password to update your personal info.
Re-enter your password and click ‘Continue’, the main screen will be displayed.
Remember table sorting
How to set up your personal preferred sorting?
1.
From the main screen, select in the administrative tools the ‘Personal Info’.
2.
Remember table sorting offers the user to possibility to select and save your personal
preferenced sorting requirements.
Time preferences
How to set up your personal time preference?
1.
From the main screen, select in the administrative tools the ‘Personal Info’.
2.
Time preferences offers you the possibility to choose which time is displayed in the
application. Default UTC time will be displayed, unless you select local.
3.
Once your selection is made and you select operations from the menu, the system header
also displays your time selection.
UTC
LT
ACS TGV MODULE V1.115
USER GUIDE V 2.2
23
Using the Operations Module
III Use the Operations module
How to manage: Export – acceptance and outbound procedures
•
Acceptance of paperwork, freight and perform weight and dimensions checks.
•
Outbound: reloading the freight, prepare outbound movement and manifest.
•
Information of failed connection related to paperwork and/or freight.
How to manage: Transit - paperwork and transfer procedures
•
Acceptance of paperwork.
•
Outbound: handle transfer positions, reloading freight, prepare outbound movement
and manifest or handover to another airline and create trsf mfst.
•
Information of failed connection related to paperwork and/or freight.
How to manage: Import - paperwork and handover procedures
•
Acceptance of paperwork.
•
Proof of delivery of the freight and create POD.
•
Information of failed connection related to paperwork.
How to manage Checkpoints: to represent a situation in time, a snapshot of the cycle of a
shipment and capturing more status visibility
For detailed operational information you can also consult GSOP
http://wcms.intra.dpwn.net/wcmsrepo/repo22041285/repo24181763/repo28216893/Depot/repoFolder93594085/repoFolder339877556/repofol
der347653659/repoFolder363272888/bro_kve_air_capacity_sales_acs_v3_2012_acs_acceptance.pdf
http://wcms.intra.dpwn.net/wcmsrepo/repo22041285/repo24181763/repo28216893/Depot/repoFolder93594085/repoFolder339877556/repofol
der347653659/repoFolder363272888/bro_16_2_air_capacity_sales_acs_v3_2012_acs_transit_ops.pdf
http://wcms.intra.dpwn.net/wcmsrepo/repo22041285/repo24181763/repo28216893/Depot/repoFolder93594085/repoFolder339877556/repofol
der347653659/repoFolder363272888/bro_kve_air_capacity_sales_acs__v3_2012_acs_import_ops.pdf
ACS TGV MODULE V1.115
USER GUIDE V 2.2
24
Using the Operations Module
Accessing the Operations (TGV) Module
From ACG Central Database main page, select Operations.
figure 13: Operations (TGV)
Default the outbound screen will be loaded. (Outbound List page 68)
Sorting
The lists in the TGV Module can be sorted ascending or descending.
* 1 = sort ascending * 2 = sort descending
The user has the possibility to save his personal preferred sorting; consult: Remember table
sorting page 23
Time display
All Date/time fields are default converted to and displayed accordingly (Coordinated
Universal Time). UTC does not change with a change of seasons, but local time may change if
a time zone jurisdiction observes daylight saving time (summer or winter time). The user has
the possibility to change and save his personal time preference; consult: Time preferences
page 23
ACS TGV MODULE V1.115
USER GUIDE V 2.2
25
Using the Operations Module
Menu bar
figure 14: Menu bar
Home menu: possibility to return to the Main menu, log out or check current version.
Shipment menu to open and view the sub menu and select shipment options.
Paperwork menu to open and view the submenu and select paperwork options.
Inbound (no sub menu) to manage the inbound movements.
Warehouse (no sub menu) to manage warehouse activities
Outbound menu to open the sub menu which allows to manage outbound movements.
Manifest menu to search a generated historical manifest or create a transfer manifest.
POD menu to open and view the sub menu to manage pod(s).
Planning list menu to open the submenu and select a list option.
Print menu to open the submenu and choose a label option.
Export – outbound procedure
•
Acceptance of paperwork, freight and perform weight and dimensions checks.
•
Outbound: reloading the freight, prepare outbound movement and manifest.
•
Information of failed connection related to paperwork and/or freight.
•
Checkpoints: represents a situation in time, a snapshot of the cycle of a shipment
Export: acceptance of ppw - freight and volumetric procedure
For all export shipments the acceptance of paperwork (Paperwork Entry) and acceptance of
freight (Check in) must be captured. All export shipments are subject to volumetric checks.
Acceptance of paperwork
All paperwork presented to your location for outbound needs to be checked and submitted.
Paperwork menu
Hoover on PAPERWORK, from the sub menu
on Paperwork Entry.
ACS TGV MODULE V1.115
USER GUIDE V 2.2
26
Using the Operations Module
Paperwork Entry
This screen allows to add or edit a PPW entry and/or add HAWB info to the MAWB.
Note: The cursor position is immediately in the Mawb field, when performing the first
paperwork entry and also after a submit for new ppw entry. Purpose is fast data entry.
Fill in the Mawb nr and
.
If the entered MAWB has been booked, but there is no PPW entry performed.
figure 15: Ppw entry
If there’s no booking nor PPW entry for the MAWB, following empty page is loaded.
Note:
Sometimes following message is displayed, then please check if MAWB nr is correct!
, this means the modulus 7 calculation failed.
The Air Waybill comprises three components
- three-digit IATA airline prefix, a seven digit serial number and a check digit
The check digit is based on an unweighted modulus 7 calculation. The seven-digit serial number
is simply divided by 7 and the resulting remainder is the check digit.
ACS TGV MODULE V1.115
USER GUIDE V 2.2
27
Using the Operations Module
MAWB Data (tab)
1 PPW Origin
2 PPW Destination
3 Pieces
4 Weight
5 Volume Weight
6 Description
The 3 letter airport code mentioned on the PPW, point of origin
The 3 letter airport code mentioned on the PPW, point of destination.
Total nr of pieces as mentioned on the PPW of the MAWB
The weight in KGs or LBs as mentioned on the PPW of the MAWB.
Volume wgt (Kg or LB, selected in the wgt section, as mentioned on the PPW(Not mandatory)
Select a description from the list or enter a description manually if not within the list.
flag the checkbox if using the manual description
7 Account /
subaccount
8 Service &
Commodity
to open a lookup list to select
Enter the 3 letter account code to define the customer or
the account code. Fill in the sub account code in the second entry field (Not mandatory): a
check is performed on status enabled – disabled (not possible to to submit the paperwork.
Enter the 3 letter service code and if applicable 1 or 2 letter commodity code in 2 nd entry field.
Ccombination of available service&commodity on account level, and depending account
matrix restriction.
Service Codes
CODE
ACA
ACE
ACP
BSA
DESCRIPTION
Air Cargo Advantage
Air Cargo Economic
Air Cargo Priority
Block Space Agreement
ACS TGV MODULE V1.115
USER GUIDE V 2.2
CODE
CHA
DFX
EXP
GFH
DESCRIPTION
CODE DESCRIPTION
Chartered
GFT
Truck
US domestic freight
TST
TEST SYNC
Express Frt AP (Asia Pacific) VHW
Value Heavy Wgt AP
TPH (Third Party Handling) only, not on DHL mvt
28
Using the Operations Module
8 Service &
Commodity
9 Customs Status
Commodity Codes
CODE
A
AU
B
CH
CM
CP
D
DA
DC
DG
DT
FL
FS
FT
GC
GX
HE
HR
L
DESCRIPTION
Automotive (auto parts)
Automotives
Human remains (body)
Chickens
Computer micro chips priority connection
Computer chips
Dangerous goods
Domestic animals
Dry cargo
Dangerous goods
DGR cargo trsferred to us, in transit with special rate
Flowers
Sea Products II
Sea Products I
General cargo (also valid for regular general public rates)
General express cargo (also valid for regular public rates)
Hatching eggs
Human remains
Live animals
CODE
L1
L2
L3
L4
L5
LA
M
MC
MM
MS
N
P
PE
PH
RE
VE
VU
W
WE
DESCRIPTION
Live animals (1 horse)
Live animals (2 horses)
Live animals (3 horses)
Live animals (4 horses/pos)
Live animals (5 horses/pos)
Live animals
Magazines
Miscellaneous 2
Mail
Miscellaneous
Newspapers
Perishable
Perishables
Pharmaceuticals
Reptiles
Vegetables
Vulnerable cargo
Intra West Africa Traders
Weapons, guns
C: goods in free circulation within EC
X: goods traveling from EC to non EC
T1: goods aren’t in free circulation and not conform to EC preferences
T2: goods aren’t in free circulation but are conform to EC preferences
TD: goods aren’t in free circulation and not conform to EC preferences. The accompanying
Transit Document will not be cleared DHL customs.
Note; When performing an update to an existing booking/ preadvice or the first PPW entry,
the customs status is blanked out and the info needs to be entered.
Very important note: Only applicable for freight org/dest GVA
GVA is an exception regarding the normal custom status regulation.
The airport of GVA has an EC customs zone and a Non EC customs zone!
The existing customs check is extended for the exceptional customs rules for freight
origin/destination GVA. Based upon and depending the original paperwork freight with
origin/destination GVA can have an EC or NEC related customs status. It is the
responsibility of the shipper or handling agent to make sure the correct customs status is
clearly mentioned on the paperwork!
10 Notify Party
EORI
Economic Operator Registration and Identification
Note; An EORI number is unique throughout the European Community, assigned by a
customs authority in a Member State to economic operators or persons. By registering for
customs purposes in one Member State, an Economic Operator is able to obtain an EORI
number which is valid throughout the Community, and then use this number in all
communications with any EC customs authorities where a customs identifier is required for
example customs declarations. This unique number will be used, for example, on the
provision to the customs authorities of pre-arrival and pre-departure information on all
goods entering and leaving the customs territory of the Community. The EORI number is
also included on the customs declaration when you import your goods from or export
goods to countries outside the European Union (EU). In addition it will be used for the
exchange of information between the customs authorities as well as between customs
authorities and other authorities for example other government departments but only in
respect of the movement of goods involving a customs procedure.
ACS TGV MODULE V1.115
USER GUIDE V 2.2
29
Using the Operations Module
11 BA / M-Form
Number:
11 BA / M-Form
Date
Single MAWB
12 SLAC Code
13 FIRMS
14 AGT Code
HAWB Pieces
15 MRN
16 Internal Origin
Internal
Destination
17 Raise CCA
18 Override
MAWB range
check:
19 MAWB PPW
handled only for
customs
Enter the BA / M-Form nr this info is mentioned on the hardcopy of the MAWB. Input for
manifest purpose is mandatory for goods traveling to Nigeria, heavier than 250 kgs in total (or
a max of 50 kgs/pc), in exception to perishables, hatching eggs, diplomatic goods, courier and
mail. (This nr is displayed on the Air Cargo & Consolidated Mfst).
Note; This nr is only mandatory for goods traveling to Nigeria. The BA/M-Form number
Enter the BA/M-form date in this entry field, this info is mentioned on the hardcopy of the
MAWB. (This Date will be displayed on the Air Cargo Manifest)
Select this checkbox if the MAWB is a single MAWB
(no HAWB’s required: See also ‘Exceptions for Shipments to the US’ page 32)
Enter the “Shippers Load And Count” this info will be mentioned on the hardcopy of the
MAWB. E.g. 1 ULD or a shrinkwrapped pallet – then enter in the SLAC field the actual
If a shipment is transferred at destination to a bonded facility, the FIRMS “Facilities
Information and Resource Management System” code should be entered. The firms code is
mentioned on the hardcopy of the MAWB written in the Handling Information box using the
For companies transmitting the info via AMS directly to CBP, the AGT code must be
mentioned on the hardcopy of the MAWB written in the Handling Information box using
format: AGT-XXXX (e.g., AGT-B123). Enter the Agent code in this entry field.
Note; only applicable for goods to the US and not a mandatory entry field.
If the Agent code is available, DHL doesn’t need to verify HAWB info, it is the responsibility of
the shipper to provide correct data to the CBP, any liability for incorrect data lies solely with
the shipper. Sent SITA FHL message to BRUACER or insert hawb(s) via CMS or CMS CBP
entry before the shipments arrive at our DHL facility.
Shows the total number of pieces of the HAWB details. (only available if the MAWB has been
booked or preadviced with HAWB data or if a PPW entry has already been performed.)
Enter the Movement Reference Number in this field when MRN is on mawb level.
- The MRN field allows an entry of max 18 alphanumeric chars (not mandatory).
- If received via booking, then this field will display the MRN, otherwise it will be blank.
- It isn’t possible to insert/add an MRN for both a MAWB and its containing HAWBs.
- Adding or updating an MRN is possible on Mawb or Hawb level when doing a new
paperwork entry or when you edit an existing paperwork entry.
Remove an MRN on mawb, to insert on hawb, consult: Add or update MRN on HAWB
level.page 45. Purpose is to meet the ECS (Export Control System) legislative requirements for
all declarable shpts prior to the departure of consignments from the EU within the required
timeframes.
Enter the 3 letter airportcode: origin point of the internal routing on the DHL network.
Enter the three letter airport code regarding the destination point of the internal routing
This flag (default setting is off) allows the user to print out the CCA document after submitting
the PPW. See section Charge Data (tab) page 35
The flag is default off. A validation is performed to check if the mawb nr is allocated to the
account. To update the allocated account set the flag on.
If for a reason the user didn’t receive original PPW, but needs to perform a PPW entry based
upon a copy, the user can flag this checkbox to inform everybody you are not in possession of
the original PPW. TGV stores only the last PPW entry for each gateway. This means that
Customs reasons indication in T&T3 will only be shown if the last PPW entry in that gtw had
the ‘MAWB PPW handled only for customs’ checkbox flagged.
Important note: Only applicable for LATAM users!
Correcting a service/commodity is only possible if the user has a special permission and will
require entering his / her credentials in order to check permission to change.
ACS TGV MODULE V1.115
USER GUIDE V 2.2
30
Using the Operations Module
Important notes concerning MRN: Movement Reference Number
The objective is to meet the ECS (Export Control System) legislative requirements for all
declarable shipments prior to the departure of consignments from the EU within the
required timeframes.
*The required MRN data/reference should be available to the declaring gtw within the
required timeframes, in the event they need the MRN(s) to make arrival notification.
*Ensure declarable shipments leaving the EU are compliant to Safety&Security validation.
*Ensure that the electronic manifest contains all the necessary MRN data.
Add or update MRN on MAWB level
In the MAWB Data tab the related MRN is displayed if available. When the MRN is already
added on HAWB level following message is displayed:
Note: An MRN cannot be on MAWB and HBs level, TGV displays a warning message:
When a shpt is reloaded on Mawb level, the Consolidated (pre) mfst and the ‘Consol
Ex Acc’ (pre) mfst displays the MRN(s) of the related Mawb(s) when available.
Consult: Print layout of different (pre) manifests page 124.
ACS TGV MODULE V1.115
USER GUIDE V 2.2
31
Using the Operations Module
Exceptions for Shipments to the US
Only applicable for shipments that have a US destination and need to be compliant with the
US customs regulations. Either a mawb has hawb(s) or is a single mawb without hawb(s).
When performing PPW entry for a shpt to the US, the screen loads following info.
Single mawb confirmed from CMS or previous paperwork entry.
Confirm single mawb
figure 16: Single MAWB
When performing a PPW verification, and you notice that the MAWB has no HAWB, the
user can check the
option.
ACS TGV MODULE V1.115
USER GUIDE V 2.2
32
Using the Operations Module
When selecting this option the system will load the following information.
figure 17: Disable HAWB input
to close this pop-up message and continue with the PPW entry.
Note: once this option is selected, it will be impossible to add any HAWB data to this
MAWB, the following information will be displayed after submitting the PPW.
Remove single mawb
Only TGV super users are able to remove a confirmed single mawb.
figure 18: Remove single MAWB
Click the confirm button. The system will show following pop:
figure 19: Enable HAWB input
Click OK to confirm and the system will visualize the Hawb Data section and offers the
possibility to add hawb(s). Click Cancel to abort the action.
ACS TGV MODULE V1.115
USER GUIDE V 2.2
33
Using the Operations Module
Shipper / Consignee (tab)
This tab allows the user to add or edit shipper and consignee details
Search Shipper / Consignee
To search a shipper or consignee, enter at least 1 letter or digit in the “search on name” field and
, the following pop-up box may appear or is blank.
Select from the address dropdown list, or close the window and create a new shipper/consignee.
Copy last shipper/consignee details
and the system will complete the last shipper or consignee used.
Add new shipper/consignee
Key in all available info regarding shipper and consignee as mentioned on the PPW manually.
Name:
Street:
City:
State / province
Zip code:
Country:
Phone:
Fax:
E-mail:
EORI
RUC Number:
WH location:
Enter the shipper / consignee’s full name in this entry field.
Enter the street name where the shipper / consignee is located
Enter the city where the shipper / consignee is located.
Enter the state or province of the shipper / consignee
Enter the Zip code of the shipper / consignee location
Select the country of the shipper / consignee
Enter the phone of the shipper / consignee in this entry field.
Enter the fax of the shipper / consignee in this entry field.
Enter the E-mail address of the shipper / consignee.
Enter the Economic Operator Registration and Identification
Enter the RUC (Registro Unico de Consumidor) = Import License Number. This number
is displayed on the MAWB hardcopy and on the consolidated manifest.
Allows to identity the warehouse location for this freight. You can add or clear the WH
location. This WH location is displayed on the consolidated manifest.
ACS TGV MODULE V1.115
USER GUIDE V 2.2
34
Using the Operations Module
Routing Data (tab)
This tab will display the routing details that have been entered during the booking process (in
CMS) for the selected MAWB. This data is read-only and can not be edited in TGV.
Charge Data (tab)
When selecting the Charge Data tab, the system will load the following information.
Add or correct charges of the MAWB, this information is shown on the PPW. Flag the checkbox
‘Charge Declarations at Origin’ to allow input. A selection is needed to define the currency and if
the charges are P (Pre-Paid) or C (Collect), combining C & P is not possible.
When you submit the PPW, the system will check if the total of the charges is correct and
provide the option to continue or return to the Charges Tab and correct the totals.
Very important notes
•
The set up to allow CCA, whereas the user can create manually a CCA or an automatic CCA is
raised, is via the parameter control on prefix level. So only whenthe prefix is CCA enabled the
checkbox to raise a manual CCA is visible.
•
A CCA can only be raised at the GTW where the first PPW entry is or has been performed. A CCA
document logs the changes of the previous PPW entry and the last performed entry and
accumulates the comments added to each CCA.
•
When the rate and charges are set up in Falcon in USD, and the charges mentioned on the PPW
are in a different currency, the user can submit the
MAWB charges in the currency as mentioned on the PPW and the system will perform the
ACS TGV MODULE V1.115
USER GUIDE V 2.2
35
Using the Operations Module
currency conversion calculation to check versus the charges found in Falcon, and take in
consideration the tolerance limit level.
The currency conversion is set up via the parameter control.
•
There are several reasons to issue a CCA. But the system can not determine whether it concerns an
incorrect PPW input or incorrect information provided on the PPW, therefore following rules
apply.
When can a manual CCA be raised?
When will an automatic CCA be issued?
a).When corrections performed to
following data:
• If the input of charges, based upon the info as mentioned on the PPW
is lower than the rates found in Falcon.
• PPW origin whereas the internal
routing remains unchanged after
the first PPW entry
• If the volumetric check is higher than mentioned on the PPW and has
been submitted in the volumetric verification
• PPW destination whereas the
internal routing remains
unchanged after the first PPW entry
• Pieces after first PPW entry
• Weight/volume weight after first
PPW entry, but no volumetric
check/entry has been performed
b) When the input of charges, based
upon the info as mentioned on the
PPW, is higher than the rates found in
Falcon
Very important notes:
In parameter control it’s possible to set up a tolerance level,
based upon:
MAWB charges tolerance
The tolerance level will be maintained before a CCA is
raised. If one of the charges or if the total of the charges
exceeds the tolerance level a CCA is raised.
Weight tolerance
The tolerance level will be maintained before a CCA is
raised.
If the AWB crosses the levels a CCA is raised.
• If the accountcode or service/commodity differs from the first PPW
entry it’s possible a different rate is found in Falcon than mentioned
on the PPW and previous PPW entry.
• If the routing information differs from the first PPW entry whereas the
PPW origin and/or destination remains unchanged, it’s possible a
different rate is found in Falcon than mentioned on the PPW and
previous PPW entry.
Each CCA that has been raised can be re-printed from the Track&Trace module - Tracking /
Comments Tab.
ACS TGV MODULE V1.115
USER GUIDE V 2.2
36
Using the Operations Module
Manually raise CCA (Cargo Charges Correction)
When can a manual CCA be raised?
a).When corrections performed to following data:
•PPW origin whereas the internal routing remains unchanged after the first PPW entry
•PPW destination whereas the internal routing remains unchanged after the first PPW
entry
•Pieces after first PPW entry
•Weight/volume wgt after first PPW entry, but no volumetric check/entry has been
performed
b) When the input of charges, based upon the info as mentioned on the PPW, is higher than
the rates found in Falcon.
Submit the mawb charges and flag the checkbox ‘Raise CCA’
Charges found in Falcon
The system will always check the input of charges versus the rate found in Falcon.
The user has the option to accept or reject the Falcon charges. In both cases a CCA will be
raised cause the user has instructed the system to raise a CCA manually.
ACS TGV MODULE V1.115
USER GUIDE V 2.2
37
Using the Operations Module
Accept Falcon charges
If the user accepts the falcon charges, the previous inserted charges are considered as incorrect
and the found falcon charges will be treated as correctly and as such displayed on the CCA
hardcopy. To accept the falcon charges as being correct
and the
system will load a pop-up box that allows the user to enter a remark why the CCA was raised.
The user can enter a free text up to 500 characters, which will be displayed on the CCA in the
box: ‘Remarks and reason for issuing CCA’. Enter a remark and
to capture the
remark, the system will proceed with the PPW entry and a CCA print preview will be loaded
in a new browser window.
to abort the CCA remark and continue with the CCA
without entering a remark and a CCA print preview will be loaded in a new browser window.
figure 20: CCA
A CCA document logs the changes of the previous PPW entry and the last performed entry
and accumulates the comments added to each CCA.
Reject Falcon charges
Rejecting Falcon charges is only possible if you have special rights (set up via Parameter
Control) and requires entering his / her credentials in order to check permission to reject.
figure 21: Ignore CCA, check permission
ACS TGV MODULE V1.115
USER GUIDE V 2.2
38
Using the Operations Module
The system will check if you’ve got permission to reject the Falcon charges, and use instead
the inserted charges via the PPW entry to raise a CCA.
•
The user has permission.
Possible to raise CCA based on the inserted charges via PPW entry as mentioned ppw.
•
You’ve got no permission.
The system will force the user to use the found Falcon charges to issue the CCA.
No charges found in Falcon
The system will check the input of the charges versus the charges found in Falcon.
If no rates found, the user can proceed (continue anyway) or abort the PPW entry and return
to the PPW entry screen without performing a PPW entry or without applying the changes.
Continue anyway
You want to use the charges as mentioned on the PPW to raise a CCA
and the system loads a pop-up box to allow you to enter a remark why the CCA was raised.
You can enter a free text up to 500 chars, which is displayed on the CCA in the box: ‘Remarks
and reason for issuing CCA’. Enter a remark,
to capture, the system proceeds
ACS TGV MODULE V1.115
USER GUIDE V 2.2
39
Using the Operations Module
with the PPW entry and a CCA print preview is loaded in a new browser window.
to abort the CCA remark and continue with the CCA without entering a remark,
a CCA print preview will be loaded.
Abort PPW insert
To quit the PPW entry, without performing a PPW entry or without applying the changes
following confirmation box will pop up.
and no PPW entry or changes will be performed.
Warning messages:
1. In CMS for this booking/mawb the requested rate is still in request: not approved yet
2.
Mawb has status ready to bill in Falcon.
3.
Mawb has status billed in Falcon.
Note: the user will have the possibility to “ignore” this error message and continue with the
change, or abort the paperwork entry. Result will be that the mawb can be changed from
PP to CC, but the impact on the CCA process will be ignored.
ACS TGV MODULE V1.115
USER GUIDE V 2.2
40
Using the Operations Module
Automatically issue a CCA (Cargo Charges Correction)
When will an automatic CCA be issued?
• If the input of charges, based upon the info as mentioned on the PPW, is lower than
the rates found in Falcon.
•
If the volumetric check is higher than mentioned on the PPW and has been submitted
in the volumetric verification
Very important notes:
If the AWB crosses the levels a CCA is raised.
In the parameter control it’s possible to set up a tolerance level, based upon:
MAWB charges tolerance
The MAWB charges tolerance being % and/or amount will be the level
maintained before a CCA is raised. If one of the charges or if the total of the
charges exceeds the tolerance level a CCA is raised.
Weight tolerance
The weight tolerance being % and/or weight will be the level maintained
before a CCA is raised
• If an accountcode or service/commodity differs from the first PPW entry it’s possible
a different rate is found in Falcon than mentioned on the PPW and previous PPW
entry.
• If the routing information differs from the first PPW entry whereas the PPW origin
and/or destination remains unchanged, it’s possible a different rate is found in Falcon
than mentioned on the PPW and previous PPW entry.
MAWB charges tolerance
MAWB charges on the PPW are lower than rate found in Falcon
Submit the MAWB charges as mentioned on the PPW.
ACS TGV MODULE V1.115
USER GUIDE V 2.2
41
Using the Operations Module
Charges found in Falcon
The system will always check the input of charges versus the rate found in Falcon.
figure 22: Charges found in falcon
The calculation of the Falcon charges is based upon measured weight and not the declared
weight mentioned on the PPW. The user has the option to accept or reject the Falcon charges.
Consult: Accept Falcon charges page 38 and Reject Falcon charges.page 38
Keep in mind:
The MAWB charge tolerance is the level maintained before a CCA is raised. If one of the
charges or if the total of charges exceeds the tolerance level an automatic CCA is raised.
Notes:
• a CCA fee is only applicable and will be calculated when a CCA is raised.
• Each CCA raised for a mawb: the CCA fee is applicable and added to the calculation.
Weight tolerance
Volumetric check and weight/vol weight is higher than mentioned on PPW.
When a volumetric check has been performed (scaled weight or LxWxH measurement) and
this information is entered in the volumetric verification entry, then this info will be taken
into consideration to issue a CCA even if the weight and vol weights remains unchanged and
are submitted in the system via PPW entry as mentioned on the MAWB.
Keep in mind:
The weight tolerance level will be maintained before a CCA is raised.
If the volumetric checked weight exceeds the tolerance level a CCA is raised.
ACS TGV MODULE V1.115
USER GUIDE V 2.2
42
Using the Operations Module
Handling Codes (Tab)
This tab will display handling codes if available from the booking details, and additionally allow
the user to add and or remove handling codes to the MAWB.
The user can select multiple codes when pushing the ctrl key during the selection of the codes.
Use the
and
buttons to add or remove handling codes.
HAWB Data (tab)
The Hawb data tab is only available when the mawb is already known:
•
by means of a confirmed booking
•
by means of a previous PPW entry.
•
when during PPW entry, the Single MAWB checkbox hasn’t been checked.
See ‘Exceptions for Shipments to the US’ page 32
ACS TGV MODULE V1.115
USER GUIDE V 2.2
43
Using the Operations Module
figure 23: Add HAWB
To add a new hawb, fill in all data of the house airway bill and
.
Notes:
•
weight and volume weight are forced to be entered in the same weight scheme as
selected on MAWB level during PPW entry;
•
select the “Save Shipper & Consignee information” if the information on HAWB level
needs to be saved in the system;
•
Entry fields marked with * are mandatory for US and Latin American destinations.
•
A track record is kept of the history on HAWB level, insert, removal or changes are
visible in the Track&Trace application on HAWB level – Events – HAWB History
ACS TGV MODULE V1.115
USER GUIDE V 2.2
44
Using the Operations Module
Add or update MRN on HAWB level
In the HAWB Data tab the related MRN will be displayed when available.
When the MRN is already added on MAWB level then in the HAWB Data tab following
message is displayed:
Notes:
It is not be possible to have an MRN for both a MAWB and its containing HAWBs.
To avoid this, following restriction is built in:
• Add an MRN on HAWB level when the parent mawb has already an MRN: as soon as
the MRN is filled in and the user presses the add or the update button in the HAWB
Data tab, TGV will display a warning message :
• To remove an MRN on HAWB level, in order to insert on MAWB level, consult: Add or
update MRN on MAWB level page 31.
If a shpt is reloaded on Hawb level, the Consolidated Hawb (pre) mfst displays the MRN(s)
of the Hawb(s) if available. Consult: Print layout of different (pre) manifests page 124.
Shipper / Consignee (HAWB)
When the HAWB information is entered, shipper and consignee information for this HAWB
can be added. These shipper and consignees will be stored in the system and displayed when
tracing a MAWB or HAWB. To search a shipper of consignee, enter a query string in the
“search for name” field and
ACS TGV MODULE V1.115
USER GUIDE V 2.2
, the following pop-up box will appear.
45
Using the Operations Module
Select from the address dropdown list, or create a new shipper and or consignee.
and the system will complete the last shipper or consignee used. When the HAWB, with or
without shipper & consignee information and PP / CC information is completed,
to
add the HAWB details to the selected MAWB.
Charge Declarations
The user can add charges of the HAWB. A selection is needed to define the currency and if the
charges are P (Pre-Paid) or C (Collect), combining C & P is not possible.
To submit the HAWB to the MAWB
, the following info is displayed at the bottom.
figure 24: HAWB information
the HAWB number to edit the HAWB information.
delete to remove the HAWB information from the selected MAWB.
Notes:
•
HAWB info can only be deleted if no operational event has occurred on this HAWB.
(E.g.; Reload on HAWB) and when no tracing request is created for this HAWB.
•
When a shipment is reloaded on HAWB, the HAWB manifest will display the HAWB
shipper / Consignee when the HAWB data does not have Shipper & Consignee
information, MAWB Shipper & Consignee will be displayed.
HAWB CBP Check
To comply with the US Customs AMS regulations, TGV will perform a CBP (Customs
Border Protection) check and indicate if the HAWB is compliant or not.
CBP Ready
Indicates that the HAWB information is compliant
the Shipper / consignee HAWB info is not –compliant, 1 or more detail(s) are missing:
-
Name
-
Street Address
-
City
-
Country
Volumetric Data (tab)
Consult: Volumetric procedure page 52
ACS TGV MODULE V1.115
USER GUIDE V 2.2
46
Using the Operations Module
Paperwork entry buttons
Submit Paperwork
When paperwork entry is finalized
to submit the new entry.
Print MAWB (only available after at least 1 ppw entry)
This option allows you to print the MAWB if the shipper and consignee information is known
in the system and the print will show the entered info. (not an image of the original ppw)
, the print preview will open in a new browser window (PDF format).
figure 25: MAWB Preview
Print MAWB Back (only available after at least 1 ppw entry)
This option allows you to print the backside of a MAWB.
preview will open in a new browser window (PDF format).
, the print
figure 26: MAWB Back Preview
ACS TGV MODULE V1.115
USER GUIDE V 2.2
47
Using the Operations Module
Print Label (only available after at least 1 ppw entry)
This option allows you to print the shipment label(s) (including barcodes).
, the following pop up window will appear.
figure 27: Print Label
Note: The information in the detail box above can be edited if needed, but shows the
information based upon the available mawb details. Default the ‘show pieces’ checkbox is
flagged so the labels will display the amount of pcs if not applicable deselect the checkbox.
Select the Avery type 3483 (10.5cmX14.8cm – 4.1”X6.2”) or 5168 (8.8cmX12.6cm – 3.5”X5”)
The window is a preview of the first page to be printed, it allows you to deselect a number of
labels to keep the remainder label(s). (E.g.: if the piece count of the previous print is 3, your
first page of the next print will only have 1 label on it, thus deselect 3 on above window so
only the available label remains green .)
To deselect a label,
, so that it changes to .
Select ‘Ignore modulo 7 Check’ if the MAWB is not Modulo 7 check compliant.
to print the shipment label(s).
to reset all values within the details box.
ACS TGV MODULE V1.115
USER GUIDE V 2.2
48
Using the Operations Module
Block this MAWB (only for US destinations)
When performing a PPW verification, and the MAWB information is not compliant to the
new US Customs AMS regulations, the MAWB can be blocked.
to block
the MAWB. When blocked the MAWB will appear in the TGV ‘Block / Unblock’ option in the
‘MAWB’s’ main menu with status ‘US Customs Import Block’.
See section Block/Unblock page 111 for more details about unblocking.
Paperwork Entry checkboxes
Raise CCA
This flag (default off) allows the user to print out the CCA document after submitting the
PPW. See section Charge Data (tab) page 35
Override MAWB range check
The flag is default off. A validation is performed to check if the mawb nr is allocated to the
account. To update the allocated account set the flag on.
MAWB PPW handled only for customs
If for a reason the user didn’t receive original PPW, but needs to perform a PPW entry based
upon a copy, the user can flag this checkbox to inform everybody you are not in possession of
the original PPW. TGV stores only the last PPW entry for each gateway. This means that
Customs reasons indication in T&T3 will only be shown if the last PPW entry in that gtw had
the ‘MAWB PPW handled only for customs’ checkbox flagged.
ACS TGV MODULE V1.115
USER GUIDE V 2.2
49
Using the Operations Module
Error indications
figure 28: Error indications
* PPW origin/destination not correct may occur if the gateway is unknown or disabled.
* Pcs not correct happens when the input is not numeric, min 1 up to max 5 characters.
* Weight not correct, numeric input is required, min 1 up to maximum 7 characters.
* Description not correct: select via the drop down list or flag and insert manually the description.
*Account not correct occurs when the account is unknown or disabled.
* Subaccount not correct occurs when the subaccount is unknown or disabled.
* Service/Commodity/Account combination not correct, for each account a matrix restriction is set
up, the account holder isn’t allowed to book/forward this combination.
* Customs status not correct. You’ll need to check the paperwork.
MAWB Modulo check failed
Means the modulus 7 calculation failed. Re-check if you’ve submitted the correct MAWB nr.
Mawb status
Mawb is closed
All pcs are handed over to the consignee, pod for all pcs was created, closed and signed for.
New data entry, ppw entry is not allowed, the button
is not available.
Mawb is cancelled
The mawb (booking) is cancelled. Ppw entry not allowed,
is not available.
Mawb is rejected
The mawb (booking) is rejected. Ppw entry not allowed,
ACS TGV MODULE V1.115
USER GUIDE V 2.2
is not available.
50
Using the Operations Module
Acceptance of freight
Check-in
Only the first point within the DHL network that receives and accepts the freight for export
on Check in .
needs to perform a check in. Hoover on SHIPMENT, from the sub menu
figure 29: Check-in Input
MAWB / HAWB:
GTW:
Pieces:
Container:
Received From:
Enter the MAWB or HAWB in this entry field.
Default your own location will be selected from the dropdown list.
Enter the nr of pieces of the specified MAWB/HAWB that are checked-in.
Enter the container nr if you received the MAWB/HAWB prebuilt.
Define the airline Code when checking in freight received from a Commercial Carrier airline
that will enter the DHL Network. This freight will be reloaded and manifested within TGV in
the same way as any other ACS freight.
Enter the check-in information in the appropriate entry field and
MAWB:
HAWB:
ORG:
DEST:
PCS:
CS:
Container:
GTW:
Rcv From:
Check in DT:
User:
.
The MAWB of the checked-in shipment.
The HAWB of the checked-in shipment.
The shipments origin DHL three-letter airport code.
The shipments destination DHL three-letter airport code.
The number of pieces of the checked-in shipment.
The shipments customs status.
ULD nr (prebuilt uld) in which the shipment was when performing check in/acceptance.
The DHL three letter airport code, station of check-in.
The Commercial Airline code handeling the frt prior to the entry within the DHL network.
The date and time when the shipment has been checked-in.
The user-id of the person who performed the check-in.
on the MAWB to view the tracing details of this MAWB in a new browser window.
When a HAWB is allocated to multiple MAWBS a dropdown list shows the available MAWB’s
Select the MAWB from the list
ACS TGV MODULE V1.115
USER GUIDE V 2.2
, the system will perform a checkin.
51
Using the Operations Module
Volumetric procedure
All export freight is subject to volumetric & weight checks and must be done at point of origin. It
is imperative that all pcs of a shipment are measured. Volumetric checks can be submitted via the
‘Weigh and dimension’ or via the ‘Paperwork Entry’.
Note; When a mawb is closed, volumetric data entry is no longer allowed/possible.
When volume data is available from your origin gtw the system will display the entered data.
If volume data is already done at a different gtw you will get following pop up
Weigh and dimensions
Hoover over the Shipment menu,
Weigh and dimensions, following screen is displayed.
figure 30: Weigh and dimensions
Volumetric data can be entered on MAWB or HAWB level, if HAWB data is available.
MAWB level
Fill in the MAWB nr: if the mawb has no hawbs there is no need to flag the checkbox ‘Force
entry at MAWB level’, and
. If the MAWB has hawbs and you want to insert
volumetric checks on MAWB level and not on HAWB level then you will need to flag the
. The system will check if there is already volume data available.
checkbox and
figure 31: Volumetric entry on MAWB level
to perform a volumetric verification.
For the first entry you have the possibility to select the inserting scheme Metric or Imperial.
ACS TGV MODULE V1.115
USER GUIDE V 2.2
52
Using the Operations Module
Once selected, all further entries will use the previous selected scheme.
Explanation of the fields:
Inserting
Pieces
Origin GTW
3rd Party Handling
Length Width Height
Cumulated
dimensions/scaled
weight
Scaled weight
The user is able to choose the measurement scheme to use for this volumetric verification.
Note: Selection of a measurement scheme is only possible/allowed when creating the first
volumetric entry, and a combination/use different measurement schemes for the same
mawb/hawbisn’t possible/allowed.
Fill the number of pieces that are volumetric checked
3 letter airport code to identify the Gateway where the volumetric verification is performed
Enter the name of the 3rd party (e.g. GSA, handling agent) who has provided the
volumetric verifications to a DHL GTW (optional)
Enter the length - width - height of the volumetric checked piece(s).
Flagged=YES: the entered dims and scaled wgt is the total for all pcs specified for this entry.
Not flagged=NO: the entered dims and scaled wght is for 1 pc for this entry, the system will
cumulate the volume and scaled weight based upon amount of submitted pcs for this entry.
Enter the scaled weight for the shipment in this entry field.
Keep in mind the above cumulate set up - explanation.
Complete the fields and check the Cumulated dimension/scale weight checkbox if needed.
to confirm or
to annul.
Cumulated dimensions/scaled weight
Flagged=YES: the entered dims and scaled wght is the total for all pcs specified for this entry.
Not flagged=NO: the entered dims and scaled wght is for 1 pc for this entry, the system will
cumulate the volume and scaled weight based upon amount of submitted pcs for this entry.
figure 32: Cumulated dimensions/scaled weight
ACS TGV MODULE V1.115
USER GUIDE V 2.2
53
Using the Operations Module
Update
figure 33: Update volumetric entry
Delete
figure 34: Delete volumetric entry
HAWB level
Fill in the HAWB nr, if the mawb has hawbs and you want to perform volumetric checks on
HAWB level there is no need to flag the checkbox ‘Force entry at MAWB level’, just
, following screen is displayed:
figure 35: Volumetric entry on HAWB level
ACS TGV MODULE V1.115
USER GUIDE V 2.2
54
Using the Operations Module
Select the HAWB from the dropdownlist and
.
to perform a volumetric verification.
Note: After insert, the data can still be updated or deleted on HAWB level.
Paperwork Entry - Volumetric Data (tab)
Hover over the Paperwork menu,
on the Paperwork Entry, submit the mawb and go to the
volumetric data tab, only available if the mawb is known.
Note; When a mawb is closed, volumetric data entry is no longer allowed/possible.
When volume data is available from your origin gtw the system will display the entered
data. If volume data is already done at a different gtw you will get following pop up
The tab is only available if the mawb is known (confirmed booking-ppw entry)
figure 36: Paperwork entry - Volumetric Data
Volumetric data can be entered on MAWB or HAWB level if HAWB data is available.
ACS TGV MODULE V1.115
USER GUIDE V 2.2
55
Using the Operations Module
MAWB level
Select Volumetric entry on MAWB level and
, following screen is displayed:
to perform a volumetric verification.
For the first entry you have the possibility to select the inserting scheme Metric or Imperial.
Once selected, all further entries will use the previous selected scheme.
Explanation of the fields:
Inserting
Pieces
Origin GTW
3rd Party Handling
Length Width Height
Cumulated
dimensions/scaled
weight
Scaled weight
The user is able to choose the measurement scheme to use for this volumetric verification.
Notes: Selection of a measurement scheme is only possible/allowed when creating the first
volumetric entry. It is not possible to combine or use different measurement schemes for
the same mawb/hawb.
Fill the number of pieces that are volumetric checked
3 letter airport code to identify the Gateway where the volumetric verification is performed
Enter the name of the 3rd party (e.g. GSA, handling agent) who has provided the
volumetric verifications to a DHL GTW (optional)
Enter the length - width - height of the volumetric checked piece(s).
Flagged=YES: the entered dims and scaled wgt is the total for all pcs specified for this entry.
Not flagged=NO: the entered dims and scaled wght is for 1 pc for this entry, the system will
cumulate the volume and scaled weight based upon amount of submitted pcs for this entry.
Enter the scaled weight for the shipment in this entry field.
Keep in mind the above cumulate set up - explanation.
Complete the fields and check the Cumulated dimension/scale weight checkbox if needed.
to confirm or
to annul.
Cumulated dimensions/scaled weight
Flagged=YES: the entered dims and scaled wght is the total for all pcs specified for this entry.
Not flagged=NO: the entered dims and scaled wght is for 1 pc for this entry, the system will
cumulate the volume and scaled weight based upon amount of submitted pcs for this entry.
ACS TGV MODULE V1.115
USER GUIDE V 2.2
56
Using the Operations Module
Update
Delete
ACS TGV MODULE V1.115
USER GUIDE V 2.2
57
Using the Operations Module
HAWB level
Select Volumetric entry on HAWB level and
,
Then select HAWB from the dropdown box to enter Volumetric Data,
to perform a volumetric verification.
For the first entry you have the possibility to select the inserting scheme Metric or Imperial.
Once selected, all further entries will use the previous selected scheme.
Explanation of the fields:
Inserting
Pieces
Originator GTW
3rd Party Handling
Length Width Height
Cumulated
dimensions/scaled
weight
Scaled weight
The user is able to choose the measurement scheme to use for this volumetric verification.
Notes: Selection of a measurement scheme is only possible/allowed when
creating the first volumetric entry. It is not possible to combine or use different
measurement schemes for the same mawb/hawb.
Fill the number of pieces that are volumetric checked
3 letter airport code to identify the Gateway where the volumetric verification is performed
Enter the name of the 3rd party (e.g. GSA, handling agent) who has provided the
volumetric verifications to a DHL GTW (optional)
Enter the length - width - height of the volumetric checked piece(s).
Flagged=YES: the entered dims and scaled wgt is the total for all pcs specified for this entry.
Not flagged=NO: the entered dims and scaled wght is for 1 pc for this entry, the system will
cumulate the volume and scaled weight based upon amount of submitted pcs for this entry.
Enter the scaled weight for the shipment in this entry field.
Keep in mind the above cumulate set up - explanation.
ACS TGV MODULE V1.115
USER GUIDE V 2.2
58
Using the Operations Module
Complete the fields and check the Cumulated dimension/scale weight checkbox if needed.
to confirm or
to annul.
After insert, the data can still be updated or deleted on MAWB and HAWB level.
ACS TGV MODULE V1.115
USER GUIDE V 2.2
59
Using the Operations Module
Export: outbound – manifest procedure
All export shipments must be:
1.
scanned/reloaded into an ULD using the relevant DHL software (AHS, pTGV, TGV)
2.
ULD needs to be allocated to a movement and manifested
OR
3.
If connection failed: freight and/or paperwork should be captured as left behind.
Consult: Export: failed connection procedure page 81
Manually reload freight into an uld.
The user should go to the virtual TGV warehouse to manually reload a shipment into a uld.
on the Warehouse section and following page is loaded.
Warehouse
In the warehouse the user can create an ULD (Unit Loading Device: container, pallet etc..), view
available (already created) ULDs, and perform manual reload of freight.
figure 37: Warehouse
Note; it is imperative to maintain a clean warehouse. Warehouse Uld’s which: reached
dest, will not be transferred, or marked On Hold or used for Pod’s should be deleted.
DEL
OH
POD
Container:
Destination:
Pieces:
Created/ modified by:
Status:
Flag box and press the “Apply Delete” button to indicate the selected ULD(s) and
contents is deleted from your TGV warehouse.
Flag box, press “Apply On Hold” button to indicate selected ULD(s) and content is OH at
your location. Consult: ULD On Hold via TGV warehouse page 84.
Flag box (Pod creation for selection based upon container level/contents) and press Apply
POD. Consult: Create pod for an entire ULD page 106
Click this box, a pop up information message is displayed: The mawbs on this container
are already on a POD, or container is empty
Container number or BULK,LOOSE or BELLY for loose loaded material .
The 3 letter airportcode to identify the dest/location where ULD will be processed (sorted).
The number of pieces reloaded on this ULD
The user id of the person who created the ULD, or performed last modification.
The status of the ULD.
ACS TGV MODULE V1.115
USER GUIDE V 2.2
60
Using the Operations Module
Description:
Delete
Batch Rld
Image File
The contents of the ULD as per Standard flagging procedures.
to remove the handling unit (reload-contents included) from the TGV warehouse
Reload: to reload shipments on the selected handling unit.
Click
the status of the container will be open and reload is again possible.
Indicates if the MAWB’s in the ULD have Scanned MAWB images available or not.
Create a new ULD (Handling Unit Device)
Before you can start to reload shipments first create a container in the virtual TGV
warehouse. At the bottom of the warehouse screen you’ll find the creation field.
figure 38: create new ULD
Consult Global Standard Flagging Procedure: https://mynet.dpdhl.com/web/expressglobal/article/-/display/20150323111011462905_en
to create the new Handling Unit, the system will add the new
Handling Unit to the available ULD’s list.
to clear the entry field without creating a new Handling Unit.
The following information will be loaded when a new handling unit is created.
Reload a shipment into a container
to load shipments in the selected handling unit.
Note: If the ULD has status closed you will notice the reload option is not available. In stead
there is a
, click on this link to re-open the ULD and the reload button is re-instated.
Reload on mawb level.
Enter the MAWB in the MAWB/HAWB entry field and the number of pieces to be reloaded
in the selected ULD and.
. The reload result will be displayed as follow.
figure 39: Reload a shipment in a container
ACS TGV MODULE V1.115
USER GUIDE V 2.2
61
Using the Operations Module
Reload on hawb level.
Enter the HAWB in the MAWB/HAWB entry field and the nr of pcs to be reloaded in the
selected ULD and.
. When you are reloading on hawb level the system will check
for the mawb, it’s possible that a hawb is re-used and linked to multiple mawbs. The system
will then display a list of mawbs whereas the user needs to select the correct mawb.
The reload result will be displayed as follow.
Reload more pieces then mentioned on the PPW/booking
When reloading a MAWB or HAWB if the reloaded pieces exceed the nr of pcs mentioned
on the PPW/booking, a message is displayed to advise you and an additional button will
become available (
) to reload the number of pieces mentioned.
to accept the number of pieces mentioned, without letting
the system check the number of pieces .
to reload the nr of pcs, letting the system
verify the mentioned pieces with the pieces mentioned on the paperwork or preadvice.
to clear the entry fields.
Note: When reloading more pcs than mentioned on the ppwk or booking if no ppw, the
system will only apply the number of pieces at the reloading event. The system will not
allow to manifest more pieces than mentioned on the paperwork or booking.
The mawb cannot be reloaded cause it is blocked/cancelled or rejected!
The mawb is blocked for a certain reason. Consult: Block/Unblock page 111
or the mawb is cancelled or rejected then contact the capacity team [email protected].
The reload button is not available!
If the container is closed you’ll need to re-open
,to visualize the reload button.
Unload a shipment from the container
to unload the selected MAWB/HAWB from the ULD.
ACS TGV MODULE V1.115
USER GUIDE V 2.2
62
Using the Operations Module
Container number is wrong - rename ULD
TGV Super-users are able to rename the ULD’s with status open in the warehouse. He or she
behind the container number.
will see the
figure 40: Re-name ULD
Click on it will load a pop-up box allowing the user to enter a new container number.
to apply the change.
to abort without applying the change.
Note; the ULD name must be a unique identifier.
Container destination is wrong - change destination of the ULD
You are able to change/correct the dest only if the status of the container is open.
figure 41: Change ULD destination
Click on the dest link, a pop up is loaded to change and correct the original destination.
to apply the change.
to abort without applying the change.
Container description is wrong - change description of the ULD
As long as the container is open the user is able to change/correct the description (flagging).
figure 42: insert or change ULD description
Click on the description link, a pop up box appears to change the description (flagging).
https://mynet.dpdhl.com/web/global-root/article/-/display/20150323111011462905_en
ACS TGV MODULE V1.115
USER GUIDE V 2.2
63
Using the Operations Module
Delete a ULD (Handling Unit Device) from the warehouse
figure 43: Delete ULD from warehouse
to remove the ULD (reload included) from the warehouse. (once deleted there is
no way back, reload and uld info is lost)
Link (allocate) a uld to a movement
Prior to allocate a container to a movement, the outbound movement must be available.
Create outbound movement
Hoover over the OUTBOUND menu, a sub menu is listed and
on New Outbound.
figure 44: New Outbound
New outbound
To avoid double-incorrect creation of mvts,a search option appears with search criteria:
Very Important note : The search result takes into consideration your chosen time
preference UTC or Local! The operational date of a mvt is based upon STD and UTC or LT.
• Movement number: is not mandatory and a look alike function is applied to take into
account the wildcard(s) and zero, if you key in only part of the mvt nr all mvts which look
similar to your date/org/dest and mvt type criteria are displayed.
• Movement date (specific format: dd MMM yyyy or dd-MMM-yyyy = not mandatory) if
empty a list of movements based upon your mvt nr criteria with start date 3 months in the
past up to 1 week in the future (regardless of the movement status) and result list is limited
to display a maximum of 50.
• Origin (the gtw of the user)-Destination (dropdown with gtw codes of 3 characters)
• Movement type: a dropdown where the user can select flight or truck
ACS TGV MODULE V1.115
USER GUIDE V 2.2
64
Using the Operations Module
Fill in the search criteria, click
, the system checks for existing mvt in dbCore.
Very Important note : You are not able to select a movement for creation when the
status is: Cancelled or if ATA (Actual Time of Arrival) is already in place.
If a movement already exist the movement is shown in the result as a link on the movement
nr and will direct the user to the movement screen.
Search movement (scheduled) Example: empty mvt nr – then date mandatory
, the new created movement will be
Select/flag the specific movement and
listed in the outbound list. (consult Outbound List page 68)
Search movement (scheduled) Example: mvt nr using wildcard (%)
Select/flag the specific movement and
listed in the outbound list.
ACS TGV MODULE V1.115
USER GUIDE V 2.2
, the new created movement will be
65
Using the Operations Module
Search movement (scheduled) Example mvt nr 0 in front of mvt nr digits
Search movement (scheduled) Example mvt nr but no date indication
Create movement (scheduled) Example
mvt nr
BCS1648
org
BRU
BRU
dest
LEJ
LEJ
STD
22 april 2013 23:45 UTC
23 april 2013 01:45 LT
STA
23 april 2013 01:00 UTC
23 april 2013 03:00 LT
Time preference UTC
Time preference LT
Select the mvt,
. All database fields are filled with info from dbCore and the
dbCore mvtid. The user is re-directed to the Outbound List, where the new mvt is listed.
ACS TGV MODULE V1.115
USER GUIDE V 2.2
66
Using the Operations Module
Create movement (non-scheduled) Example
If the movement is unknown in dbCore the user is able to create the movement. Fill in the mvt’s
search criteria and click the Search button, following screen will be exhibited.
Complete the fields, You are forced to fill in the STD and STA (HH:MM) in UTC or LT
depending your chosen time preference.
Reason: all PDF manifests display the STD and STA of the mvt always in LT.
Check if the mvt details are correct,
. The new mvt will be listed in the outbound
screen.The cancel button is available to return to the search screen
IMPORTANT Notes: the system checks based upon STD and STA the correct STA date.
E.g.; if STD is 25 Feb 2014 - 23:30 LT and STA is 26 Feb 2014 - 02:30 LT the system will
calculate if STA hour-minutes < STD hour-minutes then arrival date = date of STD + 1 day.
* The mvt nr and registration must be alphanumeric, special characters aren’t allowed.
* As soon as a movement is created it will not be possible to create a new movement having
exactly the same movement number, origin, destination and movement date.
* All movements in TGV are linked with the corresponding movement in dbCore.
- If the movement is created based on an incoming FFM or AHS message.
*Matching the movements from AHS or from an FFM will take into account:
- The movement number (taken into account the middle zero)
- The origin – destination
- The operational date
When a match is found, the movement is created with details from dbCore. If no match found
the movement will be created with details from the related message
* Duplicate mvt-different dest: When FFM is already received/processed and a user is creating
manually a new mvt, with the same mvt nr, mvt date and origin as the existing one, following
rule applies: suffix A is added to the new mvt nr iso replacing the existing mvt.
ACS TGV MODULE V1.115
USER GUIDE V 2.2
67
Using the Operations Module
Outbound List
Hoover over the OUTBOUND menu, a sub menu is listed and
on Outbound List.
The system will show all available outbound movements created in AHS and/or TGV regardless
of the status of the movement.
figure 45: Outbound list
Delete an empty movement
The action button
is only available when a movement doesn’t have any contents.
Update movement
To update a movement can be done via the Outbound menu select Outbound List or via
Update Movement.
Note: You can only update a mvt type,dest, mvt nr, STD-STA of a non scheduled mvt!.
If a non scheduled mvt was created with wrong details, it is possible to change/correct as long
as the movement isn’t manifested. From the outbound list click on the mvt hyperlink.
To change any related movement detail
on
or
, following screen is displayed.
figure 46: Update movement details
ACS TGV MODULE V1.115
USER GUIDE V 2.2
68
Using the Operations Module
Make or select the correct changes and
to apply the changes to the Mvt details.
to reset and keep the original Mvt details.
Note: To update an existing movement following restrictions have been implemented.
For a truck movement the movement nr must be alphanumeric, no special characters are
allowed! For a flight movement the movement nr and the registration must be
alphanumeric, no special characters are allowed!
Set the movement destination (if missing)
on the movement which has no destination and following screen is exhibited.
figure 47: Set movement destination
To insert the movements destination
Fill in the destination of the movement
and following pop up will be displayed.
to capture or
to abort.
Note: The movement destination must be set befor a manifest can be created.
Load (allocate) uld from the TGV warehouse to the outbound movement
From the Outbound menu go to the Outbound List and click on the mvt hyperlink (
).
these ULD’s are in the warehouse and can be linked to the outbound mvt.
figure 48: Available containers in the warehouse
ACS TGV MODULE V1.115
USER GUIDE V 2.2
69
Using the Operations Module
Select the ULD (1 or more) you want to allocate to the outbound movement and
the system will add the ULD(s) to the movement as Loaded ULD’s.
,
figure 49: Loaded ULD(s) of an outbound movement
Note:The buttons
aren’t available for AHS owned ULD(s).
Once allocated to the outbound movement and not manifested the user can still:
to de-allocate (offload) uld(‘s) from the movement back to the TGV warehouse.
to delete uld(‘s) (reload included) from the outbound mvt (once deleted there s no
way back al reload and uld info is lost).
to reload or unload shipments to/from the uld; consult Reload a shipment into a
container page 61 and Unload a shipment from the container page 62
Container already assigned to a movement
If a ULD was already allocated to a mvt the user will be notified and allocation is not possible.
Load mail bags to the outbound movement
Mail requirement: how to add besides the mawb also the CN38/41/46/47-AV7 to a mfst?.
Hoover over the SHIPMENT menu, a sub menu is listed and
on Mail.
figure 50: Mail input
Enter the CN38 / AV7 details and
to add the input to the list.
to remove an
entry from the list. The entries performed in this option are available for manifesting. See Create
outbound manifest including mail CN38/AV7 load for a mvt page 76 for more details.
ACS TGV MODULE V1.115
USER GUIDE V 2.2
70
Using the Operations Module
Un-load (de-allocate) an uld from a movement
Hoover over the OUTBOUND menu, a sub menu is listed and
on Outbound List.
You are able to un-load/de-allocate an ULD(‘s) only from an un-manifeted movement.
on the mvt hyperlink (
) and then click on Loaded ULDs.
figure 51: Unload-offload ULD from movement
to de-allocate (offload) ULD(s) + contents from a mvt, back to TGV warehouse.
Unload a shipment from the container
Hover over the OUTBOUND menu and
Outbound List. on the mvt hyperlink (
),
then on Loaded ULDs.
on the Container link (
)to view the ULD content. As long as
the mvt has no manifest you are able to un-load/de-allocate ULD(‘s) from the mvt.
figure 52: Unload-remove-shipment from ULD
to unload and remove the reload of mawb/hawb from the loaded ULD.
ACS TGV MODULE V1.115
USER GUIDE V 2.2
71
Using the Operations Module
Merge handling unit into other handling unit
Crossload content of a non AHS ULD into another non AHS ULD of the same movement.
Notes;
• If a movement has status closed-mfsted or no mfst you are able to merge :
* handling unit into other handling unit
* movement into other movement
• If a movement has status open–pre-mfsted or no mfst you are able to merge:
* handling unit into other handling unit
• The merge option doesn’t work for Handling units older than 15 days.
• Only ULDs allocated to the same movement can be selected to merge.
• Only mvts with the same dest and available in the outboundlist can be selected to merge.
From the outbound movement on Loaded ULDs and then
on the ULD number you want
to merge (cross load), the following option will appear below the container list.
figure 53: Merge handling unit into other handling unit
Select the ULD within the same movement from the dropdown list where you want to cross load
the previous uld into and
. The contents of the first handling unit is automatically
merged/crossloaded into the selected second handling unit, and therefore the first handling unit
will disappear from the list of loaded ULDs.
ACS TGV MODULE V1.115
USER GUIDE V 2.2
72
Using the Operations Module
Create pre-manifest
You can generate and print a pre-manifest before the movement is closed. From the
OUTBOUND
Outbound List , click on the mvt nr hyperlink (
) and
.
figure 54: Create pre-manifest
When a pre-manifest is created, the system loads the pre-manifest details and allows to print (see
Print layout of different (pre) manifests page 124) and mail (see Send Manifest page 78)
TGV (OPS…….) ULD’s
Once the pre-manifest is created, you can still edit the mvt contents (extra reload, unload) if it is
not an AHS owned uld.
Note:The buttons
aren’t available for AHS owned ULD(s).
If the outbound movement is still open, not manifested only pre-manifest; the user can still:
*
De-allocate (offload) uld(‘s) + contents from the movement back to the warehouse.
*
Delete loaded uld(‘s) (reload included) from the outbound mvt (once deleted there s no
way back al reload and uld info is lost).
*
Reload or unload shipments to/from the uld; consult Reload a shipment into a
container page 61 and Unload a shipment from the container page 62
When one of the above actions is performed you can generate another pre-manifest, or proceed
with closing the movement and create the final manifest. (See Close and create (final) manifest
ACS TGV MODULE V1.115
USER GUIDE V 2.2
73
Using the Operations Module
for a movement page 74Error! Reference source not found.Error! Reference source not
found.Error! Reference source not found.).
AHS (H………) ULD’s
A generated pre-manifest for only AHS owned ULD’s cannot be altered by a TGV user. All
changes and updates (scanning-unload-allocation-de-alloaction) needs to be performed in AHS
and transmitted into TGV. When new AHS changes or updates are transmitted the previous premanifest is removed and you can generate another pre-manifest See Create pre-manifest page
73), or wait until movement is closed in AHS and create the final manifest. (See Close and create
(final) manifest for a movement page 74Error! Reference source not found.Error! Reference
source not found.Error! Reference source not found.).
Notes;
* When you edit the contents (Load / Unload ULD’s and/or MAWB’s/HAWB’s) of a premanifested movement, the system will remove the created pre-manifest and you can create
a new pre-manifest or after closure a regular final manifest can be issued. (See Close and
create (final) manifest for a movement page 74).
* Once the mvt is closed the option to create or edit the pre-mfst is disabled.
What is the difference between a pre-manifest and a manifest?
Creation of a pre(preliminary)-mfst is an option to issue a draft mfst until the movement is
closed and the final mfst can be issued, and allows to perform actions such as: allocate extra
uld(s), de-allocate uld(s), reload extra pc(s) in uld(s) and un-load pc(s) from uld. The generated
pre-manifest is removed if any of the previous actions is performed. A final manifest can be
created after closure of the mvt and is the final step. If for some reason afterwards extra
ulds/contents are loaded, the status will become
and you will need to create a
second mfst. Consult: Handle partial manifest page 77
Note: Creation of a pre-manifest is only available for open mvts and doesn’t generate a
FFM! Regarding image files of mawbs consult the Create image file
Close and create (final) manifest for a movement
When all shipments are reloaded in ulds and all ulds are loaded to the outbound movement: the
outbound procedure is complete and finalize. Next steps are:
* close the outbound movement manually in TGV or via AHS
* manage outbound manifest and if necessary partial manifest
* depart a movement
* if required return a movement (back to origin)
* hide a movement
Note: In order to manifest an outbound movement you will have to ensure the following
•
A non-AHS movement must be closed manually.
•
An AHS movement is closed in AS400 and status is transmitted to TGV and will color
RED when closed, a movement destination must be set before a manifest can be issued.
•
A partially manifested movement is colored ORANGE until complete manifested.
ACS TGV MODULE V1.115
USER GUIDE V 2.2
74
Using the Operations Module
Close movement
Note: for AHS movements the close button will not be available, closure is done in AHS.
Hoover over the OUTBOUND menu on Outbound List, the system shows all available
outbound mvts created in TGV or AHS regardless of the status of the mvt.
figure 55: Close movement
If for non AHS movements operations is finalized and mvt is ready
Or from the OUTBOUND list click on the movement hyperlink (
.
) and
Once the outbound mvt is closed and not manifested; for non AHS ulds the user can still:
* De-allocate (offload) loaded uld(‘s) from the outbound mvt back to the warehouse.
* Delete loaded uld(‘s) (reload included) (deleted = no way back all rld/uld info is lost).
* Reload or unload shipments to/from the uld; consult Reload a shipment into a container page
61 and Unload a shipment from the container page 62
Create outbound manifest for a movement
From the Outbound – Outbound list
on the movement you want to manifest.
figure 56: Create manifest
, and following screen will be exhibited.
ACS TGV MODULE V1.115
USER GUIDE V 2.2
75
Using the Operations Module
Explanation of fields (manifest details);
Manifest Reference:
Created:
UserId:
Manifest Status:
Defines a unique manifest reference number.
Defines the date and time when the manifest was created.
Defines the UserId of the person who created the manifest.
Defines the status of the manifest.
Create outbound manifest including mail CN38/AV7 load for a mvt
From the Outbound - Outbound list select the mvt you want to manifest and
figure 57: Create manifest and add mail bags
to proceed without adding mailbags to the manifest.
to proceed and select the mailbags you want to add to this manifest.
figure 58: Select/add mail bags
Select the CN38/AV7’s you want to manifest on this movement and
The system will besides the reloaded mawbs also manifest all selected mailbags.
.
Notes: Only CN38/AV7 (mailbags) with an identical dest as the mvt destination will be taken
into consideration. So the message to add mail bags to a manifest will only be shown if there is
CN38/AV7 input with an identical destination as the mvt destination. Mailbags will only
appear on the last page of the Air Cargo and Consolidated manifest.
ACS TGV MODULE V1.115
USER GUIDE V 2.2
76
Using the Operations Module
Handle partial manifest
If after the manifest creation; extra uld(s) with contents are allocated to the movement the
.
manifest status will change from complete to
figure 59: Handle partial manifest
on the movement hyperlink (
).
and a second manifest will be created only showing the extra freight info.
Re-manifest
An error occurred during manifesting (0 manifested pcs) an option ‘Re-manifest’ appears.
figure 60: Remanifest
and if the error remains after an attempt contact [email protected].
ACS TGV MODULE V1.115
USER GUIDE V 2.2
77
Using the Operations Module
Print manifest
Note: To view/print a manifest you need Adobe Acrobat installed on your pc.
When printing a manifest for a movement with US origins, you will be prompted to choose a
print in Metric or Imperial scheme.
figure 61: Print manifest
on the preferred manifest type to display and view manifest layout.
figure 62: example of a manifest
For detailed info consult Print layout of different (pre) manifests page 124.
Send Manifest
This option allows to send an air cargo manifest to an e-mail, fax and/or SITA address.
figure 63: Send manifest
•
Select if you want to include all account info, include or exclude a certain acc code.
•
Select or deselect the default provided addresses.
•
Add individual addresses and select the address type from the dropdown list.
ACS TGV MODULE V1.115
USER GUIDE V 2.2
78
Using the Operations Module
Resend IATA
•
is only visible for users with the permission to send IATA. Only if SITA
messaging is configured/set up (which can be FFM-FWB-FHL) resending is possible.
FFM
FWB
FHL
SITA message will contain Flight Manifest data
SITA message will contain Air Waybill data
SITA message will contain House Waybills associated with a Master Air Waybill.
Send as txt, pdf, XML
,
or
to the appropriate addresses.
to send the manifest in text, pdf or xml format,
Very important note: Only applicable for destined LOS & BAH manifest!
The destined LOS and BAH manifest should be sent as a ZIP file containing XML files
(eXtensible Markup Language).XML data is stored in text format, and is a software- and
hardware-independent tool designed for data transmissions between all sorts of
applications. Currently only the destined LOS and BAH manifest should be sent as XML,
therefore the button
will only be visible for outbound manifests to LOS and
BAH. The XML is different for both dest due to other predefined values.
Send ICS as CSV – Resend ICS info
,
these buttons are only visible: if the movement has a
NON EC/EU origin and dest is EC/EU, and only for users having the permission to
resend ICS. The button remains visible for 2 days after the mvt operational date.
Very important note: ICS compliant. Use the resend ICS info button to sent after mfst the
missing info, or when a second manifest is created. TGV will always resend all info. After
updates hit again the Send ICS as CSV button.
TGV will send information to the interface file, even if not all mandatory information is
available for ICS upon manifesting, for every movement, with an origin flagged as nonICS enabled (non EU) and a destination flagged as ICS enabled (EU), which is manifested
in TGV. Only MAWB’s, house airway bills included, with the UN-numbers from RCTS in
case of dangerous goods, with an account code and product code not having the flag
‘Exclude from ICS’ will be sent. All other MAWBs will not be sent towards the interface
file. By using the resend ICS info button missing information can be sent after manifesting
of the movement. When the resend ICS button is pressed or when a second manifest is
created, TGV will always resend all info towards the interface file.
To receive the extract it is needed to:
•
enter the email address required
•
select the correspondent tick box to activate the email address
•
press the "Send ICS as CSV" button
In few minutes the extract will be sent to the required email address and it will be possible to
elaborate it with Microsoft Excel. Consult: Import CSV file page 115
ACS TGV MODULE V1.115
USER GUIDE V 2.2
79
Using the Operations Module
Depart
When the movement is manifested, you can ‘depart’ the movement, just
figure 64: Depart movement
Return to origin
If the mvt is manifested & departed, and for a certain reason (re-routed, change of mvt due to
.
technical problem, or diverted for a particular reason) you can
figure 65: Return movement to origin
Note: this option is only available until the movement has status ‘arrived’.
If the mvt is ‘returned to origin’ the letter R is added behind the movementnr (
) and
mfst, but also brings the mvt to the ‘Inbound’ sector / menu. The mvt will get an equal org/dest.
The return to origin scenario for a rerouted or diverted movement.
The original mvt is already closed, manifested and departed, the next option is return
•
to origin. The mvt will get an equal org/dest, and the system will add a suffix R.
•
Create in the New outbound screen the same movement with identical movement
number, origin, ops date and different destination.Consult: New outbound page 64
•
Go to the inbound screen where you can transfer all huids of the RTO movement to
the new identical movement with the correct diverted destination. Consult: Transfer
transit ULD from inbound to outbound movement page 91.
•
If all ulds are transferred to the mvt with the correct dest, continue with the mfst.
ACS TGV MODULE V1.115
USER GUIDE V 2.2
80
Using the Operations Module
The return to origin scenario for a cancelled movement.
•
The original mvt is already closed, manifested and departed, the next option is return
to origin. The mvt will get an equal org/dest, and the system will add a suffix R.
Go to the inbound screen and move all ulds of the RTO mvt to the warehouse. Consult:
Move ULD from inbound mvt to TGV warehouse page 93. The ulds are now available to be
linked/ allocated to another outbound mvt the same day/night or for next outbound mvt.
Consult: Load (allocate) uld from the TGV warehouse to the outbound movement page 69.
Note: If the freight is not fwd the same day/night then do not forget to mark these ulds On
Hold. Consult: ULD (and contents) on hold page 83
Export: failed connection procedure
Failed connection of freight and/or paperwork should be captured as on hold-left behind.
Failed connection of paperwork
All paperwork presented to your location which missed connection on the outbound movement
needs to be captured as left behind.
Paperwork Left Behind
Hover over the PAPERWORK menu, from the sub menu
Paperwork LB.
figure 66: Paperwork left behind
Enter the MAWB number
ACS TGV MODULE V1.115
USER GUIDE V 2.2
to add the MAWB to the PPW L/B list.
81
Using the Operations Module
Notes;
* You can only mark PPW as L/B if at least 1 ppw entry is performed, regardless the gateway.
* For cxld, rejected, closed and/or billed MAWBs the user cannot mark PPW as LB.
* PPW can be released in the PPW L/B option (limited to PPW entered in your gateway), or
by doing a PPW entry.
* A comment in the T&T application is added to the mawb when add/released to/from the
PPW L/B list.
and print the list using the browser print option.
Release a PPW L/B from the PPW L/B option
to remove a MAWB from the PPW L/B list. A Comment is added in T&T3.
Release a PPW L/B by performing a PPW entry
Consult: Paperwork Entry page 27.
Failed connection of freight
All freight presented to your location which missed connection on the outbound movement
needs to be captured as on hold.
Freight on hold
The On Hold entry is included in the Checkpoints section. Input can be done on MAWB-HAWB
level or Container level (the checkpoint is linked to all MAWBs included-loaded in that ULD).
Note: When on hold remark FM is selected a delay reason is required.
On Hold checkpoint
This option allows to mark shipments (on MAWB – HAWB level or ULD level ) On Hold.
Mawb/HAWB on hold
Hover over the SHIPMENT menu, from the sub menu
Checkpoints.
From the checkpoint drop down list select checkpoint OH.
ACS TGV MODULE V1.115
USER GUIDE V 2.2
82
Using the Operations Module
figure 67: Freight on hold
Fill in MAWB and if applicable HAWB, your own location is set as default, insert the amount
of pieces for which the OH checkpoint is valid. Select an associated remark from the drop
down list (mandatory).
to capture and save the checkpoint information.
ULD (and contents) on hold
The user has 2 options to indicate an ULD (and contents) is on hold.
ULD On Hold via checkpoint menu
Hover over the SHIPMENT menu, from the sub menu
Checkpoints.
From the checkpoint drop down list select checkpoint OH.
Fill in the container nr and container destination. Select the associated (mandatory) remark
from the drop down list and
to capture and save the checkpoint information. In
this case the checkpoint is linked to all MAWBs included-loaded in that specific ULD.
The system will perform 2 checks:
1) ULD should be known in RUM (Regional ULD Management) application - if not existing
following error = ULD not found in system
2) ULD should exist in TGV - if not following error = ULD not found in Warehouse.
ACS TGV MODULE V1.115
USER GUIDE V 2.2
83
Using the Operations Module
ULD On Hold via TGV warehouse
Warehouse to view the available ULD(s) in the TGV warehouse.
This option allows you to create OH(s) for one or more ULDs including contents that have
been imported into the warehouse.
figure 68: ULD on hold
Select the ULD(s) for which you want to create on hold,
be exhibited where you need to select the on hold reason.
. A pop screen will
When on hold reason FM is selected a delay reason is required.
, the system will remove the checkbox in front of the uld which has been put on
hold, and the uld and contents will be displayed on the on hold screen.
Note: The On Hold remark is only visible when tracking the MAWB in T&T3.
On-Hold Remarks
Level
Remark
MAWB or ULD
Yes
Yes
Yes
Yes
Yes
Yes
Yes
Yes
Yes
Yes
Yes
Yes
Yes
Yes
Yes
Yes
Yes
Abbreviation
AS INSTRUCTED
BREAKDOWN
CNEE HOL
CONT MISSING
DEL
DEST IMP RESTR
DEST PUB HOL
DGR GOODS
FAILED SI
FM
HWB MISSING
IND ACTION
INDUST HOL
INSPECTION
LATE
MISPPWK
MISSED CONNEX
ACS TGV MODULE V1.115
USER GUIDE V 2.2
Description
INSTRUCTED BY CONSIGNEE/CONSIGNOR
VEHICLE BREAKDOWN
CONSIGNEE ON HOLIDAY UNTIL
CONTENTS MISSING
DELIVERY SCHEDULED
DESTINATION IMPORT RESTRICTION
NO MOVEMENT PUBLIC HOLIDAY AT DESTINATION
DANGEROUS GOODS NON-CONFORMING
SHIPMENT INSPECTION FAILED
FORCE MAJEURE
HWB MISSING
INDUSTRIAL ACTION
INDUSTRIAL HOLIDAY UNTIL
INSPECTION BY
ARRIVED TOO LATE TO MAKE CONNECTION
MISSING PAPERWORK
MISSED CONNECTION
84
Using the Operations Module
Yes
Yes
Yes
Yes
Yes
Yes
Yes
Yes
Yes
Yes
Yes
Yes
Yes
Yes
Yes
Yes
Yes
Yes
MVMT CANX
NO MVMT SCHD
NO PRE ALERT
NO SD
NON CONVEY
OFFLOAD
OVERLOAD
PENDING HWO
PIECE MISSING
PUB HOL
REPACK SERVICE
SHIPMENT ON HOLD
TECHNICAL
WAITING DEL
WAITING INST FR
WEATHER
WRONG ROUTE
HWB MISSING
MOVEMENT CANCELLED
NO MOVEMENT SCHEDULED FORDESTINATION
NO PRE ALERT RECEIVED
NO SHIPMENT DETAIL RECEIVED
EXCEEDS MAXIMUM WEIGHT OR DIMENSIONS (NON CONVEYABLE)
OFFLOAD
NO FURTHER UPLIFT AVAILABLE TODESTINATION
PENDING HWO APPROVAL
PIECE MISSING
PUBLIC HOLIDAY UNTIL
REPACK SERVICE
SHIPMENT ON HOLD
TECHNICAL FAULT
AWAITING DELIVERY
AWAITING INSTRUCTIONS FROM
WEATHER
WRONG ROUTE
HWB MISSING
Delay reasons is mandatory (only if on hold remark FM is selected)
Abbrev
Description
3RDPT
CVUNR
DSTER
EBRGO
SPCFC
TOTAL
WAR
3RD PARTY INDUSTRIAL ACTION – LEGAL / SAFETY RESTRICTIONS
CIVIL UNREST PREVENTING DHL FROM FULLY OPERATING IF AT ALL
A NATURAL DISASTER HAS OCCURRED THAT PREVENTS DHL FROM FULLY OPERATING IF AT ALL
AN IMMEDIATE EMBARGO HAS BEEN PUT INTO PLACE PREVENTING DHL FROM OPERATING
A SPECIFIC GOVT/AUTHORATIVE COMMAND HAS DECLARED OPERATIONS CANNOT BE FULLY OR
A TOTAL LOSS OF A TRUCK/AIRCRAFT HAS OCCURRED AFFECTING ALL SHIPMENTS LOADED TO IT
AN ACT OF WAR/TERRORISM HAS OCCURRED IN A SPECIFIC TERRITORY PREVENTING DHL FROM FULLY
OPERATING IF AT ALL
SEVERE WEATHER THAT PREVENTS DHL FROM FULLY OPERATING IF AT ALL
WTHER
Notes:
* On hold reasons are replaced with on hold remarks (cfr: Checkpoint reference guide).
When on hold remark FM is selected a delay reason is required.
* The On Hold remark will only be visible when tracking the MAWB in T&T3.
* OH checkpoints are displayed in the OH section, all other checkpoints inclusive OH
checkpoints are displayed in the checkpoint tab within the T&T3 application.
* It will not be possible to insert on mawb/hawb level more pcs on hold at your location as
there are on mawb level. Meaning a piece count check is performed based upon :
the amount of pieces on mawb/hawb level
the on hold location
the last 12 hours based upon the on hold scan dt/time
Checkpoints
The insert of a checkpoint(s) for a shipment(s) – ULD represents a situation in time, a snapshot
of the cycle of a shipment and captures more status visibility. Checkpoint input can be done on
MAWB-HAWB level or Container level (the checkpoint is linked to all MAWBs included-loaded
in that ULD). Hover over the SHIPMENT menu, from the sub menu
Checkpoints.
ACS TGV MODULE V1.115
USER GUIDE V 2.2
85
Using the Operations Module
figure 69: Checkpoints
From the checkpoint drop down list select relevant checkpoint.
Checkpoint on mawb-hawb level.
Fill in MAWB and if applicable HAWB, your location is set as default, insert the pcs for which
the checkpoint is valid. Select an associated remark from the drop down list (remark drop down
list is only displayed if mandatory).
to capture and save the checkpoint information.
Note: For specific checkpoints following rule(s) are implemented:
* the Container number and destination is blanked out if not applicable for that checkpoint.
* the remark dropdown list is only available for selection if the remark is mandatory.
* if on hold remark FM is selected a delay reason is required
The checkpoint remark is only visible when tracking the MAWB in T&T3.
Checkpoint on ULD level.
Your own location is set as default. Fill in the container number and container destination and
select an associated remark from the drop down list (remark drop down list is only displayed if
mandatory).
to capture and save the checkpoint information.
Note: For specific checkpoints following rule(s) are implemented:
* the Container number and destination is blanked out if not applicable for that checkpoint.
* the remark dropdown list is only available for selection if the remark is mandatory.
* if on hold remark FM is selected a delay reason is required
The checkpoint remark is only visible when tracking the MAWB in T&T3.
Checkpoints
Check Point
BA
BL
BN
CS
DD
DM
DS
HP
MC
MS
OH
RD
SI
SM
SS
Description
Bad Address
Bond Location
Customer Broker Notified
Closed Shipment
Delivered Damaged
Damaged
Destroyed/Disposal
Held for Payment
Mis-code
Mis-sort
On Hold
Refused Delivery
Shipment Inspection
Scheduled for Movement
Shipment Stopped
ACS TGV MODULE V1.115
USER GUIDE V 2.2
Type
SERVICE INC.
PROGRESS
PROGRESS
COMPLETION
COMPLETION
SERVICE INC.
COMPLETION
SERVICE INC.
SERVICE INC.
SERVICE INC.
SERVICE INC.
SERVICE INC.
PROGRESS
PROGRESS
COMPLETION
Can be captured on
MAWB
MAWB
MAWB
MAWB
MAWB
MAWB
MAWB
MAWB
MAWB
MAWB
MAWB or ULD
MAWB
MAWB or ULD
MAWB or ULD
MAWB or ULD
86
Using the Operations Module
Checkpoint remarks
code description
BA
Bad Address
remark
Yes
BL
BN
Bond Location
Customer Broker Notified
CS
Closed Shipment
No
Not
mandatory
Yes
DD
Delivered Damaged
Yes
DM
Damaged
Yes
DS
Destroyed/Disposal
Yes
HP
Held for Payment
Not
mandatory
MC
MS
Miscode
Missort
Yes
Yes
OH
On Hold
Yes
ACS TGV MODULE V1.115
USER GUIDE V 2.2
abbreviationRemark
INCOR CITY
INCOR CNTRY
INCOR PCODE
INCOR ST NO
NO APARTMENT NUMBER
NO CNTCT NAME
PO BOX ONLY
UNK COMPANY
UNK STREET
NO REMARK
PPWK SENT
FM TOTAL
GHOST
MC REF
REDIRECTION
UNAUTHORIZED INCIDENT
CONT
CONT MISSING
PACK
CONTENTS
DEL STOPPED
IN TRACING
INAD PACKAGE
MVMT SUSPEND
PACKAGE
REPACK
SEAL BROKEN
ABND
CNEE
CNOR
NO REMARK
CREDIT STOP
DUTY
GST
ST
TOTVAL
VAT
SENT TO
SENT TO
WRONG LOAD
AS INSTRUCTED
BREAKDOWN
CNEE HOL
CONT MISSING
DEL
DEST IMP RESTR
DEST PUB HOL
DGR GOODS
FAILED SI
FM
HWB MISSING
IND ACTION
INDUST HOL
INSPECTION
MISPPWK
MISSED CONNEX
MVMT CANX
NO MVMT SCHD
NO PRE ALERT
NO SD
standardRemark
INCORRECT CITY/TOWN
INCORRECT COUNTRY
INCORRECT POST CODE
INCORRECT STREET NUMBER
NO APARTMENT NUMBER
NO CONTACT NAME
PO BOX ONLY
COMPANY NOT AT ADDRESS
UNKNOWN STREET
PAPERWORK SENT TO
A TOTAL LOSS OF A TRUCK/AIRCRAFT HASOCCURRED
GHOST SHIPMENT
MISCODED REF
REDIRECTION
UNAUTHORIZED INCIDENT
CONTENTS
CONTENTS MISSING
PACKAGING
CONTENTS DAMAGED
DELIVERY STOPPED DUE TO TOTAL DAMAGE
IN TRACING
INADEQUATE PACKAGING
MOVEMENT SUSPENDED DUE TOTOTAL DAMAGE
PACKAGING DAMAGED
REPACKED
SEAL BROKEN
ABANDONED
CONSIGNEE AUTHORISED
CONSIGNOR AUTHORISED
CREDIT STOP
IMPORT DUTY
GST
SALES TAX
TOTAL VALUE
VAT
SENT TO
SENT TO
WRONG LOADING FROM ORIGIN ORLAST TRANSIT POINT.
INSTRUCTED BYCONSIGNEE/CONSIGNOR
VEHICLE BREAKDOWN
CONSIGNEE ON HOLIDAY UNTIL
CONTENTS MISSING
DELIVERY SCHEDULED
DESTINATION IMPORT RESTRICTION
NO MOVEMENT PUBLIC HOLIDAY ATDESTINATION
DANGEROUS GOODS NON-CONFORMING
SHIPMENT INSPECTION FAILED
FORCE MAJEURE
HWB MISSING
INDUSTRIAL ACTION
INDUSTRIAL HOLIDAY UNTIL
INSPECTION BY
MISSING PAPERWORK
MISSED CONNECTION
MOVEMENT CANCELLED
NO MOVEMENT SCHEDULED FORDESTINATION
NO PRE ALERT RECEIVED
NO SHIPMENT DETAIL RECEIVED
87
Using the Operations Module
NON CONVEY
OFFLOAD
OVERLOAD
PENDING HWO APPROVAL
PIECE MISSING
PUB HOL
REPACK SERVICE
SHIPMENT ON HOLD
TECHNICAL
WAITING DEL
WAITING INST FR
WEATHER
WRONG ROUTE
PM
RD
Piece Missing
Refused Delivery
Yes
Not
mandatory
SI
Security Inspection
Yes
SM
Scheduled for Movement
Yes
SS
Shipment Stopped
TD
Transport Delay
Not
mandatory
Yes
TT
Trace Terminated
Yes
ACS TGV MODULE V1.115
USER GUIDE V 2.2
NO REMARK
CNEE RESCH
CONT SHORT
DAMAGED
LATE DAYS
LATE HOURS
MISSING PIECE
NCI REQ
NO EXCHANGE
NOT ORDERED
PERSONAL DEL
DOG SCR
ETD
INSPECT
RAD SCR
XRAY
XRAY
DEPART
MVT
USNEXTDAY
NO REMARK
CUSTWHS
ATC
FM
GROUND HANDLING
OFFLOAD
OPERATOR
OVERLOAD
TECHNICAL
TRAFFIC
WEATHER
EXCEEDS MAXIMUM WEIGHT ORDIMENSIONS
OFFLOAD
NO FURTHER UPLIFT AVAILABLE TODESTINATION
PENDING HWO APPROVAL
PIECE MISSING
PUBLIC HOLIDAY UNTIL
REPACK SERVICE
SHIPMENT ON HOLD
TECHNICAL FAULT
AWAITING DELIVERY
AWAITING INSTRUCTIONS FROM
WEATHER
WRONG ROUTE
CONSIGNEE RESCHEDULED DELIVERY
CONTENTS SHORT
DAMAGED
OUTSIDE AGREED DAYS
OUTSIDE AGREED HOURS
PIECE MISSING
NEW CONSIGNEE INFORMATION REQUIRED
NO EXCHANGE UNIT
NOT ORDERED
PERSONAL DELIVERY
DOG SCREEN
EXPLOSIVE TRACE DETECTION
PHYSICAL INSPECTION BY
RADIATION SCREEN DETECTION
XRAY
XRAYED BY
DEPARTURE SCHEDULED
MOVMENT
US NEXT DAY
SENT TO CUSTOM’S WAREHOUSE
ATC
FM
GROUND HANDLING
OFFLOAD
OPERATOR
OVERLOAD
TECHNICAL
TRAFFIC
WEATHER
88
Using the Operations Module
Transit: transfer procedure
•
Acceptance of transit paperwork.
•
Transit: reloading freight, transfer transit ULD(s), prepare outbound mvt and mfst.
•
Information of failed connection related to paperwork and/or freight.
•
Checkpoints: represents a situation in time, a snapshot of the cycle of a shipment
Transit: acceptance of ppw procedure
All transit paperwork arriving at your location for outbound needs to be checked. Transit ppw
acceptance can be done via an ‘Inbound’ movement or the ‘Paperwork Entry’.
from
the menu, and all inbound movements will be displayed.
figure 70: Inbound movements
on the inbound movement link and default the loaded ULD(s) are shown.
Accept (transit) paperwork
Via the Inbound movement on mawb level it is possible to accept paperwork at gateway: confirm
receipt of paperwork at your location even if you are the transit gateway/location.
to view all available MAWBs loaded on the selected inbound movement.
figure 71: Inbound - MAWB - accept ppw
ACS TGV MODULE V1.115
USER GUIDE V 2.2
89
Using the Operations Module
Explanation of fields;
MAWB:
Dst:
Cs
Container:
MAWB Pieces
Reloaded Pieces:
Manifested Pieces:
PPW at origin location
PPW at GTW
Image File
Click on the MAWB and you will be re-directed to the Track&Trace application.
DHL three letter airport code, station of destination.
Customs status of the mawb-shipment
The container where the MAWB has been reloaded in.
The total nr of pieces of this mawb
The number of reloaded pieces of the MAWB in that container.
Defines the number of pieces already manifested.
This is the previous location, the origin of the movement.
Done: Paperwork entry or acceptance at the previous location is done
Missing: There is a paperwork entry done somewhere in the DHL network but not
at the previous location (link to the Paperwork Entry page 27)
Missing: There’s no paperwork entry done in the DHL network, so you’ll need to
check details and perform a ppw entry (link to the Paperwork Entry page 27)
This is your own location
Done: Paperwork entry or acceptance at your location is already done
MAWB Closed: There is already a pod for the complete shipment therefore
acceptation of paperwork is no longer allowed
Accept PPW: Link to accept/confirm paperwork receipt at your location
No PPW found: There is no paperwork entry done in the DHL network, therefore
you will need to check all details and perform a manual ppw entry
Indicate if a MAWB image scans available for this MAWB.
PPW acceptance at gateway
The option is available at your gateway: if your location is a transit point or destination, but at
least 1 ppw entry at another location needs to be performed
on the ‘Accept PPW’ link to
perform your GTW PPW acceptance and the system will create a PPW acceptance record visible
in T&T3. After performing the acceptance the link is replaced by ‘Done’.
Paperwork menu
Hover on PAPERWORK, from the sub menu
on Paperwork Entry.
Paperwork Entry
Consult: Paperwork Entry page 27
ACS TGV MODULE V1.115
USER GUIDE V 2.2
90
Using the Operations Module
Transit: Outbound – manifest procedure
Transit shipments can arrive at your location in 2 different ways:
•
Freight loaded in an ULD having your location as destination: contents is a mixture of
different destinations (within your own country and/or other countries) and ULD needs
to be unloaded and sorted at your location for outbound. (to be treated as export freight)
or needs to be transferred to another Commercial airline for uplift.
•
Freight loaded in a transit ULD (different destination than your location): contents
consists of transit shipments which doesn’t have to be unloaded nor sorted at your
location. ULD needs to be offloaded from the inbound movement in your location and
transferred to the outbound movement.
All transit shipments:
1.
Must be scanned/reloaded into an ULD using relevant DHL software (AHS, pTGV, TGV).
Allocate ULD(s) to a mvt for mfst creation. Consult: Export: outbound – manifest
procedure page 60.
2.
Which are loaded in a transfer ULD need to be transfered to the outbound movement for
mfst creation. Consult: Transfer transit ULD from inbound to outbound movement page 91
3.
Which need to be handed over to another commercial airline for uplift; create a transfer
manifest. Consult: Transfer transit freight to another commercial airline page 94
4.
which missed outbound connection: freight and/or paperwork should be captured as on
hold - left behind. Consult: Export: failed connection procedure page 81
Transfer transit ULD from inbound to outbound movement
All transit freight loaded in an ULD with a different destination than your location: contents
consists of transit shipments which do not have to be unloaded nor sorted at your location. ULD
needs to be offloaded in your location and transferred to the outbound movement.
Transit ULD (and contents) needs to be transferred from the inbound movement to the
outbound movement.
Inbound
from the menu, and all inbound movements will be displayed.
This section explains you how to:
•
Move the handling unit from an inbound movement to the warehouse
•
Transfer a handling unit of an inbound movement to an outbound movement.
ACS TGV MODULE V1.115
USER GUIDE V 2.2
91
Using the Operations Module
Arrive movement
Important note: Prior to perform any action on an inbound mvt, you need to arrive the
mvt, and in case it is an AHS owned movement, the user also needs to take ownership.
From the Inbound Movement list
OR from the Inbound List , click on the movement link
figure 72: Arrive inbound movement
’Arrive’, the mvt gets status ‘Arrived’, required to transfer ULD’s from an inbound mvt to
an available outbound mvt or to the TGV warehouse. Take ownership if AHS owned mvt.
Take Ownership
figure 73: Inbound movement - take ownership
When the inbound movement is AHS owned the user needs to take possession of the
movement. Take Ownership to enable the option to transfer ULD’s from an AHS owned
inbound movement to an available outbound movement or TGV warehouse.
ACS TGV MODULE V1.115
USER GUIDE V 2.2
92
Using the Operations Module
Container/HUID:
Org/Dst:
Pcs/User:
Date/Status:
Manifest status:
Descr:
Location:
To WH:
Transfer:
Print:
The container number and Handling Unit Identification (H = AHS id, OPS = TGV id).
Three letter airport code, station of origin, station of destination.
Total nr of pcs reloaded and/or scanned in the container, and the userid.
The operational date and the status of the container.
The manifest status of the movement.
The contents of this container.
The location of the container: the movement number and destination of the movement.
Status N/A=Not available.
= offload and move the ULD to the TGV warehouse
to transfer the ULD to an active (available) outbound movement
To print the contents of the ULD. (Note the print preview will open in a new window.)
Notes: If you are an AHS site transferring transit positions should be done in AHS and
preferable not manually in the TGV application.
Once you’ve arrived and/or took ownership of the inbound movement you can perform
following actions for the AHS owned ULD(s):
•
Move loaded uld from inbound mvt to the TGV warehouse.Consult Warehouse page 60
•
Transfer a loaded uld from an inbound mvt to an existing outbound movement.
Move ULD from inbound mvt to TGV warehouse
figure 74: Move ULD from inbound movement to TGV warehouse
to move the ULD to the TGV warehouse, the ULD will be placed with the available
ULD’s in the TGV warehouse. Consult: Warehouse page 60
Why move a transit ULD from the inbound movement to the warehouse?
If a complete ULD (+ contents) is left behind, you can mark this uld and contents as on hold
via the warehouse. Consult: ULD On Hold via TGV warehouse page 84
ACS TGV MODULE V1.115
USER GUIDE V 2.2
93
Using the Operations Module
Transfer ULD from inbound movement to outbound movement
Note: The transfer option is not available (n/a)!
•
the location is no longer an inbound mvt/dest but already an outbound mvt/dest, so the
transit ULD is already transferred from the inbound to the outbound movement.
•
The location is no longer an inbound movement/dest but your TGV warehouse, so the
transit ULD is moved from the inbound movement to your TGV warehouse.
To transfer the transit ULD’s to an existing outbound mvt, if the movement doesn’t exist, it
must be created first prior to transfer. Consult: New outbound page 64
To transfer the selected ULD to an available existing outbound movement, select the preferred
movement from the dropdown list.
figure 75: Transfer ULD from inbound movement to outbound movement
, the ULD will be transferred to the selected outbound movement.
Continue with the normal export procedure. Consult: Export: outbound – manifest
procedure page 60
Transfer transit freight to another commercial airline
For inbound-transit freight which needs to be handed over to another commercial airline for
uplift a transfer manifest should be created.
ACS TGV MODULE V1.115
USER GUIDE V 2.2
94
Using the Operations Module
Inbound
from the menu, then click on the required inbound movement, the loaded ULD’s
will be displayed.
Assign (mawb) for transfer to another commercial airline.
To assign MAWB’s as transfer to Commercial Airline freight,
‘Loaded ULDs’ to view the ULD contents being mawbs.
on the ULD number in the
figure 76: Assign MAWB to transfer to another commercial airline
Select/flag the MAWB (multiple selection is possible),
will update and complete the Trns To information as follows
. The system
The mawb assigned for transfer to another commercial airline is now available for a transfer
manifest creation.
Create transfer manifest to another commercial airline.
Hover on MANIFEST from the sub menu
on Create Transfer Manifest.
Assign (available MAWB ‘s to an Airline)
To assign a MAWB to an Airline select (flag) a MAWB from the “Assign available MAWB’s”
list, and click
.The system will prompt you to enter a valid 2-letter airline code. Once
the code is completed the MAWB is assigned to the available transfer manifests.
ACS TGV MODULE V1.115
USER GUIDE V 2.2
95
Using the Operations Module
figure 77: Create transfer manifest to another commercial airline
MAWB’s that are assigned to an airline can still be edited or removed from the manifest until
the manifest has been closed / printed.
Save changes (change pcs-weight of available mawbs or add/remove a remark)
Correct the amount of pcs and/or weight, insert or remove a remark, flag the check box in
front of the mawb for which you want to save the changes and
Remove from list (assign available MAWB’s)
Select (flag) the MAWB, and click
.
. Note; Multiple selection is possible.
Retrieve MAWB
A PPW entry should occur in your GTW. This option can be used for;
Retrieve a MAWB that was previously removed from the list
Retrieve the total amount of pieces of a partially send shipment
Retrieve a MAWB when your GTW is the origin and freight should be transferred to
another airline for uplift.
Retrieve a MAWB that was previously transferred to another incorrect airline.
To retrieve the MAWB, enter the MAWB number in the entry field and
figure 78: Retrieve extra available MAWBs for transfer
This action will load the MAWB in the “Assigned Available MAWB’s” list and will be
available to be assigned to a Transfer Manifest.
ACS TGV MODULE V1.115
USER GUIDE V 2.2
96
Using the Operations Module
Avialable Transfer Manifests for printout
This option allows the user to manage and print or re-print a transfer manifest. The transfer
manifest contains MAWB information that is identified as leaving the DHL network and will
be handed over to a Commercial Airline.
figure 79: Print - Print&close transfer manifest
DHL carrier
Select from the drop down list of available DHL owned carriers the appropriate carrier, this
name is also displayed on the hardcopy of the transfer manifest.
figure 80: DHL carrier selection for transfer manifest
Print / Print & Close a transfer manifest
, to open a draft version of the Transfer manifest in a new browser window. (Requires
Adobe Acrobat Reader ).
Note: regardless of the entered measurement scheme, the transfer manifest is in metric.
ACS TGV MODULE V1.115
USER GUIDE V 2.2
97
Using the Operations Module
figure 81: Air Cargo Transfer manifest
. The system will load the following confirmation box.
After confirmation, the system will close the manifest, remove the information from the
“Available Transfer Manifests” list and open the final manifest in a new window.
To re-print a closed Transfer Manifest, track one of the MAWB’s that has been assigned to the
manifest in the Track & Trace 3 and select the “Reload / Manifest” tab.
figure 82: Track&Trace application - transfer manifest
Save changes (change pcs-weight of assigne to … mawbs)
MAWB’s that are assigned to an airline can still be edited/changed until the manifest has been
closed / printed. Correct the amount of pcs and/or weight, insert or remove a remark, flag the
check box in front of the mawb for which you want to save the changes and
.
Remove from manifest (assigned MAWB’s)
MAWB’s that are assigned to an airline can still be removed from the manifest until the
manifest has been closed / printed. Select (flag) the MAWB, and click
. Note; Multiple selection is possible.
ACS TGV MODULE V1.115
USER GUIDE V 2.2
98
Using the Operations Module
Transit: failed connection procedure
Failed connection of freight and/or paperwork should be captured as on hold-left behind.
Failed connection of transit paperwork
All paperwork arriving at your location which missed connection on the outbound movement
needs to be captured as left behind. Consult: Paperwork Left Behind page 81
Failed connection of transit freight
All transit freight arriving at your location which missed connection on the outbound movement
needs to be captured as on hold. Consult: Failed connection of freight page 82-85
Transit ULD (+complete content) on hold
Inbound
from the menu, then click on the required inbound movement, the loaded
ULD’s will be displayed.
Move ULD from inbound mvt to TGV warehouse
to move the ULD to the TGV warehouse, the ULD will be placed with the available
ULD’s in the TGV warehouse.
Why move a transit ULD from the inbound movement to the warehouse?
If a complete ULD (+ contents) is left behind, you can mark this uld and contents as on hold
via the warehouse. Consult: ULD On Hold via TGV warehouse page 84-85
Checkpoints
The insert of a checkpoint(s) for a shipment(s) – ULD represents a situation in time, a snapshot
of the cycle of a shipment and captures more status visibility. Checkpoint input can be done on
MAWB-HAWB level or Container level (the checkpoint is linked to all MAWBs included-loaded
in that ULD). Consult section Checkpoints at page 85-88
ACS TGV MODULE V1.115
USER GUIDE V 2.2
99
Using the Operations Module
Import: inbound procedure
•
Acceptance of import paperwork.
•
Proof Of Delivery: freight available for pick up.
•
Checkpoints: represents a situation in time, a snapshot of the cycle of a shipment
Import: acceptance of ppw procedure
All import paperwork arriving at your location as final destination needs to be checked.
Import ppw acceptance can be done via an ‘Inbound’ movement or the ‘Paperwork Entry’.
Accept (import) paperwork
Consult: Accept (transit) paperwork page 89
PPW acceptance at gateway
The option is available at your gateway: if your location is a destination, but at least 1 ppw entry
at another location needs to be performed
on the ‘Accept PPW’ link to perform your GTW
PPW acceptance and the system will create a PPW acceptance record visible in T&T3. After
performing the acceptance the link is replaced by ‘Done’.
Paperwork menu
Hover on PAPERWORK, from the sub menu
on Paperwork Entry.
Paperwork Entry
Consult: Paperwork Entry page 27
Checkpoints
The insert of a checkpoint(s) for a shipment(s) – ULD represents a situation in time, a snapshot
of the cycle of a shipment and captures more status visibility. Checkpoint input can be done on
MAWB-HAWB level or Container level (the checkpoint is linked to all MAWBs included-loaded
in that ULD). Consult section Checkpoints at page 85-88
ACS TGV MODULE V1.115
USER GUIDE V 2.2
100
Using the Operations Module
Import: proof of delivery - handover procedure
All import freight arriving at your location as final destination needs to have a proof of delivery.
POD section allows to create, prepare, find, print and close a Proof Of Delivery’s.
Create pod on mawb(s) – hawb(s) level
New POD
From the POD menu select
, the following information will be loaded.
figure 83: New POD
Generate
POD Nbr:
Gateway:
POD Remarks:
Movement
Consignee:
CMR entry
Select this option and the system generates an unique POD number automatically.
Or enter the POD number of the hardcopy in this entry field
Your location: airport code, station of issuing.
Enter the global POD remarks in this entry field.
Enter the movement reference (license plate) in this entry field.
Enter the consignees name in this entry field.
Flag this checkbox if the related info is not a POD but a CMR (Convention of International
Road Transportation)
When all fields are completed
, the following information will be loaded.
figure 84: Create POD
Pod has now been created but is still empty cause no mawbs/hawbs are inserted to this pod.
As long as no mawbs/hawbs are attached onto the pod, the user will have the option to remove
the pod. For detailed info consult: Delete a POD page 110
ACS TGV MODULE V1.115
USER GUIDE V 2.2
101
Using the Operations Module
Update POD
This section explains how to update the main POD information.
figure 85: Update POD
Only the accessible fields can be corrected, edit the necessary fields and
.
Show ATA
Allows to add the Actual Time of Arrival of the inbound movement to the POD.
and the system will automatically add the Actual Time of Arrival of the
inbound movement to the POD, when available.
figure 86: POD show ATA
Notes;
•
•
The ATA for flights will be displayed in UTC, for trucks in Local Time.
If selected Show ATA, and the system displays N/A, this means the movement is
not a Scheduled movement and is not available in the DB-Core Movement database.
Hide ATA
This option is only visible when a user has previously added the ATA to the POD, and allows
to remove/hide the ATA of the inbound movement from the POD.
the system
will remove the Actual Time of Arrival of the inbound mvt from the POD.
Manually add MAWB to a POD
This option allows the user to manually add MAWB information to the POD.
figure 87: Add MAWB to POD
MAWB:
Pieces
Enter the MAWB number in this entry field.
Submit the number of pieces which will be picked up
ACS TGV MODULE V1.115
USER GUIDE V 2.2
102
Using the Operations Module
Weight
NEW: You are able to enter the correct wgt if required on pc level part shipments or complete
freight.If you do not fill in the wgt, the system will automatically calculate the wgt based upon
the amount of pod pcs (wgt devided by total amount of pcs multiplied by pod amount of pcs)
Note: if you choose to enter the weight manually for the first mawb, you will need to
enter for all other mawbs on this same pod the weight manually.
If you do not enter the weight for the first mawb, you will no longer be able to fill in
the weight for the other mawbs on the same pod.
Incident
Select if needed an incident code from the dropdown list.
Avail. Date: The date defines when the freight was available for pick-up. (can be changed manually).
Avail. Time: This time defines when the freight was available for pick-up. (can be changed manually).
Remarks:
Note: Regardless of your chosen time preference you always need to fill in the local time,
cause this is the time which will be displayed on the pod print as : ready for pick up.
Add the remarks for this MAWB in this entry field.
Populate all fields required
, the MAWB detail will be added to the POD.
Update MAWB details
Allows the user to update or delete the MAWB information, as long as the pod hasn’ been
printed nor closed. update to correct the selected MAWB detail.
figure 88: Update MAWB POD details
Apply the necessary changes and
or
to abort without the changes.
Delete MAWB details
delete to remove the MAWB detail, the following confirmation box will appear.
figure 89: Delete-remove MAWB from POD
to delete the selected MAWB detail from the POD, or
ACS TGV MODULE V1.115
USER GUIDE V 2.2
to abort.
103
Using the Operations Module
Manually add HAWB to a POD
If the selected MAWB contains HAWB information, following information is displayed.
add HAWB’s to view the available HAWB’s for the selected MAWB.
figure 90: Add HAWB to POD
to add all available HAWB’s displayed to the POD.
to deselect the selected HAWB’s.
to add the selected HAWB’s to the POD.
Note: If not the complete amount of pcs is received on hawb level, change the HAWB POD
pcs manually, cause default at the beginning the total nr of pcs will be displayed after
selected. Once an HAWB with incomplete amount of pcs is added, the second attempt to
add this HAWB to a pod the remaining pcs will be displayed as default.
If the HAWB(s) have been selected to add, the HAWB window will be closed, and the selected
HAWB info is added to the POD.
figure 91: HAWB on POD
Note: HAWB information will also be displayed on the POD printout.
ACS TGV MODULE V1.115
USER GUIDE V 2.2
104
Using the Operations Module
Remove HAWB details
remove to delete the HAWB from the POD, following confirmation box will appear.
figure 92: Remove HAWB from POD
to delete the selected HAWB detail from the POD.
to proceed without deleting the selected HAWB detail from the POD.
Search Mawbs available for POD
This option is available at the bottom underneath Manual Mawb entry, and allows the user to
search mawbs available for POD based upon destination and account. Select the GTW and
account from the dropdown list and
, the following information will be loaded.
figure 93: Search MAWBs available for POD
Explanation of additional fields;
Include: This field shows how many pieces are available according to the PPW.
If the available nr of pcs doesn’t correspondent with the nr of pieces you received at your
destination then change the number of pieces that will be placed on the POD, and flag the
accompanied checkbox to indicate that the MAWB must be included to the POD.
to add the selected MAWB(s) to the POD.
ACS TGV MODULE V1.115
USER GUIDE V 2.2
105
Using the Operations Module
Create pod for an entire ULD (+complete content)
The user should go to the virtual TGV warehouse to manually select 1 or more ULD(s) for pod
creation.
on the Warehouse section to consult your virtual TGV warehouse.
Create POD for selected ULD(s)
You can create POD(s) for 1 or more ULDs + contents which are available in your virtual TGV
warehouse.
figure 94: Create POD for select ed ULD(s) of the TGV warehouse
Flag the POD checkbox in front of the ULD(s) for POD creation and
.
The system will now produce an unsigned POD for each mawb loaded in the selected ULD(s)
and will re-direct the user to the POD unsigned screen. (Consult: Unsigned POD’s page 110)
When a ULD is not selectable for POD creation, the
button will be in front of the ULD.
When clicking on this button, an explanation pop-up box will appear with one of the following
details regarding the ULD.
figure 95: MAWBs on this container are already on a POD, or container is empty
•
MAWBs in this selected ULD are already put manually on a POD.
When the ULD is empty there is no need to generate a POD
figure 96: This container may contains MAWBs without paperwork
•
MAWB without PPW, see section Perform PPW checkin link from ULD in
warehouse page 107 to solve the problem, the ULD will become selectable for POD
generating.
ACS TGV MODULE V1.115
USER GUIDE V 2.2
106
Using the Operations Module
Perform PPW checkin link from ULD in warehouse
on the ULD nr link
and the system will display all MAWB’s in the selected
ULD that have no PPW checkin.
on the MAWB number, and the
system will direct you to the PPW entry screen. When the PPW checking has been done,go to
the warehouse, and the ULD will be selectable for generating POD(s).
Print a POD
Print/Save Changes (first print)
This option allows the user to print out a POD without closing the POD.
figure 97: Print POD
Important notes:
* If you do not want to close the pod make sure the Signatory name is not filled in.
* The system will force the user to fill in the consignee name, when not yet done.
* When you click on OK, the system will disable any actions on MAWB and or hawb level
(except “remarks after closure”).
* The default POD copies to print have been reduced from 3 copies to 2 copies, reason is:
there is no need any more to send a copy to Brussels
* The pick up date/time will not be displayed on the pod print. Only when the Signatory name
is filled in, the system will default take the current local time to be populated, but can be
changed manually (but always fill in the local time, cause this is the time which will be
displayed on the pod print as : pick up date/time)
ACS TGV MODULE V1.115
USER GUIDE V 2.2
107
Using the Operations Module
to print out the POD, the system displays a warning.
to proceed or
to abort the current action.
The system will load a print-preview using the adobe acrobat plug-in.
figure 98: First print
When closing this print preview window, the following information will be loaded.
figure 99: POD after first print
Close a POD
Finalize / Close POD
To close a POD, enter the signatory name, Pickup date & time and
Once a pod is closed this pod will be removed from the unsigned pod list.
.
Note: the pod is only closed if the Signatory name is filled in. The system will default set the
Pickup date & time as current local time, but this can be changed manually (always fill in the
local time, cause this is the time which is displayed on the pod print: pick up date/time)
ACS TGV MODULE V1.115
USER GUIDE V 2.2
108
Using the Operations Module
to proceed or
to abort the current action.
figure 100: Close POD
Print Final
, the system will load a print-preview of the final/closed POD.
Print Original
to printout the duplicate of an original (first print) POD.
Add remarks after closure
in front of the MAWB, the following information will be loaded.
figure 101: POD - add remarks after closure
Add the after closure remarks and,
proceed without updating the POD detail.
ACS TGV MODULE V1.115
USER GUIDE V 2.2
to update the detail or
to
109
Using the Operations Module
Unsigned POD’s
This option allows the user to search for all unsigned POD’s in your gateway.
From the POD submenu select
, the following information will be loaded.
figure 102: Unsigned PODs
Explanation of fields;
POD Nbr: The POD number. (Click on the list header to sort ascending/ descending)
POD Date: The date and time when the POD was created. . (Click on the header of the list to sort ascending
or descending)
Consignee Defines the consignee information mentioned on the unsigned POD. (Click on the header of the
list to sort ascending or descending)
GTW:
Defines the DHL tree letter code where the POD was created.
User:
Defines the user-Id who created the POD.
the POD number and close or update the selected POD.
Delete a POD
This option allows you to delete an Unsigned POD without MAWB/HAWB details allocated
, the following information will be loaded.
to them. From the POD menu select
figure 103: Delete POD
Delete to remove the selected Unsigned POD from the list.
The following confirmation window will appear.
to close this confirmation box and delete the selected Unsigned POD.
to close this confirmation box without deleting the Unsigned POD.
Note: As long as no mawbs/hawbs are attached onto the pod, the user will have the option to
remove the pod.
ACS TGV MODULE V1.115
USER GUIDE V 2.2
110
Using the Operations Module
Usefull options
Block/Unblock
Hoover over the Shipment menu,
Block/Unblock to stop or release a shipment.
figure 104: Block-Unblock shipments
Reason
User
AA:
US Customs Import Block
BR:
Shipment under Bank release
CD:
Customs check
DG:
Dangerous goods Check
DM:
Damaged
IC:
ICS Customs block
ID:
Missing/icorrect customs documents
IW:
ICS Customs WAIT
LP:
Lost PPWK / Docs
RB:
Rejected Booking
RT
Return to Consignor
SC
Security checked
SI:
Shipment inspection
UN:
Unsecured shipment
Defines the user who blocked the MAWB
Block a shipment
To block a shipment for a certain reason enter the MAWB / HAWB in the MAWB entry field,
select the Block reason from the dropdown list and
Notes: if a MAWB is unknown, the following will be displayed.
ICS block
TGV will send the block and unblock messages for ACS material from customs. TGV will
process these block/unblock messages together with their related incident code.
Whenever a block message is received for a particular MAWB, this MAWB will receive a
reload block in the related gateway with the incident code ‘ICS customs block’ (incident
code IC). The shipment will change back to the previous status when an unblock message is
ACS TGV MODULE V1.115
USER GUIDE V 2.2
111
Using the Operations Module
sent. A new permission for customs will be created that allow certain users to manually
unblock these shipments. These manual unblocks will not be forwarded to AHS. Manual
unblocks in AHS will also not be forwarded towards TGV.
Blocked
If a shipment has a reload block in a certain gateway it will not be possible in TGV:
•
•
To manually reload this shipment in the related gateway
To create a POD for this shipment in the related gateway
Unblock a MAWB
the MAWB is released. Multiple unblock, flag the MAWB’s and
.
Print Blocked MAWB’s list
to open the blocked MAWB’s list in a new browser window.
Paperwork Notice
Hoover over the Paperwork menu,
Paperwork Notice to enter a notification (e.g.: route
details, special attention, specific request) for an existing MAWB.
Add a PPW Notice
Enter the MAWB number and comment that you want to add to the MAWB and
The MAWB and Notification details will be added to the list as follows.
.
figure 105: Paperwork notification input
The notification is displayed to the user when performing a PPW entry for this specific
MAWB in the same GTW where the notification is entered. When the PPW entry is done, the
notification is removed from the MAWB. Each time a PPW notification is set or removed a
GTW comment in the Track&Trace application – Tracking is added to the MAWB.
Remove a PPW Notice
From the ‘PPW Notice’ option, click ‘Remove’ to remove the selected notice.
Note: you can only remove paperwork notification from your own location/gtw.
ACS TGV MODULE V1.115
USER GUIDE V 2.2
112
Using the Operations Module
OR: Perform a PPW entry for the MAWB. When performing the PPW entry a message box
will appear with the entered notice.
figure 106: Paperwork notification
‘Continue’ to remove the notification and close the message box.
Note: Paperwork notification on mawb level is automatically cleaned up when a paperwork
entry is performed in a different gateway than the notification gateway.
Mail
Mail: how to add besides mawbs also the CN38/41/46/47-AV7 to a mfst?
Hover over the SHIPMENT menu, a sub menu is listed and
on Mail.
figure 107: Mail input
Enter the CN38 / AV7 details and
to add the input to the list.
to remove an
entry from the list. The entries performed in this option are available for manifesting.
Create outbound manifest including mail CN38/AV7 load for a mvt
From the Outbound - Outbound list select the mvt you want to manifest and
figure 108: Add mail bags to an outbound manifest
ACS TGV MODULE V1.115
USER GUIDE V 2.2
113
Using the Operations Module
to proceed without adding mailbags to the manifest.
to proceed and select the mailbags you want to add to this manifest.
figure 109: Select/add mail bags
Select the CN38/AV7’s you want to manifest on this movement and
The system will besides the reloaded mawbs also manifest all selected mailbags.
.
Notes: Only CN38/AV7 (mailbags) with an identical dest as the mvt destination will be taken
into consideration. So the message to add mail bags to a manifest will only be shown if there is
CN38/AV7 input with an identical destination as the mvt destination. Mailbags will only
appear on the last page of the Air Cargo and Consolidated manifest.
Outbound List
Hoover over the Outbound menu,
Outbound List to view all outbound movements.
The system will show all available outbound movements created in AHS and/or TGV regardless
of the status of the movement.
on the mvt hyperlink (eg;
)
figure 110: Outbound movement - create image file
Create image file
This option allows to create a ZIP file containing all scanned images of the MAWB’s that are
loaded onto the mvt. The Image file can be created after creating the Pre-mfst or Final Manifest
and requires a WINZIP or other software that can handle this type of archive.
on ‘Create
Image File’, then
‘Retrieve Image File’ to initiate the download of the zip file.
ACS TGV MODULE V1.115
USER GUIDE V 2.2
114
Using the Operations Module
figure 111: Save or open image file
The user can open the ZIP file or save it on the PC’s hard drive and attach the file to an email.
figure 112: ZIP file
Send ICS as CSV file - Import CSV file
Import CSV file: the extract will be sent to the required email address and it will be possible to
elaborate it with Microsoft Excel.In order to import correctly the CSV file there is an important
setting to be done on Microsoft Excel (this operation has to be done only once).
Microsoft Excel 2003
Tool -> Option menu
select the "International" tab
set decimal separator "."
click on the Ok button
figure 113: Import CSV file
ACS TGV MODULE V1.115
USER GUIDE V 2.2
115
Using the Operations Module
Microsoft Excel 2010
File->Options->Advanced
set decimal separator "."
click on the Ok button
Excel is ready to correctly import the .CSV files you are generating with TGV. Once the files have
been imported to Excel it should already been displayed in separated columns.
If this is not the case, follow a simple procedure to separate the data in columns.
Microsoft Excel 2003
select spreadsheet column (A)
select the Data->Text to column
Microsoft
Excel 2010
ACS TGV MODULE V1.115
USER GUIDE V 2.2
116
Using the Operations Module
Microsoft Excel 2003
pop-up window
select "Delimited" option
press the "Next" button
set as separator character "|"
Finish" button
Microsoft Excel 2010
pop-up window
select "Delimited" option
press the "Next" button
set as separator character "|"
Finish" button
The file is ready to be elaborated on Excel.
Note: This proces has been installed especially for AS400 countries which are not yet ready and
non AHS sites/countries. This option can also be used by H&G at origin to provide commercial
airlines (in case of Interline traffic into EU or in transit in EU) with the required ACS ICS info to
lodge the declaration themselves at the first point of entry.
ACS TGV MODULE V1.115
USER GUIDE V 2.2
117
Using the Operations Module
Merge movement
To merge an entire outbound mvt into another outbound mvt with the same dest. Hoover over
Outbound List to view all outbound movements. The system will show
the Outbound menu,
all available outbound mvts created in AHS and/or TGV regardless of the status of the mvt.
on the mvt hyperlink (eg;
)
Allows to merge an entire outbound mvt into another outbound mvt with the same dest.
Note; Only complete OPS (TGV owned) movements with status “closed” can be merged.
When an OPS (complete TGV owned/ no AHS ULD info) movement is closed, the following
option will appear below the container list (in the option “Loaded ULD’s”).
figure 114: Merge movement
Select a movement from the dropdown list and
. The Ulds and contents are
automatically merged/crossloaded into the selected second outbound movement, and therefore
the first outbound movement will disappear from the outbound list.
Note; Once a movement is manifested or partial manifested the merge option is disabled.
Lookup ULD from previous movement
Option to lookup ULD(s) of a movement for which the LDM is already created and reload the
customs mawb for the ULD(s) on ULD level to the outbound movement. Hoover over the
OUTBOUND menu, a sub menu is listed and
on Outbound List. The system will show all
available outbound mvts created in AHS and/or TGV regardless of the status of the movement.
ACS TGV MODULE V1.115
USER GUIDE V 2.2
118
Using the Operations Module
on the mvt hyperlink (
) and
.
figure 115: Outbound movement - lookup ULD on previous movement
Reload via LDM (load message)
This option can only be used when a LDM for the outbound movement is already created.
Fill in the movement number - movement date and
on
of the drop down list to view the containers of the outbound LDM.
Select the correct ULD, submit the customs AWB and
.
The mawb is now reloaded as an imported ULD. The mawb remains in the input field and can be
ACS TGV MODULE V1.115
USER GUIDE V 2.2
119
Using the Operations Module
used for another selection of containers regarding this LDM , or select another container and
submit a different customs awb. The imported ULD and mawb is now listed as loaded ULD for
your selected outbound movement. (You’ve already selected the outbound movement at the
start.). For belly material you can use the manual reload
Hide (archive a movement/mfst)
To hide (remove) a movement manually from your current outbound list
figure 116: Hide (archive) a movement-manifest
to remove the movement manually from your outbound list and it will be archived in
the manifest section. For detailed info consult :
ACS TGV MODULE V1.115
USER GUIDE V 2.2
120
Using the Operations Module
Search Manifest page 121
Note: Completed Inbound and outbound mvts are automatically hidden after 12 hrs
Update outbound
From the OUTBOUND menu,
. You can update/correct outbound mvts at
your location if the mvt status is open, no premanifest nor manifested and if no dbCore mvt.
Select the appropriate outbound movement from the dropdown list and
figure 117: Update an outbound movement
Make the necessary changes to the Movement,
to apply the changes to the Movement.
to ignore the changes made and keep the original Movement details.
Note: Correction of a movement type is only possible for a non scheduled mvt)
Manifest
Hoover over the Manifest menu,
ACS TGV MODULE V1.115
USER GUIDE V 2.2
Search Manifest, to search for a generated ACS manifest.
121
Using the Operations Module
Search Manifest
figure 118: Search a manifest
Enter/select search options: a ‘like’ functionality on movement level has been implemented.
. Like functionality in the “Movement” field enter at least 1 letter or digit.
figure 119: Manifest list
Wildcard use. In the “Movement” field you can use ‘%’ as a wildcard.
Manifest Reference:
Movement:
Origin:
Destination:
Day
Month:
Year
Enter the Manifest Reference number in this field
Enter the complete or part of the mvt nr in this entry field, or use ‘%’ as a wildcard.
Select or enter the DHL three letter airport code, station of origin.
Select or enter the DHL 3 letter airport code, station of destination.
Select or enter the day = movement operational day (default the current day is populated).
Select or enter the month (default the current month will be populated).
Select or enter the year (By default the current year will be populated).
Note: Used parameters are kept in memory until you quite the manifest search.
ACS TGV MODULE V1.115
USER GUIDE V 2.2
122
Using the Operations Module
To view the manifest details
on the Manifest Reference number.
Details on how to print a manifest can be found in section Print manifest page 78.
Details on how to send a manifest can be found in section Send Manifest page 78
Print layout of different (pre) manifests
Click on the movement link
on the preferred manifest type to display and view manifest layout.
figure 120: Print layout of different (pre) manifests
Note:
To view/print a manifest you need Adobe Acrobat plug-in installed on your pc.
When printing a manifest for a movement of which the origin is within USA, a popup box
ACS TGV MODULE V1.115
USER GUIDE V 2.2
123
Using the Operations Module
appears to choose to print in Metric or Imperial scheme.
•
When a shipment is reloaded on Mawb level, the Consolidated manifest and the ‘Consol
Ex Acc’ manifest will display the MRN(s) of the Mawb(s) when available.
•
If a shipment is reloaded on Hawb level, the Consolidated Hawb and Consolidated
HAWB CBP manifest will display the MRN(s) of the Hawb(s) when available.
•
All the PDF manifests layouts have been slightly changed, and will now display the STD
and the STA of the scheduled movement or manual created movement.
: the consolidated (pre) manifest of the selected movement.
: the consolidated ex Account (pre) manifest (Info is split by accountcode)
: the transfer (pre) mfst without indication of the inbound movement/ULD.
ACS TGV MODULE V1.115
USER GUIDE V 2.2
124
Using the Operations Module
: a transfer (pre) manifest with indication of the inbound movement/ULD, based
upon received reload info of the transfer position.
: the HAWB (pre) Manifest shows the MAWB and HAWB details (as scanned).
: the Air Cargo (pre) Manifest of the selected movement.
ACS TGV MODULE V1.115
USER GUIDE V 2.2
125
Using the Operations Module
: the Container (pre) Manifest shows the MAWB details per container and is
extended with the volume (chargeable) weight: volume weight entered during ppw entry.
ACS TGV MODULE V1.115
USER GUIDE V 2.2
126
Using the Operations Module
: the Container/Page Manifest shows the MAWB details per container, (max 1
container per page). The manifest is extended with the volume (chargeable) weight which is the
volume weight entered during paperwork entry.
On the Container manifest and the Container/Page manifest following info is displayed:
•
•
•
The MAWB line shows the volume wgt next to the wgt. In case of a partial shipment the
volume wgt for that mawb is divided equally by the total number of pieces from that
MAWB and multiplied by the loaded nr of pieces.
The ULD header shows total volume wgt for the ULD next the total wgt for the ULD.
The MVT total footer shows the volume wgt next the total wgt for that mvt.
If the volume (chargeable) weight is not available for a MAWB:
* The detailed MAWB line will show ‘na’ for the chargeable weight
* The related ULD header will show ‘na’ for the chargeable weight
* The movement total footer will show ‘na’ for the chargeable weight
: the (pre) mfst combines and splits data per dest, regardless the customs status.
ACS TGV MODULE V1.115
USER GUIDE V 2.2
127
Using the Operations Module
: the Air Cargo (pre) manifest: data is split by account, regardless customs status.
ACS TGV MODULE V1.115
USER GUIDE V 2.2
128
Using the Operations Module
: the HAWB CBP (Customs Border Protection) (pre) manifest displays the MAWB &
HAWB, regardless if scanned on MAWB or HAWB level.
To print the manifest use the Adobe Acrobat print
button in the Acrobat menu bar.
POD
Select POD (search POD)
Allows to search for a POD based on MAWB / POD Nbr / gateway / account and/or date.
figure 121: Search POD
MAWB:
POD Nbr:
Gateway:
Account:
Start Date:
End Date:
Enter the MAWB number in this entry field and flag the checkbox
Enter the POD number in this entry field and flag the checkbox
Select or enter the gateway where the POD has been created and flag the checkbox.
Select or enter the account code (*** = all accounts), and flag the checkbox.
Default the start/search date is set
to set to the current dt or select/enter another dt.
Default the end / search date is set to the current day, but can be manually changed
ACS TGV MODULE V1.115
USER GUIDE V 2.2
129
Using the Operations Module
Enter/select the look-up information and
unsigned POD’s) will be listed.
, a list with all available POD’s (signed and
the POD number to view, print, reprint, and or update the selected POD. For detailed
information consult: New POD page 99
Planning List (menu)
Import List
This option will load a list of all import MAWB’s for your location.
figure 122: Import list
View Other Gateway
MAWB:
Origin:
Destination:
Account:
Serv/Comm:
Pieces:
CS
Inbound Mfst:
POD pieces:
Date:
Select the gateway you want to view. By default your gtw will be displayed.
Note; you can only view gtws of your own country.
The import MAWB, click on the MAWB to go to T&T3 for tracking.
DHL three letter airport code, station of origin.
DHL three letter airport code, station of destination.
Three letter code that defines the customer.
Defines the type of service/commodity.
Total number of pieces of the MAWB.
Customs status
Number of pieces manifested at point of origin or transit.
Number of pieces already on a POD at destination (local Gtw).
The operational date for this MAWB .
to open the Import MAWB’s list in a new browser window.
from the browser to print the list.
ACS TGV MODULE V1.115
USER GUIDE V 2.2
130
Using the Operations Module
Export List
This option will load a list of all export MAWBs of your location.
figure 123: Export list
View Other Gateway
MAWB:
Origin:
Destination:
Account:
Serv/Comm:
Pieces:
CS
Manifested:
Date:
Select the gateway you want to view. By default your gtw will be displayed.
Note; you can only view gtws of your own country.
The export MAWB, click on the MAWB to go to T&T3 for tracking.
DHL three letter airport code, station of origin.
DHL three letter airport code, station of destination.
Three letter code that defines the customer.
Three letter code that defines the type of product.
Total number of pieces of the MAWB.
Customs status
Number of pieces manifested at the your (local) Gateway.
Defines the operational date for this MAWB .
to open the Export MAWB’s list in a new browser window.
from the browser to print the list.
Reload List
This option will show (new browser window) a list of MAWBs available for reloading.
figure 124: Reload list
View Other Gateway
MAWB:
Org:
Select the gateway you want to view. By default your gtw will be displayed.
Note; you can only view gtws of your own country.
The available MAWB for reload, click on the MAWB to go to T&T3 for tracking.
DHL three letter airport code, station of origin.
ACS TGV MODULE V1.115
USER GUIDE V 2.2
131
Using the Operations Module
Dst:
Acc:
SERV/C:
Pcs:
Wgt
Rld Pcs:
CNT#:
MVT
Date:
Blocked:
Reason:
DHL three letter airport code, station of destination.
Three letter code that defines the customer.
Defines the type of service/commodity.
Total number of pieces of the MAWB.
Total weight of all pieces on the MAWB
The total number of pieces reloaded for this MAWB.
The container nr where the pieces have been loaded in.
Movement
Defines the operational date for this MAWB .
Indication if shipment is blocked Y or N
Block reason
Transfer List
This option will show (new browser window) a list of MAWBs available for transfer that will pass
your GTW. This information is based on the allocated ULD(s) of an inbound movement for
your location, if the MAWB destination is different than the destination of the movement.
figure 125: Transfer list
MAWB:
Flight:
Container:
Org
Dst:
Acc:
SRV/C:
Pcs:
CS:
Date:
Status
Defines the transfer MAWB, click on the MAWB to go to T&T3 for tracking.
Defines the inbound movement number
Defines the ULD where the freight is loaded in
DHL three letter airport code, station of origin.
DHL three letter airport code, station of destination.
Three letter code that defines the customer.
Service/Commodity.
Total number of pieces of the MAWB.
Defines the customs status of the MAWB.
Defines the operational date for this MAWB (Date format = mm/dd/yy).
Defines the inbound movement status.
ACS TGV MODULE V1.115
USER GUIDE V 2.2
132
Using the Operations Module
Print (menu)
Print label
From the Print menu select Print Label, the following pop up window will appear.
Fill in the mawb nr
* if the mawb is known all data fields are populated
* if mawb unknown: fill in/select info for all fields
flag ‘show pieces’
to print pcs amount on labels
Select the Avery type
* 3483 (10.5cmX14.8cm – 4.1”X6.2”)
* 5168 (8.8cmX12.6cm – 3.5”X5”)
* first page to be printed: it allows you to deselect a number
of labels to keep the remainder label(s). (E.g.: if the piece
count of the previous print is 3, your first page of the next
print will only have 1 label on it, thus deselect 3 on above
window so only the available label remains green .)
To deselect a label,
, it changes to .
Select ‘Ignore modulo 7 Check’ if the MAWB is not
Modulo 7 check compliant
to print the shipment label(s).
to reset all values.
figure 126: Print label
ACS TGV MODULE V1.115
USER GUIDE V 2.2
133
Using the Operations Module
Print Barcode
From the Print menu select Print Barcode, the following screen will appear.
figure 127: Print barcode
Fill in the free text field the mawb(s) to print a barcode(s) in a PDF doc.
and following PDF document will be displayed in order to print.
Hospital Area Label
Especially for LEJ HUB: ACS shipments which cannot be scanned and re-labeling is needed
arrive at the hospital area but require too much manual intervention. To solve this, a new screen
with input box is created where the user can enter mawb(s) (by hand-scanner or by keyboard)
after which the information is automatically retrieved and printed with barcode on a label. Users
will be able after configuration to print on (data max) printers available in their location. Fill in
the mawb, select from the dropdown box the data max printer and
to print
shipment label(s), or
to reset.
figure 128: Hospital Area print label
ACS TGV MODULE V1.115
USER GUIDE V 2.2
134