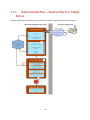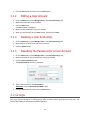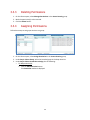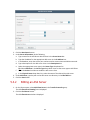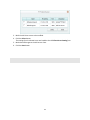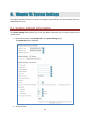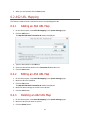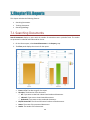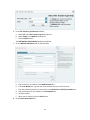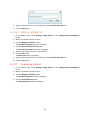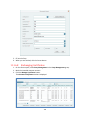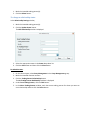
1
1 Copyright and Legal Disclaimers User Manual for DiConnect Enterprise R11. Document Release Date: June 25, 2014. Copyright © 2014 by DiCentral Corporation. All rights reserved. This document and all content that is contained, embedded and linked to this document, and that is written by DiCentral Corporation, or its partners or affiliates is copyright and bound by all copyright laws. The names of companies and individuals used in any sample database or as examples in the documentation are fictitious and illustrate the use of the software, only. Any resemblance to actual companies or individuals, whether past or present, is purely coincidental. This document and the related software described in this manual are supplied under license or nondisclosure agreement and may be used or copied only in accordance with the terms of the agreement. The information in this document is subject to change without notice and does not represent a commitment on the part of DiCentral. This document may contain examples of data screens or reports or other descriptions or examples which use the names of individuals, companies, brands, categories, products and/or product codes. All of these names and codes are fictitious, and any similarity to the names and codes used by an actual person or entity is entirely coincidental. U.S. Government Users: This documentation and any software it describes are “commercial items” as that term is defined in 48 C.F.R. 2.101 and successor regulations, consisting of “commercial computer software documentation”, “documentation related to commercial computer software” or “commercial computer software” as such terms are used in 48 C.F.R. 12.212 and 48 C.F.R. 252.227-7014(a)(1) and their successor regulations. Consistent with 48 C.F.R. 12.212 and 48 C.F.R. 252.227-7202-1 through 227.7202-4 and their successor regulations, all U.S. Government users, agencies and contractors acquire this documentation and the software to which it relates with only those rights described in this paragraph. For further information, contact DiCentral Corporation. Address: Phone: Fax: 1199 NASA Parkway, Houston, TX 77058 +1.281.480.1121 or +1.713.559.0580 +1.281.480.1181 2 Table of Contents Copyright and Legal Disclaimers ..................................................................................................................... 2 Table of Contents ................................................................................................................................................... 3 Quick Reference Guide ..................................................................................................................................... 10 1. Chapter I: Introduction ............................................................................................................................ 13 2. Chapter II: DiConnect Process Overview ........................................................................................... 14 2.1 3. Overview ..................................................................................................................................... 14 2.1.1 Overview ............................................................................................................................. 15 2.1.2 Inbound Data Flow – Receiving Files From a Trading Partner ............................................ 16 2.1.3 Outbound Data Flow – Sending Files to a Trading Partner ................................................. 18 2.1.4 Administrator Roles ............................................................................................................ 19 2.1.5 Glossary ............................................................................................................................... 20 2.2 System Requirements ................................................................................................................. 21 2.3 Feature Panel .............................................................................................................................. 21 2.4 Installing DiConnect Enterprise................................................................................................... 23 2.4.1 Installing DiConnect.Core.................................................................................................... 23 2.4.2 Installing DiConnect.FTP Server .......................................................................................... 25 2.4.3 Installing DiConnect.AS2 Server .......................................................................................... 28 2.4.4 Installing DiConnect AS2 Client ........................................................................................... 31 Chapter III: Administration .................................................................................................................... 34 3.1 User Accounts ............................................................................................................................. 34 3.1.1 Creating a User Account ..................................................................................................... 34 3.1.2 Editing a User Account ........................................................................................................ 36 3.1.3 Deleting a User Account(s).................................................................................................. 36 3.1.4 Resetting the Password for a User Account........................................................................ 36 3.2 Groups ......................................................................................................................................... 36 3.2.1 Creating a Group ................................................................................................................. 37 3.2.2 Editing a Group ................................................................................................................... 37 3.2.3 Deleting a Group ................................................................................................................. 37 3.2.4 Adding a User Account to a Group...................................................................................... 38 3 3.2.5 3.3 Permissions ................................................................................................................................. 39 3.3.1 Creating Permissions ........................................................................................................... 39 3.3.2 Editing Permissions ............................................................................................................. 39 3.3.3 Deleting Permissions ........................................................................................................... 40 3.3.4 Assigning Permissions ......................................................................................................... 40 3.4 4. Removing a User Account(s) from a Group ........................................................................ 38 VAN Administration .................................................................................................................... 42 3.4.1 Adding a VAN ...................................................................................................................... 42 3.4.2 Editing a VAN ...................................................................................................................... 43 3.4.3 Deleting a VAN(s) ................................................................................................................ 44 3.4.4 Setting the Interconnection between VANs ....................................................................... 44 Chapter IV: Servers.................................................................................................................................... 45 4.1 Server Type ................................................................................................................................. 45 4.1.1 Creating a Server Type ........................................................................................................ 45 4.1.2 Editing a Server Type........................................................................................................... 45 4.1.3 Deleting a Server Type(s) .................................................................................................... 46 4.2 Physical Servers ........................................................................................................................... 46 4.2.1 Adding a Physical Server ..................................................................................................... 46 4.2.2 Editing a Physical Server ..................................................................................................... 46 4.2.3 Deleting a Physical Server(s) ............................................................................................... 47 4.3 Logical Servers............................................................................................................................. 47 4.3.1 Creating a Logical Server ..................................................................................................... 47 4.3.2 Editing a Logical Server ....................................................................................................... 48 4.3.3 Deleting a Logical Server(s) ................................................................................................. 48 4.4 Server Folder Management ........................................................................................................ 48 4.4.1 Adding a Server Folder ........................................................................................................ 48 4.4.2 Editing a Server Folder ........................................................................................................ 49 4.4.3 Deleting a Server Folder(s) .................................................................................................. 49 4.5 Filename Management ............................................................................................................... 49 4.5.1 General Filename Settings .................................................................................................. 49 4.5.2 Filename Settings for a User ............................................................................................... 50 4 5. 4.5.2.1 Filename Settings: Users ................................................................................................. 52 4.5.2.2 Data Mapping.................................................................................................................. 53 4.5.2.3 Filename Types ............................................................................................................... 55 4.5.3 Copying Formats of a Filename Setting .............................................................................. 55 4.5.4 Applying the Default Filename Settings to a User .............................................................. 56 Chapter V: Transfer Protocols ............................................................................................................... 57 5.1 FTP Server ................................................................................................................................... 57 5.1.1 Adding an FTP Server .......................................................................................................... 57 5.1.2 Editing an FTP Server .......................................................................................................... 58 5.2 FTP Client Server ......................................................................................................................... 59 5.2.1 Adding an FTP Server Client ................................................................................................ 59 5.2.2 Editing an FTP Server Client ................................................................................................ 60 5.3 AS2 Server ................................................................................................................................... 60 5.3.1 Adding an AS2 Server .......................................................................................................... 61 5.3.2 Editing an AS2 Server .......................................................................................................... 61 5.3.2.1 5.4 6. 7. 8. Generating a Keyset ........................................................................................................ 62 AS2 Client Server ......................................................................................................................... 63 5.4.1 Adding an AS2 Server Client................................................................................................ 63 5.4.2 Editing an AS2 Server .......................................................................................................... 64 Chapter VI: System Settings ................................................................................................................... 66 6.1 Setting Default Information ........................................................................................................ 66 6.2 AS2 URL Mapping ........................................................................................................................ 67 6.2.1 Adding an AS2 URL Map...................................................................................................... 67 6.2.2 Editing an AS2 URL Map ...................................................................................................... 67 6.2.3 Deleting an AS2 URL Map ................................................................................................... 67 Chapter VII: Reports ................................................................................................................................. 68 7.1 Searching Documents ................................................................................................................. 68 7.2 Document Tracking ..................................................................................................................... 70 7.3 Searching Mailbags ..................................................................................................................... 71 Chapter VIII: Trading Partner Management .................................................................................... 73 8.1 Manage Trading Partners............................................................................................................ 73 5 8.1.1 Adding a New Trading Partner ............................................................................................ 73 8.1.2 Customer Registration & Approval ..................................................................................... 73 8.1.3 Viewing a Trading Partner Account .................................................................................... 75 8.1.4 Deleting a Trading Partner Account(s) ................................................................................ 75 8.1.5 Profiles ................................................................................................................................ 75 8.1.6 Web Accounts ..................................................................................................................... 75 8.1.6.1 Creating a Web Account ................................................................................................. 75 8.1.6.2 Editing a Web Account .................................................................................................... 77 8.1.6.3 Deleting a Web Account(s) ............................................................................................. 77 8.1.7 Trading Members ................................................................................................................ 78 8.1.7.1 Adding a Trading Member .............................................................................................. 78 8.1.7.2 Editing a Trading Member .............................................................................................. 79 8.1.7.3 Inactivating a Trading Partner ......................................................................................... 79 8.1.7.4 Assigning a Trading Partner to a Trading Member ......................................................... 80 8.1.8 Mailboxes ............................................................................................................................ 80 8.1.8.1 Creating an FTP Mailbox in Simple Mode ....................................................................... 80 8.1.8.2 Creating an FTP Mailbox in Advanced Mode .................................................................. 82 8.1.8.2.1 FTP User Actions ....................................................................................................... 85 8.1.8.2.2 FTP User Client Actions ............................................................................................. 86 8.1.8.3 Creating an AS2 Mailbox in Simple Mode ....................................................................... 88 8.1.8.4 Creating an AS2 Mailbox in Advanced Mode .................................................................. 90 8.1.8.5 Viewing a Mailbox ........................................................................................................... 92 8.1.8.6 Editing a Mailbox............................................................................................................. 92 8.1.8.7 Assigning a Mailbox to a Trading Partner(s) ................................................................... 92 8.1.9 Certificates .......................................................................................................................... 93 8.1.9.1 Importing a Certificate .................................................................................................... 93 8.1.9.2 Exporting a Certificate(s)................................................................................................. 96 8.1.9.3 Changing the Status of a Certificate(s)............................................................................ 96 8.1.9.4 Deleting a Certificate ...................................................................................................... 97 8.1.9.5 Assigning a Certificate to a Mailbox ................................................................................ 97 8.1.9.6 Managing Certificate Sets ............................................................................................... 98 8.1.9.6.1 Adding a Certificate Set ............................................................................................ 98 6 8.1.9.6.2 Editing a Certificate Set ............................................................................................. 99 8.1.9.7 Generating a Keyset ........................................................................................................ 99 8.1.9.8 Exchanging Certificates ................................................................................................. 100 8.1.9.9 Importing Keysets ......................................................................................................... 101 8.1.9.10 9. Downloading Keysets ................................................................................................ 102 8.1.10 Setting Relationships for a Trading Partner ...................................................................... 103 8.1.11 Trading Partner FTP Client Relationships .......................................................................... 107 Chapter IX: Integration Settings ......................................................................................................... 110 9.1 Application Settings .................................................................................................................. 110 9.1.1 Adding a Routing Server ................................................................................................... 110 9.1.2 Editing a Routing Server .................................................................................................... 111 9.1.3 Deleting a Routing Server(s) ............................................................................................. 111 9.2 Application Category ................................................................................................................. 111 9.2.1 Adding an Application Category........................................................................................ 111 9.2.2 Editing a Routing Category................................................................................................ 112 9.2.3 Deleting a Routing Category(ies) ...................................................................................... 112 9.3 Integration Task Flow ................................................................................................................ 112 9.3.1 Adding a Task Flow............................................................................................................ 112 9.3.2 Editing a Task Flow ............................................................................................................ 113 9.3.3 Deleting a Task Flow(s) ..................................................................................................... 113 9.4 Routing Group ........................................................................................................................... 113 9.4.1 9.4.1.1 Adding a Routing Group .................................................................................................... 113 Routing Element Actions ............................................................................................... 115 9.4.2 Viewing Routing Elements within a Routing Group .......................................................... 116 9.4.3 Editing a Routing Group .................................................................................................... 116 9.4.4 Deleting a Routing Group.................................................................................................. 116 10. Chapter X: Alerts Management ....................................................................................................... 117 10.1 General Alert Options ............................................................................................................... 117 10.2 Schedule Validation .................................................................................................................. 118 10.2.1 Adding a Validation Schedule ........................................................................................... 118 10.2.2 Editing a Validation Schedule............................................................................................ 119 7 10.2.3 10.3 11. Deleting a Validation Schedule ......................................................................................... 119 SMTP Server Settings ................................................................................................................ 119 Chapter XII: Party Management ..................................................................................................... 121 11.1 Manage Party ............................................................................................................................ 121 11.1.1 Adding a New Party........................................................................................................... 121 11.1.2 Managing Party Profiles .................................................................................................... 121 11.1.3 Web Accounts ................................................................................................................... 122 11.1.3.1 Creating a Web Account ........................................................................................... 122 11.1.3.2 Editing a Web Account .............................................................................................. 123 11.1.3.3 Deleting a Web Account(s) ....................................................................................... 124 11.1.4 Trading Members .............................................................................................................. 124 11.1.4.1 Adding a Trading Member ........................................................................................ 124 11.1.4.2 Editing a Trading Member......................................................................................... 125 11.1.4.3 Inactivating a Trading Member ................................................................................. 125 11.1.4.4 Assigning a Trading Partner to a Trading Member ................................................... 126 11.1.5 Mailboxes .......................................................................................................................... 126 11.1.5.1 Creating an FTP Mailbox in Simple Mode ................................................................. 126 11.1.5.2 Creating an FTP Mailbox in Advanced Mode ............................................................ 128 11.1.5.2.1 FTP User Actions ................................................................................................... 131 11.1.5.2.2 FTP User Client Actions ......................................................................................... 132 11.1.5.3 Creating an AS2 Mailbox in Simple Mode ................................................................. 134 11.1.5.4 Creating an AS2 Mailbox in Advanced Mode ............................................................ 136 11.1.5.5 Viewing a Mailbox ..................................................................................................... 138 11.1.5.6 Editing a Mailbox....................................................................................................... 138 11.1.5.7 Assigning a Mailbox to a Trading Partner(s) ............................................................. 138 11.1.6 Certificates ........................................................................................................................ 139 11.1.6.1 Importing a Certificate .............................................................................................. 139 11.1.6.2 Exporting a Certificate(s)........................................................................................... 142 11.1.6.3 Changing the Status of a Certificate(s)...................................................................... 142 11.1.6.4 Deleting a Certificate................................................................................................. 143 11.1.6.5 Assigning Certificate to Mailbox ............................................................................... 143 8 11.1.6.6 Managing Certificate Sets ......................................................................................... 144 11.1.6.6.1 Adding a Certificate Set ........................................................................................ 144 11.1.6.6.2 Editing a Certificate Set......................................................................................... 145 11.1.6.7 Generating a Keyset .................................................................................................. 145 11.1.6.8 Exchanging Certificates ............................................................................................. 146 11.1.6.9 Importing Keysets ..................................................................................................... 147 11.1.6.10 Downloading Keysets ................................................................................................ 148 11.1.7 Setting Relationships for a Trading Partner ...................................................................... 148 11.1.8 Trading Partner FTP Client Relationships .......................................................................... 152 12. Chapter XI: Resource Management ............................................................................................... 155 12.1 Manage Resource DB ................................................................................................................ 155 12.1.1 Importing a Resource File ................................................................................................. 155 12.1.2 Editing a Resource ............................................................................................................. 155 12.2 Language Management ............................................................................................................ 156 12.2.1 Adding a Language ............................................................................................................ 156 12.2.2 Editing a Language ............................................................................................................ 156 12.2.3 Language Customization ................................................................................................... 157 9 Quick Reference Guide List of Procedures Page 1 To install DiConnect Enterprise 23 2 To access your Server Owner Party 57 3 To assign Server Owner Party Identifiers 61 4 To configure the AS2 transport for a Server Owner party 61 5 To test AS2 connection with the DiCentral test server 88 6 To test FTP connection with the DiCentral test server 80 7 To launch the Add New Trading Partner wizard 73 8 To edit an imported Exchange Profile 94 9 To add new Trading Partner/Party configuration settings from scratch 73 10 To define Party Identifiers to import Trading Partner certificates 94 11 To add a Trading Partner Party Transport 80 12 To add a Sending-To AS2 Transport 90 13 To add a Receiving-From AS2 Transport 90 14 To configure DiConnect with TMPVAN 44 15 To send a file to DiConnect using AS2 16 To receive a file from TMPVAN using AS2 17 To configure DiConnect for FTP communication with TMPVAN 42 18 To send a file to TMPVAN using FTP 82 19 To receive a file from TMPVAN using FTP 82 20 To obtain your CA Certificate digital key 96 21 To retrieve and install your CA Certificate 94 22 To configure an outbound Functional Acknowledgement document 109 10 23 To adjust settings for generating control numbers 44 24 To access the Reconciliation report screen 68 25 To access the Exceptions report screen 71 26 To configure duplicate EDI Interchange settings 42 27 To access EDI reports To add a new (non-standard) Document Type 68 28 To add a new EDIFACT transaction definition To add a new rule 109 29 To add a condition for an EDI Document Type 112 30 To add a condition for a non-standard Document Type 112 31 To modify an existing party rule 112 32 To configure a Transaction Mailbox Gateway 66 33 To add an SMTP Gateway 116 34 To configure a “From” email address To configure a Transaction Mailbox Trading Partner party 116 35 To configure a party View for use with the Transaction Mailbox 80 36 To add a mailbox user 80 37 To upload files to DiConnect for processing 38 To display a report 68 39 To add web accounts for each company, add to groups, and grant permissions 37 40 To set filename conventions 49 41 To search transactions, mailbags 72 42 To resend failed transactions 68 43 To manage certificates: exchange, import, export, change status, assign certificates to the 94 mailbox (Certificate Management) 44 To locate received files, outgoing files, and failed transaction files (Manage Servers) 48 45 To add a customer and set up trading partners (add a party, trading partner, and members) 72 11 46 To set up relationships between trading partners 102 47 To create mailboxes and assign mailboxes to trading partners 99 48 To set up default servers: FTP, FTP Client, AS2, and AS2 Client 66 49 To set up alerts and alert options (Alerts Management) 116 50 To set up multiple languages (Resource Management) 154 12 1. Chapter I: Introduction DiConnect Enterprise is a comprehensive Business-to-Business Communication Gateway solution for enterprise integration. DiConnect includes messaging, mapping, transformation, trading partner community management, tracking, and auditing. About This Guide This guide was developed to help you operate DiConnect Enterprise. It includes startup hints, task lists, tutorials, and detailed guidelines for the effective use of the software. Audience This guide will be useful to all users who design and monitor DiConnect processes. To successfully administer DiConnect, you must be able to do the following: Use Internet Explorer Have a working knowledge of your database and database server Have a working knowledge of the data and communication requirements defined with your trading partners for document exchange Have a working knowledge of your company’s networking and security requirements 13 2.Chapter II: DiConnect Process Overview DiConnect Enterprise enables you to securely exchange transactions and any other business documents over the Internet via transports such as AS2 (HTTP), FTP, and other network-based protocols. 2.1 Overview This section includes the following topics: Overview Inbound Data Flow: Receiving files from a trading partner Outbound Data Flow: Sending files to a trading partner Administrator Roles: Describes the role for each type of administrator 14 2.1.1 Overview DiConnect is a comprehensive software product for trading partner connectivity, business messaging, and integration. It has been developed as a message-based data transport tool. It bridges between your back end system, such as an ERP system, and your trading partners. DiConnect takes care of matching documents to the proper trading partner, transmitting the documents in a variety of defined communication protocols, and handling errors when problems occur. DiConnect uses several components to perform a variety of operations required to complete the communication and document management process. DiConnect Enterprise System 1. Processing Engine 2. Transport Agent 3. DiConnect Administrator & Party Portal Install & Configure Processing Engine DiConnect.Core DiConnect.Parser User Install & Configure Transport Agent DiConnect.AS2 Server Admin DiConnect.Log DiConnect.Add-Ins DiConnect.AS2 Client DiConnect Administrator DiConnect.FTP Server DiConnect.FTP Client Server Management Trading Partner Management Party Management Access Security Mail Client Configure Process Engine Setup Trading Partner Setup Party Manage User Configure Transport Agent Setup Trading Member Setup Party Member Manage Group Create & Configure Mailbox Create & Configure Mailbox Manage Permission Assign Mailbox to Trading Member Assign Mailbox to Party Member Assign Permission Report & Trading Partner Portal Phase Trading Partner Portal Transaction Report Transaction Activity Dashboard Document Tracking Trading Member Management VAN Communication Tracking 15 Trading Partner 2.1.2 Inbound Data Flow – Receiving Files From a Trading Partner DiConnect Inbound Process Flow 1 Transport Agent (AS2) Write Message & Log 3 Decrypt/Verify Signature (Optional) Decompress (Optional) Inbound Processing 2 Check Message Header Write MDN & Log DiConnnect Database Sign/Encrypt MDN (Optional) Out Create MDN Processing Engine 4 Routing Rules Parse Document (Get Sender, Receiver) Translate Document to Expected format (ASCII, ERP) Put Document to Incoming Folder 5 Integration Agent (ERP) Pickup document from Incoming Folder 16 When DiConnect sends documents from External Trading partners, they are received using either defined Service agents such as FTP or a Directory Monitor. They can also be received using a Receiving transport such as AS1, AS2, or AS3. Once received, the documents are sent through the stages of inbound processing. The message headers are checked and the message itself is decrypted, if necessary, with a certificate supplied by the Trading Partner. The success or failure of the inbound processing is added to the audit history. The document is passed to the DiConnect processing engine to be parsed. Any processing rules defined for the document type are then applied. The document is then sent via an integration Task, such as File copy, Program Call, or FTP, to a back end system. 17 2.1.3 Outbound Data Flow – Sending Files to a Trading Partner The following diagram illustrates a simple example of an outbound document flow within DiConnect. 18 DiConnect receives documents from a back end system such as an ERP system. DiConnect receives these documents through a defined Task agent. Examples of Task agents are FTP, AS2, or a Directory Monitor. The document is handed off to the DiConnect processing engine to be parsed. The processing engine will determine which External Trading Partner to send this document to. It will then apply any relevant rules defined for the document type. The success or failure of the processing engine tasks are recorded to the audit history. The document is then prepared for transport. It is encrypted and signed, if necessary. Next, the document is sent to the appropriate trading partner using the “Sending To” transport defined for that external trading partner. 2.1.4 Administrator Roles There are four types of administrator roles in DiConnect. Use the following descriptions to identify your role, and then contact DiCentral Customer Support for the user name login and password. 1. Developer Administrator: This role is designed for plug-in or adaptor developers. Please contact DiCentral at +1 281 480-1121 or [email protected] for assistance. 2. System Administrator: This administrator role is designed for the user who is installing DiConnect. 3. Master Administrator: The combination of System and Party Administrator. 4. Party Administrator: This role is designed for the owner of a network (e.g., Walmart). 19 2.1.5 Glossary Parties: Each organizational entity administered by the system is called a party. A party is typically a trading partner entity such as a company, department, organization, or individual with whom you will trade documents. Server Owner parties represent your company and hold configuration settings relevant to identifying your company and setting processes based upon your needs. When you configure a party, you define a range of settings that govern the way that the system processes documents associated with that party. Tasks: The tasks deployed in connection with the DiConnect application function mostly as transport agents. A transport agent provides an interface, using a given protocol and configuration settings, between DiConnect and an external document source/target (e.g., EDI translator, AS2, FTP, or ERP adapters). Certificates: Digital Certificates are used to ensure data security while exchanging messages with your trading partners. Certificates are generally used with AS2, SFTP, or FTPS transports. Within DiConnect, certificates can be used for: Signing messages Encryption SSL Client and Server authentication Rules: Processing rules are a key component of the party configuration because they govern how the system handles documents that meet certain conditions. A rule is a set of conditions and actions for processing documents in the system. When processing a rule, the system evaluates the conditions and applies the associated actions if the conditions are satisfied. Document Types: DiConnect can identify defined document types and apply certain processing rules based upon criteria in the document type definitions. Predefined document types include EDI-X12 or EDIFACT. Reporting Screens and Dashboards: DiConnect provides a number of reports, summary screens, and audit trails. These screens and dashboards allow the user to both monitor and interact with the flow of documents and document processes. 20 2.2 System Requirements Please ensure your system meets the minimum requirements described below prior to running DiConnect. Hardware Operating system Software 1024 x 768 display resolution with 32-bit color setting Internet connection 32-bit or 64-bit edition of Windows 7, Windows Vista, or Windows XP Windows Server 2012 Internet Explorer 9 2.3 Feature Panel The main menu is listed on the Feature Panel and is located on the left side of the main page of DiConnect. The menu displays the available features and their corresponding tasks. Access Security – Allows the System Administrator to set up user access rules. Manage Users – create a new user and assign proper access permissions. Manage Groups Manage Permissions Assign Permission 21 Server Settings Manage Server Types Manage Servers Manage Physical Server Manage Server Folder Filename Management Integration Settings Application Settings Application Category Routing Group Integration Task Flow Report Search Documents Search Transaction Logs Search Mailbags Transfer Protocols FTP Server AS2 Server FTP Client Server AS2 Client Server VAN Administration VAN Information Trading Partner Management Customer Management Manage Customer Profile Summary Page System Settings System Info AS2 URL Mapping Alerts Management SMTP Server Setting Alert Options 22 Resource Management Manage Resource DB Language Management Customize Language Party Management Party Management Manage Party Profile Summary Page 2.4 Installing DiConnect Enterprise 2.4.1 Installing DiConnect.Core DiConnect.Core is an essential part of DiConnect Enterprise. It processes documents received from Parties and Trading partners, defines the receiver, and then delivers files in the desired format (optional). 1. Double-click the setup file to start the installation. 2. The Welcome to... window is displayed. Click the Next button. 23 3. Select the installation folder and then click the Next button. 4. In the Confirm Installation window, click the Next button. 5. Type the Administrator account and click the OK button. 6. In the Connect to Server window, enter the SQL Server Information. 24 7. In the Server Information window, enter the TMPVAN information and then click the Save button. 8. Click Close to complete the installation. 9. dcCoreApi.cfg will be inserted automatically in the current Core version. 2.4.2 Installing DiConnect.FTP Server Installing DiConnect.FTP Server will allow you to receive files from the Trading Partner and Party using the FTP protocol. 1. Double-click the DiConnect.FTPServer setup file. 2. In the Welcome to... window, click the Next button. 25 3. Select the Installation Folder and click the Next button. 4. In the Confirm dialog box, click the Next button. 5. In the Set Service Login window, enter the Administrator Account. 6. In the Database Server Information window, enter Microsoft SQL Server information and then click the Connect button. 26 7. Enter DiConnect.FTP Server information and click the Save button. 8. Enter the FTP Root folder and public URL of the FTP Server, and then click the Save button. 9. Click the Close button to complete the installation. Configuration 1. Open DiConnect.FTPServer.Service.exe and update the configuration. <add key="RoutingType” value="LoadBalance" /> <add key="TMPVanServer" value="1" /> Note: - Go to DiConnect.Admin (Server Settings -> Manage Server to get the Server ID of TMPVAN). 2. When you are finished, restart the DiConnect FTP Server service. 27 2.4.3 Installing DiConnect.AS2 Server Installing DiConnect.AS2 Server will allow you to receive files using the AS2 protocol. 1. Double-click Setup.exe. 2. In the Installation Wizard, click the Install button. Note: This window is displayed when the server is missing components that AS2 requires. In the Welcome window, click the Next button. On the License Agreement window, select Accept, and then click the Next button. Enter the Registration Information. On the Feature Selection window, select the desired installation features. 28 3. Click the Install button. Click the Close button to complete the installation of SQL Native Client. In the Setup Type window, click the Next button. 4. Enter the Microsoft SQL Server information and click the Next button. 29 5. Click the Install button. 6. Click Finish to complete the installation. Configuration 1. Open dcAS2WindowsService.exe and update the configuration using the following settings: <add key="RoutingType" value="LoadBalance" /> <add key="TMPVanServer" value="1" /> Note: - Go to DiConnect.Admin (Server Settings -> Manage Server to get the Server ID of TMPVAN (similar to the FTP Server configuration). 2. 3. 4. 5. Go to the Diconnect.Admin website (Transfer Protocols -> AS2 Server). Click the Find Server button and then select AS2 server. Enter AS2 information using the example displayed below. Click the Save button. 30 Note: Follow the same steps displayed as above for the “Https” Transport type. 6. Click the Manage Certificates button. 7. Click the Generate Keyset button to create a private keyset for the AS2 Server of DiCentral. Note: The password for the private keyset must not contain the “@” character. 8. Click the Export Certificate button to export the certificate for the trading partner. 9. Start AS2 Server on Services.msc. 2.4.4 Installing DiConnect AS2 Client DiConnect AS2 Client will allow you to transmit files to Trading Partners using the AS2 Protocol. 1. Click Setup.exe. 31 2. Click the Next button. 3. Insert database information such as the login name, password, etc., using the example below. 4. When you are finished, click Next, click Install, and then click Finish. Configuration 1. Go to the Diconnect.Admin website (Transfer Protocols -> AS2 Client Server). 2. Click the Find Server button, and then select AS2 Client server. 3. Configure the AS2 Client Server using the example displayed below. 32 Note: “Get Dir” will be the AS2 client Root Dir + AS2 Mailbox Dir. 4. Start the AS2 client server. 33 3. Chapter III: Administration This chapter provides instructions on how to create and manage User accounts, Groups, and Permissions, and how to configure the VAN. 3.1 User Accounts 3.1.1 Creating a User Account 1. On the Feature pane, select Manage Users in the Access Security group. 2. Click the Add button. The User window is displayed. 3. On the General Information tab, do the following: a. Type the full name of the user for whom you want to create an account in the Full Name box. b. Type the user name for the account in the User Name box. c. Type the password for the account in the Password box. Alternative: Click the Generate Password button to generate a random password. d. Type the email address of the user in the Mail box. e. Type the telephone and fax numbers in the Phone and Fax boxes respectively. f. Select the Active check box if you want to enable this account. 4. On the Member Of tab, do the following: 34 o o To add a user to a group a. Click the Add button. The User to Group window is displayed. b. Mark the group name to which you want to add the user. c. Click the Save button. To remove a user from a group a. Select the group name from which you want to remove the user. b. Click the Remove button. 35 5. Click the Save button and then click the Close button. 3.1.2 Editing a User Account 1. On the Feature pane, select Manage Users in the Access Security group. 2. Mark the user account to be modified. 3. Click the Edit button. The User window is displayed. 4. Make the desired changes to the user account. 5. When you are finished, click the Save button, and then click Close. 3.1.3 Deleting a User Account(s) 1. On the Feature pane, select Manage Users in the Access Security group. 2. Mark the user account(s) that you want to remove. 3. Click the Delete button. 3.1.4 Resetting the Password for a User Account 1. On the Feature pane, select Manage Users in the Access Security group. 2. Mark the account for which you want to reset the password. 3. Click the Reset Password button. The Reset Password window is displayed. 4. Type a new password in the Password box. Alternative: Click the Generate Password button. 5. Click the Save button and then click the Close button. 3.2 Groups Each user account belongs to a defined group which provides specific permissions to that user. This feature task allows you to create and modify a group(s). 36 3.2.1 Creating a Group 1. On the Feature pane, select Manage Groups in the Access Security group. 2. Click the Add button. The Group window is displayed. 3. 4. 5. 6. 7. Type a name for the group in the Name box. Select the appropriate group type in the Group Type drop-down list. Type a group description in the Description box. Select the Active check box if you want to enable the group. Click the Save button and then click the Close button. Note: There are two group types: Admin and Customer. The Admin type has administrator rights in DiConnect (web), while the Customer type can only access a limited number of features. 3.2.2 Editing a Group 1. On the Feature pane, select Manage Groups in the Access Security group. 2. In the Groups table, select the group to be modified. 3. Click the Edit button. The Group window is displayed. 4. Make the desired changes to the group. 5. Click the Save button and then click the Close button. 3.2.3 Deleting a Group 1. On the Feature pane, select Manage Groups in the Access Security group. 2. In the Groups table, select the group that you want to remove. 3. Click the Delete button. 37 3.2.4 Adding a User Account to a Group 1. On the Feature pane, select Manage Groups in the Access Security group. 2. In the Groups table, select the group to which you want to add user accounts. 3. Click the User to Group button. The Add User to Group window is displayed. 4. In the User table, mark the preferred user account(s). 5. Click the Save button. 3.2.5 Removing a User Account(s) from a Group 1. On the Feature pane, select Manage Groups in the Access Security group. 2. In the Groups table, select the group from which you want to remove the user account(s). 38 3. In the Users in Group table, select the desired user accounts. 4. Click the Remove User from Group button. 3.3 Permissions This function is set DiConnect administrators and provides user groups the rights to process assigned tasks. 3.3.1 Creating Permissions 1. On the Feature pane, select Manage Permissions in the Access Security group. 2. Click the Add button. The Permission window is displayed. 3. 4. 5. 6. Type a name for the permission in the Name box. Type a description for the permission in the Description box. Select the Active check box if you want the permission available for use. Click the Save button and then click the Close button. 3.3.2 Editing Permissions 1. On the Feature pane, select Manage Permissions in the Access Security group. 2. Mark the permission to be modified. 3. Click the Edit button. The Permission window is displayed. 4. Make desired changes to the permission. 5. Click the Save button and then click the Close button. 39 3.3.3 Deleting Permissions 1. On the Feature pane, select Manage Permissions in the Access Security group. 2. Mark the permission(s) to be removed. 3. Click the Delete button. 3.3.4 Assigning Permissions Follow these steps to assign permissions to a group: 1. On the Feature pane, select Assign Permission in the Access Security group. 2. Under Step 1: Select Group, select the intended group in the drop-down list. 3. Under Step 2: Select Permission to Assign, do the following: o To add permission(s): a. Click the Add Permission button. The Permission window is displayed. 40 b. Mark the permission(s) you want to assign to the group. c. Click the Save button. o To remove a permission: a. Select the desired permission. b. Click the Remove Permission button. 4. Under Step 3: Select Action of Permission, do the following: o To add action(s): a. Click the Add Action button. The Action window is displayed. 41 o b. Mark the appropriate action(s). c. Click the Save button. To remove an action: a. Select the desired action. b. Click the Remove Action button. 3.4 VAN Administration This Feature is used to configure the connection between Trading Partners and a Value Added Network(VAN) such as TMPVAN, which uses the FTP or AS2 protocol Mailbag communication language. 3.4.1 Adding a VAN 1. On the Feature pane, select VAN Information in the VAN Administration group. 2. Click the Add button. The VAN Setup window is displayed. 42 3. In the Customer group, fill out the information for the intended customer. 4. Under VAN Information, fill out the following: a. Type the ID number of the VAN that you want to register in the Interconnect Id box. b. Type the qualifier number of the VAN in the Qualifier box. c. Type the user name and password used to connect to the VAN in the User Name and Password boxes respectively. d. Select the Is Internal VAN check box if you want to set the VAN as the internal VAN of the customer. e. Select the Allow Duplicated Interconnect Control No check box if you want to allow document duplicates of the interconnect control number. f. Select Yes in the Mailbag YN drop-down list if you want to allow the VAN to create and receive mailbags from other VANs. 5. When you are finished, click the Save button and then click the Close button. Note: When the customer’s database is deployed, a default internal VAN is created. It is recommended that customers have an internal VAN only Each document has a unique interconnect control number. 3.4.2 Editing a VAN 1. On the Feature pane, select VAN Information in the VAN Administration group. 2. Mark the desired VAN to be modified. 3. Click the Edit button. The VAN Setup window is displayed. 4. Make the desired changes to the VAN. 43 5. Click the Save button and then click the Close button. 3.4.3 Deleting a VAN(s) 1. On the Feature pane, select VAN Information in the VAN Administration group. 2. Mark the desired VAN(s) that you want to remove. 3. Click the Delete button. 3.4.4 Setting the Interconnection between VANs 1. On the Feature pane, select VAN Information in the VAN Administration group. 2. Click the Interconnect Settings button. The Interconnect Settings window is displayed. 3. In the From VAN Id drop-down list, select the VAN ID that you want to connect from. 4. In the To VAN Id drop-down list, select the VAN ID that you want to connect to. 5. Enter the initial value of the interconnect control number for the transaction in the Control No box. Tip: The interconnect control number of each transaction will increase by 1. 6. Type 00100 in the Version box. 7. Select Enabled in the Status drop-down list to enable the connection between VANs. 8. Click the Save button and then click the Close button. Note: Interconnection Settings should be set on both sides if users want to process documents between External VAN and Internal VAN. 44 4. Chapter IV: Servers This chapter includes instructions for configuring the following features: Servers Filename Management 4.1 Server Type This feature is used to group servers of the same type such as FTP servers and AS2 server. 4.1.1 Creating a Server Type 1. On the Feature pane, select Manage Server Types in the Server Settings group. 2. Click the Add button. The Add/Edit Server Type window is displayed. 3. 4. 5. 6. Type a name for the server type in the Server Type Name box. Select the system type in the System Type Name box. Type a description for the server type. Click the Save button and then click the Close button. 4.1.2 Editing a Server Type 1. On the Feature pane, select Manage Server Types in the Server Settings group. 2. Mark the server type to be modified. 3. Click the Edit button. The Add/Edit Server Type window is displayed. 4. Make the desired changes to the server type. 5. Click the Save button and then click the Close button. 45 4.1.3 Deleting a Server Type(s) 1. On the Feature pane, select Manager Server Types in the Server Settings group. 2. Mark the server type(s) that you want to remove. 3. Click the Delete button. 4.2 Physical Servers This feature is used to manage server groups on the physical server. A physical server is a physical computer which runs one or more than one logical server. 4.2.1 Adding a Physical Server 1. On the Feature pane, select Manage Physical Server in the Server Settings group. 2. Click the Add button. The Server window is displayed. 3. Type a name for the physical server in the Physical Name box. 4. Type a description for the physical server in the Description box. 5. Click the Save button and then click the Close button. 4.2.2 Editing a Physical Server 1. On the Feature pane, select Manage Physical Server in the Server Settings group. 2. Mark the physical server to be modified. 3. Click the Edit button. The Server window is displayed. 4. Make desired changes to the physical server. 46 5. Click the Save button and then click the Close button. To start the physical server Select the Started check box. To stop the physical server Clear the Started check box. 4.2.3 Deleting a Physical Server(s) 1. On the Feature pane, select Manage Physical Server in the Server Settings group. 2. Mark the physical server(s) that you want to remove. 3. Click the Delete button. 4.3 Logical Servers 4.3.1 Creating a Logical Server 1. On the Feature pane, select Manage Servers in the Server Settings group. 2. Click the Add button. The Server window is displayed. 3. Type a name for the logical server in the Server Name box. 4. Type a description for the logical server in the Description box. 47 5. 6. 7. 8. 9. 10. In the IP Address box, type the IP Address that you will assign to the logical server. Enter the port number for the logical server in the Port box. Select the appropriate server type in the Server Type drop-down list. Select the appropriate physical server in the Physical Server drop-down list. Select the Active check box if you want the logical server available for use. Click the Save button and then click the Close button. 4.3.2 Editing a Logical Server 1. On the Feature pane, select Manage Servers in the Server Settings group. 2. Mark the logical server to be modified. 3. Click the Edit button. The Server window is displayed. 4. Make the desired changes to the logical server. 5. Click the Save button and then click the Close button. 4.3.3 Deleting a Logical Server(s) 1. On the Feature pane, select Manage Servers in the Server Settings group. 2. Mark the logical server(s) that you want to remove. 3. Click the Delete button. 4.4 Server Folder Management This feature is used to configure the necessary processing folders in DiConnect Core. 4.4.1 Adding a Server Folder 1. On the Feature pane, select Manage Server Folder in the Server Settings group. 2. Click the Add button. The Add/Edit Server Folder window is displayed. 48 3. Type the local path to the folder in the Local Path box, for example, C:\TMP\Outbox\850. 4. Type the network path to the folder in the Network Path box, for example, \\172.16.0.45\TMP\Outbox\850 5. In the Server drop-down list, select the server where the folder is located. 6. Select the folder type in the Folder Type drop-down list. 7. Click the Save button and then click the Close button. 4.4.2 Editing a Server Folder 1. On the Feature pane, select Manage Server Folder in the Server Settings group. 2. Mark the server folder to be modified. 3. Click the Edit button. The Add/Edit Server Folder window is displayed. 4. Make the desired changes to the server folder. 5. Click the Save button and then the Close button. 4.4.3 Deleting a Server Folder(s) 1. On the Feature pane, select Manage Server Folder in the Server Settings group. 2. Mark the server folder(s) that you want to remove. 3. Click the Delete button. 4.5 Filename Management This feature is used to define inbound and outbound document filenames. 4.5.1 General Filename Settings 1. On the Feature pane, select Filename Management in the Server Settings group. The Filename Management page is displayed. 2. Select the Default List of Filenames option. 3. In the Filename table, select the desired filename type. 4. Click the Set Format button. The Setting Filename Format window is displayed. 49 5. Set a format for the filename type. 6. Click the Save button. 4.5.2 1. 2. 3. 4. 5. Filename Settings for a User On the Feature pane, click Filename Management in the Server Settings group. Select the Setting List for specific sender/receiver option. In the User table, select the user whose filename you want to set a format for. In the Filename table, select the desired filename type. Click the Set Format button. The Setting Filename Format window is displayed. 50 6. Set a format for the filename type. o To insert an element to the filename type, follow these steps: a. Click the Add button. The Add/Edit Format window is displayed. o b. Type a name for the element in the Name box. c. Type a value for the element, if applicable, in the Value column. d. Select the data type for the element in the Type drop-down list. e. If the element is mandatory, select the IsRequired check box. f. If needed, type a fixed length for the element in the Fix Length box. g. Click the Save button. To edit an element in the filename type, do the following: 51 o o a. Select the check box for the preferred element. b. Click the Edit button. The Add/Edit Format window is displayed. c. Make the desired changes to the element. d. Click the Save button. To remove element(s) from the filename type, a. Select the check box for the preferred element(s). b. Click the Remove button. To change the sequence of elements in the filename type, drag the desired element to the new location in the list. 7. Click the Close button. 4.5.2.1 Filename Settings: Users If the user whose filename you want to set a format for does not appear in the User table, you need to add him/her to the table. To add user(s) 1. Click the Add User button. The Add User to Setting window is displayed. 52 2. Mark the preferred user(s). 3. Click the Save button. To remove a user 1. In the User table, select the preferred user. 2. Click the Remove User button. 4.5.2.2 Data Mapping To add a Data Mapping element 1. In the User table, select the preferred user. 2. Click the Data Mapping button. The Data Mapping window is displayed. 53 3. Click the Add button. The Data Mapping window is displayed. 4. 5. 6. 7. 8. Select the desired direction in the Direction drop-down list. Select a data type in the Type drop-down list. Type the original data in the OriginalData box. Type the converted data in the ConvertedData box. Click the Save button. To edit a Data Mapping element 1. In the User table, select the preferred user. 2. Click the Data Mapping button. The Data Mapping window is displayed. 3. Select the desired data mapping to be modified. 4. Click the Edit button. The Data Mapping window is displayed. 5. Make the desired changes. 6. Click the Save button. 54 To remove a Data Mapping element 1. In the User table, select the preferred user. 2. Click the Data Mapping button. The Data Mapping window is displayed. 3. Select the desired data mapping that you want to remove. 4. Click the Delete button. 4.5.2.3 Filename Types To create a filename type 1. Click the Add button. The Add/Edit Format window is displayed. 2. 3. 4. 5. Type a designation for the filename type in the File Name box. Type the filename type description in the Description box. Select the intended filename type in the Type drop-down list. Click the Save button. To edit a filename type 1. In the Filename table, select the filename type to be modified. The Add/Edit Format window is displayed. 2. Make the desired changes to the filename type. 3. Click the Save button. To delete a filename type 1. In the Filename table, select the filename type to be removed. 2. Click the Delete button. 4.5.3 Copying Formats of a Filename Setting 1. On the Feature pane, select Filename Management in the Server Settings group. 55 2. In the User table, select the intended user name. 3. In the File Name table, select the intended filename. 4. Click the Copy Format button. The Copy Format window is displayed. 5. Fill out the form. 6. Click the Save button. 4.5.4 Applying the Default Filename Settings to a User 1. On the Feature pane, select Filename Management in the Server Settings group. 2. In the User table, select the user to whom you want to apply the default filename settings. 3. Click the Reload Default button 56 5. Chapter V: Transfer Protocols This chapter includes instructions on how to configure the following servers for transmitting and receiving EDI documents: FTP Server FTP Client Server AS2 Server AS2 Client Server 5.1 FTP Server FTP Server is used to receive documents from Trading Partners using the FTP protocol. Follow the procedure below to configure an FTP Server. 5.1.1 Adding an FTP Server 1. On the Feature pane, select FTP Server in the Transfer Protocols group. The FTP Server Setting form is displayed. 2. Type a name for the FTP server in the Server Name box. 57 3. 4. 5. 6. 7. 8. 9. 10. 11. 12. 13. 14. Select the appropriate type of FTP server in the Server Type drop-down list. Type the FTP server’s IP Address in the IP Address box. In the FTP Port box, enter the port number on which FTP server listens. In the PASV Port Range and To boxes, enter the range of port numbers that are used to transfer data if the client is in passive mode. Type the path to the root directory in the FTP Server Root Dir box. In the Publish FTP URL box, type the URL which is used to connect to the FTP server. Tip: The published URL should use the following format: ftp://IP_Address:Port_Number, for example, ftp://172.16.2.71:21. Select the Auto start FTP Listener check box if you want the FTP server to start automatically when the server is restarted. Select the Active check box if you want to enable this FTP server. Type a description for the FTP server in the Description box. In the Files column, select the check box for each file action that you want to enable for users. In the Folders column, select the check box for each folder action that you want to enable for users. When you are finished, click the Save button. To find an FTP Server 1. Click the Find button. The Select FTP Server to Edit window is displayed. 2. Mark the appropriate server. 3. Click the Select button. 5.1.2 Editing an FTP Server 1. On the Feature pane, select FTP Server in the Transfer Protocols group. 2. In the FTP Server Setting form, click the Find button. The Select FTP Server to Edit window is displayed. 3. Mark the FTP server to be modified. 4. Click the Select button. 58 The settings for the selected FTP server are loaded in the FTP Server Setting form. 5. Make the desired changes to the FTP server. 6. Click the Save button. 5.2 FTP Client Server FTP Client Server is used to download/receive documents from Trading Partners using the FTP protocol. Use the procedure below to configure the FTP Client Server. 5.2.1 Adding an FTP Server Client 1. On the Feature pane, select FTP Client Server in the Transfer Protocols group. The FTP Client Server Setting form is loaded. 2. Click the New Server button. 3. Under Server Information, do the following: a. Type a name for the FTP server for the desired client in the Server Name box. b. Type the IP address for the appropriate FTP server in the IP Address box. c. In the Port box, enter the WCF service port number which is used to communicate with DiConnect web. d. Type a description for the FTP server in the Description box. e. Select the appropriate server type in the Server Type drop-down list. Tip: Select FTPClient in the Server Type drop-down list to set the server type as FTP Client. 59 f. Select the Active check box to enable the FTP server. g. Select the name of the desired physical server in the Physical Server drop-down list. 4. Under FTP Client, a. Type the path to the FTP server’s root directory in the Root DIR box. b. In the Send DIR box, type the path to the root folder that contains files to be sent to the FTP server. c. In the Receive DIR box, type the path to the root folder that contains downloaded documents from the FTP server d. Select the Archive DIR check box and then, in the text box, type the path to the root folder containing the sent files to the FTP server. e. In the Timer box, enter an interval time per minute to download files. f. Enter the number of users handled by the FTP server into the Number of Users box. 5. When you are finished, click the Save button. 5.2.2 Editing an FTP Server Client 1. On the Feature pane, select FTP Client Server in the Transfer Protocols group. The FTP Client Server Setting form is displayed. 2. Click the Find Server button. The FTP Client Server window is displayed. 3. Mark the desired FTP client server to be modified. 4. Click the Select button. The settings for the selected server are loaded in the FTP Client Server Setting form. 5. Make the desired changes to the FTP server of the client. 6. Click the Save button. 5.3 AS2 Server AS2 Server is used to receive documents from Trading Partner using the AS2 protocol. The procedure below provides a step-by-step procedure for configuring an AS2 Server. 60 5.3.1 Adding an AS2 Server 1. On the Feature pane, select AS2 Server in the Transfer Protocols group. The AS2 Server Setting form is loaded. 2. Under Server Information, do the following: a. Type a name for the AS2 server in the Server Name box. b. Type the IP address for the AS2 server in the IP Address box. c. In the Port box, enter the port number which is used by the AS2 server to communicate with its client. d. Select the appropriate AS2 server type in the Server Type drop-down list. e. Select the Active check box if you want to enable the AS2 server. f. In the physical Server drop-down list, select the name of the desired physical server. 3. Under AS2, a. In the Publish URL box, type the URL which is used to connect to the AS2 server. b. In the Message DIR box, type the path to the desired folder on the AS2 server that stores AS2 messages. c. In the AS2 Name box, type a name for the AS2 server that is used when communicating with its client. d. Select the desired set of certificates in the Certificate Set drop-down list. e. In the Transport Type drop-down list, select the desired protocol used to transfer AS2 messages. 4. When you are finished, click the Save button. 5.3.2 Editing an AS2 Server 1. On the Feature pane, select AS2 Server in the Transfer Protocols group. 61 The AS2 Server Setting form is loaded. 2. Click the Find Server button. The AS2 Server window is displayed. 3. Mark the desired AS2 server to be modified. 4. Click the Select button. The settings of the AS2 server are loaded in the AS2 Server Setting form. 5. Make desired changes to the AS2 server. 6. Click the Save button. 5.3.2.1 Generating a Keyset 1. On the Feature pane, select Customer Management in the Trading Partner Management group. 2. Mark the intended customer account. 3. Click the Manage Certificates button. The Customer Certificates window is displayed. 4. Click the Generate Keyset button. The Generate Keyset window is displayed. 62 5. Fill out the form. 6. When you are finished, click the Create button. 5.4 AS2 Client Server AS2 Client Server is used to transmit documents to Trading Partners using the AS2 protocol. Follow the procedure below to configure the AS2 Client Server. 5.4.1 Adding an AS2 Server Client 1. On the Feature pane, select AS2 Client Server in the Transfer Protocols group. The AS2 Client Server Setting form is loaded. 63 2. Click the New Server button. 3. Under Server Information, do the following: a. Type a name for the AS2 Server desired client in the Server Name box. b. Type the IP address for the appropriate AS2 server in the IP Address box. c. In the Port box, enter the service port number used to communicate with DiConnect web. d. Type a description for the AS2 server client in the Description box. e. Select the appropriate server type in the Server Type drop-down list. Tip: Select AS2Client in the Server Type drop-down list to set the server type as AS2 Client. f. Select the Active check box to enable the AS2 server client. g. In the Physical Server drop-down list, select the name of the desired physical server. 4. Under AS2 Client, type the path to the AS2 server root directory in the Root DIR box. 5. Click the Save button. 5.4.2 Editing an AS2 Server 1. On the Feature pane, select AS2 Client Server in the Transfer Protocols group. The AS2 Client Server Setting form is displayed. 2. Click the Find Server button. The AS2 Client Server window is displayed. 64 3. Mark the AS2 client server to be modified. 4. Click the Select button. The settings for the selected server are loaded to the AS2 Client Server Setting form. 5. Make desired changes to the AS2 server client. 6. Click the Save button. 65 6. Chapter VI: System Settings This chapter includes instructions on how to to configure system defaults, such as the default FTP server and default AS2 server. 6.1 Setting Default Information The System Settings feature allows you to set the default information for file transfer protocols and system servers. 1. On the Feature pane, select System Info in the System Settings group. The System Info page is displayed. 2. Fill out the form. 66 3. When you are finished, click the Save button. 6.2 AS2 URL Mapping This feature is used to match a transaction ID to a corresponding AS2 URL. 6.2.1 Adding an AS2 URL Map 1. On the Feature pane, select AS2 URL Mapping in the System Settings group. 2. Click the Add button. The Map AS2 URL with Transaction ID window is displayed. 3. Type the desired URL in the URL box. 4. Select the desired transaction in the Transaction ID drop-down list. 5. Click the Save button. 6.2.2 Editing an AS2 URL Map 1. On the Feature pane, select AS2 URL Mapping in the System Settings group. 2. Mark the URL to be modified. 3. Click the Edit button. The Map AS2 URL with Transaction ID window is displayed. 4. Make the desired change to the URL in the URL box. 5. Click the Save button. 6.2.3 Deleting an AS2 URL Map 1. On the Feature pane, select AS2 URL Mapping in the System Settings group. 2. Mark the URL that you want to remove. 3. Click the Delete button. 67 7. Chapter VII: Reports This chapter includes the following features: Searching Documents Tracking Documents Searching Mailbags 7.1 Searching Documents Search Documents displays a report with the number of transactions over a period of time. The results are presented in Inbound and Outbound bar charts. 1. On the Feature pane, select Search Documents in the Report group. 2. The Filter panel displays the criteria for the report: From and To: The date range for the report. Direction: The direction of the document. All: If you want to view both inbound and outbound documents. Inbound: If you want to view inbound documents. Outbound: If you want to view outbound documents. ISA/GS Control No: The ISA and GS control numbers of the document. Status: The status of the processed documents. Sender: The sender of the documents. 68 Receiver: The recipient of the documents. Mailbox: The FTP mailbox address from and to where the documents are sent. Show N/A Outbound Transaction: Displays documents which have parsing problems, unknown recipient, etc. 3. Click the Search button. The Inbound and Outbound charts are loaded. 4. Reprocess the document(s) if necessary: o To resend the outbound document(s), a. Click on any vertical bar on the Outbound chart. The Outbound Communication Graph is displayed. o b. Click the View Content link to view the corresponding documents. c. Click the Resend button. To repost the inbound document(s): a. Click on any vertical bar of the Inbound chart. The Inbound Communication Graph is displayed. 69 b. Click the View Content link to view the corresponding documents. c. Click the Repost button. To view the contents of a document In the Inbound Communication Graph/ Outbound Communication Graph table, click the View Content link corresponding to the desired document. To view the processing status of a document Trace Process allows you to view the status of all actions performed on the document in order. Each part of the horizontal bar represents an action. The successful actions are represented in green, the failed ones in red, and the idle ones in white. In the Inbound Communication Graph/ Outbound Communication Graph table, click the Trace Process link corresponding to the desired document. The Transaction Log is displayed. 7.2 Document Tracking This feature is used to track the status of sent/received files (success or fail) and document logs. 1. On the Feature pane, select Document Tracking in the Report group. 70 2. The Filter panel displays the criteria for the report: From and To: The date range for the report. Status: The status of the processed documents. Transaction Key: The unique key number of the transaction. 3. Click the Search button. The Transaction table is loaded. To view the processing status of a document In the Transaction table, click on the Status link in the Status column corresponding to the desired transaction key. The Transaction Log table is displayed. Each part on the horizontal bar represents an action performed on the document. 7.3 Searching Mailbags Search Mailbags displays all transactions which have mailbag documents. Mailbag is an ANSI-defined standard for interconnects between VAN (EDI) addresses. 1. On the Feature pane, select Search Mailbags in the Report group. 2. The Filter panel displays the criteria for the report: 71 Date Range From and To: The date range for the report. Mailbag Control No.: The unique control number of the mailbag document. Mailbag Type: The type of the mailbags. Interchange: Displays the documents which have been acknowledged or unacknowledged. After the Interchange mailbag is selected, a drop-down list is displayed to set the desired interchange type. Acknowledgement: Displays the acknowledgement of the documents. Transaction Key: The key number of the transaction. Interconnect Sender ID: The ID number of the VAN sender. Interconnect Receiver ID: The ID number of the VAN recipient. 3. Click the Search button. The Transaction table is loaded. Actions In the Action column, click the link corresponding to the desired transaction key to perform one of the following actions on the document: RESEND – resends the transaction to the recipient. EDI – displays the information of the document. LOG – displays the processing status of the document. ACK – displays all document acknowledgements. 72 8. Chapter VIII: Trading Partner Management This chapter provides a step-by-step procedure for managing Trading Partners, such as adding a new Trading Partner, editing a Trading Partner profile, and setting up mailboxes. 8.1 Manage Trading Partners 8.1.1 Adding a New Trading Partner 1. On the Feature pane, select Manage Trading Partner in the Trading Partner Management group 2. Click the Add Trading Partner button. The Add New Trading Partner window is displayed. 3. Fill out the form. 4. When you are finished, click the Save button and then click the Close button. 8.1.2 Customer Registration & Approval To register a customer account For Customers: 1. On the Login page, click the Customer Register link. The Add New Customer window is displayed. 73 2. Fill out the form. 3. Click the Save button and then click the Close button. To approve a customer registration For the DiConnect administrator: 1. On the Feature pane, select Manage Trading Partner in the Trading Partner Management group. 2. Mark the customer(s) for approval. 3. Click the Approve & Send Activation button. Note: An email message with the activation link and code is sent to the customer. To activate a customer account For customers: 1. Open the activation email. 2. Click the Please click here to activate your profile link. The Activate Customer window is displayed in a new tab within your browser. 74 3. Click the Activate button. If the customer account has successfully been activated, you will be notified as follows: “Customer activation is successful. Please login to access the system.” Next, a second email message with the web account and FTP user account is sent to you. 4. Click the Login button to log on to DiConnect. Note: If the the activation code does not appear in the Approval Code box, copy the activation code found in the email message and paste it in this box. 8.1.3 Viewing a Trading Partner Account 1. On the Feature pane, select Manage Trading Partner in the Trading Partner Management group. 2. Mark the customer account you want to view. 3. Click the View button. The Approve Customer window is displayed. 8.1.4 Deleting a Trading Partner Account(s) 1. On the Feature pane, select Manage Trading Partner in the Trading Partner Management group. 2. Mark the customer account that you want to remove. 3. Click the Delete button. 8.1.5 Profiles 1. On the Feature pane, select Manage Trading Partner in the Trading Partner Management group. 2. Mark the intended customer account. 3. Click the Manage Profile button. To edit the profile 1. Switch to the Primary Profile tab. 2. Make the desired changes to the profile. 3. Click the Save button. 8.1.6 Web Accounts 8.1.6.1 Creating a Web Account 1. On the Feature pane, select Manage Trading Partner in the Trading Partner Management group. 2. Mark the customer account for which you want to create a web account. 75 3. Click the Manage Profile button. You are taken to the Manage Customer Profile page. 4. Switch to the Web Accounts tab. 5. Click the Add button. The Add User Account window is displayed. 6. On the General Information tab, a. Select the desired mailbox for the account in the Mailbox drop-down list. b. Type the full name of the account owner in the Full Name box. Tip: Click the Generate Password button to generate a random password. c. Type the email address, phone number, and fax of the account owner in the Email, Phone and Fax boxes respectively. 7. Switch to the Member Of tab. 8. Add the user to the intended groups: a. Click the Add button. The User to Group window is displayed. 76 b. Mark the group(s) to which the user belongs. c. Click the Save button. o To remove the user from a group, select the group to be removed and then click the Remove button. 9. Click the Save button and then click the Close button. 8.1.6.2 Editing a Web Account 1. On the Feature panel, select Manage Trading Partner in the Trading Partner Management group. 2. Mark the intended customer. 3. Click the Manage Profile button. You are taken to the Manage Customer Profile page. 4. Switch to the Web Accounts tab. 5. Mark the web account to be modified. 6. Click the Edit button. 7. Make the desired changes to the web account. The Edit User Account window is displayed. 8. Click the Save button and then click the Close button. 8.1.6.3 Deleting a Web Account(s) 1. On the Feature panel, select Manage Trading Partner in the Trading Partner Management group. 2. Mark the intended customer. 77 3. Click the Manage Profile button. You are taken to the Manage Customer Profile page. 4. Switch to the Web Accounts tab. 5. Mark the web account(s) that you want to remove. 6. Click the Delete button. 8.1.7 Trading Members 8.1.7.1 Adding a Trading Member Use the following procedure to add a trading member to a trading partner account. 1. On the Feature panel, select Manage Trading Partner in the Trading Partner Management group. 2. Mark the intended customer. 3. Click the Manage Profile button. You are taken to the Manage Customer Profile page. 4. Switch to the Trading Members tab. 5. Click the Add button. The Add/Edit Trading Member window is displayed. 78 6. Fill out the form. 7. Click the Save button and then click the Close button. 8.1.7.2 Editing a Trading Member Perform the steps below to edit a trading partner for a customer account. 1. On the Feature pane, select Manage Trading Partner in the Trading Partner Management group. 2. Mark the intended customer account. 3. Click the Manage Profile button. You are taken to the Manage Customer Profile page. 4. Switch to the Trading Members tab. 5. Mark the trading partner you want to edit. 6. Click the Edit button. The Add/Edit Trading Member window is displayed. 7. Make the desired changes to the trading partner. 8. Click the Save button and then click the Close button. 8.1.7.3 Inactivating a Trading Partner 1. On the Feature pane, select Manage Trading Partner in the Trading Partner Management group. 2. Mark the intended customer account. 3. Click the Manage Profile button. You are taken to the Manage Customer Profile page. 79 4. Switch to the Trading Members tab. 5. Mark the trading partner you want to inactivate. 6. Click the Inactivate button. 8.1.7.4 Assigning a Trading Partner to a Trading Member Follow these steps to assign a trading partner to a customer account. 1. On the Feature pane, select Manage Trading Partner in the Trading Partner Management group. 2. Mark the intended customer account. 3. Click the Manage Profile button. You are taken to the Manage Customer Profile page. 4. Switch to the Trading Members tab. 5. Mark the trading partner you want to assign. 6. Click the Assign Trading Partner to Other Customer button. The Assign Trading Partner window is displayed. 7. Fill out the form. 8. Click the Save button. 8.1.8 Mailboxes 8.1.8.1 Creating an FTP Mailbox in Simple Mode In the Simple mode, the system sets default values for fields in the Mailbox. 1. On the Feature pane, select Manage Trading Partner in the Trading Partner Management group. 2. Mark the intended customer account. 3. Click the Manage Profile button. 4. Switch to the Mailboxes tab. 5. Click the Add button. The File Transfer Type Selection window is displayed. 80 6. In the File Transfer Type Selection window, a. Select FTP in the File Transfer Type drop-down list. b. Select Simple in the Mode drop-down list. c. Click the Select button. The Add Mailbox (Simple Mode) window is displayed. 7. On the Mailbox Information tab, do the following: a. Type a name for the mailbox in the Mailbox Name box. b. In the User Name box, type the user name that will connect to the FTP server c. Type the password twice for the user name in the Password and Verify Password boxes. d. Type a description for the mailbox in the Description box. e. Set other options. f. When you are finished, click the Save button. 8. On the Client Information tab, 81 a. b. c. d. e. f. In the User Name box, type the user name that will connect to the FTP client computer. Type the password twice for the user name in the Password and Verify Password boxes. Select the Passive Mode check box if you want to use this function. Type a URL for the FTP client in the URL drop-down list. Type a description for the FTP client in the Description box. Select the check box next to the Get DIR box. Type the folder name for the incoming files in the box. g. Select the check box next to the Put DIR box. Type the folder name for the outgoing files in the box. h. Select the check box next to the Archive box. Type the folder name for the archive files in the box. i. Click the Save button. 8.1.8.2 Creating an FTP Mailbox in Advanced Mode In the Advanced mode, the user sets up the mailbox manually. 1. On the Feature pane, select Manage Trading Partner in the Trading Partner Management group. 2. Mark the intended customer account. 3. Click the Manage Profile button. 4. Switch to the Mailboxes tab. 5. Click the Add button. The File Transfer Type Selection window is displayed. 82 6. In the File Transfer Type Selection window, a. Select FTP in the the File Transfer Type drop-down list. b. Select Advance in the Mode drop-down list. c. Click the Select button. The Add Mailbox (Advanced Mode) window is displayed. 7. Type a name for the mailbox in the Mailbox Name box. 8. Under Mailbox Options, a. Select the Allow Multiple users check box to allow many FTP users to access the mailbox. b. Select the Share Incoming Folder check box to share the common Incoming folder with users. c. Select the Share Outgoing Folder check box to share the common Outgoing folder with users. d. Select the Flat File check box to create a separate folder for each document type if needed. This will enable the following two check boxes: Create DIR for Transaction id (Flat File) and Parse File Name 9. Type a description for the mailbox in the Description box. 10. Click the Save button to add the mailbox. A default FTP user is automatically added to the mailbox. 83 11. 12. 13. 14. Customize the mailbox directories if needed. Add FTP user(s) as needed. Mark the desired FTP user and then add the FTP user clients as needed. When you are finished, click the Close button. Note: The Share Incoming Folder and Share Outgoing Folder check boxes are only used when the Allow Multiple users check box is selected. The separate folders are only created for the transaction ID if the document is a flat file. To customize the mailbox directories In the Add Mailbox (Advanced Mode) window, you are able to change the name of the mailbox directories after adding the mailbox. 1. Click the Customize Mailbox DIR button. The Mailbox DIR window is displayed. 2. Type a new name for the home directory in the Home DIR box. 3. Under Mailbox DIR, a. Mark the desired directory to be renamed. b. Click the Edit button. 84 The Edit Mailbox Virtual Path window is displayed. c. Type a new name for the directory in the Virtual Path box. d. Click the Save button and then click the Close button. 4. Click the Save button and then click the Close button in the Mailbox DIR window. 8.1.8.2.1 FTP User Actions To add an FTP user You can add other FTP users to the mailbox in addition to the default FTP user. 1. Under FTP Users, click the Add button. The Add FTP User window is displayed. 2. 3. 4. 5. In the User Name box, type the user name that will connect to the FTP server, Type the password twice for the user name in the Password and Verify Password boxes. Type a description for the mailbox in the Description box. Select the Send/Pickup Document from Client check box if you want to move the documents to the client’s computer. 6. Select the Allow SMIME check box if you want to use SMIME functions. 7. Click the Save button and then click the Close button. Note: You can only add multiple FTP users if the mailbox allows access to multiple FTP users. 85 You can use SMIME functions, such as achieving a document before sending or encrypting a document. To edit an FTP user 1. Under FTP Users, mark the FTP user name to be modified. 2. Click the Edit button. The Edit FTP User window is displayed. 3. Make the desired changes to the FTP user. 4. Click the Save button and then click the Close button. To delete an FTP user Under FTP Users, mark the FTP user that you want to remove, and then click the Delete button. 8.1.8.2.2 FTP User Client Actions To add an FTP user client 1. Under FTP Users Client in the Add Mailbox (Advanced Mode) window, click the Add button. The Add FTP User Client window is displayed. 2. In the User name box, type the user name that will access the client’s computer. 3. Type a password twice for the user name in the Password and Verify Password boxes. 86 4. 5. 6. 7. 8. Select the Passive Mode check box if you want to use this function. Type the IP address of the client’s computer in the URL box. Type a description for the FTP user client in the Description box. Click the Save button to add the FTP user client. In the Directory table, follow these steps to set up folders on the client’s computer: o To add a folder on the client’s computer: a. Click the Add button. The Add/Edit Access Settings window is displayed. b. In the Virtual Path box,.type the path to the folder on the client’s computer. c. Select the desired transaction ID in the Trans ID drop-down list. d. Select the desired document type in the Document Type drop-down list. e. Select the desired folder type in the Folder Type drop-down list. f. Click the Save button and then click the Close button. o To edit a folder on the client’s computer: a. Mark the desired folder. b. Click the Edit button. The Add/Edit Access Settings window is displayed. c. Make the desired changes to the folder. d. Click the Save button and then click the Close button. o To delete a folder(s) on the client’s computer: Mark the desired folder(s) and then click the Delete button. 9. Click the Close button. Note: You can use SMIME functions, such as achieving a document before sending or encrypting a document. 87 To edit an FTP user client 1. Under FTP Users Client in the Add Mailbox (Advanced Mode) window, mark the user name of the FTP client to be modified. 2. Click the Edit button. The Edit FTP User Client window is displayed. 3. Make the desired changes to the mailbox. 4. Click the Save button and then click the Close button. To delete an FTP user client(s) Under FTP Users Client in the Add Mailbox (Advanced Mode) window, mark the FTP client(s) that you want to remove and then click the Delete button. 8.1.8.3 Creating an AS2 Mailbox in Simple Mode 1. On the Feature pane, select Manage Trading Partner in the Trading Partner Management group. 2. Mark the intended customer account. 3. Click the Manage Profile button. 4. Switch to the Mailboxes tab. 5. Click the Add button. The Add Mailbox (Simple Mode) window is displayed. 6. On the File Transfer Type Selection window, a. Select AS2 in the File Transfer Type drop-down list. b. Click the Select button. The Add Mailbox (Simple Mode) window is displayed. 7. In the Mailbox Information tab, 88 a. Type a name for the AS2 mailbox in the Mailbox Name box. b. In the AS2 Name box, type the user name that will connect to DiCentral’s AS2 server. c. Type a description for the mailbox in the Description box. d. Click the Save button. 8. In the Client Information tab, a. In the AS2 Name box, type the AS2 identifier name for the trading partner with whom you want to connect. b. In the User name box, type the user name that will connect to the trading partner’s AS2 server receiving the message. 89 c. Type the password for the user name twice in the Password and Verify Password boxes. Tip: The user name and password are not mandatory unless the trading partner’s AS2 server requires it. d. Type the URL for the AS2 server in the AS2 URL box. e. Type a description for the AS2 client in the Description box. f. Click the Save button. 9. Click the Close button. Tip: For more information about creating and managing certificates, see Managing Certificate Sets, (Chapter VIII). 8.1.8.4 Creating an AS2 Mailbox in Advanced Mode 1. On the Feature pane, select Manage Trading Partner in the Trading Partner Management group. 2. Mark the intended customer account. 3. Click the Manage Profile button. 4. Switch to the Mailboxes tab. 5. Click the Add button. The Add Mailbox (Simple Mode) window is displayed. 6. In the Add Mailbox (Simple Mode) window, a. Select AS2 in the File Transfer Type drop-down list. b. Click the Select button. The Add AS2 Mailbox (Simple Mode) window is displayed. 90 7. 8. 9. 10. 11. Type a name for the AS2 mailbox in the Mailbox Name box. Type a description for the mailbox in the Description box. Click the Save button. Add AS2 users as needed. Switch to Client Information tab. 12. Fill out the form. 13. Click the Advanced Settings bar for advanced options. 91 14. Under Advanced Settings, select the desired advanced options. 15. When you are finished, click the Save button. 8.1.8.5 Viewing a Mailbox 1. On the Feature pane, select Manage Trading Partner in the Trading Partner Management group. 2. Mark the intended customer account. 3. Click the Manage Profile button. You are taken to the Manage Customer Profile page. 4. Switch to the Mailboxes tab. 5. Mark the preferred mailbox. 6. Click the View button. 8.1.8.6 Editing a Mailbox 1. On the Feature pane, select Manage Trading Partner in the Trading Partner Management group. 2. Mark the intended customer account. 3. Click the Manage Profile button. You are taken to the Manage Customer Profile page. 4. Switch to the Mailboxes tab. 5. Mark the preferred mailbox. 6. Click the Edit button. The Edit Mailbox window is displayed. 7. Make the desired changes to the mailbox. 8. Click the Save button on the tab(s) where you made changes. 9. Click the Close button. 8.1.8.7 Assigning a Mailbox to a Trading Partner(s) 1. On the Feature pane, select Manage Trading Partner in the Trading Partner Management group. 2. Mark the intended customer account. 3. Click the Manage Profile button. You are taken to the Manage Customer Profile page. 4. Switch to the Mailboxes tab. 92 5. Mark the preferred mailbox. 6. Click the Assign Mailbox to Trading Partner button. The Assign Trading Partner window is displayed. 7. In the table under 2. Select File Transfer Users, mark the intended FTP user account. 8. In the table under 3. Select Trading Partners, mark the trading partner(s) to whom you want to assign the FTP user account. 9. Repeat steps (7) and (8) provided that you want to assign other FTP user accounts to trading partners. 10. Click the Save button. 8.1.9 Certificates 8.1.9.1 Importing a Certificate 1. On the Feature pane, select Manage Trading Partner in the Trading Partner Management group. 2. Mark the intended customer account. 3. Click the Manage Profile button. You are taken to the Manage Customer Profile page. 4. Switch to the Certificates tab. 5. Click the Import Certificate button. The Import Certificate Simple window is displayed. 6. Import the desired certificates: o To import a single certificate, 93 o a. Select the intended certificate set in the Certificate Set drop-down list. b. Click the Browse button next to the Certificate box. In the File Upload window, navigate to and locate the appropriate certificate file and then click the Open button. c. Set the options for the certificate (Encryption, Signature and SSL). d. Click the Browse button next to the CA File box. In the Choose File to Upload window, navigate to and locate the appropriate CA file and then click the Open button. To upload two or three certificates, a. Click the Display in Advanced Mode link. The window is changed to Import Certificate Advance. 94 b. Select the intended certificate set in the Certificate Set drop-down list. c. Choose the files for the first certificate and CA files. i. Click the Browse button next to the Certificate 1 box. In the File Upload window, navigate to and locate the appropriate certificate file and then click the Open button. ii. Set the options for the certificate (Encryption, Signature and SSL). d. Choose the files for the second certificate (Certificate 2). e. Choose the files for the third certificate (Certificate 3). 7. When you are finished, click the Upload button and then click the Close button. To create a certificate set 1. Type the name of the certificate set that you want to create in the display box of the Certificate Set drop-down list. 2. Click the Create Certificate Set button. For Administrators: 1. On the Feature pane, select Customer Management in the Trading Partner Management group. 2. Mark the intended customer account. 3. Click the Manage Certificates button. The Customer Certificates window is displayed. 4. Click the Import Certificate button. 95 8.1.9.2 Exporting a Certificate(s) 1. On the Feature pane, select Manage Trading Partner in the Trading Partner Management group. 2. Mark the intended customer account. 3. Click the Manage Profile button. You are taken to the Manage Customer Profile page. 4. Switch to the Certificates tab. 5. Mark the certificate(s) to be exported. 6. Click the Export Certificate button. The Export Certificate window is displayed. 7. Select the appropriate format for the certificate(s) in the Format drop-down list. 8. Click the Export button. For Administrators: 1. On the Feature pane, select Customer Management in the Trading Partner Management group. 2. Mark the intended customer account. 3. Click the Manage Certificates button. The Customer Certificates window is displayed. 4. Mark the certificate(s) to be exported. 5. Click the Export Certificate button. 8.1.9.3 Changing the Status of a Certificate(s) 1. On the Feature pane, select Manage Trading Partner in the Trading Partner Management group. 2. Mark the intended customer account. 3. Click the Manage Profile button. You are taken to the Manage Customer Profile page. 4. Switch to the Certificates tab. 96 5. Mark the certificate(s) that you want to change. 6. Click the Change Status button. The Change Status window is displayed. 7. Select the desired status in the Change status to drop-down list. 8. Click the OK button. For Administrators: 1. On the Feature pane, select Customer Management in the Trading Partner Management group. 2. Mark the intended customer account. 3. Click the Manage Certificates button. The Customer Certificates window is displayed. 4. Mark the certificate(s) that you want to change. 5. Click the Change Status button. 8.1.9.4 Deleting a Certificate 1. On the Feature pane, select Manage Trading Partner in the Trading Partner Management group. 2. Mark the intended customer account. 3. Click the Manage Certificates button. The Customer Certificates window is displayed. 4. Mark the certificate(s) that you want to remove. 5. Click the Delete button. 8.1.9.5 Assigning a Certificate to a Mailbox 1. On the Feature pane, select Manage Trading Partner in the Trading Partner Management group. 2. Mark the intended customer account. 3. Click the Manage Certificates button. The Customer Certificates window is displayed. 4. Mark the certificate(s) that you want to assign. 5. Click the Assign Certificate to Mailbox button. The Assign Certificate to Mailbox window is displayed. 97 6. Select the desired mailbox in the Mailbox drop-down list. 7. Select the desired certificate set in the Certificate Set drop-down list. 8. Click the Save button. 8.1.9.6 Managing Certificate Sets 8.1.9.6.1 Adding a Certificate Set 1. On the Feature pane, select Manage Trading Partner in the Trading Partner Management group. 2. Mark the intended customer account. 3. Click the Manage Certificates button. The Customer Certificates window is displayed. 4. Click the Manage Certificate Set button. The Manage Certificate Set window is displayed. 5. Click the Add button. The Edit Form window is displayed. 98 6. Type the desired name for the certificate set in the Certificate Set Name box. 7. Click the Save button. 8.1.9.6.2 Editing a Certificate Set 1. On the Feature pane, select Manage Trading Partner in the Trading Partner Management group. 2. Mark the intended customer account. 3. Click the Manage Certificates button. The Customer Certificates window is displayed. 4. Click the Generate Certificate Set button. The Generate Certificate Set window is displayed. 5. Select the desired certificate set to be modified. 6. Click the Edit button. The Edit Form window is displayed. 7. Type the desired name for the certificate set in the Certificate Set Name box. 8. Click the Save button 8.1.9.7 Generating a Keyset 1. On the Feature pane, select Manage Trading Partner in the Trading Partner Management group. 2. Mark the intended customer account. 3. Click the Manage Certificates button. The Customer Certificates window is displayed. 4. Click the Generate Keyset button The Generate Keyset window is displayed. 99 5. Fill out the form. 6. When you are finished, click the Create button. 8.1.9.8 Exchanging Certificates 1. On the Feature pane, select Manage Trading Partner in the Trading Partner Management group. 2. Mark the intended customer account. 3. Click the Manage Certificates button. The Customer Certificates window is displayed. 100 4. Select the desired customer certificate to be exchanged. 5. Click the Exchange Certificate button. The Exchange Certificate window is displayed 6. In the Exchange Certificate window, do the following: Select the desired email in the Using Email tab, and then click the MailTo button. Select the desired Sendto in the Using CEM Request tab, and then click the Send button. 8.1.9.9 Importing Keysets 1. On the Feature pane, select Manage Trading Partner in the Trading Partner Management group. 2. Mark the intended customer account. 3. Click the Manage Certificates button. The Customer Certificates window is displayed. 101 4. Click the Import Keyset button. The Import Keyset window is displayed. 5. Select the intended certificate set in the Certificate Set drop-down list. 6. Click the Browse button next to the Keyset File (*.15) box. In the File Upload window, navigate to and locate the appropriate keyset file and then click the Open button. 7. Type an alias for the keyset in the Alias box. 8. Type the desired password for the keyset in the Keyset Password box. 9. Set the options for the keyset (Encryption, Signature and SSL). 10. Click the Import button. 8.1.9.10 Downloading Keysets 1. On the Feature pane, select Manage Trading Partner in the Trading Partner Management group. 2. Mark the intended customer account. 3. Click the Manage Certificates button. The Customer Certificates window is displayed. 102 4. Select the desired keyset(s) to be downloaded. 5. Click the Download Keyset button. 8.1.10 Setting Relationships for a Trading Partner Two trading partners can send/receive documents to/from each other when a relationship is configured. The following procedure is used to set up relationships between a trading partner and others. 1. 2. 3. 4. 5. 6. On the Feature pane, select Manage Trading Partner in the Trading Partner Management group. Mark the intended customer account. Click the Manage Profile button. You are taken to the Manage Customer Profile page. Switch to the Trading Partners tab. Mark the trading partner for whom you want to set the relationship. Click the Set Relationship button. The Relationship Settings window is displayed. 7. Click the Add button. 8. In the Select Trading Partners window, 103 a. Mark the appropriate trading partners. b. Click the Select button and then click the Close button. 9. Click the Close button. To delete a relationship In the Relationship Settings window, 1. Mark the intended trading partner(s). 2. Click the Delete button. To change a relationship status In the Relationship Settings window, 1. Mark the intended trading partner(s). 2. Click the Update Status button. The Edit Relationship window is displayed. 104 3. Select the appropriate status in the Status drop-down list. 4. Click the Save button and then click the Close button. For Administrators 1. On the Feature pane, select Customer Management in the Trading Partner Management group. 2. Mark the intended customer account. 3. Click the Trading Partner Relationship button. The Set Trading Partner Relationship window is displayed. 4. Under From Trading Partner, click the Find button. 5. In the Select Trading Partner window, mark the source trading partner for whom you want to set a relationship and then click the Select button. The source trading partner’s information is supplied into the fields under From Trading Partner. The trading partners with whom the source trading partner currently has a relationship are shown in the table below. 105 6. Click the Add button. 7. In the Select Trading Partner window, mark the intended target trading partner and then click the Select button. The target trading partner’s information is supplied into the fields under To Trading Partner. 8. Under File Transfer User, a. Select the file transfer user in the File Transfer User drop-down list. b. Select the relationship status between the source and target trading partners. 9. Click the Save and then click the Close button. To edit the relationship status with a trading partner In the Set Trading Partner Relationship window, 1. Mark the trading partner whose information you want to edit. 2. Click the Edit button. The trading partner’s information is supplied into the fields under To Trading Partner and File Transfer User. 106 3. Make the desired changes to the trading partner. Tip: You can change the relationship status and file transfer user. 4. Click the Save button. To delete the relationship with a trading partner In the Set Trading Partner Relationship window, 1. Mark the trading partner whose relationships with a source trading partner you want to delete. 2. Click the Remove button. 8.1.11 1. 2. 3. 4. 5. Trading Partner FTP Client Relationships On the Feature pane, select Manage Trading Partner in the Trading Partner Management group. Mark the intended customer account. Click the Trading Partner Client Relationship button. The Trading Partner FTP Client Relationship window is displayed. Under From Trading Partner, click the Find button. In the Select Trading Partner window, mark the source trading partner for whom you want to set a relationship, and then click the Select button. 107 The source trading partner’s information is supplied into the fields under From Trading Partner. The trading partners with whom the source trading partner currently has a relationship are shown in the table below. 6. Click the Add button. 7. In the Select Trading Partner window, mark the intended target trading partner and then click the Select button. The target trading partner’s information is supplied into the fields under To Trading Partner. 8. Under File Transfer User, select the file transfer user in the File Transfer User drop-down list. 9. Click the Save and then click the Close button. To edit a file transfer user 1. Under From Trading Partner, mark the trading partner whose information you want to edit. 2. Click the Edit button. The trading partner’s information is supplied into the fields under To Trading Partner and File Transfer User. 108 3. Change the file transfer user client. 4. Click the Save button. To delete the relationship with a trading partner In the Trading Partner FTP Client Relationship window, 1. Under From Trading Partner, mark the trading partner whose relationship with the source trading partner you want to delete. 2. Click the Delete button. 109 9. Chapter IX: Integration Settings This chapter includes the instructions to configure a DiConnect add-in which will process EDI documents for each Trading Partner mailbox or Party mailbox. 9.1 Application Settings Application Settings allow you to configure DiConnect add-in applications such as sending email when documents are received from Trading Partners. Use the following procedures to set up add-in applications. 9.1.1 Adding a Routing Server 1. On the Feature pane, select Application Settings in the Integration Settings group. 2. Click the Add button. The Application Settings window is displayed. 3. 4. 5. 6. 7. 8. Type a name for the routing server in the Name box. Select the desired routing category in the Application Category drop-down list. Select the desired server name in the Server Name drop-down list. In the IPAddress box, type an IP address that you want to assign to the routing server. Type the port number for the routing server in the Port box. In the Command box, type the Command name that you want to run. 110 9. Type an optional parameter in the Optional Parameter box if necessary. 10. Click the Save button and then click the Close button. 9.1.2 Editing a Routing Server 1. On the Feature pane, select Application Settings in the Integration Settings group. 2. Mark the desired routing server to be modified. 3. Click the Edit button. The Routing Server window is displayed. 4. Make the desired changes to the routing server. 5. Click the Save button and then click the Close button. 9.1.3 Deleting a Routing Server(s) 1. On the Feature pane, select Application Settings in the Integration Settings group. 2. Mark the routing server(s) that you want to remove. 3. Click the Delete button. 9.2 Application Category In order to group DiConnect add-in applications, use the following procedure. 9.2.1 Adding an Application Category 1. On the Feature pane, select Application Category in the Integration Settings group. 2. Click the Add button. The Routing Category window is displayed. 3. Type a name of the routing category in the Name box. 111 4. 5. 6. 7. Select the server type in the Server Type drop-down list. Select the master server in the Master Server drop-down list. Type a description for the routing category in the Description box. Click the Save button and then click the Close button. 9.2.2 Editing a Routing Category 1. On the Feature pane, select Application Category in the Integration Settings group. 2. Mark the category to be modified. 3. Click the Edit button. The Routing Category window is displayed. 4. Make the desired changes to the routing category. 5. Click the Save button and click the Close button. 9.2.3 Deleting a Routing Category(ies) 1. On the Feature pane, select Application Category in the Integration Settings group. 2. Mark the desired category(ies) that you want to remove. 3. Click the Delete button. 9.3 Integration Task Flow This feature is used to define the procedures and the order for each DiConnect add-in. 9.3.1 Adding a Task Flow 1. On the Feature pane, select Integration Task Flow in the Integration Settings group. 2. Click the Add button. The Task Flow window is displayed. 112 3. 4. 5. 6. 7. 8. 9. In the Application drop-down list, select the application to which you want to add the task. Select the desired action in the Action drop-down list. Select the appropriate routing category in the Routing Category drop-down list. Type a direction for the task in the Direction box. Select the appropriate routing priority in the Routing Priority drop-down list. In the Depend on Task Flow drop-down list, select the task flow on which the task depends. Click the Save button and then click the Close button. Note: The Depend on Task Flow drop-down list is not available in this version of DiConnect. 9.3.2 Editing a Task Flow 1. On the Feature pane, select Integration Task Flow in the Integration Settings group. 2. Mark the task flow to be modified. 3. Click the Edit button. The Task Flow window is displayed. 4. Make the desired changes to the task flow. 5. Click the Save button and then click the Close button. 9.3.3 Deleting a Task Flow(s) 1. On the Feature pane, select Integration Task Flow in the Integration Settings group. 2. Mark the desired task flow(s) that you want to remove. 3. Click the Delete button. 9.4 Routing Group In order to define a proper DiConnect add-in for processing documents, the Routing Group feature classifies EDI documents by sender/receiver or document type( X12, EDIFACT). 9.4.1 Adding a Routing Group 1. On the Feature pane, select Routing Group in the Integration Settings group. 2. Click the Add button. The Add/Edit Routing Group window is displayed. 113 3. Type a name for the priority in the Name box. 4. Select the desired document format in the Format drop-down list. The default routing element belonging to the selected format is displayed in the Element table. 5. Select the appropriate document version in the Document Version drop-down list. 6. Select the appropriate processing type in the Processing Type drop-down list. 7. Enter a priority value for the route in the Weight box. 8. Under Mailbox List, add at least one mailbox: a. Under Mailbox table, click the Add button. The Add/Edit Routing Mailbox window is displayed. b. Select the desired mailbox in the Mailbox Name drop-down list. 114 c. Click the OK button. 9. Under Routing Element, add sub-routing element(s) if needed: a. In the Element table, select the default routing element to which you want to add a subelement. b. Click the Add button. The Add Routing Element window is displayed. c. Select the desired element name in the Name drop-down list. d. Type a value for the element in the Value box. e. Click the OK button 10. When you are finished, click the Save button and then click the Close button. 9.4.1.1 Routing Element Actions To edit a routing element 1. In the Element table, select the routing element to be modified. 2. Click the Edit button. The Edit Routing Element window is displayed. 3. Type a new value in the Value box. 4. Click the OK button. To delete a routing element 1. Select the routing element that you want to remove. 2. Click the Delete button. 115 Tip: You cannot remove the default routing element of the selected format. 9.4.2 Viewing Routing Elements within a Routing Group 1. On the Feature pane, select Routing Group in the Integration Settings group. 2. In the Routing Group table, select the desired routing priority. Under Routing Element, the element(s) of the selected priority is(are) displayed. 3. Expand the routing element by clicking the 9.4.3 icon next to the element name. Editing a Routing Group 1. On the Feature pane, select Routing Group in the Integration Settings group. 2. In the Routing Group table, select the desired priority. 3. Click the Edit button. The Add/Edit Routing Group window is displayed. 4. Make the desired changes to the routing priority. 5. Click the Save button and then click the Close button. 9.4.4 Deleting a Routing Group 1. On the Feature pane, select Routing Group in the Integration Settings group. 2. In the Routing Group table, select the routing priority that you want to remove. 3. Click the Delete button. 116 10. Chapter X: Alerts Management This chapter includes the following topics: 1. Configuring a mail gateway 2. Configuring mail sending options 10.1 General Alert Options On the Feature pane, select Alert Options in the Alerts Management group. The Alert Option page is loaded. To alert about failed transactions Under Alert Option, select the Alert if there is any transaction failed check box. To alert about missing asynchronous MDNs for a certain period Under Alert Option, select the Alert if we do not receive Asynchronous after... minute(s) check box, and then type the desired time. 117 To alert about the expiration of partner’s certificates or private keysets Under Alert Option, select the Alert if partner’s certificates or our private keysets are expired Alert before... day(s) check box, and then type the desired number of days. To alert about a blank incoming/outgoing file Under Alert Option, select the Alert if a file with zero byte in size when check box. To block a blank incoming/outgoing file Under Alert Option, select the Block if a file with zero byte in size when check box. To alert if a file is not sent on schedule Under Alert Option, select the Alert if a Trading Partner NOT sent a file on schedule check box. 10.2 Schedule Validation 10.2.1 Adding a Validation Schedule 1. On the Feature pane, select Alert Options in the Alerts Management group. 2. Click the Add button. The Validation Schedule window is displayed. 3. In the Validation Schedule, do the following: o To schedule validation once: a. Type the desired time in the Received File Before box. b. Select the desired day from the drop-down Calendar in the On box. c. Select the desired trading partner in the Trading Partner drop-down list. d. Type the desired file name in the Expected File Name box (optional). e. Clear the Recurrence Validation check box. 118 o 10.2.2 f. Click the Save button. To schedule recurring validation: a. Type the desired time in the Received File Before box b. Select the desired trading partner in the Trading Partner drop-down list. c. Select the Recurrence Validation check box. d. Set up the desired recurring options. e. When you are finished, click the Save button. Editing a Validation Schedule 1. On the Feature pane, select Alert Options in the Alerts Management group. 2. Select the validation schedule to be modified. 3. Click the Edit button. The Validation Schedule window is displayed. 4. Make the desired changes to the validation schedule. 5. Click the Save button. Note: Only Validation schedules with a “New” status can be edited. 10.2.3 Deleting a Validation Schedule 1. On the Feature pane, select Alert Options in the Alerts Management group. 2. Select the validation schedule that you want to remove. 3. Click the Delete button. 10.3 SMTP Server Settings 1. On the Feature pane, select SMTP Server Setting in the Alerts Management group. The SMTP Server Setting page is loaded. 119 2. In the SMTP Server Setting page, a. Type a name for the SMTP mail in the SMTP Mail box. b. Type the intended port number for the selected SMTP mail in the Server Port list. c. Type the sender’s email address in the Sender Email box. d. Type the password for the email address in the Password box. e. Select the SSL check box if you want to use Secure Sockets Layer (SSL). f. Type the recipient’s email address in the Receiver Email(s) box g. Click the Save button. 120 11. Chapter XII: Party Management This chapter includes the instructions about Party management, such as adding a new Party, editing a Party profile, or setting a mailbox. 11.1 11.1.1 Manage Party Adding a New Party 1. On the Feature pane, select Party Management in the Party Management group. 2. Click the Add Party button. The Add New Party window is displayed. 3. Fill out the form. 4. When you are finished, click the Save button and then click the Close button. 11.1.2 Managing Party Profiles 1. On the Feature pane, select Party Management in the Party Management group. 2. Mark the intended customer account. 3. Click the Manage Profile button. 121 To edit the profile 1. Switch to the Primary Profile tab. 2. Make the desired changes to the profile. 3. Click the Save button. 11.1.3 Web Accounts 11.1.3.1 Creating a Web Account 1. On the Feature pane, select Party Management in the Party Management group. 2. Mark the customer account for which you want to create a web account. 3. Click the Manage Profile button. You are taken to the Manage Customer Profile page. 4. Switch to the Web Accounts tab. 5. Click the Add button. The Add User Account window is displayed. 6. On the General Information tab, a. Select the desired mailbox for the account in the Mailbox drop-down list. b. Type the full name of the account owner in the Full Name box. Tip: Click the Generate Password button to generate a random password. 122 c. Type the email address, phone number and fax of the account owner in the Email, Phone and Fax boxes respectively. 7. Switch to the Member Of tab. 8. Add the user to the intended groups: a. Click the Add button. The User to Group window is displayed. b. Mark the group(s) to which the user belongs. c. Click the Save button. o To remove the user from a group, select the group to be removed and then click the Remove button. 9. Click the Save button and then click the Close button. 11.1.3.2 Editing a Web Account 1. On the Feature panel, select Party Management in the Party Management group. 2. Mark the intended customer. 3. Click the Manage Profile button. You are taken to the Manage Customer Profile page. 4. Switch to the Web Accounts tab. 5. Mark the web account to be modified. 6. Click the Edit button. 7. Make the desired changes to the web account. The Edit User Account window is displayed. 123 8. Click the Save button and then click the Close button. 11.1.3.3 Deleting a Web Account(s) 1. On the Feature panel, select Party Management in the Party Management group. 2. Mark the intended customer. 3. Click the Manage Profile button. You are taken to the Manage Customer Profile page. 4. Switch to the Web Accounts tab. 5. Mark the web account(s) that you want to remove. 6. Click the Delete button. 11.1.4 Trading Members 11.1.4.1 Adding a Trading Member The following procedure is for adding a trading member to a Party account. 1. On the Feature panel, select Party Management in the Party Management group. 2. Mark the intended customer. 3. Click the Manage Profile button. You are taken to the Manage Customer Profile page. 4. Switch to the Trading Members tab. 5. Click the Add button. The Add/Edit Trading Member window is displayed. 124 6. Fill out the form. 7. Click the Save button and then click the Close button. 11.1.4.2 Editing a Trading Member Follow the steps below to edit a trading member for a customer account. 1. On the Feature pane, select Party Management in the Party Management group. 2. Mark the intended customer account. 3. Click the Manage Profile button. You are taken to the Manage Customer Profile page. 4. Switch to the Trading Members tab. 5. Mark the trading member that you want to edit. 6. Click the Edit button. The Add/Edit Trading Member window is displayed. 7. Make the desired changes to the trading partner. 8. Click the Save button and then click the Close button. 11.1.4.3 Inactivating a Trading Member To inactivate a trading member for a customer account, use these steps: 1. On the Feature pane, select Party Management in the Party Management group. 2. Mark the intended customer account. 3. Click the Manage Profile button. You are taken to the Manage Customer Profile page. 125 4. Switch to the Trading Members tab. 5. Mark the trading member that you want to inactivate. 6. Click the Inactivate button. 11.1.4.4 Assigning a Trading Partner to a Trading Member Perform the steps below to assign a trading partner to a trading member. 1. On the Feature pane, select Party Management in the Party Management group. 2. Mark the intended customer account. 3. Click the Manage Profile button. You are taken to the Manage Customer Profile page. 4. Switch to the Trading Members tab. 5. Mark the trading partner that you want to assign. 6. Click the Assign Trading Partner to Other Customer button. The Assign Trading Partner window is displayed. 7. Fill out the form. 8. When you are finished, click the Save button. 11.1.5 Mailboxes 11.1.5.1 Creating an FTP Mailbox in Simple Mode 1. 2. 3. 4. 5. On the Feature pane, select Party Management in the Party Management group. Mark the intended customer account. Click the Manage Profile button. Switch to the Mailboxes tab. Click the Add button. The File Transfer Type Selection window is displayed. 126 6. In the File Transfer Type Selection window, a. Select FTP in the File Transfer Type drop-down list. b. Select Simple in the Mode drop-down list. c. Click the Select button. The Add Mailbox (Simple Mode) window is displayed. 7. On the Mailbox Information tab, do the following: a. Type a name for the mailbox in the Mailbox Name box. b. In the User Name box, type the user name that will connect to the FTP server. c. Type the password twice for the user name in the Password and Verify Password boxes. d. Type a description for the mailbox in the Description box. e. Set other options. f. Click the Save button. 8. On the Client Information tab, 127 a. b. c. d. e. f. In the User Name box, type the user name that will connect to the FTP client computer. Type the password twice for the user name in the Password and Verify Password boxes. Select the Passive Mode check box if you want to use this function. Type a URL for the FTP client in the URL drop-down list. Type a description for the FTP client in the Description box. Select the check box next to the Get DIR box. Type the folder name for the incoming files in the box. g. Select the check box next to the Put DIR box. Type the folder name for the outgoing files in the box. h. Select the check box next to the Archive box. Type the folder name for the archive files in the box. i. Click the Save button. 11.1.5.2 1. 2. 3. 4. 5. Creating an FTP Mailbox in Advanced Mode On the Feature pane, select Party Management in the Party Management group. Mark the intended customer account. Click the Manage Profile button. Switch to the Mailboxes tab. Click the Add button. The File Transfer Type Selection window is displayed. 128 6. In the File Transfer Type Selection window, a. Select FTP in the File Transfer Type drop-down list. b. Select Advance in the Mode drop-down list. c. Click the Select button. The Add Mailbox (Advanced Mode) window is displayed. 7. Type a name for the mailbox in the Mailbox Name box. 8. Under Mailbox Options, a. Select the Allow Multiple users check box to allow many FTP users to access the mailbox. b. Select the Share Incoming Folder check box to share the common Incoming folder with users. c. Select the Share Outgoing Folder check box to share the common Outgoing folder with users. d. Select the Flat File check box to create a separate folder for each document type if needed, This will enable the following two check boxes: Create DIR for Transaction id (Flat File) and Parse File Name 9. Type a description for the mailbox in the Description box. 10. Click the Save button to add the mailbox. 129 11. 12. 13. 14. A default FTP user is automatically added to the mailbox. Customize the mailbox directories if needed. Add FTP user(s) as needed. Mark the desired FTP user and then add the FTP user clients as needed. When you are finished, click the Close button. Note: The Share Incoming Folder and Share Outgoing Folder check boxes are only used when the Allow Multiple users check box is selected. The separate folders are only created for the transaction ID if the document is a flat file. To customize the mailbox directories After adding the mailbox, you can change the name of the mailbox directories in the Add Mailbox (Advanced Mode) window. 1. Click the Customize Mailbox DIR button. The Mailbox DIR window is displayed. 2. Type a new name for the home directory in the Home DIR box. 3. Under Mailbox DIR, a. Mark the desired directory to be renamed. 130 b. Click the Edit button. The Edit Mailbox Virtual Path window is displayed. c. Type a new name for the directory in the Virtual Path box. d. Click the Save button and then click the Close button. 4. Click the Save button and then click the Close button in the Mailbox DIR window. 11.1.5.2.1 FTP User Actions To add an FTP user In addition to default FTP user, you can add other FTP users to the mailbox. 1. Under FTP Users, click the Add button. The Add FTP User window is displayed. 2. 3. 4. 5. In the User Name box, type the user name that will connect to the FTP server. Type the password twice for the user name in the Password and Verify Password boxes. Type a description for the mailbox in the Description box. Select the Send/Pickup Document from Client check box if you want to move the documents to the client’s computer. 6. Select the Allow SMIME check box if you want to use SMIME functions. 7. Click the Save button and then click the Close button. Note: 131 You can only add multiple FTP users if the mailbox allows access to multiple FTP users. You can use SMIME functions, such as achieving a document before sending or encrypting a document. To edit an FTP user 1. Under FTP Users, mark the FTP user name to be modified. 2. Click the Edit button. The Edit FTP User window is displayed. 3. Make the desired changes to the FTP user. 4. Click the Save button and then click the Close button. To delete an FTP user Under FTP Users, mark the FTP user that you want to remove, and then click the Delete button. 11.1.5.2.2 FTP User Client Actions To add an FTP user client 1. Under FTP Users Client in the Add Mailbox (Advanced Mode) window, click the Add button. The Add FTP User Client window is displayed. 2. In the User name box, type the user name that will access client’s computer. 132 3. 4. 5. 6. 7. 8. Type a password twice for the user name in the Password and Verify Password boxes. Select the Passive Mode check box if you want to use this function. Type the client’s computer IP address in the URL box. Type a description for the FTP user client in the Description box. Click the Save button to add the FTP user client. In the Directory table, follow these steps to set up folders on the client’s computer: o To add a folder on the client’s computer: a. Click the Add button. The Add/Edit Access Settings window is displayed. b. Type the path to the folder on the client’s computer in the Virtual Path box. c. Select the desired transaction ID in the Trans ID drop-down list. d. Select the desired document type in the Document Type drop-down list. e. Select the desired folder type in the Folder Type drop-down list. f. Click the Save button and then click the Close button. o To edit a folder on the client’s computer: a. Mark the desired folder. b. Click the Edit button. The Add/Edit Access Settings window is displayed. c. Make the desired changes to the folder. d. Click the Save button and then click the Close button. o To delete a folder(s) on the client’s computer: Mark the desired folder(s) and then click the Delete button. 9. Click the Close button. Note: You can use SMIME functions, such as achieving a document before sending or encrypting a document.. 133 To edit an FTP user client 1. Under FTP Users Client in the Add Mailbox (Advanced Mode) window, mark the user name of the FTP client to be modified. 2. Click the Edit button. The Edit FTP User Client window is displayed. 3. Make the desired changes to the mailbox. 4. Click the Save button and then click the Close button. To delete an FTP user client(s) Under FTP Users Client in the Add Mailbox (Advanced Mode) window, mark the FTP client(s) that you want to remove, and then click the Delete button. 11.1.5.3 1. 2. 3. 4. 5. Creating an AS2 Mailbox in Simple Mode On the Feature pane, select Party Management in the Party Management group. Mark the intended customer account. Click the Manage Profile button. Switch to the Mailboxes tab. Click the Add button. The Add Mailbox (Simple Mode) window is displayed. 6. In the File Transfer Type Selection window, a. Select AS2 in the File Transfer Type drop-down list. b. Click the Select button. The Add Mailbox (Simple Mode) window is displayed. 7. In the Mailbox Information tab, do the following: 134 a. Type a name for the AS2 mailbox in the Mailbox Name box. b. In the AS2 Name box, type the user name that will be used to connect to DiCentral’s AS2 server. c. Type a description for the mailbox in the Description box. d. Click the Save button. 8. In the Client Information tab, do the following: a. In the AS2 Name box, type the AS2 identifier name of the trading partner with whom you want to connect. 135 b. In the User name box, type the user name that willconnect to the trading partner’s AS2 receiving the message. c. Type the password for the user name in the Password and Verify Password boxes. Tip: The user name and password are not mandatory unless the trading partner’s AS2 server requires it. d. Type the URL for the AS2 server in the AS2 URL box. e. Type a description for the AS2 client in the Description box. f. Click the Save button. 9. When you are finished, click the Close button. Tip: For more information about creating and managing certificates, see Managing Certificate Sets (Chapter VIII). 11.1.5.4 1. 2. 3. 4. 5. Creating an AS2 Mailbox in Advanced Mode On the Feature pane, select Party Management in the Party Management group. Mark the intended customer account. Click the Manage Profile button. Switch to the Mailboxes tab. Click the Add button. The Add Mailbox (Simple Mode) window is displayed. 6. In the Add Mailbox (Simple Mode) window, a. Select AS2 in the File Transfer Type drop-down list. b. Click the Select button. The Add AS2 Mailbox (Simple Mode) window is displayed. 136 7. 8. 9. 10. 11. Type a name for the AS2 mailbox in the Mailbox Name box. Type a description for the mailbox in the Description box. Click the Save button. Add AS2 users as needed. Switch to the Client Information tab. 12. Fill out the form. 13. Click the Advanced Settings bar for advanced options. 137 14. Under Advanced Settings, select the desired advanced options. 15. Click the Save button. 11.1.5.5 Viewing a Mailbox 1. On the Feature pane, select Party Management in the Party Management group. 2. Mark the intended customer account. 3. Click the Manage Profile button. You are taken to the Manage Customer Profile page. 4. Switch to the Mailboxes tab. 5. Mark the preferred mailbox. 6. Click the View button. 11.1.5.6 Editing a Mailbox 1. On the Feature pane, select Party Management in the Party Management group. 2. Mark the intended customer account. 3. Click the Manage Profile button. You are taken to the Manage Customer Profile page. 4. Switch to the Mailboxes tab. 5. Mark the preferred mailbox. 6. Click the Edit button. The Edit Mailbox window is displayed. 7. Make the desired changes to the mailbox. 8. Click the Save button on the tab(s) where you made changes. 9. Click the Close button. 11.1.5.7 Assigning a Mailbox to a Trading Partner(s) 1. On the Feature pane, select Party Management in the Party Management group. 2. Mark the intended customer account. 3. Click the Manage Profile button. You are taken to the Manage Customer Profile page. 4. Switch to the Mailboxes tab. 5. Mark the preferred mailbox. 6. Click the Assign Mailbox to Trading Partner button. The Assign Trading Partner window is displayed. 138 7. In the table under 2. Select File Transfer Users, mark the intended FTP user account. 8. In the table under 3. Select Trading Partners, mark the trading partner(s) to whom you want to assign the FTP user account. 9. Repeat steps (7) and (8) provided that you want to assign other FTP user accounts to trading partners. 10. Click the Save button. 11.1.6 Certificates 11.1.6.1 Importing a Certificate 1. On the Feature pane, select Party Management in the Party Management group. 2. Mark the intended customer account. 3. Click the Manage Profile button. You are taken to the Manage Customer Profile page. 4. Switch to the Certificates tab. 5. Click the Import Certificate button. The Import Certificate Simple window is displayed. 6. Import the desired certificates: o To import a single certificate, 139 o a. Select the intended certificate set in the Certificate Set drop-down list. b. Click the Browse button next to the Certificate box. In the File Upload window, navigate to and locate the appropriate certificate file and then click the Open button. c. Set the options for the certificate (Encryption, Signature and SSL). d. Click the Browse button next to the CA File box. In the Choose File to Upload window, navigate to and locate the appropriate CA file and then click the Open button. To upload two or three certificates, a. Click the Display in Advanced Mode link. The window is changed to Import Certificate Advance. 140 b. Select the intended certificate set in the Certificate Set drop-down list. c. Choose the files for the first certificate and CA files. i. Click the Browse button next to the Certificate 1 box. In the File Upload window, navigate to and locate the appropriate certificate file and then click the Open button. ii. Set the options for the certificate (Encryption, Signature and SSL). d. Choose the files for the second certificate (Certificate 2). e. Choose the files for the third certificate (Certificate 3). 7. Click the Upload button and then click the Close button. To create a certificate set 1. In the display box of the Certificate Set drop-down list, type the name of the certificate set that you want to create. 2. Click the Create Certificate Set button. For Administrators: 1. On the Feature pane, select Party Management in the Party Management group. 2. Mark the intended customer account. 3. Click the Manage Certificates button. The Customer Certificates window is displayed. 4. Click the Import Certificate button. 141 11.1.6.2 Exporting a Certificate(s) 1. On the Feature pane, select Party Management in the Party Management group. 2. Mark the intended customer account. 3. Click the Manage Profile button. You are taken to the Manage Customer Profile page. 4. Switch to the Certificates tab. 5. Mark the certificate(s) to be exported. 6. Click the Export Certificate button. The Export Certificate window is displayed. 7. Select the appropriate format for the certificate(s) in the Format drop-down list. 8. Click the Export button. For Administrators: 1. On the Feature pane, select Party Management in the Party Management group. 2. Mark the intended customer account. 3. Click the Manage Certificates button. The Customer Certificates window is displayed. 4. Mark the certificate(s) to be exported. 5. Click the Export Certificate button. 11.1.6.3 Changing the Status of a Certificate(s) 1. On the Feature pane, select Party Management in the Party Management group. 2. Mark the intended customer account. 3. Click the Manage Profile button. You are taken to the Manage Customer Profile page. 4. Switch to the Certificates tab. 5. Mark the certificate(s) that you want to change. 6. Click the Change Status button. The Change Status window is displayed. 142 7. Select the desired status in the Change status to drop-down list. 8. Click the OK button. For Administrators: 1. On the Feature pane, select Party Management in the Party Management group. 2. Mark the intended customer account. 3. Click the Manage Certificates button. The Customer Certificates window is displayed. 4. Mark the certificate(s) that you want to change. 5. Click the Change Status button. 11.1.6.4 Deleting a Certificate 1. On the Feature pane, select Party Management in the Party Management group. 2. Mark the intended customer account. 3. Click the Manage Certificates button. The Customer Certificates window is displayed. 4. Mark the certificate(s) that you want to remove. 5. Click the Delete button. 11.1.6.5 Assigning Certificate to Mailbox 1. On the Feature pane, select Party Management in the Party Management group. 2. Mark the intended customer account. 3. Click the Manage Certificates button. The Customer Certificates window is displayed. 4. Mark the certificate(s) that you want to assign. 5. Click the Assign Certificate to Mailbox button. The Assign Certificate to Mailbox window is displayed. 143 6. Select the desired mailbox in the Mailbox drop-down list. 7. Select the desired certificate set in the Certificate Set drop-down list. 8. Click the Save button. 11.1.6.6 Managing Certificate Sets 11.1.6.6.1 Adding a Certificate Set 1. On the Feature pane, select Party Management in the Party Management group. 2. Mark the intended customer account. 3. Click the Manage Certificates button. The Customer Certificates window is displayed. 4. Click the Manage Certificate Set button. The Manage Certificate Set window is displayed. 5. Click the Add button. The Edit Form window is displayed. 144 6. Type the desired name for the certificate set in the Certificate Set Name box. 7. Click the Save button. 11.1.6.6.2 Editing a Certificate Set 1. On the Feature pane, select Party Management in the Party Management group. 2. Mark the intended customer account. 3. Click the Manage Certificates button. The Customer Certificates window is displayed. 4. Click the Generate Certificate Set button. The Generate Certificate Set window is displayed. 5. Select the desired certificate set to be modified. 6. Click the Edit button The Edit Form window is displayed. 7. In the Certificate Set Name box, type the desired name for the certificate set. 8. Click the Save button 11.1.6.7 Generating a Keyset 1. On the Feature pane, select Party Management in the Party Management group. 2. Mark the intended customer account. 3. Click the Manage Certificates button. The Customer Certificates window is displayed. 4. Click the Generate Keyset button The Generate Keyset window is displayed. 145 5. Fill out the form. 6. When you are finished, click the Create button. 11.1.6.8 Exchanging Certificates 1. On the Feature pane, select Party Management in the Party Management group. 2. Mark the intended customer account. 3. Click the Manage Certificates button. The Customer Certificates window is displayed. 146 4. Select the desired customer certificate to be exchanged. 5. Click the Exchange Certificate button The Exchange Certificate window is displayed 6. In the Exchange Certificate window, do the following: Select the desired email in the Using Email tab, and then click the MailTo button. Select the desired Sendto in the Using CEM Request tab, and then click the Send button. 11.1.6.9 Importing Keysets 1. On the Feature pane, select Party Management in the Party Management group. 2. Mark the intended customer account. 3. Click the Manage Certificates button. The Customer Certificates window is displayed. 4. Click the Import Keyset button. The Import Keyset window is displayed. 147 5. Select the intended certificate set in the Certificate Set drop-down list. 6. Click the Browse button next to the Keyset File (*.15) box. In the File Upload window, navigate to and locate the appropriate keyset file and then click the Open button. 7. Type an alias for the keyset in the Alias box. 8. Type the desired password for the keyset in the Keyset Password box. 9. Set the options for the keyset (Encryption, Signature and SSL). 10. Click the Import button. 11.1.6.10 Downloading Keysets 1. On the Feature pane, select Party Management in the Party Management group. 2. Mark the intended customer account. 3. Click the Manage Certificates button. The Customer Certificates window is displayed. 4. Select the desired keyset(s) to be downloaded. 5. Click the Download Keyset button. 11.1.7 Setting Relationships for a Trading Partner Two trading partners can send/receive documents to/from each other when a relationship is configured. The following procedure is used to set up relationships between a trading partner and others. 1. On the Feature pane, select Party Management in the Party Management group. 148 2. Mark the intended customer account. 3. Click the Manage Profile button. You are taken to the Manage Customer Profile page. 4. Switch to the Trading Partners tab. 5. Mark the trading partner for whom you want to set the relationship. 6. Click the Set Relationship button. The Relationship Settings window is displayed. 7. Click the Add button. 8. In the Select Trading Partners window, a. Mark the appropriate trading partners. b. Click the Select button and then click the Close button. 9. Click the Close button. To delete a relationship In the Relationship Settings window, 149 1. Mark the intended trading partner(s). 2. Click the Delete button. To change a relationship status In the Relationship Settings window, 1. Mark the intended trading partner(s). 2. Click the Update Status button. The Edit Relationship window is displayed. 3. Select the appropriate status in the Status drop-down list. 4. Click the Save button and then click the Close button. For Administrators 1. On the Feature pane, select Party Management in the Party Management group. 2. Mark the intended customer account. 3. Click the Trading Partner Relationship button. The Set Trading Partner Relationship window is displayed. 4. Under From Trading Partner, click the Find button. 5. In the Select Trading Partner window, mark the source trading partner for whom you want to set a relationship and then click the Select button. 150 The source trading partner’s information is supplied into the fields under From Trading Partner. The trading partners with whom the source trading partner currently has a relationship are shown in the table below. 6. Click the Add button. 7. In the Select Trading Partner window, mark the intended target trading partner and then click the Select button. The target trading partner’s information is supplied into the fields under To Trading Partner. 8. Under File Transfer User, a. Select the file transfer user in the File Transfer User drop-down list. b. Select the relationship status between the source and target trading partners. 9. Click the Save and then click the Close button. 151 To edit the relationship status with a trading partner In the Set Trading Partner Relationship window, 1. Mark the trading partner whose information you want to edit. 2. Click the Edit button. The trading partner’s information is supplied into the fields under To Trading Partner and File Transfer User. 3. Make the desired changes to the trading partner. Tip: You can change the relationship status and file transfer user. 4. Click the Save button. To delete the relationship with a trading partner In the Set Trading Partner Relationship window, 1. Mark the trading partner whose relationships with the source trading partner you want to delete. 2. Click the Remove button. 11.1.8 Trading Partner FTP Client Relationships 1. On the Feature pane, select Party Management in the Party Management group. 2. Mark the intended customer account. 3. Click the Trading Partner Client Relationship button. The Trading Partner FTP Client Relationship window is displayed. 4. Under From Trading Partner, click the Find button. 5. In the Select Trading Partner window, mark the source trading partner for whom you want to set a relationship and then click the Select button. 152 The source trading partner’s information is supplied into the fields under From Trading Partner. The trading partners with whom the source trading partner currently has a relationship are shown in the table below. 6. Click the Add button. 7. In the Select Trading Partner window, mark the intended target trading partner and then click the Select button. The target trading partner’s information is supplied into the fields under To Trading Partner. 8. Under File Transfer User, select the file transfer user in the File Transfer User drop-down list. 9. Click the Save and then click the Close button. To edit a file transfer user 1. Under From Trading Partner, mark the trading partner whose information you want to edit. 2. Click the Edit button. The trading partner’s information is supplied into the fields under To Trading Partner and File Transfer User. 153 3. Change the file transfer user client. 4. Click the Save button. To delete the relationship with a trading partner In the Trading Partner FTP Client Relationship window, 1. Under From Trading Partner, mark the trading partner whose relationship with the source trading partner you want to delete. 2. Click the Delete button. 154 12. Chapter XI: Resource Management This chapter includes instructions for the following language customization features: 1. Manage Resource DB 2. Language Management 3. Customize Language 12.1 Manage Resource DB 12.1.1 Importing a Resource File 1. On the Feature pane, select Manage Resource DB in the Resource Management group. 2. Click the Import From Resource File button. The Import Resource window is displayed. 3. 4. 5. 6. Select the desired resource file in the Resource File drop-down list. Select the desired feature in the Feature drop-down list. Select the desired language in the Language drop-down list. Click the Import button. 12.1.2 Editing a Resource 1. On the Feature pane, select Manage Resource DB in the Resource Management group. 2. Select the resource to be modified. 3. Click the Edit button. The Customize Resource DB window is displayed. 155 4. Make the desired changes to the resource. 5. Click the Save button. 12.2 Language Management 12.2.1 Adding a Language 1. On the Feature pane, select Language Management in the Resource Management group. 2. Click the Add button. The Add/Edit Language window is displayed. 3. Select the desired language in the Language drop-down list. 4. Select the desired status in the Status drop-down list. 5. Click the Save button. 12.2.2 Editing a Language 1. On the Feature pane, select Language Management in the Resource Management group. 2. Select the language to be modified. 156 3. Click the Edit button. The Add/Edit Language window is displayed 4. Make the desired changes. 5. Click the Save button. Note: The default language cannot be edited. 12.2.3 Language Customization 1. On the Feature pane, select Customize Language in the Resource Management group. 2. Select the desired language in the drop-down list. The Customize Language page is displayed. 3. In the File Name list on the left side, select the file that you want to modify. The corresponding Keys and Values are displayed on the right side. 4. Make the desired modifications in each Value text box. 5. When you are finished, click the Save button. 157