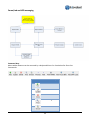
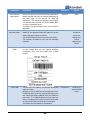
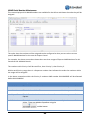
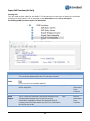
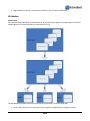
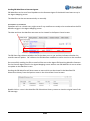
1
Volume 16 Expedient User Manual – Export Air Forwarding Gavin Millman & Associates (Aust) Pty Ltd 281 Buckley Street Essendon VIC 3040 Phone 03 9331 3944 • Web www.expedientsoftware.com.au Table of Contents Air Export Neutral Air Waybill Registration ...................................................................................................................2 Consol, Job and IATA messaging........................................................................................................................................ 3 Command Keys ............................................................................................................................................................... 3 Consol Registration ............................................................................................................................................................ 4 View EDNs Button .......................................................................................................................................................... 5 Register House Bills .......................................................................................................................................................... 13 Workflow ...................................................................................................................................................................... 13 Configuring Pop Up Notes ............................................................................................................................................ 21 Add IATA Costs ............................................................................................................................................................. 22 Link HAWBs .................................................................................................................................................................. 25 Consol Registration Screen - Menus ................................................................................................................................ 27 Communication ............................................................................................................................................................ 27 View message history ................................................................................................................................................ 27 Options ......................................................................................................................................................................... 27 View/Add Events ....................................................................................................................................................... 27 Consol Notes ............................................................................................................................................................. 29 Add ESM(CMR Export Sub Manifest) ........................................................................................................................ 29 View House Bills ........................................................................................................................................................ 30 NAWB Options .......................................................................................................................................................... 30 Print NAWB Labels .................................................................................................................................................... 33 Print NAWB Amendment .......................................................................................................................................... 33 Email NAWB Amendment ......................................................................................................................................... 34 Get NAWB number .................................................................................................................................................... 34 Copy NAWB with house bills ..................................................................................................................................... 34 Bulk Bookings ............................................................................................................................................................ 36 Withdraw NAWB Number ......................................................................................................................................... 37 Print Cost Analysis Sheet ........................................................................................................................................... 37 Export Job Registration Screen – Menus.......................................................................................................................... 37 Charges ...................................................................................................................................................................... 38 Enter Creditors Invoice........................................................................................................................................... 38 View Rates .............................................................................................................................................................. 38 View Job Financials ................................................................................................................................................ 38 Notifications .............................................................................................................................................................. 38 Options ...................................................................................................................................................................... 38 View Consol Registration ....................................................................................................................................... 38 Update Consol ........................................................................................................................................................ 38 Status ..................................................................................................................................................................... 38 Add EDN ................................................................................................................................................................. 38 View/Add Events .................................................................................................................................................... 42 Multiple Job Note Creation ....................................................................................................................................... 42 Consol Notes .......................................................................................................................................................... 44 Job Notes................................................................................................................................................................ 44 Multiple Job Note Creation ....................................................................................................................................... 44 Shipper’s Invoice .................................................................................................................................................... 48 Creating Parts ............................................................................................................................................................ 52 Adding Export Only Parts ....................................................................................................................................... 52 Classifying Parts from Shipper Invoice ................................................................................................................... 54 Reset Options ............................................................................................................................................................... 57 Reset TLF for all lines ................................................................................................................................................. 57 Reset TLF for Unclassified Parts ................................................................................................................................ 57 Load File Feature .......................................................................................................................................................... 57 Emailing Shipper Invoices ............................................................................................................................................. 59 View/Add client Reference No ..................................................................................................................................... 59 View/Add Delivery Docket............................................................................................................................................ 59 Printing Options............................................................................................................................................................ 62 Copy Job ....................................................................................................................................................................... 62 Charges ......................................................................................................................................................................... 62 Attach Documents ........................................................................................................................................................ 62 Job Milestones .............................................................................................................................................................. 62 Export Consignees ............................................................................................................................................................ 63 NAWB Serial Number Maintenance ................................................................................................................................ 65 Add NAWB Numbers .................................................................................................................................................... 67 Assign a specific AWB number to an Air Export Consol ............................................................................................... 68 Airway Bill Bulk Bookings ................................................................................................................................................. 69 Air Rate Charges .............................................................................................................................................................. 72 Print Manifest .................................................................................................................................................................. 76 Print Manifest – Summary ............................................................................................................................................... 76 Airline Statistics ............................................................................................................................................................... 76 Export CMR Functions (AU Only) ..................................................................................................................................... 77 Creating TLFs ................................................................................................................................................................ 77 EDN’s ............................................................................................................................................................................ 78 Bond Warehouse updates ......................................................................................................................................... 88 IDL View Screen ......................................................................................................................................................... 88 IDL Master Email Addresses ...................................................................................................................................... 89 ESM’s ............................................................................................................................................................................ 90 Browse Button .............................................................................................................................................................. 95 Entering Customs Quantities ........................................................................................................................................ 95 Copy Shippers Invoice .................................................................................................................................................. 96 Load Invoice File............................................................................................................................................................... 96 Printing Export Documents .............................................................................................................................................. 98 Generic Consol CSV ......................................................................................................................................................98 Generic Jobs CSV .........................................................................................................................................................98 Exporter’s Declaration .................................................................................................................................................. 99 Commercial Invoice .................................................................................................................................................... 100 Certificate of Origin .................................................................................................................................................... 101 Packing List ................................................................................................................................................................. 102 Preparing Charges (Accounting Module only) ............................................................................................................... 103 Forwarding Rates Process .......................................................................................................................................... 103 There are 3 ways to prepare charges. ........................................................................................................................ 104 1. Manually Enter Charges ................................................................................................................................. 104 2. Auto Rating with Exact Match (Prepare Charges) ......................................................................................... 105 3. Auto Rating without exact match .................................................................................................................. 106 Default Company Tariff ........................................................................................................................................... 109 Prepare Invoice ........................................................................................................................................................... 112 View Invoice ............................................................................................................................................................... 112 Creating Tariff’s .......................................................................................................................................................... 112 Exporter’s Declaration ............................................................................................................................................. 115 Creating Parts ............................................................................................................................................................. 115 Entering Dangerous Goods Information ................................................................................................................. 118 Entering Part Weight Information ........................................................................................................................... 120 Exports CMR Frequently Asked Questions. ................................................................................................................ 121 Q. OUR I.T. DEPARTMENT INFORMS ME THAT OUR EMAIL IS NOT WORKING.HOW CAN WE APPLY FOR EDN/ESM? ................................................................................................................................................................................. 121 Q. I SENT MY EDN/ESM OVER 10 MINUTES AGO AND IT STILL INDICATES THAT IT IS "B *BEING SUBMITTED". WHAT DO I DO? ....................................................................................................................................................... 121 Q. I SENT MY EDN/ESM OVER 10 MINUTES AGO AND IT STILL INDICATES THAT IT IS ............................................ 122 "I In-Progress" WHAT DO I DO?............................................................................................................................... 122 Q. I RECEIVE THE ERROR "ATTEMPTED TO LODGE A DOCUMENT WHERE ONE ALREADY EXISTS .......................... 122 WITH THE SAME MESSAGE OWNER SITE ID, MESSAGE TYPE AND SENDERS REFERENCE." WHAT DOES THIS MEAN? ................................................................................................................................................................................. 122 Q. MY PERMIT HAS ENCRYPTION HOWEVER I CAN'T SEE WHERE TO ENTER IT IN THE EDN .................................. 122 SCREEN. WHAT DO I DO? ........................................................................................................................................ 122 Q. I RECEIVE THE ERROR "INVALID GOODS OWNER ID (Goods Owner ID=XXXXXXXXXXX)." .................................. 123 WHAT DOES THIS MEAN? ........................................................................................................................................ 123 Q. I HAVE PREVIOUSLY SENT AN ESM AND NOW I WANT TO WITHDRAW IT. HOW DO I DO THIS? ....................... 123 Q. I HAVE DELETED ALL LINES FROM MY ESM AND NOW I RECEIVE AN ERROR. WHAT DO I DO? ......................... 123 Q. I HAVE WITHDRAWN MY EDN/ESM AND NOW WHEN I RE-SEND IT I RECEIVE AN ERROR. WHAT DO I DO? .... 123 Q. What does the warning message “THE RACA UNDERTAKING FORM HAS NOT BEEN SENT. TO SUBMIT THE FORM TO THE SHIPPER, PLEASE REFER TO THE CUSTOMER MASTERFILE” mean?................................................. 123 EDI Manifest .................................................................................................................................................................. 124 Introduction ................................................................................................................................................................ 124 Export File Creation and Delivery ............................................................................................................................... 125 EDI Manifest Configuration ........................................................................................................................................ 126 Agent Mapping ........................................................................................................................................................ 126 Adding an Overseas Agent ................................................................................................................................... 126 Sending EDI Manifests to Overseas Agents ................................................................................................................ 129 Automatic Sending .................................................................................................................................................. 129 Manual Sending ....................................................................................................................................................... 130 EXPORT FORWARDING INTRODUCTION E Xpedient software contains the Export Freight Forwarding Module. The Export Forwarding Function allows users to register Consols, Shipments, Report EDN’s1 and CRN’s to Customs, Send FWB and FHL Messages along with preparing Neutral Masters, and prepare Charges for customers. (Accounting Module only) Air Export Neutral Air Waybill Registration Expedient utilises a consol number for the Neutral Air Waybill and a job number for each house bill. A consol refers to a Forwarding Consolidation, and the job number refers to house bills on shipments. Users can also prepare charges and create a Debtors Invoice (only applicable for Accounting Module Customers) 2 Consol, Job and IATA messaging Command Keys Most toolbar buttons can be accessed by a Keyboard Short Cut. See below for Short Cut Commands: Icon Shortcut Key A U D F B 3 Icon Shortcut Key P N H Consol Registration From the Main Menu select Air Export Forwarding, Consol Registration function. This is performed when you are acting as the forwarder and are consolidating the shipment. 1 consol can have many jobs or house bills. See below diagram: By clicking the button or typing A will place the cursor in the input screen in Add Mode. 4 See below: View EDNs Button When the below button is selected it will direct the user to the EDN screen. If EDNs have been created and attached to the Consol, then it will show all the EDNs. Field Name Description Validation Default This describes the type of Neutral Master: Direct Master with no house bills, Consol Master with house bills, or Sub Master with no Neutral Airway Bill This is the Dept in which the Neutral Airway Bill will be created. This defaults to the users Branch This is the Registration Date Mandatory Blank Mandatory Branch Mandatory Today This is the Agent which will be performing the forwarding function overseas. Use the to search the customer zoom. This indicates the status of the FWB submission. This field will update with the general status of the consol. Mandatory Blank System Generated FWB message status NAWB Details Tab Job Type Department Date Reg Agent FWB Status 5 Field Name Consol Number Bulk Booking Reference Issued By ULD Extn. Code Extn. Code 2 Master Bill Prepaid/Collect Description Validation Default This is the Consol Number System Generated Consol Number Optional Airway Bill Bulk Booking Screen Mandatory Blank Optional Blank Optional System Generated Optional System Generated System Generated Blank Mandatory Blank Conditional Blank Mandatory No System Generated Blank If this field is not blank this indicates the Consol was created by Bulk Booking using the Airway Bill Bulk Booking menu in Air Export Forwarding. The bulk booking reference can be used to search the details on the Bulk Booking in the Airway Bill Bulk Booking screen. This is the airline providing the Master Air Way Bill number This field shows the ULD type used for the Consol. Click on the to show a list of valid ULD codes This is the reference for the Consol used in your global system. This may not be relevant at your site. You can update this field if your site permits it This is the reference for the Consol used in your global system. This may not be relevant at your site and this field may be hidden. You can update this field if your site permits it This is the Master Bill number This is the terms of the Neutral Airway Bill Commissionable This describes whether the overseas agent earns Agent commission Perishable Printed Express Indicates whether goods in the Neutral Airway Bill are perishable This indicated whether an original of the Neutral Airway Bill has been printed CAN Value Indicates whether the airline is offering an express Mandatory service This is the Customs Authority Number. Conditional Customs Response This field is populated when a Customs Response is received or the ESM, whether Clear of Failed. 6 Based on ESM Customs response No Conditional: Defaults to match Job EDN where consol is Direct Blank Field Name Description Validation Default Origin Code Mandatory Blank ETD 1 This is the Origin airport. Use the to search the ISO Port Codes Masterfile. This is the estimated date of departure for the first flight Mandatory Blank Cut Off Date/Time This is the cut off date and time that the shipper must deliver the goods to the Forwarder Optional Blank Flight No 1 This is the first flight number. ‘FIRAV’ can be entered where the flight number is not yet known. This is the first airline carrier. Use the to search the Airline Masterfile. Mandatory Blank Mandatory Defaults to match Issued By Airline Code 1 Via Code 1 ETD 2 Flight No 2 Airline Code 2 Via Code 2 ETD 3 Flight No 3 Airline Code 3 Dest. Code ETA Optional This is the first transit Port Code. Use the to search the ISO Port Codes Masterfile. This is the estimated date of departure for the second Conditional flight This is the second flight number. ‘FIRAV’ can be entered Conditional where the flight number is not yet known. This is the airline for the second flight Conditional Blank This is the 2nd transit Port Code. Use the to search the ISO Port Codes Masterfile. This is the estimated date of departure for the third flight Optional Blank Conditional Blank This is the third flight number. ‘FIRAV’ can be entered Conditional where the flight number is not yet known. This is the airline for the third flight Conditional Blank Mandatory Blank Optional Blank This is the destination airport. Use the to search the ISO Port Codes Masterfile. This is the Estimate Time of Arrival at the final airport Blank Blank Blank Blank Ratings Details Tab RCP This is the Rate Combination Point where rate charges in each class are combined. Use the to search the ISO Port Codes Masterfile. Mandatory for NAWB print Origin Code Class This is the rate class. Use the IATA rate classes Mandatory for NAWB print Blank Conditional on Class Blank Pcs to search the available This is the number of pieces on the Neutral Airway Bill 7 Field Name Description Validation Default Gr Wgt This is the gross weight for the Neutral Airway Bill in kg Conditional on Class Blank Volume This is the volume in cubic metres Conditional on Class Blank This describes how the rate is applied and is dependent on the rate class. Click on the to select another Rate Type if multiple Rate Types are available for the Rate Class This is the Commodity type code. The requirement for a commodity code and the format of the code is dependent on the rate class This is the chargeable weight in kg for the rate class. The value is rounded up to the nearest 0.5kg. Expedient will calculate the Charge Weight based on whichever is the greater, Actual Weight or Volume x Cubic Factor. This figure can be manually updated. Note that if a charge weight is already shown on the screen this will not be updated if the volume is changed. This is the rate charge for the rate class Conditional on Class Blank Conditional on Class Blank Conditional on Class System Generated Conditional on Class Blank This is the calculation of Chg Wght x Rate Chrg, except where the Rate Class is related to a Unit Load Device in which case the calculation is No. of Pcs x Rate Chrg. Indicates if the rate class contains Hazardous material System Generated Blank Conditional on Class Blank Goods Description This is a brief description of the goods in the rate class. The message “CONSOLIDATION AS PER ATTACHED MANIFEST” will auto-populate when the Rate Class is entered. Address Details Tab Mandatory for NAWB print Blank Shipper Information Details From Indicates the type of shipper Mandatory for NAWB print Blank This is the shipper’s name Please note the number of characters printed is restricted for Dot Matrix NAWB due to space availability. Mandatory Conditional for NAWB on Shipper print Address Details Rate Type Commodity Chg Wght Rate Chrg Total Chrg Hazardous Name 8 Field Name Description Validation Address This is the first line of the shipper’s address. Please note the number of characters printed is restricted for Dot Matrix NAWB due to space availability. Mandatory Conditional for NAWB on Shipper print Address Details Suburb This is the shipper’s suburb or city Please note the number of characters printed is restricted for Dot Matrix NAWB due to space availability. Mandatory Conditional for NAWB on Shipper print Address Details This is the shipper’s state Conditional State Default Conditional on Shipper Address Details Country This is the shipper’s country. Use the ISO Country Codes Masterfile. Zip This is the shipper’s zip or postcode. Conditional This is the shipper’s primary contact number showing type of contact and contact number Conditional: Blank Mandatory if the contact type is selected Indicates the type of consignee Optional This is the consignee’s name Please note the number of characters printed is restricted for Dot Matrix NAWB due to space availability. Mandatory Conditional for NAWB on print Consignee Address Details Contact Details Consignee Information Details From Name 9 to search the Mandatory Conditional for NAWB on Shipper print Address Details Use the to search the ISO Port Codes Masterfile. Blank Field Name Description Validation Address This is the first line of the consignee’s address Please note the number of characters printed is restricted for Dot Matrix NAWB due to space availability. Mandatory Conditional for NAWB on print Consignee Address Details Suburb This is the consignee’s suburb or city Please note the number of characters printed is restricted for Dot Matrix NAWB due to space availability. Mandatory Conditional for NAWB on print Consignee Address Details This is the consignee’s state Optional State Default Conditional on Consignee Address Details Country This is the consignee’s country. Use the ISO Country Codes Masterfile. Zip This is the consignee’s zip or postcode. Optional Address This is the consignee’s primary contact number showing type of contact and contact number Conditional: Mandatory if the contact type is selected Conditional on Consignee Address Details Contact Details 10 to search the Mandatory Conditional for NAWB on print Consignee Address Details Field Name Description Validation Handling Information This is the handling information for the Neutral Airway Bill and should include a Dangerous Goods statement if hazardous material is included, marks and numbers which appear on the consignment and method of packing, any contact details and address details of the notifying party at destination in addition to the consignee, the name of any documents to accompany the AWB, any special handling instructions for the Neutral Airway Bill. The message “PLEASE NOTIFY CONSIGNEE IMM UPON ARRIVAL” will auto-populate on the first line, when the cursor is entered into any of the 3 lines of the handling Information Group. Please note the 3rd Handling Information line cannot be printed on a Dot Matrix Neutral Air Way Bill due to space restrictions. The Dot Matrix print is also restricts each Handling Information line to 65 characters. Valuation Details Tab Optional Blank Decl. Value (Carriage) This the declared value for carriage. Optional ‘NVD’ Decl. Value (Customs) This is the declared value for Customs Optional ‘NCV’ Insurance Amount This is the insurance amount Optional ‘XXX’ This is the IATA charge code for the Neutral Airway Bill. Use the to search the IATA charge code list. This the accounting information for the Neutral Airway Bill and can include details of the payment method, the Government Bill of Lading number, the original AWB number of the consignment is to be returned to origin, the credit card number if applicable This indicates whether the weight charge is prepaid or collect for the Neutral Airway Bill Mandatory Blank Optional Blank Mandatory Default payment option from NAWB tab, default value from Chg Wght on Ratings tab Charge Code Accounting Information Weight 11 Default Field Name Description Validation Default This indicates whether the valuation charge is prepaid or collect for the Neutral Airway Bill Mandatory. This field cannot be 0.00 if the Decl. Value (Carriage) is ‘NVD’ Default payment option from NAWB tab, default value 0.00 Tax This indicates whether the tax is prepaid or collect for the Neutral Airway Bill Mandatory Default payment option from NAWB tab, default value 0.00 On This is the date of execution for the Neutral Airway Bill Mandatory. Today Must be Today’s date or less At This is the place of execution for the Neutral Airway Bill Mandatory Branch Location This is the Other Charge Code. Use the to search the Other Charge Codes Masterfile. This is the description for the Other Charge Code Optional Blank System Generated Blank This indicates whether the Other Charge Code is prepaid or collect This indicates whether the Other Charge is payable by the agent or carrier This is the Other Charge amount Conditional Blank Conditional Blank Conditional Blank Valuation Other Details Tab Charge Code Description P/C Agent/Carrier Charge Amount 12 Register House Bills Workflow To register new house bills use in the Consol Registration screen and click select Job Registration from the Air Export Forwarding module in the main menu. To update existing House Bills use , or in the Consol Registration screen and click , or select Job Registration from the Air Export Forwarding module in the main menu and click . The Job Registration screen can also be accessed by double clicking on existing house bills listed in the Job Information table in the first tab on the Consol Registration screen. In the Job Registration screen the first house bill associated with the Neutral Airway Bill will be displayed. Use to move forwards through the house bills and to move backwards through the house bills. The sequence of house bills is indicated at the bottom of the screen in brackets. 13 Field Name Description Validation Default Job Details Tab Shipper This is the shipper code and full name. This must be an exporter as defined in the Customer Masterfile Mandatory Consol Registration screen House PPD This is the bill to agent code and full name. Use to search the customer list. This must be a Debtor as defined in the Customer Masterfile This is the clearance agent code and full name. Use to search the customer list. This must be a Debtor as defined in the Customer Masterfile This is the overseas agent code and full name. Use to search the customer list. Conditional Blank Conditional Blank Mandatory Consol Registration screen Optional Blank House CCX O/S Agent Shipper Ref This is the shippers reference 14 Field Name Description Validation Default Consignee This is the Shipper’s Consignee at the Destination Port. The party, to whom a consignment is dispatched, is having legal title to the goods. Use the to search for Consignees already linked to Mandatory Consol Registration screen if Direct Master otherwise blank Optional Today Optional Now Optional System Generated Mandatory Blank Optional System Generated Mandatory System generated the Shipper. Use the a new Export Consignee or button to create to check and update details of existing Consignees. If the Consignee already exists in the system but linked Docs Received Time Extn. Code Goods Desc 1 Extn. Code 2 Job No to a different shipper use the button to find the Consignee and double click so that Expedient copies the details to the new Shipper together with any Notes This is the date the documentation was received. This is the time the documentation was received This is the reference for the job used in your global system. This may not be relevant at your site. You can update this field if your site permits it This is the short text description of the goods This is the reference for the job used in your global system. This may not be relevant at your site and this field may be hidden. You can update this field if your site permits it This is the reference number for the house bill Consol No This is the consol number for the Neutral Airway Bill Mandatory Consol Registration screen Date Reg This is this date of registration for the Neutral Airway Bill Mandatory Consol Registration screen Department This identifies the department producing the Neutral Airway Bill Mandatory Consol Registration screen 15 Field Name Description Validation Default Master Bill This is the master bill number which the house bill belongs to Mandatory Consol Registration screen House Bill This is the house bill number for the job Mandatory System generated EDN Origin Code ETD 1 Flight No 1 This indicates the Export Exemption Code. Use Optional Blank to search the Export Exemptions code list This is the Origin airport. Use the to search the ISO Port Mandatory Defaults to Neutral Codes Masterfile. Airway Bill value This is the estimated date of departure for the first flight Mandatory Defaults to Neutral Airway Bill value This is the first flight number. For Periodic NZ Customs Mandatory Defaults to Entries ‘PER AIR’ can be entered if there is no Consol Neutral Airway Bill value Airline Code 1 This is the first airline carrier. Use the Airline Masterfile. to search the Mandatory Defaults to Neutral Airway Bill value Via Code 1 This is the first transit Port Code. Use the ISO Port Codes Masterfile. to search the ETD 2 Flight No 2 Optional Defaults to Neutral Airway Bill value This is the estimated date of departure for the second flight Conditional Defaults to Neutral Airway Bill value This is the second flight number Conditional Defaults to Neutral Airway Bill value 16 Field Name Airline Code 2 Via Code 2 ETD 3 Flight No 3 Airline Code 3 Dest. Code ETA Description Validation This is the airline for the second flight Default Conditional Defaults to Neutral Airway Bill value This is the 2nd transit Port Code. Use the ISO Port Codes Masterfile. to search the Optional Defaults to Neutral Airway Bill value This is the estimated date of departure for the third flight Conditional Defaults to Neutral Airway Bill value This is the third flight number Conditional Defaults to Neutral Airway Bill value This is the airline for the third flight Conditional Defaults to Neutral Airway Bill value This is the destination airport. Use the Port Codes Masterfile. to search the ISO This is the Estimate Time of Arrival at the final airport Mandatory Defaults to Neutral Airway Bill value Optional Defaults to Neutral Airway Bill value Actual Wgt This is the actual weight for the shipment in kg Optional Blank Charge Wgt This is the chargeable weight for the shipment in kg This is the declared value for Customs Optional Blank Optional Blank Mandatory Blank Decl. Value No. Pcs This is the number of pieces Volume This is the volume in cubic metres Optional Blank This determines whether there are Dangerous Goods in this shipment. Optional Blank Dangerous Goods 17 Field Name Prepaid/Collect Description Validation Default This indicates the payment terms Mandatory Blank Free Domicile This indicates whether the domicile is free or not Optional Blank Drawback This indicates whether there is drawback or not Mandatory No INCO This is the purchase term. Use the to search the INCOTERMS. Shipment Tab Mandatory Blank Type This indicates whether a whole ULD unit or loose cargo is to be shipped. Select from the drop down box Optional Defaults Unit if ULD is provided in Consol ULD This is the type of ULD. Use the to find the ULD code. The ULD type is used to find valid Export Air Rates. Conditional. Mandatory where Type is Unit Matches ULD type on Consol where provided This is the number of ULD units Conditional. Mandatory where line is populated Defaults 1 Unit Charge Weight This is the Charge Weight for the ULD type. This can be updated. The total Charge Weight in this tab should not exceed the Charge Weight for the Job Conditional. Mandatory where Type is Unit Default Charge Weight for Job where Type is Unit Loose Charge Weight This is the Charge where the Type is Loose. This can be updated. The total Charge Weight in this tab should not exceed the Charge Weight for the Job Conditional. Mandatory where Type is Loose Default Charge weight for the Job where Type is Unit Number of Units Goods and Special Handling Tab Pieces This is the number of pieces per line item Optional Blank Goods This is the longer goods description Optional Blank This is the gross weight for the line item in kg Optional Blank Gross Wght 18 Field Name Validation Default Optional Blank Optional Blank Optional Blank Optional Blank This is the consignee for the house bill. Mandatory Blank Address 1 This is the consignee’s first line of address Mandatory Blank Address 2 This is the consignee’s first line of address Optional Blank Mandatory Blank Optional Blank Mandatory Blank Optional Blank SLAC Volume Special Handling Instructions Security Declaration Name Suburb State Country Zip Description This the Shipper’s Load and Count which refers to the number of cartons on a unit or pallet which can be counted individually and separately without removing the packaging This is the volume for the line item in cubic metres This table stores the Special Handling Codes that are required for the FWB messaging and e-AWB. Use the to search to find the appropriate Code. If the following Special Handling Codes are listed the Security Declaration section will appear at the bottom of the screen – SCO, SHR, SPX More information can be entered that will be included on the Security Declaration document and within the FWB message to the airlines. Where Special Handling Instructions SCO, SHR and SPX are listed you can list Screening Methods or select an Exemption Reason. If the Screen Method ‘Other Means’ is used you must enter a description of the means used. If the Job is flagged as Dangerous Goods in the Job Details tab you must answer the question regarding Lithium Batteries. Any screening methods or exemption methods entered for the Houses on the Consol will be collated and included on the Security Declaration print and in the FWB message from the Air Export Consol Registration screen. Consignee Details Tab This is the consignee’s location This is the consignee’s state This is the consignee’s country This is the consignee’s zip or postcode 19 Field Name Validation Default Conditional: Mandatory if the contact type is selected Blank This is the shipper for the house bill. Mandatory Customer Masterfile, Name Address 1 This is the shipper’s first line of address Mandatory Customer Masterfile, Street Address Address 2 This is the shipper’s first line of address Optional Customer Masterfile, Street Address Mandatory Customer Masterfile, Street Address Optional Customer Masterfile, Street Address Mandatory Customer Masterfile, Billing Address Optional Customer Masterfile, Street Address Conditional: Mandatory if the contact type is selected Customer Masterfile, Phone Contact Details Description This is the Consignee’s main contact number Shipper Details Tab Name Suburb State Country Zip Contact Details This is the shipper’s location This is the shipper’s state This is the shipper’s country This is the shipper’s zip or postcode This is the shipper’s main contact number 20 Field Name Description Validation Default Additional Information Handling Information This is the handling information for the house bill Optional Blank Execution Information This is the additional execution information which prints on the House Air Way Bill Optional Blank Executed Date This is the date of execution of the house bill Optional Today Place This is the place of execution of the house bill Optional Branch location Name This is the shipper for the house bill. Mandatory Customer Masterfile, Name This is the person responsible for the sales Optional account for this client. This is automatically populated from the Debtor tab in the Customer Masterfile. Use to update the Sales Person This is available to store information relevant to Optional this client and can be used in User Defined Auto Reports This is available to store information relevant to this Optional client and can be used in User Defined Auto Reports This is available to store information relevant to this Optional client and can be used in User Defined Auto Reports Customer Masterfile Sales Person Field 1 Field 2 Field 3 Blank Blank Blank Configuring Pop Up Notes Expedient allows users to configure what type of notes to pop up at a customer level. The following pop up notes can be configured via the Customer Masterfile (Configuration Tab): Export Air Consol Registration Notes – each time a user adds/updates a consol, the Agent Notes will pop up Export Air Job Registration Notes – each time a user adds/updates a Job, the Customer’s Export Air Job Registration Notes will pop up 21 Add IATA Costs By clicking the below. button or typing A will place the cursor in the input screen in Add Mode. See This screen can be used for any creditor that you owe money for. If the creditor happens to be CASS IATA in which they send you their Creditors Invoice at the Consol level, then in the Invoice No field enter the Master Bill Number. Field Name Description Validation Default Header Invoice Date This is the date of the Creditors Invoice Acc. Date Due Date This is the accounting date in which you want the Creditors invoice to fall in This is the due date of when the invoice is due. The due date is based on the terms of the Creditor which is located in the Creditors Tab in the Customer Masterfile. There is some validation on this date. The due date cannot take place before the invoice creation date. This can be amended by the user. 22 Mandatory Blank Mandatory Blank Optional Invoice Date + Terms Days Field Name Creditor Description Validation Default This is the Creditor in which the invoice is received from Clicking on the will bring up a lookup from the customer master file (Where Creditor is selected) This is the Creditors Invoice Number Mandatory Blank Mandatory Blank This is the currency in which the Creditor’s Invoice was received. Note: If Foreign Currency then you need to process payment via Banking Foreign Contra Payment. If AUD then use Banking Creditor Cheques This is the current Exchange Rate in which the invoice was received. Mandatory AUD Mandatory 1.00 for AUD This is the total amount as per the Creditor’s invoice Mandatory Blank Invoice Line Type This is the type of charge method on the invoice, Excluding GST or Including GST Mandatory Excl. GST OK to Post? This flag is used when the posting program is activated. If this is set to “No” then the invoice will be posted. Defaults to Yes when a user adds, defaults to No when a Creditors Invoice is created from a Data Interface Detail Mandatory Yes C/H This flags whether the below number is a consol or house bill Blank Defaults from Job/Con sol Invoice Number Currency Exch. Rate Invoice Amount 23 Field Name Description Validation Job/Consol This is the Job/Consol Number in which the Creditors invoice is based on. (Import & Export). E.g.: If there is a consol with 4 house bills and the Creditor is a IATA Cass that bills Freight for the whole consol, then users can enter the Consol Number and the Total Invoice Amount. Expedient will portion the total amount to the 4 house bills based on the Volume (sea) or Kilograms (Air) for each house bill. To view the break up you can click on the View Jobs and Default Mandatory Blank Amounts button . See below for the break-up of costs for each house bill (job) Type This is the department of the Job No / Consol No. This is for display purposes only. N/A Defaults from Job/Con sol Client This is the Client Code for the job that has been entered. The word CONSOL will appear if a consol has been entered. N/A Defaults from Job/Con sol Cost Code This is the Cost associated with the Creditors Invoice you are entering. Clicking on the will bring up a lookup from the Alpha Charge Code master file, which is found in Administration Menu. This is the General Ledger Cost Code associated to the Alpha Cost Code. Mandatory Null N/A Defaults from Cost Code N/A Defaults from Cost Code Account Description This is the Cost Code Description 24 Field Name Description Validation Excl Amount This is the amount on the invoice line excluding the GST Amount Incl Amount This is the amount on the invoice line including the GST Amount Previous This is the amount of money that has already been billed on Billed this invoice for the creditor. This is for display purposes only. Default N/A Null N/A Null N/A Defaults from Invoice /Creditor Previous Cost This is the amount of money that has previously been paid out on this invoice for the creditor N/A Defaults from Invoice / Creditor Balance This is the balance of money from the Previous Billed minus Previous Cost N/A Previous Bill – Previous Cost GST On Clicking this Check box will automatically add the GST to the line items. Use this feature if the Creditors Invoice you have received excludes the GST amounts on the line items. Optional Blank Link HAWBs This option allows multiple House Bills to be quickly linked to a Consol. 25 Field Name HAWB Description Validation Default Optional Blank N/A N/A Job No Enter the House Bill to be linked to the Consol. The House Bill must be on an Export Air Job that is not on a Consol. The screen will list all Export Air Jobs matching the House Bill number that were registered in the last 365 days. Use the After entering a valid House Bill the Job No will appear Shipper This is the Shipper Code on the Job N/A N/A This is the name of the Shipper on the Job N/A N/A This will display any EDN for the Job N/A N/A Shipper Name EDN On OK the Master Bill Number, the Consol Number and the routing details of the Consol will be copied to the listed House Bills and the Consol Registration screen will be refreshed to show the newly linked House Bills. 26 Consol Registration Screen - Menus Communication VIEW MESSAGE HISTORY This option is available in the Direct Master and Consol Master views. This option displays the history of FWB and FHL messages sent to CNN/IATA and the detailed error responses. If there have been no errors in the FWB and FHL messages no information will be displayed. This screen also provides a view of the information received from the Airline regarding the status of the shipment. Options VIEW/ADD EVENTS This option displays manually added events associated with the Neutral Airway Bill. Click to manually insert new events can be added in this screen. 27 Field Name Description Event Type This describes the event type. Use the Various Dates list. This is the event date and time Date & Time Validation to search the Mandatory Blank Mandatory Blank Optional Blank Cont/Entry/Invoice This is the reference for the event, e.g. invoice number 28 Default CONSOL NOTES This option displays the notes held against the Consol Notes. These notes can also be accessed from Jobs on the Consol. ADD ESM(CMR EXPORT SUB MANIFEST) Export Sub Manifest (ESM) can be created from the Consol Registration Screen via the Options Menu and by using the toolbar button . ESM’s can also be created from the CMR Functions under the Export Air Freight Menu from the Main Menu. The ESM’s can be sent once all of the related EDN’s have been sent to Customs. Field Name Description Validation Default ESM Status This is the Status of the ESM advised by Customs N/A Customs EDI Status This is the status of the EDI submission to Customs N/A System Generated User ID This identifies what user has created the ESM N/A User Date This identifies what date the ESM was created N/A User Consol This is the unique Expedient Reference Number. The / after the Consol Number represents the version number of the Customs Message N/A N/A 29 CRN This is the Customs Reference Number N/A N/A VIEW HOUSE BILLS This option opens the Export Air Job Registration screen for the current Neutral Airway Bill. This option is also available using the button in the Consol Registration screen. The first house bill associated with the Neutral Airway Bill will be displayed. Use the to move forwards through the house bills and to move backwards through the house bills. The sequence of house bills is indicated at the bottom of the screen in brackets. Click to create a new house bill in the consol or click shown on screen. to amend details the house bill NAWB OPTIONS This option opens the Neutral Airway Bill Options box. This option is also available from the NAWB Options button on the Consol Registration screen. Depending on the Neutral type, i.e. Direct Master, Consol Master or Sub Master, and whether the Original Neutral Airway Bill has been printed different options will be available from this screen. 30 Field Name Description Validation Default Print Original This indicates whether an original 8 page Neutral Airway Bill can be printed for the Neutral Airway Bill open on screen. Direct or Consol Master – Defaults tick if the original Neutral Airway Bill has not been printed. If the Neutral Airway Bill has already been printed you cannot reprint the original. Print a Copy or go to Print NAWB Amendment menu option if you want to make changes. An eight page duplex laser print version of the Neutral Airway Bill or a 1 page dot matrix version will be produced depending on the printer parameters at your branch. Sub Master – A one page ‘Original 3 – for Shipper’ print will be produced. This indicates whether a draft or copy of the Neutral Airway Bill can be printed for the Neutral Airway Bill open on screen. Conditional Conditional on Neutral Airway Bill job type and print status Conditional Tick Optional Blank Print Draft/Copy If the original has not yet been printed you can select to print a Draft copy which will have ‘DRAFT’ in the header. If you have already printed the Original this option will print a copy Neutral Airway Bill which will have “REPRINT” in the header. Direct or Consol Master - Defaults tick if Neutral Airway Bill has been printed. A 1 page copy duplex laser print version or dot matrix version will be produced depending on the printer parameters at your branch. The Draft or Reprint can be emailed Sub Master – A one page ‘Original 3 – for Shipper’ print will be produced with the word ‘REPRINT’ in the header. Don’t Print The Draft or Reprint can be emailed. Select this option to prevent printing of the Neutral Air Way Bill document. This can be ticked in conjunction with the Print Security Declaration? tickbox to generate the Security Declaration as a stand-alone document. 31 Field Name Print Security Declaration? Print Master Barcode Labels Description Select this option to print the Security Declaration which includes the Chain of Custody Statement as the final page of the Neutral Air Way Bill document. This cannot be selected if the Original has already been printed, and if the NAWB Draft or Copy is selected to print. This option can be accessed if your site is not IATA approved. This will print the requested number of master labels for the Neutral Airway Bill open on screen where job type is Direct or Consol. Tick in the tick box if you want to print the labels. The number of labels to print can be manually updated. Validation Default Optional Blank Conditional From 1 to number of pieces on Ratings tab, Consol Registration screen Print Cargo Pouch Label This option will appear where there is a House Bill on the Consol that has the Special Handling Instruction ‘EAP’ and your branch has a Label Printer. Mandatory Ticked Send FWB This will send the FWB for the Neutral Airway Bill open on screen Defaults to tick if FWB has not already been sent, if FWB has been sent but rejected by IATA and if the Consol has been updated since the FWB has been sent. If an FWB has been sent but there has been no response from IATA you will not be able to resend the FWB until IATA have responded. This option is not available for Sub Master. Conditional Neutral job type and FWB status 32 Field Name Send FHL Description Validation Default This will send FHL messages for the House Bills listed in the Neutral Airway Bill. This option is only available for Consol Masters. Defaults to a tick if all or some FHLs have not already been sent, if some FHLs has been sent but rejected by IATA or if the Consol or the House Bills have been updated since the last FWB was sent. If FHLs has been sent but there has been no response from IATA you will not be able to resend the FHLs until IATA have responded. Conditional Conditional on Neutral job type and FHL status PRINT NAWB LABELS This option provides quick access to print Master Barcode Labels without providing all the information required to print the NAWB. PRINT NAWB AMENDMENT This option allows a Neutral Airway Bill document to be amended and printed after the Original has been printed and details such as addresses need to be amended e.g. for Letter of Credit purposes. The Amendment screen is very similar to the Consol Registration screen except you are able to edit each field with the exception of the following list: Agent Name IATA Code Account No 33 These fields are missing from the Amendment screen. If you wish to change details in these fields withdraw the Master Airway Bill number. If you are using a laser printer and have this set as your NAWB printer in your branch masterfile you will be asked if you want a 1 page version or and 8 page version of the amended Neutral Airway Bill. An additional field “Execution Information” has been added to the Valuation Details in the Amendment screen so that text can been added to the Signature box on the Neutral Airway Bill print, e.g. “For and on behalf of …” etc. Please note the 3rd line of Handling Information will not print on a Dot Matrix NAWB due to space restrictions All Neutral Airway Bills printed from this screen will include the word ‘REPRINT’ in the header as instructed by IATA. EMAIL NAWB AMENDMENT This option provides the same ability as the Print NAWB Amendment option except the 1 page or 8 page document will be emailed to your own address or to your choice of three email addresses. GET NAWB NUMBER This option provides the next available Master Airway Bill number for the Issuing Airline. An Express Master Airway Bill number will be assigned if the Neutral Airway Bill is designated as Express. COPY NAWB WITH HOUSE BILLS This option will copy the Direct or Consol Master on the screen and the information from it’s associated house bills. The following information will be copied over to the new Neutral Airway Bill: Job type Agent Department Origin Routing (via Codes) Destination All other information in the new Neutral Airway Bill will need to be added. The following information will be copied from the original house bills to the new Consol: Shipper and Consignee address and contact details Agent Department Origin Routing (via Codes) Destination The following house bill information will be defaulted: Number of pieces = “1” 34 Date of Registration = today Flight number = “TBA” Goods description = “TBA” Please update the house bill information as you require. 35 BULK BOOKINGS This option will allow users to copy details from the Direct or Consol Master on the screen and make multiple copies. The new consols will be assigned to the user’s department. Please specify the issuing airline, express, origin and destination so the system can assign the appropriate Master Airway Bill numbers. The option will output a report so that bulk bookings can be monitored. See Below: Once the user clicks on the Bulk Booking Option, the user then is prompted to enter the following information: Number of NAWB’s required Express Bills? Issuing Airline Origin Destination Once the user clicks OK, the below System Prompt appears: 36 Once the new AWB’s have been created, the user can output these new AWB’s to a spreadsheet to send to the airline: The below spreadsheet is then created which allows users to enter the number of pieces, weight and volume and then send to the Airline for confirmation: If the user wishes to view this at a later stage, they can perform a search on the Date Registered and the Airline and then Click Browse, which will allow then to also output to a CSV. Air Export Bulk Bookings can also be made through the Airway Bill Bulk Bookings menu in the Air Export Forwarding Module. WITHDRAW NAWB NUMBER If FWB or FHL message have not already been sent to IATA this option will remove the Master airway Bill number from the Neutral Airway Bill. This number will be saved and assigned to the next Neutral Airway Bill. PRINT COST ANALYSIS SHEET This option produces a print cost analysis for the consol. Export Job Registration Screen – Menus 37 CHARGES Enter Creditors Invoice Please refer to the Creditors User Manual View Rates Please refer to the Rate Module User Manual View Job Financials Please refer to the Query User Manual Print Job Financial - This will allow the user to print the Job Financials direct from the Job Screen. NOTIFICATIONS These are automated email and/or fax notifications of booking and flight details to be sent to the client. OPTIONS View Consol Registration This option will direct the user to the Consol Registration screen Update Consol This option allows the Job to be linked to a Consol or moved to an alternative Consol. Select the button at the bottom of the screen to access the Consol No field and enter the consol to link the job to, or change to a new consol if the job is to be moved to a difference consol. Select the from the job. button to remove the Consol No completely Status This option opens the Message History screen display the Airline Status updates received for the MAWB on the Job. Add EDN Export Declaration Number (EDN) can be created from the Job Registration Screen via the EDN Details Button or from the Main Menu under Air Export Forwarding / CMR Functions / EDN Entry Screen. 38 Field Name Description Validation Default EDN Status This is the Status of the EDN advised by Customs N/A Customs EDI Status This is the Status of the Submission to Customs N/A System Generated Mandatory Job Registration Mandatory NonConfirming Mandatory No Indicates where who the owner of the goods are, Owner or Agent Enter the Goods Owner’s ABN or Agent’s CCID. Relates to the Own/Agent field above The Name of the Consignee Mandatory Agent Mandatory Blank Mandatory Job Registration This is the City of the Consignee Mandatory Job Registration The Export Goods Type. Use the to search from the Export Goods Types Masterfile This is the Transport Mode Mandatory Blank Mandatory Air Load Port This is the Port of Loading Mandatory Job Registration Dest Ctry This is the Destination Country Mandatory Job Registration Disc Port This is the Discharge Port Mandatory Job Registration This is the date of the export Mandatory Job Registration This is the Invoice Currency Code. Use the to search from the Currency Masterfile This is the FOB Currency Code. Use the to search from the Currency Masterfile Mandatory AUD Mandatory AUD Our Reference This is Expedient’s internal reference Confirm/Non-Conf This indicates whether the Export Declaration is a Confirming Export Declaration. If a declaration has been marked as a confirming export this field can later be changed to C (confirmed). Excisable/ Indicates whether the goods in the entire consignment covered by the export declaration Customable are subject to Excise or Customs Duty. Own/Agent Owner ABN /CCID Consignee Name Consignee City Goods Type Mode Transport Export Date Inv Curr CODE FOB Curr 39 Field Name Total FOB No. Containers No. Pieces Description Validation Default This is the Total FOB Amount Mandatory Job Registration This is the Total number of Containers for the shipment Mandatory Job Registration This is the total number of Pieces for the shipment Mandatory Job Registration Cargo Type This is the Type of Cargo on the shipment. Use Mandatory Blank the to search from the Export Cargo Types Masterfile Cargo Type This is the Type of Cargo on the shipment. Use Mandatory Blank the to search from the Export Cargo Types Masterfile Repost Button – The Repost Button allows users to Repost the Shipper’s Invoice Lines into the Commodity Lines Tab. This is used if users have made errors on the lines and which to start again, or a second invoice has appeared and users wish to add the extra Shipper’s Invoice to the Job. 40 Field Name Description Validation Default Commodity Lines The commodity lines tab allows users to add or modify lines. The following Buttons perform the following: Aheccs Button – The Aheccs Button allows users to view and select from a list of Ahecc Codes that have been previously used for this Shipper Permits Button – The Permits Button allows users to enter permits against the line. Assay Button – The Assay Button allows users to enter any Assays against the line Please Note: The Cursor must be on a line for this to be functional. AHECC CODE Optional Blank Optional Blank Optional Blank Description The Australian Harmonised Export Commodity Classification Code, as provided by the Australian Bureau of Statistics that classifies a particular type of export commodity. Use the to search from the Ahecc Codes Masterfile This is the Origin Port of the Commodity Line Item. Use the to search from the Export Goods Origin Codes Masterfile This is the Country of Origin of the Commodity Line Item This is the Description of the Commodity Line Optional Ahecc Code Net Quantity This is the Quantity of the Commodity Line Optional Blank This is the FOB Value of the Commodity Line Optional Blank Orig Code Country FOB Value 41 Field Name Description Validation Default Gross Weight This is the Gross Weight of the Commodity Line Optional Blank Gross Weight Type This is the Gross Weight Type of the Commodity Line. Kilograms, Grams, Tons Optional Blank Temp. Imp No Temporary Import Number. The Identifier of a Customs Document that represents a declaration to Customs by a Party concerning Goods that may cross the Australian border. Extra Info Tab Optional Blank Unique Cons Ref Optional Blank Vessel/Airline A unique reference of a consignment used for identification purposes in documents and messages exchanged between parties in international trade. This is the Vessel / Airline of the shipment Optional Blank Voyage / Flight This is the Voyage and Flight Information Optional Blank W/House Est Id The identifier issued by Customs to an approved/licensed premise for loading/unloading of goods under Customs control until clearance is issued A Branch Identifier is a facility within the Client Register which enables clients to identify specific areas of their organisation in dealings with Customs. A Branch Id is always linked with the Client ID. A Branch will belong to a single client, and will be uniquely identified and associated with a name and address. An indicator indicating whether any of the goods in the consignment covered by the export declaration are prescribed goods Optional Blank Optional Blank Optional Blank Branch Id Prescribed Goods View/Add Events This option displays manually added events associated with the Neutral Airway bill. MULTIPLE JOB NOTE CREATION This screen is available from the Sundry Module and allows the user to update a Single Event Type and associated Reference No. against multiple Job Numbers in one action. Please see below screenshot for your reference. 42 Field Name Event Type Reference No. Doc No. Created Date Created Time Created By Posted? Posted Date Posted Time Posted By Description Job Event Details Group Select the zoom to access the list of Event Types. The Event selected, will then be applied against the Job Number listed in the Job Number Details Group once Posted. Enter a Reference Number that is associated with the Event selected. This will then be applied against the Job Number listed in the Job Number Details Group once Posted. Accept max. 20 characters. Internal Reference Number. Generated when the record is Saved. Read-Only field. Date the record was created. Auto-populates in ADD Mode. Read-Only field. Time the record was created. Auto-populates in ADD Mode. Read-Only field. UserID who created the record. Read-Only field. Indicates if the record has been Posted. Yes and No values. Read-Only field. NOTE: You cannot UPDATE or DELETE a Posted Entry. The Date the record was Posted. Read-Only field. The Time the record was Posted. Read-Only field. The UserID that Posted the record. Read-Only field. Job Number Details Group 43 Validation Default Mandatory Blank Optional Blank System Generated Unique Document Number Current Date System Generated System Generated Current Time System Generated System Generated N/A System Generated System Generated System Generated N/A N/A N/A N/A Field Name Job Number Client Code Client Name Post Job Event OK Button Description Manually enter the Job Number that you want to apply the Event Type too. NOTE: You can amend the Job Numbers added via the Insert, Append and Delete buttons shown at the foot of the screen. NOTE: Once the record has been saved, you can double click on the row and it will direct the user to the Job No selected. Auto-populated when the Job Number is entered. Read-Only field. Validation Mandatory Default Blank Mandatory Auto-populated when the Job Number is entered. Read-Only field. Mandatory Retrieved from associated Job Retrieved from associated Job Action Buttons When this button is selected, it will then apply the Event to the Job Numbers listed in the Job Number Details Group. It will change the indicator in the ‘Posted?’ Field from No to Yes. The record will still exist in this screen as a view only. The user can view the Entry added via the View/Add Events window in the Export Job screen. NOTE: You cannot UPDATE or DELETE a Posted Entry. When the OK button is selected, you have the option to Post the entry each time the record is Saved. The following message will be shown: “Do you wish to post this job event now?” If YES, then the record will be Posted and the ‘Posted?’ field will show YES, along with the Posted Date, Posted Time and Posted By fields being populated. If NO, then the record will be Saved but NOT Posted and the ‘Posted?’ field will show NO. Consol Notes This option displays the Notes held against the Consol. Job Notes This option displays the Notes held against the Job. MULTIPLE JOB NOTE CREATION This screen is available from the Sundry Module and allows the user to update a Single Note Type against multiple Job Numbers in one action. Please see below screenshot for your reference. 44 Field Name Note Type Job Type Job Mode Posted? Posted Date Posted By Description Validation Job Note Details Group Select Note Type; Accounting, Delivery, Job, Miscellaneous, Forwarding, Notification, WIP, Check In/Out. When Posted, the notes will then show on the specific tab in the Notes. NOTE: The Note Type defaults to ‘Job Note’ in ADD Mode. Select Air or Sea. This section criteria is not applicable for Manual Entry. Select Import or Export. This selection criteria is not applicable for Manual Entry. Indicates if the record has been Posted. Yes and No values. Read-Only field. NOTE: You cannot UPDATE or DELETE a Posted Entry. The Date the record was Posted. Read-Only field. The UserID that Posted the record. Read-Only field. 45 Default Mandatory Blank Mandatory Blank Mandatory Blank System Generated N/A System Generated System Generated N/A N/A Field Name Doc No. Created Date Load by Transport Details Load by Container Details Manual Entry Vessel / Airline Voyage ID / Flight No Description Internal Reference Number. Generated when the record is Saved. Read-Only field. Date the record was created. Auto-populates in ADD Mode. Read-Only field. Load Method for Job Numbers Option to retrieve/load the Job Numbers using the Transport Details from the Import/Export Jobs. When this method is selected it will show the details in the Transport Details Group. NOTE: ONLY looks at data in the last 180days that match the criteria entered. Option to retrieve/load the Job Numbers using the Container Number that has been attached to the Import/Export Jobs. When this method is selected it will show the details in the Container Details Group. NOTE: If Air Import or Air Export has been selected then this Load Method is not applicable. This allows the user to add the Job Numbers manually in the Job Number Details Group. NOTE: The Job Type and Job Mode are not applicable for this Load Method. Transport Details Group (ONLY looks at data in the last 180days) ALL fields in this Group MUST be populated for the Job Numbers to be retrieved/loaded that match the criteria entered. If there are Job Numbers where these fields are blank then they will not be shown. NOTE: Once the Job Numbers are retrieved, the system still allows you to manually add Job Numbers of any Job Type & Job Mode. The Vessel or Airline field will be shown depending on the Job Type selected. Vessel – Vessel field from the Sea Import/Export Job Screen. Airline – Airline Code 1 / Airline fields from the Air Import/Export Job Screen. The Voyage ID or Flight No field will be shown depending on the Job Type selected. Voyage ID – Voy ID / Voyage ID fields from the Sea Import/Export Job Screen. Flight No – Flight No 1 / Flt No fields from the Air Import/Export Job Screen. 46 Validation System Generated System Generated Default Unique Document Number Current Date Mandatory N/A Mandatory N/A Mandatory N/A Mandatory Blank Mandatory Blank Field Name ETA Dest / ETD 1 Dest. Port / Orig. Port Container No. Notes Job Number Client Code Description The ETA Dest or ETD 1 field will be shown depending on the Job Type & Job Mode selected. ETA Dest – ETA Dest field from the Air Import Job Screen. ETD 1 – ETD 1 field from the Air Export Job Screen. The Dest. Port or Orig. Port field will be shown depending on the Job Mode selected. Dest. Port – Dest Port / Destn Port from the Sea/Air Import Job Screen. Orig. Port – Origin Code Port from the Sea/Air Export Job Screen. Container Details Group NOTE: Once the Job Numbers are retrieved, the system still allows you to manually add Job Numbers of any Job Type & Job Mode. This is the Container Number that is attached to the Sea Import/Export Job in the Container Details Tab. Manual Entry This Load Method allows the user to add the Job Numbers Manually. Notes Group Enter in appropriate Notes. Once the record is posted, the notes will then be updated on the specific Note Tab (depending on Note Type selected) of the Notes screen, against the Job Numbers that were entered in the Job Number Details Group. 55 characters permitted per line. Unlimited number of lines. Job Number Details Group The Job Number can be auto-populated via the Transport Details or Container Details Load Methods. The Job can also be manually entered if the Manual Entry Load Method is selected. The Notes entered will apply against these Job Numbers listed. NOTE: You can amend the Job Numbers added via the Insert, Append and Delete buttons shown at the foot of the screen, when the Job Number line is selected. Once the record has been saved, you can double click on the row and it will direct the user to the Job Number selected. Auto-populated when the Job Number is entered. Read-Only field. 47 Validation Default Mandatory Blank Mandatory Blank Mandatory Blank Mandatory Blank Mandatory Blank Mandatory Retrieved from associated Job Field Name Client Name Post Job Note Duplicate Job Note OK Button Description Auto-populated when the Job Number is entered. Read-Only field. Action Buttons/Links When this button is selected, it will then apply the Note to the Job Numbers listed in the Job Number Details Group. It will change the indicator in the ‘Posted?’ Field from No to Yes. The record will still exist in this screen as a view only. The user can view the Entry added via the Job Notes window in the Import Job screen. NOTE: You cannot UPDATE or DELETE a Posted Entry. The system allows you to copy a Posted and Non-Posted record. If you Copy a Posted record then it will update the record with a new Doc No and set the ‘Posted?’ indicator (Positioned in the Options Menu) When the OK button is selected, you have the option to Post the entry each time the record is Saved. The following message will be shown: “Do you wish to post this job note now?” If YES, then the record will be Posted and the ‘Posted?’ field will show YES, along with the Posted Date, Posted Time and Posted By fields being populated. If NO, then the record will be Saved but NOT Posted and the ‘Posted?’ field will show NO. Shipper’s Invoice By clicking the below: Validation Default Mandatory Retrieved from associated Job After you have created a job, you can create a Shipper’s Invoice. Expedient allows user to create a Shipper’s Invoice from the Job Registration Screen. This is used in the EDN Creation of Commodity Lines process. button or typing A will place the cursor in the input screen in Add Mode. See 48 Field Name Description Validation Default Summary Tab Job No This is the Job Number in which you wish to create the Mandatory Shipper’s Invoice for Defaults from Job Registration Screen Client This is the client you wish to create the Shipper’s Invoice for Mandatory Defaults from Job Registration Screen Invoice No This is the Shippers Invoice Number. Once this is input, then the Details Tab appears, allowing you to add the shipper invoice lines. NOTE: The Invoice Number cannot be amended once an EDN has been raised. This is the goods that appear on the Shipper’s Invoice Mandatory Blank N/A Job Registration Optional Present Date N/A Job Registration Goods Invoice Date Date of the Shipper’s Invoice. It will become enabled once the Invoice No has been entered. Packages This is the total number of packages Invoice Type This is the Purchase Terms (INCOTERMS). Use the from the INCOTERMS Masterfile. 49 to search Mandator y Blank Field Name Description Validation Default Currency This is the currency as it appears on the Shipper’s Invoice Mandatory (if not AUD) Blank Exchange Rate This is the exchange rate used at the time of the Shipper’s Invoice received Mandatory (if not AUD) Blank These are the charges relating to the Shipper’s Invoice Mandatory (if not AUD) Blank N/A Pulled from actual number of lines Freight / Insurance / Origin/ Destination Invoice Information No. Inv Lines This counts the number of Invoice lines, either entered in the Details Tab manually, or from the CSV/TXT File you have loaded via the Load File button. This is a no entry field and for display purposes only Inv Amount Enter the Total Invoice Dollar Amount. This must equal the Entered Amount to balance the Supplier’s Invoice This totals the dollar amount entered in the Details Tab. This must equal the Inv Amount. This is a no entry field and for display purposes only. If these are not equal you will receive the below message. You can still save the Supplier’s Invoice. Entered Amount Invoice Qty Enter the Total Invoice Qty of pieces. This must equal the Entered Qty to balance the Supplier’s Invoice Entered Qty This total the qty amount entered in the Details Tab. This must equal the Invoice Qty. This is a no entry field and for display purposes only Details Tab 50 Mandatory Blank N/A Pulled from actual amounts entered Mandatory Blank N/A Pulled from actual Qty’s entered Field Name Description Part Description This is the Part Number that appears on the Invoice. This will be automatically populated if the Load File button was successful. Validation Default N/A Pulled from actual Qty’s entered You can also click on the button to list all Export Parts on file . See below zoom screen: Order No Select one of the parts that you want to add to the Shipper Invoice Line. Please Note: The Re Query Button allows you to perform another search for any parts for that Customer (excludes the Consignee from this selection). Clicking OK will search for all parts for that Customer regardless of Consignee. This is the Quantity of the part that appears on the invoice line. This is the total line amount for the part that appears on the invoice line. This is the Order Number as ordered by the customer Country This information is pulled from the Parts TLF File. Mandatory Drawn from the Parts/TLF Masterfile Weight This is the weight of the part line item Mandatory Blank AHECC This is the AHECC Code of the part Mandatory Parts Master File Quantity Amount TLF Mandatory Blank Mandatory Blank Optional Blank This is the Export TLF for the Part Number. This is a no entry Mandatory Parts / TLF field. This information is drawn from the Parts Masterfile, TLF Masterfile information. If the part does not have an associated TLF then this field will display ***** See below If the Part is unclassified you can still save the invoice. Once you have done this you can click on 51 Field Name Description Validation Default the Classify Button This will allow you to classify the part with the correct TLF Code. Action Buttons Docs This allows the user to attach supporting documents that relate to the Shippers Invoice. CREATING PARTS Export Parts can be added directly into the Export Parts Masterfile if they are Export Parts only, or into the Parts Masterfile within the Customs menu if the Part is for Import and Export. Parts can also be classified and added to Expedient as the Parts are saved to the Shipper Invoice. Adding Parts to the Expedient System is performed via menu Customs Adding Export Only Parts Clearance/Tariff Class – CMR Parts. By clicking the place the cursor in the input screen in Add Mode. See below: Field Name Description Client Code This is the Customer Code. You can click on the to lookup the Customer Masterfile. ABN This is the Customer’s ABN (and CAC if entered in the Customer Masterfile). This is a no entry field and is used for display purposes only 52 button or typing A will Validation Mandatory Default Blank Mandatory Customer Masterfile Field Name Description Supplier This is the Supplier Code. You can click on the Code lookup the Supplier Masterfile. to Validation Mandatory Default Blank If you wish to add parts that are available to the customer from many suppliers use ‘#DEF’ in this field. Last Job Supplier Part No Last Used If you wish to add parts that are available for Export from the customer use ‘#EXP’ in this field This is a no entry field and used to display what Import job N/A this part was last used against and what mode the job was. This is the Supplier’s Part Number Mandatory This is a no entry field and used to display what date this part was last used in an Import Job Description This is the text description for the part. Use the to see a list of part descriptions previously used for the client and supplier. Selecting a row in this list will set the TLF for the Part to match the selected row. Cust TLF This is the reference the Customer uses for the TLF Client Part This is the part number the client uses to reference the part TLF Cost Price Quantity Factor VFD Classified On Approved On Import Classification This is the Import TLF that you wish to associate with this part. Use the to select a TLF from the TLF Masterfile. All other fields in this section are populated from the selected TLF Masterfile. Use the toolbar button to access the TLF Masterfile screen. This is the cost price stored against the part This is the Landed Costing Volume/Weight factor for the part. Enter a value here that will be used to calculate the Customs Quantity when the Part is used in a Supplier Invoice e.g. the number of litres in a bottle, or the number of cans in a pallet This is the Value for Duty This is the user who classified this part for Import. This is a no entry field and used for display purposes This is the date the part was classified This is the user who approved this part for Import This is the date the user approved this part Export Classification 53 N/A Optional System Generated Blank System Generated Blank Optional Optional Blank Defaults to Supplier Part Number Mandatory Blank Optional Optional Blank Blank Optional N/A Blank System Generated System Generated Blank Today N/A Optional N/A Field Name Description Export TLF This is the Export TLF that you wish to associate with this part. Use the to select a TLF from the Export TLF Masterfile. All other fields in this section are populated from the selected TLF Masterfile. On The following fields will be populated with the information from the Export TLF Masterfile AHECC E-UQ Description TLF Approved Date Valid Export This is the Volume Factor for the part. Enter a value here that will be used to calculate the Customs Quantity when the Part is used in a Shipper Invoice e.g. the number of litres in a bottle, or the number of cans in a pallet This is the user who classified this part for Export. This is a no entry field and used for display purposes This is the date the part was classified Approved On Field Name This is the user who approved this part for Export This is the date the user approved this part Description Quantity Factor Classified Classifying Parts from Shipper Invoice Validation Mandatory Default Blank Optional Blank N/A System Generated System Generated Blank Today Default N/A Optional N/A Validation If you have added parts to the Shipper Invoice that have not been classified before then you can click the toolbar button Supplier Invoice. Click on when you have saved the to complete the classification. 54 Field Name Client Description This is the Customer Code and Name that is pulled from the Shipper Invoice Screen Validation N/A Consignee Part This is the Part Number, that is pulled from the Shipper Invoice Screen Mandatory Description This is the Description of the Part. If this part is not yet classified, then “UNCLASSIFIED PART“ will appear. On Mandatory Default Shipper Invoice Screen Shipper Invoice Screen Blank update this will clear. Use the to search for Part Descriptions that have already been used for this Shipper Double click on a row in this screen to re-use the Part Client Part Description. Use the button to list all Part Descriptions previously used for the Shipper and any Consignee This is the reference the Client uses for the Part. This prints on Landed Costings. On tabbing through the field the Client Part will default to the Consignee Part No. 55 Mandatory Consignee Part No if left blank Field Name TLF Code Validation Mandatory Default Blank AHECC This will search all Export TLFs that contain the word ‘BOOK’. Select the TLF, or Click on the Re Query button to search for another TLF. If you cannot locate a suitable TLF use the button to open the Export TLF Masterfile screen and add the details of a new TLF. This is the AHECC code for the Export TLF N/A E-UQ This is the Export Unit Quantity for the Tariff N/A Quantity Factor Optional Classified This is the Volume factor for the part. Enter a value here that will be used to calculate the Customs Quantity when the Part is used in a Shipper Invoice e.g. the number of litres in a bottle, or the number of cans in a pallet This column will display the description for the TLF code selected in the previous column. This is the user who classified the Part Export TLF Masterfile Export TLF Masterfile Blank On This is the date the part was classified N/A Approved by On This is the user who approved the classifications Optional Export TLF Masterfile Classifying User System Generated Blank This is the date the classification of the part was approved N/A Today Description Description You can click on the which will lookup the Export TLF Masterfile. This screen allows you to search on any number of fields. See below: N/A N/A Once you have entered the relevant information click OK to classify the part. Use to view any other unclassified parts. On OK the screen will automatically refresh to show the next part to be classified if there are more unclassified parts. 56 Reset Options These options allow the TLF and Tariff information to be updated to match the details stored for the Parts in the Parts Masterfile RESET TLF FOR ALL LINES This option will reset all the Shipper Invoice lines to match the information from the Parts Masterfile. This option is useful where the Shipper has been changed in the Job and all parts information must be updated for the new Shipper RESET TLF FOR UNCLASSIFIED PARTS This option will set the TLF in the lines with unclassified parts to match the Parts Masterfile. This is useful where a Part is classified directly, either manually or by Parts File upload, in the Parts Masterfile screen. Load File Feature You are able to load a CSV file or a text file from your desktop directly into the Shipper Invoice screen, as long as the data conforms to the required format documented below. To use this feature: Add the Shipper Invoice and then enter the job no. Once you are in the Invoice No field you can click on the Load File button that appears on the lower area of the screen. You can then browse to the required file (.CSV or .TXT) and click on the Open button. The file will then be read into the screen line by line. If the program detects an error you will get a message explaining the problem. If errors are detected you will probably want to cancel the invoice you are adding, fix the errors in the file, and then start the load process again. The file format must be: -A comma separated values (.csv) file (easily created in Microsoft Excel) OR a pipe (|) delimited text (.txt) file, see the following examples. RULES: The Country of Origin, if provided, must be in two digit ISO format (i.e.: CN for China) The file must contain one invoice line per file line. The file must not contain column headings. Quantity and Amount fields must contain only numbers or decimal point (no dollar signs). The file must contain only ONE Shipper Invoice. Each Invoice line must be in the same currency. Case is not important; the system will convert all values to Upper Case. WARNING MESSAGE The following warning message is shown when the same Customer/Supplier and Invoice Number is used on a different Job. 57 Australian Exports The data must be in the following order: Column Description Validation A B C D E F G H Invoice Number Part Number Quantity Amount Purchase Order Number Currency Country of Origin Gross Weight Mandatory Mandatory Mandatory Mandatory Optional Mandatory Optional Mandatory Field Format General General General General General General General General Some AU file examples: (pipe delimited text file) INV_NO02|PART_NO1|10|100.1|AUD|1.5 INV_NO02|part_no2|10|150|order1|AUD|5.6 INV_NO02|part_no3|30|30.30|order3|AUD|au|7.4 (note line 1 contains no optional data, line 2 contains optional data item Purchase Order Number, whereas line 3 contains all information, mandatory and optional) (the same file above but this time comma separated values CSV) "INV_NO02","PART_NO1",10,100.1,"AUD",1.5 "INV_NO02","part_no2",10,150,”order1”,"AUD",5.6 "INV_NO02","part_no3",30,30.30,”order3”,"AUD""au",7.4 If data is not valid, the user will get an email from the system detailing what line produced the error and which column was at fault. Please allow up to 30 minutes for file to process. An email will be sent to the sender, and the internal contact set up to receive notifications in Sundry>Down Load Data File>Auto Invoice Admin (also available from Administration>Corporate Interface>Inbound), after the file has been successfully completed or if there were errors in loading the data. Please allow up to 30 minutes for file to process. An email will be sent after load to the sender and the internal contact for received invoices. 58 Emailing Shipper Invoices You can email the Shipper invoice and upload into Expedient using a standard CSV file format. Email the CSV File to: shipinv@<yourdomain>.com.au. To see the CSV file Specification select Help from this screen. Once this is loaded you will be able to view the Downloaded invoices by clicking the lookup within the Invoice number field. The format for the CSV is Column Format Client Code Invoice No Part No Part Description Quantity Unit Price char(10) char(10) char(28) char(35) decimal(12,2) decimal(12,2) Line Price decimal(12,2) Order No Currency Cntry of Manufacture Weight Char(20) Char(3) Char(2) Mandatory/Opti onal/Conditional Mandatory Mandatory Mandatory Mandatory Mandatory Conditional: Mandatory if Line Price not provided Conditional: Mandatory if Unit Price not provided Optional Mandatory Mandatory Decimal(12,2) Mandatory View/Add client Reference No This option allows order numbers to be added to the job. This screen also allows amendment of existing order numbers. View/Add Delivery Docket This option opens the Export Delivery Dockets screen. 59 Field Name Description Validation Default Job Number This is Expedient’s internal reference Mandatory Job Registration This is the Job Class Mandatory Job Registration This is the Cut Off Date Optional Job Registration Describes whether the goods are hazardous Optional Blank Receive Date This is the date in which the goods will be received Optional Blank Container Info This is additional container information. Use the to search from the list of additional information This is the Bolt Seal indicator Optional Blank Optional Blank Optional Blank Release No This is the ISO Container Type. Use the to search from the ISO Container Types Masterfile This is the Release Number of the shipment Optional Blank Carrier Code This is the Shipping Line Optional Blank This is the Shipping Line Reference Optional Job Registration This is the Depot where the container is to be picked up from Optional Blank Job Class Cut Off Date Hazardous Bolt Seal ISO Type Carrier Ref Depot 60 Field Name Description Validation Default This is the date in which the container is to be picked up. Pickup Time Open This is the time that the container can be picked up from Pickup Time Close This is the time that the container can be picked up until Depot Time Open This is the time the Depot Opens Optional Blank Optional Blank Optional Blank Optional Blank Depot Time Close This is the time the Depot Closes Optional Blank This is a free text field describing the Empty Container Details This is the delivery address. The default address comes from the Delivery Address Masterfile from the Customer Masterfile. Use the to search from the Multiple Delivery Addresses Any special instructions for the Truck Driver. Optional Blank Optional Blank Optional Blank Pickup Date M/T Delivery Address Information Instructions 61 Printing Options There are a number of documents and labels available for printing from this menu. Print HAWB – You are able to print or email a 1 page Original print an 8 page Original print or email a 1 page copy from this menu option. Please note the Copy version will say ‘Copy’ in the header. Copy Job This option will provide a new House bill based on the information in the open job screen. The Consol number and flight details will not be copied but the flight route will be. The job number for the new House Bill will be advised and the Job Registration screen will refresh to the newly created job. This function will also notify the user if they would like to copy the Consol No over at the same time. Charges Please refer to the Customs Module User Manual Attach Documents This opens a browse window to locate documents to attach to the job Job Milestones Please refer to the Order Tracking User Manual 62 Export Consignees The Export Consignees Masterfile is found in the Air Export Forwarding Menu from the Main Menu. Field Name Description Validation Default Client Code Mandatory Blank Mandatory Blank Contact This is the client code. Use to search the customer list. This cannot be Updated after the Export Consignee has been created This is the consignee to be linked to the client. Use to search the customer list. This cannot be Updated after the Export Consignee has been created This is the Consignee contact name Optional Blank Phone This is the Consignee’s telephone number Optional Blank This is the Consignee’s fax number Optional Blank This is the Consignee’s email address Optional Blank Consignee Code Fax Email Address 63 Field Name Description Validation Default External Id This is the External ID supplied to the Export Consignee Optional Blank Address 1 This is the consignee’s first address line Optional Blank Address 2 This is the consignee’s second address line Optional Blank This is the consignee’s city Optional Blank Mandatory Blank Optional Blank Mandatory Blank Optional Blank City Country State Zip Special Instructions This is the consignee’s country This is the consignee’s state This is the consignee’s zip or postcode This is special instructions for the consignee 64 NAWB Serial Number Maintenance This screen displays which NAWB numbers are available for the Airline and shows the order they will be assigned. The order than the numbers will be assigned can be configured so that you can select to use a specific NAWB Number for the next Air Export Consol. For example, the above screenshot shows there are three ranges of Express AWB Numbers for Air Canada at the Adelaide Branch. The numbers with Priority 0 will be used first, then Priority 2, then Priority 3. Within each Priority range there is a Sequence number that indicates the order the numbers within the range will be assigned. In the above screenshot within the Priority 3 numbers AWB number 014-10100005 will be allocated before 014-10100016. Field Name Description Validation Default Air Code This is the 2 letter airline code Mandatory Blank Branch This is the branch identifier Mandatory Blank Express? This defines whether the serial numbers are for Express Mandatory Blank AWB Number These is the set of AWB numbers stored for the airline. These are added to Expedient using the Optional Blank toolbar button. 65 Field Name Priority Description Validation Default This number indicates the range the AWB number belongs to. The lower the priority number the higher priority the range is, e.g. Priority 1 numbers will be used before Priority 2 numbers. The Mandatory From Add NAWB Number screen or defaults to ‘0’ when an AWB number is Withdrawn from a Consol Mandatory From Add NAWB Number screen or defaults to ‘1’ when an AWB number is withdrawn from a Consol N/A System Generated Priority can be set in the screen. Click to chance the Priority number for an AWB number. Sequence This number indicates where in the range the AWB number will be used. The Start of the sequence can be set in the screen. Click to chance the Sequence number for an AWB number. Added By This is the user that added the AWB number in the screen Added On This is the date the AWB number was added for the airline N/A System Generated Modified By This is the user that last updated the Priority or the Sequence of the AWB number N/A System Generated Modified On This is the date the AWB number was last updated N/A System Generated Status This indicated whether the AWB number was Added as a new number or withdrawn from an Air Export Consol N/A System Generated This is the account number associated with the AWB Number. This is can be added in the N/A From Add NAWB Number screen Account Number screen. Use the to view the history of any changes made to the AWB numbers. 66 Add NAWB Numbers You can use the toolbar button to extend a range of AWB Serial Numbers, add a new range of AWB numbers or add separate AWB numbers as advised by the airline. Field Name Description Validation Default Air Code This is the 2 letter airline code Mandatory Blank Branch This is the branch identifier Mandatory Blank This defines whether the serial numbers are for Express Mandatory Blank Mandatory Blank This is the start number. This will default to the first 7 digits of the number in the starting sequence field. System generated First 7 digits of the Starting Sequence number This is the number of Master Airway Bill numbers to be added. Mandatory Blank This is the Master Airway Bill number to be assigned to the next Neutral Airway Bill. Mandatory Conditional: if new airline enter first 7 digits of Starting Sequence Express? Starting Sequence This is the 8 digit starting serial number provided by the airline. The 8th digit is a check number. Begin Qty Up To If you are entering a series of MAWB numbers for a new airline for a branch enter the first 7 digits of the Starting Sequence number 67 Field Name Description Validation Default This is the last 7 digit number in the sequence Mandatory System Generated Priority This is the range the set of AWB numbers belongs to. Expedient will automatically assign the lowest range but this can be manually set to a higher priority range if you want to extend an existing set of AWB numbers Mandatory Pre-existing lowest priority for the Airline +1 Start Sequence This is the start number for the Sequence for the set of AWB numbers. Expedient will automatically start the sequence at 1 but this can be manually changed to merge the new set with an existing set. Mandatory 1 Acct No. This is the branch account number with the airline Optional Blank End Assign a specific AWB number to an Air Export Consol If you have an AWB number that you must allocate to the next Air Export Consol, use the button in the NAWB Serial Maintenance screen to add the AWB number, then in the Air Serial Number Maintenance screen, click to assign to the next consol. Click the and click the AWB number row you need button. This will give the selected AWB Number the top Priority range and the top Sequence number within that range. This means that selected AWB number will be assigned to the next Air Export Consol for the airline. 68 Airway Bill Bulk Bookings This option allows fast registration of regularly scheduled consols e.g. if your client books a consol every Monday on the same flight. Field Name Issued By Express Description Validation Default This is the airline who issues the Master Airway Bill number This indicates whether this is Express freight and will allocate the appropriate Master Air Way Bill number Mandatory Blank Mandatory Blank 69 Field Name Description Validation Default Booking Reference This is the reference number for the bulk booking generation Mandatory System Generated Origin Code This is the port of origin. Use port code list. Mandatory Blank Flight No 1 This is the flight number for the first flight Mandatory Blank Via Code 1 This is the first port of transhipment. Use search the ISO port code list. Optional Blank Flight No 2 This is the flight number for the second flight Optional Blank Via Code 2 This is the second port of transhipment. Use to search the ISO port code list. Optional Blank Flight No 3 This is the flight number for the third flight Optional Blank Dest Code This is the destination port. Use ISO port code list. Mandatory Blank to search the ISO to to search the Shipper This is the customer code for the Shipper. Use to search for active Customers. Optional Blank Pieces This is the number of pieces on each Air Way Bill Optional Blank Weight This is the weight on each Air Way Bill Optional Blank Volume This is the volume on each Air Way Bill Optional Blank ULD This is the type of ULD used for each Air Way Bill Optional Blank ETD Start Date This is the date you want the regularly scheduled consols to start from Mandatory Blank ETD End Date This is the date you want the regularly scheduled consols to end Mandatory Blank Cut-Off Time This is the time of day the shipper must delivery the goods to the forwarder Optional Blank 70 Field Name Description Validation Default Days of the Week This is the day of the week you want the consols to be booked, within the ETD date range selected. E.g. if you want a consol for every Monday between 27th August and 24th September 2013 select the Monday tickbox to generate 5 consols for the shipper on 28th August, and 3rd September, 10th September, 17th September and 24th September 2013. Mandatory Blank Allocate MAWBS Select from the dropdown list if you want the Master Air Way Bill to be allocated on saving the Bulk Booking details. The MAWB can be allocated at a later date within the Air Consol Registration screen Mandatory Yes MAWB Count This indicates the number of Master Air Way Bills that were generated by the Bulk Booking according to the ETD date range selected and the day of the week selected Mandatory System Generated Generated On This indicates the date the bulk booking was created. Mandatory System Generated Generated By This indicates the user who generated the bulk booking Mandatory System Generated Last Modified On This indicates the date the bulk booking was last updated and who updated it. Mandatory System Generated On OK use the toolbar button to generate the Consols from the Bulk Booking details on the screen. You will be prompted to confirm the number of MAWBs to be created On selecting Yes, you will be asked if you want to view the new Air Way Bills. 71 On selecting Yes the Air Consol Registration screen will open at the first of the AWBs created. There is a Bulk Booking Reference field on the Air Consol Registration screen which indicates that the Consol was created as part of a bulk booking. Air Rate Charges This screen outlines a list of Export Airline Buy rates, along with the function to list Preferred Carriers and Search Tools. Field Name Description Validation Port Search Group This group allows the user to search for specific rates in the Air Rate Charges group via the Origin Port or Destination Port. Records will be returned that match the search parameters. 72 Default Field Name Description Origin Port This is the Port of Origin that is shown in the Origin column in the Air Rates Charges Group. Use to search the ISO port code list. This is the Port of Destination that is shown in the Destination column in the Air Rates Charges Group. Use to search the ISO port code list. Preferred Carriers Group Destination Port Validation Default N/A Blank N/A Blank N/A N/A Mandatory Blank No Blank Mandatory N/A Mandatory N/A Mandatory N/A Optional N/A Optional N/A Optional N/A This group lists the Preferred Carriers that the Customer uses. This is controlled and maintained by the Customer. The details are added and updated via the UPDATE Button. NOTE: Mandatory fields are highlighted in Red. # Airline Code Description Preferred Carrier Ranking. This column is automatically populated when the Airline Code is entered in the corresponding field. The ranking will be updated when the Tab key is selected. Airline Carrier Code that is used. Use the to search the Airline Masterfile. Description of the associated Airline Code. Air Rate Charges Group This table outlines the Export Airline Rates that have been uploaded via a file or entered in manually. The existing records can also be amended or new records added via the UPDATE button. NOTE: Mandatory fields are highlighted in Red and Rates are in Local Currency. Origin <45 This is the Port of Origin Code (Aircraft Departure Location) that is associated with the rate charge. Use to search the ISO port code list. This is the Port of Destination Code (Aircraft Arrival Location) that is associated with the rate charge. Use to search the ISO port code list. This is the Airline/Co-Load Code (Cargo is under Airline control) that is associated with the rate charge. Use the to search the Airline Masterfile. Minimum Value for Minimum Weight. (Numeric Value) Rate value for Weight shown. (Numeric Value) +45 Rate value for Weight shown. (Numeric Value) Destination Airline/Co-Load Min 73 Field Name Description Validation Default +100 Rate value for Weight shown. (Numeric Value) Optional N/A +250 Rate value for Weight shown. (Numeric Value) Optional N/A +300 Rate value for Weight shown. (Numeric Value) Optional N/A +500 Rate value for Weight shown. (Numeric Value) Optional N/A +1000 Rate value for Weight shown. (Numeric Value) Optional N/A Units Conditional N/A Weight (KG) Unit Load Device that is used to load the cargo/freight on board the aircraft. Use the to search the ULD Code list. Cargo Weight of the Air Freight. (Numeric Value) Conditional N/A Commodity Description of the Cargo. (Free text field) Optional N/A Standard Rate of the Air Freight. (Numeric Value) Optional N/A Airline Fuel Surcharge Rate. (Numeric Value) Optional N/A War Risk Insurance Rate. (Numeric Value) Optional N/A Optional N/A Optional N/A Optional N/A Optional N/A Mandatory N/A Mandatory N/A Optional N/A Rate Fuel Surcharge War Risk Freighter/Passenger Freight that is on Cargo Planes/Passenger Airlines. (Free text field) Additional Charges Special Rates for the Air Freight. (Numeric & Non-Numeric Values) Comments Additional Comments for the Air Freight. (Free text field) Promotional Code Code for a Special Promotional Deal. (Free text field) Effective Date From Date the Airline Rate is Active From. Effective Date To Date the Airline Rate is Active To. Rate Quoted By Person who Quoted the Rate. (Free text field) Action Buttons Upload File Each time the CSV file is uploaded it will add the record to the Air Rate Charges table. Once the file is uploaded, you will need to refresh the screen for the results to appear or use the Search Tools available to retrieve the records. Validation is not executed on duplicate records. The data will default to descending order on Effective Date To – the records can be sorted further by clicking on the column heading. 74 Field Name Air Line Rates Search Description Validation Default This additional function allows the user to search the Air Rate Charges table for specific charges. You can search by Airline code or Effective Dates. These fields are not dependent on each other, therefore you do not need to populate each field to execute the search. Please see below an example of the Air Line Rates Search pop-up window. Please see below an example of the spreadsheet uploaded. NOTE: If ALL column headings are not included in the file, then data will be loaded in the incorrect columns. When uploading the CSV file, the system will executed specific validation rules. Any errors that result from this file, will be shown per line in a pop-up window. Please see below screenshot for your reference. 75 Print Manifest This option will provide a print or email of the detailed Export Air Manifest for the consol number provided. Print Manifest – Summary This option will provide a print or email of the summary Export Air Manifest for the consol number provided. Airline Statistics This option will provide a view of pieces, weight, charge weight, freight and sundry charges for all Export Air Consols by Issuing Carrier. The report screen is available in the Air Export Forwarding folder where the site is IATA registered. The report can be filtered on departure date range, issuing carrier, origin, destination and country. The report can be produced as a pdf or in .csv format. 76 Export CMR Functions (AU Only) Creating TLFs TLFs are used as short codes for the AHECC. This allows users to save time in data entry and when changing TLF information. This is accessed via the Main Menu select Sea or Air Export Forwarding>CMR Functions>Export TLF Masterfile Field Name Export TLF AHECC Code E-UQ Description Valid Export Description This is the Tariff Line File. This is a unique number. The TLF cannot be updated after the TLF has been created. This is the AHECC code associated with the TLF. Click on to see a list of available AHECCS This is the Export Unit Quantity. E.g.: No for Number or KG for Kilograms This is the Description of the TLF This is a no entry field and is for display purposes only. This describes whether the TLF has the correct information. Expedient checks this data with that of Customs and if the information on the TLF is invalid then this will be set to No. 77 Validation Mandatory Default Blank Mandatory Blank N/A System Generated from Customs Blank System Generated from Customs Optional N/A Field Name Auto Rated Last Used Amended Approved Description This is a no entry field and is for display purposes only. This describes the last date in which the Expedient System checked with Customs whether the TLF is valid/in valid. This is a no entry field and is used for display purposes only. This displays the last time the TLF was used in a shipment This displays who was the last person to amend the TLF. This is a no entry field, and is used for display purposes only. This is followed by the date of the last amendment This displays who approved the TLF. This is followed by the date of the approval Validation N/A Default System Generated N/A System Generated N/A System Generated Optional Blank EDN’s Export Declaration Number (EDN) can be created from the Job Registration Screen via the EDN Details Button, from the Main Menu under Air Export Forwarding / CMR Functions / EDN Entry Screen, or from the Pick List screen where your site uses the Bond Warehouse module. Field Name Description Validation Default Mandatory Job Registration N/A N/A EDN Entry Tab – Entry Details Group Job No EDN This is Expedient’s Internal Reference This is the Export Declaration Number and is updated based on a successful response from Customs. This is also updated in the EDN field in the Export Job Registration. 78 Field Name ESM/CRN EDN Status EDI Status Customs Response EDN Creation Date User ID Version Description Validation Default This is the Customs Authority Number and is updated on a successful response from Customs for the ESM. NOTE: This information is also shown on the ESM Screen. Current Status of the EDN. These consist of the following statuses: (1) Create (2) Replace (3) Withdrawn Current status of the EDI. These consist of the following Customs statuses: (1) Not Submitted (2) *Being Submitted (3) Failed (4) In Progress (5) Submitted (6) OK with Warnings N/A N/A N/A N/A N/A N/A Customs Response. This is updated based on a response from Customs to the EDN message. N/A N/A This is the date of the original EDN created. This field is system generated and is only enabled in FIND Mode. User ID who originally submitted the EDN to Customs. Any future changes to the EDN can be viewed in the EDI History screen. This field is system generated and is only enabled in FIND Mode. Version of the Message that is sent to Customs. This figure only changes when the EDN message is submitted to Customs. This field is system generated and disabled in ADD and UPDATE Mode. N/A N/A N/A N/A N/A N/A Mandatory Job Registration Mandatory Job Registration EDN Entry Tab – Job Customs Information Group Master Bill House Bill Master Bill for shipment. This information is retrieved from the Master Bill field in the Export Job Registration. House Bill Number for shipment. This information is retrieved from the House Bill field in the Export Job Registration. 79 Field Name Shipper Owner ABN /CCID Consignee Name Consignee City Cargo Type Description This is the company that is shipping the cargo. This information is retrieved from the Shipper field in the Export Job Registration. You can also access the (Zoom Function) to search from the Client Masterfile. Account Business Number for the Shipper. This information is retrieved from the ABN field in the Client Masterfile. The name of the Consignee that the cargo will be delivered too. This information is retrieved from the Consignee Name field in the Export Job Registration. This is the City of the Consignee that the cargo will be delivered too. This information is retrieved from the Consignee City field in the Export Job Registration. This is the Type of Cargo on the shipment. These consist of the following Cargo Types: (1) (2) (3) (4) No. Containers No. Pcs Goods Type Default Mandatory Job Registration Mandatory Customer Masterfile Mandatory Job Registration Mandatory Job Registration Mandatory Job Registration Mandatory Job Registration Mandatory Job Registration Mandatory N/A Bulk Containerised Combination Non Containerised This is the Total number of Containers for the shipment. This information is retrieved from the Container fields in the Export Job Registration. This is the total number of Pieces for the shipment. This information is retrieved from the No. Pcs field in the Export Job Registration. Type of goods that is been shipped for export. Use the drop down list to select the Goods Type. This information is defined by Customs. These consist of the following Goods Type: (1) (2) (3) (4) (5) (6) Validation Accompanied Baggage Own Power Other Postal Spares Stores 80 Field Name Description Validation Default Mandatory Job Registration Mandatory NonConfirming Mandatory No Mandatory Agent Mandatory Job Registration Mandatory Job Registration Country Code of the destination Port. This information is determined by the Destination Port and the Country Code Masterfile. This is the date that the container will leave the port of origin. This information is retrieved from the ETD field in the Export Job Registration. EDN Entry Tab – Invoice Information Group Mandatory Country Code Masterfile Mandatory Job Registration This is the Invoice Currency Code. Use the (Zoom Function) to search from the Currency Masterfile. This is automatically populated if a Shipper’s Invoice is created for the Job No. entered. This is the FOB Currency Code. Use the (Zoom Function) to search from the Currency Masterfile. This is automatically populated if a Shipper’s Invoice is created for the Job No. entered. This is the Total FOB Amount and is calculated based on the values entered in the FOB Value field in the Commodity Lines tab. EDN Entry Tab – Additional Information Group Mandatory Blank Mandatory Blank Mandatory Blank Mode Transport This is the type of Transport; Air or Sea. This is determined when the Job No. is entered in the EDN screen. Confirming Export This indicates whether the Export Type Declaration is to be confirmed. If a declaration has been marked as a confirming export, this field can later be changed to C (confirmed). Excisable/Customable Indicates whether the goods in the entire consignment covered by the export declaration are subject to Excise or Customs Duty; No or Yes. Own/Agent This drop down list Indicates who the owner of the goods are; Owner or Agent. Origin Port Destn. Port Dest Ctry Export Date Inv Curr CODE FOB Curr Total FOB EDN Entry Tab – Shipping & Port Information Group This port code indicates where the container will be loaded from. Final destination port where the container will discharge. 81 Field Name Unique Cons Ref Vessel/Airline Description A unique reference of a consignment used for identification purposes in documents and messages exchanged between parties in international trade. This is the Vessel / Airline of the shipment. Validation Default Optional Blank Optional Blank Voyage / Flight This is the Voyage and Flight Information. Optional Blank W/House Est Id The identifier issued by Customs to an approved/licensed premise for loading/unloading of goods under Customs control until clearance is issued. A Branch Identifier is a facility within the Client Register which enables clients to identify specific areas of their organisation in dealings with Customs. A Branch Id is always linked with the Client ID. A Branch will belong to a single client, and will be uniquely identified and associated with a name and address. An indicator indicating whether any of the goods in the consignment covered by the export declaration are prescribed goods. Optional Blank Optional Blank Optional No Branch Id Prescribed Goods 82 Field Name Description Validation Default Commodity Lines The commodity lines tab allows users to add or modify lines. These lines will be populated from a Pick List if your site is using the Bond Warehouse module for stock released for Export. The following Buttons perform the following: Commodity Lines Tab – Extra Information Group (Defaults to 3 line items) House Bill House Bill Number for shipment. This information is shown to remind the user what House Bill they are applying the AHECC Codes against. Job No This is Expedient’s Internal Reference. This information is shown to remind the user what Job No they are applying the AHECC Codes against. Line The line number of the AHECC Code. This will be populated once you exit the line item. AHECC Code The Australian Harmonised Export Commodity Classification Code, as provided by the Australian Bureau of Statistics that classifies a particular type of export commodity. Use the (Zoom Function) to search for an AHECC Code that have been previously used for this Shipper. Non-expired AHECC Codes are listed. Orig Code This code indicates where the container will be loaded from for the Commodity Line Item. Use the (Zoom Function) This information is defined by Customs. 83 Mandatory EDN Mandatory EDN Mandatory N/A Mandatory Blank Mandatory Blank Field Name Description Validation Country This port code indicates the country where the container will be loaded from for the Commodity Line Item. This information is retrieved from the Country Code Masterfile. Net This is the Net Quantity of the Commodity Line. This field Quantity can be auto-populated if the Shipper’s Invoice is raised against the Job No. Net This field is not labelled. It is positioned on the right hand Quantity side of the Net Quantity field. This field is auto-populated Unit once the AHECC Code is entered. Information is retrieved from the TLF Masterfile. Gross This is the Gross Weight of the Commodity Line. This field Weight can be auto-populated if the Shipper’s Invoice is raised against the Job No. Gross This is the Gross Weight Type of the Commodity Line. Weight Type Kilograms, Grams, Tons. This is populated when the Gross Weight value is entered. FOB Value This is the FOB Value of the Commodity Line. This is autopopulated if the Shipper’s Invoice is raised against the Job No. Description This is the Description of the AHECC Code. This information is retrieved from the TLF Masterfile. Temp. Imp No Permit Assay Temporary Import Number. The Identifier of a Customs Document that represents a declaration to Customs by a Party concerning Goods that may cross the Australian border. Commodity Lines Tab – Code Information Group Allows users to enter Permit Codes against each line item. In UPDATE or ADD Mode, select the line item and then enter in the Code in the Permit Table. Allows users to enter any Assay Codes against each line item. In UPDATE or ADD Mode, select the line item and then enter in the Code in the Assay Table. Action Buttons OK Saves each field entry. Cancel Any changes made will not be saved. Insert This button will add a line item above or below existing AHECC Codes, depending on what AHECC Code has been selected. 84 Default Conditional Blank Mandatory Blank Mandatory TLF Masterfile Mandatory Blank Mandatory Blank Mandatory Blank Mandatory AHECC Code Optional Blank Optional Blank Optional Blank Field Name Append Delete AHECCS Repost Submit EDN EDI History Description Validation This button will add an AHECC Code line item to the end of the existing AHECC Codes that have been created. This button will remove an AHECC Code line item. Select the line item and then press the Delete button. The AHECC Button allows users to view and select from a list of AHECC Codes. This is used in conjunction with the Shipper’s Invoice. If a Shipper’s Invoice exists and the Job is added in the EDN screen, then it will populate the AHECC Code details in the each line item, whether it is consolidated or notconsolidated. If the user has made a mistake and would like to re-load the data from the Shipper’s Invoice, then they can use the Repost Button to re-load the AHECC Codes. ADD Mode – The Repost Button is only visible when the Job No has been entered. UPDATE Mode - The Repost Button is enabled in this mode. This executes the mandatory requirements that Customs require and sends the EDN message to Customs. If the validation fails then the EDN Submission Validation will be shown with a list of errors that need to be corrected. If no errors exist Expedient can check at this point if the User and the Exporter have valid Aviation Security Status. Then the EDN will be sent to Customs. On response from Customs an email will also be sent to the user who created the EDN, outlining the EDN details and status. This Button directs you to the EDI History screen, to view inbound and outbound messages that relate to the EDN Screen. The information in this screen shows a list of inbound and outbound messages, along with the user who submitted the message and access to view the raw messages. 85 Default Field Name Description Validation Validate EDN This button will validate Customs Mandatory Requirements. It will not submit the EDN to Customs. Depending on the result from the validation, a window will appear which outlines the errors and warnings that have been found on the EDN. This screen can also be accessed via the Validate EDN link in the Tools Main Menu. The OK Button will be enabled if the validation is successful. The Cancel Button will be enabled if validation has failed. Shipper’s Invoice This will direct the user to the Shipper’s Invoice screen. If an invoice exists then it will be shown. If one does not exist then the Shipper’s Invoice screen will have blank fields. This screen can also be accessed via the Shipper’s Invoice link in the Options Main Menu. Main Menu – Communications Submit EDN Withdraw EDN This link executes the mandatory requirements that Customs require and sends the EDN message to Customs. If the validation fails then the EDN Submission Validation will be shown with a list of errors that need to be corrected. If no errors exist then the EDN will be sent to Customs. This link will withdraw the EDN message from Customs and automatically send a message to Customs informing them of this change to the EDN. You are not able to submit the same Job No. after this action occurs. 86 Default Field Name EDI Errors View EDI History Description Validation This link directs you to the EDI History screen, to view inbound and outbound messages that relate to the EDN Screen. The most current message will be highlighted. The information in this screen shows a list of inbound and outbound messages, along with the user who submitted the message and access to view the raw messages. This link directs you to the EDI History screen, to view inbound and outbound messages that relate to the EDN Screen. The information in this screen shows a list of inbound and outbound messages, along with the user who submitted the message and access to view the raw messages. Main Menu – Options Update ESM This link allows the user to manually update the ESM/CRN field in the EDN screen. When this link is pressed, it will automatically place the cursor in the ESM/CRN field. You will not be able to edit other fields in the EDN Screen. CMR Notes This link directs the user to the CMR Notes screen. It will allow the user to view the Customs Notes that relate to the EDN that has been submitted to Customs. This screen also allows you to view the raw error message received from Customs via Options in the Main Menu. Print EDN This link allows the user to print the lodgement form and will show the details that have been entered in the EDN. Shipper’s This link will direct the user to the Shipper’s Invoice Invoice screen. If an invoice exists then it will be shown. If one does not exist then the Shipper’s Invoice screen will have blank fields. Main Menu – Tools 87 Default Field Name Validate EDN Description Validation Default This link will validate Customs Mandatory Requirements. It will not submit the EDN to Customs. Depending on the result from the validation, a window will appear which outlines the errors and warnings that have been found on the EDN. BOND WAREHOUSE UPDATES If your site uses the Bond Warehouse Module and the EDN has been generated from a Pick List, the Bond Warehouse will be updated to show the stock has been released when Customs return a successful entry status. IDL VIEW SCREEN This screen display messages from AU Customs where the Customs Authority Number has been deemed idle. Update the message from Customs with the Reason for the IDL. Field Name DATE Description This is the Date the IDL message was received 88 Validation Default N/A System Generated Field Name Validation Default This is the reference the IDL message is associated with N/A System Generated This is Customs Reference for the IDL message N/A N/A This advises the Entry Type the IDL is associated with This is the Customs Authority Number that has been deemed idle This is the user who received the IDL notification by email N/A N/A N/A N/A N/A System Generated Actioned On This is the date the IDL was processed N/A Today By This is the user who processed the IDL N/A User who updates the IDL screen N/A Blank N/A N/A Job No/Send Ref IDL Adv No Message Type CAN User Notified Reason Customs Notice Description This is the reason for the IDL. Click on to select from the list of available IDL Reason Codes This is the text from AU Customs explaining the reason for issuing the IDL IDL MASTER EMAIL ADDRESSES This screen stores the email addresses that receive IDL notifications from AU Customs. The Recipient email address can be set for Department and Transport Mode i.e. Queenland Export Air and Sea IDL messages can be forwarded to different email addresses. 89 Field Name Description Validation Default Department Select the department the IDL messages should be grouped by Select Air or Sea or leave blank Mandatory Blank Optional Blank Enter the Email Address to receive the IDL messages Optional Blank Transport Mode Email Address ESM’s Export Sub-manifest (ESM) can be created from the Consol Registration Screen via the Options Menu and from the toolbar button in the Consol Registration screen, . ESM’s can also be created from the CMR Functions under the Export Air Freight Menu from the Main Menu. The ESM’s can be sent once all of the related EDN’s have been sent to Customs. Field Name Description Validation Default Mandatory Export Consol Registration N/A N/A ESM Entry Tab – Entry Details Group Consol No Version This is Expedient’s Internal Reference. Version of the Message that is sent to Customs. This figure only changes when the EDN message is submitted to Customs. This field is system generated and a read-only field on ADD, UPDATE and FIND Mode. 90 Field Name ESM ESM Status EDI Status Description Validation Default This is the Customs Reference Number that is autopopulated based on Customs Response for the ESM. Once this field is updated, the ESM/CRN field in the EDN screen is also updated against the related Job No. Current status of the ESM. These consist of the following ESM statuses: (1) Creation (2) Replacement (3) Delete Lines (4) Replace Header (5) Withdrawal (6) Interactive Change N/A N/A N/A N/A Current status of the EDI. These consist of the following EDI Statuses: Not Submitted *Being Submitted Failed In Progress Submitted OK with Warnings N/A N/A N/A N/A N/A N/A N/A N/A Mandatory Export Consol Mandatory Country Code Masterfile Conditional Export Consol Conditional Export Job Registration Customs Response Customs Response. This is updated based on a response from Customs to the ESM message. ESM Created Date This is the date that the original ESM was created. This field is system generated and is only enabled in FIND Mode. User ID User ID who originally submitted the ESM to Customs. Any future changes to the ESM can be viewed in the EDI History screen. This field is system generated and is only enabled in FIND Mode. ESM Entry Tab – ESM Details Group Master Bill Dest Ctry Total Pieces Total Containers Master Bill for shipment. This information is retrieved from the Ocean Bill (Sea Freight) or Master Bill (Air Freight) field in the Export Consol Registration. Country Code of the destination Port. This information is determined by the Destination Port and the Country Code Masterfile. Total pieces against the Job No’s that are attached to the Consol which is entered in the ESM. Total number of full containers that are shown on the Job No’s that are attached to the Consol which is entered in the ESM Screen. 91 Field Name Empty Container Mode Transport Consolidation/Slot ETD No. Jobs sent to Customs Job No House Bill EDI Status EDN EDN Status Submitted By Submission Date Description Validation Default Total number of empty containers that are shown on the Job No’s that are attached to the Consol which is entered in the ESM Screen. This is the type of Transport; A (Air) or S (Sea). This is determined when the Consol No. is entered in the ESM screen. C- Consolidation and S – Slot. Conditional Export Job Registration Mandatory Export Consol Mandatory N/A This information is retrieved from the ETD field in the Export Consol Registration. This indicates the number of jobs that have successfully been sent to Customs. Mandatory Export Consol Conditional ESM ESM Entry Tab – Job Information Group (Double click on the line item directs the user to the Job Registration) This is Expedient’s Internal Reference. List of Job No’s that are attached to the Consol that has been entered in the ESM Screen. House Bill Number for shipment. This information is retrieved from the Job Information Group in the Consol. Current EDI Status based on the EDN message that is sent to Customs. This is the Export Declaration Number and is updated based on a successful response from Customs. This is also updated in the EDN field in the Export Job Registration. Current Status of the EDN that is attached to the Job No. User ID who originally submitted the EDN to Customs. Date that the original EDN was sent to Customs. Action Buttons OK Cancel Saves each field entry. Any changes made will not be saved. 92 Field Name Submit ESM EDI History Validate ESM Description Validation This executes the mandatory requirements that Customs require and sends the EDN message to Customs. If the validation fails then the ESM Submission Validation will be shown with a list of errors that need to be corrected. If no errors exist then the ESM will be sent to Customs. On response from Customs an email will also be sent to the user who created the ESM, outlining the ESM details and status. This Button directs you to the EDI History screen, to view inbound and outbound messages that relate to the ESM Screen. The information in this screen shows a list of inbound and outbound messages, along with the user who submitted the message and access to view the raw messages. This button will validate Customs Mandatory Requirements. It will not submit the ESM to Customs. Depending on the result, a validation window will appear which outlines the errors and warnings that have been found on the ESM. This screen can also be accessed via the Validate EDN link in the Tools Main Menu. The OK Button will be enabled if the validation is successful. The Cancel button will be enabled if the validation fails. Main Menu – Communications 93 Default Field Name Description Submit ESM This link executes the mandatory requirements that Customs require and sends the EDN message to Customs. If the validation fails then the ESM Submission Validation will be shown with a list of errors that need to be corrected. If no errors exist then the ESM will be sent to Customs. This link removes the Job No/EDNs that are linked to the ESM and Consol. You need to remove the lines from the ESM before you can withdraw the ESM from Customs. The details in the ESM are changed and replaced with an ESM message automatically sent to Customs. Delete EDN from ESM Replace ESM Header Withdraw ESM EDI Errors View EDI History EDN List Customs Validation This link will withdraw the ESM message from Customs and automatically send a message to Customs informing them of this change to the ESM. You are not able to submit the same Consol No. after this action occurs. This link directs you to the EDI History screen, to view inbound and outbound messages that relate to the ESM Screen. The most current message will be highlighted. The information in this screen shows a list of inbound and outbound messages, along with the user who submitted the message and access to view the raw messages. This link directs you to the EDI History screen, to view inbound and outbound messages that relate to the ESM Screen. The information in this screen shows a list of inbound and outbound messages, along with the user who submitted the message and access to view the raw messages. Main Menu – Options List of EDNs that have been successfully sent to Customs. 94 Default Field Name Description CMR Notes This link directs the user to the CMR Notes screen. It will allow the user to view the Customs Notes that relate to the ESM that has been submitted to Customs. This screen also allows you to view the raw error message received from Customs via Options in the Main Menu. This link will validate Customs Mandatory Requirements. It will not submit the ESM to Customs. Depending on the result from the validation, a window will appear which outlines the errors and warnings that have been found on the ESM. Validate ESM Validation Default Browse Button You can export the details from the Shipper’s Invoice to Excel. By right clicking on the column headings in the Browse Window you are able to select which information you would like shown and exported. Any information that is displayed in the Browse window will be shown in Excel when the data is extracted. Any modifications that are applied by the user in the Browse window (remove or reposition column headings) will be shown in the output to CSV. Entering Customs Quantities Once you have saved the Shipper’s Invoice, if you have added parts whereby the Classification requires extra measurements added to the Parts, for example Kilograms, Square Metres add the details using the toolbar button in the Shipper’s Invoice screen. Clicking on this button will search the TLF and if it doesn’t require a number or blank then it will allow you to enter the quantities. The screen will list all the parts in the Shipper Invoice that requires additional Customs Quantities 95 If a Volume Factor has been stored for the part during classification or in the Parts Masterfile the column will calculate the Customs Quantity Customs Quantity = Part Invoice Amount x Volume Factor This value can be updated. Copy Shippers Invoice This option allows the details of the Shippers Invoice in the screen to be copied to a designated job number as long as the client is the same. Access the Copy Shippers Invoice function from the Options menu in the Shippers Invoice screen. Load Invoice File You are able to load a CSV file or a text file from your desktop directly into Expedient using the Sundry>Down Load Date Files>Load Export File feature. This option allows you to load a file that contains more than one invoice number for the same client. The format for the CSV file is configured in this screen. Select a pre-existing template for the load file or create a new template. The templates must include all the mandatory columns, which are indicated with a ‘*’ in the name. The columns can be in any order. 96 Field Name Description Data File User the Browse button to locate the file in your system Location Column This indicates where the column is found in the file. Select from the pull down list. Field This is the information contained in the column. Select a column from the pull down list. ‘*’ indicates that the column must be included in the file template. Templates This is the list of available templates. If you want to set up a new template enter the name of the new template in the field below and unwanted templates. . Use Validation Mandatory Default Blank Mandatory Blank Mandatory Blank Mandatory Default to remove You can then browse to the required CSV file and click on the button. The file will then be read into the screen line by line. If the program detects an error you will get a message explaining the problem, however no further lines of the file will be processed after this error (i.e. there are 10 invoice lines in the file, but the system detects a problem on line 5, only the first 4 lines will be loaded). If errors are detected you will probably want to cancel the invoice you are adding, fix the errors in the file, and then start the load process again. The Import Log will display a summary of the details loaded. Use depth information. 97 to see more in RULES: The Country, if provided, must be in two digit ISO format (i.e.: CN for China) - PREFERENCE and PREFERENCE RULE, if provided, must be the same codes as used by Australian Customs. The file must contain one invoice line per file line. Quantity and Amount fields must contain only numbers or decimal point (no dollar signs). Each Invoice line must be in the same currency. Case is not important; the system will convert all values to Upper Case. Printing Export Documents Expedient allows users to print the following Export Documents from the Shipper’s Invoice Screen: Shipper’s Invoice Packing List Certificate of Origin To print the above documents, the following is required: Create Export Job Add “Export Docs” Information to the job (available on the toolbar from Job Registration Screen) Add Shipper’s Invoice (available on the toolbar from Job Registration Screen) Ensure Parts are Classified and contain weight information Enter Export Declaration information(available from the Shipper’s Invoice Screen) (only required for Commercial Invoice) Generic Consol CSV This report allows users to output consol level data into a spreadsheet. Generic Jobs CSV This report allows users to output job level data into a spreadsheet. You can run the report via the following options: Full – Job Information Partial – Job Information 98 Exporter’s Declaration If the Exporter requires you to perform the export document printing function then the Exporter’s Declaration information is required in order to print the Commercial Invoice Document. To print the above documents, go to the Shipper’s Invoice Screen and select options, see below: 99 Commercial Invoice Data extracted from the Exporter Declaration Screen 100 Certificate of Origin 101 Packing List 102 Preparing Charges (Accounting Module only) Expedient allows users to prepare charges for the shipment from the Job Registration Screen. This is accessed from the Charges Button. Forwarding Rates Process 103 There are 3 ways to prepare charges. 1. MANUALLY ENTER CHARGES To use this option the user can simply click on the update button. This will allow the user to input charges manually. There is an option in Expedient to include Default Company Tariff Charge Codes based on Job Type, and Job Class. The company tariff is maintained in the Rates Module, Forwarding Rates, Rate Account Codes screen. See the Rates Module User Manual for more information. See below: Once the user clicks the Update button, based on the Rate Account Codes Screen, the default Charge Codes populate. 104 2. AUTO RATING WITH EXACT MATCH (PREPARE CHARGES) Once the Rates has been set up for Customs/Forwarding, the Prepare Charges button will pre-populate with the same number of charges lines as set up in the Rates Master file, and the correct Amount based on the Rates Master file setup for Customs and/or Forwarding. Please Note: Each Rate has an Expiry Date. This date must be greater than the Departure Date for the relevant job to be used. See below. Once the user clicks Prepare Charges, Expedient will Check which charges to Auto- Rate. As per the below screen shot, there are 4 charges, the second 2 charges are a straight profit item (4000 series numbers) hence the Expected Cost is 0. The other 2 lines display the same amounts in Local Amount and Expected Cost (where applicable). This is up to the user to update the correct Expected Cost. Please Note: The “Bill To” Parties are split between Prepaid and Collect, this is defined in the Rates Masterfile. The system will create 2 invoices when the Prepare Invoicing Button is clicked. One for BROHAN and the other for ACOSTA 105 3. AUTO RATING WITHOUT EXACT MATCH If a user does not have an exact Ratings match, but wishes to use a “Generic” rate that has been set up, then it is possible to perform a search of the Rates Master file. Once the User clicks on the Prepare Charges, if Expedient can’t find an exact Rates match, the system will display all Approved Export Rates for that Customer. The user can select one displayed on the screen, OR REQUERY the Rates Masterfile from any of the above fields. 106 107 Once the Rates has been set up for Forwarding, the Prepare Charges button will pre-populate with the same number of charges lines as set up in the Rates Masterfile, and the correct Amount based on the Rates Masterfile setup, see below for example: Variance indicator on Exchange Rates – only used when entering charges in O/S Currency but billing in AUD Lines populate automatically based on Rates Masterfile View Invoice Already Posted Lines populate based on Rates Account Codes Masterfile where the Job Class for Export Matches, and the Active indicator is ticked Tick if wanting to invoice in Foreign Currency. Can create up to 3 Foreign Currency Invoices If the Charge is a prepaid or collect charge. This can be set up in the Rates Masterfile Can only be modified if charge code has FXC indicator set to YES in General Ledger Chart of Accounts Masterfile Currency Defaults based on the First Job Currency. IF this is OS Currency then will only populate that if the Charge Code accepts OS Currency. 108 Based on USD Exchange Rate and Exchange Variance. Only applicable if invoicing in AUD DEFAULT COMPANY TARIFF The Update button will default the Charge Lines to the Default Company Tariff. Charges that exist in the Rate Account Codes Masterfile that are active and match the job type will be inserted. The company tariff is maintained in the Rates Module, Forwarding Rates, Rate Account Codes screen. See the Rates Module User Manual for more information. Field Name Description Validation Default Optional Blank Optional Blank Optional Blank Optional As Agreed Header House Currency This is the Currency of the House Bill. Any Foreign Charge Amounts will default to the house Currency Rate Charge This is the Rate Charge for printing of House Airway Bills. The Rate Charge will print in the Rate/Charge section of the House Air Way Bill unless Rate Charge is blank, in which case the FRT Local Amount will appear in the Rate/Charge section. The Rate Charge amount is used to calculate the FRT Local amount automatically. Rate Class This is the Rate Class for printing of House Airway Bills As Agreed This prints on the House Airway Bill 109 Field Name Currency Description Validation Default The Expedient System allows users to invoice in up to 3 Foreign Currencies. For example you may enter USD, and EURO in the Job Currency Field, see below: Optional Blank Then in the charge lines, ensure at least one charge of each currency exists. Please Note: To be able to change the Currency on the line items, the General Ledger Code must have the FXC Indicator set to Yes. This is accessed from menu General Ledger – Chart of Accounts. If you now hit the Button, the system will create 2 new invoices, 1 for each currency. Please Note: Once you have created an invoice, any further changes to either the invoice or the charges screen will not be synchronised. For example if you add an extra charge to the invoice the Charges screen will not reflect the additional charge. Detail Code Description FXC This is the Charge Code. You can perform a look up on this field Mandato ry by clicking: The chart of Accounts Masterfile is found in Menu – General Ledger – Chart of Accounts. The Code is set up in Menu Administration – Alpha Codes Blank (if Rates Module inactive) This is the Charge Code Description N/A From Chart of Accounts Masterfile This indicates whether you wish to invoice the customer as a Foreign Currency Invoice. This is only available if the Chart of Accounts Masterfile has FXC Indicator = Yes. The chart of Accounts Masterfile is found in Menu – General Ledger – Chart of Accounts N/A Blank 110 Field Name Description Validation Default PP/Coll Indication whether the charge is Prepaid / Collect. This will populate the House Air Way Bill N/A From Job Registration Curr This is the Currency in which you wish to enter the Amount for. This is only available if the Chart of Accounts Masterfile has FXC Indicator = Yes. The chart of Accounts Masterfile is found in Menu – General Ledger – Chart of Accounts. This defaults to the House Bill Currency. if the House Bill Currency is FXC, then if the Charge Code has FXC Indicator=Yes then this will default to the Foreign Currency N/A Blank FXC Amount This is the Foreign Currency Amount. This is available if you have selected a Foreign Currency Code in the above field. N/A Blank Please Note: If you enter a FXC Amount in and do not check the FXC Indicator, the invoice created will be in AUD. Local Amount This is the Local Currency Amount. N/A Blank GST Amount This is the amount of GST. This is a no entry field and for display purposes only N/A From Amount Total Amount This is the Total Line amount. N/A Amount + GST Amount (if applicable) This is the Entity that is being billed. This can be both the Prepaid or Collect Party. N/A Amount + GST Amount (if applicable) Bill To The above will create 2 invoices, 1 for DEMCON and 1 invoice for SLCTEST 111 Prepare Invoice Once you are happy with the charges, currencies, and exchange variances (where applicable) you now can prepare the Invoice. Click on the corresponding Invoice Number. button to create an Invoice and Once this has been done you will receive the following message: View Invoice Once you have created the Invoice Number then you can view the invoice in order to modify or print it. This screen can also be accessed via Main Menu – Debtors – Input Invoices Creating Tariff’s TLF’s are used as short codes, storing information such as Tariff, Stat, and Treatment Code. This allows users to save time in data entry and when changing TLF information. This is accessed via the Main Menu select Export Forwarding /CMR Functions, Tariff Maintenance 112 Field Name TLF Tariff Stat UQ TRT Description Validation Default This is the Tariff Line File. This is a unique number Mandatory Blank The eight-digit tariff classification applicable to the goods Optional being entered, as specified in Schedule 3 of the Australian Customs Tariff. The statistics code. Mandatory Blank This is the Unit Quantity. E.g.: No for Number or KG for Kilograms This is the 3 letter Treatment Code Optional Blank Optional Blank Optional Blank Optional Blank Instrument This is the Instrument Code. You can click on the lookup the Country Codes Masterfile. AHECC Code This is the Export Code for the TLF. to Blank E-UQ This is the Export Unit Quantity Optional Blank Description This is the Description of the TLF Optional Blank 113 Field Name Description Validation Valid Import This is a no entry field and is for display purposes only. This describes whether the TLF has the correct information. Expedient checks this data with that of Customs and if the information on the TLF is invalid then this will be set to No. Valid Export This is a no entry field and is for display purposes only. This describes whether the TLF has the correct information. Expedient checks this data with that of Customs and if the information on the TLF is invalid then this will be set to No. Auto Rated This is a no entry field and is for display purposes only. This describes the last date in which the Expedient System checked with Customs whether the TLF is valid/in valid. Last Used This is a no entry field and is used for display purposes only. This displays the last time the TLF was used in a shipment Duty Rate This describes the Duty Rate against Preferential Rates: GEN DC DCT DCS FI LDC Preference This describes the Preference Scheme for the following Schemes countries: CA MY NZ PG SG TH US Amended This displays who was the last person to amend the TLF. This is a no entry field, and is used for display purposes only. Date This display the date in which the TLF was last amended. This is a no entry field, and is used for display purposes only. Approved This displays who approved the TLF. Date This display what date the TLF was approved 114 Default N/A N/A N/A N/A Optional Blank Optional Blank N/A Blank N/A Blank Optional Blank Optional Blank EXPORTER’S DECLARATION If the Exporter requires you to perform the export document printing function then the Exporter’s Declaration information is required in order to print the below documents. Creating Parts Adding Parts to the Expedient System is performed via menu Customs Clearance/Tariff Class – CMR Parts. By clicking the button or typing A will place the cursor in the input screen in Add Mode. 115 See below: Field Name Client Id ABN GSTE Supplier id ORG PRF Rule Description Validation Default This is the Customer Code. You can click on the to lookup the Customer Masterfile. This is the Customer’s ABN, this is a no entry field and is used for display purposes only Mandatory Blank Mandatory Customer Masterfile Optional Blank Mandatory Blank Optional Blank Optional Blank Optional Blank This is the GST Exemption Code. You can click on the to lookup the GST Exemption Codes that is downloaded from Customs This is the Supplier Code. You can click on the Supplier Masterfile. to lookup the This is the Origin Country of the Part. You can click on the to lookup the Country Codes Masterfile. This Masterfile is found in the (Administration Menu, Country Codes Masterfile). This is the Product Preference Scheme Code. You can click on the to lookup the Preferences that is downloaded from Customs. This is the Product Preference Rule Code. . You can click on the to lookup the Preference Scheme Types that is downloaded from Customs. 116 Field Name Supplier Part No Description Validation This is the Supplier’s Part Number Optional Default Blank DRC This is the Product Dumping Exemption Code. Optional Blank ADJ This is the Product Adjustment Percentage. Optional Blank ICN This is the Product Import Credit Number. This identifies the Credit Spend. This is the Product Security Code. A Customs-allocated security number that must be quoted when the goods being entered are subject to compliance with either end-use conditions, dumping/countervailing provisional measures or temporary importations. This is the Client’s Part Number. This is what the customer recognises. This prints on Landed Costings This is the Client’s TLF Optional Blank Optional Blank Optional Blank Optional Blank This is the Landed Costing Volume / Weight Factor. Optional Blank This is the Value for Duty Optional Blank N/A Blank N/A Blank Mandatory Blank CSC Code Client Part Cust. TLF Volume Fact VFD Last Used Last Job TLF This is a no entry field and used to display what date this was last used This is a no entry field and used to display what job this was last used for Parts Information This is the TLF that you wish to associate with this part. All other fields in this section relate to the TLF. See the TLF Screen for further details on each field Cost Price Classified Date Approved Date Blank This is the user who classified this part. This is a no entry field and used for display purposes This is the date the part was classified This is the user who approved this part This is the date the user approved this part 117 N/A Blank N/A Blank Optional Blank Blank ENTERING DANGEROUS GOODS INFORMATION If this part is declared as Dangerous, then information pertaining to dangerous goods is found in Options – Enter Dangerous Goods Information. Field Name Description Validation Default Client Id This is a no entry field, and for display purposes only Mandatory Data drawn from Parts Masterfile Part Number This is a no entry field, and for display purposes only Mandatory Drawn from Parts Masterfile Proper Name This is the proper shipping name of the Dangerous Good Optional Blank 118 Field Name Description Validation Default Optional Blank Optional Blank Optional Blank Optional Blank The maximum quantity per inner packaging or article for transporting dangerous goods Optional Blank This is the Emergency Schedule Optional Blank Inner Packaging This describes the type of inner packaging with the Dangerous Good Optional Blank Outer Packaging This describes the type of outer packaging with the Dangerous Good Optional Blank Category This is the Category of the Goods Optional Blank Enter any Special Clause that pertains to this good Optional Blank Class This is the Class of the Dangerous Goods. There are 9 classes of Dangerous Goods: Class 2.1 - Flammable gases Class 2.2 - Non-flammable, non-toxic gases Class 2.2 - Non-flammable, non-toxic gases sub-risk 5.1 (Oxidising gases) Class 2.2 - Toxic gases Class 3 - Flammable liquids Combustible liquids Class 4.1 - Flammable solids Class 4.2 - Substances liable to spontaneous combustion Class 4.3 - Substances that in contact with water emit flammable gases Class 5.1 - Oxidising agents Class 5.1 - Organic peroxides Class 6.1 - Toxic substances Class 8 - Corrosive substances Class 9 - Miscellaneous dangerous goods UN Number This is the four-digit numbers that identify hazardous substances, and articles (such as explosives, flammable liquids, toxic substances, etc.) in the framework of international transport Packing Packing groups are used for the purpose of determining the Group degree of protective packaging required for Dangerous Goods during transportation. Special Contains the numeric codes of special provisions that have to Provisions be met. These provisions concern a wide array of subjects. Limited Quantities EMS Special Clause 119 ENTERING PART WEIGHT INFORMATION To update the Weights of the Part, you can perform this via Options – Update Weights. Please Note: The Part Weight information is needed if users wish to print one of the following documents Packing List Commercial Invoice Certificate of Origin Field Name Description Validation Default Client Id This is a no entry field, and for display purposes only Mandatory Data drawn from Parts Masterfile Supplier Id This is a no entry field, and for display purposes only Mandatory Data drawn from Parts Masterfile Part Number This is a no entry field, and for display purposes only Mandatory Drawn from Parts Masterfile This is the Net Weight of the Part Optional Blank Gross Weight This is the Gross Weight of the Part Optional Blank Cubic Volume This is the Cubic Volume for the Part Optional Blank Net Weight 120 Package Type This is the Packaging type of the part Optional Blank Exports CMR Frequently Asked Questions. Q. OUR I.T. DEPARTMENT INFORMS ME THAT OUR EMAIL IS NOT WORKING.HOW CAN WE APPLY FOR EDN/ESM? A. The Expedient system communicates to and from Customs via email. Two options are available depending on the situation. 1. If you are unable to send/receive email and you are still have access to the Internet you can use the Customs Interactive web site. To use this web site you will require an Microsoft XP/2000+/NT PC, Microsoft Java Virtual Machine installed and an Exported and Registered PKI Certificate. 2. If you are unable to send/receive email and DO NOT have access to the Internet or a Valid PKI Certificate. You will need to find someone in your organisation who does. If they too are unable to access the Internet you will need to action your Business Continuity Plan and obtain the EDN/ESM as a contingency from Customs or have a friendly obtain on your behalf. Once you have obtained your EDN/ESM: EDN. You should use the Job Number as the Senders Reference once you have a clear EDN update this 9 character EDN Number in the Job Screen. ESM. You should use the Job Number as the Senders Reference once you have a clear ESM update this 9 character ESM Number in the ESM Entry screen. This is done my selecting the "U" located under Options. ***** WARNING ***** Once you make any changes in the Customs Interactive Web for any EDN or ESM you are not able to use EDI (Expedient System) to Amend / Change or Withdraw. Any future action must also be made via the Customs Interactive Web site. Q. I SENT MY EDN/ESM OVER 10 MINUTES AGO AND IT STILL INDICATES THAT IT IS "B *BEING SUBMITTED". WHAT DO I DO? A. Expedient communicates to and from Customs via email. Connect to the http://www.customs.gov.au web site and click on "ICS Updates" This will display all declared ICS Outages. If there are no Outages declared by Customs the next step is confirm that there are no email problems in you organisation. NOTE: If other EDN/ESM's have returned OK you could assume email is OK. The Expedient system allows the user to Reset the Submission status if the EDN/ESM has not returned in 10 minutes. The reset option will not display if this 10 minute time has not lapsed. To reset the status you select the "*" Option located in the EDN/ESM Entry screen. NOTE: If you have reset and resent the EDN/ESM once and you still have the same lack of response see below. The procedures are as follows: 1. Re-Check the Customs web site for Outages 2. Contact Your I.T. Support and confirm email is working 3. Contact ICS Help Desk 1800 022 267 Option 2 121 Q. I SENT MY EDN/ESM OVER 10 MINUTES AGO AND IT STILL INDICATES THAT IT IS "I IN-PROGRESS" WHAT DO I DO? A. Expedient communicates to and from Customs via email. Connect to the http://www.customs.gov.au web site and click on "ICS Updates". This will display all declared ICS Outages. If there are no Outages declared by Customs the next step is confirm that there are no email problems in you organisation. NOTE: If other EDN/ESM's have returned OK you could assume email is OK. The Expedient system only allows the user to Reset the Submission status if the EDN/ESM has not returned in 10 minutes and has a valid EDN/ESM (I.e. It was a replacement). The reset option will not display if this 10 minute time has not lapsed. To reset the status you select the "*" Option located in the EDN/ESM Entry screen. NOTE: If the EDN/ESM is NOT a replacement and there is no valid EDN/ESM Number then the only options available are the procedure noted below. NOTE: If the EDN/ESM was a replacement and you have reset and resent the EDN/ESM replacement once and you still have the same lack of response see below. The procedures are as follows: 1. Re-Check the Customs web site for Outages 2. Connect to the Customs Interactive and Search for the EDN/ESM in the Outbound Messages area and then once found click on the re-send link. 3. If this still does not update the status Contact ICS Help Desk 1800 022 267 Option 2 *** Q. I RECEIVE THE ERROR "ATTEMPTED TO LODGE A DOCUMENT WHERE ONE ALREADY EXISTS WITH THE SAME MESSAGE OWNER SITE ID, MESSAGE TYPE AND SENDER S REFERENCE." WHAT DOES THIS MEAN? A. This normally occurs when a user attempts to create an EDN/ESM twice. The most common reason this can happen is when there has been an email outage within you organisation and the user has reset and resent the EDN/ESM. The original EDN/ESM response containing the EDN/ESM Number will normally arrive and update the system. Once this has occurred you can send a replacement. The original EDN/ESM response error / clear indicator can be viewed from option "H" from the EDN or ESM Entry screens. If the original does not arrive for one reason of another you can search for the EDN/ESM in the Customs Interactive system in the Outbound Messages area. If you do not have access to this system Please call ICS Business Support on 1800 022 267 Option 2 and have them resend the response. Q. MY PERMIT HAS ENCRYPTION HOWEVER I CAN'T SEE WHERE TO ENTER IT IN THE EDN SCREEN. WHAT DO I DO? A. The ICS does not require Encryptions on Permits. Simply enter the Permit without the Encryption. 122 Q. I RECEIVE THE ERROR "INVALID GOODS OWNER ID (GOODS OWNER ID=XXXXXXXXXXX)." WHAT DOES THIS MEAN? A. This indicates that Customs have not dealt with the client since the introduction of CMR or you have not entered the ABN correctly. If the ABN is correct then you will need to access the Customs Interactive web site and add the Client into ICS Production. NOTE: Another less common cause could be you have sent the EDN/ESM to the ICS Test system. You can see this in the EDI History Option "H" in the EDN/ESM Entry screen. Q. I HAVE PREVIOUSLY SENT AN ESM AND NOW I WANT TO WITHDRAW IT. HOW DO I DO THIS? A. To Withdraw and ESM you need to firstly delete the attached EDN lines. This is done by selecting Delete line from the ESM Entry screen. Once all lines have been removed from the ESM the Withdraw option will be visible and you may select it. NOTE: Once you have Withdrawn the ESM you will not be able to use this Consol number for ESM again. Q. I HAVE DELETED ALL LINES FROM MY ESM AND NOW I RECEIVE AN ERROR. WHAT DO I DO? A. Now you have deleted all the lines from the ESM you are now able to withdraw the ESM. However if you wish to use the consol in the future do not Withdraw it. Simply leave it in error until you wish to re-submit the EDN Lines. Q. I HAVE WITHDRAWN MY EDN/ESM AND NOW WHEN I RE-SEND IT I RECEIVE AN ERROR. WHAT DO I DO? A. Once you have Withdrawn and EDN/ESM in the ICS system you are unable to use the Job Number for EDN's and Consol Number for ESM's again. The solution here for EDN's is to NULLIFY to Consol option "U" in the Export Job Registration screen. This will remove it from the Consol allowing you to register a new Export Job which will result in a new Job Number. The solution here for ESM's is to create a new Consol. In each Job Registration attached to the old Consol use the "U" option to change the Consol Number to the newly created Consol. Q. WHAT DOES THE WARNING MESSAGE “THE RACA UNDERTAKING FORM HAS NOT BEEN SENT. TO SUBMIT THE FORM TO THE SHIPPER, PLEASE REFER TO THE CUSTOMER MASTERFILE” MEAN? The message only takes affect under the following conditions: IATA Module is turned ON Exporter = YES (Customer Masterfile) Active Shipper Letter Sent Date in the Aviation Security Tab (Customer Masterfile) is blank 123 Regulated Client Status = NO (Aviation Security Tab; Customer Masterfile) EDI Manifest Introduction This module allows Manifest information to be sent from Export Agents to Import agents and from Import agents to Customs Brokers by electronic files, EDI. The EDI Manifest module assists to speed up the registration of Consols and Jobs. Export Jobs can be sent to Overseas Import Agents to populate their Imports systems 124 Each time a manifest is sent or received a notification email is sent to the relevant contacts on both sides EDI Manifest options are available inside the Sea and Air Job Registration screens and the Export Consol screens. Export File Creation and Delivery Manifests sent by the Export Agent to the Overseas Import Agent will follow the process below. 125 EDI Manifest Configuration To allow import and export of manifest data Agents and Departments must be mapped to ensure manifest data is captured correctly. The set up options are available in the Air Import Forwarding folder and the Sea Import Forwarding folder AGENT MAPPING Details of the Agents, Forwarders and Brokers receiving and sending EDI Manifests must be set up in the Agent Mapping screen. Adding an Overseas Agent If you are an Agent use the Agent Mapping screen to set up the Oversea Agents you want to receive import EDI manifests from and send export EDI Manifests to. 126 Field Name Description Validation Default What is the reason for mapping this agent? Select the appropriate reason for mapping the agent from the pull down menu - “Receiving Import and/or sending Export EDI Manifests from an O/S Agent” Mandatory Blank Mandatory Blank Mandatory Default to match O/S Agent Code Select Yes from the drop down list to allow the import of the agents EDI manifests Mandatory Yes Select the file format the Agent will send to you. What system does the agent use to produce the EDI manifest file? Please refer to Error! Reference source not found. for the details of the Expedient Format which should be passed to your Overseas Agent for their information if they do not use one of the listed formats. Once selected the email address the Overseas Agent should send the EDI Manifests to is displayed. Please advise your Overseas Agent to use this email address. If your Overseas Agent is not able to supply the EDI Manifest in the Expedient format or any other format listed please send an example of the agent’s EDI Manifest to Expedient Software for investigation using Support Tracker. Conditional on Send Export EDI is Yes Blank Mandatory No Conditional on Send Export EDI is Yes Conditional on Send Export EDI is Yes Conditional on Export File Trigger is ETD Blank Details O/S Agent Code O/S Agent Ref This is your customer code for the agent. Use the to zoom on active Overseas Agents. This is reference code for the agent. In Manifests imported from the Agent this is the code they use to identify themselves. This code will also be used in the manifests exported to the agent to identify the recipient. Import Manifest Information Do we receive Import EDI files from them? File Source Export Manifest Information Do we send Export EDI Files to them? Sender Ref This indicates if you want to send Export Manifest EDI to the Overseas Agent Export File Trigger This indicates the trigger for sending the Export EDI Manifest automatically. Select from the pull down menu. Days This is the number of days after ETD the EDI Manifest will be sent This is your reference to the Overseas Agent so they know the Export Manifest EDI came from you. The Sender Ref is usually the code the Overseas Agent uses for your office. Import EDI 127 ETD 0 Field Name Contacts to receive alerts regarding the EDI Import Manifests (Successful/Erro rs) Contact Type Contact Name Email Address Description This table lists the contacts at the Overseas Agent and internally to receive email notifications when new or updated Import Manifests have been received and if there are any errors processing the data. There must be at least one contact at the Overseas Agent and at least one internal User to receive email notifications. Select the appropriate contact type from the pull down menu Use the to find active personnel at the Overseas Agent. If you have selected Internal as the Contact Type the will provide a list of active Users. This is populated when a Contact Name is selected. This field cannot be updated in this screen. If the email address is incorrect please update the Personnel in the Customer Masterfile or the User Masterfile for internal Users Validation Default Active Personnel/Ac tive Users Blank Mandatory O/S Agent Mandatory Blank N/A Blank Export EDI Email Addresses This table lists the O/S Agent contacts and any internal to receive the Users that receive the Export Manifest EDI. EDI Export Manifest File Contact Type Contact Name Email Address Contacts to receive EDI Export Manifest errors Contact Type Contact Name Email Address Select the appropriate contact type from the pull down menu Use the to find active personnel at the Overseas Agent. If you have selected Internal as the Contact Type the will provide a list of active Users. This is populated when a Contact Name is selected. This field cannot be updated in this screen. If the email address is incorrect please update the Personnel in the Customer Masterfile or the User Masterfile for internal Users This table lists the internal Users to receive email alerts when there is a problem sending the Export Manifest EDI. O/S Agent contacts can also be listed here. Select the appropriate contact type from the pull down menu Use the to find active Users. If you have selected O/S Agent as the Contact Type the will provide a list of active Personnel at the Overseas Agent. This is populated when a Contact Name is selected. This field cannot be updated in this screen. If the email address is incorrect please update the User Masterfile for internal Users or the Personnel in the Customer Masterfile for the Overseas Agent. 128 Active Personnel/Ac tive Users Mandatory O/S Agent Mandatory Blank N/A Blank Active Users/Active Personnel Mandatory Internal Mandatory Blank N/A Blank Sending EDI Manifests to Overseas Agents EDI Manifests can be sent from Expedient to the Overseas Agent if the details have been set up in the Agent Mapping screen. The Manifest can be sent automatically or manually. AUTOMATIC SENDING Expedient will run a check every night to see if any manifests are ready to be sent based on the EDI Manifest trigger in the Agent Mapping screen. The date and time the Manifest was sent can be viewed in the Export Consol screen. The EDI Sent flag indicates whether the file has been sent or not and also indicates whether the manifest was an update. ‘M’ indicates the EDI Manifest modified an earlier version or the manifest. On successfully sending the EDI an email will be sent to the Agent EDI Receiving Manifest Contacts for the Oversea Agent listed in the Agent Mapping screen when a new EDI Manifest is sent or when an update to the Manifest is sent. Sending the EDI Manifest will also create an event which can be viewed in the Manifest EDI Submission History from the Options menu in the Air and Sea Consol screens. Double click on a row in the Manifest EDI Submission History screen to view the original text of the EDI message 129 If there are any missing information in the EDI Manifest file a message will be sent to the Internal Export Responsible Contacts listing the missing details. MANUAL SENDING Select the option ‘Send EDI Manifest’ from the Options menu in the SEA Export and AIR Export Consol screens. This option is only available where the EDI Manifest module is active and the Agent is mapped in the Agent Mapping screen. Any missing information will be listed in a pop up message. Provide all the missing information to send the EDI message. 130