1
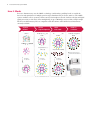
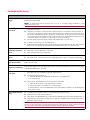
Panomics Solutions User Manual Procarta® Immunoassays Using Polystyrene Beads For serum, plasma, cell lysate or bodily fluid samples. P/N 10482-SPLB Rev.A 020912 ii Procarta® Immunossay User Manual For research use only. Not for use in diagnostic procedures. Trademarks Affymetrix® , Luminex®, xMAP® and Procarta® are registered trademarks of Affymetrix, Inc. and xPonent® are registered trademarks of the Luminex Corporation. All other trademarks are the property of their respective owners. Limited License Subject to the Affymetrix terms and conditions that govern your use of Affymetrix products, Affymetrix grants you a non-exclusive, nontransferable, non-sublicensable license to use this Affymetrix product only in accordance with the manual and written instructions provided by Affymetrix. You understand and agree that, except as expressly set forth in the Affymetrix terms and conditions, no right or license to any patent or other intellectual property owned or licensable by Affymetrix is conveyed or implied by this Affymetrix product. In particular, no right or license is conveyed or implied to use this Affymetrix product in combination with a product not provided, licensed, or specifically recommended by Affymetrix for such use. Citing Procarta® Immunoassay in Publications When describing a procedure for publication using this product, please refer to it as the Procarta® Immunoassay from Affymetrix. Disclaimer Affymetrix, Inc. reserves the right to change its products and services at any time to incorporate technological developments. This manual is subject to change without notice. Although this manual has been prepared with every precaution to ensure accuracy, Affymetrix, Inc. assumes no liability for any errors or omissions, nor for any damages resulting from the application or use of this information. Copyright © 2012 Affymetrix Inc. All rights reserved. Contents iii Contents Intended Use . . . . . . . . . . . . . . . . . . . . . . . . . . . . . . . . . . . . . . . . . . . . . . . . . . . . . . . . . . . . 1 Contacting Technical Support . . . . . . . . . . . . . . . . . . . . . . . . . . . . . . . . . . . . . . . . . . . . . . . . 1 About Procarta Immunoassay Kits . . . . . . . . . . . . . . . . . . . . . . . . . . . . . . . . . . . . . . . . . . . . . 1 How it Works . . . . . . . . . . . . . . . . . . . . . . . . . . . . . . . . . . . . . . . . . . . . . . . . . . . . . . . . . . . . 2 Procarta Immunoassay Kit Contents and Storage Conditions . . . . . . . . . . . . . . . . . . . . . . . . . 3 Sample Type Specific Reagents . . . . . . . . . . . . . . . . . . . . . . . . . . . . . . . . . . . . . . . . . . . . . . . 4 Required Equipment and Materials Not Supplied . . . . . . . . . . . . . . . . . . . . . . . . . . . . . . . . . . 4 Precautions and Technical Hints . . . . . . . . . . . . . . . . . . . . . . . . . . . . . . . . . . . . . . . . . . . . . . 5 Sample Preparation . . . . . . . . . . . . . . . . . . . . . . . . . . . . . . . . . . . . . . . . . . . . . . . . . . . . . . . . 5 Preparing Plasma Samples . . . . . . . . . . . . . . . . . . . . . . . . . . . . . . . . . . . . . . . . . . . . . . . . . . . 6 Preparing Serum Samples . . . . . . . . . . . . . . . . . . . . . . . . . . . . . . . . . . . . . . . . . . . . . . . . . . . 6 Preparing Bodily Fluid Samples . . . . . . . . . . . . . . . . . . . . . . . . . . . . . . . . . . . . . . . . . . . . . . . 6 Preparing Lysates from Cultured Adherent Cells . . . . . . . . . . . . . . . . . . . . . . . . . . . . . . . . . . 7 Preparing Lysates from Cultured Suspension Cells . . . . . . . . . . . . . . . . . . . . . . . . . . . . . . . . . 7 Preparing Antigen Standards . . . . . . . . . . . . . . . . . . . . . . . . . . . . . . . . . . . . . . . . . . . . . . . . 8 Performing the Assay . . . . . . . . . . . . . . . . . . . . . . . . . . . . . . . . . . . . . . . . . . . . . . . . . . . . . . 9 Setup of the Luminex Instrument . . . . . . . . . . . . . . . . . . . . . . . . . . . . . . . . . . . . . . . . . . . . 10 Analyzing Results . . . . . . . . . . . . . . . . . . . . . . . . . . . . . . . . . . . . . . . . . . . . . . . . . . . . . . . . 11 Troubleshooting . . . . . . . . . . . . . . . . . . . . . . . . . . . . . . . . . . . . . . . . . . . . . . . . . . . . . . . . . 11 Setting up and Calibrating the Vacuum Manifold . . . . . . . . . . . . . . . . . . . . . . . . . . . . . . . . 13 Recommended Sample Dilutions for Analytes . . . . . . . . . . . . . . . . . . . . . . . . . . . . . . . . . . . 14 Example Plate Layout . . . . . . . . . . . . . . . . . . . . . . . . . . . . . . . . . . . . . . . . . . . . . . . . . . . . .15 Blank Plate Layout . . . . . . . . . . . . . . . . . . . . . . . . . . . . . . . . . . . . . . . . . . . . . . . . . . . . . . . 15 iv Procarta® Immunossay User Manual 1 Intended Use This user manual is for a Procarta® Immunoassay Kit - Polystyrene Beads from Affymetrix to perform quantitative, multiplexed immunoassays based on the Luminex® technology. The procedure is for simultaneous measurements of multiple protein biomarkers in serum, plasma, cell lysate and bodily fluid (e.g. bronchoalveolar lavage fluid, synovial fluid, cerebrospinal fluid, nasal lavage fluid, peritoneal fluid, tear, blister fluid, adipose interstitial fluid) samples. The assay protocol and reagents supplied are not compatible with other manufacturer's reagents. Each 96-well plate kit is configured to allow for the following usage: 16 wells for an 8-point standard curve (in duplicate), 2 wells for blanks, and up to 78 wells for samples. Procarta Immunoassay kits can be stored for up to 6 months from the date of receipt when stored at recommended temperatures. NOTE: For the most current version of user documentation, go to our website at www.panomics.com Contacting Technical Support For technical support, contact the appropriate resource provided below based on your geographical location. For an updated list of FAQs and product support literature, visit our website at www.panomics.com. Location Contact Information North America 1-877-726-6642 option 1, then option 3; [email protected] Europe +44 1628-552550 [email protected] Asia +81 3 6430 430 [email protected] About Procarta Immunoassay Kits Procarta Immunoassay Kits are available as: Standard pre-mixed panels “By Request” user configured panels New custom assay development for analytes not listed on our website Procarta Immunoassay Kits contain all the reagents required to run the assays. Please order an appropriate standard diluent buffer for a specific matrix. Please contact your local Affymetrix sales representative for new custom assay development for analytes not listed on our website www.panomics.com. 2 Procarta® Immunoassay User Manual How it Works Procarta® Immunoassays use the xMAP® technology (multi-analyte profiling beads) to enable the detection and quantitation of multiple protein targets simultaneously in diverse matrices. The xMAP system combines a flow cytometer, fluorescent-dyed microspheres (beads), dual laser design and digital signal processing to effectively allow multiplexing of up to 100 unique assays within a single sample. The Procarta Immunoassay kits are compatible with all Luminex and Luminex-based instruments currently available. Capture protein SSample Sampl ple le Detect captured protein Antibody A nti tib iib body b ody conj conjugated conjug ugatte ug ed bead beads Label with SAPE Antibody An ntibod ntib body b ody conj conjug conjugated j gate t d beads b bead ead d ds Read on Luminex® Antibody ntibody y conjug conjugated j gated beads Antibody An A Ant ntib nt ttiib ibody od co conjugated onjju ug gate a ed ed beads b ds Biotinylated Bio otinylated y ated d de detection ettectio on o antibody antttib iibo body d Streptavidin-SE (SAPE) Read signal using a Luminex® instrument Incubate for 60 min Incubate for 30 m for min i Incubate for 30 min 3 Procarta Immunoassay Kit Contents and Storage Conditions The Procarta Immunoassay Kit contains the following components listed below. The kits are available in single 96-well plate or ten 96-well plate formats. Refer to the Package Insert for quantities and details of components supplied. The kits are shipped with blue ice. Shelf-life of the kit is 6 months from date of receipt when stored at 2-8 °C. The kits are also supplied with the following inserts: Packaging Insert: Describes the products included in the kit. Premixed Standard Insert: Lists the lot number and starting antigen values used standard value calculation. Bead Analyte Association Insert: Lists the bead number and analyte number. Component Description Antigen Standards, premixed, lyophilized (2 vials each lot for a 1 plate kit) Recombinant proteins in lyophilized powder. Do not reuse, discard after use. Please note that more than 1 lot of vials may be shipped with each kit. Review the Premixed Standard Insert prior to use. Detection Antibody, premixed Detection antibodies in aqueous buffered solution Antibody Polystyrene Beads Capture antibodies conjugated to microspheres in aqueous buffered solution. The Bead ID’s are printed on the inside flap of the Kit Box and also listed in the Bead Analyte Associate Insert. Streptavidin-PE (SAPE) Streptavidin-conjugated R-phycoerythrin in aqueous buffered solution 10X Wash Buffer1 Concentrated aqueous buffered solution Reading Buffer1 Aqueous buffered solution PCR 8-Tube Strip 0.2 mL polypropylene PCR 8-tube strip Filter Plate and Lid 96-well, Filter plate used with the vacuum manifold Plate Seals Adhesive-backed foil plate sealer 1 Contains sodium azide. See WARNING below. WARNING: All chemicals should be considered potentially hazardous. We recommend that this product and its components be handled by those trained in laboratory techniques and be used according to the principles of good laboratory practice. WARNING: This kit contains small quantities of sodium azide. Sodium azide is highly toxic and reactive in the pure form. At this product’s concentration, though not classified as hazardous, build up of sodium azide may react with lead and copper plumbing to form highly reactive explosive metal azide. Dispose of the product in accordance with all State and local regulations. 4 Procarta® Immunoassay User Manual Sample Type Specific Reagents All of the buffers below are compatible with human, mouse, rat, non-human primate, and canine samples. Catalog No. Assay Specific Reagents Description Quantity PC0160 Serum Standard Diluent Kit, 1 plate Serum Standard Buffer Serum Assay Buffer 2.5 mL 9 mL PC0161 Plasma Standard Diluent Kit, 1 plate Plasma Standard Buffer Plasma Assay Buffer 2.5 mL 9 mL PC0162 Serum Standard Diluent Kit, 10 plate Serum Standard Buffer Serum Assay Buffer 25 mL 90 mL PC0163 Plasma Standard Diluent Kit, 10 plate Plasma Standard Buffer Plasma Assay Buffer 25 mL 90 mL PC0164 Cell Lysate Assay Buffer, 1 plate Used for reconstitution of antigen standard and as Assay Buffer 7.5 mL PC0165 Cell Lysate Assay Buffer, 10 plate Used for reconstitution of antigen standard and as Assay Buffer 75 mL PC6002 Procarta Cell Lysis Buffer1 (for cell lysate preparation) Used for cell lysate preparation 20 mL PC0166 Bodily Fluid Buffer, 1 plate Used for reconstitution of antigen standard and as Assay Buffer 7.5 mL PC0167 Bodily Fluid Buffer, 10 plate Used for reconstitution of antigen standard and as Assay Buffer 75 mL PC0168 Sample Dilution Buffer Used for dilution of all samples with high concentration analytes 50 mL 1 Store at -20 °C Required Equipment and Materials Not Supplied Required Equipment/Material Source Vacuum Manifold Millipore Microplate shaker Labline Luminex or Luminex-based instrument MiraiBio, Bio-Rad or other Luminex instrument providers Part Number 4625 or equivalent (must have 3 mm orbit with ability to maintain 500 rpm) 5 Required Equipment/Material Source Vortex mixer Major laboratory supplier (MLS) Adjustable single and multi channel precision pipettes for dispensing 1-20 μL, 20-200 μL and 200-1000 μL MLS Reagent reservoirs, 25 mL and 100 mL capacity Vist Labs Corning Costar Double-distilled (dd) water (H2O) MLS Microcentrifuge MLS Part Number 3054-1002 or equivalent CLS 4873 or equivalent Precautions and Technical Hints Thoroughly read this user manual and product insert that is included with the assay kit. The product insert may contain specific instructions for proper use of the “By Request” or custom panels. Before starting the assay, turn on the Luminex machine and initiate the startup protocol. It takes 30 min for the lasers to warm-up. Make sure the Luminex machine is calibrated according to the manufacturer’s instructions. Some samples may contain high analyte concentrations and require sample dilution for accurate quantitation. Please use Sample Dilution Buffer (PC0168) and refer to the table on Recommended Sample Dilution for Analytes at the end of this manual. When working with samples and standards, change the pipette tips after every transfer and avoid creating bubbles when pipetting. During the incubation steps, cover the 96-well Filter Plate with aluminum foil to minimize exposure of the beads to light. Be careful not to invert the Filter Plate during the assay or allow contents from one well to mix with another well. Use a multi-channel pipette and reagent reservoirs whenever possible to achieve optimal assay precision. Store the detection antibody, antibody beads, Streptavidin-PE, samples, and reconstituted standards (including standard diluents sets) on ice before adding to the Filter Plate. For frozen samples, thaw completely on ice and mix well prior to running the assay. Seal all unused wells with an enclosed Plate Seal to ensure proper vacuum pressure. When sealing the Filter plate with a Plate Seal, gently press your finger over the Plate Seal. Too much pressure can force the fluid through the filter plate. To avoid Filter Plate leakages, do not seal Filter Plates using a rubber roller (or equivalent) as they apply significant pressure resulting in leakage. Sample Preparation Please follow the guidelines below for preparing serum, plasma, cell lysate or bodily fluid samples. A total volume of 25 µL/well of serum, plasma, cell lysate or bodily fluid samples is needed and a minimum of 2 replicates is recommended. Some samples may contain high concentrations of the analytes. Dilution of the samples may be needed if the analyte concentration is above the assay upper limit of quantitation. Serial dilution of the samples may need to be prepared to determine the appropriate dilution factor for accurately measuring the analytes of interest. Use Sample Dilution Buffer (Catalog No. PC0168) to prepare dilutions of the samples. Refer to the table of Recommended Sample Dilution for Analytes at the end of this manual. 6 Procarta® Immunoassay User Manual The TGF-β assay requires a special sample preparation procedure. The TGF- β assay can only detect the active form of TGF- β. The samples must be acid treated and then neutralized to convert the complexed form of TGF- β to its active form. The assay should be processed as a single plex assay since the sample must be acid treated. The TGF-β sample preparation protocol can be found on our website: www.panomics.com. Preparing Plasma Samples Samples may be collected in sodium citrate or EDTA tubes. When using heparin as an anticoagulant, no more than 10 IU of heparin per mL of blood collected should be used since an excess of heparin may give falsely high values of some of the analytes. Step Action Step 1. Centrifuge samples at 1,000 x g at 4 °C for 10 min within 30 min of blood collection Step 2. Collect the plasma fraction. Step 3. (Optional) To minimize lipid and/or platelets in the sample, centrifuge the sample at 10,000 x g for 10 min at 2-8 °C and collect the plasma fraction. Step 4. Use immediately or aliquot and store at -80 °C. Preparing Serum Samples Step Action Step 1. Allow blood to clot for 20-30 min at 20-25 °C. Step 2. Centrifuge at 1,000 x g for 10 min at 20-25 °C. Step 3. Collect the serum fraction. (Alternatively, use any standard serum separator tube following the manufacturer's instructions.) Step 4. (Optional) If there is a high lipid content in the sample, centrifuge at 10,000 x g for 10 min at 2-8 °C. Collect the serum fraction. Step 5. Use immediately or aliquot and store at -80 °C. Preparing Bodily Fluid Samples If the sample contains cells and/or has a high lipid content, centrifuge the sample at 10,000 x g for 10 min at 2-8 °C. Collect the aqueous fraction. Use immediately or aliquot and store at -80 °C. 7 Preparing Lysates from Cultured Adherent Cells Step Action Step 1. Seed cells at a concentration of ~1x10⁴ to 1x10⁵ cells per well of a 96-well plate or 1x10⁵ to 1x10⁵ cells per well of 24-well plate depending on cell type. Grow cells under appropriate experimental conditions. Step 2. Remove cell culture media by aspiration. Step 3. (Optional) Wash cells once with ice cold 1x Phosphate Buffered Saline (PBS). Step 4. Add ice cold Procarta Cell Lysis Buffer to each well (100 μL/well of a 96-well plate or 250 μL/well of a 24well plate). Step 5. Pipette up and down 8-10 times then incubate on ice for 5 min. Step 6. (Optional) Transfer the entire content to either a 96-well PCR plate or a microcentrifuge tube. Step 7. Centrifuge at 2,000 x g for 20 min at 4 °C and collect the supernatant fraction. Step 8. Use immediately or aliquot and store at -80 °C. NOTE: We recommend Lowry Protein Assay for measuring protein concentrations of cell lysates if needed. Preparing Lysates from Cultured Suspension Cells Step Action Step 1. Seed cells at a concentration of ~1x10⁴ to 1x10⁵ cells per well of a 96-well plate or 1x10⁵ to 1x10⁵ cells per well of 24-well plate depending on cell type. Grow cells under appropriate experimental conditions. Step 2. (Optional) Transfer the entire content to either a 96-well PCR plate or a microcentrifuge tube. Step 3. Centrifuge at 500 x g at 4 °C for 5 min. Step 4. Remove the cell culture media by aspiration. Step 5. (Optional) Wash cells once with ice cold PBS, centrifuge and aspirate PBS. Step 6. Add ice cold Procarta Cell Lysis Buffer to each sample (100 μL/well of a 96-well plate or 250 μL/well of a 24-well plate). Step 7. Pipette up and down 8-10 times then incubate on ice for 5 min. Step 8. Centrifuge at 2,000 x g for 20 min at 4 °C and collect the supernatant fraction. Step 9. Use immediately or aliquot and store at -80 °C. NOTE: We recommend Lowry Protein Assay for measuring protein concentrations of cell lysates if needed. 8 Procarta® Immunoassay User Manual Preparing Antigen Standards This section provides instructions on how to make a 4-fold, 8-point standard curve for the assay panel. The antigen standards should be prepared after sample preparation is completed. The serially diluted antigen standards should be added to the assay plate at the same time the samples are added. Each1 plate kit is shipped with two vials of identical antigen standards from the same lot. In some cases an additional set(s) of standards from a different lot may be included in the kit. Please refer to the Premixed Antigen Standard Insert when assigning the Standard 1- Standard 8 antigen values for each analyte. Step Step 1. Reconstitute Lyophilized Antigen Standards Action A. Instructions for assay panels with only 1 standard lot in the kit: 1. Centrifuge the antigen standard vial at 2000 x g for 10 sec. 2. Add 250 μL of sample type-specific standard buffer (Serum or Plasma Standard Buffer, Cell Lysate Assay Buffer or Bodily Fluid Buffer) into the vial. 3. Vortex gently for 30 sec. 4. Incubate on ice for 5-10 min. B. Instructions for assay panels with more than one standard lots in the kit: 1. Centrifuge all the antigen standard vials with different lot numbers at 2000 x g for 10 sec. 2. Add 250 μL of sample type-specific standard buffer (Serum or Plasma Standard Buffer, Cell Lysate Assay Buffer or Bodily Fluid Buffer) into one of the vials. 3. Incubate the tubes on ice for 5-10 min. 4. Vortex gently for 30 sec. 5. Transfer the entire content into the second vial with a different lot number. 6. Incubate on ice for 5-10 min. 7. Vortex gently for 30 sec. 8. If more than 2 lots of antigen standards are in the kit, repeat steps 5-7 until all the vials with different lot numbers are reconstituted. NOTE: For panels with liquid antigens, follow the instructions on the Package Insert. Step 2. Prepare 4-Fold Serial Dilution A. Prepare a 4-fold serial dilution of the reconstituted standard(s) using the PCR 8-tube strip provided. B. Add 200 μL of the reconstituted antigen standards into the first tube of the strip tube and label as Standard 1 (Std 1). C. Add 150 μL sample type-specific standard buffer (Serum or Plasma Standard Buffer, Cell Lysate Assay Buffer or Bodily Fluid Buffer) into Tubes 2-8. D. Using a P-200 pipette, transfer 50 μL of the reconstituted antigen standards from Tube 1 into Tube 2. E. F. G. H. Mix by pipetting up and down for a total of 10 times. After changing the pipette tip, transfer 50 μL of the mixed standards from Tube 2 into Tube 3 Mix by pipette up and down 10 times. Repeat Actions D to G for the rest of the tubes to prepare Std 4-8. Transfer 200 μL 50 μL Antigen Standard Vial Std 1 50 μL Std 2 50 μL Std 3 50 μL Std 4 50 μL Std 5 50 μL Std 6 Std 7 50 μL Std 8 9 Performing the Assay Step Action Step 1. Prepare 1X wash buffer Bring the 10X Wash Buffer to room temperature and vortex for 15 seconds. Mix 20 mL of the 10X Wash Buffer with 180 mL ddH20. NOTE: 1X wash Buffer can be stored at 2-8 °C for up to 6 months. Bring the buffer to room temperature prior to use. Step 2. Prepare the Filter Plate A. Mark the standard, sample and blank wells. For your convenience, a blank layout is provided in the Plate Layout section. B. Seal the un-used wells of the plate with a Plate Seal prior to starting the assay. Keep the unused wells of the plate sealed throughout the whole assay procedure. Place the Filter plate on top of the inverted Filter Plate Lid. The plate should be sitting on the hollow end of the lid and not touching any of the surfaces, except for the borders of the lid. This will prevent the bottom of the Filter Plate from against any surface which can lead to leakage. C. Pre-wet the Filter Plate by adding 150 μL of Reading Buffer into each well. D. Incubate for 5 minutes at room temperature E. Remove the Reading Buffer with vacuum filtration. Reading Buffer should clear wells within 810 seconds. See “Setting Up and Calibrating the Manifold” at the end of this manual Step 3. Add the Antibody Polystyrene Beads A. Vortex the premixed Antibody Beads for 30 seconds at room temperature. B. Add 50 μL of Antibody Beads to each well. C. Remove buffer with vacuum filtration. Step 4. Wash Antibody Beads A. Add 150 μL of 1X Wash Buffer into each well and remove by vacuum filtration. B. Blot the bottom of the Filter Plate thoroughly with paper towels to remove residual buffer. Step 5. Add sample type-specific buffer And 25 μL of sample type-specific assay buffer (Serum, Plasma, or Cell Lysate Assay Buffer or Bodily Fluid Buffer) into each well. Step 6. Add Antigen Standards and Samples Add 25 μL of standards or samples as marked on the plate layout sheet into each well. For blanks, add 25 μL of sample type-specific standard buffer (Serum or Plasma Standard Buffer, Cell Lysate Assay Buffer or Bodily Fluid Buffer) into each well. Step 7. Incubate the Filter Plate A. Gently seal the Filter Plate gently using a Plate Seal provided, place the Filter Plate onto the Filter Plate Lid and completely wrap with aluminum foil. B. Room temperature incubation: 1. Shake the 96-Well Plate at 500 rpm for 60 min at room temperature. 2. Proceed to step 8. C. Alternatively, the 96-Well Plate can be incubated overnight. 1. Shake the Filter Plate at room temperature for 30 min. 2. Transfer the plate to 4 °C and store on a level surface. 3. After incubation, remove the Filter Plate from 4 °C and shake for 30 min at room temperature. 4. Proceed to step 8. Step 8. Wash the Filter Plate A. B. C. D. Carefully remove the Plate Seal to avoid splashing the plate contents. Remove solution with vacuum filtration. Add 150 μL of 1X Wash Buffer into each well then immediately remove with vacuum filtration. Wash the plate three times and after the 3rd wash, thoroughly blot the bottom of the Filter Plate with paper towels. NOTE: When washing the Filter Plate, we recommend using a multi-channel pipette and a large plastic reservoir for the wash buffer or a multi-channel automatic liquid dispenser. Avoid touching the pipette tips to the sides of the wells when adding wash buffer using a multi-channel pipette. 10 Procarta® Immunoassay User Manual Step Action Step 9. Add Premixed Detection Antibodies A. Add 25 μL of Detection Antibodies into each well. B. Gently seal the Filter Plate with a new Plate Seal. C. Set the Filter Plate onto the Filter Plate Lid and Wrap with aluminum foil. Shake at 500 rpm for 30 min at room temperature. Step 10. Wash the Filter Plate A. Repeat Step 8. Step 11. Add SAPE A. B. C. D. Vortex the SAPE solution vial for 20 sec. Add 50 μL of SAPE solution into each well. Gently seal the Filter Plate with a new Plate Seal. Set the Filter Plate onto the Filter Plate Lid and wrap with aluminum foil. Shake at 500 rpm for 30 min at room temperature. Step 12. Wash the Filter Plate A. Repeat Step 8. Step 13. Prepare the Filter Plate for Analysis on a Luminex Instrument A. B. C. D. Add 120 μL of the Reading Buffer into each well. Seal the Filter Plate with a new Plate Seal. Wrap the Filter with aluminum foil and shake at 500 rpm for 5 min at room temperature. Remove the Plate Seal prior to reading on the Luminex instrument. NOTE: We recommend reading the assayed samples on the Luminex instrument immediately. However, the Filter Plate can be wrapped with aluminum foil and stored for up to 48 hours at 4 °C before proceeding. After storage, shake at 500 rpm for 5 min at room temperature prior to reading. Delay in reading the assayed samples may result in decreased sensitivities for some assays. Setup of the Luminex Instrument Software Sample Size DD Gate Timeout Bead Event/Bead Region Luminex 100/ IS100 v 2.318 100 μL 7,500 - 15,000 45 sec 50-100 Bioplex/ Bio-Rad 100 μL 4,335 - 10,000 45 sec 50-100 Miraibio/ Hitachi 100 μL 2,000 - 15,000 45 sec 50-100 Starstation/ ACS 100 μL 4,335 - 10,000 45 sec 50-100 If you are running assays on your Luminex instrument that uses both Plates for Magnetic Beads and Filter Plates for Polystyrene Beads, verify the probe height for each plate type before reading. Failure to adjust the probe height can cause damage to the instrument. The Luminex system allows for calibration of Low and High RP1 target values. We recommend RP1 Low target value settings for Procarta Immunoassays. Please refer to the label inside of the Kit Box or the Bead Analyte Association Insert for bead regionanalyte associations when entering the information into the Luminex acquisition software (xPonent®, Bio-Plex®, MasterPlex®, StarStation®). Please also refer to the Premixed-Antigen Standard Insert when assigning the Standard 1 (Std 1) concentration into the analysis software. Each analyte may have a different Std 1 concentration. A 4 fold dilution should be applied to each subsequent standard (Standard 2-8). For example if the starting concentration was 20,000, then a 4 fold dilution for Std 1-8 would be 20,000, 5000. 1250, 312, 78, 19.5, 4.8 and 1.2 pg/ml. 11 NOTE: If there is a malfunction of the Luminex instrument or software during the run, the Filter can be re-read. Remove the Filter Plate from the instrument and vacuum filter the plate. Resuspend the beads in 120 μL of Reading Buffer, seal with a new Plate Seal and shake at 500 rpm for 5 min at room temperature. The assayed samples may take longer to read since there will be less beads in the wells. Analyzing Results The concentration of the samples can be calculated by plotting the expected concentration of the standards against the MFI generated by each standard. A 4PL or 5PL algorithm is recommended for the best curve fit. The typical Sample Dilution Factor will be 2 when combining 25 µL of sample and 25 µL of assay buffer in each well. Analyze the assayed samples according to the operation manual for the Luminex or Luminex-based instrument. Troubleshooting Observation Probable Cause Recommend Solution Low Flow Rate Partial Blockage of the flow cell Remove the Filter plate and perform a wash and rinse cycle. Instrument needle is partially clogged Replace or clean needle according to the manufacturer's recommendations. Samples and antigen standards not stored on ice Prepare the samples and standards on ice before setting up the assay. Contamination from re-using the Plate Seal Use a new Plate Seal for each incubation step. Contamination from contents from adjacent wells Avoid splashing the Wash Buffer during wash steps into adjacent wells Poor pipetting techniques Use appropriate pipetting techniques. Use new pipette tips for each well during sample and standard addition. Avoid touching pipette tips to sides of the wells when adding wash buffer. High CVs 12 Procarta® Immunoassay User Manual Observation Probable Cause Recommend Solution Low bead count Probe height is incorrect Refer to the Luminex manual for proper adjustment of the needle height. Reading buffer volume added in the last step to resuspend the beads is too low Add 120 μL Reading Buffer into each well and shake at 500 rpm for 5 min at room temperature to resuspend the beads prior to reading on the Luminex instrument. Make sure sample size is set at 100 μL in the acquisition protocol. High bead aggregation Vortex the bead suspension well before using in the assay and ensure that the beads are properly mixed during the incubation steps. Dyes contained in the beads are photo-bleached from overexposure to light Store bead solution in the dark and protect the Filter Plate from light by wrapping the Filter Plate with aluminum foil. Partial blockage of the flow cell Remove the Filter Plate and perform a wash and rinse to the instrument Instrument needle is partially clogged Replace or clean needle according to the manufacturer's recommendations Beads settle on the bottom of the well Confirm that the plate shaker is set to 500 rpm and shaking for at least 5 min before reading. Air bubble in the sample loop Refer to the Luminex manual for proper removal of the air bubble. Standards not reconstituted and diluted correctly Prepare fresh antigen standards following the instructions in the Preparing Antigen Standards Section. Expired reagents were used Reagents are good for 6 months from the date of receipt. Do not use expired reagents. Suboptimal assay conditions Follow the recommended incubation times and temperature. Shake the Filter Plate during all incubations except during optional overnight incubation step (Step 7C). Did not use the appropriate assay diluents Use the same sample type-specific standard and assay buffers for standard and sample preparations. Samples and antigen standards were not stored on ice Prepare and store the samples and standards on ice before setting up the assays Low signal or sensitivity Poor accuracy 13 Setting up and Calibrating the Vacuum Manifold Step Action Step 1. Set Up Vacuum Manifold Step 2. Calibrate Pressure A. Place the Filter Plate on top of the manifold and Turn on the vacuum. B. Press down on all 4 corners of the Filter Plate to form a tight seal. C. Adjust the pressure so that it takes 4-6 seconds to evacuate 150 μL of wash buffer from the wells. If the vacuum is too high, beads can get trapped or pulled through the filter. D. Turn off vacuum as soon as the solution filters through the wells and remove the plate from the manifold. Step 3. Operating the Manifold For all filtration steps, turn on the vacuum pump, place the Filter Plate onto the vacuum manifold and then filter the solution. Avoid splashing and cross-contamination of wells during all wash steps. NOTE: Do not allow the Filter Plates to air-dry following washes and immediately add the next component after each filtration step. We recommend performing all the wash steps next to the manifold to minimize the amount of time that the beads are exposed to air.s. Step 4. Following the last wash in each series, blot the bottom of the Filter Plate thoroughly with a paper towel to remove traces of 1X Wash Buffer. Avoid touching the bottom of the Filter Plate with your fingers or to the bench during manipulations. Immediately move to the next step to ensure that the beads are in the appropriate buffered solution. 14 Procarta® Immunoassay User Manual Recommended Sample Dilutions for Analytes Below are recommended sample dilutions for analytes with high normal serum or plasma concentrations. Use Sample Dilution Buffer (Catalog No: PC0168) for preparing dilutions of samples. Please note that these recommendations are based on normal plasma or serum samples. Dilution factors may need to be modified according to your specific samples. Serial dilutions are recommended when doing high dilutions of samples Species Analytes Recommended Sample Dilution Factor Final Dilution in the assay well Human Adiponectin 4,000 8,000 Human B2M 1,000 2,000 Human D-Dimer 200 400 Human Factor V 200 400 Human Factor VII 200 400 Human Factor VIII 200 400 Human Factor X 200 400 Human Fibrinogen 100,000 200,000 Human ICAM 200 400 Human MMP-2 100 200 Human MMP-3 100 200 Human MMP-9 100 200 Human PAI-1 200 400 Human Protein C 200 400 Human RANTES 200 400 Human Resistin 25 50 Human SAA 200 400 Human SAP 4,000 8,000 Human SCGF-b 25 50 Human TPA 200 400 Human VCAM 200 400 Mouse IgA 20,000 40,000 Mouse IgG1 20,000 40,000 Mouse IgG2a 20,000 40,000 Mouse IgG2b 20,000 40,000 Mouse IgG3 20,000 40,000 Mouse IgM 20,000 40,000 Mouse CRP 1,000 2,000 Rat ICAM 200 400 Rat VCAM 200 400 15 Example Plate Layout Standards Samples Standard 1 Standard 1 1 1 8 8 16 16 24 24 32 32 Standard 2 Standard 2 2 2 9 9 17 17 25 25 33 33 Standard 3 Standard 3 3 3 10 10 18 18 26 26 34 34 Standard 4 Standard 4 4 4 11 11 19 19 27 27 35 35 Standard 5 Standard 5 5 5 12 12 20 20 28 28 36 36 Standard 6 Standard 6 6 6 13 13 21 21 29 29 37 37 Standard 7 Standard 7 7 7 14 14 22 22 30 30 38 38 Standard 8 Standard 8 15 15 23 23 31 31 39 39 Blank Blank Blank Plate Layout 1 A B C D E F G H 2 3 4 5 6 7 8 9 10 11 12 16 Procarta® Immunoassay User Manual