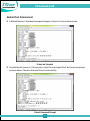
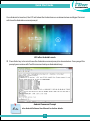
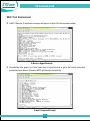
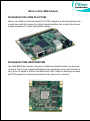
1
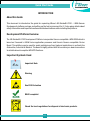
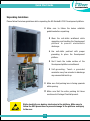
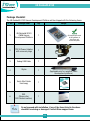
i.MX6 Qseven SOM Development Platform iW-RainboW-G15D Quick Start Guide R2.0 Disclaimer iWave Systems reserves the right to change details in this publication including but not limited to any Product specification without notice. No warranty of accuracy is given concerning the contents of the information contained in this publication. To the extent permitted by law no liability (including liability to any person by reason of negligence) will be accepted by iWave Systems, its subsidiaries or employees for any direct or indirect loss or damage caused by omissions from or inaccuracies in this document. Trademarks All registered trademarks and product names mentioned in this publication are used for identification purposes only. Technical Support iWave Systems technical support team is committed to provide the best possible support for our customers so that our Hardware and Software can be easily migrated and used. For assistance, contact our Technical Support team at, Address Email Website : iWave Systems Technologies Pvt. Ltd. # 7/B, 29th Main,BTM Layout 2nd Stage, Bangalore, India – 560076 : [email protected] : www.iwavesystems.com Quick Start Guide INTRODUCTION About this Guide This document is intended as the guide for unpacking iWave’s iW-RainboW-G15D - i.MX6 Qseven Development platform package and setting up the test environment for it. It also gives details about safety information and important cautions which should adhere while installing the platform. Development Platform Overview The iW-RainboW-G15D Development Platform incorporates Qseven compatible i.MX6 SOM which is based on Freescale’s i.MX6 Series application processor and Generic Qseven compatible Carrier Board. This platform can be used for quick prototyping of any high end applications in verticals like Automotive, Industrial & Medical. The board is highly packed with all necessary on-board connectors to validate almost complete i.MX6 CPU features. Important Symbols Used Important Note Warning Use ESD Protection ROHS complaint Check the local regulations for disposal of electronic products O1 iW-RainboW-G15D UNPACKING Safety Information Before unpacking and installing the Development Platform or adding devices on it, carefully read all the manuals that came with the package. Place the product on a stable surface. To avoid short circuits in electronics, keep all conducting material away from the Development platform. Avoid using platform in extreme dust, humidity and temperature conditions. Do not place the Development platform in wet area. Before using the platform, make sure that all cables are correctly connected and the power adopter is correctly selected. Make sure that Electrical Outlet where you connected the power adapter is not damaged and working fine. If the power adapter is broken, do not try to fix it by yourself. To prevent electrical shock hazard, disconnect the power cable from the electrical outlet before displacing the system. Don’t try to remove the Qseven SOM module from the Development platform unless really required. Before connecting or removing Qseven SOM module from the Development platform, ensure that power cable is unplugged and ESD antistatic guidelines are followed. Check the local regulations for disposal of electronic products. O2 Quick Start Guide Unpacking Guidelines Please follow the below guidelines while unpacking the iW-RainboW-G15D Development platform. Make sure to follow the below antistatic guidelines before unpacking. Wear the anti-static wristband while unpacking and handling the Development platform to prevent electrostatic discharge. Use anti-static pad/mat with proper grounding to place the Development platform. Don't touch the inside surface of the Development platform circuit board. Self-grounding: Touch a grounded conductor every few minutes to discharge any excess static build-up. Make sure that packing box is facing upwards while opening. Make sure that the entire packing list items mentioned in Package Checklist present. Static electricity can destroy electronics in the platform. Make sure to follow the ESD precautions to prevent damage to the platform and injury to the user. O3 iW-RainboW-G15D Package Checklist The iW-RainboW-G15D Qseven Development Platform will be shipped with the following items: Sl. No. Package Item Qty 1 iW-RainboW-G15D i.MX6 Qseven Development Platform 1 2 12V,2A Power Adaptor with universal plugs 1 3 Debug USB Cable 1 4 Stylus 1 5 Quick Start Guide Hard copy 1 6 DVD (Please refer DVD Content section) 1 Image All components used in this platform is Lead free and ROHS complaint (Applicable only for resistive Touch Development platform) Do not proceed with installation, if any of the items listed in the above checklist is missing or damaged. Contact iWave support team. O4 Quick Start Guide SETTING UP THE TEST ENVIRONMENT Getting Start This section describes the step by step procedure to setup the test environment for iW-RainboWG15D Development System. Read the Development Platform Documents Check Boot Mode Switch setting Check Boot Media Switch setting Setting up the Debug port Power ON the Development platform Read the Documents Before setting up the test environment, one must read all the documents of the iW-RainboW-G15D Development platform to know about the Platform, its features and to get familiar with it. These documents are available in the DVD which comes along with the iW-RainboW-G15D Package. Below mentioned documents are available in the DVD, iW-RainboW-G15D Quick start Guide (This Guide) i.MX6 Qseven SOM Hardware User Guide Generic Qseven Carrier Board Hardware User Guide Software User Manual Release Notes for Software Refer DVD contents section to know about the DVD content structure and platform related document’s path. 05 iW-RainboW-G15D Boot Mode Setting iW-Rainbow-G15D Development platform supports different boot mode options for booting. Internal Boot Mode (Default): This mode is used for normal booting and default set while shipping. Please make sure that boot mode switch (SW2) is in this mode while setting up the Test Environment. Serial Downloader Mode: This mode is used when user wants to program boot media using MFG Tool. For more details, please refer Software User Manual. Boot modes can be selected by user using boot mode switch (SW2) settings on i.MX6 SOM as mentioned below . For more details, refer i.MX6 Qseven SOM Hardware User Guide. Boot Mode Settings Truth Table Boot Mode Setting On i.MX6 SOM SW2 (2 Position Switch) POS1 POS2 Internal Boot Mode (Default) OFF ON Serial Downloader Mode ON OFF Image ON - High OFF - Low Use ESD Protection while changing the switch setting. 06 Quick Start Guide Boot Media Setting iW-Rainbow-G15D platform supports different boot media options for booting. Boot media can be selected by user using boot media switch (SW1) settings on i.MX6 SOM as mentioned below. Boot Media Settings Truth Table Boot Media Setting On i.MX6 SOM SW1 (8 Position Switch) POS1 POS2 POS3 POS4 POS5 POS6 POS7 POS8 eCSPI1- SPI Flash (Default) ON ON OFF X X X X X SD3-4 bit Micro SD OFF OFF ON OFF ON ON OFF OFF OFF ON ON ON ON OFF ON OFF SD4-8 bit eMMC Image ON - High OFF - Low X - Don't Care 1. iW-RainboW-G15D platform is loaded with binaries on default boot media. 2. If different boot media is selected other than default one, make sure to load bootable binaries in selected boot media. 07 iW-RainboW-G15D Debug Port Setting iW-RainboW-G15D platform comes with Debug MicroAB to Type A cable for easy debugging and testing. Please follow the below procedure to setup the Debug Micro USB of Development platform. Connect TypeA end of USB cable to PC and Micro AB end of USB cable to Development platform's debug Micro USB connector(J15) as shown below. Debug Port Connection Install the driver for Debug USB Port in Host PC/Laptop using the below link. Drivers located at: http://www.ftdichip.com/Products/ICs/FT232R.htm Open the HyperTerminal on PC/Laptop with the following setting. Baud rate Data bits Parity Stop bits Flow control : 115200 bps :8 : None :1 : None 08 Quick Start Guide Powering ON iW-RainboW-G15D iW-RainboW-G15D platform comes with 12V, 2A power supply with universal plugs. Please follow the below procedure to power ON the Development platform. Connect the 12V power supply plug to the power connector (J3) of the iW-RainboW-G15D platform as shown below and switch ON the power supply. Power Supply Connection Do not use different power adapter other than the supplied one. 09 iW-RainboW-G15D Once Power is applied to iW-RainboW-G15D platform, the Power LEDs in the i.MX6 SOM module and Generic Qseven carrier board will glow as shown below. Power ON Indication Do not proceed with installation, if any of the Power Status LEDs are blinking or not glowing. Contact iWave support team. 10 Quick Start Guide Done with Test Environment Once power is applied to iW-RainboW-G15D platform as explained in the previous section, the HyperTerminal of the PC/Laptop which is connected to the Development platform will immediately show the boot messages of the boot loader. iWave supports below mentioned Operating System Releases for iW-RainboW-G15D Development platform. Linux 3.0.35 (or higher) Android 4.0.4 (or higher) Windows Embedded Compact 7 Depending upon the supported Operating system and boot loader on particular delivery, the Hyper Terminal will show the boot messages as described in the following section. 1. Platform comes with bootable binary in default boot media. 2. Make sure that all the steps mentioned in Getting Start section is followed. 11 iW-RainboW-G15D Linux Test Environment In Linux Release, U-boot boot messages will appear in Hyper Terminal as shown below. U-boot on Terminal Immediately after power on, Press any key in HyperTerminal to go to the U-boot command prompt as shown below. Otherwise Linux will launch automatically. U-boot Command Prompt 12 Quick Start Guide Once Linux is launched, the LCD will show the Linux Penguin images as shown below and HyperTerminal will show the Linux Login. LCD after Linux Launch To Login in Linux, enter “root” in terminal and you will get the Linux command prompt as shown below. Once you get the prompt you are done with Test Environment setup on Linux delivery. Linux Command Prompt Refer Linux Software User Manual for further details. 13 iW-RainboW-G15D Android Test Environment In Andriod Release, U-boot boot messages will appear in Hyper Terminal as shown below. U-boot on Terminal Immediately after power on, Press any key in HyperTerminal to go to the U-boot command prompt as shown below. Otherwise Andriod will launch automatically. U-boot Command Prompt 14 Quick Start Guide Once Android is launched, the LCD will show the Android screen as shown below and HyperTerminal will show the Android command prompt. LCD after Android Launch Press Enter key in terminal to see the Android command prompt as shown below. Once you get the prompt you are done with Test Environment setup on Android delivery. Android Command Prompt Refer Android Software User Manual for further details. 15 iW-RainboW-G15D WEC7 Test Environment In WEC7 Release, E-boot boot messages will appear in HyperTerminal as shown below. E-Boot on HyperTerminal Immediately after power on, Press Space key in HyperTerminal to go to the E-boot command prompt as shown below. Otherwise WEC7 will launch automatically. E-boot Command Prompt 16 Quick Start Guide Once WEC7 is launched, the LCD will show the WEC7 screen as shown below. Once you get the WEC7 screen, you are done with Test Environment setup on WEC7 delivery. 7'' LCD after WEC7 Launch Refer WEC7 Software User Manual for further details. 17 iW-RainboW-G15D DVD Contents iWave supports below mentioned Operating System Releases for iW-RainboW-G15D Development platform iW-G15D-Q7LXC - Linux 3.0.35 or higher iW-G15D-Q7LAC - Android 4.0.4 or higher iW-G15D-Q7WCC - Windows Embedded Compact 7 DVD contents will differ depending upon the operating system supported on the particular delivery. The following Figures show the DVD content structure of each Operating System Release. Linux Release DVD Contents 18 Quick Start Guide Android Release DVD Contents 19 iW-RainboW-G15D WCE7 Release DVD Contents iWave continuously improves software releases with latest kernel version. Contact iWave for latest software release detail. 20 iWave’s other i.MX6 Products iW-RainboW-G15S i.MX6 Pico ITX SBC iWave's new i.MX6 Dual Lite/Solo based Pico ITX SBC integrates all standard interfaces into a single board with ultra-compact yet highly integrated platform that can be utilized across multiple embedded PC, system and industrial designs. iW-RainboW-G15M-i.MX6 MXM SOM The i.MX6 MXM SOM is based on Freescale’s i.MX6 Series Quad/Dual/Solo core processor running at 1GHz.A single ruggedized MXM connector provides the carrier board interface to carry all the I/O signals to and from the MXM module. With 1080p HD decoding & encoding and 2D/3D graphics an enhanced and optimized user experience is achieved . Headquarter Branches INDIA iWave Systems Tech. Pvt. Ltd., JAPAN iWave Japan, Inc. 8F-B, Kannai Sumiyoshi Building, 3-29, Sumiyoshi-cho, Naka-ku, Yokohama, Kanagawa, Japan. Ph: +81 45 227 7626 Email: [email protected] www.iwavejapan.co.jp 7/B, 29th Main, BTM Layout 2nd Stage, Bangalore-560076, India. Ph:+91 80 26683700, 26786245 Fax: +91 80 26685200 Email: [email protected] www.iwavesystems.com FRANCE iWave Systems Technologies 11,Rue Emmanuel Mounier 78370 Plaisir. France. Ph: +33 1 83 62 08 59 Email: [email protected] www.iwavesystems.com Our Partners Across The Globe NETHERLANDS & BELGIUM DACH REGION ITALY Venkelbaan 82 2908 KE Capelle a/d IJssel The Netherlands Tel: +31 10 2580580 Email: [email protected] www.adelco.nl Adelco Electronics USA ACTRON AG BRELCO S.r.l. Posthalterring 18 D - 85599 Parsdorf Germany Tel: +49 89 991509 0 Email: [email protected] www.actron.de Via Emilia 3 20853 Biassono - MB Italy Tel. +39 039 2494280 Email: [email protected] www.brelco.it UK AUSTRALIA/NEWZEALAND BRAEMAC BRAEMAC 9208 Waterford Center Blvd, #140 Austin, TX 78758, USA Tel: +1 512 582 9102 Email: [email protected] www.firstviewconsultants.com Braemac House, 1 Mandarin Court, Centre Park, Warrington, Cheshire. WA1 1GG. Tel: +44 (0)1925 419090 Email: [email protected] www.braemac.co.uk 1/59-61 Burrows Road, Alexandria NSW 2015, Sydney, Australia. Tel: 61 2 9550 6600 Email: [email protected] www.braemac.com.au SINGAPORE NORWAY SWEDEN FirstView Consultants Spyro Technology ACTE AS ACTE Solutions AB Blk 18D, Holland Drive, #15-431 Singapore 275018, Tel:+65 6659 4328 Email: [email protected] www.spyrotechnology.com Vestvollveien 34B 2019 SKEDSMOKORSET, Norway Tel : +47 6389 8900 Fax : +47 6387 9000 Email : [email protected] www.acte.no Box 4115, SE-171 04 Solna Karlsbodavägen 20A, 3tr, Bromma Tel: +46 8 445 28 00 Fax: +46 8 98 26 19 Email: [email protected] www.actesolutions.se NORDIC REGION FRANCE KOREA Hecovej 6, DK-8722 Hedensted. Tel: +45 3067 3330 Fax: +45 9669 5001 E-mail: [email protected] www.m-comp.dk 6 Avenue Morane Saulnier 78140 Velizy, France Tel: +33 1 39 45 15 20 Email: [email protected] www.pne.fr www.futureelectronics.com/emea M-COMP A/S PN Electronics J.S Communications #913, Dojung Tower, Anyang-ro 115, Manan-gu, Anyang-si, Gyeonggi-do, Korea Tel : +82-31-349-9793 Fax : +82 3030 3444 9793 Email: [email protected] www.jscoms.co.kr