1
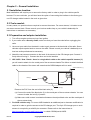
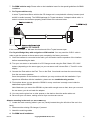
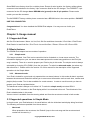
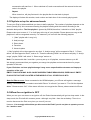
GROM-IPOD V2 Adapter (GROM-IPD2)
Installation and operation instructions
Chapter 1 – Getting Started
1.1 Subject
The GROM iPod V2 adapter—an integration between an iPod (or iPhone) and a car stereo. Featuring
additional 3.5mm phone jack for any audio source (MP3, DVD players, XM radio, GPS and etc…)
1.2 Introduction
Thank you for purchasing the GROM iPod adapter, which has been designed to provide endless hours of
listening pleasure through most vehicles’ factory radios. You will be able to control your iPod/iPhone with
the car stereo buttons or steering wheel controls, and your iPod/iPhone will stay charged when
connected to the car stereo. Additional 3.5mm phone jack will allow you to connect and listen to the
music from many other audio sources with the 3.5mm plug. To ensure that your iPod/iPhone performs
correctly in your car or truck, we recommend that you read this entire manual before attempting install the
GROM interface.
1.3 Precautions
Proper mounting location
Securely install the interface in a location that is free from heat, humidity, moving parts, or direct sunlight.
Beware of the hot airflow from your vehicle’s climate control system. We recommend securing the
interface to a suitable location that is free of sharp metal edges using double-sided tape, Velcro, or wire
ties.
The iPod/iPhone has not been designed to withstand extreme automotive temperatures. You may
damage your iPod/iPhone if you leave it inside your vehicle on a very hot or very cold day. For further
information, please refer to your iPod/iPhone manual.
1.4 Disclaimer
•
This product is not affiliated with any OEM manufacturers.
•
Modifying the radio may void any outstanding warranty.
•
The purchase of this product carries with it no warranties, either expressed or implied.
•
While every care has been taken to provide a quality product, we cannot guarantee that the
GROM iPod adapter will function correctly if installation is not done according to the instructions
provided in this guide. We also cannot guarantee that the GROM adapter will function correctly
with an iPod if the iPod is broken or damaged or not supported.
•
rev. 4.1
Keep your eyes on the road while driving!
Copyright©GROM Audio, 2010
1
•
We are not liable for the misuse of this product. Misuse includes improper installation, damage to
the board or radio while trying to install it, and the illegal use of the radio.
1.5 Completeness and connection of set
a) The GROM audio adapter set consists of the GROM-IPD2 (iPod V2) interface, one iPod dock cable,
and one vehicle-specific cable with optional accessories.
GROM iPod interface (1)
Docking cable (2)
Vehicle specific cable
Figure 1. Package contents
b) The basic package does not include the optional accessories that you can purchase
separately:
3.5mm phone jack 6FT
Figure 2. Optional Accessories (sold separately)
c) The basic wiring diagram of the GROM Audio iPod V2 (GROM-IPD2) adapter is
detailed in Figure 3:
Figure 3. Basic wiring diagram.
1.6 Important Compatibility Notes
If your vehicle is equipped with an external factory CD changer, you must disconnect it in order to be able
to install the interface. You will lose the use of the external CD changer to gain the use of your iPod or
MP3 player. Any built-in CD changers will remain working.
For a full version of the GROM application guide, please visit
http://gromaudio.com/docs/grom_application_guide.pdf
or contact Grom Audio at http://gromaudio.com/support.html
rev. 4.1
Copyright©GROM Audio, 2010
2
Chapter 2 – General Installation
2.1 Installation location:
Most installations will require you to remove the factory radio in order to plug in the vehicle-specific
harness. For some vehicles, you will also have the option of connecting the interface to the factory prerun CD changer cable located in the trunk or glove box.
2.2 Tools needed:
In many cases, no special tools are required to remove the stereo. For some stereos, it is better to use
car stereo removal tools. Please consult your local car audio shop or your vehicle’s dealership for
instructions or assistance as necessary.
2.3 Preparation and adapter installation
1. Turn off car engine and remove key from ignition
2. If your radio uses a Security Code, make sure that you have the code before unplugging the
radio.
3. Un-mount your radio from the dash in order to gain access to the back side of the radio. Some
vehicles require special tools to remove the radio. Please consult your vehicle’s dealership or a
local car audio professional as necessary.
4. Attach the car harness connector to the back of the stereo via the CD changer port. Connect it
firmly without forcing it. Connect the other end to the interface
5. VW / AUDI / Seat / Skoda : there is a single black cable on the vehicle specific harness (3)
you will need to attach it to the metal part of the car stereo chassis The failure to attach the black
cable to the chassis of the stereo will mean that the GROM adapter will not work!
Vehicle harness (1)
Bolt (3)
Black wire (2)
.
Remove the PVC from the end of the black wire (2)
(a) Connect the end of the black wire (2) to the metal part of the car stereo chassis. You can
connect it under the bolt (3) if present
(b) Make sure solid contact is maintained between the striped black wire and the metal part of
the car stereo body.
6. For AUDI vehicles only: For some AUDI headunits an additional part or harness modification is
required in order to gain the access to the CD changer port. The 8-pin CD changer port on such
stereos is occupied by a solid 20-pin connector. Please refer to the instructions at:
http://gromaudio.com/pie-audi-how-to.html or obtain GROM part # AUDS.
rev. 4.1
Copyright©GROM Audio, 2010
3
7. For BMW vehicles only: Please refer to the installation insert for the special guidelines for BMW
installation.
8. For Toyota vehicles only:
In some Toyota/Lexus/Scion vehicles the CD changer ort is occupied with a factory harness (such
as NAV or audio harness). The GROM package for Toyota includes a Y shaped vehicle cable. In
order to connect the interfaces properly please follow to the scheme below.
If the car has no NAV or XM leave the female end of the Toyota harness open.
For Chrysler/Dodge/Jeep with navigation or XM installed: You may need the CHR-Y cable in
order to gain the access to the car stereo port occupied by the factory connector.
9. Once the interface is connected to the radio, you will need to test the operation of the interface
before re-assembling the dash.
10. Turn your car stereo on and switch it to CD Changer mode using the Disk / Mode / CD / AUX
buttons (depending on the stereo type) on your car stereo until it shows Disk 1, Track 01 on the
display.
11. Connect the iPod cable to the iPod. Turn on the iPod. You should now hear the sound coming
from the car stereo speakers.
Once the operation of the interface is confirmed, you may continue with the installation. If you
experience difficulties with the installation, please see our troubleshooting section.
12. Find a place where you can place the GROM. In many cars there is enough room inside the
dashboard to place GROM.
Note: Make sure you mount the GROM in a place with enough room so that, when you re-mount
the car stereo, you do not break the adapter.
13. You may use the glove box or other spaces on the dash to direct the audio cables out.
14. Re-mount your car stereo, making sure its clips or screws are secure.
Adapter mounting in the trunk (for VW and BMW only)
1. Locate the trunk mounting cable in your car (usually located along the left side of the car in the
back).
2. Disconnect the existing CD changer, if present.
3. Attach the matching cables
4. For BMW trunk installation:
rev. 4.1
Copyright©GROM Audio, 2010
4
Some BMW’s are factory wired for a cellular phone. Except for wire location, the factory cellular phone
connector looks identical to the factory 3-pin connector used for the CD changer. The CORRECT 3-pin
connector for the CD changer has a BROWN wire (ground) in the #1 pin position. Please make
certain you use this connector.
The INCORRECT factory cellular phone connector has a BROWN wire in the center position—DO NOT
USE THIS CONNECTOR.
Congratulations! You have installed the GROM iPod adapter. You may now use it with your
iPod/iPhone.
Chapter 3- Usage manual
3.1 Supported iPods
4th Gen iPod and newer / Nano 1st, 2nd, 3rd, 5th Gen and Nano-chromatic / iPod Video / iPod Photo /
iPod Classic 1st and 2nd Gen / iPod Touch 1st and 2nd Gen / iPhone / iPhone 3G / iPhone 3GS
3.2 Basic features
The GROM-iPod adapter has two modes of operation:
3.2.1
Simple mode:
iPod stays unlocked. Your iPod can be controlled via its clickwheel or via car stereo controls. The
information displayed on your car stereo does not represent the actual song position on the iPod (the
song’s number). There is no need to prepare your iPod to play in this mode. The simple mode is always
selectable by choosing CD1 (DISK1) from the car stereo. To switch to advanced mode, just select any
disk other than 1. Please refer to the section 3.3 of this manual for the description of the supported
operations in the Simple Mode.
3.2.2
Advanced mode:
Your iPod is locked for control and only operated via car stereo buttons. In this mode all data is synched
between the stereo and iPod which allows you to see current information such as track time, number and
playlist (disk) number. Text is also available for certain stereos. In order to use this mode you have to
prepare your iPod as explained below.
The advanced mode is always on for disks 2-9. To switch to simple mode just select DISK 1
“Ok to disconnect” is shown on the iPod display while it is connected to this unit. The clickwheel of the
iPod is disabled when in this mode.
Volume control is available from the steering wheel and from the car stereo controls in both modes.
3.3 Supported operations in Simple Mode
In simple mode, your iPod behaves in its usual fashion, with the clickwheel and display being functional.
The following controls are possible from the car stereo:
-
Next track
When pressed on the car stereo, the iPod will jump to the next song and the car stereo track
number will increase by 1.
rev. 4.1
Copyright©GROM Audio, 2010
5
-
Previous track
When pressed on the car stereo, the iPod will jump to the previous song and the car stereo track
number will decrease by 1
-
Fast Forward
When pressed, the iPod will start moving quickly through the current track.
-
Fast Reverse
When pressed, the iPod will start rewinding the current track.
-
Play/Pause
When the stereo is turned to the CD changer mode, the iPod will automatically start playing.
Turning the stereo off or switching to another source (FM, AM, etc.) will cause the iPod to pause
the current track.
-
Disk Change
When changing the disk other than 1 the iPod will switch to the Advanced Mode
None of the information displayed during the simple mode is related to the song currently playing. The
display will show: DISK 1 TRACK xx TIME 00:00. Track information can change from 00-99.
3.4 Supported operations in Advanced Mode
In advanced mode iPod controls will be locked and the following operations will be supported:
-
Next track
When pressed on car stereo, iPod will jump to the next song and car stereo track number will
represent song number in a current playlist
-
Previous track
When pressed on car stereo, iPod will jump to the previous song and car stereo track number will
represent song number in a current playlist
-
Fast Forward
When pressed iPod will start rewinding current track forward. Time on car stereo will represent
actual position within the audio track
-
Fast Reverse
When pressed iPod will start rewinding current track backward. Time on car stereo will represent
actual position within the audio track
-
Play/Pause
When stereo is turned into CD changer mode the iPod will automatically start playing in simple
mode at the last position it was left.
-
Scan
Allow to skip tracks by 10 when set. Next track will jump to current track+10. Previous track will
jump to current track-10. It is helpful to skip the whole album (usually ~10 songs)
-
Disk Change
When you select Disk 2-9, iPod will stay in Advanced Mode and will resume last playing track in a
playlist. Once DISK 1 is selected, iPod will switch over to Simple Mode
-
Mix/Random
When turned on it will allow to play songs in a shuffle mode through the whole playlist. The track
rev. 4.1
Copyright©GROM Audio, 2010
6
enumeration will start from 1. When switched off, track enumeration will be restored to the real
order in the playlist.
-
Repeat
When turned on, will play first track in the playlist after the last track is played.
The display will show disk number, track number and track time of the currently playing track.
3.5 Playlists set up for advanced mode
To use your iPod in Advanced Mode you have to define playlists. The number of playlists depends on the
stereo (usually 5-8). We recommend naming the playlists starting with the number according to the
desirable disk position. The first playlist is ignored by GROM; therefore, it should be a “fake” playlist.
Please make sure to name it “1” so it will stay at the top of your playlists. Please place one song to this
playlist so it will be recognized correctly. For instance if you can have the following playlists:
1. (“fake” playlist with 1 song in it)
2. Andy’s songs
3. Disco dance
4. Favorites
5. House rhythms
1 (“fake” playlist) will not be mapped to any disk, “2. Andy’s songs” will be mapped to Disk 2, “3. Disco
dance” will be mapped to Disk 3, and so on. Therefore selecting DISK 2 on car stereo will play “2. Andy’s
songs” playlist, DISK 3 will select “3. Disco songs” and so on.
Note: For stereos with disk ^ and disk V you may set up to 10 playlists, on some stereos up to 99.
We strongly recommend that you organize your songs into playlists and enumerate them for proper
operation of this unit.
If your iPod does not have playlists/songs it may cause unpredictable outcomes and improper
operation of the unit.
EMPTY PLAYLISTS MAY ALSO CAUSE UNPREDICTABLE BEHAVIOURS, ESPECIALLY EMPTY
PLAYLISTS THAT ARE LOCATED IN THE MIDDLE OF ALL OTHER PLAYLISTS.
Note for iPhone users: Once connected to the GROM adapter, your iPhone will register a message
stating “This accessory is not made to work with iPhone.” It will ask if you want to “Turn ON the Airplane
Mode.” Please answer “NO”. If the stereo still does not recognize the iPhone, please restart the iPhone
3.6 When the car ignition is OFF
When you turn your car stereo or car ignition off, the iPod will automatically will go into sleep mode. In the
sleep mode, the iPod will still consume power—although very little—from the car battery. There is no
need to disconnect the iPod every time you turn off your car.
However, it is strongly advised that you disconnect the iPod if you do not plan to operate your car
for 1 week or more.
rev. 4.1
Copyright©GROM Audio, 2010
7
3.7 Using AUX input on your GROM-IPD2 adapter
There is the additional 3.5mm AUX jack for the alternative audio sources such as MP3 player, DVD,
GPS, XM and etc. You can use it by simply plugging in one of those devices. We recommend that you
unplug the iPod/iPhone from the dock connector if you are using the AUX input on GROM-iPD2 adapter.
If you don’t unplug the iPod/iPhone and connect the 3.5mm audio source at the same time some sound
interference may occur.
3.8 Troubleshooting
Symptom
Cause
Remedy
No power
Bad connection
Check the cable connections.
Radio is not recognizing
Some Honda, Toyota, and Lexus car stereos
After connecting the adapter turn the ignition
GROM iPod interface
have to be restarted before the radio catches
off and back on
the signal
Radio is not recognizing
External CD changer is present
GROM iPod interface
Make sure to disconnect the external CD
changer
Radio is not recognizing
Bad cables or cables are not connected
GROM iPod interface
properly between the interface box and car
Check connection and cables, push in firmly.
radio.
You can hear the music
The Firmware on the iPod may not be
from the iPod but you
updated
can’t control it from the
or
stereo
iPod needs to be reset
Update the firmware on the iPod
Reset the iPod (resetting will not erase your
music, it will only restart the iPod)
You can’t hear the music
An empty album or playlist is selected on the
Make sure that the non-empty album or
from the iPod
iPod
playlist is selected on the iPod
or
No CD changer is selected
Make sure CD changer, SAT mode or AUX is
selected ( correct key depends on your
stereo)
The music is distorted
EQ or BASS boost options are turned ON on
Make sure all EQ and BASS boost options
the iPod
are turned OFF on your iPod
For VAG only:
Single black wire on the vehicle specific
Attach the black cable to the car stereo body
Radio is not recognizing
harness (3) is not attached to the stereo
Make sure it is properly grounded
GROM iPod interface
chassis ( stereo body)
For BMW only:
iBus wire have come loose
Make sure the IBus wire is securely attached
Radio is not recognizing
Sometimes when using T-Tap clips, the IBus
by using multimeter or slightly tighten the T-
GROM iPod interface
wire may not receive proper connection due
Tap connector so its slot is smaller.
to its wire size.
Audio is coming only
The 10-pin sound connector is not aligned
Make sure that 10-pin sound connector on
from 1 speaker
correctly
vehicle cable is aligned correctly
Audio is not coming from
The audio cable is not inserted properly.
Make sure that the audio cable inserted
the speakers
rev. 4.1
properly.
Copyright©GROM Audio, 2010
8
3.8 Support
For questions or technical support please visit http://gromaudio.com/support.html Your question will
be answered within next business day.
Chapter 4. Warranty, license agreement and disclaimers
4.1 THIRTY (30) - DAY MONEY BACK WARRANTY.
You can return any product purchased directly from GROM AUDIO or from www.InDashPC.org,
referencing a Return Merchandize Authorization (RMA) during the Thirty-(30) day period following
shipment by GROM AUDIO, may be returned for a full refund of the purchase price actually paid for any
reason. The RMA number must be obtained from GROM Audio Customer Support via web form on
www.gromaduio.com/support.html, and is valid for only fifteen - (15) days from its issuance. RMA
must be noted on the outside of the returned PRODUCTS’ packaging. The PRODUCTS must be returned
in its original packaging, intact, without any evidence of tampering with the PRODUCTS or physical
damage caused by the Customer (End-User). We would strongly recommend that the item be shipped
insured. We are not responsible for the lost or stolen items.
SHIPPING AND HANDLING OF THE END-USER IS NOT REFUNDABLE.
PLEASE ALLOW UP TO TWO (2) WEEKS FOR GROM AUDIO TO CREDIT YOUR ACCOUNT.
a. ONE (1) YEAR LIMITED WARRANTY
This warranty covers any supplied or manufactured parts of the product that, upon inspection by GROM
Audio authorized personnel, is found to have filed in normal use due to defects in the material or
workmanship. This warranty does not apply to the installation expenses. Attempting to service or modify
this unit, operating this unit under conditions other than the recommended will render this warranty void.
Unless otherwise prescribed by law, GROM Audio shall not be liable for any personal injury, property
damage and or any incidental or consequential damages of any kind (including water damage) resulting
from malfunctions, defects, misuse, improper installation or alteration of this product.
All parts of this product are guarantied for a period of 1 year as follows:
Within the first 12 months form the date of purchase, subject to the conditions above, Grom Audio will
repair or replace the product at their discretion, if it is defective in the material or workmanship.
All customers should contact GROM Audio support team at http://gromaudio.com/support.html and
obtain an RMA number. All defective adapters returned to Grom Audio within warranty period must be
accompanied by the original invoice (or copy).
All shipping handling charges are non-refundable. Warranty does not cover normal tear and wear,
damages due to negligence, improper installation and operation.
SHIP TO:
GROM AUDIO
P.O. Box 619
Belmont CA 94002
rev. 4.1
Copyright©GROM Audio, 2010
9