1
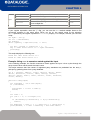
© 2010 – 2012 Datalogic Automation S.r.l. - ALL RIGHTS RESERVED - Protected to
the fullest extent under U.S. and international laws. • Copying, or altering of this
document is prohibited without express written consent from Datalogic Automation
S.r.l.
Datalogic and the Datalogic logo are registered trademarks of Datalogic S.p.A. in
many countries, including the U.S.A. and the E.U.
All other brand and product names mentioned herein are for identification purposes
only and may be trademarks or registered trademarks of their respective owners
Published 31 October 2012
Printed in Donnas (AO), Italy.
Lighter – Project Editor User’s Manual
2
REVISION INDEX
REVISION INDEX
iii
Revision
Date
Number of added or
edited pages
6.0.0
31/10/2012
Release
Lighter – Project Editor User’s Manual
SUMMARY
SUMMARY
REVISION INDEX.............................................................................................................................................. iii
SUMMARY ........................................................................................................................................................ 4
1
WELCOME................................................................................................................................................ 6
1.1
2
1.1.1
Using the Help System: ........................................................................................................... 6
1.1.2
Contents of the Help:............................................................................................................... 6
GETTING STARTED WITH PROJECT EDITOR ..................................................................................... 8
2.1
About Project Editor ......................................................................................................................... 9
2.2
Work environment overview........................................................................................................... 10
2.2.1
3
3.1
Editor configuration ........................................................................................................................ 13
3.2
Creating a project ........................................................................................................................... 14
3.3
Adding files to the project............................................................................................................... 16
3.3.1
Creating a new source file ..................................................................................................... 17
3.3.2
Importing source or resource files into a project ................................................................... 17
Working with Source files ............................................................................................................... 18
3.4.1
Copying, cutting, and pasting text ......................................................................................... 19
3.4.2
Searching or replacing text.................................................................................................... 20
3.4.3
Renaming or deleting files ..................................................................................................... 21
3.4.4
Exporting source files ............................................................................................................ 21
3.5
About Formatters............................................................................................................................ 22
OPENING, SAVING, AND DELETING PROJECTS............................................................................... 23
4.1
Opening a project ........................................................................................................................... 24
4.2
Saving a project.............................................................................................................................. 25
4.2.1
Saving a project locally.......................................................................................................... 25
4.2.2
Saving a project to the device ............................................................................................... 25
4.3
5
Work environment components:............................................................................................ 11
MANAGING PROJECTS ........................................................................................................................ 12
3.4
4
About this Help System .................................................................................................................... 6
Managing files on the device.......................................................................................................... 26
4.3.1
Opening a project from a device............................................................................................ 26
4.3.2
Saving a project as the default project .................................................................................. 26
4.3.3
Deleting a project from the device ......................................................................................... 26
SENDING PROJECTS TO MARKING ................................................................................................... 27
5.1
Connecting to the device................................................................................................................ 28
5.2
Running a project ........................................................................................................................... 29
5.2.1
Manual Mode vs. Auto Mode................................................................................................. 29
5.2.2
Executing the marking operation ........................................................................................... 29
5.3
Testing a project............................................................................................................................. 30
Lighter – Help Online Manual
4
SUMMARY
6
LASER ENGINE LANGUAGE REFERENCE ......................................................................................... 31
6.1
6.1.1
What are identifiers................................................................................................................ 32
6.1.2
Reserved words (Keywords) ................................................................................................. 32
6.2
Commenting the code .................................................................................................................... 34
6.3
Declarations ................................................................................................................................... 35
6.3.1
Declaring Functions............................................................................................................... 35
6.3.2
Declaring Classes.................................................................................................................. 35
6.3.3
Declaring Variables ............................................................................................................... 36
6.3.4
Declaring Constants .............................................................................................................. 37
6.4
Control Statements......................................................................................................................... 38
6.4.1
Break ..................................................................................................................................... 39
6.4.2
Const ..................................................................................................................................... 40
6.4.3
Continue ................................................................................................................................ 41
6.4.4
For ......................................................................................................................................... 43
6.4.5
Function ................................................................................................................................. 44
6.4.6
If...else ................................................................................................................................... 45
6.4.7
Label ...................................................................................................................................... 47
6.4.8
Return .................................................................................................................................... 47
6.4.9
Switch .................................................................................................................................... 48
6.4.10
Throw..................................................................................................................................... 50
6.4.11
Try...catch .............................................................................................................................. 53
6.4.12
Var ......................................................................................................................................... 55
6.4.13
While...................................................................................................................................... 56
6.4.14
With........................................................................................................................................ 57
6.5
Classes and Methods (Member functions)..................................................................................... 59
6.5.1
Qualified Names .................................................................................................................... 59
6.5.2
Class Properties .................................................................................................................... 59
6.6
5
Identifiers and reserved words ....................................................................................................... 32
Native and Built-in Objects............................................................................................................. 60
6.6.1
Native Objects ....................................................................................................................... 60
6.6.2
Arguments variable................................................................................................................ 96
6.6.3
Built-in Constants .................................................................................................................. 97
6.6.4
Built-in Functions ................................................................................................................... 98
6.6.5
Built-in Operators................................................................................................................. 101
Lighter – Project Editor User’s Manual
CHAPTER 1
1 WELCOME
1.1 About this Help System
This Help System is designed for developers who will be using Project Editor to write and manage
programs so as to customize and automate laser engraving operations.
Project Editor is integrated into Laser Editor.
1.1.1 Using the Help System:
•
•
To access the whole contents, choose Help > Help from the Project Editor's menu bar, or
press F1 in the main screen of the application.
To use the context-sensitive Help: press F1 (or the ? button in the title bar) to open dialog or
window level Help.
1.1.2 Contents of the Help:
In particular, the Help is organized into the following main topics:
Chapter
Contents
Getting started with
Project Editor
Presents an overview of the product in terms of scope and work
environment.
Managing Projects
Describes how to create a project, how to add source or resource files, as
well as to manage files.
Opening, Saving, and
Deleting Projects
Describes how to open or save an existing project, either locally or to/from
the laser device.
Sending projects to
marking
Describes how to test and run a project, and how to send it to marking.
Laser Engine Language Describes all of the objects, types, functions, variables, classes, and
Reference
constants that can be used to write your own programs.
Lighter – Help Online Manual
6
CHAPTER 1
7
Lighter – Project Editor User’s Manual
CHAPTER 2
2 GETTING STARTED WITH PROJECT EDITOR
This chapter is organized into the following sections:
Topic
What you will learn
About Project Editor
Scope and overview of Project Editor.
Work environment overview
Overview on how the work environment is organized.
Lighter – Help Online Manual
8
CHAPTER 2
2.1 About Project Editor
Project Editor is a programs editor integrated into Laser Editor. It has a friendly user interface,
advanced debugging functions, and is provided with samples programs and reference material.
Developers can use this tool to write and manage programs so as to interact with the laser system.
Such programs are then interpreted and executed via the Laser Engine. The programming language is
an implementation of a subset of ECMAScript 4.0. ECMAScript, which is also called JavaScript or
JScript by some vendors.
By creating your own programs with Project Editor you can:
•
control the marking process
•
fully customize your layout
•
interact with users and with other programs or devices
•
automate procedures and update the layout's contents at runtime
Project Editor is launched by choosing File > Project Editor from the Laser Editor's menu bar.
Tip:
Reference material on the programming language is provided into the Laser Engine
Language Reference section of this Help System. To access it, choose menu Help >
Help or press F1 at a window level.
Related topics:
9
•
Work environment overview
•
Managing Projects
Lighter – Project Editor User’s Manual
CHAPTER 2
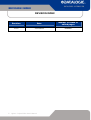
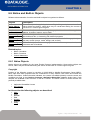
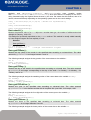
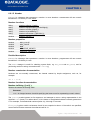
2.2 Work environment overview
This section provides an overview of the Project Editor work environment.
The picture below shows the main window of Project Editor when you access it:
Tip:
To hide/unhide a pane in the Project Editor window, either use the Window menu or rightclick in a blank area next to the toolbar.
Lighter – Help Online Manual
10
CHAPTER 2
2.2.1 Work environment components:
Area
Description
Menu bar with all the Project Editor commands. All functions are described later.
Toolbar - It shows the tools that allow creating, managing and running the project. Point
and hover a button to display a tooltip. All functions are described later.
Right-click this area to display a shortcut menu that allows you to hide/unhide the panes 5,
6, and 7.
Project Files pane - It lists the source files and resource files that compose the current
project. Right-clicking an item (either the project folder, the source files folder, the resource
files folder, or a file) will result in a shortcut menu being displayed on which you can choose
options for files management.
This window can float over the work area, or you can dock it at the left-side of the window
by double-clicking its title bar. Furthermore, you can hide/display this window by rightclicking next to the toolbar and then selecting/deselecting the corresponding option.
Program editor area - This is the area where the source file is displayed. You can enter
your code, edit it, copy, paste or search the code by using the menus or the toolbar. To
customize how the editor looks, choose Edit > Configuration and then enter the desired
values.
Output area - When you run a project, it displays the relevant status or error messages.
This window can float over the work area, or you can dock it at the bottom of the window by
double-clicking its title bar. Furthermore, you can hide/display this window by right-clicking
next to the toolbar and then selecting/deselecting the corresponding option.
11
Lighter – Project Editor User’s Manual
CHAPTER 3
3 MANAGING PROJECTS
This chapter is organized into the following sections:
•
Editor configuration
•
Creating a project
•
Adding files to the project
•
Working with Source files
•
About Formatters
Lighter – Help Online Manual
12
CHAPTER 3
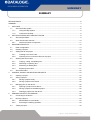
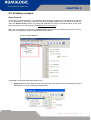
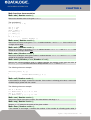
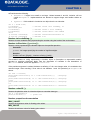
3.1 Editor configuration
You can customize Project Editor in terms of syntax formatting of the source files during editing.
To customize the editor:
1. From the Project Editor's menu bar, choose Edit > Configuration. The Preferences dialog box
is displayed showing the current settings:
2. From the Element list, choose the item(s) you want to change the formatting for and enter the
desired values.
3. When finished, click OK.
Related topics:
13
•
Creating a project
•
Adding files to the project
Lighter – Project Editor User’s Manual
CHAPTER 3
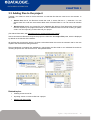
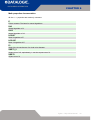
3.2 Creating a project
About Projects
The Project is a program with a .xqs extension that works as a "container" for the files that are used to
run the application. In particular a project is composed by Source files, that is, the files that contain the
code, and Resource files, that is, any image file, database file, Word or Excel documents, and so forth
that are required to run the program. (See Adding files to the project).
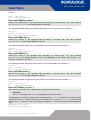
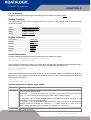
When you are working on a project, the Project Files pane lists all the files that compose the project.
The pane is displayed by default on the left side of the window.
Figure Project Files pane
In particular, the Project Files pane allows you to:
•
Right-click the Project folder to open a shortcut menu that shows a list of commands for project
management (such as renaming or adding files):
Lighter – Help Online Manual
14
CHAPTER 3
•
Right-click any document or project file to open a shortcut menu that shows a list of commands
relevant to it.
•
Move the pane to another location in the window by clicking the title bar. To restore the original
position and dock the pane, double-click the title bar.
•
Hide/unhide the pane by right-clicking in a blank area next to the toolbar, and then
deselect/select the corresponding item.
To create a new project:
1. Do one of the following:
o
Click the
New Project button on the toolbar.
o
From the menu bar, choose File > New Project.
2. A new default project is created, named Untitled, which contains a default source file
named main.qs. You can use the default project as the basis for your application.
3. If you want, rename the project or the file as required: Right-click the name, choose Rename
file, and then enter the new name.
4. Enter the code in the source file as required.
5. Add or import any Source or Resource files you need by doing one of the following:
o
Right-click the Project folder and choose the option you want.
o
Choose a command from the File menu.
6. Save your project as required. (See Saving a project)
To install a project deployed from somebody else:
According to the format the project comes to you (flat files or zipped archive), do the following steps
from point "2" or "1" respectively:
1. Unzip the archive in a local directory.
2. Follow the steps for opening a project.
3. Follow the steps for saving a project to the device.
Tip:
Reference material for developers is provided into the Laser Engine Language
Reference section of this Help system.
Related topics:
15
•
Adding files to the project
•
Importing source or resource files into a project
Lighter – Project Editor User’s Manual
CHAPTER 3
3.3 Adding files to the project
Typically, you create (or open) a Project and then you add the files that are used to run the program. In
particular:
•
Source files, that is, the files that contain the code. A source file has a .qs extension. You can
directly enter the code into the program editor area of Project Editor, or you can import an existing
file.
•
Resource files, that is, any image file, icons, database file, Word or Excel documents, and so forth
that are required by the program at runtime, as well as XML files that are used for marking on plastic
cards. You can import any of these files into your project.
(For further information, see Importing source or resource files into a project.)
Source and resource files that compose the project are listed into the Project Files pane, which is displayed
by default on the left side of the window.
All the files that compose the project, are then synchronized when the project is executed, that is, they are
copied to the device before being executed.
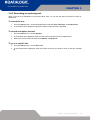
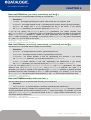
Files management commands are available by right-clicking the files folder or an individual file and then
choosing an option form the shortcut menu. See pictures below:
Related topics:
•
Creating a new source file
•
Importing source or resource files into a project
•
Working with Source files
Lighter – Help Online Manual
16
CHAPTER 3
3.3.1 Creating a new source file
To create a new file:
1. Create the project (See Creating a project) and then do one of the following:
o From the menu bar, choose File > New source file.
o In the Project Files pane, right-click the Source Files folder or an existing source file and
then choose New source file from the shortcut menu.
2. In the Input file name window that is displayed, enter the name for the source file and click OK.
Note that the new file is added to the Project Files list. Furthermore, a new tab is opened in the
program editor area allowing you to enter the code.
Tip:
Reference material for developers is provided into the Laser Engine Language Reference section
of this Help system.
To print a source file:
1. Open the file to be printed. (If no file is opened, the command is disabled).
2. From the Project Editor menu bar, choose File > Print source file.
3. Choose the printer and click OK.
3.3.2 Importing source or resource files into a project
You can import both source and resource files. The files that you import are added to the corresponding
folder into the Project Files pane.
All the files that compose the project, are then synchronized when the project is executed, that is, they are
copied to the device before being executed. (See also Running a project).
To import a source file:
You can import an existing source file for further editing.
1. Do one of the following:
o
From the menu bar, choose File > Import source file.
o
In the Project Files pane, right-click the Source Files folder or an existing source file and
then choose Import source file from the shortcut menu.
2. In the Import file window that is displayed, browse to locate the .qs file and click Open.
Note that the file is added under the Source files folder in the Project Files pane.
To import a resource file
You might import image files, icons, database file, Word or Excel documents, as well as XML files.
1. Do one of the following:
o From the menu bar, choose File > Import file.
o In the Project Files pane, right-click the Resource Files folder or an existing resource file
and then choose Import file from the shortcut menu.
2. In the Import file window that is displayed, browse to locate the required file and then click Open.
Note that the file is added under the Resource files folder in the Project Files pane.
17
Lighter – Project Editor User’s Manual
CHAPTER 3
3.4 Working with Source files
You can easily manage or edit source files by using the menu bar, the toolbar, or by right-clicking the files
into the Project Files pane.
For further information:
•
Copying, cutting, and pasting text
•
Searching or replacing text
•
Renaming or deleting files
•
Exporting source files
Lighter – Help Online Manual
18
CHAPTER 3
3.4.1 Copying, cutting, and pasting text
When a source file is displayed in the program editor area, you can use the menu bar o the toolbar to
perform common operations.
To copy, cut, and paste text:
1. Select the text in the source file (or choose File > Select all to select all the code).
o
To copy the text, use the Edit > Copy menu command, or click the
the toolbar.
o
To cut the text, use the Edit > Cut menu command, or click the
toolbar.
o
To paste the text, use Edit > Paste menu command, or click the
toolbar.
2. Use the
19
Undo/Redo commands to reverse the changes.
Lighter – Project Editor User’s Manual
Copy button in
Cut button in the
Paste button in the
CHAPTER 3
3.4.2 Searching or replacing text
When a source file is displayed in the program editor area, you can use the search functions to locate or
replace text.
To search the text:
1. From the Search menu, choose the appropriate command (Find, Find Next, or Find Previous).
2. In the window that is displayed, specify the search criteria and then click Find.
To search and replace the text:
1. From the Search menu, choose Replace.
2. In the window that is displayed, enter the text to be found and text for the replacement.
3. Specify the search criteria and then click Replace or Replace all.
To go to a specific line:
1. From the Search menu, choose Go to line.
2. In the window that is displayed, enter the number of the line you want to move to and then click Go
to.
Lighter – Help Online Manual
20
CHAPTER 3
3.4.3 Renaming or deleting files
You might rename or remove both source and resource files.
To rename a source or resource file:
1. In the Project Files list, right-click the file (not the folder) you want to rename.
2. From the shortcut menu, choose Rename File, enter a new name in the window that is displayed
and then click OK.
To delete a source or resource file:
1. In the Project Files list, right-click the file (not the folder) you want to delete.
2. From the shortcut menu, choose Delete File.
3. Answer Yes in the window that is displayed.
3.4.4 Exporting source files
You might export source files so as to be used for other applications. When you export a file, a copy of it is
saved as a .qs file in another location and the original is kept into your project.
To export a source file:
1. In the Project Files pane, right-click the source file (not the folder) you want to export and then
choose Export file from the shortcut menu.
2. In the Export file window that is displayed, select the folder you want to save the .qs file in, and then
click on Save.
21
Lighter – Project Editor User’s Manual
CHAPTER 3
3.5 About Formatters
Formatters are source files that are supplied with Project Editor. These files can be used as functions
libraries.
Their purpose is to make it easier for developers to create custom applications. For example, as an
integrator, you might need specific functions that these libraries provide.
Formatters have a .qs extension and are stored in the folder ...\Data\Formatters.
To prepare formatters:
1. From the Project Editor's menu bar, choose File > Formatters.
2. In the Project Files section, double click the formatter source file in order to access its code.
Alternatively, right-click Source Files and then click New Source File for creating a new
one.
To use formatters:
1. In the layout, select one or more textual objects.
2. In the property section, set its Custom Formatters property to True.
3. Open the combo box named Script just below the preceeding property and set it with the file
name of the desired property.
Lighter – Help Online Manual
22
CHAPTER 4
4 OPENING, SAVING, AND DELETING PROJECTS
This chapter is organized into the following sections:
23
•
Opening a project
•
Saving a project
•
Managing files on the device
Lighter – Project Editor User’s Manual
CHAPTER 4
4.1 Opening a project
You can open projects that you have previously saved for further editing, or for sending them to the
engraver.
You can open a project that was saved locally, or a project that was saved to a device. (See Opening a
project from a device).
To open a project
1. Do one of the following:
o
From the Project Editor menu bar, choose File > Open project.
o
From the Project Editor standard toolbar, click the
Open project button.
2. In the Choose a project to open window that is displayed, browse to locate the .xqs project
you want to open.
3. Click on Open. The selected project and the related files are listed in the Project Files pane,
and the current source file appears in the programs editor area.
Lighter – Help Online Manual
24
CHAPTER 4
4.2 Saving a project
You can save a project either locally, or to a device so that it is then sent to the engraver through an
automated procedure. Furthermore, you can save a project to a device as the default project
(see Saving a project as the default project).
4.2.1 Saving a project locally
The following procedure allows saving a project with a .xqs extension (Laser Project file) on your disk,
for later use or editing.
To save the project:
1. To save a new, unnamed project:
o
Choose File > Save Project (or click the
button on the toolbar). The project is
automatically saved into the default folder, which depends on your operating system.
For example, if you are using Windows 7, the default folder is ...
C:\Users\UserName\AppData\<Application Name>\Data.
Tip:
To locate the folder where projects are automatically saved in your system, do the following:
Access the system configuration registry (Start > Run, and then digit regedit.)
Navigate
to HKEY_LOCAL_MACHINE\Software\Laservall\DataDirectory to
see the folder's path.
2. To save a copy of an existing project:
o Choose File > Save Project as.
o In the Save project as window that is displayed, either go to the desired location or
keep the default one.
o In the File name box, type a new name for the project and click Save.
4.2.2 Saving a project to the device
The following procedure allows saving a project to the device to which you are connected.
The projects are saved into the folder that is shared with the Laser Engine. They will be sent to the
engraver in an automated way.
To save the project to a device:
1. To save a new, unnamed project:
o From the Project Editor menu bar, choose File > Save project to device. The project is
saved automatically to the current device.
2. To save a copy of an existing project with a specific name:
o From the Project Editor menu bar, choose File > Save project to device as.
o In the Project name window that is displayed, enter a new name for the project and
click OK.
25
Lighter – Project Editor User’s Manual
CHAPTER 4
4.3 Managing files on the device
You can open, save, or delete projects to and from the device to which you are connected.
Furthermore, you can save a project as the default.
In order to interact to a device you must be connected with it (see Connecting to the device).
4.3.1 Opening a project from a device
You can open a project that has been previously saved to a device for edit or test operations, before
sending it to the engraver.
To open a project from a device:
1. From the Project Editor menu bar, choose File > Open project from device.
2. In the window Laser device projects list window that is displayed, all projects that have been
saved to the device are listed. Select from the list the project you want to open and click OK.
4.3.2 Saving a project as the default project
When your project is ready, you can save it to the current device as the default. This way, this project
will be automatically executed whenever the Auto Mode (default mode) is activated, that is, on any
system boot.
To save a project as the default:
1. From the Project Editor menu bar, choose File > Save device default project.
2. In the window Laser device projects list window that is displayed, all projects that have been
saved to the device are listed. Select from the list the project you want as the default and
click OK.
4.3.3 Deleting a project from the device
You can delete a project that has been saved to the device.
To delete a project:
1. From the Project Editor menu bar, choose File > Delete project in device.
2. In the window Laser device projects list window that is displayed, all projects that have been
saved to the device are listed. Select from the list the project you want to delete and click OK.
Lighter – Help Online Manual
26
CHAPTER 5
5 SENDING PROJECTS TO MARKING
This chapter is organized into the following sections:
27
•
Connecting to the device
•
Running a project
•
Testing a project
Lighter – Project Editor User’s Manual
CHAPTER 5
5.1 Connecting to the device
The laser device that you will use for marking your layouts can be either local, in the case of a standalone marking solution, or remote, in the case of a Supervisor unattended marking solution, typically on
a production line.
In both cases, you can use the File menu to connect to the device.
To connect to the device:
1. From Project Editor menu bar, choose File > Connect to device.
2. In the Connect to device device window that is displayed, choose the device you want to
connect to.
Note:
If you have a Supervision installation of Laser Editor, all available devices are listed, both
local and remote (if enabled), while, if you have a Stand-alone installation, only local
devices are listed. In the case of a remote device, the IP Address is also displayed.
3. Click OK.
Related topics:
•
Running a project
•
Testing a project
Lighter – Help Online Manual
28
CHAPTER 5
5.2 Running a project
When you are ready with your project (see Creating a project), you can run the program in two ways:
•
In Manual Mode - By pressing F5 (or clicking
•
In Auto Mode - By saving the project to the device and executing it at the device level by
activating the Auto Mode. (See Saving a project).
Run Project).
5.2.1 Manual Mode vs. Auto Mode
In Auto Mode, programs are executed by the Laser Engine; this means that the currently selected
default project is executed.
In order to test your projects you must switch to the Manual Mode. This way, the Laser Engine waits for
commands rather than executing programs automatically.
To switch to the Manual Mode:
1. From the Project Editor menu bar, choose File > Switch to Manual Mode.
2. Select either the device or the simulator and then run the project.
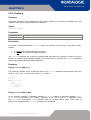
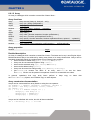
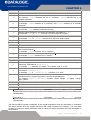
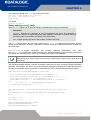
5.2.2 Executing the marking operation
Attention:
When you execute a project (that is, when you press Run Project), all the source and
resource files that compose it are copied to the device before being executed. Note that any
file with the same name will be overwritten.
To send the project to the engraver:
1. Be sure that you are in Manual Mode.
2. Do one of the following:
o
Press F5 or click on
Run Project on the toolbar.
o
Choose Project > Run project from the menu bar).
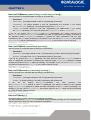
3. Note that in the Output pane of the Project Editor's window, the results of the operation are
displayed. In the example here below the message says that the program has been loaded:
4. To stop the execution, click
29
Stop Project.
Lighter – Project Editor User’s Manual
CHAPTER 5
To save a project to the device for next marking:
From the Project Editor menu bar, do one of the following:
•
To save the project, choose File > Save Project to Device or Save Project to Device As. The
project will be sent to the engraver in an automated way. (For further information, see Saving a
project to the device).
•
To save the project as the default, choose File > Save device default project. (For further
information, see Saving a project as the default project).
5.3 Testing a project
Project Editor can be used to test your projects by executing them on the connected device.
Attention:
The simulation can only be done in Manual Mode. In Auto Mode the feature is not available
and the laser engraving is managed automatically through the Laser Engine (see Manual
Mode vs. Auto Mode).
To test your program:
1. Be sure that you have activated the Manual Mode. To activate it, from the menu bar,
choose File > Switch to Manual Mode.
Note: This is a toggle command: if the Manual Mode is activated, the command is To Auto
Mode, and vice versa.
2. Press F5 (or click
Run Project).
3. To stop the project, click
Stop Project.
Note:
When you press Run Project, a copy of the project that you are executing is automatically
saved to the device.
Lighter – Help Online Manual
30
CHAPTER 6
6 LASER ENGINE LANGUAGE REFERENCE
About this reference
This language reference describes the language features provided by Laser Engine Program for
Applications.
Laser Engine is based on the ECMAScript scripting language, as defined in the ECMAScript Language
Specification. Microsoft's JScript, and Netscape's JavaScript are also based on the ECMAScript standard.
Audience
This reference is addressed to developers who will use Project Editor to write their own programs in order to
automate marking operations, and to customize Laser Editor so as to suit their environment specific needs.
Readers are assumed to have a basic understanding of programming.
Contents
This language reference is organized into the following sections:
Section
Contents
Identifiers and reserved words
What are identifiers and reserved keywords that you cannot use
Commenting the code
How to comment the code within your programs
Declarations
How to declare classes, functions, variables, and constants
Control Statements
A full description of the control statements and how to use them in a
program.
Classes and
functions)
Methods
(Member
What are classes and methods, and what are qualified names.
Native and Built-in Objects
A description of the native and built-in objects that are supplied with
the Laser Engine Program for Applications.
Arguments variable
How to use the arguments variables within functions.
Built-in Constants
A full description of the constants that are provided, which are built
into the Laser Engine Program.
Built-in Functions
A full description of the functions that are provided, which are built
into the Laser Engine Program.
Built-in Operators
A full description of the operators that are provided, which are built
into the Laser Engine Program.
31
Lighter – Project Editor User’s Manual
CHAPTER 6
6.1 Identifiers and reserved words
6.1.1 What are identifiers
Identifiers are the names for things that you get to make up.
Laser Engine Program for Application's identifiers match the regex pattern [_A-Za-z][_A-Za-z0-9]*.
The rules for the construction of identifiers are simple: you may use the 52 upper and lower case
alphabetic characters, the 10 digits and finally the underscore '_', which is considered to be an
alphabetic character for this purpose. The only restriction is the usual one; identifiers must start with an
alphabetic character.
Identifiers are used for variables, constants, class names, function names and labels.
See also:
•
Declaring Classes
•
Declaring Variables
•
Declaring Constants
•
Declaring Functions
6.1.2 Reserved words (Keywords)
Laser Engine Program reserves some words which are valid identifiers for its own use.
Important notice:
You cannot use any of these reserved words as identifiers for variables, functions, methods,
or objects.
The following words are used as keywords in proposed extensions and are therefore reserved to allow
for the possibility of future adoption of those extensions:
•
•
•
•
•
•
•
•
•
•
•
•
•
•
•
•
abstract
boolean
byte
char
class
const
debugger
double
enum
export
extends
final
float
goto
implements
import
Lighter – Help Online Manual
32
CHAPTER 6
•
•
•
•
•
•
•
•
•
•
•
•
•
•
•
int
interface
long
native
package
private
protected
public
short
static
super
synchronized
throws
transient
volatile
Related topics:
33
•
Declarations
•
Classes and Methods (Member functions)
•
Native and Built-in Objects
•
Built-in Constants
Lighter – Project Editor User’s Manual
CHAPTER 6
6.2 Commenting the code
Laser Engine Program for Applications supports the same commenting syntax as C++.
One line comments may appear on a line of their own, or after the statements on a line. Multi-line comments
may appear anywhere.
// A one line comment.
/*
A multi-line
comment.
*/
Lighter – Help Online Manual
34
CHAPTER 6
6.3 Declarations
This section describes how to declare classes, functions, variables and constants. They are declared
with class, function, var and const respectively.
In this section:
•
Declaring Functions
•
Declaring Classes
•
Declaring Variables
•
Declaring Constants
6.3.1 Declaring Functions
A function definition consists of the function keyword, followed by:
•
The name of the function.
•
A list of arguments to the function, enclosed in parentheses and separated by commas.
•
The Laser Engine Program statements that define the function, enclosed in curly braces, { }.
The statements in a function can include calls to other functions defined in the current
application.
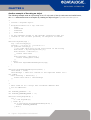
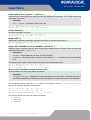
For example, the following code defines a simple function named square:
function square(number) {
return number * number;
}
6.3.2 Declaring Classes
A class is not defined explicitly; there is no class keyword. Instead, you define a new class by defining
a constructor function that will initialize new objects.
Functions that don't operate on the this object ("static" methods) are typically stored as properties of the
constructor function, not as properties of the prototype object. The same applies to constants, such as enum
values.
The following code defines a simple constructor function for a class called Person:
function Person(name)
{
this.name = name;
}
When defining subclasses, there's a general pattern you can use. The following example shows how to
create a subclass of Person called Employee:
35
Lighter – Project Editor User’s Manual
CHAPTER 6
Example:
function Employee(name, salary)
{
Person.call(this, name); // call base constructor
this.salary = salary;
}
// set the prototype to be an instance of the base class
Employee.prototype = new Person();
// initialize prototype
Employee.prototype.toString = function() { ... }
Again,
you
can
use
the instanceof to
verify
Employee and Person has been correctly established:
var e =
print(e
print(e
print(e
print(e
that
the
class
relationship
between
new Employee("Johnny Bravo", 5000000);
instanceof Employee); // true
instanceof Person);
// true
instanceof Object);
// true
instanceof Array);
// false
6.3.3 Declaring Variables
Variables are declared using the var keyword:
var a;
var c = "foliage";
x = 1;
// undefined
// the string "foliage"
// global variable
If a variable is assigned to without being declared, it is automatically declared as a global variable.
Tip:
Using global variables can make your code difficult to debug and maintain and is not
recommended.
Using the var keyword you can optionally initialize variables. If just the variableName is given, the
variable is created, but it has no value, that is, its value is undefined:
var variableName;
var anotherVariableName = InitialValue;
If an InitialValue is given, the variable is created and assigned this InitialValue. Variables
declared within functions are local to the function in which they are declared. Variables declared outside
of functions and classes are global.
Example:
var i;
var count = 22;
var str = "string";
Lighter – Help Online Manual
36
CHAPTER 6
6.3.4 Declaring Constants
Constants are declared using the const keyword:
Syntax:
const identifier = Value;
The const keyword is used to define constant values. The identifier is created as a constant with
the given Value. The constant is global unless defined within the scope of a class or function.
Constants must be defined at the point of declaration, because they cannot be changed later.
Constants are public global if they are declared outside of any enclosing braces. When declared within
the scope of some braces, that is, within an if statement, their scope is local to the enclosing block.
Example:
const PI2 = Math.PI * 2;
const COPYRIGHT = "Copyright (c) 2001";
37
Lighter – Project Editor User’s Manual
CHAPTER 6
6.4 Control Statements
The flow--of--control in Laser Engine Program is controlled by control statements.
Statements consist of keywords used with the appropriate syntax. A single statement may span multiple
lines. Multiple statements may occur on a single line if each statement is separated by a semicolon.
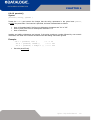
The following table summarizes the Laser Engine Program Control statements. Click the statement's
name for detailed information:
Table 1 Statements list
Statement Description
break
Terminates the current loop, switch, or label statement and transfers program control to
the statement following the terminated statement.
const
Declares a global constant and initializes it to a value.
continue
This keyword is used within the context of a for, while or do loop. Terminates
execution of the statements in the current iteration of the current or labelled loop, and
continues execution of the loop with the next iteration.
for
Creates a loop that consists of three optional expressions, enclosed in parentheses and
separated by semicolons, followed by a statement executed in the loop.
function
Declares a function.
if...else
Executes a statement if a specified condition is true. If the condition is false, another
statement can be executed.
label
Provides an identifier for a statement (continue) and refers to it elsewhere in a program.
return
Specifies the value to be returned by a function.
switch
Evaluates an expression, matching the expression's value to a case label, and executes
statements associated with that case.
throw
Throws a user-defined exception.
try...catch
Marks a block of statements to try, and specifies a response, should an exception be
thrown.
var
Declares a variable, optionally initializing it to a value.
while
Creates a loop that executes a specified statement as long as the test condition evaluates
to true. The statement is executed after evaluating the condition.
with
Extends the scope chain for a statement.
Copyright
The material on Control Statements included in this Language Reference, is copyright (c) 2005-2008 by
Mozilla Development Center (MDC). MDC wikis have been prepared with the contributions of many
authors, both within and outside the Mozilla Foundation. Unless otherwise indicated, the content is
available primarily under the terms and conditions set forth in the Creative Commons: AttributionSharealike License, v3.0 or later. Code samples are available under the terms of the MIT License. The
latest versions of these licenses are presently available here:
• Attribution-Sharealike License
• MIT License
Lighter – Help Online Manual
38
CHAPTER 6
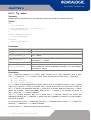
6.4.1 Break
Summary
Terminates the current loop, switch, or label statement and transfers program control to the
statement following the terminated statement.
Syntax
break [label];
Parameters
Parameter Description
Identifier associated with the label of the statement. If the statement is not a loop or
switch, this is required.
label
Description
The break statement includes an optional label that allows the program to break out of a labeled
statement. The break statement needs to be nested within this labelled statement. The labelled
statement can be any block statement; it does not have to be preceded by a loop statement.
Examples
The following function has a break statement that terminates the while loop when i is 3, and then
returns the value 3 * x.
function
var i
while
if
testBreak(x) {
= 0;
(i < 6) {
(i == 3) {
break;
}
i += 1;
}
return i * x;
}
Related topics:
•
39
continue, switch
Lighter – Project Editor User’s Manual
CHAPTER 6
6.4.2 Const
Summary
Declares a read-only, named constant.
Syntax
const varname1 [= value1], varname2 [= value2], ..., varnameN [=
valueN];
Parameters
Parameter
Description
varnameN
Constant name. It can be any legal identifier.
valueN
Value of the constant. It can be any legal expression.
Description
Creates a constant that can be global or local to the function in which it is declared. Constants follow
the same scope rules as variables.
The value of a constant cannot change through re-assignment, and a constant cannot be re-declared.
Because of this, although it is possible to declare a constant without initializing it, it would be useless to
do so.
A constant cannot share its name with a function or a variable in the same scope.
Examples
The following example produces the output "a is 7."
const a = 7;
print("a is " + a + ".");
Related topics:
•
var
Lighter – Help Online Manual
40
CHAPTER 6
6.4.3 Continue
Summary
Terminates execution of the statements in the current iteration of the current or labelled loop, and
continues execution of the loop with the next iteration.
Syntax
continue [label];
Parameters
Parameter
Description
label
Identifier associated with the label of the statement
Description
In contrast to the break statement, continue does not terminate the execution of the loop entirely:
instead,
•
•
In a while loop, it jumps back to the condition.
In a for loop, it jumps to the update expression.
The continue statement can include an optional label that allows the program to jump to the next
iteration of a labelled loop statement instead of the current loop. In this case, the continue statement
needs to be nested within this labelled statement.
Examples
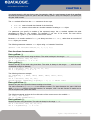
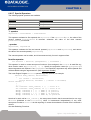
Using continue with while
The following example shows a while loop that has a continue statement that executes when the
value of i is 3. Thus, n takes on the values 1, 3, 7, and 12.
i = 0;
n = 0;
while (i < 5) {
i++;
if (i == 3)
continue;
n += i;
}
Using continue with a label
In the following example, a statement labeled checkiandj contains a statement labeled checkj.
If continue is encountered, the program continues at the top of the checkj statement. Each
time continue is encountered, checkj reiterates until its condition returns false. When false is
returned, the remainder of the checkiandjstatement is completed.
41
Lighter – Project Editor User’s Manual
CHAPTER 6
If continue had a label
the checkiandj statement.
of checkiandj,
the
program
would
continue
at
the
top
of
checkiandj:
while (i < 4) {
print(i );
i += 1;
checkj:
while (j > 4) {
print(j );
j -= 1;
if ((j % 2) == 0)
continue checkj;
print(j + " is odd.");
}
print("i = " + i);
print("j = " + j);
}
Related topics:
•
break, label
Lighter – Help Online Manual
42
CHAPTER 6
6.4.4 For
Summary
Creates a loop that consists of three optional expressions, enclosed in parentheses and separated by
semicolons, followed by a statement executed in the loop.
Syntax
for ([initial-expression]; [condition]; [final-expression])
statement
Parameters
Parameter
Description
initialexpression
An expression (including assignment expressions) or variable declaration. Typically
used to initialize a counter variable. This expression may optionally declare new
variables with the var keyword. These variables are not local to the loop, that is, they
are in the same scope thefor loop is in. The result of this expression is discarded.
condition
An expression to be evaluated before each loop iteration. If this expression evaluates
to true, statement is executed. This conditional test is optional. If omitted, the
condition always evaluates to true. If the expression evaluates to false, execution skips
to the first expression following the for construct.
finalexpression
An expression to be evaluated at the end of each loop iteration. This occurs before the
next evaluation of condition. Generally used to update or increment the counter
variable.
statement
A statement that is executed as long as the condition evaluates to true.
Examples
The following for statement starts by declaring the variable i and initializing it to 0. It checks that i is
less than nine, performs the two succeeding statements, and increments i by 1 after each pass through
the loop:
for (var i = 0; i < 9; i++) {
n += i;
myfunc(n);
}
43
Lighter – Project Editor User’s Manual
CHAPTER 6
6.4.5 Function
Summary
Declares a function with the specified parameters.
Syntax
function name([param] [, param] [..., param]) {
statements
}
Parameters
Parameter
Description
name
The function name.
param
The name of an argument to be passed to the function. A function can have up to 255
arguments.
statements
The statements which comprise the body of the function.
Description
To return a value, the function must have a return statement that specifies the value to return.
A function created with the function statement is a Function object and has all the properties,
methods, and behavior of Function objects.
A function can also be declared inside an expression. In this case the function is usually anonymous.
See function operator for more information about the function (function expression).
Functions can be conditionally declared. That is, a function definition can be nested within
an if statement. Technically, such declarations are not actually function declarations; they are function
expressions.
Examples
The following code declares a function that returns the total dollar amount of sales, when given the
number of units sold of products a, b, and c.
function calc_sales(units_a, units_b, units_c) {
return units_a*79 + units_b * 129 + units_c * 699;
}
Related topics:
•
Built-in Functions
Lighter – Help Online Manual
44
CHAPTER 6
6.4.6 If...else
Summary
Executes a statement if a specified condition is true. If the condition is false, another statement can be
executed.
Syntax
if (condition)
statement1
[else
statement2]
Parameters
Parameter
Description
condition
An expression that evaluates to true or false.
statement1
Statement that is executed if condition evaluates to true. Can be any statement,
including further nested if statements.
statement2
Statement that is executed if condition evaluates to false and the else clause exists.
Can be any statement, including block statements and further nested if statements.
Description
Multiple if...else statements can be nested to create an else if clause:
if (condition1)
statement1
else if (condition2)
statement2
else if (condition3)
statement3
...
else
statementN
To see how this works, this is how it would look like if the nesting were properly indented:
if (condition1)
statement1
else
if (condition2)
statement2
else
if (condition3)
...
45
Lighter – Project Editor User’s Manual
CHAPTER 6
Do not confuse the primitive boolean values true and false with the true and false values of
the Boolean object. Any value that is not undefined, null, 0, NaN, or the empty string (""), and
any object, including a Boolean object whose value is false, evaluates to true when passed to a
conditional statement. For example:
var b = new Boolean(false);
if (b) // this condition evaluates to true
Examples
Using if ... else
if (cipher_char == from_char) {
result = result + to_char;
x++;
} else
result = result + clear_char;
Assignment within the conditional expression
It is advisable to not use simple assignments in a conditional expression, because the assignment can
be confused with equality when glancing over the code. For example, do not use the following code:
if (x = y) {
/* do the right thing */
}
If you need to use an assignment in a conditional expression, a common practice is to put additional
parentheses around the assignment. For example:
if ((x = y)) {
/* do the right thing */
}
Lighter – Help Online Manual
46
CHAPTER 6
6.4.7 Label
Summary
Provides a statement with an identifier that you can refer to using a break or continue statement.
For example, you can use a label to identify a loop, and then use the break or continue statement to
indicate whether a program should interrupt the loop or continue its execution.
Syntax
label :
statement
Parameters
Parameter
Description
label
Any Laser Engine Program identifier that is not a reserved word.
statement
Statements. break can be used with any labeled statement, and continue can be
used with looping labeled statements.
Examples
For an example of a label statement using break, see break. For an example of a label statement
using continue, see continue.
6.4.8 Return
Summary
Specifies the value to be returned by a function.
Syntax
return [expression];
Parameters
Parameter
Description
expression
The expression to return. If omitted, undefined is returned instead.
Examples
The following function returns the square of its argument, x, where x is a number.
function square(x) {
return x * x;
}
47
Lighter – Project Editor User’s Manual
CHAPTER 6
6.4.9 Switch
Summary
Evaluates an expression, matching the expression's value to a case label, and executes statements
associated with that case.
Syntax
switch (expression) {
case label1:
statements1
[break;]
case label2:
statements2
[break;]
...
case labelN:
statementsN
[break;]
default:
statements_def
[break;]
}
Parameters
Parameter
Description
expression
An expression matched against each label.
labelN
Identifier used to match against expression.
statementsN
Statements that are executed if expression matches the associated label.
statements_def
Statements that are executed if expression does not match any label.
Description
If a match is found, the program executes the associated statements. If multiple cases match the
provided value, the first case that matches is selected, even if the cases are not equal to each other.
The program first looks for a case clause with a label matching the value of expression and then
transfers control to that clause, executing the associated statements. If no matching label is found, the
program looks for the optional default clause, and if found, transfers control to that clause, executing
the associated statements. If no default clause is found, the program continues execution at the
statement following the end of switch. By convention, the default clause is the last clause, but it
does not need to be so.
The optional break statement associated with each case label ensures that the program breaks out of
switch once the matched statement is executed and continues execution at the statement following
switch. If break is omitted, the program continues execution at the next statement in
the switch statement.
Lighter – Help Online Manual
48
CHAPTER 6
Examples
In the following example, if expression evaluates to "Bananas", the program matches the value with
case "Bananas" and executes the associated statement. When break is encountered, the program
breaks out of switch and executes the statement following switch. If break were omitted, the
statement for case "Cherries" would also be executed.
switch (expr) {
case "Oranges":
print("Oranges are $0.59 a pound.");
break;
case "Apples":
print("Apples are $0.32 a pound.");
break;
case "Bananas":
print("Bananas are $0.48 a pound.");
break;
case "Cherries":
print("Cherries are $3.00 a pound.");
break;
case "Mangoes":
case "Papayas":
print("Mangoes and papayas are $2.79 a pound.");
break;
default:
print("Sorry, we are out of " + expr + ".");
}
print("Is there anything else you'd like?");
49
Lighter – Project Editor User’s Manual
CHAPTER 6
6.4.10 Throw
Summary
Throws a user-defined exception.
Syntax
throw expression;
Parameters
Parameter
Description
expression
The expression to throw.
Description
Use the throw statement to throw an exception. When you throw an exception, expression specifies
the value of the exception. Each of the following throws an exception:
throw "Error2"; // generates an exception with a string value
throw 42; // generates an exception with the value 42
throw true; // generates an exception with the value true
Examples
Throw an object
You can specify an object when you throw an exception. You can then reference the object's properties
in
the catch block.
The
following
example
creates
an
object myUserException of
type UserException and uses it in a throw statement.
function UserException(message) {
this.message = message;
this.name = "UserException";
}
function getMonthName(mo) {
mo = mo-1; // Adjust month number for array index (1=Jan,
12=Dec)
var months = new Array("Jan", "Feb", "Mar", "Apr", "May",
"Jun", "Jul", "Aug", "Sep", "Oct", "Nov", "Dec");
if (months[mo] != null) {
return months[mo];
} else {
myUserException = new UserException("InvalidMonthNo");
throw myUserException;
}
}
try {
// statements to try
monthName = getMonthName(myMonth);
} catch (e) {
monthName = "unknown";
logMyErrors(e.message, e.name); // pass exception object to
err handler
}
Lighter – Help Online Manual
50
CHAPTER 6
Another example of throwing an object
The following example tests an input string for a U.S. zip code. If the zip code uses an invalid format,
the throw statement throws an exception by creating an object of type ZipCodeFormatException.
/*
* Creates a ZipCode object.
*
* Accepted formats for a zip code are:
*
12345
*
12345-6789
*
123456789
*
12345 6789
*
* If the argument passed to the ZipCode constructor does not
* conform to one of these patterns, an exception is thrown.
*/
function ZipCode(zip) {
zip = new String(zip);
pattern = /[0-9]{5}([- ]?[0-9]{4})?/;
if (pattern.test(zip)) {
// zip code value will be the first match in the string
this.value = zip.match(pattern)[0];
this.valueOf = function() {
return this.value
};
this.toString = function() {
return String(this.value)
};
} else {
throw new ZipCodeFormatException(zip);
}
}
function ZipCodeFormatException(value) {
this.value = value;
this.message = "does not conform to the expected format for a
zip code";
this.toString = function() {
return this.value + this.message
};
}
/*
* This could be in a script that validates address data
* for US addresses.
*/
var ZIPCODE_INVALID = -1;
var ZIPCODE_UNKNOWN_ERROR = -2;
function verifyZipCode(z) {
try {
z = new ZipCode(z);
} catch (e) {
if (e instanceof ZipCodeFormatException) {
return ZIPCODE_INVALID;
} else {
51
Lighter – Project Editor User’s Manual
CHAPTER 6
return ZIPCODE_UNKNOWN_ERROR;
}
}
return z;
}
a
b
c
d
e
=
=
=
=
=
verifyZipCode(95060);
verifyZipCode(9560;)
verifyZipCode("a");
verifyZipCode("95060");
verifyZipCode("95060 1234");
//
//
//
//
//
returns
returns
returns
returns
returns
95060
-1
-1
95060
95060 1234
6.4.10.1.1.1 Rethrow an exception
You can use throw to rethrow an exception after you catch it. The following example catches an
exception with a numeric value and rethrows it if the value is over 50. The rethrown exception
propagates up to the enclosing function or to the top level so that the user sees it.
try {
throw n; // throws an exception with a numeric value
} catch (e) {
if (e <= 50) {
// statements to handle exceptions 1-50
} else {
// cannot handle this exception, so rethrow
throw e;
}
}
Lighter – Help Online Manual
52
CHAPTER 6
6.4.11 Try...catch
Summary
Marks a block of statements to try, and specifies a response, should an exception be thrown.
Syntax
try {
try_statements
}
[catch (exception_var_1 if condition_1) {
catch_statements_1
}]
...
[catch (exception_var_2) {
catch_statements_2
}]
[finally {
finally_statements
}]
Parameters
Parameter
Description
try_statements
The statements to be executed.
catch_statements_1,
catch_statements_2
Statements that are executed if an exception is thrown in
the try block.
exception_var_1,
exception_var_2
An
identifier
to
hold
associated catch clause.
condition_1
A conditional expression.
finally_statements
Statements that are executed after the try statement completes.
These statements execute regardless of whether or not an exception
was thrown or caught.
an
exception
object
for
the
Description
The try statement consists of a try block, which contains one or more statements, and at least
one catch clause or a finally clause, or both. That is, there are three forms of the try statement:
1. try...catch
2. try...finally
3. try...catch...finally
A catch clause contain statements that specify what to do if an exception is thrown in the try block.
That is, you want the try block to succeed, and if it does not succeed, you want control to pass to
the catch block. If any statement within the try block (or in a function called from within the try block)
throws an exception, control immediately shifts to the catch clause. If no exception is thrown in
the try block, the catch clause is skipped.
The finally clause executes after the try block and catch clause(s) execute but before the
statements following the try statement. It always executes, regardless of whether or not an exception
was thrown or caught.
You can nest one or more try statements. If an inner try statement does not have a catch clause, the
enclosing try statement's catch clause is entered.
You also use the try statement to handle Java exceptions.
53
Lighter – Project Editor User’s Manual
CHAPTER 6
Unconditional catch clause
When a single, unconditional catch clause is used, the catch block is entered when any exception is
thrown. For example, when the exception occurs in the following code, control transfers to
the catch clause.
try {
throw "myException"; // generates an exception
}
catch (e) {
// statements to handle any exceptions
logMyErrors(e); // pass exception object to error handler
}
The exception identifier
When an exception is thrown in the try block, exception_var (e.g. the e in catch (e)) holds the
value specified by the throw statement. You can use this identifier to get information about the
exception that was thrown.
This identifier is local to the catch clause. That is, it is created when the catch clause is entered, and
after the catch clause finishes executing, the identifier is no longer available.
The finally clause
The finally clause contains statements to execute after the try block and catch clause(s) execute
but before the statements following the try statement. The finally clause executes regardless of
whether or not an exception is thrown. If an exception is thrown, the statements in the finally clause
execute even if no catchclause handles the exception.
You can use the finally clause to make your script fail gracefully when an exception occurs; for
example, you may need to release a resource that your script has tied up. The following example opens
a file and then executes statements that use the file (server-side Laser Engine Program allows you to
access files). If an exception is thrown while the file is open, the finally clause closes the file before
the script fails.
openMyFile()
try {
// tie up a resource
writeMyFile(theData);
}
finally {
closeMyFile(); // always close the resource
}
Examples:
See the examples for throw
Lighter – Help Online Manual
54
CHAPTER 6
6.4.12 Var
Summary
Declares a variable, optionally initializing it to a value.
Syntax
var varname1 [= value1], varname2 [= value2], ..., varnameN [=
valueN];
Parameters
Parameter
Description
varnameN
Variable name. It can be any legal identifier.
valueN
Initial value of the variable. It can be any legal expression.
Description
The scope of a variable is the current function or, for variables declared outside a function, the current
application.
Using var outside a function is optional; assigning a value to an undeclared variable implicitly declares
it as a global variable. However, it is recommended to always use var, and it is necessary within
functions in the following situations:
•
If a variable in a scope containing the function (including the global scope) has the same name.
•
If recursive or multiple functions use variables with the same name and intend those variables
to be local.
Failure to declare the variable in these cases will very likely lead to unexpected results.
Examples
The following example declares two variables, num_hits and cust_no, and initializes both to the
value 0.
var num_hits = 0, cust_no = 0;
55
Lighter – Project Editor User’s Manual
CHAPTER 6
6.4.13 While
Summary
Creates a loop that executes a specified statement as long as the test condition evaluates to true. The
condition is evaluated before executing the statement.
Syntax
while (condition)
statement
Parameters
Parameter
Description
condition
An expression evaluated before each pass through the loop. If this condition evaluates
to true, statement is executed. When condition evaluates to false, execution continues
with the statement after the while loop.
statement
A statement that is executed as long as the condition evaluates to true.
Examples
The following while loop iterates as long as n is less than three.
n = 0;
x = 0;
while (n < 3) {
n ++;
x += n;
}
Each iteration, the loop increments n and adds it to x. Therefore, x and n take on the following values:
•
•
•
After the first pass: n = 1 and x = 1
After the second pass: n = 2 and x = 3
After the third pass: n = 3 and x = 6
After completing the third pass, the condition n < 3 is no longer true, so the loop terminates.
Lighter – Help Online Manual
56
CHAPTER 6
6.4.14 With
Summary
Extends the scope chain for a statement.
Syntax
with (object)
statement
Parameters
Parameter
Description
object
Adds the given object to the scope chain used when evaluating the statement. The
parentheses around object are required.
statement
Any statement.
Description
Laser Engine Program looks up an unqualified name by searching a scope chain associated with the
execution context of the script or function containing that unqualified name. The 'with' statement adds
the given object to the head of this scope chain during the evaluation of its statement body. If an
unqualified name used in the body matches a property in the scope chain, then the name is bound to
the property and the object containing the property. Otherwise a 'ReferenceError' is thrown.
Performance Pro & Con
• Pro: 'with' can help reduce file size by reducing the need to repeat a lengthy object reference
without performance penalty. The scope chain change required by 'with' is not computationally
expensive. Use of 'with' will relieve the interpreter of parsing repeated object references. Note,
however, that in many cases this benefit can be achieved by using a temporary variable to store
a reference to the desired object.
• Con: 'with' forces the specified object to be searched first for all unqualified name lookups.
Therefore all identifiers that match formal function argument and declared local variable names
will be found more slowly in a 'with' block. Where performance is important, 'with' would likely
only be used to encompass code blocks that do not use function argument and declared local
variable identifiers.
Ambiguity Con
• Con: 'with' makes it hard for a human reader or Laser Engine Program compiler to decide
whether an unqualified name will be found along the scope chain, and if so, in which object. So
given this example:
function f(x, o) {
with (o)
print(x);
}
only when f is called is x either found or not, and if found, either in o or (if no such property exists)
in f's activation object, where x names the first formal argument. If you forget to define x in the object
you pass as the second argument, or if there's some similar bug or confusion, you won't get an error -just unexpected results.
57
Lighter – Project Editor User’s Manual
CHAPTER 6
Examples
The following with statement specifies that the Math object is the default object. The statements
following the with statement refer to the PI property and the cos and sin methods, without specifying
an object. Laser Engine Program assumes the Math object for these references.
var a, x, y;
var r = 10;
with (Math) {
a = PI * r * r;
x = r * cos(PI);
y = r * sin(PI / 2);
}
Lighter – Help Online Manual
58
CHAPTER 6
6.5 Classes and Methods (Member functions)
Laser Engine Program is a fully object oriented language.
A class's constructor is the function which has the same (case-sensitive) name as the class itself. The
constructor should not contain an explicit return statement; it will return an object of its type
automatically. Laser Engine Program does not have a destructor function (a function that is called when
the class is destroyed), for a class.
The class's member variables are declared with var (see Declaring Variables), and its member
functions (methods) with function (see Declaring Functions).
The object instance itself is referred to using the this operator. Inside a member function of a class,
member variables and member functions can be accessed with an explicit this (e.g. this.x = posx;).
This is not required, but can sometimes help to increase visibility.
Laser Engine Program supports single inheritance, and if a class inherits from another class, the
constructor of the superclass constructor can be called with super().
For further information:
•
•
•
Qualified Names
Class Properties
Declaring Classes
6.5.1 Qualified Names
When you declare an object of a particular type, the object itself becomes, in effect, a namespace. For
example, in Laser Engine Program there is a function called Math.sin(). If you want to have
a sin() function in your own class that would not be a problem, because objects of your class would call
the function using theobject.function() syntax. The period is used to distinguish the namespace a
particular identifier belongs to.
For example, in a Laser Engine Program GUI application, every application object belongs to
the Application object.
This
can
lead
to
some
rather
lengthy
code,
for
example Application.Dialog.ListBox.count. Such long names can often be shortened, for
example, within a signal handler, e.g. this.ListBox.count.
In practice, Laser Engine Program is intelligent enough to work out the fully qualified name, so the code
you would actually write is simply ListBox.count. The only time that you need to qualify your names
is when an unqualified name is ambiguous.
6.5.2 Class Properties
A property is an undeclared variable that can be written to and accessed if the class supports
properties. The classes supporting properties are the application objects and the classes provided by
the object and wrapper factories.
var obj = new Object
object.myProperty = 100;
The class Object does not define the variable myProperty, but since the class supports properties,
we can define the variable with that name on the fly and use it later. Properties are associated with the
object they are assigned to, so even though the object obj in the example above gets the
property myProperty, it does not mean that other objects of type Object will have
the myProperty property, unless explicitly stated.
59
Lighter – Project Editor User’s Manual
CHAPTER 6
6.6 Native and Built-in Objects
Reference documentation for native and built-in objects is organized as follows:
Objects
Description
Native Objects
This set of objects is supplied by the Laser Engine Program implementation. Some
native objects are built-in, while other may be constructed during the course of
execution of a Laser Engine Program.
Graphical
User This set of objects allows defining the graphical interface of the application
Interface Objects (dialogs, checkbox, buttons, and so forth).
Base
Objects
System This set of objects allows defining the system interface, as well as accessing
directories and files, or interacting with external programs.
Laser Graphical This set of objects allows managing the documents and all of the graphic objects
Objects
they may contain (arrays, codes, strings, and so forth).
Laser
Objects
System This set of objects allows managing the low-level laser system, that is, axis
movement and I/O modules.
Related topics:
•
•
•
Built-in Constants
Built-in Functions
Control Statements
6.6.1 Native Objects
Native objects are supplied by the Laser Engine Program implementation. Some native objects are
built-in; others may be constructed during the course of execution of a Laser Engine Program.
Copyright
Portions of the following content is copyright (c) 2005-2008 by Mozilla Development Center (MDC).
MDC wikis have been prepared with the contributions of many authors, both within and outside the
Mozilla Foundation. Unless otherwise indicated, the content is available primarily under the terms and
conditions set forth in the Creative Commons: Attribution-Sharealike License, v3.0 or later. Code
samples are available under the terms of the MIT License. The latest versions of these licenses are
presently available here:
•
•
Attribution-Sharealike License
MIT License
In this section the following objects are described:
•
•
•
•
•
•
•
Math
Array
Boolean
Date
Number
RegExp
String
Lighter – Help Online Manual
60
CHAPTER 6
6.6.1.1 Math
The built-in Math object provides a variety of functions, including all the common mathematical
functions. More...
Math Functions
Number
Number
Number
Number
Number
Number
Number
Number
Number
Number
Number
Number
Number
Number
Number
Number
Number
Number
Number Math::abs ( Number number );
Math::acos ( Number number );
Math::asin ( Number number );
Math::atan ( Number number );
Math::atan2 ( Number yCoord, Number xCoord );
Math::ceil ( Number number );
Math::cos ( Number number );
Math::exp ( Number number );
Math::floor ( Number number );
Math::log ( Number number );
Math::max ( Number number1, Number number2 );
Math::min ( Number number1, Number number2 );
Math::pow ( Number number, Number power);
Math::random ( );
Math::round ( Number number );
Math::sin ( Number number );
Math::sqrt ( Number number );
Math::tan ( Number number );
Math Properties
Number
Number
Number
Number
Number
Number
Number
Number
E
LN2
LN10
LOG2E
LOG10E
PI
SQRT1_2
SQRT2
Detailed description
The built-in Math object provides a variety of functions, including all the common mathematical
functions.
The Math object always exists in a Laser Engine program. Use the Math object to access mathematical
constants and functions, for example.
var x, angle, y;
with ( Math ) {
x = PI * 2;
angle = 1.3;
y = x * sin( angle );
}
61
Lighter – Project Editor User’s Manual
CHAPTER 6
Math functions documentation
Math::abs ( Number number );
Returns the absolute value of the given number.
The equivalent of:
x = x < 0 ? -x : x;
var x = -99;
var y = 99;
with ( Math ) {
x = abs( x );
y = abs( y );
}
if ( x == y )
print( "equal" );
Math::acos ( Number number );
Returns the arccosine of the given number in radians between 0 and Math.PI. If the number is out
of range, returns NaN.
Math::asin ( Number number );
Returns the arcsine of the given number in radians between -Math.PI/2 and Math.PI/2. If the
number is out of range, returns NaN
Math::atan ( Number number );
Returns the arctangent of the given number in radians between -Math.PI/2 and Math.PI/2. If the
number is out of range, returns NaN.
Math::atan2 ( Number yCoord, Number xCoord );
Returns the counter-clockwise angle in radians between the positive x-axis and the point at
(xCoord, yCoord). The value returned is always between -Math.PI and Math.PI.
The following shows an example:
function polar( x, y )
{
return Math.atan2( y, x );
}
Math::ceil ( Number number );
If the number is an integer, it returns the number. If the number is a floating point value, it returns the
smallest integer greater than the number.
The following shows an example:
var
x =
var
y =
x = 913.41;
Math.ceil( x ); // x == 914
y = -33.97;
Math.ceil( y ); // y == -33
Math::cos ( Number number );
Returns the cosine of the given number. The value will be in the range -1..1.
Math::exp ( Number number );
Returns Math.E raised to the power of the given number.
Math::floor ( Number number );
If the number is an integer, it returns the number. If the number is a floating point value, it
Lighter – Help Online Manual
62
CHAPTER 6
returns the greatest integer less than the number.
Math::log ( Number number );
If the number is > 0, it returns the natural logarithm of the given number. If the number is 0, it
returns Infinity. If the number is < 0, it returns NaN.
Math::max ( Number number1, Number number2 );
Returns the largest of number1 and number2.
Math::min ( Number number1, Number number2 );
Returns the smallest of number1 and number2.
Math::pow ( Number number, Number power);
Returns the value of the number raised to the power.
Math::random ( );
Returns a pseudo-random floating point number between 0 and 1. Pseudo random numbers are
not truly random, but may be adequate for some applications, for example, games and simple
simulations.
Math::round ( Number number );
Returns the number rounded to the nearest integer. If the fractional part of the number is >= 0.5,
the number is rounded up; otherwise it is rounded down.
Math::sin ( Number number );
Returns the sine of the given number. The value will be in the range -1..1.
Math::sqrt ( Number number );
If the number is >= 0, it returns the square root. If the number is < 0, it returns NaN.
Math::tan ( Number number );
Returns the tangent of the given number.
63
Lighter – Project Editor User’s Manual
CHAPTER 6
Math properties documentation
All the Math properties are read-only constants.
E
Eulers constant. The base for natural logarithms.
LN2
Natural logarithm of 2.
LN10
Natural logarithm of 10.
LOG2E
Base 2 logarithm of E.
LOG10E
Base 10 logarithm of E.
PI
Ratio of the circumference of a circle to its diameter.
SQRT1_2
Square root of 1/2; equivalently, 1 over the square root of 2.
SQRT2
Square root of 2.
Lighter – Help Online Manual
64
CHAPTER 6
6.6.1.2 Array
An Array is a datatype which contains a named list of items. More...
Array functions
Array
String
Object
Number
void
Object
Array
Number
Array
String
Number
Array::concat ( Array a1, Array a2 ... aN );
Array::join ( String optSeparator );
Array::pop ( );
Array::push ( item1, optItem2, ... optItemN );
Array::reverse ( );
Array::shift ( );
Array::slice ( Number startIndex, Number optEndIndex );
Array::sort ( Function optComparisonFunction );
Array::splice ( Number startIndex, Number replacementCount, optItem1, ... optItemN );
Array::toString ( );
Array::unshift ( String expression, optExpression1, ... optExpressionN );
Array properties
Number
length
Detailed description
An Array is a datatype which contains a named list of items. The items can be any Laser Engine object.
Multi-dimensional arrays are achieved by setting array items to be arrays themselves. Arrays can be
extended dynamically simply by creating items at non-existent index positions.
• Items can also be added using push(), unshift() and splice().
• Arrays can be concatenated together using concat().
• Items can be extracted using pop(), shift() and slice().
• Items can be deleted using splice().
• Arrays can be turned into strings using join() or Array::toString().
• Use reverse() to reverse the items in an array, and sort() to sort the items.
The sort() function can be passed a comparison function for customized sort orders.
In general, operations that copy array items perform a
are Number or String objects, and a shallow copy on other objects.
deep
Array constructor documentation
Arrays can be constructed from array literals or using the new operator:
var mammals = [ "human", "dolphin", "elephant", "monkey" ];
var plants = new Array( "flower", "tree", "shrub" );
var things = [];
for ( i = 0; i < mammals.length; i++ ) {
things[i] = new Array( 2 );
things[i][0] = mammals[i];
things[i][1] = plants[i];
}
Arrays can be initialized with a size, but with all items undefined:
var a = new Array( 10 ); // 10 items
65
Lighter – Project Editor User’s Manual
copy
on
items
that
CHAPTER 6
Array access
Array items are accessed via their names. Names can be either integers or strings.
var m2 = mammals[2];
mammals[2] = "gorilla";
var thing = things[2][1]
The first statement retrieves the value of the third item of the mammals array and assigns it to m2, which
now contains "monkey". The second statement replaces the third item of the mammals array with the
value "gorilla". The third statement retrieves the second item of the third item's array from
the things array and assigns it tothing, which now contains "shrub".
As stated above, it is also possible to access the arrays using strings. These act as normal properties,
and can be accessed either using the square bracket operator ([]) or by directly dereferencing the array
object and specifying the property name (.name). These two accessor types can be mixed freely as
seen below with theaddress and phoneNumber properties:
var names = [];
names["first"] = "John";
names["last"] = "Doe";
var firstName = names["first"];
var lastName = names["last"];
names["address"] = "Somewhere street 2";
names.phoneNumber = "+0123456789";
var address = names.address;
var phoneNumber = names["phoneNumber"];
Array functions documentation
Array::concat ( Array a1, Array a2 ... aN );
Concatenates the array with one or more other arrays in the given order, and returns a single array.
Parameter:
a1 ... aN - Arrays and/or values to concatenate to the resulting array.
var x = new Array( "a", "b", "c" );
var y = x.concat( [ "d", "e" ], [ 90, 100 ] );
// y == [ "a", "b", "c", "d", "e", 90, 100 ]
Array::join ( String optSeparator );
Joins all the items of an array together, separated by commas, or by the specified optSeparator.
var x = new Array( "a", "b", "c" );
var y = x.join();
// y == "a,b,c"
var z = x.join( " * " ); // y == "a * b * c"
Array::pop ( );
Pops (that is, removes) the top-most (right-most) item off the array and returns it.
var x = new Array( "a", "b", "c" );
var y = x.pop(); // y == "c" x == [ "a", "b" ]
Lighter – Help Online Manual
66
CHAPTER 6
Array::push ( item1, optItem2, ... optItemN );
Pushes (that is, inserts) the given items onto the top (right) end of the array. The function returns the
new length of the array.
Parameter:
item1 ... optItemN - The items to add to the array.
var x = new Array( "a", "b", "c" );
x.push( 121 ); // x == [ "a", "b", "c", 121 ]
Array::reverse ( );
Reverses the items in the array.
var x = new Array( "a", "b", "c", "d" );
x.reverse(); // x == [ "d", "c", "b", "a" ]
Array::shift ( );
Shifts (that is, removes) the bottom-most (left-most) item off the array and returns it.
var x = new Array( "a", "b", "c" );
var y = x.shift(); // y == "a" x == [ "b", "c" ]
Array::slice ( Number startIndex, Number optEndIndex );
Extracts a slice of the array from the item with the given starting index to the item before the item with
the given ending index, optEndIndex.
Parameters:
startIndex - Zero-based index at which to begin extraction.
optEndIndex - Zero-based index at which to end extraction. slice extracts up to but not including
end.
If no ending index is given, all items from the starting index onward are sliced.
var x = new Array( "a", "b", "c", "d" );
var y = x.slice( 1, 3 ); // y == [ "b", "c" ]
var z = x.slice( 2 );
// z == [ "c", "d" ]
Array::sort ( Function optComparisonFunction );
Sorts the items in the array using string comparison.
Parameter:
optComparisonFunction - Specifies a function that defines the sort order. If omitted, the array is
sorted lexicographically (in dictionary order) according to the string conversion of each element.
For customized sorting, pass the sort() function a comparison function, optComparisonFunction,
that has the following signature and behavior:
var x = new Array( "d", "x", "a", "c" );
x.sort(); // x == [ "a", "c", "d", "x" ]
function comparisonFunction( a, b ) // signature
The function above must return an integer as follows:
• -1 if a < b
• 0 if a == b
• 1 if a > b
67
Lighter – Project Editor User’s Manual
CHAPTER 6
The following is an example:
function numerically( a, b ) { return a < b ? -1 : a > b ? 1 :
0; }
var x = new Array( 8, 90, 1, 4, 843, 221 );
x.sort( numerically ); // x == [ 1, 4, 8, 90, 221, 843 ]
Array::splice ( Number startIndex, Number replacementCount, optItem1, ... optItemN );
Splices items into the array and out of the array.
Parameters
startIndex - The index at which to start changing the array.
replacementCount - The number of items that are to be replaced.
optItem1 ... optItemN - The items to be inserted.
Make the second argument 0 if you are simply inserting items.If you are simply deleting items, the second
argument must be > 0 (that is, the number of items to delete), and there must be no new items given.
var x = new Array( "a", "b", "c", "d" );
// 2nd argument 0, plus new items
==> insertion
x.splice( 1, 0, "X", "Y" );
// x == [ "a", "X", "Y", "b", "c", "d" ]
// 2nd argument > 0, and no items
==> deletion
x.splice( 2, 1 );
// x == [ "a", "X", "b", "c", "d" ]
// 2nd argument > 0, plus new items ==> replacement
x.splice( 3, 2, "Z" );
// x == [ "a", "X", "b", "Z" ]
Array::toString ( );
Joins all the items of an array together, separated by commas.
This function is used when the array is used in the context of a string concatenation or is used as a text
value, e.g. for printing. Use join if you want to use your own separator.
See also:
Array::join ( String optSeparator );
var x = new Array( "a", "b", "c" );
var y = x.toString(); // y == "a,b,c"
var z = x.join();
// y == "a,b,c"
Array::unshift ( String expression, optExpression1, ... optExpressionN );
Unshifts (that is, inserts) the given items at the bottom (left) end of the array and returns the new length
of the array.
Parameter:
expression ... optExpressionN - The items to add to the array.
var x = new Array( "a", "b", "c" );
x.unshift( 121 ); // x == [ 121, "a", "b", "c" ]
Property documentation
length
Holds the number of items in the array. Items with string keys are excluded from the length property.
Lighter – Help Online Manual
68
CHAPTER 6
6.6.1.3 Boolean
Laser Engine Program provides a Boolean data type. More...
Boolean functions
String
Boolean
Boolean::toString ( );
Boolean::valueOf ( );
Detailed description
Laser Engine Program provides a Boolean data type. In general, creating objects of this type is not
recommended since the behavior will probably not be what you would expect.
Instead, use the boolean constants true and false as required. Any expression can be evaluated in a
boolean context, for example, in an if statement.
If the expression's value is 0, null, false, NaN, undefined or the empty string "", the expression
is false; otherwise the expression is true.
Boolean functions documentation
Boolean::toString ( );
Returns a string representing the specified Boolean object.
Laser Engine Program calls the toString method automatically when a Boolean is to be represented
as a text value or when a Boolean is referred to in a string concatenation. For Boolean objects and
values, the built-in toString method returns the string "true" or "false" depending on the value of the
boolean object.
In the following code, flag.toString returns "true".
var flag = new Boolean(true)
var myVar=flag.toString()
Boolean::valueOf ( );
Returns the primitive value of a Boolean object or literal Boolean as a Boolean data type.
x = new Boolean();
myVar = x.valueOf()
//assigns false to myVar
69
Lighter – Project Editor User’s Manual
CHAPTER 6
6.6.1.4 Date
Instances of the Date class are used to store and manipulate dates and times. More...
Static date functions
Number
Number
Date::parse ( String dateString );
Date::UTC (year, month[, date[, hrs[, min[, sec[, ms]]]]] )
Date functions
Number
Number
Number
Number
Number
Number
Number
Number
Number
Number
void
void
void
void
void
void
void
void
String
String
String
String
String
String
Number
Number
Number
Number
Number
Number
Number
Number
Number
void
void
void
void
void
void
void
String
Date::getDate ( );
Date::getDay ( );
Date::getFullYear ( );
Date::getHours ( );
Date::getMilliseconds ( );
Date::getMinutes ( );
Date::getMonth ( );
Date::getSeconds ( );
Date::getTime ( );
Date::getTimezoneOffset ( );
Date::setDate ( Number dayOfTheMonth );
Date::setFullYear ( yearValue[, monthValue[, dayValue]] );
Date::setHours ( Number hour );
Date::setMilliseconds ( Number milliseconds );
Date::setMinutes ( Number minutes );
Date::setMonth ( Number month );
Date::setSeconds ( );
Date::setTime ( Number milliseconds );
Date::toString ( );
Date::toDateString ( );
Date::toTimeString ( );
Date::toLocaleString ( );
Date::toLocaleDateString ( );
Date::toLocaleTimeString ( );
Date::valueOf ( );
Date::getUTCDate ( );
Date::getUTCDay ( );
Date::getUTCFullYear ( );
Date::getUTCHours ( );
Date::getUTCMilliseconds ( );
Date::getUTCMinutes ( );
Date::getUTCMonth ( );
Date::getUTCSeconds ( );
Date::setUTCDate ( dayvalue );
Date::setUTCFullYear ( yearValue[, monthValue[, dayValue]] );
Date::setUTCHours ( hoursValue[, minutesValue[, secondsValue[, msValue]]] );
Date::setUTCMilliseconds ( millisecondsValue );
Date::setUTCMinutes ( minutesValue[, secondsValue[, msValue]] );
Date::setUTCMonth ( monthValue[, dayValue] );
Date::setUTCSeconds ( secondsValue[, msValue] );
Date::toUTCString ( );
Lighter – Help Online Manual
70
CHAPTER 6
Detailed description
Instances of the Date class are used to store and manipulate dates and times.
A variety of get functions are provided to obtain the date, time or relevant parts (see Date functions). A
complementary variety of set functions are also provided (such as, for example, setDate or setYear).
The functions operate using local time. Conversion between Date objects to and from strings are
provided by parse() and Date::toString().
Elapsed time (in milliseconds) can be obtained by creating two dates, casting them to Number and
subtracting one value from the other.
var date1 = new Date();
// time flies..
var date2 = new Date();
var timedifference = date2.getTime() - date1.getTime();
Date constructor documentation
Dates can be constructed with no arguments, in which case the value is the date and time at the
moment of construction using local time. A single integer argument is taken as the number of
milliseconds since midnight on the 1st January 1970.
Date()
Date( milliseconds )
Date( year, month, day, optHour, optMinutes, optSeconds,
optMilliseconds )
var
var
var
var
today = new Date();
d = new Date( 1234567 );
date = new Date( 1994, 4, 21 );
moment = new Date( 1968, 5, 11, 23, 55, 30 );
Static Date functions documentation
Date::parse ( String dateString );
This is a static function that parses a string, dateString, which represents a particular date and time. It
returns the number of milliseconds since midnight on the 1st January 1970. The string must be in the ISO
8601 extended format:
YYYY-MM-DD or with time YYYY-MM-DDTHH:MM:SS.
var d = new Date( Date.parse( "1976-01-25T22:30:00" ) );
d = Date.parse( "1976-01-25T22:30:00" );
Date::UTC (year, month[, date[, hrs[, min[, sec[, ms]]]]] )
Accepts the same parameters as the longest form of the constructor, and returns the number of milliseconds
in a Date object since January 1, 1970, 00:00:00, universal time.
Parameters
year - A year after 1900.
month - An integer between 0 and 11 representing the month.
date - An integer between 1 and 31 representing the day of the month.
hrs - An integer between 0 and 23 representing the hours.
min - An integer between 0 and 59 representing the minutes.
sec - An integer between 0 and 59 representing the seconds.
ms - An integer between 0 and 999 representing the milliseconds.
71
Lighter – Project Editor User’s Manual
CHAPTER 6
You should specify a full year for the year; for example, 1998. If a year between 0 and 99 is specified,
the method converts the year to a year in the 20th century (1900 + year); for example, if you specify 95,
the year 1995 is used.
The UTC method differs from the Date constructor in two ways.
•
•
Date.UTC uses universal time instead of the local time.
Date.UTC returns a time value as a number instead of creating a Date object.
If a parameter you specify is outside of the expected range, the UTC method updates the other
parameters to allow for your number. For example, if you use 15 for month, the year will be
incremented by 1 (year + 1), and 3 will be used for the month.
Because UTC is a static method of Date, you always use it as Date.UTC(), rather than as a method of
a Date object you created.
The following statement creates a Date object using GMT instead of local time:
gmtDate = new Date(Date.UTC(96, 11, 1, 0, 0, 0));
Date functions documentation
Date::getDate ( );
Returns the day of the month using local time. The value is always in the range 1..31.
var d = new Date( 1975, 12, 25 );
var x = d.getDate(); // x == 25
Date::getDay ( );
Returns the day of the week using local time. The value is always in the range 1..7, with the week
considered to begin on Monday.
var d = new Date( 1975, 12, 25, 22, 30, 15 );
var x = d.getDay(); // x == 4
The following shows an example:
var IndexToDay = [ "Mon", "Tue", "Wed", "Thu", "Fri", "Sat",
"Sun" ];
var d = new Date( 1975, 12, 28 );
System.println( IndexToDay[ d.getDay() - 1 ] ); // Prints "Sun"
Date::getFullYear ( );
Returns the year of the specified date according to local time.
The value returned by getFullYear is an absolute number. For dates between the years 1000 and
9999, getFullYear returns a four-digit number, for example, 1995. Use this function to make sure a
year is compliant with years after 2000.
The following example assigns the four-digit value of the current year to the variable yr.
var today = new Date();
var yr = today.getFullYear();
Date::getHours ( );
Returns the hour using local time. The value is always in the range 0..23.
var d = new Date( 1975, 12, 25, 22 );
var x = d.getHours(); // x == 22
Lighter – Help Online Manual
72
CHAPTER 6
Date::getMilliseconds ( );
Returns the milliseconds component of the date using local time. The value is always in the range 0..999.
In the example, x is 0, because no milliseconds were specified, and the default for unspecified components
of the time is 0.
var d = new Date( 1975, 12, 25, 22 );
var x = d.getMilliseconds(); // x == 0
Date::getMinutes ( );
Returns the minutes component of the date using local time. The value is always in the range 0..59.
var d = new Date( 1975, 12, 25, 22, 30 );
var x = d.getMinutes(); // x == 30
Date::getMonth ( );
Returns the month component of the date using local time. The value is always in the range 1..12.
var d = new Date( 1975, 12, 25, 22, 30 );
var x = d.getMonth(); // x == 12
The following shows an example:
var IndexToMonth = [ "Jan", "Feb", "Mar", "Apr", "May", "Jun",
"Jul",
"Aug", "Sep", "Oct", "Nov",
"Dec" ];
var d = new Date( 1975, 12, 25 );
System.println( IndexToMonth[ d.getMonth() - 1] ); // Prints
"Dec"
Date::getSeconds ( );
Returns the seconds component of the date using local time. The value is always in the range 0..59. In the
example x is 0 because no seconds were specified, and the default for unspecified components of the time
is 0.
var d = new Date( 1975, 12, 25, 22, 30 );
var x = d.getSeconds(); // x == 0
Date::getTime ( );
Returns the number of milliseconds since midnight on the 1st January 1970 using local time.
var d = new Date( 1975, 12, 25, 22, 30 );
var x = d.getTime(); // x == 1.91457e+11
Date::getTimezoneOffset ( );
Returns the time-zone offset in minutes for the current locale.
The time-zone offset is the minutes in difference, the Greenwich Mean Time (GMT) is relative to your local
time. For example, if your time zone is GMT+10, -600 will be returned. Daylight savings time prevents this
value from being a constant.
x = new Date()
currentTimeZoneOffsetInHours = x.getTimezoneOffset()/60
Date::setDate ( Number dayOfTheMonth );
Sets the day of the month to the specified dayOfTheMonth in local time.
var d = new Date( 1975, 12, 25, 22, 30 );
d.setDate( 30 ); // d == 1975-12-30T22:30:00
Date::setFullYear ( yearValue[, monthValue[, dayValue]] );
Sets the full year for a specified date according to local time.
Parameters
yearValue - An integer specifying the numeric value of the year, for example, 1995
73
Lighter – Project Editor User’s Manual
CHAPTER 6
monthValue - An integer between 0 and 11 representing the months January through December
dayValue - An integer between 1 and 31 representing the day of the month. If you specify
the dayValue parameter, you must also specify the monthValue
If you do not specify the monthValue and dayValue parameters,
the getMonth and getDate methods are used.
theBigDay = new Date();
theBigDay.setFullYear(1997);
the
values
returned
from
Date::setHours ( Number hour );
Sets the hour to the specified hour, which must be in the range 0..23, in local time.
The
minutes,
seconds
and
milliseconds
past
(optMinutes, optSeconds and optMilliseconds) can also be specified.
var d = new Date( 1975, 12, 25, 22, 30 );
d.setHours( 10 ); // d == 1980-12-30T10:30:00
the
hour
Date::setMilliseconds ( Number milliseconds );
Sets the milliseconds component of the date to the specified value in local time.
var d = new Date( 1975, 12, 25, 22, 30 );
d.setMilliseconds( 998 ); // d == 1980-12-30T10:30:00:998
Date::setMinutes ( Number minutes );
Sets the minutes to the specified minutes, which must be in the range 0..59, in local time.
The seconds and milliseconds past the minute (optSeconds and optMilliseconds) can also be
specified.
var d = new Date( 1975, 12, 25, 22, 30 );
d.setMinutes( 15 ); // d == 1980-12-30T10:15:00
Date::setMonth ( Number month );
Sets the month to the specified month, which must be in the range 0..11, in local time.
var d = new Date( 1975, 12, 25, 22, 30 );
d.setMonth(0); // d == 1980-01-11T22:30:00
Date::setSeconds ( );
Sets the seconds to the specified seconds, which must be in the range 0..59, in local time.
var d = new Date( 1975, 12, 25, 22, 30 );
d.setSeconds( 25 ); // d == 1980-12-30T22:30:25
Date::setTime ( Number milliseconds );
Sets the date and time to the local date and time given in terms of milliseconds since midnight on the 1st
January 1970.
var d = new Date( 1975, 12, 25, 22, 30 );
var duplicate = new Date();
duplicate.setTime( d.getTime() );
Date::toString ( );
Converts the date into a string on the ISO 8601 extended format: YYYY-MM-DDTHH:MM:SS.
var d = new Date( 1975, 12, 25, 22, 30 );
var s = d.toString(); // s == "1975-12-25T22:30:00"
Date::toDateString ( );
Returns the date portion of a Date object in human readable form.
var d = new Date(1993, 6, 28, 14, 39, 7);
println(d.toString()); // prints Wed Jul 28 1993 14:39:07 GMT0600 (PDT)
println(d.toDateString()); // prints Wed Jul 28 1993
Date::toTimeString ( );
Returns the time portion of a Date object in human readable form.
Lighter – Help Online Manual
74
CHAPTER 6
var d = new Date(1993, 6, 28, 14, 39, 7);
println(d.toString()); // prints Wed Jul 28 1993 14:39:07 GMT0600 (PDT)
println(d.toTimeString()); // prints 14:39:07 GMT-0600 (PDT)
Date::toLocaleString ( );
Converts a date to a string, using the operating system's locale's conventions.
The toLocaleString method converts the date to a string using the formatting convention of the
operating system where the script is running. If the operating system is not year-2000 compliant and
does not use the full year for years before 1900 or over 2000, toLocaleString returns a string that is
not year-2000 compliant.toLocaleString behaves similarly to toString when converting a year that
the operating system does not properly format.
Methods such as getHours, getMinutes,
than toLocaleString.
and getSeconds give
more
portable
results
In the following example, today is a Date object:
today = new Date(95,11,18,17,28,35); //months are represented by
0 to 11
today.toLocaleString();
In this example, toLocaleString returns a string value that is similar to the following form. The exact
format depends on the platform.
12/18/95 17:28:35
Date::toLocaleDateString ( );
Converts a date to a string, returning the date portion using the operating system's locale's
conventions.
The toLocaleDateString method converts the date to a string using the formatting convention of the
operating system where the script is running. If the operating system is not year-2000 compliant and
does not use the full year for years before 1900 or over 2000, toLocaleDateString returns a string
that is not year-2000 compliant. toLocaleString behaves similarly to toString when converting a
year that the operating system does not properly format.
Methods such as getHours, getMinutes,
than toLocaleDateString
and getSeconds give
more
portable
results
today = new Date(95,11,18,17,28,35) //months are represented by
0 to 11
today.toLocaleDateString()
Date::toLocaleTimeString ( );
Converts a date to a string, returning the date portion using the current locale's conventions.
See also:
Date::toString ( );
The toLocaleTimeString method converts the date to a string using the formatting convention of the
operating system where the script is running. If the operating system is not year-2000 compliant and
does not use the full year for years before 1900 or over 2000, toLocaleDateString returns a string
that is not year-2000 compliant. toLocaleString behaves similarly to toString when converting a
year that the operating system does not properly format.
75
Lighter – Project Editor User’s Manual
CHAPTER 6
Methods such as getHours, getMinutes, and getSeconds give more portable results
than toLocaleDateString. Use toLocaleTimeString when then intent is to display to the user a
string formatted using the regional format chosen by the user. Be aware that this method, due to its
nature, behaves differently depending on the operating system and on the user's settings.
today = new Date(95,11,18,17,28,35) //months are represented by
0 to 11
today.toLocaleTimeString()
today.toLocaleDateString()
Date::valueOf ( );
Returns the primitive value of a Date object as a number data type, the number of milliseconds since
midnight 01 January, 1970 UTC.
This method is functionally equivalent to the getTime method. This method is usually called internally
by Laser Engine Program and not explicitly in code.
See also:
Date::getTime ( );
x = new Date(56, 6, 17);
myVar = x.valueOf();
//assigns -424713600000 to myVar
Date::getUTCDate ( );
Returns the day (date) of the month in the specified date according to universal time. The value
returned by getUTCDate is an integer between 1 and 31.
The following example assigns the day portion of the current date to the variable d.
var d;
Today = new Date();
d = Today.getUTCDate();
Date::getUTCDay ( );
Returns the day of the week in the specified date according to universal time. The value returned
by getUTCDay is an integer corresponding to the day of the week: 0 for Sunday, 1 for Monday, 2 for
Tuesday, and so on.
The following example assigns the weekday portion of the current date to the variable weekday.
var weekday;
Today = new Date()
weekday = Today.getUTCDay()
Date::getUTCFullYear ( );
Returns the year in the specified date according to universal time. The value returned
by getUTCFullYear is an absolute number that is compliant with year-2000, for example, 1995.
The following example assigns the four-digit value of the current year to the variable yr.
var yr;
Today = new Date();
yr = Today.getUTCFullYear();
Date::getUTCHours ( );
Returns the hours in the specified date according to universal time. The value returned
by getUTCHours is an integer between 0 and 23.
The following example assigns the hours portion of the current time to the variable hrs.
Lighter – Help Online Manual
76
CHAPTER 6
var hrs;
Today = new Date();
hrs = Today.getUTCHours();
Date::getUTCMilliseconds ( );
Returns the milliseconds in the specified date according to universal time. The value returned
by getUTCMilliseconds is an integer between 0 and 999.
The following example assigns the milliseconds portion of the current time to the variable ms.
var ms;
Today = new Date();
ms = Today.getUTCMilliseconds();
Date::getUTCMinutes ( );
Returns the minutes in the specified date according to universal time. The value returned
by getUTCMinutes is an integer between 0 and 59.
The following example assigns the minutes portion of the current time to the variable min.
var min;
Today = new Date();
min = Today.getUTCMinutes();
Date::getUTCMonth ( );
Returns the month of the specified date according to universal time. The value returned
by getUTCMonth is an integer between 0 and 11 corresponding to the month. 0 for January, 1 for
February, 2 for March, and so on.
The following example assigns the month portion of the current date to the variable mon.
var mon;
Today = new Date();
mon = Today.getUTCMonth();
Date::getUTCSeconds ( );
Returns the seconds in the specified date according to universal time. The value returned
by getUTCSeconds is an integer between 0 and 59.
The following example assigns the seconds portion of the current time to the variable sec.
var sec;
Today = new Date();
sec = Today.getUTCSeconds();
Date::setUTCDate ( dayvalue );
Sets the day of the month for a specified date according to universal time.
Parameter
dayvalue - An integer from 1 to 31, representing the day of the month.
If a parameter you specify is outside of the expected range, setUTCDate attempts to update the date
information in the Date object accordingly. For example, if you use 40 for dayValue, and the month
stored in the Date object is June, the day will be changed to 10 and the month will be incremented to
July
theBigDay = new Date();
theBigDay.setUTCDate(20);
77
Lighter – Project Editor User’s Manual
CHAPTER 6
Date::setUTCFullYear ( yearValue[, monthValue[, dayValue]] );
Sets the full year for a specified date according to universal time.
Parameters
yearValue - An integer specifying the numeric value of the year, for example, 1995.
monthValue - An integer between 0 and 11 representing the months January through December.
dayValue - An integer from 1 to 31, representing the day of the month. If you specify
the dayValue parameter, you must also specify the monthValue.
If you do not specify the monthValue and dayValue parameters, the values returned from
the getMonth and getDate methods are used. If a parameter you specify is outside of the expected
range, setUTCFullYear attempts to update the other parameters and the date information in
the Date object accordingly. For example, if you specify 15 for monthValue, the year is incremented
by 1 (year + 1), and 3 is used for the month.
theBigDay = new Date();
theBigDay.setUTCFullYear(1997);
Date::setUTCHours ( hoursValue[, minutesValue[, secondsValue[, msValue]]] );
Sets the hour for a specified date according to universal time.
Parameters
hoursValue - An integer between 0 and 23, representing the hour.
minutesValue - An integer between 0 and 59, representing the minutes.
secondsValue - An integer between 0 and 59, representing the seconds. If you specify
the secondsValue parameter, you must also specify the minutesValue.
msValue - A number between 0 and 999, representing the milliseconds. If you specify
the msValue parameter, you must also specify the minutesValue and secondsValue.
If you do not specify the minutesValue, secondsValue, and msValue parameters, the values
returned from the getMinutes, getSeconds, and getMilliseconds methods are used. If a
parameter you specify is outside of the expected range, setUTCHours attempts to update the other
parameters and the date information in the Date object accordingly. For example, if you use 100
for secondsValue, the minutes will be incremented by 1 (min + 1), and 40 will be used for seconds.
theBigDay = new Date();
theBigDay.setUTCHours(8);
Date::setUTCMilliseconds ( millisecondsValue );
Sets the milliseconds for a specified date according to universal time.
Parameter
millisecondsValue - A number between 0 and 999, representing the milliseconds.
If a parameter you specify is outside of the expected range, setUTCMilliseconds attempts to update
the other parameters and the date information in the Date object accordingly. For example, if you use
1100 for millisecondsValue, the seconds stored in the Date object will be incremented by 1, and
100 will be used for milliseconds.
theBigDay = new Date();
theBigDay.setUTCMilliseconds(500);
Lighter – Help Online Manual
78
CHAPTER 6
Date::setUTCMinutes ( minutesValue[, secondsValue[, msValue]] );
Sets the minutes for a specified date according to universal time.
Parameters
minutesValue - An integer between 0 and 59, representing the minutes.
secondsValue - An integer between 0 and 59, representing the seconds. If you specify
the secondsValue parameter, you must also specify the minutesValue.
msValue - A number between 0 and 999, representing the milliseconds. If you specify
the msValue parameter, you must also specify the minutesValue and secondsValue.
If you do not specify the secondsValue and msValue parameters, the values returned from
the getSeconds and getMilliseconds methods are used. If a parameter you specify is outside of
the expected range, setUTCMinutes attempts to update the other parameters and the date
information in theDate object accordingly. For example, if you use 100 for secondsValue, the minutes
(minutesValue) will be incremented by 1 (minutesValue + 1), and 40 will be used for seconds.
theBigDay = new Date();
theBigDay.setUTCMinutes(43);
Date::setUTCMonth ( monthValue[, dayValue] );
Sets the month for a specified date according to universal time.
Parameters
monthValue - An integer between 0 and 11 representing the months January through December.
dayValue - An integer from 1 to 31, representing the day of the month.
If you do not specify the dayValue parameter, the value returned from the getUTCDate method is
used. If a parameter you specify is outside of the expected range, setUTCMonth attempts to update
the date information in the Date object accordingly. For example, if you use 15 for monthValue, the
year will be incremented by 1 (year + 1), and 3 will be used for month.
theBigDay = new Date();
theBigDay.setUTCMonth(11);
Date::setUTCSeconds ( secondsValue[, msValue] );
Sets the seconds for a specified date according to universal time.
Parameters
secondsValue - An integer between 0 and 59, representing the seconds.
msValue - A number between 0 and 999, representing the milliseconds.
If
you
do
not
specify
the msValue parameter,
the getUTCMilliseconds method is used. If a parameter you
range, setUTCSeconds attempts to update the date information
example, if you use 100 forsecondsValue, the minutes stored in
by 1, and 40 will be used for seconds.
theBigDay = new Date();
theBigDay.setUTCSeconds(20);
the
value
returned
from
specify is outside of the expected
in the Date object accordingly. For
the Date object will be incremented
Date::toUTCString ( );
Converts a date to a string, using the universal time convention.
The value returned by toUTCString is a readable string formatted according to UTC convention. The
format of the return value may vary according to the platform.
var today = new Date();
var UTCstring = today.toUTCString();
// Mon, 03 Jul 2006 21:44:38 GMT
79
Lighter – Project Editor User’s Manual
CHAPTER 6
6.6.1.5 Number
A Number is a datatype that represents a number. In most situations, programmers will use numeric
literals like 3.142 directly in code. More...
Number functions
String
String
String
String
String
Number
Number::toString ( [radix] );
Number::toExponential ( [fractionDigits] );
Number::toFixed ( [Digits] );
Number::toLocaleString ( );
Number::toPrecision ( [ precision ] );
Number::valueOf ( );
Number properties
Number
Number
Number
Number
Number
MAX_VALUE
MIN_VALUE
NaN
NEGATIVE_INFINITY
POSITIVE_INFINITY
Detailed description
A Number is a datatype that represents a number. In most situations, programmers will use numeric
literals like 3.142 directly in code.
The Number datatype is useful for obtaining system limits, e.g. MIN_VALUE and MAX_VALUE, and for
performing number to string conversions with toString()
Number constructor documentation
Numbers are not normally constructed, but instead created by simple assignment, such as, for
example:
var x = 3.142;
Number function documentation
Number::toString ( [radix] );
Returns the number as a string value.
Parameter:
radix - An integer between 2 and 36 specifying the base to use for representing numeric values.
The toString method parses its first argument, and attempts to return a string representation in the
specified radix (base). For radixes above 10, the letters of the alphabet indicate numerals greater than
9. For example, for hexadecimal numbers (base 16), A through F are used.
If toString is given a radix not between 2 and 36, an exception is thrown. If the radix is not specified,
Laser Engine Program assumes the preferred radix is 10.
Lighter – Help Online Manual
80
CHAPTER 6
var count = 10;
print(count.toString());
print((17).toString());
// displays "10"
// displays "17"
var x = 7;
print(x.toString(2));
// displays "111"
Number::toExponential ( [fractionDigits] );
Returns a string representing the Number object in exponential notation
Parameter:
fracionDigits - An integer specifying the number of digits after the decimal point. Defaults to as
many digits as necessary to specify the number.
See also:
Number::toFixed ( [Digits] );
This method returns a string representing a Number object in exponential notation with one digit before
the decimal point, rounded to fractionDigits digits after the decimal point. If
the fractionDigits argument is omitted, the number of digits after the decimal point defaults to the
number of digits necessary to represent the value uniquely.
If you use the toExponential method for a numeric literal and the numeric literal has no exponent and
no decimal point, leave a space before the dot that precedes the method call to prevent the dot from
being interpreted as a decimal point.
If a number has more digits that requested by the fractionDigits parameter, the number is rounded
to the nearest number represented by fractionDigits digits. See the discussion of rounding in the
description of the toFixed method, which also applies to toExponential.
var num=77.1234;
print("num.toExponential() is " + num.toExponential()); //
displays 7.71234e+1
print("num.toExponential(4) is " + num.toExponential(4)); //
displays 7.7123e+1
print("num.toExponential(2) is " + num.toExponential(2)); //
displays 7.71e+1
print("77.1234.toExponential() is " + 77.1234.toExponential());
//displays 7.71234e+1
print("77 .toExponential() is " + 77 .toExponential()); //
displays 7.7e+1
var x = 7;
Number::toFixed ( [Digits] );
Formats a number using fixed-point notation.
Parameter:
Digits - The number of digits to appear after the decimal point; this may be a value between 0
and 20, inclusive, and implementations may optionally support a larger range of values. If this
argument is omitted, it is treated as 0.
This method returns a string representation of number that does not use exponential notation and has
exactly digits digits after the decimal place. The number is rounded if necessary, and the fractional
part is padded with zeros if necessary so that it has the specified length. If number is greater than
1e+21, this method simply calls Number.toString() and returns a string in exponential notation.
81
Lighter – Project Editor User’s Manual
CHAPTER 6
toFixed throws the following
• RangeError - If digits is too small or too large. Values between 0 and 20, inclusive, will not
cause a RangeError. Implementations are allowed to support larger and smaller values as
well.
• TypeError - If this method is invoked on an object that is not a Number.
var n = 12345.6789;
n.toFixed();
fractional part
n.toFixed(1);
n.toFixed(6);
zeros
(1.23e+20).toFixed(2);
(1.23e-10).toFixed(2)
// Returns 12346: note rounding, no
// Returns 12345.7: note rounding
// Returns 12345.678900: note added
// Returns 123000000000000000000.00
// Returns 0.00
Number::toLocaleString ( );
Returns a human readable string representing the number using the locale of the environment.
Number::toPrecision ( [ precision ] );
Returns a string representing the Number object to the specified precision.
Parameter:
precision - An integer specifying the number of significant digits.
See also:
Number::toFixed ( [Digits] );, Number::toString ( [radix] );
This method returns a string representing a Number object in fixed-point or exponential notation
rounded to precision significant digits. See the discussion of rounding in the description of
the toFixed method, which also applies to toPrecision.
If the precision argument is omitted, behaves as toString. If it is a non-integer value, it is rounded to the
nearest integer. After rounding, if that value is not between 1 and 100 (inclusive), a RangeError is
thrown.
var num = 5.123456;
print("num.toPrecision() is " + num.toPrecision());
5.123456
print("num.toPrecision(4) is " + num.toPrecision(4));
5.123
print("num.toPrecision(2) is " + num.toPrecision(2));
5.1
print("num.toPrecision(1) is " + num.toPrecision(1));
5
//displays
//displays
//displays
//displays
Number::valueOf ( );
Returns the primitive value of a Number object as a number data type.
var x = new Number();
print(x.valueOf());
// prints "0"
Number properties documentation
MAX_VALUE
Returns the maximum value for floating point values.
MIN_VALUE
Returns the minimum value for floating point values.
Lighter – Help Online Manual
82
CHAPTER 6
NaN
A value representing Not-A-Number. NaN is always unequal to any other number, including NaN itself;
you cannot check for the not-a-number value by comparing to Number.NaN. Use the isNaN() function
instead.
NEGATIVE_INFINITY
A value representing the negative Infinity value. Several Laser Engine Program methods (such as
the Number constructor, parseFloat, and parseInt) return NaN if the value specified in the
parameter is significantly lower than Number.MIN_VALUE.
In the following example, the variable smallNumber is assigned a value that is smaller than the
minimum value. When the if statement executes, smallNumber has the value "-Infinity",
so smallNumber is set to a more manageable value before continuing:
var smallNumber = (-Number.MAX_VALUE) * 2
if (smallNumber == Number.NEGATIVE_INFINITY) {
smallNumber = returnFinite();
}
POSITIVE_INFINITY
A value representing the negative Infinity value. Several Laser Engine Program methods (such as
the Number constructor, parseFloat, and parseInt) return NaN if the value specified in the
parameter is significantly lower than Number.MIN_VALUE.
In the following example, the variable smallNumber is assigned a value that is smaller than the
minimum value. When the if statement executes, smallNumber has the value "-Infinity",
so smallNumber is set to a more manageable value before continuing:
var smallNumber = (-Number.MAX_VALUE) * 2
if (smallNumber == Number.NEGATIVE_INFINITY) {
smallNumber = returnFinite();
}
A numeric variable can hold a non-numeric value, in which case isNaN() returns true. The result of an
arithmetic expression may exceed the maximum or minimum representable values in which case the
value of the expression will be Infinity, and isFinite() will return false.
83
Lighter – Project Editor User’s Manual
CHAPTER 6
6.6.1.6 RegExp
Creates a regular expression object for matching text according to a pattern. More...
RegExp Functions
The global RegExp object has no methods of its own, however, it does inherit some methods through
the prototype chain.
Array
Boolean
String
String
RegExp::exec(String str);
RegExp.test([String str])
RegExp::toString( );
RegExp::valueOf( )
RegExp Properties
(*ptFunction)
Boolean
Boolean
Number
Boolean
String
constructor
global
ignoreCase
lastIndex
multiline
source
Detailed description
Creates a regular expression object for matching text according to a pattern.
var regex = new RegExp("pattern" [, "flags"]);
var literal = /pattern/flags;
When using the constructor function, the normal string escape rules (preceding special characters with \
when included in a string) are necessary. For example, the following are equivalent:
var re = new RegExp("\\w+");
var re = /\w+/;
Notice that the parameters to the literal format do not use quotation marks to indicate strings, while the
parameters to the constructor function do use quotation marks. So the following expressions create the
same regular expression:
/ab+c/i;
new RegExp("ab+c", "i");
Special characters in regular expressions
Character Meaning
\
For characters that are usually treated literally, indicates that the next character is special
and not to be interpreted literally.
For example, /b/ matches the character 'b'. By placing a backslash in front of b, that is by
using /\b/, the character becomes special to mean match a word boundary.
or
For characters that are usually treated specially, indicates that the next character is not
special and should be interpreted literally.
For example, * is a special character that means 0 or more occurrences of the preceding
character should be matched; for example, /a*/ means match 0 or more "a"s. To
match * literally, precede it with a backslash; for example, /a\*/ matches 'a*'.
^
Matches beginning of input. If the multiline flag is set to true, also matches immediately after
a line break character.
Lighter – Help Online Manual
84
CHAPTER 6
For example, /^A/ does not match the 'A' in "an A", but does match the first 'A' in "An A."
85
$
Matches end of input. If the multiline flag is set to true, also matches immediately before a
line break character.
For example, /t$/ does not match the 't' in "eater", but does match it in "eat".
*
Matches the preceding item 0 or more times.
For example, /bo*/ matches 'boooo' in "A ghost booooed" and 'b' in "A bird warbled", but
nothing in "A goat grunted".
+
Matches the preceding item 1 or more times. Equivalent to {1,}.
For example, /a+/ matches the 'a' in "candy" and all the a's in "caaaaaaandy".
?
Matches the preceding item 0 or 1 time.
For example, /e?le?/ matches the 'el' in "angel" and the 'le' in "angle."
If used immediately after any of the quantifiers *, +, ?, or {}, makes the quantifier nongreedy (matching the minimum number of times), as opposed to the default, which is greedy
(matching the maximum number of times).
Also used in lookahead assertions, described under (?=), (?!), and (?:) in this table.
.
(The decimal point) matches any single character except the new line characters: \n \r
\u2028 or \u2029. ([\s\S] can be used to match any character including new lines.)
For example, /.n/ matches 'an' and 'on' in "nay, an apple is on the tree", but not 'nay'.
(x)
Matches x and remembers the match. These are called capturing parentheses.
For example, /(foo)/ matches and remembers 'foo' in "foo bar." The matched substring
can be recalled from the resulting array's elements [1], ..., [n] or from the
predefined RegExp object's properties $1, ..., $9.
(?:x)
Matches x but does not remember the match. These are called non-capturing parentheses.
The matched substring can not be recalled from the resulting array's elements [1], ...,
[n] or from the predefined RegExp object's properties $1, ..., $9.
x(?=y)
Matches x only if x is followed by y.
For example, /Jack(?=Sprat)/ matches 'Jack' only if it is followed by 'Sprat'.
/Jack(?=Sprat|Frost)/ matches 'Jack' only if it is followed by 'Sprat' or 'Frost'.
However, neither 'Sprat' nor 'Frost' is part of the match results.
x(?!y)
Matches x only if x is not followed by y.
For example, /\d+(?!\.)/ matches a number only if it is not followed by a decimal point.
/\d+(?!\.)/.exec("3.141") matches 141 but not 3.141.
x|y
Matches either x or y.
For example, /green|red/ matches 'green' in "green apple" and 'red' in "red apple."
{n}
Where n is a positive integer. Matches exactly n occurrences of the preceding item.
For example, /a{2}/ doesn't match the 'a' in "candy," but it matches all of the a's in
"caandy," and the first two a's in "caaandy."
{n,}
Where n is a positive integer. Matches at least n occurrences of the preceding item.
For example, /a{2,} doesn't match the 'a' in "candy", but matches all of the a's in "caandy"
and in "caaaaaaandy."
{n,m}
Where n and m are positive integers. Matches at least n and at most m occurrences of the
preceding item.
For example, /a{1,3}/ matches nothing in "cndy", the 'a' in "candy," the first two a's in
"caandy," and the first three a's in "caaaaaaandy". Notice that when matching
"caaaaaaandy", the match is "aaa", even though the original string had more a's in it.
[xyz]
A character set. Matches any one of the enclosed characters. You can specify a range of
characters by using a hyphen.
For example, [abcd] is the same as [a-d]. They match the 'b' in "brisket" and the 'c' in
"ache".
[^xyz]
A negated or complemented character set. That is, it matches anything that is not
enclosed in the brackets. You can specify a range of characters by using a hyphen.
For example, [^abc] is the same as [^a-c]. They initially match 'r' in "brisket" and 'h' in
Lighter – Project Editor User’s Manual
CHAPTER 6
"chop."
[\b]
Matches a backspace. (Not to be confused with \b.)
\b
Matches a word boundary, such as a space. (Not to be confused with [\b].)
For example, /\bn\w/ matches the 'no' in "noonday"; /\wy\b/ matches the 'ly' in
"possibly yesterday."
\B
Matches a non-word boundary.
For example, /\w\Bn/ matches 'on' in "noonday", and /y\B\w/ matches 'ye' in "possibly
yesterday."
\cX
Where X is a letter from A - Z. Matches a control character in a string.
For example, /\cM/ matches control-M in a string.
\d
Matches a digit character in the basic Latin alphabet. Equivalent to [0-9].
For example, /\d/ or /[0-9]/ matches '2' in "B2 is the suite number."
\D
Matches any non-digit character in the basic Latin alphabet. Equivalent to [^0-9].
For example, /\D/ or /[^0-9]/ matches 'B' in "B2 is the suite number."
\f
Matches a form-feed.
\n
Matches a linefeed.
\r
Matches a carriage return.
\s
Matches a single white space character, including space, tab, form feed, line feed and
other unicode spaces. 1
For example, /\s\w*/ matches ' bar' in "foo bar."
\S
Matches a single character other than white space. 2
For example, /\S\w*/ matches 'foo' in "foo bar."
\t
Matches a tab.
\v
Matches a vertical tab.
\w
Matches any alphanumeric character from the basic Latin alphabet, including the
underscore. Equivalent to [A-Za-z0-9_].
For example, /\w/ matches 'a' in "apple," '5' in "$5.28," and '3' in "3D."
\W
Matches any character that is not a word character from the basic Latin alphabet.
Equivalent to [^A-Za-z0-9_].
For example, /\W/ or /[^$A-Za-z0-9_]/ matches '%' in "50%."
\n
Where n is a positive integer. A back reference to the last substring matching the n
parenthetical in the regular expression (counting left parentheses).
For example, /apple(,)\sorange\1/ matches 'apple, orange,' in "apple, orange,
cherry, peach."
\0
Matches a NUL character. Do not follow this with another digit.
\xhh
\uhhhh
Matches the character with the code hh (two hexadecimal digits.)
Matches the character with the Unicode value hhhh (four hexadecimal digits).
1
equivalent_s
Equivalent
to:
[\t\n\v\f\r
\u00a0\u2000\u2001\u2002\u2003\u2004\u2005\u2006\u2007\u2008\u2009\u200a\u200b\u2028
\u2029\u3000]
2
equivalent_S
Equivalent
to:
[^\t\n\v\f\r
\u00a0\u2000\u2001\u2002\u2003\u2004\u2005\u2006\u2007\u2008\u2009\u200a\u200b\u2028
\u2029\u3000]
The literal notation provides compilation of the regular expression when the expression is evaluated.
Use literal notation when the regular expression will remain constant. For example, if you use literal
notation to construct a regular expression used in a loop, the regular expression won't be recompiled on
each iteration.
Lighter – Help Online Manual
86
CHAPTER 6
The constructor of the regular expression object, for example, new RegExp("ab+c"), provides runtime
compilation of the regular expression. Use the constructor function when you know the regular
expression pattern will be changing, or you don't know the pattern and are getting it from another
source, such as user input.
RegExp functions documentation
RegExp::exec(String str);
Executes a search for a match in a specified string. Returns a result array, or null.
Parameter:
str - The string against which to match the regular expression.
As shown in the syntax description, a regular expression's exec method can be called either directly,
(with regexp.exec(str)) or indirectly (with regexp(str)). If you are executing a match simply to find
true or false, use the test method or the String search method.
If the match succeeds, the exec method returns an array and updates properties of the regular expression
object. If the match fails, the exec method returns null.
Consider the following example:
// Match one d followed by one or more b's followed by one d
// Remember matched b's and the following d
// Ignore case
var myRe = /d(b+)(d)/ig;
var myArray = myRe.exec("cdbBdbsbz");
The following table shows the results for this script:
Object Property/Index Description
MyArray
87
Example
The content of myArray.
["dbBd",
"bB", "d"]
index
The 0-based index of the match in the string.
1
input
The original string.
cdbBdbsbz
[0]
The last matched characters.
dbBd
[1], ...[n]
The parenthesized substring matches, if any. The
[1] = bB
number of possible parenthesized substrings is [2] = d
unlimited.
Lighter – Project Editor User’s Manual
CHAPTER 6
MyRe
lastIndex
The index at which to start the next match.
5
IgnoreCase
Indicates if the "i" flag was used to ignore case.
true
global
Indicates if the "g" flag was used for a global match.
true
multiline
source
Indicates if the "m" flag was used to search in strings false
across multiple line.
d(b+)(d)
The text of the pattern.
If your regular expression uses the "g" flag, you can use the exec method multiple times to find
successive matches in the same string. When you do so, the search starts at the substring
of str specified by the regular expression's lastIndex property. For example, assume you have this
script:
var myRe = /ab*/g;
var str = "abbcdefabh";
var myArray;
while ((myArray = myRe.exec(str)) != null)
{
var msg = "Found " + myArray[0] + ". ";
msg += "Next match starts at " + myRe.lastIndex;
print(msg);
}
This script displays the following text:
Found abb. Next match starts at 3
Found ab. Next match starts at 9
Example: Using exec to execute a match against the input
In the following example, the function executes a match against the input. It then cycles through the
array to see if other names match the user's name.
This script assumes that first names of registered party attendees are preloaded into the array A,
perhaps by gathering them from a party database.
var A = ["Frank", "Emily", "Jane", "Harry", "Nick", "Beth",
"Rick", "Terrence", "Carol", "Ann", "Terry", "Frank",
"Alice", "Rick", "Bill", "Tom", "Fiona", "Jane", "William",
"Joan", "Beth"];
function lookup(input)
{
var firstName = /\w+/i.exec(input);
if (!firstName)
{
print(input + " isn't a name!");
return;
}
var count = 0;
for (var i = 0; i < A.length; i++)
{
if (firstName[0].toLowerCase() == A[i].toLowerCase())
count++;
}
var midstring = count == 1 ? " other has ": " others have ";
print("Thanks, " + count + midstring + "the same name!")
Lighter – Help Online Manual
88
CHAPTER 6
RegExp.test([String str])
Executes the search for
Returns true or false.
a
match
between
a
regular
expression
and
a
specified
string.
Parameter:
str - The string against which to match the regular expression.
When you want to know whether a pattern is found in a string use the test method (similar to
the String.search method); for more information (but slower execution) use the exec method (similar to
the String.match method).
The following example prints a message which depends on the success of the test:
function testinput(re, str){
if (re.test(str))
midstring = " contains ";
else
midstring = " does not contain ";
print (str + midstring + re.source);
}
RegExp::toString( );
Returns a string representing the specified object.
The following example displays the string value of a RegExp object:
myExp = new RegExp("a+b+c");
alert(myExp.toString());
// displays "/a+b+c/"
RegExp::valueOf( )
Returns a string representing the source code of the function.
RegExp properties documentation
Note that several of the RegExp properties have both long and short (Perl-like) names. Both names
always refer to the same value. Perl is the programming language from which Laser Engine Program
modeled its regular expressions.
constructor
Specifies the function that creates an object's prototype.
Returns a reference to the RegExp function that created the instance's prototype. Note that the value of
this property is a reference to the function itself, not a string containing the function's name.
global
Whether to test the regular expression against all possible matches in a string, or only against the
first. global is a property of an individual regular expression object.
The value of global is true if the "g" flag was used; otherwise, false. The "g" flag indicates that the regular
expression should be tested against all possible matches in a string.
You cannot change this property directly.
ignoreCase
Whether to ignore case while attempting a match in a string. ignoreCase is a property of an individual
regular expression object.
The value of ignoreCase is true if the "i" flag was used; otherwise, false. The "i" flag indicates that case
should be ignored while attempting a match in a string.
You cannot change this property directly.
lastIndex
A read/write integer property that specifies the index at which to start the next match. lastIndex is a
property of an individual regular expression object.
This property is set only if the regular expression used the "g" flag to indicate a global search.
89
Lighter – Project Editor User’s Manual
CHAPTER 6
The following rules apply:
•
•
•
•
If lastIndex is greater than the length of the string, regexp.test and regexp.exec fail,
and lastIndex is set to 0.
If lastIndex is equal to the length of the string and if the regular expression matches the
empty string, then the regular expression matches input starting at lastIndex.
If lastIndex is equal to the length of the string and if the regular expression does not match
the empty string, then the regular expression mismatches input, and lastIndex is reset to 0.
Otherwise, lastIndex is set to the next position following the most recent match.
For example, consider the following sequence of statements:
re = /(hi)?/g - Matches the empty string.
re("hi") - Returns ["hi", "hi"] with lastIndex equal to 2.
re("hi") - Returns [""], an empty array whose zeroth element is the match string. In this
case, the empty string because lastIndex was 2 (and still is 2) and "hi" has length 2.
multiline
Reflects whether or not to search in strings across multiple lines. multiline is a property of an
individual regular expression object..
The value of multiline is true if the "m" flag was used; otherwise, false. The "m" flag indicates that a
multiline input string should be treated as multiple lines. For example, if "m" is
used, "^" and "$" change from matching at only the start or end of the entire string to the start or end
of any line within the string.
You cannot change this property directly.
source
A read-only property that contains the text of the pattern, excluding the forward slashes. source is a
property of an individual regular expression object.
You cannot change this property directly.
Lighter – Help Online Manual
90
CHAPTER 6
6.6.1.7 String
A String is a sequence of zero or more Unicode characters. More...
Static String functions
String
String::fromCharCode ( Number code1, Number code2,... );
String functions
String
Number
String
Number
Number
String
String
Number
String
String
String
String
String
String
String::charAt ( Number pos );
String::charCodeAt ( Number pos );
String::concat ( string2, string3[, ..., stringN] );
String::indexOf( String or RegExp pattern, Number pos );
String::lastIndexOf ( String or RegExp pattern, Number pos );
String::match ( RegExp pattern );
String::replace ( RegExp pattern, String newValue );
String::search ( RegExp pattern );
String::slice ( beginslice[, endSlice]);
String::split ([separator][, limit]);
String::substring ( Number startIndex, Number endIndex );
String::toLowerCase ( );
String::toString ( );
String::toUpperCase ( );
String Properties
Number
length
Detailed description
A String is a sequence of zero or more Unicode characters. Laser Engine's String class uses the
QString class's functions and syntax.
Strings can be created and concatenated as follows.
var text = "this is a";
var another = new String( "text" );
var concat = text + " " + another; // concat == "this is a
text"
Static String function documentation
String::fromCharCode ( Number code1, Number code2,... );
Returns a string made up of the characters with code code1, code2, etc., according to their Unicode
character codes.
var s = String.fromCharCode( 65, 66, 67, 68 );
println( s ); // prints "ABCD"
String functions documentation
String::charAt ( Number pos );
Returns the character in the string at position pos. If the position is out of bounds, undefined is returned.
Parameter:
Pos - An integer between 0 and 1 less than the length of the string.
91
Lighter – Project Editor User’s Manual
CHAPTER 6
The following example displays characters at different locations in the string "Brave new world":
var anyString="Brave new world"
print("The character at index 0 is '" + anyString.charAt(0) +
"'")
print("The character at index 1 is '" + anyString.charAt(1) +
"'")
These lines display the following:
The character at index 0 is 'B'
The character at index 1 is 'r'
String::charCodeAt ( Number pos );
Returns the character code of the character at position pos in the string. If the position is out of
bounds, undefined is returned.
Parameter:
Pos - An integer greater than 0 and less than the length of the string; if unspecified,
defaults to 0.
The following example returns 65, the Unicode value for A:
"ABC".charCodeAt(0) // returns 65
String::concat ( string2, string3[, ..., stringN] );
Combines the text from one or more strings and returns a new string. Changes to the text in one
string do not affect the other string.
Parameter:
string2 ... stringN - Strings to concatenate to this string.
s1="Oh "
s2="what a beautiful "
s3="mornin'."
s4=s1.concat(s2,s3) // returns "Oh what a beautiful mornin'."
String::indexOf( String or RegExp pattern, Number pos );
Returns the index of pattern in the string, starting at position pos. If no position is specified,
the function starts at the beginning of the string. If the pattern is not found in the string, -1 is
returned.
Parameters:
pattern - A string representing the value to search for.
pos - The location within the calling string to start the search from. It can be any integer
between 0 and the length of the string. The default value is 0.
The following example uses indexOf to locate a value in the string "Brave new world":
var anyString="Brave new world"
print("<The index of the first w from the beginning is " +
anyString.indexOf("w"))
// Displays 8
Lighter – Help Online Manual
92
CHAPTER 6
String::lastIndexOf ( String or RegExp pattern, Number pos );
Returns the last index of pattern in the string, starting at position pos and searching
backwards from there. If no position is specified, the function starts at the end of the string. If the
pattern is not found in the string, -1 is returned.
Parameters:
pattern - A string representing the value to search for.
pos - The location within the calling string to start the search from, indexed from left to
right. It can be any integer between 0 and the length of the string. The default value is the
length of the string.
The following example uses lastIndexOf to locate a value in the string "Brave new world":
var anyString="Brave new world"
print("<The index of the first w from the end is " +
anyString.lastIndexOf("w"))
// Displays 6
String::match ( RegExp pattern );
Returns the matched pattern if this string matches the pattern defined by regexp. If the string
doesn't match or regexp is not a valid regular expression, undefined is returned.
String::replace ( RegExp pattern, String newValue );
Replaces the first occurrence of pattern in the string with newvalue if the pattern is found in
the string. A modified copy of string is returned.
If pattern is a regular expression with global set, all occurrences of pattern in the string will be
replaced.
String::search ( RegExp pattern );
Executes the search for a match between a regular expression and this String object.
If successful, search returns the index of pattern inside the string.
The following example prints a message which depends on the success of the test:
function testinput(re, str){
if (string.search(re) != -1)
midstring = " contains ";
else
midstring = " does not contain ";
print (str + midstring + re.source);
}
String::slice ( beginslice[, endSlice]);
Extracts a section of a string and returns a new string. Changes to the text in one string do not
affect the other string.
Parameters:
beginSlice - The zero-based index at which to begin extraction.
endSlice - The zero-based index at which to end extraction. If omitted, slice extracts to the
end of the string.
93
Lighter – Project Editor User’s Manual
CHAPTER 6
The following example uses slice to create a new string:
var str1 = "The morning is upon us.";
var str2 = str1.slice(3, -2);
print(str2);
This writes:
morning is upon u
String::split ([separator][, limit]);
Splits a String object into an array of strings by separating the string into substrings.
Parameters:
separator - Specifies the character to use for separating the string. The separator is
treated as a string or a regular expression (see RegExp). If separator is omitted, the array
returned contains one element consisting of the entire string.
limit - Integer specifying a limit on the number of splits to be found.
The split method returns the new array. When found, separator is removed from the string and the
substrings are returned in an array. If separator is omitted, the array contains one element consisting of
the entire string.
If separator is a regular expression that contains capturing parentheses, then each
time separator is matched the results (including any undefined results) of the capturing parentheses
are spliced into the output array. However, not all browsers support this capability.
Note:
When the string is empty, split returns an array containing one empty string, rather than an
empty array.
The following example defines a function that splits a string into an array of strings using the specified
separator. After splitting the string, the function displays messages indicating the original string (before
the split), the separator used, the number of elements in the array, and the individual array elements.
function splitString(stringToSplit,separator)
{
var arrayOfStrings = stringToSplit.split(separator);
print('The original string is: "' + stringToSplit + '"');
print('The separator is: "' + separator + '"');
print("The array has " + arrayOfStrings.length + " elements:
");
for (var i=0; i < arrayOfStrings.length; i++)
print(arrayOfStrings[i] + " / ");
}
var tempestString = "Oh brave new world that has such people in
it.";
var monthString = "Jan,Feb,Mar,Apr,May,Jun,Jul,Aug,Sep,Oct,Nov,
Dec";
var space = " ";
var comma = ",";
splitString(tempestString, space);
splitString(tempestString);
splitString(monthString, comma);
Lighter – Help Online Manual
94
CHAPTER 6
This example produces the following output:
The original string is: "Oh brave new world that has such people
in it."
The separator is: " "
The array has 10 elements: Oh / brave / new / world / that / has
/ such / people / in / it. /
The original string is: "Oh brave new world that has such people
in it."
The separator is: "undefined"
The array has 1 elements: Oh brave new world that has such
people in it. /
The original string is: "Jan,Feb,Mar,Apr,May,Jun,Jul,Aug,Sep,
Oct,Nov,Dec"
The separator is: ","
The array has 12 elements: Jan / Feb / Mar / Apr / May / Jun /
Jul / Aug / Sep / Oct / Nov / Dec /
String::substring ( Number startIndex, Number endIndex );
Returns a copy of this string which is the substring starting at startIndex and ending at endIndex.
Parameters:
startIndex - An integer between 0 and one less than the length of the string.
endIndex - An integer between 0 and the length of the string.
The following example uses substring to display characters from the string "Laser Editor".
// assumes a print function is defined
var anyString = "Laser Editor";
// Displays "Light"
print(anyString.substring(0,5));
String::toLowerCase ( );
Returns the value of the string converted to lowercase. toLowerCase does not affect the value of the
string itself.
String::toString ( );
Returns a string representing the specified object.
The following example displays the string value of a String object:
x = new String("Hello world");
alert(x.toString())
// Displays "Hello world"
String::toUpperCase ( );
Returns the value of the string converted to uppercase. toUpperCase does not affect the value of the
string itself.
String property documentation
length
A value that specifies the length of the string.
95
Lighter – Project Editor User’s Manual
CHAPTER 6
6.6.2 Arguments variable
The arguments object is a local variable available within all functions.
You can refer to a function's arguments within the function by using the arguments object. This object
contains an entry for each argument passed to the function, the first entry's index starting at 0. For
example, if a function is passed three arguments, you can refer to the argument as follows:
arguments[0]
arguments[1]
arguments[2]
The arguments object is not an array. It is similar to an array, but does not have any array properties
except length.
You can use the arguments object if you call a function with more arguments than it is formally declared
to accept. This technique is useful for functions that can be passed a variable number of arguments.
You can use arguments.length to determine the number of arguments passed to the function, and
then process each argument by using the arguments object.
Description
It is an Array of the arguments that were passed to the function. It only exists within the context of a
function.
Example:
function sum()
{
total = 0;
for ( i = 0; i < arguments.length; i++ ) {
total += arguments[ i ];
}
return total;
}
Lighter – Help Online Manual
96
CHAPTER 6
6.6.3 Built-in Constants
Laser Engine Program provides a number of convenient built-in constants.
For further information:
• Infinity
• NaN
• undefined
6.6.3.1 Infinity
This is the value of any division by zero.
Syntax
var i = 1/0;
In Laser Engine Program, division by zero does not raise an exception; instead it assigns
the Infinity value as the result of the expression. Use isFinite() to test whether a value is finite or not.
6.6.3.2 NaN
NaN means "Not-a-Number", and is used to signify that a value is not a legal number.
Use isNaN() function to test a value to see if it is NaN.
6.6.3.3 undefined
This is the value of a variable that has never been declared, or that has been declared, but has not
been assigned a value.
Example:
var i;
// ...
if ( i == undefined ) {
i = 77;
}
In this example, if execution reaches the if statement, and i has not been assigned a value, it will be
assigned the value 77.
97
Lighter – Project Editor User’s Manual
CHAPTER 6
6.6.4 Built-in Functions
Laser Engine Program provides the following built-in functions.
connect()
isNaN()
disconnect()
isFinite()
print()
parseFloat()
eval()
parseInt()
See also:
•
Declaring Functions
6.6.4.1 connect()
Syntax:
connect(function)
This function is used to create signals and slots connections between objects.
It has two forms, with or without arguments, as it is shown in the following examples:
Example without arguments:
function myInterestingScriptFunction() { ... }
...
myQObject.somethingChanged.connect(myInterestingScriptFunction);
Example with arguments:
function myInterstingScriptFunction2(arg1,arg2) { ... }
...
myQObject["somethingChanged2(arg1,arg2)"]
.connect(myInterestingScriptFunction2);
Note that the function is resolved when the connection is made, not when the signal is emitted.
•
Back to the full list of Built-in Functions
6.6.4.2 disconnect()
To disconnect from a signal, you invoke the signal's disconnect() function, passing the function to
disconnect as argument:
myQObject.somethingChanged.disconnect(myInterestingFunction);
•
Back to the full list of Built-in Functions
6.6.4.3 print()
Syntax:
print( expression )
Prints the expression (applying toString() if necessary) to the output (stderr), followed by a
newline.
•
Back to the full list of Built-in Functions
Lighter – Help Online Manual
98
CHAPTER 6
6.6.4.4 eval()
Syntax:
eval( string )
var x = 57;
var y = eval( "40 + x" ); // y == 97
This function parses and executes the contents of the string, taking the text to be valid Laser Engine
Program.
•
Back to the full list of Built-in Functions
6.6.4.5 isFinite()
Syntax:
isFinite( expression )
Returns true if the expression's value is a number that is within range; otherwise returns false.
•
Back to the full list of Built-in Functions
6.6.4.6 isNaN()
Syntax:
isNaN( expression )
Returns true if the expression's value is not a number; otherwise returns false.
Example:
var x = parseFloat( "3.142" );
var y = parseFloat( "haystack" );
if ( isNaN( x ) ) debug( "x is not a number" );
if ( isNaN( y ) ) debug( "y is not a number" );
// Prints: "y is not a number"
•
Back to the full list of Built-in Functions
6.6.4.7 parseFloat()
Syntax:
parseFloat( string )
Parses the string and returns the floating point number that the string represents or NaN if the parse
fails. Leading and trailing whitespace are ignored. If the string contains a number followed by nonnumeric characters, the value of the number is returned and the trailing characters ignored.
•
•
99
See also parseInt().
Back to the full list of Built-in Functions
Lighter – Project Editor User’s Manual
CHAPTER 6
6.6.4.8 parseInt()
Syntax:
parseInt( string, optBase )
Parses the string and returns the integer that the string represents in the given base optBase,
or NaN if the parse fails. If the base isn't specified, the base is determined as follows:
•
•
•
base 16 (hexadecimal) if the first non-whitespace characters are "0x" or "0X"
base 8 (octal) if the first non-whitespace character is "0"
base 10 otherwise
Leading and trailing whitespace are ignored. If the string contains a number followed by non-numeric
characters, the value of the number is returned and the trailing characters ignored.
Example:
var i = parseInt( "24" );
// i == 24
var h = parseInt( "0xFF" );
// h == 255
var x = parseInt( " 459xyz " ); // x == 459
•
See also parseFloat().
Lighter – Help Online Manual
100
CHAPTER 6
6.6.5 Built-in Operators
Laser Engine Program provides a set of built-in operators, which are divided into the following types:
• Assignment Operators
• Arithmetic Operators
• String Operators
• Logical Operators
• Comparison Operators
• Bit-wise operators
• Special Operators
6.6.5.1 Assignment Operators
These operators are used to assign the value of expressions to variables:
= operator
&= operator
+= operator
^= operator
-= operator
|= operator
*= operator
<<= operator
/= operator
>>= operator
%= operator
>>>= operator
= operator
var variable = expression;
The assignment operator is used to assign the value of an expression to the variable.
It is an error to attempt to assign to a constant.
+= operator
variable += expression;
This operator adds the value of the expression to the variable. It is the same as:
variable = variable + expression;
but is shorter to write, and less error-prone.
See also String Operators (+= string)
-= operator
variable -= expression;
This operator subtracts the value of the expression from the variable.
*= operator
variable *= expression;
This operator multiplies the value of the expression by the value of the variable.
101
Lighter – Project Editor User’s Manual
CHAPTER 6
/= operator
variable /= expression;
This operator divides the value of the variable by the value of the expression.
%= operator
variable %= expression;
This operator divides the variable by the expression, and assigns the remainder of the division
(which may be 0), to the variable.
&= operator
variable &= expression;
This operator performs a bit-wise AND on the value of the expression and the value of the variable,
and assigns the result to the variable.
^= operator
variable ^= expression;
This operator performs a bit-wise OR on the value of the expression and the value of the variable,
and assigns the result to the variable.
|= operator
variable |= expression;
This operator performs a bit-wise OR on the value of the expression and the value of the variable,
and assigns the result to the variable.
<<= operator
variable <<= expression;
This operator performs a bit-wise left shift on the variable by an expression number of bits. Zeros
are shifted in from the right.
>>= operator
variable >>= expression;
This operator performs a
an expression number of bits.
bit-wise
(sign-preserving)
right
shift
on
the variable by
shift
on
the variable by
>>>= operator
variable >>>= expression;
This operator performs a
an expression number of bits.
bit-wise
(zero-padding)
right
Lighter – Help Online Manual
102
CHAPTER 6
6.6.5.2 Arithmetic Operators
These operators are used to perform arithmetic computations on their operands.
+ operator
* operator
++ operator
/ operator
- operator
% operator
-- operator
+ operator
operand1 + operand2
This operator returns the result of adding the two operands (operand1 and operand2).
See also String Operators (+ string)
++ operator
++operand; // pre-increment
operand++; // post-increment
The pre-increment version of this operator increments the operand, and returns the value of the (now
incremented) operand.
The post-incremented version of this operator returns the value of the operand, and then increments
the operand.
- operator
var result = operand1 - operand2; // subtraction
operand = -operand;
// unary negation
The subtraction version of this operator returns the result of subtracting its second operand (operand2)
from its first operand (operand1).
The unary negation version of this operator returns the result of negating (changing the sign) of
its operand.
-- operator
--operand; // pre-decrement
operand--; // post-decrement
The pre-decrement version of this operator decrements the operand, and returns the value of the (now
decremented) operand.
The post-decremented version of this operator returns the value of the operand, and then decrements
the operand.
* operator
operand1 * operand2
This operator returns the result of multiplying the two operands (operand1 and operand2).
103
Lighter – Project Editor User’s Manual
CHAPTER 6
/ operator
operand1 / operand2
This operator returns the result of dividing the first operand (operand1) by the second operand (operand2).
Note that division by zero is not an error. The result of division by zero is Infinity. (See Infinity).
% operator
operand1 % operand2
This operator returns the integer remainder (which may be 0) from the division of operand1 by operand2.
6.6.5.3 String Operators
These operators provide string functions using operators. Many other string functions are available.
(See also String built-in type).
The String operators are described in the table below:
Operator
Syntax
Description
+ string
str1 + str2
This operator returns a string that is the concatenation of its
operands, (str1 and str2).
See also Arithmetic Operators (+ operator).
+= string
str1 += str2
This operator appends its second operand (str2) onto the end of
the first operand (str1).
See also Assignment Operators (+= operator).
6.6.5.4 Logical Operators
These operators are used to evaluate whether their operands are true or false in terms of the operator
(for unary operators) and in terms of each other (for binary operators).
The binary operators use short-circuit logic, i.e. they do not evaluate their second operand if the logical value
of the expression can be determined by evaluating the first operand alone.
The Logical operators are described in the table below:
Operator Syntax
Description
operand1
operand2
This operator returns an object whose value is true if both its operands
are true; otherwise it returns an object whose value is false.
&&
Specifically,
if
the
value
of operand1 is false, the
operator
returns operand1 as its result. If operand1 is true, the operator
returns operand2.
||
operand1
operand2
This operator returns an object whose value is true if either of its
operands are true; otherwise it returns an object whose value is false.
||
Specifically, if the value of operand1 is true, the operator
returns operand1 as its result. If operand1 is false, the operator
returns operand2.
!
! operand
&&
If the operand's value is true, this operator returns false; otherwise it
returns true.
Lighter – Help Online Manual
104
CHAPTER 6
6.6.5.5 Comparison Operators
Comparison operators are used to compare objects and their values.
The following table summarizes comparison operators:
Operator
Syntax
Description
==
operand1 ==
operand2
Returns true if the operands are equal; otherwise returns false.
!=
operand1 !=
operand2
Returns true if the operands are not equal; otherwise returns false.
= = =
operand1 ===
operand2
Returns true if the operands are equal and of the same type;
otherwise returns false.
!==
operand1 !==
operand2
Returns true if the operands are not equal or if the operands are of
different types; otherwise returns false.
>
operand1 >
operand2
Returns true if operand1 is greater than operand2; otherwise
returns false.
>=
operand1 >=
operand2
Returns true if operand1 is greater than or equal to operand2;
otherwise returns false.
<
operand1 <
operand2
Returns true if operand1 is less than operand2; otherwise
returns false.
<=
operand1 <=
operand2
Returns true if operand1 is less than or equal to operand2; otherwise
returns false.
6.6.5.6 Bit-wise operators
These operators perform their operations on binary representations, but they return standard Laser
Engine Program numerical values.
The following table summarizes bit-wise operators:
Operator Syntax
Description
&
operand1
operand2
& Returns the result of
(operand1 and operand2).
a
bit-wise
AND
on
the
operands
^
operand1
operand2
^ Returns the result of
(operand1 and operand2).
a
bit-wise
XOR
on
the
operands
|
operand1
operand2
| Returns the result of
(operand1 and operand2).
OR
on
the
operands
~
~ operand
<<
operand1
operand2
<< Returns the result of a bit-wise left shift of operand1 by the number of bits
specified by operand2. Zeros are shifted in from the right.
>>
operand1
operand2
>> Returns the result of a bit-wise (sign propagating)
of operand1 by the number of bits specified by operand2.
>>>
operand1 >>> Returns the result of a bit-wise (zero filling) right shift of operand1 by the
operand2
number of bits specified by operand2. Zeros are shifted in from the left.
105
a
bit-wise
Returns the bit-wise NOT of the operand.
Lighter – Project Editor User’s Manual
right
shift
CHAPTER 6
6.6.5.7 Special Operators
The following special operators are available:
?: operator
instanceof operator
, operator
new operator
function operator
this operator
in operator
typeof operator
?: operator
expression ? resultIfTrue : resultIfFalse
This operator evaluates its first operand, the expression. If the expression is true, the value of the
second operand (resultIfTrue) is returned; otherwise the value of the third operand
(resultIfFalse) is returned.
, operator
expression1, expression2
This operator evaluates its first and second operand (expression1 and expression2), and returns
the value of the second operand (expression2).
The comma operator can be subtle, and is best reserved only for use in argument lists.
function operator
var variable = function( optArguments ) { Statements }
This operator is used to create anonymous functions. Once assigned, the variable is used like any
other function name, e.g. variable(1, 2, 3). Specify the argument names (in optArguments) if
named arguments are required. If no optArguments are specified, arguments may still be passed and
will be available using the arguments list. (See Arguments variable).
The Laser Engine Program function operator supports closures, for example:
function make_counter( initialValue )
{
var current = initialValue;
return function( increment ) { current += increment;
return current; }
}
// ...
var counterA = make_counter( 3 ); // Start at 3.
var counterB = make_counter( 12 ); // Start at 12.
debug( counterA( 2 ) ); // Adds 2, so prints 5
debug( counterB( 2 ) ); // Adds 2, so prints 14
debug( counterA( 7 ) ); // Adds 7, so prints 12
debug( counterB( 30 ) ); // Adds 30, so prints 44
Note that for each call to make_counter(), the anonymous function that is returned has its own copy
of current (initialized to the initialValue), which is incremented independently of any other
anonymous function's current. It is this capturing of context that makes the function that is returned a
closure.
See also Declaring Functions.
Lighter – Help Online Manual
106
CHAPTER 6
in operator
property in Object
Returns true if the given Object has the given property; otherwise returns false.
instanceof operator
object instanceof type
Returns true if the given object is an instance of the given type, (or of one of its base classes); otherwise
returns false.
new operator
var instance = new Type( optArguments );
This function calls the constructor for the given Type, passing it the optional arguments (optArguments) if
any, and returns an instance of the given Type. The Type may be one of the built-in types, one of the
library types, or a user-defined type.
Example:
var circle = new Circle( x, y );
var file = new File();
this operator
this.property
The this operator may only be used within a function that is defined within a class or form, i.e. a member
function. Within the scope of the function this is a reference to the particular instance (object) of the class's
type. (See also Declaring Functions and Declaring Classes).
To illustrate the concept of binding, refer to the following example.
Example:
function Car(brand) {
this.brand = brand;
}
Car.prototype.getBrand = function() {
return this.brand;
}
var foo = new Car("toyota");
print(foo.getBrand());
As expected, this outputs "toyota".
typeof operator
typeof item
This operator returns a type of the object as a string.
Example:
var f = new Function("arguments[0]*2"); // "object"
var str = "text"; // "string"
var pi = Math.PI; // "number"
Functions and built-in objects have a typeof of "function".
107
Lighter – Project Editor User’s Manual