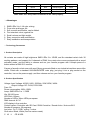
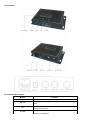
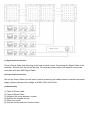
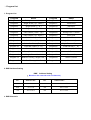
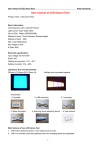
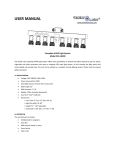
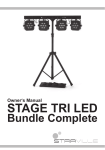
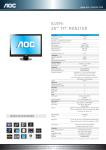
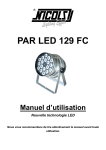
1
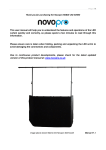
Led Dynamic DMX Tri Curtain Manual
Welcome to use the LED dynamic DMX Tri curtain , please read following Safety Notes as well
as those in User Manual carefully before connection, installing, operation or maintaining this
product.
Safety Notes
1. After receiving the new curtain, please open the packing carton to check the goods and all other
accessories whether they are consistent with packing list and in good condition, in case finding
something damaged by transportation, please contact the reseller or distributor to repair or change.
2. Curtain is for indoor use only!
3. Curtain should be far from rain, moisture, water and any other liquid.
4. Curtain should be far from flammability, explode and heating.
5. Curtain should be far from shock,vibration,impact and dust.
6. Curtain must be installed in a location with adequate ventilation, at least 50cm from adjacent
surfaces.
7. The connection, installation, operation and maintenance of curtain should be processed by qualified
person.
8. Make sure no ventilation slots are blocked.
9. Prohibit trample and tear the curtain, keep the internal cable connection in order.
10. Electrical connection must be carried out by qualified person.
11. Make sure the voltage and frequency of power supply match the power require of this device.
12. Always connect this product to a grounded circuit to avoid the risk of electrocution.
13. Do not connect curtain to a dimmer.
14. Make sure the power cord is not crimped or damaged.
15. Never pull out the plug from power cord by pulling or tugging on the cord.
16. Never operate this product with the covers removed.
17. Always disconnect this product from the power supply before cleaning or attempting any
maintenance work.
18. Never carry this product from any moving part, always use the hanging/mounting bracket or the
handles.
19. The maximum ambient temperature is 40℃, Do not operate this product at higher temperatures.
20. In case of a serious operation problem, stop using this product immediately and contact reseller or
distributor.
21.
Warning:
Any damages caused by the non-observance of this manual or any unauthorized modification to this
product are not be subject to warranty.
Important:
This product is supplied with an open power cable without a plug, so before connecting this product to
the mains with a power cable, make sure the right color cable connected to the right place. The
following table is for your reference.
International
EU Cable
UK Cable
US Cable
Pin
L
Brown
Red
Yellow/Copper
Fase
N
Blue
Black
Silver
Nul
Yellow/Green
Green
Green
Earth
Note: Make sure this product connected to the earth properly.
Advantages
1.
2.
3.
4.
5.
6.
7.
SMD LEDs 3-in-1 full color mixing.
Pure color and longer life.
Soft, smooth and flexible, can be folded.
Fire retardant velvet, against fire.
Small volume and light weight.
Easy connection and combination.
Easy installation and transportation.
Technology Parameters
1. Product Description
All curtains are made of high brightness SMD LEDs 3 in 1/RGB, and fire retardant velvet cloth. 30
exciting patterns, and support for 8 channels of DMX, the curtain also comes equipped with a sound
activation mode, and the ability to choose and run your favorite program with a simple press of a
button without a DMX-512 console.
2 layers of smooth velvet sewn with wool. Many grommets fitted on our industrial machines around the
cloths. Fitted with a standard UK/USA/EUROPE main plug, just plug it into a plug socket on the
controller, turn on the power supply ,and then choose and run your favorite program.
2. Product Specification
Voltage: Input Voltage: AC90V-240V, 50/60Hz, 25W/150W, 3A/2A
Output Voltage: DC 5V/5A, DC5V/30A
Fuse: 2A
Power consumption: 30W~150W
Lamp: SMD LEDs 3 in 1 / RGB
Life: 50,000 hours
LED Pitch: 180mm
Number of LEDs: 30pcs LEDs per square
DMX channel: 8 CH.
LCD display in the controller
Control system: Controller with SD Card / DMX Controller / Sound Active / Auto run/M-S
Number of program: 30 programs
Led color: 3 in 1 / RGB , mixing 7 colors
Cloth color: Black, White (Can be custom made)
C tifi ti
CE & SGS
3. Packing Include
One curtain
One Controller
One Power Cable
One User Manual
Spare LEDs
Reusable Zip Ties
Note: The curtain is connected to the controller directly.
Size
Color
Leds
Weight
Packing Size
H: 1M X W: 2M
RGB 7 Colors
66pcs
3.6kgs
26X14X16cm
H: 2M X W: 3M
RGB 7 Colors
176pcs
7.5kgs
51X23X28cm
H: 2M X W: 4M
RGB 7 Colors
242pcs
8kgs
66X37X24cm
H: 3M X W: 4M
RGB 7 Colors
352pcs
12kgs
50X70X26cm
H: 3M X W: 6M
RGB 7 Colors
512pcs
17kgs
51X76X29cm
H: 4M X W: 6M
RGB 7 Colors
704pcs
20kgs
52X79X39cm
Installation
Curtains can be used by single or through combination to make a large led curtain.
1. Product Overview
(1) LED Vision Curtain
(2) Controller
(3) Controller Description
Button
FUN
ENTER
UP
DOWN
Function
Menu or Function
Display menu or set the selected menu as the function you
need
Upwards the menu or increase the number value of the
function you selected
Downwards the menu or decrease the number value of the
function you selected
(4) Menu Options
Menu
Function
PU
Program (01- 30)
SP
Program speed
Add
DMX Address
A001
DMX Address (001 - 512)
Sound
Sound active
( 01 - 20 , fast - slow)
(5) Controller Operation
2. Installation
(1) After receiving the new curtain, take out to check whether the curtain is damaged, and all
accessories is as per the Packing Include, make sure all things are already.
(2) Unfold the curtain.
(3) Hang the curtain on the truss with reusable zip ties, and fasten the reusable zip ties at the other
three sides of this curtain.
(4) Use male and female velcro at the left and right side of the curtain to make the nearby vision
curtain connect together.
Combine several pieces LED Vision Curtain to make a big curtain
There are male and female velcro at the left and right side of the curtain , the function of these velcro
is just to combine several pieces into one. But not to load too much.
(1) Signal Cable Connection
There is Signal Cable with 4pin plug at the back of each curtain, Connecting this Signal Cable to the
controller, and then lock the nut on the plug. For several pieces curtains, just need to connect the
controllers with 3pin DMX Signal Cable.
(2) Power Cable Connection
Get out the Power Cable from the carton, before connecting this cable between controller and power
supply, please make sure the voltage is AC90V-240V 50Hz-60Hz.
(3) Disassembly
(1) Take off Power Cable
(2) Take off Signal Cable
(3) Unfasten the velcro between curtains
(4) Release all reusable zip ties
(5) Clean the curtain
(6) Fold the curtain and put it into the carton
0.'0!,)12
1. Program List
Program
Effect
Program
Effect
Program 1
Falling Horizontal Line
Program16
Center Burst
Program 2
Single Arrow ( Up - Down )
Program17
Outer Burst
Program 3
Single Arrow ( L - R )
Program18
EQ Effect
Program 4
Single Arrow ( R - L )
Program19
Rolling Color
Program 5
Color Chase ( Down - Up )
Program20
Rolling Color + Strobe
Program 6
Color Chase ( Up - Down )
Program21
Inner Zone
Program 7
Color Chase ( L - R )
Program22
Outer Zone
Program 8
Color Chase ( R - L )
Program23
Single Diamond Spread
Program 9
Color Bar Chase ( R - L )
Program24
Single Diamond Squeeze
Program 10
Color Bar Chase ( L - R )
Program25
Inward Arrow ( L , R )
Program 11
Windmill ( Clockwise )
Program26
Program 12
Fan ( Counterclockwise )
Program27
X-Factor
Program 13
Single Color + Strobe
Program28
Double Diamond Squeeze
Program 14
Multi Box Frenzy ( Single Color )
Program29
Green X-Factor
Program 15
Multi Box Frenzy ( Multi Color )
Program30
Multi Rain
Crisscross
2. DMX Address Setting
DMX Address Setting
( Based on the controller with 16 channels )
No.
Address SET
No.
1st
1
4th
49=1+16*3
2nd
17=1+16
5th
65=1+16*4
3rd
33=1+16*2
6th
81=1+16*5
3. DMX Channels
Address SET
( Up , Down )
Replacement of the LEDs
1. Cut off the power supply
2. Disconnect the power cable and signal cable
3. Open the zip fastener at the side of led curtain
4. Disconnect the wires between the LEDS
5. Take out the LED holder from the cloth
6. Take out PCB board with LEDs
7. Connect the replace PCB board with LEDs (Please note the small marks "+" and "-" on the PCB
b
d)
8. Insert the lamp holder into the hole made on the cloth
9. Connect the power cable and signal cable, then turn on the power for testing
10. Still without working, please test the wires connection
11. Close the cloth again