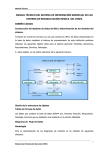
1
KODAK S-RA2500 Editing System
For information programs
running under PC-DOS
Version 1.0
(C) Copyright
Kodak Limited, 1987
Contents
A-1
A-2
A-3
A-4
A-5
A-5.1
A-5.1.1
A-5.2
A-5.2.1
A-5.2.2
A-5.3
A-5.3.1
A-5.3.2
A-5.4
A-5.5
A-6
A-7
What the S-RA2500 Editing System is used for
Connecting the hardware 4
Starting the Editing System 5
Main menu 7
Submenus 8
Setup 8
Install equipment 8 A-5.1.2Assign projectors 9
Editor 9
Frame Editor 10
Screen Editor 18
Execute 20
Run source program 21
Run compiled program21
Disk 22
Exit 23
What the user system is used for23
User system operating procedure24
1
A-7.1
A-7.2
A-7.3
Producing a user diskette 25
Specifying a pathname for SCREENS
Self-start 27
B-1
B-1.1
B-1.2
B-1.3
B-1.4
B.1.5
B-2.1
B-2.2
B-2.3
C-1
C-1.1
C-1.2
C-1.3
C.1.3.1
C.1.3.2
C-1.3.3
First lesson 28
Starting is easy 28
Getting to know each other 30
One step at a time 34
Making an attractive impression 41
Screen text 43B-2Second lesson 48
Structural characteristics 48
Each to his own 50
The alternative 52
Programming techniques56
Using the demo program56
Listing of demo program57
Special tips and tricks64
Advice concerning branch instructions64
Branch instructions in program loops66
Avoiding unnecessary setting instructions67
D-1
D-1.1
D-1.2
D-1.3
D-1.4
D-1.5
D-2
D-2.1
D-2.2
D-3
D-3.1
D-3.2
D-3.3
D-4
D-4.1
D-4.2
D-5
FRAME Editor program instructions68
Projector instructions68
Screen instructions 70
Logic instructions 71
Auxiliary instructions74
Comments 74
FRAME Editor key functions75
Assignment of function keys75
Assignment of edit keys75
SCREEN Editor function keys76
Global functions76
Functions in box mode76
Functions in text mode77
Program control using DOS environment variables78
Pathname for blocks of text78
Disabling projector tracking79
Technical information concerning control of auxiliary units80
26
How to use this Manual
Because we understand the misgivings which many software users have about bulky manuals,
we created this software package as a product whose design makes it almost unnecessary to
refer to a manual.
Nevertheless, we feel that initial reference to this Manual when first using the program will
allow users to discover the many capabilities of this powerful software product more quickly.
This Manual is divided into four Parts in order to help users obtain successful results as soon as
possible:
Part A:
Part B:
Part C:
Part D:
Familiarisation
Practical exercises
Programming techniques
Appendix
Part A tells you what the system can do, how to put the system into operation and the system
functions which are available to you. You should always read this Part of the Manual before
attempting to create your first program.
If you already have some experience of computers and programming systems in the SLIDEAV area, you will be able to start experimenting with programs of your own once you have
read Part A.
On the other hand, if you prefer a systematic learning method, do the examples in Part B as
practical exercises on the computer. By then you will know enough about the system in order
to write your own programs.
Part C contains hints on how to make your programs more powerful and more efficient.
Appendix D contains a summary of the system functions for easy reference and answers to
questions of a technical nature which you may have when using the Editing System.
Good luck!
A-1 What the S-RA2500 Editing System is used for
The KODAK CAROUSEL S-RA2500 is a powerful slide projector whose functions, including
the selection of individual slides, can be remote controlled via the built-in serial computer
interface (RS232C). It makes it possible for the user to escape the rigid constraints of previous
linear SLIDE programs and allows him to program tree structures.
This is one step closer to combining the interactive capabilities of a computer system with
visual slide projection techniques. The only problem is how to write suitable computer software for the particular application. If one of the usual programming languages has to be used,
the task is generally expensive and time-consuming.
The solution to this problem is the S-RA2500 Editing System, a computer program for creating
information programs and a tool which will enable you to combine the power of the computer
and the visual qualities of slide projection in order to get your information over to the required
audience in an effective form without having to learn a programming language.
Programs written using this tool can, if required, simultaneously convey information:
-Via the screen of a PC type computer in the form of blocks of text (colour or monochrome),
-Via SLIDE projection which can use up to 16 selectable KODAK S-RA2500 type projectors
and provide familiar effects available using a SLIDE-AV technique,
-Via a printer connected to the computer. The computer provides the finished program recipient with preprogrammed printed informative text which he can take away with him,
-Via an 8-bit control interface which can be used to drive external equipment such as lighting
equipment, film projectors, video recorders etc. via a suitable add-on unit referred to as the
„auxiliary box“.
The logical structure of the information programs which are written can be interactive and treestructured. This means that:
- Inputs from the recipient can be requested, evaluated and used as a decision criterion for the
subsequent course of the information program.
-Inputs from a recipient concerning individual information items can be counted, stored on
diskette and thus made available for subsequent evaluation.
-Inputs from a recipient in the form of a line of text can be date and time logged, stored on
diskette and made available for subsequent evaluation.
-The time which a recipient takes to make an input can be limited (TIMEOUT). The fact that
a timeout has elapsed can be used as a decision criterion for the subsequent course of the
program in the same way as a normal input.
From the recipient’s viewpoint, a typical information program consists of a sequence of blocks
of text which are displayed on the screen of the computer, provide information and request a
response. Depending on the recipient’s response, individual slides or complete sequences of
slides are then projected or new blocks of text are displayed on the screen.
KODAK S-RA2500 Editing System 1.0 User Manual Page: 3
In keeping with this overall scheme, an interactive information program has the following
structural elements:
- SCREENS: these are blocks of text which are displayed on the computer
text attributes such as colours, flashing, underline
and borders made available by the computer system can be used for
layout purposes,
-FRAMES: these are instructions or sequences of instructions which can be
control selectable projectors, auxiliary units and a
printer or to call up new SCREENS or request input from the
recipient.
screen. The
used to
This overall structure is sufficiently flexible to allow the following special forms of interactive
programs:
-Programs which do not present any information on the computer screen, i.e. purely SLIDE
programs,
-Programs which consist only of SCREENS whose assigned FRAMES merely call up further
SCREENS, i.e. purely text programs,
-Programs which combine externally controlled effects (light, sound, video) with one of the
special forms of program mentioned above.
The program package consists of the following components:
-The Editing System which allows an AV producer to create, modify and debug interactive
information programs of the types mentioned above:
EDIT.COM
EDIT_OVL.000
KODAK S-RA2500 Editing System 1.0 User Manual Page: 4
EDIT_OVL.001
EDIT_OVL.002
EDIT_OVL.003
EDIT_OVL.004
-The User System which allows a recipient to use finished programs without being able to
modify them:
RUN.COM
-Several examples of typical programs together with their relevant SCREENS:
XXX.FRM
XXX.SCR
A-2 Connecting the hardware
In order to work, the KODAK S-RA2500 Editing System requires the following hardware
configuration:
Computer:IBM/PC/XT/AT or compatible,
Colour or monochrome screen,
256 K main memory min.,
1 floppy disk drive min. (2 drives preferable)
1 serial interface min.,
1 parallel interface min.
Printer:IBM compatible matrix or daisywheel printer.
In addition, you will obviously require the appropriate number of KODAK S-RA 2500 type
projectors for your application together with the relevant BUS cables (CAT 706 1401) and the
connecting cable for your MS-DOS computer (CAT 706 1419).
KODAK S-RA2500 Editing System 1.0 User Manual Page: 5
Before putting the Editing System into operation, check your hardware for completeness and
then make the connections according to the diagram shown in Figure A-1. At this point it is
important to set the addresses of the projectors used to different values (a to p) by means of the
selector switches provided (see Projector Manual) and to note these settings because you will
need these values later on.
A-3 Starting the Editing System
Before using the KODAK S-RA2500 Editing System, it is advisable to use the COPY function
of your computer to produce a backup copy of the system diskette.
Use this backup copy of the system diskette for working purposes and keep the original diskette in a safe place so that it is always available to provide a replacement if the system diskette
becomes unusable.
The Editing System is started at DOS level by entering:
EDIT <enter key>
From this point on, the system diskette must remain in the floppy disk drive from which the
program was started because the system will reload parts of the program as required while you
are working.
CAUTION: removing the working diskette from the drive while programming is in progress
may cause the program to crash.
To write more extensive programs which cannot be accommodated on the system diskette, you
need at least a second drive which contains a formatted working diskette. A hard disk is ideal.
You can change the working diskette or change over to a different working drive at any time.
KODAK S-RA2500 Editing System 1.0 User Manual Page: 6
KODAK S-RA2500 projectors
to additional
projectors
Computer cable
Cat No.: 706 1419
BUS cable
Auxiliary box
Cat No.: 706 1401
Printer
MS-DOS computer
Fig. A-1: Diagram: hardware connections
KODAK S-RA2500 Editing System 1.0 User Manual Page: 7
A-4 Main menu
As soon as the program is started, the main menu appears on the screen. These PULL-DOWN
menus are used to select the various system operating modes by using the cursor keys to move
the menu pointer to the required menu option. The menu option is called up by pressing the
enter key. The main menu offers the follow
g options:
SETUP: defines working environment,
EDIT: processes programs and text screens,
EXECUTE: tests programs in real time,
DISK: executes diskette operations,
EXIT: terminates editing, return to DOS level.
Apart from EXIT, each menu item takes you to a submenu where you can specify what you
want to do in more detail.
Additionally, function key F1 can be pressed at any time to show a help window which contains information specific to the particular Editing System function being used. If necessary,
additional help windows can be called up from this help window. The new help windows are
overlaid on previous help windows.
If there are open help windows on the screen, they can be moved around relative to each other
as required by means of the cursor keys so as to reveal information in another window which is
covered up.
Pressing the ESC key closes the last help window which was opened. When the last help
window has been closed, you can resume working at the point in the program at which you
called up the first help window.
KODAK S-RA2500 Editing System 1.0 User Manual Page: 8
The Editing System thus has a „built-in manual“ which you can bring up on your screen at any
time and to provide the specific information you require at that particular time. This function is
available at any time throughout the entire session.
A-5 Submenus
-5.1 SETUP
Selecting SETUP takes the user to a submenu containing
o options:
A-5.1.1 INSTA
EQUIPMENT
-Numberofprojectorsus
(1 to 16)
-Selection of serial interface to be used to control KODAK S-RA2500 projectors (COM1/
COM2).
-Selection of serial interface to be used to control a selectable cassette recorder (not available
in version 1.0).
-Selection of parallel interface used to drive auxiliary box (LPT1/LPT2).
-Selection of parallel interface used to drive a printer (LPT1/LPT2).
-Specification of page length (in lines) for formatted printout on printer used.
The relevant parameter is enabled by means of the cursor keys and set to the desired value by
entering the appropriate numbers. Pressing the ESC key leaves this submenu and causes the
program to accept the values which were entered.
KODAK S-RA2500 Editing System 1.0 User Manual Page: 9
A-5.1.2 ASSIGN PROJECTORS
The Editing program automatically assigns the designations A to P in ascending order to the
projectors used depending on the number of projectors defined in the INSTALL menu. ASSIGN
is used to position the projectors thus designated on the projector display of the Frame Editor a
cording to their arrangement in the application and to assign them the physical address (a to p) wh
ch was set on the relevant
rojector. The ASSIGN function represents the projector display together with the projectors u
ed and the standard default values which are preset by the program. The cursor keys are used to p
sition the luminous frame which is shown within a 3 x 8 matrix as required. Positions are
ssigned by entering the projector designation A to P at the required locations and physical addresses ar
allocated using lower case lett
s a to p.
A
.2 EDITOR
As mentioned earlier, an interactive information program consists of blocks of text
(SCREENS) and program instructions (FRAMES). The Editing System provides special
Editors for both components and these Editors can be enabled after selecting the Editor menu.
The user decides whether SCREENS or FRAMES are to be processed. Normally, a new
program is begun by entering the program instructions because the program can be tested even
without its associated blocks of text. Selecting the appropriate menu item takes the user to the
FRAME EDITOR or the SCREEN EDITOR. In both these Editors, pressing the ESC key
takes the user to the submenu and it is possible to switch between the two Editors as often as
required without losing parts of the program which have already been prepared.
KODAK S-RA2500 Editing system 1.0 User Manual Page: 10
A-5.2.1 FRAME EDITOR
The FRAME EDITOR is equivalent to a multiscreen programming system as far as its function
and handling are concerned and it gives the user the necessary instructions and programming
aids required to control selectable projectors and auxiliary units. Because of the interactive and
tree-structured nature of the information programs, the instruction set has been extended by
adding SCREEN calls, keyboard polling and conditional branching.
FRAME EDITOR operating procedure
When the FRAME EDITOR has been invoked, the screen initially shows a working window
which covers the entire screen. The name of the last program processed is displayed in the top
left hand corner and the number of the last frame processed appears on the right hand side.
The cursor is on the middle line of the screen at the location at which the program instructions
(which are explained later) are entered.
In order to make it possible to observe the effects of each individual instruction on the state of
the connected projectors or auxiliary units immediately, even if the latter are not connected at
the time of programming, function key F10 can be used to bring up a help-screen display
which indicates the appropriate status of the hardware in a graphical, visual form. This reduces
the data entry field from 23 to 11 frames which can be simultaneously viewed at a glance.
Naturally, it is possible to change over between these forms of display at any time.
KODAK S-RA2500 Editing System 1.0 User Manual Page: 11
Editor instructions
The FRAME EDITOR is interactive and menu-driven; function keys provide the following
facilities:
<F1> Help/information
<F2> Projector status poll
<F3> Delete frame
<F4> Insert frame
<F5> Start program sequence
<F6> Hold program sequence
<F7> List program
<F8> Projector on-line operation on/off
<F9> Clear memory
<F10> Projector display on/off
The cursor is moved around within the program text by means of the usual cursor control keys.
The following edit keys are also available:
<Home> Go to first frame
<End>Go to last frame
<Tab>Go to next TAB
<Shift+Tab>Go to previous TAB
<Ctrl ->> Go to next word
<Ctrl <-> Go to previous word
<PgDn> Go to next LABEL
<PgUp> Go to previous LABEL
<Del>Delete character
<Ins>Insert character
KODAK S-RA2500 Editing System 1.0 User Manual Page: 12
The <ENTER> key is used to terminate the entry or amendment of a frame and store the relevant frame. The effects of the instruction on the state of the hardware is simultaneously
apparent in the projector display (if the latter has been enabled). If projectors are connected,
their on-line operation can be enabled by F8 so that the effect of the instruction can also be
checked „live“. SCREEN instructions, requests for user inputs and program branching are not
performed at this level because this would interfere with the editing process. These instructions can be checked by starting the program by means of the EXECUTE function under realtime conditions.
Program instructions
When entering the individual instructions which make up your program, certain rules must be
observed regarding notation. Generally, a FRAME has the following format:
INSTRUCTION <ARGUMENTS>; (comment if applicable)
Instruction words can be abbreviated but at least sufficient characters must be entered to ensure
the word can be reliably distinguished from similar instruction words.
The arguments contain projector or auxiliary unit addresses and/or time data which must obey
certain notation rules. The following arguments are required depending on the instruction:
<adr> for instructions which contain no slide No.:
Examples: LIGHT AProjector A beco
es bright, DARK ACEProjectors A, C, E b
come dark,
ALT A-CProjectors A, B, C crossfade
KODAK S-RA2500 Editing System 1.0 User Manual Page: 13
<adrNN> for instructions which require a slide No.:
Examples: SLIDE A23Refers to slide No. 23 in p
ojector A, SLIDE A23 C12Slide No. 23 in projector A, slide No. 12 in
rojector C SELECT CA-C47Refers to slide No. 47 in project
s A, B, C The types of notation represented on the previous page can also be combined, e.g. A B
DE F-P is identic
to: A-P <t> for instructions which contain
time dat
Example: WAIT 3.15 means wait 3
15 seconds
<n> for instructions which contain repetitions:
Example:
REPEAT 3 means repeat loop 3 times
Instructions which contain name details <name>:
Example:
LABEL MYNAME (TO address, up to 8 characters)
A list of possible instructions is given below. Use the notation shown above for the arguments
enclosed in the less-than sign and the greater-than sign:
Projector instructions:
SLIDE <adrNN>: select stated slide location - apertures (slide lifter) open automatically.
SELECT <adrNN>: select stated slide location - apertures (slide lifter) remain closed.
KODAK S-RA2500 Editing System 1.0 User Manual Page: 14
OPEN <adr>: closed apertures open as soon as addressed projectors are ready.
CLOSE <adr>: apertures close and cover the slide in the slide gate.
STEP <adr>: forward step - apertures open automatically after location is reached - slide 0
follows slide 80.
BACKSTEP <adr>: backward step - aperture function same as above - slide 80 follows slide
0.
LIGHT <adr>: switch on lamp(s) regardless of aperture.
DARK <adr>: switch off lamp(s) regardless of aperture.
ALTERNATE <adr>: reverse lamp state regardless of aperture.
FLASH <adr> <n> <t>: lamps in the addressed projectors flash at a preselectable frequency
for a definable number of cycles, the final state of the lamps is the same as the initial state.
DISSOLVE <adr>: reverse lamp state, projectors which are extinguished transport next slide
into slide gate, apertures open automatically.
WIPE <adr> <t>: lamp state of a specified series of projectors is reversed with a selectable
time delay, projectors which are extinguished transport the next slide into the slide gates,
apertures open automatically, the sequence of the projectors is the same as the sequence of the
characters in the address specification.
Screen instructions
SHOW <name>: one block of text identified by name (8 characters) is displayed on the screen.
KODAK S-RA2500 Editing System 1.0 User Manual Page: 15
BLOW <name>: one block of text identified by name is revealed from a vertical centre-line on
the screen.
ERASE: the screen is cleared and goes dark.
PRINT <name>: one block of text identified by name is output on the printer.
POOL <name>: one block of text identified by name is transferred to a memory which can be
printed out collectively.
NEW: the content of POOL and COUNT (explained later on) is deleted.
DOCUMENT: the content of POOL is output on the printer.
Logic instructions:
WAIT <t>: delays the next program step by a time interval which can be selected in 0.01 s
steps.
LABEL <name>: sets a TO address (up to 8 characters) for instruction sequences which are to
be used with JUMP or RESPONSE.
LOOP: defines the start of a loop for iteration.
REPEAT <n>: repeats all instructions from the last LOOP marker with a preselectable number
of cycles.
JUMP <name>: continues the program from the specified TO address. The hardware context
(projectors, auxiliary units, etc.) is automatically saved.
RESPONSE <name1> <name2>: interrupts the program which is in progress and initiates a
keyboard poll which must be terminated by pressing the enter key. RESPONSE instructions
can be used in consecutive blocks. A special TO address <name2> can be assigned to each
user input defined in <name1>.
KODAK S-RA2500 Editing System 1.0 User Manual Page: 16
The program continues from <name2> if the answer is the same as <name1>.
<name1> in special cases:
Two keywords which can be assigned special functions are reserved for
<name1>:
TIMEOUT: if the user’s answer is not received within time defined
in the TIMEOUT instruction, the program continues from the
dress <name2>.
specified TO ad-
ILLEGAL: if the user enters something which is not anticipated, the
program continues
from the specified TO address - without this
statement, a flashing error message is
displayed on the text
screen for roughly 1.5 s as a prompt to repeat the entry.
KEY <name>: the program continues from the specified TO address if any key is pressed,
otherwise the next instruction after KEY is executed.
IDENT <name>: a sequence of characters entered by the user and terminated by ENTER is
date and time logged and added to the text file whose name was specified in <name>. Any
number of text files can be used in a program provided they have different names. The
<name> details must include a drive specification such as „A:“ and must not be longer than 8
characters. Extensions are not permitted, the program automatically assigns these as „.TXT“.
COUNT <n> <value>: the value <value> is added to one of the 32 counters. <value> must be
a positive or negative integer. If <value> equals zero, the counter specified in <n> is reset to
zero.
KODAK S-RA2500 Editing System 1.0 User Manual Page: 17
STORE: the instantaneous count in all 32 counters is stored in an ASCII text file under the
name COUNTER.DAT. This file contains 32 sequential entries which consist of the ASCII
digit sequence of the relevant counter terminated by a CR/LF sequence and a Ctrl-Z marker at
the end of the file. This makes the relevant counter values accessible for evaluation using other
programs. When the COUNTER.DAT file is encountered on the diskette when the user program is started, the counts stored in the file are automatically transferred to the corresponding
counters. Thus the counts which were valid just before the computer was switched off are
automatically set.
Auxiliary instructions
ON <adr>: the specified bit (A=bitO to H=bit7) of the parallel interface defined in the Setup
menu is set to logical 1.
OFF <adr>: the specified bit of the parallel interface defined in the Setup menu is set to logical
0.
INVERT <adr>: the specified bit of the parallel interface defined in the Setup menu is inverted.
Comments
Comments which have no function other than to guide the user can be inserted in the program.
Such comment lines must only be inserted after valid instructions on a line and must be introduced by the character <;> or <*>.
The FRAME EDITOR has a built-in syntax checker to monitor the correct entry of the
FRAME. Any syntax errors are audibly signalled and the relevant incorrect item flashes.
Pressing help function key F1 provides further details concerning the nature of the error.
KODAK S-RA2500 Editing System 1.0 User Manual Page: 18
A-5.2.2 SCREEN EDITOR
The blocks of text used in the program (SCREENS) are prepared using this Editor which is
essentially a screen page text editor which has a few additional special functions. Finished
SCREENS are saved to diskette for use by the information program. The Screen Editor has
two operating modes:
Text mode In this mode - which can be recognised by the fact that the cursor display is normal the SCREEN EDITOR behaves like a normal text editor. It is possible to write text to any point on the
screen and the normal edit facilities such as delete, insert, etc. are
vailable
Box mode In this mode, a box is displayed on the screen instead of the cursor. The size, shape an
colour of the box can be changed. The box can be moved around the screen by using the cursor c
ntrol keys and be set to any position. The area enclosed by the box can be filled using the availa
le colours and text attributes. Using this facility makes it possible to lay text out graphically, colo
r it in or surround it with any colou
required. General
unctions: <F1> Help/
nformation <F2> Box mode/text mode
changeover <F3>
creen dump <F4> Load scree
from disk <^F8>C
ar screen KODAK S-RA2500 Editing System 1.0 User Manu
l Page: 19
Edit functions in box mode:
<Ins>Anchor/release box
<Del>Set box
<F5> Flashing on/off
<F6> Box border type changeover
<F7> Colour in box
<F8> Delete box content
<F9> Background colour
<F10>Foreground colour
Edit functions in text mode:
<^Home> Go to first line
<^End>Go to last line
<Sft+Tab>Automatic back tab
<Tab>Automatic tab forward
<^<->Go to start of previous word
<^->>Go to start of next word
<Ins>Insert blank character
<Del>Delete character
<^L>Delete line
<^Y>Remove line
<^N>Insert line
<Alt+E>Scroll one block up
<Alt+X>Scroll one block down
<Alt+S>Pan one block left
<Alt+D>Pan one block right
Field markers
Individual areas of the screen can be marked for user inputs or system outputs to allow
SCREENS to be used as a data entry mask in conjunction with the RESPONSE instruction
described earlier.
KODAK S-RA2500 Editing System 1.0 User Manual Page: 20
Input fields
Input fields are marked by the character sequence .. The location and length of this character
string defines the field in which the cursor appears during a data entry procedure.
Output fields
The instantaneous values of counters 1 to 32 can be displayed within a SCREEN which has
been called up by marking the screen item in question with the number of the counter in question enclosing the number in a less-than sign and a greater-than sign. The count is displayed in
a 5-digit right-justified field whose first character (or blank character) appears instead of the
less-than sign:
For example, the character sequence <12> is shown as: 10 if the count in counter 12 = 10.
Printout of SCREENS
Although there is no difference in principle between SCREENS which are called up on the
screen and SCREENS which are only printed out by means of the printer, when using printers
which have a semi-graphical character set which is incompatible with the computer model used (e.g.
daisywheel printer), be sure not to use boxes to surround text for layout purposes which can only be
handled by compatibl
printers.
A-
3 EXECUTE The EXECUTE function which can be selected from the main menu makes it possibl
to test a program which is working in its editable form (RUN SOURCE PROGRAM) or pro
rams which have been compiled and saved to diskette (RUN COMPILED PROGRAM) unde
real-time
onditions. KODAK S-RA2500 Editing System 1.0 User Manu
Page: 21
A-5.3.1 RUN SOURCE PROGRAM
The RUN SEQUENCE function in the Frame Editor only executes one program sequence branch instructions are not executed, they interrupt the running of the program.
Similarly, all SCREEN instructions are ignored so as to make it possible to monitor the program flow with the aid of the projector panel display on a „dry run“ basis.
The RUN SOURCE function which can be selected from the main menu makes it possible to
test the editable program which is in memory under real-time conditions; all program instructions are executed normally, SCREENS are displayed and user inputs are requested. Any
SCREENS or LABELS (TO addresses) which are missing are indicated by appropriate error messages. On subsequent changeover to the FRAME EDITOR, the line containing the incorrect call is auto
atically shown in the displa
window. A program which is running can be interrupted at any time by pressing <F6>. If the prog
am is to be interrupted while it is waiting for a user input, press the <
C> key.
A-5.3.2 RUN COMPILE
PROGRAM This function can be used to start a compiled information program which is on diskett
without having to quit the Editor and without having to overwrite an information program which is
actually working. Naturally, this is only possible if the computer has sufficient storage ca
acity to accommodate both
ograms.
KODAK S-RA2500 Editing System 1.0 User Manual
ge: 22
Choosing this function takes the user to a Diskette menu in order to select the program to be
tarted. The operating procedure and the break option are the same as for the RUN SOURC
PROGRAM function. When a program has been interrupted, the compiled program is deleted
from the memory so as to make the entire memory available.
A-5.4 DISK
Apart from the SCREEN EDITOR and the RUN COMPILED PROGRAM functions which
have their own Diskette menus, all diskette storage functions are handled using the DISK
Diskette menu. These functions are as follows:
-SAVE: a source program which is operating is saved to diskette,
-LOAD: a source program is loaded from diskette to main memory,
-MAKE: a source program which is in main memory is compiled and saved to
is condensed to roughly 50% of its previous size but
can then no longer be modified. It is therefore good practice to
use the SAVE function to make a backup copy of the editable source
code for each compiled program.
diskette; it
The operating procedure for all the diskette functions described above is identical:
When the relevant function is chosen, an input window appears; this contains a prompt requesting the file name for the particular read or write function. In the case of the SAVE and MAKE
functions, the system suggests the last file name used as a default value. At this working level,
any name (up to 8 characters) can be entered and terminated by pressing the ENTER key.
KODAK S-RA2500 Editing System 1.0 User Manual Page: 23
If any function key (except <F1> = help) is pressed at this level, a further window appears; this
contains a selective directory for the active floppy disk drive. Use the cursor keys to select the
desired file name and press the ENTER key to transfer it to the input window. While the
directory is displayed, the active drive can be changed by pressing the appropriate keys (A to
D).
File names must always be entered without extensions because the system automatically manages extensions in order to prevent confusion and mix-ups. The following convention is used
for these automatically assigned extensions:
Source programs: XXXXXXXX.FRM
Compiled programs:XXXXXXXX.RUN
Screens:XXXXXXXX.SCR
File names may be given a drive designation (A: to D:). If drive designations are used, this
causes the active floppy disk drive to be changed.
A-5.5 EXIT
Choosing this menu item from the main menu allows the user to quit the programming system
and any program which is in memory is lost. The system therefore queries this function and
requests confirmation and, if applicable, displays a prompt reminding the user to save the source p
ogram to diskette before quitting the system.
A-6 What the user system is used for
The end product of all programming activities carried out using the KODAK S-RA 2500
Editing System is an application program which, after completion, is stored on diskette in
compiled form so that it can be used by the program .cp255
KODAK S-RA2500 Editing System 1.0 User Manual Page: 24
recipient as easily as possible. This is the purpose of the User System supplied together with
the Editing System, the User System providing the necessary software environment for a
finished application. In detail, th
means: S
lf-start
The User System can be incorporated in the AUTOEXEC.BAT file under PC-DOS so that the
application program is automatically invoked as soon as the system is booted and is ready to
operate without having to enter instructions at DOS level. To achieve this, the user must copy
the User System, together with all the files of the information program, to a diskette or hard disk c
ntaining the operating system (further details are given l
er on). Inp
errors If the User System is used with a standard keyboard, all keyboard functions which are not
required in order to operate the application program are inoperative so that the program cannot be inad
ertently or deliberately
borted. Hardwa
faults If malfunctions occur in connected projectors during normal operation of the application, f
ults are displayed in plain language on the screen and the program is int
rupted.
A-7 User System operating
ocedure
While an application program is being prepared, it contains a wide variety of informati
n which, although it is vital for editing purposes, is unnecessary as far as subsequent use is concer
ed, e.g. program text and comme
ts. The KODAK S-RA2500 Editing System 1.0 User Manual
ge: 25
programming system therefore has a compiler function which can be used to make an „ex
ract“ of the working version so that the user program does not take up unnecessary diskette space.
This is particularly useful since 360K diskettes have only a modest storage
pacity. This compiler function is chosen from the Diskette menu and uses the sourc
program XXXXXXXX.FRM to generate a compiled version desginated XXXXXXXX.RUN wh
ch takes up roughly half the amount of memory and - in conjunction with the supplied user modul
RUN.COM - is a self-contained, runnable application
rogram.
A-7.1 Producing a user diskette
The procedure to produce a runnable user diskette is normally as follows:
-Format a PC-DOS diskette (DOS: FORMAT /S),
-Copy the runtime module RUN.COM of the compiled user program XXXXXXXX.RUN and
the screens XXXXXXXX.SCR which belong to this program onto the formatted diskette
(DOS: COPY).
This will give you a usable application diskette containing a user program which can be started
at DOS level by entering the instruction RUN <name>.
A program which is started in this manner can only be interrupted by the user if a system reset
is performed.
If provision is to be made to abort the program, the program can be started using the RUN
<name> BREAK option. In this case the program can be interrupted by pressing <F6>.
KODAK S-RA2500 Editing System 1.0 User Manual Page: 26
A-7.2 Specifying a pathname for SCREENS
When the number of screens which an application program requires is so large that there is not
sufficient room for them all on one application diskette, additional diskettes containing recorded screens can be included in the program pathname. The diskette (or hard disk) drives
used for this purpose should be allotted to a DOS environment variable under the name
„DRIVES=“. The User System checks the presence of this variable and, if applicable, evaluates it. In this case, the User System is called in the same way as described above after entering the following command string at DOS level:
DRIVES=XX.. <ENTER> (XX.. = drives, e.g.: ABC)
xample: The application program whose name is TEST.FRM is on a diskette in drive A together
with the User System RUN.COM and some of the required screens. There is another diskette c
ntaining additional required screens in
rive B.
This application is started as
o l l o w s : DRIVES=A
<ENTER> RUN TEST
ENTER>
KODAK S-RA2500 Editing System 1.0 User Manual
ge: 27
A-7.3 Self-start
If there is a requirement for an application program to boot as soon as the computer is switched
on, the instruction string given on the previous page must be entered in a BATCH file under
the name AUTOEXEC.BAT using any text editor and the file must then be copied to the diske
te which contains the User System
UN.COM.
booted.
The program then starts up automatically as soon as the system i
KODAK S-RA2500 Editing System 1.0 User Manual
ge: 28
B-1Fir
t lesson
Treat this Part of the Manual as a kind of „learning game“, which, if you join in, will very
quickly teach you how the KODAK S-RA2500 Editing System works. In this case, „join in“
means reading first and then doing.
Rules of the game
Like all games, this game has rules. Obviously, you cannot play the game without the minimum computer configuration described in Section A-2. Additionally, you must have at least
one KODAK CAROUSEL S-RA2500 type projector together with a suitable connecting cable
(Cat. No. 706 1419). The exercises in Section B-1 only contain instruction sequences which
operate with this minimum configuration. Features such as crossfading, wipe functions, etc.
have been excluded - but this is not a problem because you will be able to try out these instructions yourself as soon as you have mastered the basic functions of the system.
Your original diskette contains the program mentioned in exercise B-1. Nevertheless, it is in
your own interest to follow our advice and enter the few program instructions in your computer
in accordance with the exercise without taking any short cuts. In this way it will be quicker for
you to learn how the system operates.
B-1.1 Starting is easy
Place the working copy of the Editing System diskette in drive A of your computer after booting the system with the DOS system diskette. You are now at the so-called „DOS command level“
and the screen displays the prompt „A>“. Start up the Editor by ke
n g i n : A>EDIT
<ENTER> KODAK S-RA2500 Editing System 1.0 User Manual
e: 29
After a few seconds, the Editing System main menu should appear on your
creen:
KODAK S-RA2500 Editing Software Module 1.0
MAIN MENU:
SETUP
EDITOR
EXECUTE
DISK
EXIT
(C) Copyright
Kodak Limited, 1987
For online help/info press <F1>
Fig. B-1: Editing System main menu
Now you can begin the first game which will show you how the various functions of the Editing System are selected and how to use the system’s „built-in manual“.
The main menu contains a rectangle and a series of functions:
SETUP EDITOR EXECUTE DISK EXIT
The SETUP function is highlighted - this means it is enabled. At this point you do not need to
bother about what the various functions do but it is important to know how they are enabled:
KODAK S-RA2500 Editing System 1.0 User Manual Page: 30
Try enabling various functions by using the appropriate cursor keys to move the menu pointer
to the right or left. At this point do not press the ENTER key because this would call the
particular function. All the Editing System’s menus operate on this principle.
Now you can find out how the system’s built-in manual works:
If you don’t know what to do, just press function key F1. A window automatically drops down
onto the screen. The window contains headings which provide information which might be
relevant at that point in the working session.
You can move this help window up or down on the screen by - you’ve guessed it - using the
appropriate cursor keys.
If there is more information concerning a particular topic, the bottom part of the border of the
help window refers to further help windows which can be reached by pressing the F1 key again
and moved by using the cursor keys. Having read the information, press the ESC key and the
last help window which was brought up on the screen disappears. Once the last help window
has disappeared you can resume working from the point at which you first referred to the
system’s built-in manual.
If you have followed so far you have won the first and perhaps most important game; now you
know how to use the menus and the system’s built-in manual.
B-1.2 Getting to know each other
You still don’t know much about the Editing system and the Editing System knows still less
about you. For instance, the Editing System has no idea how many projectors you wish to use,
to which interfaces of your computer system you have connected the projectors or how you
have set the ultraminiature toggle switches at the rear of your projectors.
KODAK S-RA2500 Editing System 1.0 User Manual Page: 31
The first thing to do is to let the Editing System know the hardware environment with which it
is dealing.
Press the ENTER key after choosing the SETUP function in the main menu. This will give
you another menu, the SETUP submenu, which contains the following options:
-> INSTALL EQUIPMENT
ASSIGN PROJECTORS
You start by defining your EQUIPMENT. Select and press ENTER as usual. A window
which looks like a questionnaire immediately ap
ars:
: 16
SER PORT FOR PROJ: 1
SER PORT FOR TAPE: 2
PAR PORT FOR AUXIL: 2
PAR PORT FOR PRINT: 1
LINES/PRINTER PAGE: 72
-> PROJECTORS IN US
There are many questions but the answers have already been filled in - these are the so-called
default values which the system assumes will be correct. The system therefore thinks that:
- 16 projectors will be used, that they are
- connected to the COM1 interface, that
- a selectable tape recorder is connected to COM2,
- an auxiliary box is hooked up to the LPT2 interface, and that
- a printer connected to the LPT1 interface
- is waiting to print at 72 lines per page.
It may occur to you that you need to correct one or more of these items. Use the cursor keys to
select the item(s) you wish to change, use the numeric keys to enter the correct number (press
DEL to delete) and then press ENTER.
KODAK S-RA2500 Editing System 1.0 User Manual Page: 32
Start with the number of projectors: you probably have 1 (as stated earlier) rather than 16.
Enter „1“ and use the cursor key to go to the next line. This line states that the projector is connec
ed to the COM1 interface. The only possible change is if you connected your projector to COM2.
Only correct if nece
a r y . You can ignore the next line because the current version of the Editing System (1.0) does n
t yet provide the facility to control a selectable tape recorder. This is scheduled for a later
a t e . So, go to the next line. This line states that an auxiliary box is connected to the LPT2 parallel
ort. This is only relevant if you use an auxiliary box for the program-controlled switching of
external equipment. Otherwise, all that remains is the printer; you can define the connection of
the printer and the page length of the last two lines. You can work without a printer but a
printer makes it possible to print out programs and information and this can sometimes be
extremely useful.
Now you’ve reached the end of the questionnaire and the system knows all about your hardware but it does not know what you want to call your hardware. Press the ESC key to quit this
function. This immediately takes you back to the SETUP submenu where there is still the
ASSIGN PROJECTORS item.
INSTALL EQUIPMENT
-> ASSIGN PROJECTORS
If you select this item, the projector display appears on the screen. This is a window in which
you can monitor how the projectors respond to your instructions while you are working with
the Frame Editor.
KODAK S-RA2500 Editing System 1.0 User Manual Page: 33
This window displays a small brightly bordered square containing A->a.
This means:
The connected projector is addressed by the name „A“ in your program. Computer enthusiasts
refer to such a designation as a „logical address“. This logical address need not necessarily be
identical to the „physical address“ that you set on the address selector switch of your projector
(according to the Projector Manual). The system optimistically assumes that you set this
switch to „a“ and indicates this assignment by means of the lower case letter after the arrow.
You can change this assignment at any time by simply pressing the letter key (lower case)
which corresponds to the actual setting which you made.
A few examples of this:
Projector address 1 = physical address ‘a’
Projector address 2 = physical address ‘b’
Projector address 3 = physical address ‘c’
Projector address 4 = physical address ‘d’
In addition, you can change the location of the projector symbol on the screen so that a projector which is at the top on the left in your application is also shown at the top left hand side of
the screen.
To do this, use the cursor keys to move the luminous frame to the desired location and press
the letter key for the projector (press the SHIFT key to obtain an upper case letter) which you
wish to move to this location. The symbol representing the projector immediately moves to the
new location.
KODAK S-RA2500 Editing System 1.0 User Manual Page: 34
Pressing the ESC key takes you back to the SETUP menu and pressing ESC again takes you
back to the main menu. Your system now knows everything about the equipment you are
using and now it’s time for you to find out some more about the system.
B-1.3 One step at a time
When your program has been completed it will perform precisely what you expect it to do step
by step. First of all you must enter the individual steps as a list which represents the „timetable“ according to which your show will progress.
The FRAME Editor is a program which helps you prepare such a timetable. You get to the
Frame Editor by selecting EDITOR in the main menu and then selecting the FRAME EDITOR funct
on in the subsequent submenu. The screen display is shown on the next
age.
KODAK S-RA2500 Editing System 1.0 User Manual Pa
35
FILE: NONAME
FRAME: 1
Fig. B-2: FRAME EDITOR working screen
The name of the program on which you have just started to work is shown at the top left hand
side. The name of your program is currently „NONAME“ but you can give your program a
more appropriate name when you record it on diskette.
At the top right hand side there is a counter which tells you which step (in this case: FRAME)
your program is just about to process. The cursor is on the middle line of the screen - the input
line - and this line is overbright. The part of your program which comes just before and just
after the frame which has been processed always remains visible.
KODAK S-RA2500 Editing System 1.0 User Manual Page: 36
You’re probably looking for the symbol for the projector which you spent so much time defining in the SETUP function.
Don’t worry, pressing function key F10 brings the projector up on the screen and this reduces
the size of the working area for entering FRAMES by half. Pressing F10 again restores the
previous screen display. You can therefore choose the screen display which you wish to work
with at any time.
PROJECTION:AUXIL: ABCDEFGH
FILE: NONAMEFRAME:
1
Fig. B-3: Working screen with projector display
Before you start entering program steps, you need to know a little about the symbols used in
the projector display.
KODAK S-RA2500 Editing System 1.0 User Manual Page: 37
The following S-RA2500 operational data is displayed:
- The selected magazine compartment (0 to 80),
- The position of the slide lifter (up/down),
- Lighting state of the lamp (on/off).
The number of the selected magazine compartment appears in the middle of the square which
symbolizes the projector, the lighting state of the lamp is expressed by the brightness and
colour of the display (bright/dark, yellow/grey) and the position of the slide lifter is shown by a
small diagonal bar in the upper part of the projector border. A visible diagonal bar denotes that
the slide lifter is closed. If a small triangle which represents the projector beam is visible, the
slide lifter is in the open position.
The projector display also provides information concerning the switching state of the auxiliary
box if it is connected. This display appears at the top right hand side of the picture. The letters A
o H are shown and a bright letter denotes that the allocated control channel is switched
on.
Now that you feel at home with the working screen there is nothing to prevent you entering the
first program steps. A straightforward linear program will be adequate for the purposes of this
first exercise.
Statement of problem
The projector is required to successively show slides 1, 5, 8 and 10 for 5, 5, 10 and 5 seconds
respectively.
The SLIDE instruction is used to show slides and waiting times are obtained by using WAIT.
All this takes place on projector A, the only projector in the system. Enter the follow
g:
KODAK S-RA2500 Editing System 1.0 User Manual Page
8
SLID
A1 WA
T 5 SLID
A5 WA
T 5 SLID
A8 WAI
1 0 SLIDE
A10 WA
5 Did you notice anything? Each time you press the ENTER key, the program step which you
ust entered moves one line up the screen and the projector display (if enabled) shows you the progra
med slide locations but the connected projector does noth
g . As you suspected - on-line projector operation has to be switched on. To do this, use function
key F8. The HOME key takes you back to the beginning of your program and you can recall
ach instruction you entered by pressing the ENTER
y.
What happens now? The projector obediently performs the switching instructions but still does
not show the slides. To show the slides, the projector lamp must be switched on and at the momen
it is switched
f . Already you need to modify your mini-program (we deliberately arranged it this way). There i
no instruction to switch on the lamp of the projec
r . In the example chosen, this instruction should go at the start of the program. To do this, use
the cursor keys to move the program step which is to be replaced by the program step to be inserted
(in this case: FRAME 1) to the input line and press function key F4 (insert FRAME). All the pro
ram steps immediately move down one line thus leaving an empty input line for item 1. Insert
the instruction LIGHT A at this point and the program now looks as foll
w s : KODAK S-RA2500 Editing System 1.0 User Manual Page
9
LIGHT A<— a
ded
SLIDE A1
WAIT 5
SLIDE A5
WAIT 5
SLIDE A8
WAIT 10
SLIDE A10
WAIT 5
Notice that as soon as the ENTER key is pressed, the lamp of projector A is lit although the
projection surface remains unlit. The projection surface is not lit until the second instruction
(SLIDE A1) is executed.
The state of affairs is now as follows:
The S-RA2500 provides the facility of selecting a slide without immediately projecting it. The
slide remains in the magazine and the slide lifter „stands at the ready“, i.e. it waits for an instruction to lower the slide into the slide gate. This position is referred to as the „SELECT
position“ and, in cases where several projectors with different search times are used, makes it
possible to project the selected slides simultaneously.
The Editing System therefore has two different instructions to select a slide: the SLIDE instruction which automatically lowers the slide lifter after it has reached the required location
and the SELECT instruction which leaves the slide lifter in the wait position until you use the
OPEN instruction to transport the slide to the slide gate at the required moment.
Because the projector behaves as if it had just received a SELECT A0 instruction as soon as it
is switched on, its slide lifter is still in the SELECT position and remains so until this position
is cancelled by the SLIDE A1 instruction in line 2.
KODAK S-RA2500 Editing System 1.0 User Manual Page: 40
This situation gives us the opportunity of inviting you to perform a new experiment:
Try replacing the instruction SLIDE A10 in line 8 by the instruction SELECT A10. As expected, the projector goes to magazine location 10 but does not show the slide. The slide
cannot be viewed until you have inserted the instruction OPEN A in line 10 for example.
Naturally, the OPEN instruction has a counterpart - the CLOSE instruction - which allows you
to return the projected slide to the magazine gate and set the slide lifter to the SELECT position. Try inserting this instruction as step 12 in your program after a waiting time of 5 seconds.
Your program now looks as follows:
LIGHT A
SLIDE A1
WAIT 5
SLIDE A5
WAIT 5
SLIDE A8
WAIT 10
SELECT A10<— modified
WAIT 5
OPEN A <— added
WAIT 5 <— ditto
CLOSE A <— ditto
Now is the time to take a look at the program in its entirety - until now you have only tested
individual steps. You use the F5 function (RUN SEQUENCE) to do this. This function starts
your program at the program step which is on the input line. If you want to see the entire
program, first use the HOME key to go to the beginning of the program and press F5 to run
it..cp255
KODAK S-RA2500 Editing System 1.0 User Manual Page: 41
When the program is running you should pay special attention to program steps 8 to 12 in order
to observe the special features of the SELECT, OPEN and CLOSE instructions described in the
paragraph on the previous page.
B-1.4 Making an attractive impression
Let’s assume that slide No. 5 in the program on the previous page contains information which
you particularly wish to draw to the attention of the recipient. In this case you might well try and
ook for a visual effect and this gives us the chance to introduce the FLASH instruct
n . For instance, you might want to make the projector lamp flash 5 times at a rate of 0.1 s. Neverthel
ss, the slide is still to be shown for 5 seconds. This can be calculated as foll
s : 5 x 0.1 s = 0.5 s (sum of lit durati
n s ) 5 x 0.1 s = 0.5 s (sum of unlit durati
n s ) —————
——Flashing time = 1.0 s
Or, for those who like mathematical formulae:
tb = 2 ni
tb: flashing time
n: number of cycles
i: flashing interval
KODAK S-RA2500 Editing System 1.0 User Manual Page: 42
If the flashing time is subtracted from the original waiting time (5 s), this gives a residual
waiting time of 4 s. Let us assume that the intention is to initially show the slide continuously
for 4 s and then for it to flash for 1 s. In this case, the program must be modified as follows:
LIGHT A
SLIDE A1
WAIT 4
SLIDE A5
WAIT 4<— show slide for 4 s
FLASH A 5 0.1<— and flash for 1 s
SLIDE A8
WAIT 10
SELECT A10
WAIT 5
OPEN A
WAIT 5
CLOSE A
Admittedly, the first program you have written is not yet a world-beater. You have still not
utilised the complete set of projector instructions, for there are still instructions such as STEP,
BACKSTEP, DARK, ALTERNATE, DISSOLVE and WIPE. Don’t worry, we have no intention of treating all these instructions in as much detail as those described earlier. Instead,
experiment with these instructions yourself - don’t forget you can always refer to the system’s
„built-in manual“. You already know the most important edit functions so you shouldn’t have
any real problems. If you want to take a break from a work session, don’t forget to save your
program to diskette. To do this, quit the FRAME Editor and, in the main menu, select the
DISK diskette function whose use is explained in paragraph A-5.4.
KODAK S-RA2500 Editing System 1.0 User Manual Page: 43
B-1.5 Screen text
Now we come to the question of how you can display text on the screen at the same time as
your slide presentation is taking place. The first step is to create actual text so that you have
something to display.
To avoid having to discuss the SCREEN editor which is required to achieve this at this stage,
we have prepared several pages of text and recorded them on your system diskette as „practice
material“. All you need to do is to incorporate the necessary „production instructions“ in your
program; there are only two of these: SHOW and BLOW. To try these instructions out, simply take the program segment which you have already written and expand it as follows:
LIGHT A
SLIDE A1
SHOW TEXT1<— insert
WAIT 4
SLIDE A5
BLOW TEXT2<— insert
WAIT 4
FLASH A5 0.1
SLIDE A8
BLOW TEXT3<— insert
WAIT 10
SELECT A10
WAIT 5
OPEN A
WAIT 5
CLOSE A
There is not much point in using the RUN SEQUENCE function to start this program section
in the FRAME editor because what you would see would be no different from what you saw
before.
KODAK S-RA2500 Editing System 1.0 User Manual Page: 44
Blocks of text (SCREENS) are only shown in „real-time mode“ - to display text you must go to
the EXECUTE menu and select the CURRENT PROGRAM function - the screen goes dark and
the program sta
s . Two things are worth pointing out: one is the difference between SHOW and BLOW, the othe
is the fact that your program does not come to an end: as soon as the last program step has
een executed, the program goes back to the beginning and restarts again. This is a characteristic fea
ure of information programs which are written using the Editing System: they are endless loops
and this is a requirement dictated by practical use. If you want to return to the Editor, you must p
ess function key F6 which takes you back to the EXECUTE menu where you can press the ESC ke
to go back to the main m
u . The next step is to tackle the task of laying out a block of text of your own. To do this, select
the SCREEN Editor in the Editor submenu; the screen initially goes completely blank and the cu
sor flas
s . You can type on the screen in the same way as when you use word processing programs which
you are probably already familiar with. In addition, the SCREEN Editor provides you with a serie
of functions which allow you to achieve impressive and clear text layout on the scr
en.
These „embellishment functions“ are based on the box operating mode; the SCREEN Editor
changes to this mode when you press function key F2. The normal cursor is not displayed on
the screen in this mode, a small rectangle surrounded by a border - the box - is displayed and
you can use the cursor keys to move the box around the screen. Pressing the <Ins> key anchors the top left hand corner of the box, thus allowing you to move the bottom right hand
corner of the box by using the cursor keys. This enables you to reduce or increase the size of
the box as you require.
KODAK S-RA2500 Editing System 1.0 User Manual Page: 45
The next time the <Ins> key is pressed this undoes the anchoring of the box and the entire box
can be moved around the screen by using the cursor keys. You can therefore use the <Ins> ke
to toggle between these two types of operation as often as you w
h . The ability to do all this is pointless unless you can permanently „imprint“ the box on the scr
n. This is achieved by pressing the <Del> key. When you move the box again you will see
that a duplicate of the box remains in its original position.
You can use function key F6 to switch between a single and double border for the box. The
box also acts like a paintbrush and you can use it to paint text and different areas of the screen in var
ous colo
s . Pressing F9 once or several times switches the background colour and F10 is used to switch
the foreground colour (= text colour) and you can see the result inside the border of the box immediat
y . Exam
le:
Let us assume that you set your box for a white edge and a blue background. The procedure to
generate a blue box with a white border and white text is as follows:
1st step: print box <Del>
2nd step: colour in box <F7>
3rd step: switch over to text mode <F2>
4th step: write text inside box
Obviously, you can change the colour of text which has previously been typed in by positioning an appropriately prepared box around the text and pressing F7, thus causing the area enclosed by the box to assume the new colour combination.
KODAK S-RS 2500 Editing System 1.0 User Manual Page: 46
You can use function key F5 to add the „flashing“ attribute to your selected colour combination
and set entire areas of the screen or only individual words to flash at a steady r
e . When working in box mode, key F7 can also be used to delete the screen area enclosed by the
ox, i.e. to colour in the backgro
nd.
The boxes which can be drawn on the screen are also used as a frame of reference for a series
of text mode functions:
The key combination Ctrl+Z (^Z) horizontally centres a line of text within a box.
The key combinations Alt+E, Alt+X, Alt+S and Alt+D can be used to move the content of a
box up, down, left or right (scrolli
) . Try experimenting with the functions described above until you produce a block of text w
ich looks the way you want
t . Then you should think of a name for this block of text so that it can subsequently be store
on diskette because the program can only access blocks of text which have been stored on diske
e . Function keys F3 (SAVE) and F4 (LOAD) are provided for storing and loading blocks of t
t. These functions also allow you to prepare whole series of blocks of text quickly by storing a b
ock of text, amending the block of text which still remains displayed on the screen, storing this ame
ded block of text under a new name and repeating the procedure as many times as required.
In order to display the newly prepared block of text, which we will assume you have called
„MYTEXT“, in your program you must once again expand the program:
KODAK S-RA2500 Editing System 1.0 User Manual Page: 47
LIGHT A
SLIDE A1
SHOW TEXT1
WAIT 4
SLIDE A5
BLOW TEXT2
WAIT 4
FLASH A5 0.1
SLIDE A8
BLOW TEXT3
WAIT 2<— insert
BLOW MYTEXT<— ditto
WAIT 10
SELECT A10
WAIT 5
OPEN A
WAIT 5
CLOSE A
If you start this program using the CURRENT PROGRAM function in the EXECUTE menu
you will see your block of text at the appropriate point. As you have probably already noticed, a b
ock of text remains visible until it is replaced by another block of text or until an ERASE instruc
ion clears the scr
en.
The SHOW instruction allows blocks of text to be shown extremely fast, particularly if your
computer has a hard disk or a RAM disk and you use this facility to store the blocks of text.
The picture frequency can be faster than 0.1 s and you can program special-effect-like animation sequences. The program example supplied demonstrates the use of this special effect.
KODAK S-RA2500 Editing System 1.0 User Manual Page: 48
B-2 Second lesson
As you might expect, the second lesson is somewhat more difficult but it is also more interesting. The typical program prepared in the first lesson had a linear structure and its progression
was identical regardless of the circumstances: start from the beginning and continue to the
d . The Editing System can, however, also be used to write programs which progress differe
tly depending on user input. This requires what are referred to as „conditional branch instructi
ns“ and we shall examine these in the next exam
e.
B-2.1 Structural characteristics
Before becoming involved in detailed descriptions, let us consider some of the fundamental
aspects of programs in which branching occurs.
The demonstration program supplied on your diskette shows a typical application for program
branching in which the user can select from a list those items of information which interest him
at that particular moment.
The structural elements of such a program are as follows:
- Main loop
- Subroutines
The program performs most of its activities as it goes through the main loop. It polls the user
input and continuously repeats this process until such input eventually occurs. The input is
evaluated and, depending on its type, causes the system to go into one of the subroutines, run
the subroutine and then return to the main loop when the subroutine has been completed. Figure B-4 illustrates this arrangement. Although programs can obviously be made much more
complex, in the following example we shall adopt this structure and test its capabilities on a
straightforward problem statement.
KODAK S-RA2500 Editing System 1.0 User Manual Page: 49
Programs
t
Userinpu
A?
User input B?
User input C?
Subroutine C
Subroutine B
Subroutine A
Fig. B-4: Structure of branched prog
a m s KODAK S-RA2500 Editing System 1.0 User Manual Page
0
B-2.2 Each to his
wn
As usual, our statement of the problem is very simple: we wish to show three blocks of text
(exceptionally, we shall ignore projectors on this occasion) and the user must be able to select
the text which he wishes to
e . In the first version of our example we shall use the KEY instruction to achieve this; this instruc
ion should always be used if we require the user to press only one key. In our case the keys are key
1, 2 an
3 . The format of the KEY instruction KEY <key> TO <destination> merely causes the keyb
ard buffer of the computer to be polled to establish whether a key has been pressed. If a key has
een pressed and the key is the same as the key specified in <key>, the program branches to the p
int which was marked by means of the LABEL instruction according to the destination specified i
TO <destination>. In all other cases, the program executes the next program s
p . If we wish to give users several possible options, we can string appropriate KEY instructions toge
her in a block with various specified keys and destinations. Our example makes use of this possibil
y : LABEL START; Example program starts
e r e SHOW TITLE; Show title page (supplied on demo diske
te)
LABEL SELECT ; Main loop starts here
KEY 1 SHOW1; Branch to „SHOW1“ in case of key 1
KEY 2 SHOW2; Branch to „SHOW2“ in case of key 2
KEY 3 SHOW3; Branch to „SHOW3“ in case of key 3
JUMP SELECT; Otherwise return to „SELECT“
This is the so-called „main loop“. It does not include the three subroutines which we will use
to show the three SCREENS. In our case, the subroutines are short and straightforward and are
simply „tacked onto“ the main loop:
KODAK S-RA2500 Editing System 1.0 User Manual Page: 51
LABEL SHOW1; First subroutine
SHOW PICTURE1 ; Show picture 1
WAIT 3 ; 3 seconds to look
JUMP START; Return to the start
LABEL SHOW2; Second subroutine
SHOW PICTURE2 ; Show picture 2
WAIT 3 ; 3 seconds to look
JUMP START; Return to the start
LABEL SHOW3; Third subroutine
SHOW PICTURE3 ; Show picture 3
WAIT 3 ; 3 seconds to look
JUMP START; Return to the start
After this program has been keyed in, it can only be run by using the CURRENT PROGRAM
function in the EXECUTE menu because, as you know, program branches and SCREEN
instructions are only executed in real-time mode. Write the blocks of text which are used in the
example yourself and name them according to the example. Naturally, if you don’t wish to do
this yourself you can also use any of the blocks of text in the list on the example diskette.
The KEY instruction has two other special features which must be mentioned even though they
are not used in our exam
e.
Waiting ti
s : A KEY instruction means that a test is performed to establish whether a key has been pressed ra
her than that your program waits for a key to be pressed. If no key has been pressed, the pro
ram continues immediately. In our example this had no significance because „continue“ meant „
rom the start“. If you wish to allow the user a specific time to press a key you can achieve thi
by placing a WAIT instruction before the keyboard status poll as shown in the following exam
l e : KODAK S-RA2500 Editing System 1.0 User Manual Page
2
WAIT 10 ; 10 s waiting time
KEY 1 SHOW1 ; Branch to „SHOW1“ in the case of key 1
KEY 2 SHOW2 ; Branch to „SHOW2“ in the case of key 2
KEY 3 SHOW3 ; Branch to „SHOW3“ in the case of key 3
(any instruction) ; Continue if the user
(any instruction) ; does not press a key within 10 seconds
In this example, the program „waits“ 10 seconds for a key to be pressed. If a key is pressed,
the waiting time is terminated and the program takes a branch. If the key which is pressed is not ke
1, 2 or 3 or if no key is pressed, the program executes the next instruct
n.
Response to any
y : Sometimes it may be meaningful to make the subsequent progression of the program dependen
on the fact that any key rather than a specific key has been pressed. It is possible to scan the keyb
ard buffer accordingly. In this case the question mark „?“ is used as the key sym
l . WAIT 10; 10 s waiting
i m e KEY ? PRESS; Branch to „PRESS“ if any key is pre
s e d SHOW PICTURE 2; Otherwise show picture 2, etc., e
c.,
Try out these two special cases in an example using a problem statement of your own choice.
B-2.3 The alternative
Like most things in life, there is an alternative to the KEY instruction: the RESPONSE instruction. This instruction is always useful if we require user input to consist of more than one
character. The first essential difference compared with the KEY instruction is the fact that a
RESPONSE instruction interrupts the program for as long as it takes the user to key in his
input and terminate it by pressing the ENTER key (ENTER must be pressed).
KODAK S-RA2500 Editing System 1.0 User Manual Page: 53
Nevertheless, it is possible to ensure that a program will resume after a certain time rather than
wait for user input for ever and ever. The TIMEOUT instruction can be used to define the time
interval which the user is allowed as a response time in the case of the RESPONSE instruction.
The defined time applies to all RESPONSE instructions until the defined time is changed by
another TIMEOUT instruction. TIMEOUT obviously has no effect on KEY instructions.
Another important special feature of the RESPONSE instruction is its connection with the
screen. If we require the user to enter several characters we must make it possible for him to
check the characters which he keys in. It is possible to display a block of text in which a field
is filled with the symbols @@@@.... If such a block of text is on the screen when the RESPONSE instruction occurs, a flashing cursor is shown in this field and the characters which
the user enters are displayed so he can check them. The user can also make corrections by
using the cursor keys if he mis-keys anything.
The following example uses these capabilities in order to ask the user a concept:
LABEL START ; Beginning of program
TIMEOUT 20; Set 20 s reply time
SHOW QUESTION; The question is shown
RESPONSE KODAK CORRECT ; Correct answer, go to LABEL CORRECT
RESPONSE ILLEGAL INCORRECT; Incorrect answer, go to LABEL INCORRECT
RESPONSE TIMEOUT WARN; Timeout exceeded, go to LABEL WARN
LABEL CORRECT; Subroutine CORRECT
SHOW CONF; Show block of text with confirmation
WAIT 4; Allow time to read
JUMP START; Return to main loop
LABEL INCORRECT; Subroutine INCORRECT
SHOW ERROR; Show error message
KODAK S-RA2500 Editing System 1.0 User Manual Page: 54
WAIT 4; Allow time to read
JUMP START; Return to main loop
LABEL WARN; Subroutine WARN
SHOW REMINDER; Reminder to hurry
WAIT 2; Pause for reading
JUMP START; Return to main loop
The example diskette does not contain the blocks of text for this example - it is assumed that
you will write them to suit your own ideas. The program is intended to perform the following functi
s : The response time is set to 20 seconds. A block of text containing a question is then shown on
the screen. The word „KODAK“ is the correct answer to the question. In the block of text, the chara
ter string @@@@@ is used to mark a field for the answer entered by the user (there are 5 letter
in KOD
).
The three RESPONSE instructions take all possible answers into account, nam
y : Correct input results in the subroutine CORRECT in which a suitable block of text confirms
the user’s ans
r . Incorrect input (keyword: ILLEGAL) enables the subroutine INCORRECT which has an appropr
ate block of t
xt.
Absence of user input before the timeout has elapsed (keyword: TIMEOUT) invokes the
appropriate subroutine which outputs a reminder to hurry.
All subroutines return to the main loop in which the asking of the question is repeated.
KODAK S-RA2500 Editing System 1.0 User Manual Page: 55
You are now capable of using the outline programs shown earlier as a starting basis for your
own experiments in which you will almost certainly develop more sensible questions than the ques
ion demonstrated in our example. The system has many further capabilities which are not exhau
ted by this intentionally brief introduct
n.
KODAK S-RA2500 Editing System 1.0 User Manual Page: 56
C-1 Programming techniques
The following Part of the Manual is intended to give a selected example to illustrate how the
more complex capabilities of the KODAK S-RA2500 Editing System can be used in order to
enhance the performance of your information programs.
C-1.1 Using the demo program
The example diskette supplied contains a demo program whose purpose is to illustrate the
instruction set of the Editing System in as practical a form as possible by showing that it can be
demonstrated in isolated form. The diskette contains the demo program in compiled form
(DEMO.RUN) and in editable form (DEMO.FRM). Use this program as a model or as a
framework for your own experiments or applications.
The following Chapter also contains the listing of this program together with comments which
will make it easy for you to follow the use of the individual instructions.
Run the program before examining the program listing. You will need two projectors (SRA2500) and the computer configuration described earlier - preferably including a colour
screen and a printer - in order to do this.
If you do not wish to use the printer, the demo program allows you to skip the corresponding
parts of the program.
In the last resort you may even dispense with the projectors. In this case, however, you will
have to use the demo program under Editing System control because the Editing System allows
you to make projector control signals inoperative.
KODAK S-RA2500 Editing System 1.0 User Manual Page: 57
If you use the projectors, they must be set to physical addresses a and b and their magazines
must be fitted but empty.
Start the runtime version of the program by placing the example diskette in drive A: of your
computer and entering the instruction RUN DEMO at DOS level and then follow the instructions in the program.
C-1.2 Listing of demo program
OPEN
LABEL
BLOW
LABEL
AB; OPEN BOTH SLIDE LIFTERS
START; TO DESTINATION FOR PROGRAM START
INTRO; SHOW INTRODUCTORY BLOCK OF TEXT
SELECT; *** BEGINNING OF MAIN LOOP ***
KEY 1 PROJ; GO TO SUBROUTINE „PROJ“ IN CASE OF KEY 1
KEY 2 SCRE; GO TO SUBROUTINE „SCRE“ IN CASE OF KEY 2
KEY 3 LOGI; GO TO SUBROUTINE „LOGI“ IN CASE OF KEY 3
KEY 4 AUXI; GO TO SUBROUTINE „AUXI“ IN CASE OF KEY 4
JUMP SELECT; OTHERWISE REPEAT FROM START, AB „SELECT“
LABEL PROJ; *** PROJECTOR INSTRUCTIONS SUBROUTINE ***
SLIDE A1; SHOW SLIDE 1 IN PROJECTOR A
SHOW INTRO1; AND SHOW BLOCK OF TEXT WITH SELECTION MADE
WAIT 2.5; ALLOW TIME FOR READING
BLOW SLIDE; SHOW BLOCK OF TEXT FOR SLIDE INSTRUCTION
LIGHT A; SWITCH ON LAMP IN PROJECTOR A
WAIT 1.5; SHORT PAUSE
SLIDE A2; DEMONSTRATE SEVERAL SLIDE INSTRUCTIONS
WAIT 2.5 ; ...
SLIDE B40; ...
LIGHT B; SWITCH ON LAMP OF PROJECTOR B
WAIT 3.5; ...
SLIDE A80; ...
WAIT 3.5; ...
DARK B; AND SWITCH OFF LAMP OF PROJECTOR B.cp255
KODAK S-RA2500 Editing System 1.0 User Manual Page: 58
SHOW SELECT; SHOW BLOCK OF TEXT FOR SELECT INSTRUCTION
WAIT 2.5; SHORT PAUSE
SELECT A10; DEMONSTRATE SEVERAL SELECT INSTRUCTIONS
WAIT 2; ...
SELECT A15; ...
WAIT 1; ...
SELECT A20; ...
WAIT 2; ...
SHOW OPEN; SHOW BLOCK OF TEXT FOR OPEN INSTRUCTION
WAIT 2.5; SHORT PAUSE
OPEN A; DEMONSTRATE OPEN INSTRUCTION
WAIT 2.5; SHORT PAUSE
SHOW CLOSE; SHOW BLOCK OF TEXT FOR CLOSE INSTRUCTION
WAIT 2.5; SHORT PAUSE
CLOSE A; DEMONSTRATE CLOSE INSTRUCTION
WAIT 2; ANOTHER PAUSE
SHOW STEP; SHOW BLOCK OF TEXT FOR STEP INSTRUCTION
WAIT 2.5; SHORT PAUSE
STEP A; DEMONSTRATE SEVERAL STEP INSTRUCTIONS
WAIT 2; ...
STEP A; ...
WAIT 2; ...
STEP A; ...
WAIT 2; ...
SHOW BACKSTEP; SHOW BLOCK OF TEXT FOR BACKSTEP INSTRUCTION
WAIT 2.5; SHORT PAUSE
BACK A; DEMONSTRATE SEVERAL BACKSTEP INSTRUCTIONS
WAIT 2; ...
BACK A; ...
WAIT 2; ...
BACK A; ...
WAIT 2; ...
SHOW DARK; SHOW BLOCK OF TEXT FOR DARK INSTRUCTION
KODAK S-RA2500 Editing System 1.0 User Manual Page: 59
WAIT 2.5; SHORT PAUSE
DARK A; DEMONSTRATE DARK INSTRUCTION
WAIT 2; ...
SHOW LIGHT; SHOW BLOCK OF TEXT FOR LIGHT INSTRUCTION
WAIT 2.5; SHORT PAUSE
LIGHT A; DEMONSTRATE LIGHT INSTRUCTION
WAIT 2.5; ...
SHOW ALTERNATE; SHOW BLOCK OF TEXT FOR ALTERNATE INSTRUCTION
WAIT 2.5; SHORT PAUSE
ALT AB; DEMONSTRATE ALTERNATE INSTRUCTION PROJ.A -> PROJ.B
WAIT 2.5; ARTIFICIAL PAUSE
ALT AB; REPEAT SAME
PROJ.B -> PROJ.A
ALT AB ; REPEAT SAMEPROJ.B -> PROJ.A
WAIT 3.5; ANOTHER ARTIFICIAL PAUSE
SHOW DISSOLVE; SHOW BLOCK OF TEXT FOR DISSOLVE INSTRUCTION
WAIT 2.5; SHORT PAUSE
DISS AB; DEMONSTRATE SEVERAL DISSOLVE INSTRUCTIONS
WAIT 2.5; ...
DISS AB; ...
WAIT 3.5; ...
SHOW FLASH; SHOW BLOCK OF TEXT FOR FLASH INSTRUCTION
WAIT 2.5; SHORT PAUSE
FLASH B 40 0.10; FLASH 40 TIMES WITH PROJECTOR B, CYCLE TIME: 0.10 s
WAIT 2; ARTIFICIAL PAUSE
SHOW WIPE; SHOW BLOCK OF TEXT FOR WIPE INSTRUCTION
WAIT 2.5; SHORT PAUSE
WIPE AB 0.1; WIPE INSTRUCTION, FROM A -> B WITH 0.1 s PHASE SHIFT
WAIT 3; ARTIFICIAL PAUSE
WIPE BA 0.1; SAME IN REVERSE ORDER
WAIT 3; ANOTHER ARTIFICIAL PAUSE
WIPE AB 0.5; AND THEN FORWARDS, NOW WITH 0.5 s
KODAK S-RA2500 Editing System 1.0 User Manual Page: 60
WAIT 3; ARTIFICIAL PAUSE
WIPE BA 0.5; AND THEN REVERSE
WAIT 3; ARTIFICIAL PAUSE
DARK AB; END, LIGHT GOES OUT
JUMP START; JUMP BACK TO MAIN PROGRAM
SLIDE ABO; AVOID UNNECESSARY SETTING FROM HERE ON
LABEL SCRE; *** SUBROUTINE SCREEN INSTRUCTIONS ***
SHOW INTRO2; SHOW BLOCK OF TEXT WITH SELECTION MADE
WAIT 2.5; VIEWING PAUSE
SHOW SHOW; SHOW BLOCK OF TEXT FOR SHOW INSTRUCTION
WAIT 1.5; VIEWING PAUSE
SHOW SHO1
; DEMONSTRATE SHOW INSTRUCTION WITH BLOCK OF TEXT
„SHO1“
WAIT 2,5; PAUSE
SHOW SHOW; SHOW BLOCK OF TEXT FOR SHOW INSTRUCTION AGAIN
WAIT 1.5; ANOTHER SHORT PAUSE
SHOW BLOW; SHOW BLOCK OF TEXT FOR BLOW INSTRUCTION
WAIT 2.5; VIEWING PAUSE
BLOW SHO2
; DEMONSTRATE BLOW INSTRUCTION WITH BLOCK OF TEXT
„SHO2“
WAIT 2.5; VIEWING PAUSE
SHOW BLOW; SHOW BLOCK OF TEXT FOR BLOW INSTRUCTION AGAIN
WAIT 1.5; SHORT PAUSE
SHOW ERASE; SHOW BLOCK OF TEXT FOR ERASE INSTRUCTION
WAIT 2.5; VIEWING PAUSE
ERASE ; EXECUTE ERASE INSTRUCTION
WAIT 1.5; PAUSE
SHOW ERA1; SHOW EXPLANATION
WAIT 2.5; PAUSE
SHOW ERASE; SHOW BLOCK OF TEXT FOR ERASE AGAIN
WAIT 1.5; SHORT PAUSE
SHOW PRINT; SHOW BLOCK OF TEXT FOR PRINT INSTRUCTION
WAIT 20; ALLOW 20 s FOR USER RESPONSE
KEY J CONTINUE; CONTINUE IN CASE OF KEY „J“
KEY ? START; TERMINATE PROGRAM IN CASE OF ANY OTHER KEY
KODAK S-RA2500 Editing System 1.0 User Manual Page: 61
LABEL CONTINUE; CONTINUE IF KEYPRESS IS PRESENT
SHOW PR11; SHOW BLOCK OF TEXT „PR11“
PRINT INFO1; PRINT BLOCK OF TEXT „INFO1“
SHOW NEW; SHOW BLOCK OF TEXT FOR NEW INSTRUCTION
WAIT 2.5; PAUSE
NEW ; CLEAR BUFFER
SHOW POOL; SHOW BLOCK OF TEXT FOR POOL INSTRUCTION
POOL INFO2; TRANSFER BLOCK OF TEXT INFO2 TO BUFFER
POOL INFO3; TRANSFER BLOCK OF TEXT INFO3 TO BUFFER
WAIT 2.5; PAUSE
SHOW DOCUMENT; SHOW BLOCK OF TEXT FOR DOCUMENT INSTRUCTION
DOCUMENT ; PRINT OUT POOL
JUMP START; END AND RETURN TO MAIN PROGRAM
LABEL LOGI; *** SUBROUTINE: LOGIC INSTRUCTIONS ***
COUNT 1 1; USE COUNT PROGRAM IN COUNTER #1
STORE ; AND SAVE COUNTER TO DISK
SHOW INTRO3; SHOW BLOCK OF TEXT WITH SELECTION MADE
WAIT 2.5; PAUSE
SHOW WAIT; SHOW BLOCK OF TEXT FOR WAIT INSTRUCTION
WAIT 2.5; PAUSE
SHOW LABEL; SHOW BLOCK OF TEXT FOR LABEL INSTRUCTION
WAIT 7; PAUSE
SHOW LOOP; SHOW BLOCK OF TEXT FOR LOOP INSTRUCTION
WAIT 7; PAUSE
LOOP ; BEGINNING OF LOOP
SHOW ANIMATE1; EXECUTE SCREEN ANIMATION
SHOW ANIMATE2
SHOW ANIMATE3
SHOW ANIMATE4
SHOW ANIMATE5
SHOW ANIMATE4
KODAK S-RA2500 Editing System 1.0 User Manual Page: 62
SHOW ANIMATE3
SHOW ANIMATE2
REPEAT 10 ; AND REPEAT 10 TIMES
SHOW LOOP1 ; AND SHOW ANOTHER BLOCK OF TEXT FOR LOOP
WAIT 3 ; SHORT PAUSE
SHOW REPEAT ; SHOW BLOCK OF TEXT FOR REPEAT INSTRUCTION
WAIT 7 ; READING PAUSE
SHOW JUMP ; SHOW BLOCK OF TEXT FOR JUMP INSTRUCTION
SHOW RESPONSE ; SHOW BLOCK OF TEXT FOR RESPONSE INSTRUCTION
WAIT 7 ; READING PAUSE
TIMEOUT 30 ; ALLOW 30 s FOR ANSWER
LABEL INPUT ; GO TO MARKER FOR NEW ATTEMPT
RESP LABEL CORRECT ; BRANCH TO CORRECT IN CASE OF ANSWER „LABEL“
RESP TIMEOUT NEXT ; BRANCH TO LABEL „NEXT“ IN CASE OF TIMEOUT
RESP ILLEGAL INCORRECT ; BRANCH TO LABEL „INCORRECT“ IN CASE OF
INCORRECT
ANSWER
LABEL INCORRECT ; CONTINUE FROM HERE IN CASE OF INCORRECT ANSWERS
SHOW ERROR ; SHOW ERROR MESSAGE
JUMP INPUT ;
LABEL CORRECT ; CONTINUE FROM HERE IN CASE OF CORRECT ANSWER
SHOW CORRECT ; SHOW CONFIRMATION MESSAGE
WAIT 4.5 ; ALLOW TIME FOR READING
LABEL NEXT ; GO TO MARKER FOR TIMEOUT
SHOW KEY ; SHOW BLOCK OF TEXT FOR KEY INSTRUCTION
WAIT 10 ; 10 s RESPONSE TIME
KEY ? THANK YOU ; BRANCH TO „THANK YOU“ IN CASE OF ANY KEY
JUMP NO THANKS ; OTHERWISE CONTINUE FROM „NO THANKS“
LABEL THANK YOU ; TO DESTINATION FOR „THANK YOU“
SHOW KEYTHANK YOU; SHOW THANK YOU MESSAGE
WAIT 4.5 ; PAUSE FOR READING
LABEL NO THANKS ; TO DESTINATION „NO THANKS“
SHOW IDENT ; SHOW BLOCK OF TEXT FOR IDENT INSTRUCTION
IDENT TEXT ; FETCH USER INPUT AND STORE
KODAK S-RA2500 Editing System 1.0 User Manual Page: 63
SHOW COUNT ; SHOW BLOCK OF TEXT FOR COUNT INSTRUCTION
WAIT 7 ; PAUSE
JUMP START ; RETURN TO MAIN PROGRAM
LABEL AUXI ; *** SUBROUTINE: AUXILIARY INSTRUCTIONS ***
SHOW INTRO4 ; SHOW BLOCK OF TEXT FOR SELECTION MADE
WAIT 3.5 ; PAUSE
SHOW AUXIL ; SHOW BLOCK OF TEXT FOR AUXILIARY INSTRUCTIONS
WAIT 3.5 ; PAUSE
SHOW AUXIL0 ; SHOW BLOCK OF TEXT WITH SUPPLEMENT
WAIT 7 ; PAUSE
SHOW AUXIL1 ; SHOW BLOCK OF TEXT „AUXIL1“
WAIT 7 ; PAUSE
SHOW AUXIL2 ; SHOW BLOCK OF TEXT „AUXIL2“
ON A ; SWITCH ON AUXILIARY A
WAIT 3.5 ; PAUSE
SHOW AUXIL3 ; SHOW BLOCK OF TEXT „AUXIL3“
ON C ; SWITCH ON AUXILIARY C
WAIT 3.5 ; PAUSE
SHOW AUXIL4 ; SHOW BLOCK OF TEXT „AUXIL4“
ON E ; SWITCH ON AUXILIARY E
WAIT 3.5 ; PAUSE
SHOW AUXIL5 ; SHOW BLOCK OF TEXT „AUXIL5“
ON G ; SWITCH ON AUXILIARY G
WAIT 3.5 ; PAUSE
SHOW AUXIL6 ; SHOW BLOCK OF TEXT „AUXIL6“
INV A-H ; INVERT AUXILIARIES A..H
WAIT 3.5 ; PAUSE
SHOW AUXIL7 ; SHOW BLOCK OF TEXT „AUXIL7“
OFF A-H ; SWITCH OFF ALL AUXILIARIES AGAIN
WAIT 3.5 ; PAUSE
SHOW AUXIL8 ; SHOW LAST BLOCK OF TEXT
WAIT 3.5 ; PAUSE
JUMP START ; RETURN TO MAIN PROGRAM.cp255
KODAK S-RA2500 Editing System 1.0 User Manual Page: 64
C-1.3 Special tips and tricks
C-1.3.1 Advice concerning branch instructions
All branch instructions (KEY, RESPONSE, JUMP) are expected to result in branching to a TO
destination specified in the instruction. To achieve this, steps must be taken to ensure that the
connected hardware (projectors, auxiliary box) are appropriately controlled to allow continuation from the particular point in synchronism with the program. In such cases programming
may sometimes be visually ineleg
t.
Example of bad programm
g : ...; Final sequence of first subrou
i n e SLIDE A23; Projector A selects slide No
2 3 LIGHT A; and lamp is switche
on
WAIT 5; Show slide for 5 seconds
JUMP START; End and return to first program
LABEL SECOND; Second subroutine starts here
DARK A; Switch off lamp of projector A
SLIDE A45; Select slide No. 45
LIGHT A; and switch on lamp again
...; etc., etc.
If a sequence is programmed in the manner shown above, when a branch is taken to the label
„SECOND“, the following occurs:
The system determines the hardware status at the LABEL SECOND position and finds that the
lamp of projector A must be switched on at this point and that slide No. 23 is shown. The
system therefore initially sets the hardware accordingly.
KODAK S-RA2500 Editing System 1.0 User Manual Page: 65
The instructions following LABEL SECOND are then executed. In this case the lamp of
projector A must be switched off again and slide No. 45 must be fed in. All this is performed
as one would expect.
The problem is that the overall visual impression is somewhat disjointed: the last slide in the
previous program appears for an instant before the DARK instruction clears the second program. This can be programmed in a more elegant fashion.
Example of good programming:
...; Final sequence of first subroutine
SLIDE A23; Projector A selects slide No. 23
LIGHT A; and lamp is switched on
WAIT 5; Show slide for 5 seconds
DARK A; Extinguish projector A
JUMP START; End and return to first program
SLIDE A45; Preparation: select slide No. 45 in projector A
LABEL SECOND; Second subroutine starts here
LIGHT A; Lamp of projector A with slide 45 is switched on
...; etc., etc.
What is the difference?
The DARK instruction for projector A is now executed as the last action in the first program
before returning to the start so that the lamp of projector A is already switched off when LABEL SECOND is reached. Additionally, the instruction SLIDE A45 is now in front of LABEL
SECOND so that the system immediately goes to the correct slide position (45) in the event of
a branch to SECOND, i.e. it is only set once. The program SECOND then starts in the correct
sequence by showing slide 45 without the necessity for a setting instruction.
And that’s what was intended in the first place, isn’t it?
KODAK S-RA2500 Editing System 1.0 User Manual Page: 66
C-1.3.2 Branch instructions in program loops
Branching in a LOOP REPEAT structure is not meaningful. The instructions KEY, RESPONSE and JUMP are therefore ignored when a LOOP REPEAT structure is in progress. If
you wish to program a branch from an enquiry loop this can be achieved by using an endless
loop of the following form:
Example:
LABEL START ; Enquiry loop starts here (with animation)
SHOW PICTURE1; Show SCREEN with PICTURE1
WAIT 0.1 ; Wait 1/10 s
SHOW PICTURE2; Show SCREEN with PICTURE2
WAIT 0.1 ; Wait 1/10 s
SHOW PICTURE3; Show SCREEN with PICTURE3
WAIT 0.1 ; Wait 1/10 s
KEY 1 PROG1; Branch to PROG1 in the case of key 1
KEY 2 PROG2; Branch to PROG2 in the case of key 2
KEY 3 PROG3; Branch to PROG3 in the case of key 3
JUMP START ; Return to start and repeat
LABEL PROG1 ; PROG1 starts here
...
...
...
JUMP START ; PROG1 ends here
LABEL PROG2 ; PROG2 starts here
...
...
...
JUMP START ; PROG2 ends here
LABEL PROG3 ; PROG3 starts here
...
...
...
JUMP START ; PROG3 ends here
KODAK S-RA2500 Editing System 1.0 User Manual Page: 67
C-1.3.3 Avoiding unnecessary setting instructions
If you write branched programs in which some of the subroutines only show blocks of text, the
fact that the projectors are set to the appropriate magazine position each time the subroutine is
called even though it does not use the projectors, can sometimes be a nuisance.
This setting can be prevented by placing a SLIDE instruction which sets the projectors to the
magazine positions of the main loop in front of the LABEL definition of the particular subroutine: this eliminates setting. The example program supplied uses this trick to demonstrate the
SCREEN instructions.
Example:
WAIT 3; With projector instructions
DARK AB;
JUMP START; Jump back to main loop
No projector instructions are used from this point on
SLIDE ABO; Magazine setting = main loop
LABEL SCRE; *** Subroutine SCREEN instructions ***
SHOW INTRO2;
WAIT 2.5;
SHOW SHOW; Without projector instructions
This programming trick can be used to speed up the execution of a subroutine which has a
purely text function by an amount equal to the time interval which would otherwise be required
to make the projector settings which are unnecessary in this case.
KODAK S-RA2500 Editing System 1.0 User Manual Page: 68
D-1 FRAME Editor program instructions
D-1.1 Projector instructions
SLIDE <adrNN> Example: SLIDE A12
Select stated slide location - apertures (slide lifter) open automatically.
SELECT <adrNN> Example: SELECT A12
Select stated slide location - apertures (slide lifter) remain closed.
OPEN <adr> Example: OPEN A
Closed apertures open as soon as address projectors are ready.
CLOSE <adr> Example: CLOSE A
Apertures close and cover the slide in the slide gate.
STEP <adr> Example: STEP A
Forward step - apertures open automatically after location is reached - slide 0 follows slide 80.
BACKSTEP <adr> Example: BACKSTEP A
Backward step - aperture function same as STEP - slide 80 follows 0.
LIGHT <adr> Example: LIGHT A
Switch on lamp(s) regardless of aperture..cp255
KODAK S-RA2500 Editing System 1.0 User Manual Page: 69
DARK <adr> Example: DARK A
Switch off lamp(s) regardless of aperture.
ALTERNATE <adr> Example: ALTERNATE AB
Reverse lamp state regardless of aperture.
FLASH <adr> <n> <t> Example: FLASH A 10 0.1
Lamps in the address projectors flash at a preselectable frequency for a definable number of
cycles, the final state of the lamps is the same as the initial state.
DISSOLVE <adr> Example: DISSOLVE AB
Reverse lamp states, projectors which are extinguished transport next slide into slide gate,
apertures open automatically.
WIPE <adr> <t> Example: WIPE A-D 0.1
The lamp state of a specified series of projectors is reversed with a selectable time delay: the
sequence of the projectors is the same as the sequence of the characters in the address specification.
KODAK S-RA2500 Editing System 1.0 User Manual Page: 70
D-1.2 Screen instructions
SHOW <name> Example: SHOW MYPICTUR
One block of text identified by name (8 characters) is displayed on the screen.
BLOW <name> Example: BLOW YOURPICT
One block of text identified by name is revealed from a vertical centre-line on the screen.
ERASE Example: ERASE
The screen is cleared and goes dark.
PRINT <name> Example: PRINT YOURPICT
One block of text identified by name is output on the printer.
POOL <name> Example: POOL HISPICTU
One block of text identified by name is transferred to a memory which can be printed out
collectively.
NEW Example: NEW
The content of POOL and COUNT is deleted.
DOCUMENT Example: DOCUMENT
The content of POOL is output on the printer.cp255
KODAK S-RA2500 Editing System 1.0 User Manual Page: 71
D-1.3 Logic instructions
WAIT <t> Example: WAIT 5.55
Delays the next program step by a time interval which can be selected in 0.01 s steps.
LABEL <name> Example: LABEL MYDESTIN
Sets a TO address (up to 8 characters) for instruction sequences which are to be used with
JUMP, KEY or RESPONSE
LOOP Example: LOOP
Defines the start of a loop for iteration.
REPEAT <n> Example: REPEAT 20
Repeats all instructions from the last LOOP marker with a preselectable number of cycles.
JUMP <name> Example: JUMP MYDESTIN
Continues the program from the specified TO address. The hardware context (projectors,
auxiliary units, etc.) is automatically saved.
RESPONSE <name1> <name2> Example: RESPONSE YES YOURDEST
Interrupts the program which is in progress and initiates a keyboard poll which must be terminated by pressing the enter key. RESPONSE instructions can be used in consecutive blocks.
A special TO address <name2> can be assigned to each user input defined in <name1>. The
program continues from <name2> if the answer is the same as <name1>.
KODAK S-RA2500 Editing System 1.0 User Manual Page: 72
Two keywords which can be assigned special functions are reserved for <name1>:
TIMEOUT: if the user’s answer is not received within the time defined in the TIMEOUT
instruction, the program continues from the specified TO address <name2>.
ILLEGAL: if the user enters something which is not anticipated, the program continues from
the specified TO address - without this statement, a flashing error message is displayed on the
text screen for roughly 1.5 s.
KEY <key> <name> Example: KEY 1 PROGRAM1
The program continues from the specified TO address if the key specified in <key> is pressed,
otherwise the next instruction after KEY is executed. If the question mark (?) is specified in
<key>, the program takes a branch after any key is pressed.
IDENT <name> Example: IDENT A:LIST
A sequence of characters entered by the user and terminated by [ENTER] is date and time
logged and added to the text file whose name was specified in <name>. Any number of text
files can be used in a program provided they have different names. The <name> details must
include a drive specification such as „A:“ and must not be longer than 8 characters. Extensions
are not permitted, the program automatically assigns these as „TXT“.
COUNT <n> <value> Example: COUNT 21-1
The value <value> is added to one of the 32 counters. <value> must be a positive or negative
integer. If <value> equals zero, the counter specified in <n> is reset to zero.
KODAK S-RA2500 Editing System 1.0 User Manual Page: 73
STORE Example: STORE
The instantaneous count in all 32 counters is stored in an ASCII text file under the name
COUNTER.DAT. This file contains 32 sequential entries which consist of the ASCII digit
sequence of the relevant counter terminated by a CR/LF sequence and a Ctrl-Z marker at the
end of the file. This makes the relevant counter values accessible for evaluation using other
programs. When the COUNTER.DAT file is encountered on the diskette when the user program is started, the counts stored in the file are automatically transferred to the corresponding
counters. Thus the counts which were valid just before the computer was switched off are
automatically set.
KODAK S-RA2500 Editing System 1.0 User Manual Page: 74
D-1.4 Auxiliary instructions
On <adr> Example: ON A-C E
The specified bit (A = bit0 to H = bit7) of the parallel interface defined in the Setup menu is set
to logical
.
OFF <adr> Example: OFF A-C
The specified bit of the parallel interface defined in the Setup menu is set to logical 0.
INVERT <adr> Example: INVERT AB
The specified bit of the parallel interface defined in the Setup menu is inverted.
D-1.5 Comments
Example: LIGHT A; PROJECTOR A LAMP SWITCHES ON
Comments which have no function other than to guide the user can be inserted in the program.
Such comment lines must only be inserted after valid instructions on a line and must be introduced by the character <;> or <*>.
KODAK S-RA2500 Editing System 1.0 User Manual Page: 75
D-2 FRAME Editor key functions
D-2.1 Assignment of function keys
[F1] Help/information
[F2] Projector status poll
[F3] Delete frame
[F4] Insert frame
[F5] Start program sequence
[F6] Hold program sequence
[F7] List program
[F8] Projector on-line operation on/off
[F9] Delete program
[F10] Projector display on/off
D-2.2 Assignment of edit keys
The cursor is moved around within the program text by means of the usual cursor control keys.
The following edit keys are also available:
[Enter] FRAME input/execute
[Home] Go to start of program
[End]Go to end of program
[Tab]Go to next TAB
[Shift]+[Tab] Go to previous TAB
[Ctrl]+[->]Go to next word
[Ctrl]+[<-] Go to previous word
[PgDn] Go to next LABEL
[PgUp] Go to previous LABEL
[Del]Delete character
[Ins]Insert blank character
KODAK S-RA2500 Editing System 1.0 User Manual Page: 76
D-3 SCREEN Editor function keys
D-3.1 Global functions
[F1] Help/information
[F2] Box mode/text mode changeover
[F3] Save block of text to disk
[F4] Load block of text from disk
[Ctrl]+[F8]Clear screen
D-3.2 Functions in box mode
[Ins]Anchor/release box
[Del]Set box
[F5]Flashing on/off
[F6]Box border single/double
[F7]Colour in box
[F8]Delete box
[F9]Change background colour
[F10]Change foreground colour
KODAK S-RA2500 Editing System 1.0 User Manual Page: 77
D-3.3 Functions in text mode
[Home]Go to first line
[End]Go to last line
[Shift]+[Tab]Go to previous tab