1
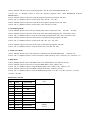
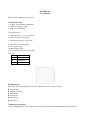
MATRIX 4*4 User Manual Please read the manual before operation. A. SPECIFICATION 1. Voltage: AC 100V-240V, 50Hz/60Hz 2. Power consumption: 155W 3. LED: 16*Tri-9W RGB 4. Beam angle: 55° 5. DMX channels: 2, 3, 5, 12, 24, 48CH 6. Operation mode: LCD display 7. Working temperature: -10℃~40℃ 8. Dimension: 340*340*105mm 9. Net weight: 6.5kgs 10. DMX linking: 30pcs 11. Power linking: 5pcs/110V, 11pcs/240V 12. Lumen: R 305lux@2m G 434lux@2m B 535lux@2m FULL 1160lux@2m B. OPERATION This fixture has six working modes, press the “MODE” button can switch the modes. Auto running Built-in programs DMX mode Master/slave Sound-active Static color 1. Built-in Programs Mode 1) Press “MODE” button to enter into built-in programs mode menu “RUN PROGRAM: 01SP:080 FS:000”; 2) Press “SETUP” button to enter operation programs select the menu “RUN PROGRAM: 01”; 3) Press “UP” or “DOWN” button to select the operation programs effect “RUN PROGRAM: 01-RUN PROGRAM:25”; 4) Press “SETUP” button to enter into setup the programs operation speed menu “SP: 080”; 5) Press “UP” or “DOWN” button to set the speed value “SP: 001 – SP: 100”; 6) Press “SETUP” button to enter into setup the strobe programs operation menu “FS: 000”; 7) Press “UP” or “DOWN” button to set the strobe value “FS: 000 - FS:100”; 2. Auto Running Mode 1) Press “MODE” button to enter into auto running mode menu “AUTO times: 001 SP: 080 FS: 000”; 2) Press “SETUP” button to enter into setup menu of the auto running programs time “AUTO times: 001”; 3) Press “UP” or “DOWN” button to set up the auto running programs time value “times: 001-times: 100”; 4) Press “SETUP” button to enter into speed menu of setup auto running programs “SP: 080”; 5) Press “UP” or “DOWN” button to set the speed value “SP:001 – SP: 100”; 6) Press “SETUP” button to enter into strobe menu of auto running programs “FS: 000”; 7) Press “UP” or “DOWN” button to setup the strobe value “FS: 000 - FS: 100”; 3. Sound-active Mode 1) Press “MODE” button to enter into sound-active running mode “SOUND TRIGGER sensitivity: 20”; 2) Press “UP” or “DOWN” button to set the sound-active mode sensitivity value “sensitivity: 00 – sensitivity: 31”; 4. DMX Mode 1) Press “MODE” button to enter into DMX mode menu “DMX address: 001 channel: 02 CHs”; 2) Press “SETUP” button to enter into to setup the DMX address value “address: 001”; 3) Press “UP” or “DOWN” button to setup the DMX address value “address: 001 – address: 512”; 4) Press “SETUP” button to enter into DMX working mode menu “channels: 02 CHs”; 5) Press “UP” or “DOWN” button to setup the DMX working mode: “02 CHs”, “03 CHs”,“05 CHs”, “12 CHs”, “24 CHs”, “48 CHs”; DMX Mode 1: 02 CHs CH1 NO. Value FUNCTION 1 0 2 1—7 R 3 8—15 RG 4 16—23 G 5 24—31 GB 6 32—39 B 7 40—47 RB 8 48—55 RGB 9 56—63 PROGRAM01 10 64—71 PROGRAM02 11 72—79 PROGRAM03 CH2 OFF -- SPEED 0—255 12 80—87 PROGRAM04 13 88—95 PROGRAM05 14 96—103 PROGRAM06 15 104—111 PROGRAM07 16 112—119 PROGRAM08 17 120—127 PROGRAM09 18 128--135 PROGRAM10 19 136—143 PROGRAM11 20 144—151 PROGRAM12 21 152—159 PROGRAM13 22 160—167 PROGRAM14 23 168—175 PROGRAM15 24 176—183 PROGRAM16 25 184—191 PROGRAM17 26 192—199 PROGRAM18 27 200--207 PROGRAM19 28 208—215 PROGRAM20 29 216—223 PROGRAM21 30 224—131 PROGRAM22 31 232—239 PROGRAM23 32 240—247 PROGRAM24 33 248—255 Sensitivity 0—255 SOUND DMX Mode 2: 03 CHs CH1 CH2 CH3 Red Green Blue DMX Mode 3: 05 CHs CH1 CH2 CH3 CH4 CH5 Red 0-255 Green 0-255 Blue 0-255 Dim 0-255 Flash 0-255 DMX Mode 4: 12 CHs CH1 CH2 CH3 CH4 CH5 CH6 Red 1 Green 1 Blue 1 Red 2 Green 2 Blue 2 CH7 CH8 CH9 CH10 CH11 CH12 Red 3 Green 3 Blue 3 Red 4 Green 4 Blue 4 DMX Mode 5: 24 CHs CH1 CH2 CH3 CH4 CH5 CH6 Red 1 Green 1 Blue 1 Red 2 Green 2 Blue 2 CH7 CH8 CH9 CH10 CH11 CH12 Red 3 Green 3 Blue 3 Red 4 Green 4 Blue 4 CH13 CH14 CH15 CH16 CH17 CH18 Red 5 Green 5 Blue 5 Red 6 Green 6 Blue 6 CH19 CH20 CH21 CH22 CH23 CH24 Red 7 Green 7 Blue 7 Red 8 Green 8 Blue 8 DMX Mode 6:48 CHs CH1 CH2 CH3 CH4 CH5 CH6 Red 1 Green 1 Blue 1 Red 2 Green 2 Blue 2 CH7 CH8 CH9 CH10 CH11 CH12 Red 3 Green 3 Blue 3 Red 4 Green 4 Blue 4 CH13 CH14 CH15 CH16 CH17 CH18 Red 5 Green 5 Blue 5 Red 6 Green 6 Blue 6 CH19 CH20 CH21 CH22 CH23 CH24 Red 7 Green 7 Blue 7 Red 8 Green 8 Blue 8 CH25 CH26 CH27 CH28 CH29 CH30 Red 9 Green 9 Blue 9 Red 10 Green 10 Blue 10 CH31 CH32 CH33 CH34 CH35 CH36 Red 11 Green 11 Blue 11 Red 12 Green 12 Blue 12 CH37 CH38 CH39 CH40 CH41 CH42 Red 13 Green 13 Blue 13 Red 14 Green 14 Blue 14 CH43 CH44 CH45 CH46 CH47 CH48 Red 15 Green 15 Blue 15 Red 16 Green 16 Blue 16 5. Master/slave Mode Press “MODE” button to enter into master/slave mode “SLAVE MODE= = = = = = = = =”. 6. Static Color 1) Press “MODE” button to enter into static color mode “STATIC COLOR R255 G255 B255 ”; 2) Press “SETUP” button, enter into red brightness settings menu “R255”; 3) Press “UP” or “DOWN” button to set the red brightness “R000 - R255”; 4) Press “SETUP” button, enter into the green brightness settings menu “G255”; 5) Press “UP” or “DOWN” button to set the green brightness “G000 - G255”; 6) Press “SETUP” button to enter into red brightness settings menu “B255”; 7) Press “UP” or “DOWN” to set the red brightness “B000 - B255”; NOTE: The LCD display will be darkened (no display)if there is no button operation in 20 seconds. The LCD display will show the current state if pressing any buttons and you could adjust the working mode. 12CHs 1 2 3 4 24CHs 1 2 3 4 1 2 3 4 5 6 7 8 5 6 7 8 1 2 3 4 5 6 7 8 9 10 11 12 13 14 15 16 48CHs