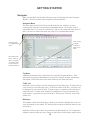
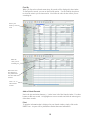
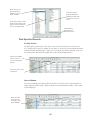
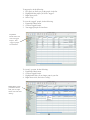
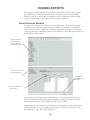
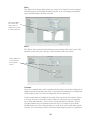
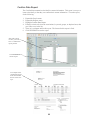
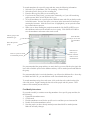
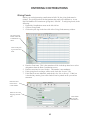
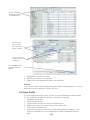
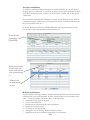
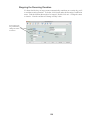
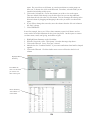
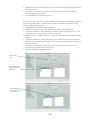
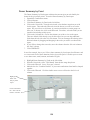
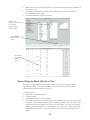
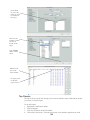
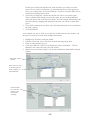
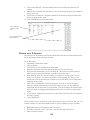
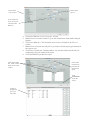
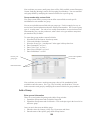
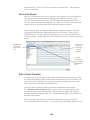
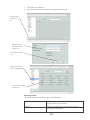
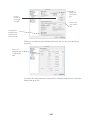
1
������������
�����������
Table of Contents
INSTALLING ROLL CALL
Single User Installation ..............................................................................................................10
Mac users from the CD .........................................................................................................10
Windows users from the CD .................................................................................................10
Network Installation? .................................................................................................................10
Installing the Server ...............................................................................................................10
Installing the Client ................................................................................................................11
Single User System ................................................................................................................11
Network Multi-User System ..................................................................................................12
Single User System ................................................................................................................13
Network Multi-User System ..................................................................................................13
GETTING STARTED
Navigator....�
15
Navigator Menu .....................................................................................................................15
Top Menu ...............................................................................................................................15
To Do List ..............................................................................................................................15
Birthdays �
15
Visitors ...�
16
Icons ...........�
17
Search/Summary Screens...........................................................................................................18
Customize ..............................................................................................................................18
Find By ..�
19
Add or Delete Records ...........................................................................................................19
Print ........�
19
Organization Info .......................................................................................................................20
License Number .........................................................................................................................20
Preferences .�
20
MAINTAINING PEOPLE INFORMATION
Import People Information.........................................................................................................23
One Row per Family (standard) .............................................................................................23
One Row per Family (custom)...............................................................................................24
One Row per Person (standard) .............................................................................................24
One Row per Person (custom) ...............................................................................................24
Import Process .......................................................................................................................24
Enter a new Family ....................................................................................................................26
Contact Information ...............................................................................................................27
Address ..�
27
Pictures...�
28
Phones ....�
29
Custom Fields ........................................................................................................................30
Dates ......�
31
Groups ....�
31
Key Words..............................................................................................................................32
Visits ......�
33
Comments ..............................................................................................................................34
Background Check .................................................................................................................35
Add the Next Family Member ...............................................................................................37
Modify Family Relationships ....................................................................................................37
Marriage .�
38
Divorce...�
41
Change HOF ..........................................................................................................................42
Death ......�
42
Background Checks ...................................................................................................................44
Enter the Request & Results ..................................................................................................44
Find/Research Background Checks .......................................................................................46
Visitations ..�
46
Enter Visitations .....................................................................................................................46
Find/Research Visitations ......................................................................................................47
Confidential Comments .............................................................................................................48
Enter Confidential Comments ................................................................................................48
Find/Research Confidential Comments .................................................................................49
FINDING PEOPLE
Search Profile Window ..............................................................................................................50
Icon Bar..�
50
Find By ..�
50
Results ....�
51
Add/Delete .............................................................................................................................51
Customize Search Window ........................................................................................................51
Find Specific Records ................................................................................................................52
Find By Criteria .....................................................................................................................52
Search Window ......................................................................................................................52
Query Editor...........................................................................................................................53
Tag People ..�
54
RUNNING REPORTS
Report Selection Window ..........................................................................................................56
Criteria ...�
57
Who ........�
57
What .......�
58
When ......�
58
View Records .........................................................................................................................59
Run the Report .......................................................................................................................59
Report Output Window ..............................................................................................................59
REPORTING ON PEOPLE
Report Window ..........................................................................................................................61
Envelope Number Report ..........................................................................................................63
Family Report ............................................................................................................................64
Birthday Report..........................................................................................................................65
Anniversary Report ....................................................................................................................66
Significant Dates ........................................................................................................................67
Confirm Data Report ..................................................................................................................69
Uninvolved Families Report ......................................................................................................70
Background Check Report .........................................................................................................71
Visitation Log.............................................................................................................................72
Visitation History .......................................................................................................................73
My Reports.�
74
RECORDING ATTENDANCE
Worship Attendance ...................................................................................................................76
Create Service ........................................................................................................................76
Record Attendance .................................................................................................................77
Find/Modify Attendance ........................................................................................................79
Group Attendance ......................................................................................................................79
Create Group ..............................................................................................................................79
Record Attendance .................................................................................................................80
Find/Modify Attendance ........................................................................................................81
Attendance Reports ....................................................................................................................82
Attendance Summary .............................................................................................................82
Attendance by Person ............................................................................................................84
Attendance by Type ...............................................................................................................88
Attendance by Session ...........................................................................................................89
Absent Present Report............................................................................................................90
Visitor Report .........................................................................................................................92
ENTERING CONTRIBUTIONS
Giving Funds..............................................................................................................................93
Batches .......�
94
Check/Cash Contributions .........................................................................................................95
Basic.......�
95
Split ........�
97
Connect to Pledge ..................................................................................................................97
Quid Pro Quo .........................................................................................................................98
Non-Cash/Property Gift Contributions ......................................................................................99
Donation Type ........................................................................................................................99
In Kind tab ...........................................................................................................................100
Non-Cash screen ..................................................................................................................101
Check Reader ...........................................................................................................................101
Import Contributions................................................................................................................102
Post a Batch..............................................................................................................................103
Import deposit to QB or MYOB ..............................................................................................104
Batch Reports ...........................................................................................................................104
Deposit Slip..............................................................................................................................105
LOOKING UP CONTRIBUTIONS
Search by Person ......................................................................................................................106
Find By �
106
Query Editor.........................................................................................................................107
Results ..�
107
Search by Batch .......................................................................................................................109
Find By �
109
Query Editor.........................................................................................................................109
Results ..�
110
In People Profile.......................................................................................................................110
MODIFYING CONTRIBUTIONS
Open Batches ...........................................................................................................................116
Add Contributions to Existing Batch ...................................................................................116
Correct a Contribution .........................................................................................................116
Posted Batches .........................................................................................................................117
Reverse the Batch ................................................................................................................117
Correct the Contribution ......................................................................................................118
Re-post the Batch .................................................................................................................118
Transfer Contributions .............................................................................................................118
A single contributions ..........................................................................................................119
Multiple contributions..........................................................................................................119
Delete Contributions ................................................................................................................120
RECURRING DONATIONS
Recurring Donation Process ....................................................................................................122
Recurring Donation Preferences ..............................................................................................122
Defaults �
122
Email notification .................................................................................................................122
Import Recurring Donation Profiles ........................................................................................123
Find By �
124
Query....�
124
Create Recurring Donation Profile...........................................................................................125
Posting the Recurring Donations .............................................................................................126
Automatically.......................................................................................................................126
Manual .�
127
Recurring Donation Log ..........................................................................................................127
Stopping the Recurring Donation ............................................................................................128
CREATING CONTRIBUTION RECEIPTS (STATEMENTS)
Contribution Receipt Process...................................................................................................129
Contribution Statement Formats ..............................................................................................129
Quarterly ..............................................................................................................................129
Quarterly Tabular .................................................................................................................130
Annual ..�
130
Canadian ..............................................................................................................................131
Individual Gift......................................................................................................................131
Quarterly Statements................................................................................................................132
Criteria .�
132
Text .....�
133
View People ........................................................................................................................135
Printing/emailing your receipt .............................................................................................135
Quarterly Tabular Statements...................................................................................................136
Criteria .�
136
Text .....�
136
View People ........................................................................................................................136
Printing your receipt ............................................................................................................136
Annual Statements ...................................................................................................................137
Criteria .�
137
Text .....�
138
View People ........................................................................................................................139
Printing/emailing your receipt .............................................................................................139
Canadian Receipts....................................................................................................................140
Printing Canadian receipts ...................................................................................................140
Select Period .......................................................................................................................140
Print options .........................................................................................................................140
Sort options ..........................................................................................................................141
Reprint Options ....................................................................................................................141
Data for the receipt...............................................................................................................141
Individual Gifts ........................................................................................................................141
Criteria .�
141
Text .....�
142
View People ........................................................................................................................143
Printing/emailing your receipt .............................................................................................144
Statement for a Specific Person ...............................................................................................144
Criteria .�
144
Text .....�
145
Printing/emailing your receipt .............................................................................................146
Email Receipts .........................................................................................................................147
Install the Print Driver .........................................................................................................147
My Email .............................................................................................................................147
Set Email Setting in Profiles ................................................................................................148
Email Receipts .....................................................................................................................148
Married Couples filing Individually.........................................................................................149
CREATING CONTRIBUTION REPORTS
Donor Detail Report.................................................................................................................150
Donor Summary Report ...........................................................................................................153
Donor Summary by Fund.........................................................................................................156
Donor Giving by Week, Month or Year ...................................................................................157
Top Donors...............................................................................................................................160
Donors over X Amount ............................................................................................................162
Given X Times .........................................................................................................................164
Given 0 Times ..........................................................................................................................165
Fund Summary .........................................................................................................................167
Fund Giving by Week, Month or Year .....................................................................................168
Contribution Detail ..................................................................................................................170
Contribution Statistics..............................................................................................................172
MAINTAIN PLEDGES
Pledge Fund .............................................................................................................................175
Individual Pledges....................................................................................................................175
Finding Pledges........................................................................................................................176
Modify Pledge Information......................................................................................................177
Changing the pledge information.........................................................................................177
Deleting a pledge fund .........................................................................................................178
Deleting pledges...................................................................................................................179
Pledge Progress Letter .............................................................................................................179
Formatting options ...............................................................................................................179
Enter the text portions of the letter ......................................................................................180
Pledge Reports .........................................................................................................................181
Criteria section .....................................................................................................................181
Output window.....................................................................................................................181
Pledge Status report .............................................................................................................182
Pledge Comparison report....................................................................................................182
Pledge Fund Comparison report ..........................................................................................183
MANAGING GROUPS
Group Hierarchy ......................................................................................................................185
Group Custom Fields ...............................................................................................................185
Group custom fields .............................................................................................................185
Group membership custom fields ........................................................................................186
Add a Group.............................................................................................................................186
Enter general information ....................................................................................................186
Add Members.......................................................................................................................187
Create sessions .....................................................................................................................188
Enter values for group custom information .........................................................................188
Preferences ...........................................................................................................................189
Copy a Group ...........................................................................................................................189
Mass Enrollment ......................................................................................................................190
Transfer members to a new group............................................................................................192
Graduation�
193
Graduation Profile ................................................................................................................193
On Birthday..........................................................................................................................193
Graduate Now ......................................................................................................................194
Modify Group Information ......................................................................................................195
Delete Groups ..........................................................................................................................195
Group Reports
Attendance Summary ........................................................................................................................ 197
Absent Present Report..............................................................................................................199
Background Checks for Groups ...............................................................................................210
Duplicate Class Enrollment .....................................................................................................211
Group Involvement ..................................................................................................................212
Group Picture Directory ...........................................................................................................215
CORRESPONDING WITH YOUR CONGREGATION
Determine your Audience ........................................................................................................216
People...�
216
Donors ..�
216
Pledgers �
218
Group Members ...................................................................................................................219
Attenders ..............................................................................................................................219
Letters ......�
220
Addressing Options..............................................................................................................221
Word Processor ....................................................................................................................221
Insert Data ............................................................................................................................222
Templates .............................................................................................................................222
Email ........�
223
My Email .............................................................................................................................223
Compose Email ....................................................................................................................224
Log .......�
225
Text ..........�
226
My Email .............................................................................................................................226
Phone information................................................................................................................227
Sending the Text...................................................................................................................227
Labels .......�
228
Criteria .�
228
Options .�
229
Customize ............................................................................................................................229
View People .........................................................................................................................230
Envelopes .�
230
PRINTING DIRECTORIES
Classic Directory......................................................................................................................232
Standard Directory ...................................................................................................................233
Group Directory .......................................................................................................................238
Group Picture Directory ...........................................................................................................240
USING THE QUERY EDITOR
Query Editor uses.....................................................................................................................241
Table Layouts ...........................................................................................................................241
Address �
241
People...�
241
Donations .............................................................................................................................241
Designation ..........................................................................................................................241
Non-Cast Gift .......................................................................................................................241
Recurring Donation..............................................................................................................241
Pledge...�
242
Groups ..�
242
Group Members ...................................................................................................................242
Sessions �
242
Attendance Summary ...........................................................................................................242
Attendance ...........................................................................................................................242
Current selection ......................................................................................................................243
Basic Query..............................................................................................................................243
Multiple criteria query .........................................................................................................244
Associations query ...............................................................................................................245
Groups query........................................................................................................................245
An either/or criteria ..............................................................................................................246
Date range criteria ................................................................................................................246
Complex Queries .....................................................................................................................248
Association plus other criteria .............................................................................................248
Query with a combination of AND and OR........................................................................250
Query using Except ..............................................................................................................251
AND, OR and EXCEPT..........................................................................................................253
Save a Query ...........................................................................................................................253
Special Query ...........................................................................................................................253
Change Selection to Mothers ...............................................................................................254
Change Selection to Fathers.................................................................................................254
Change Selection to Adult and all Children.........................................................................254
Find Single Parents ..............................................................................................................254
Find Keywords .....................................................................................................................254
Find possible blended families.............................................................................................254
Find people with picture ......................................................................................................254
Find families with a picture .................................................................................................254
Find possible uninvolved families .......................................................................................255
CREATING CUSTOM REPORTS
Create a custom report .............................................................................................................256
Base Table �
257
Data for the Report...................................................................................................................257
Select columns for the report ...................................................................................................257
Calculated columns ..................................................................................................................258
Equations..............................................................................................................................259
NUM function ......................................................................................................................259
Roll Call functions ...............................................................................................................260
Summary Information ..............................................................................................................260
Sort the Report .........................................................................................................................261
Titles.....�
261
Hide details ..........................................................................................................................262
rint the Report ..........................................................................................................................263
Re-use the Report.....................................................................................................................264
Edit a Saved Template..............................................................................................................264
CREATING CUSTOM LABELS
What People .............................................................................................................................265
Place the Fields on the Label ...................................................................................................266
Static text .�
267
Change Label Format and Size ................................................................................................267
Re-use the Label Template .......................................................................................................268
Modify a Label Template .........................................................................................................268
CLEANING UP THE DATA – DATA ADMINISTRATION
List of Valid Values ..................................................................................................................269
Duplicate Check .......................................................................................................................269
Bulk Changes ...........................................................................................................................270
MAINTAINING THE DATABASE
Data File Location....................................................................................................................272
User Security............................................................................................................................272
Activate Security..................................................................................................................272
Preferences ...........................................................................................................................273
Create New User ..................................................................................................................273
Security Levels.....................................................................................................................274
Locked User .........................................................................................................................276
Backup on single user system ..................................................................................................277
Recover the database................................................................................................................277
From within Roll Call ..........................................................................................................277
From the operating system ...................................................................................................278
Backup a networked system.....................................................................................................279
Recover database from a backup on a network system ...........................................................281
Open a Different Datafile .................................................................................................................... 28
Compact the data file........................................................................................... 282
Single user system ...............................................................................................................282
Roll Call Server....................................................................................................................282
Repair my data file ...................................................................................................................283
APPENDIX A - TABLE LAYOUTS
INSTALLING ROLL CALL
Single User Installation
The single user version of Roll Call allows one user, on one computer to access Roll Call.
For the single user installation, use the following instructions.
Mac users from the CD
To install Roll Call from the CD, simply place the CD in your CD drive. A By the Book
disk image will be displayed on your desktop. Double click on that image. There will be
three Roll Call files: 1)Roll Call 2)Roll Call Client and 3)Roll Call Server. Double click
on the Roll Call file. The install program will prompt you through the process. Click on
the NEXT button to continue through each step of the process.
Windows users from the CD
To install Roll Call from the CD, simply place the CD in your CD drive. There will be
three Roll Call installation files: 1)Roll Call 2)Roll Call Client and 3)Roll Call Server.
Double click on the Roll Call file. The install program will prompt you through the
process. Click on the NEXT button to continue through each step of the process.
Once the installation is complete, you will have a Roll Call icon on your desktop. To use
Roll Call, double click on that icon.
From the download file
To install Roll Call from the downloaded file, double click on the Roll Call installer file
you downloaded. The install program will prompt you through the process. Click on the
NEXT button to continue through each step of the process.
Once the installation is complete, you will have a Roll Call icon on your desktop. To use
Roll Call, double click on that icon.
Network Installation?
A network installation of Roll Call allows multiple people to access the data. If you have
a multi-user license, multiple users can access the data simultaneously. For example, if
you have purchased a 3 user license, 3 users may access the database at the same time. If
you have purchased a single user license, you may still install the network version, but
only one person may access the data at a time.
First you must decide which computer will house the database. That computer will be
your server. The computer you choose as your server should not be used for many other
applications. For example, if your secretary’s computer is used for creating the bulletin,
writing letters and accounting, you probably wouldn’t want her computer to be your Roll
Call Server. Since the server needs to be running at all times, it would slow down her
other work.
Next decide who will need to use Roll Call. Each of those users will need Roll Call
Client installed on their computer.
Installing the Server
To install Roll Call Server from the CD, simply place the CD in your CD drive. For
Windows users there will be three Roll Call files: 1)Roll Call 2)Roll Call Client and
3)Roll Call Server. For Mac users the By the Book disk image will be displayed on your
10
desktop. Double click on that image. Next, double click on the Roll Call Server file.
The install program will prompt you through the process. Click on the NEXT button to
continue through each step of the process.
To install Roll Call Server from the downloaded file, double click on the Roll Call Server
installation file. The install program will prompt you through the process. Click on the
NEXT button to continue through each step of the process.
Once the installation is complete, there will be a Roll Call Server icon on the desktop. To
start Roll Call Server, double click on the icon. The Roll Call Server window will be
displayed. For users to work in Roll Call the Server must be running.
Installing the Client
To install Roll Call Client from the CD, simply place the CD in your CD drive. For
Windows users there will be three Roll Call files: 1)Roll Call 2)Roll Call Client and
3)Roll Call Server. For Mac users, a By the Book disk image will be displayed on the
desktop. Double click on that image. Next, double click on the Roll Call Client file.
The install program will prompt you through the process. Click on the NEXT button to
continue through each step of the process.
To install Roll Call Client from the downloaded file, double click on the Roll Call Client
installation file. The install program will prompt you through the process. Click on the
NEXT button to continue through each step of the process.
Once the installation is complete, there will be a Roll Call Client icon on the desktop. To
start Roll Call, double click on the icon. If this is the first time this client has connected
to the Roll Call Server, you may get a -1002 error. If this happens, just click through the
message. Then you will get a window that has 3 tabs: Recent, Available and Custom.
Click on the Available tab. You should see Roll Call listed there. Highlight it and click
OPEN.
Upgrade from version 10.0.18 or later
Single User System
Before upgrading your Roll Call system, make sure you have a backup of your data files.
To create a back up:
1. Determine the location of your data file by selecting Help>About Roll Call
from the main menu. Look under the Data file Location and note the path and
name of the file. For example C:\Program Files\BytheBook\RollCall8\Data\
yourdatafile.4dd
2. Close the Roll Call program
3. Copy your data file to a different location such as a CD or memory stick. On
Mac, your data file may be one file ending in *.data or it may be two files, one
ending in *.4dd and the other *.4dr.
Next, install version 11 from the CD or from the download file. Once version 11 is
installed, your data needs to be converted to the new version. . When you are ready to
convert, copy your backup data file to the following location:
Windows C:\BytheBook\RollCall\Database
Mac HD:Applications\RollCall\
11
To begin the conversion, connect Roll Call version 11 to your data file. Double click
on the Roll Call v11 icon, then hold down the ALT/OPTION key. Choose the option for
opening a different data file. A data dialog box will be displayed. Navigate to your data
file (from the previous step), highlight the file, and press OPEN. Once the conversion
process is complete, you will be at the version 11 main menu.
Next you’ll need to enter your new license number. From the main Roll Call screen, go
to File>Enter License. Type in the license number found in the upper right corner of
your invoice, press the tab key. The number of users and people records allowed will be
displayed.
Once you review your data and everything looks fine, uninstall your earlier version of
Roll Call.
Network Multi-User System
Before upgrading your Roll Call system, make sure you have a backup of your data files.
To create a back up:
1. Determine the location of your data file by selecting Help>About Roll Call from
the main menu. Look under the Data file Location and note the path and name
of the file. For example C:\Program Files\BytheBook\RollCall_Server\Data\
yourdatafile.4dd
2. Close the Roll Call program
3. Copy your data file to a different location such as a CD or memory stick. On
Windows, your data file has an extension of 4dd. On Mac, your data file will have
an extention of *.data or *.4dd depending on your version.
Next, install Roll Call Server version 11 from the CD or from the server download file.
Next install Roll Call Client on each of the workstations that need to access Roll Call.
Roll Call Client needs to be upgraded with this new version.
Once version 11 is installed, your data needs to be converted to the new version. When
you are ready to convert, copy your backup data file to the following location on your
server:
Windows C:\BytheBook\RollCall_Server\
Mac HD:Applications\RollCall Server\
Next, connect Roll Call Server version 11 to your data file. Double click on the Roll
Call Server icon, then immediately press the ALT key. Choose the option for opening a
different data file. A data dialog box will be displayed. Navigate to your data file (from
the previous step), highlight the file, and press OPEN. Next, start Roll Call Client from a
workstation and connect to Roll Call. This will begin the conversion process.
Next you’ll need to enter your new license number. From the main Roll Call screen, go
to File>Enter License. Type in the license number found in the upper right corner of
your invoice, press the tab key. The number of users and people records allowed will be
displayed.
12
Upgrade from version 10.0.17 or earlier
Single User System
Before upgrading your Roll Call system, make sure you have a backup of your data files.
To create a back up:
1. Determine the location of your data file by selecting Help>About Roll Call
from the main menu. Look under the Data file Location and note the path and
name of the file. For example C:\Program Files\BytheBook\RollCall8\Data\
yourdatafile.4dd
2. Close the Roll Call program
3. Copy your data file to a different location such as a CD or memory stick. On
Mac, your data file may be one file ending in *.data or it may be two files, one
ending in *.4dd and the other *.4dr.
Next, install version 11 from the CD or from the download file. Once version 11 is
installed, your data needs to be converted to the new version. . When you are ready to
convert, copy your backup data file to the following location:
Windows C:\BytheBook\RollCall\Database
Mac HD:Applications\RollCall\
If you had imported pictures into Roll Call, you’ll also need to move all the images from
the old image folder to the new image folder:
Windows C:\BytheBook\RollCall\Images\
Mac HD:Applications\RollCall\Images
To begin the conversion, connect Roll Call version 11 to your data file. Double click
on the Roll Call v10 icon, then hold down the ALT/OPTION key. Choose the option for
opening a different data file. A data dialog box will be displayed. Navigate to your data
file (from the previous step), highlight the file, and press OPEN. Once the conversion
process is complete, you will be at the version 11 main menu.
Next you’ll need to enter your new license number. From the main Roll Call screen, go
to File>Enter License. Type in the license number found in the upper right corner of
your invoice, press the tab key. The number of users and people records allowed will be
displayed.
Once you review your data and everything looks fine, uninstall your earlier version of
Roll Call.
Network Multi-User System
Before upgrading your Roll Call system, make sure you have a backup of your data files.
To create a back up:
1. Determine the location of your data file by selecting Help>About Roll Call from
the main menu. Look under the Data file Location and note the path and name
of the file. For example C:\Program Files\BytheBook\RollCall_Server\Data\
yourdatafile.4dd
2. Close the Roll Call program
13
3. Copy your data file to a different location such as a CD or memory stick. On
Windows, your data file has an extension of 4dd. On Mac, your data file will have
an extention of *.data or *.4dd depending on your version.
Next, install Roll Call Server version 11 from the CD or from the server download file.
Next install Roll Call Client on each of the workstations that need to access Roll Call.
Roll Call Client needs to be upgraded with this new version.
Once version 11 is installed, your data needs to be converted to the new version. When
you are ready to convert, copy your backup data file to the following location on your
server:
Windows C:\BytheBook\RollCall_Server\
Mac HD:Applications\RollCall Server\
If you have pictures in Roll Call, you’ll need to move all the images from the old image
folder to the new image folder:
Windows C:\BytheBook\RollCall_Server\Images\
Mac HD:Applications\RollCall_Server\Images
Next, connect Roll Call Server version 11 to your data file. Double click on the Roll
Call Server icon, then immediately press the ALT key. Choose the option for opening a
different data file. A data dialog box will be displayed. Navigate to your data file (from
the previous step), highlight the file, and press OPEN. Next, start Roll Call Client from a
workstation and connect to Roll Call. This will begin the conversion process.
Next you’ll need to enter your new license number. From the main Roll Call screen, go
to File>Enter License. Type in the license number found in the upper right corner of
your invoice, press the tab key. The number of users and people records allowed will be
displayed.
14
GETTING STARTED
Navigator
When you start Roll Call, the Roll Call home screen will be displayed in the Navigator.
Window. The main sections of the navigator are discussed below:
Navigator Menu
The main menu items for Roll Call are found on the left side. If there is an arrow,
pointing to the right, there are sub menus underneath that item. Click on the arrow to
expand that menu. If an arrow is pointed down, click on it to collapse the menu items. If
there is no arrow in front of the menu item, click on it, to perform that function.
Click on plus
or minus
to add and
delete to-do
items.
Note top menu
for administrative
items.
Note main menu
items. Click on
arrow to expand
or collapse items.
Click on item to
perform function.
Top Menu
Additional menu items can be found across the top of the Navigator Window. These
menu items are typically administrative type items, for example, backups, maintenance,
and imports. Click on the name of the menu, then move the mouse and select.
To Do List
Each Roll Call user will have a To-Do list displayed on the Home page. To add an item to
your To-Do list, click on the plus sign (+) in the lower corner of the area. A window will
be displayed for you to enter the task. To mark an item as completed, click on the box in
front of the item. To delete items from the list, highlight one or more items, then click
on the minus (-) sign in the lower part of the area. To print your To-Do list, click on the
printer icon.
Birthdays
The birthday section of the Home page will show you who has a birthday this week, next
week, this month, or next month. Use the drop down to choose which time frame you are
interested in.
Each Roll Call user, can set their own preferences for this birthday list. For example, the
children’s ministry leader may only want to see kids who are in the Sunday school classes
15
in her list. While a deacon, who is the shepherd for several families, would only want to
see the birthdays for the people he is responsible for. To set this preference, click on the
Pref icon underneath the birthday area.
Print the birthdays.
Set preferences for which
people you want
in the list.
Choose the time
frame for birthday
list.
To print the birthdays, click the print icon underneath the birthday section. The
information displayed in this report is based on what is selected for the birthday report.
See the chapter on Reporting on People.
Visitors
The visitor section outlines anyone with an association of “Visitor”, who attended or gave
last week. To set the preferences for which attendance or contributions to consider, click
on the Preferences icon in the lower right corner.
Click preferences to
choose what
activity to
consider.
Choose activity
date.
Church Logo
If you would like to display your church logo on the Home page instead of the Roll Call
logo, select File>Import Logo from the top menu. A “look in” window will be displayed.
Navigate to your image file and open it. For the best network performance, this should be
a small file.
16
Icons
There is a standard set of icons you will see on each main Roll Call screen. They allow
you to perform many common functions such as printing, querying, saving a set, etc.
These icons are listed below
The printer icon allows you to print the list that is displayed on your
screen. For example, if you were in the people search screen you would
get a list of all the people that are in your current list.
The email icon allows you to send an email or text all the people in the
current list.
The write a letter icon allows you write a mail merge letter to the people
in the current list. If you are in an individual’s record, you can write a
letter to them.
The label icon allows you to print mailing labels (Avery 8160) for the
people in your list.
The spreadsheet icon allows you to put the information displayed on
your screen in a spreadsheet program.
The show all icon displays all records when pressed.
The sort records icon allows you to sort the information in your list by
any of the fields in your list.
The search records icon allows you to perform a query of the database.
The special search icon allows you to perform a predefined query, like
finding the heads of the families listed.
The compare sets icon allows you to perform a comparison of two results
sets. For example, who are my donors that are also in a small group.
The save set icon allows you to save the results of a query.
The get set icon allows you to retrieve the results of a previously saved
set.
The subset icon allows you reduce your list to only those records that are
highlighted.
17
The preference icon allows you to set user specific criteria based on the
window you are currently in. From the search windows, the preference
icon will allow you to choose which columns to display.
Search/Summary Screens
Each of the main functional areas of Roll Call will have a Search menu item. These
Search or Summary screens can be used to find records, correspond with people and add
new records.
Customize
Each Roll Call user can choose which fields they’d like displayed on a Search screen. To
select the columns, do the following:
1. Click on the Search menu item for the area you are interested in.
2. Click on the Preferences icon.
3. Move the columns you’d like displayed from the left side to the right side. You can
either drag and drop, double click or highlight the field and click the arrow to the
right.
4. To modify the ordering of these columns, drag the field name to the position in the
list.
Highlight
the Search
menu item
Click the
Prefs icon
Click on the arrow
to view all the
people fields.
Drag the columns
and place in the order you’d like to see
them on the screen.
Drag a field from
the left to the
right to include
it on the search
screen
18
Find By
When you first select a Search menu item, all records will be displayed in the window.
To find specific records, you can use the Find By option. Use the Find By drop down
to select the criteria you are interested in. Next enter the value for the criteria you are
searching for.
Select your
Find by criteria
Enter the
value you are
searching for
Notice the selection changes to
only folks with a
last name that starts
with Co
Click + or - to
add or delete
records
Add or Delete Records
Notice the plus and minus buttons (+/-) in the lower left of the Search window. Use these
buttons to add new records. Or highlight one or more records and click the minus sign to
delete those records.
Print
To print the information that is displayed in your Search window, simply click on the
PRINT icon. A report will be printed that contains that same information.
19
Organization Info
When you first begin using Roll Call, you will want to set up your Church or Ministry
information. To do this, click Organization from the Navigator menu on the left. Enter the
following information:
1.
2.
3.
4.
5.
6.
7.
8.
9.
10.
11.
Organization Name – Enter the name of the church or organization
Main Address – Enter the street address for the church or organization
City – Enter the city where the church or organization is located
State – Enter the state where the church or organization is located
Zip Code – Enter the postal code for the church or organization
Country – If not in the US, enter your country here
Tax ID – Enter your tax id. This is used on Canadian donation receipts.
Main Phone – Enter the main telephone number for the church
Main Fax – Enter the fax number for the church
Website – Enter the web address for the organization
Current Fiscal Year – Enter the starting date of the current fiscal year
Enter your church
informaiton. This
will be the return
address on year
end receipts.
Make sure to click
SAVE before you
navigate to other
menu items.
License Number
When you purchase Roll Call, you will be given a License Number. You will need to
enter that number into Roll Call. To do that select File>Enter License from the top menu.
Enter your number and press the tab key. The number of users and number of allowed
records will be filled in for you. Click OK to save the number.
Preferences
The preferences area allows you to define certain characteristics of Roll Call functionality.
For example, do you require multi-campus functionality, do you wish to default the
address to the same city, state and zip as the church, etc. To modify the preferences, go to
the top menu and select Edit>Preferences (on Windows) or select RollCall>Preferences
(on Mac).
People Preferences
The following informaiton can be set under the People tab of the Preferences screen.
1. Optional Mailing Name Autofill - Mark yes if you would like the first and last name of
the person to be automatically filled into the Optional Mailing Name field.
2. Last Comm Date - Choose which name you’d like for the date field underneath
Wedding date.
3. Family Numbers - Mark if you’d like family numbers to be autmatically or manually
generated.
20
4. Family Position - Mark at what ages children should change from Child to Youth and
from Youth to Adult. Do you want the system to automatically change this position on
their birthdate?
5. Security Clearance Level - Mark if you’d like to use this field.
6. Multiple Campus - Does your church have multiple campuses? If so mark yes here to
add a campus field to the people nnd group screen.
7. Custom Fields - Use the custom tab under the People tab to define the field, checkbox
and date custom field names. These field names will be used in the People screen under
the custom tab.
Choose the options that apply to
your church.
Click on Custom
to define the
People custom
field.
Address Preferences
The following informaiton can be set under the Address tab of the Preferences screen.
1. Default Address - Mark if you would like tthe city, state or zip from the church
address to be the default city, state and zip for the people you enter into the system.
2. Country - Mark if you’d like to display a country field in the People screen.
3. Web Maps - If you’d like to use a different web map, enter the URL and syntax
required.
Mark if you want to
use a default city,
statte and zip.
Mark if you’d like to have
acountry field displayed.
Contribution Preferences
The following informaiton can be set under the Contribution tab of the Preferences screen.
1. Default Designation - Enter the default fund name for entering contributions.
2. Pledges - Select which pledges you’d like to see on the donation entry screen.
3. Connect Pledges - Indicate if you want to connect contributions to incomplete pledges
or just the current pledge/
4. Print Receipt - Indicate if you’d like to print a donation receipt immediately after
entering a contribution.
21
Enter your default
fund name.
Indicate how you’d like
to handle pledges.
Attendance Preferences
Under attendance preferences you can select the default information that will be included
on the bar code badges used for child check in.
Group Custom and Member Custom Preferences
The group custom and member custom preferences allow you to set up templates for
certain group types. For example if you have a group type of “small group” and you want
to set up custom fields for every group that is a small group, use these fields.
In our small group example, let’s say we want to track what they are studying and if they
are accepting new members. These fields are considered group custom fields beczuse
that is information about the group as a whole. If we also want to track for every member
of a small group, their Tshirt size and Bible Knowlege Level, these would be considered
member custom fields.
Select the Group Type
that you are creating the
template for.
Enter the field names you
want for each of your
“small groups”.
Enter the custom field
names you want for
each of your small
group members.
22
MAINTAINING PEOPLE INFORMATION
Import People Information
When you begin using Roll Call, you may wish to import your existing contacts into the
database. Roll Call allows you to import people contact information and some custom
fields from a tab delimited text file. If you have the information in Excel, you can create
the tab delimited file, by saving as “tab delimited text file”.
There are four file variations that can be used for the import:
One Row per Family (standard)
This format assumes that all the information on a single line is for one family. The data
must be in the following order:
1. Family Last Name
2. Head’s First Name
3. Gender
4. Association
5. Cell Phone
6. Work Phone
7. Email
8. Spouse Last Name
9. Spouse First Name
10. Spouse Gender
11. Spouse Cell
12. Spouse Work Phone
13. Spouse Email
14. Home Phone 1
15. Home Phone 2
16. Address 1
17. Address 2
18. City
19. State
20. Postal Code
21. Child 1 First Name
22. Child 1 Gender
23. Child 1 Birth date
24. Child 2 First Name
25. Child 2 Gender
26. Child 2 Birth date
27. Child 3 First Name
28. Child 3 Gender
29. Child 3 Birth date
30. Child 4 First Name
31. Child 4 Gender
32. Child 4 Birth date
33. Child 5 First Name
34. Child 5 Gender
35. Child 5 Birth date
23
One Row per Family (custom)
This format allows you to import the same information, names, children, address, city
state, zip, gender and birthdates, but the order does not have to be exact. For example
if you don’t have a second home phone, you don’t need to leave a blank column for that
field. You will be able to tell Roll Call which data is in which column.
One Row per Person (standard)
In the one row per person format, each row in the spreadsheet represents an individual.
Roll Call will pull people together based on matches in the address field. The first person
it encounters with an address will be marked as the head of family.
This file type requires the data to be in this exact order. If you do not have data for a
column, leave that column blank.
1. Title (ex. Mr., Mrs., Rev etc.)
2. Last Name
3. First Name
4. Nick Name
5. Suffix (ex. Jr., Sr.)
6. Gender (Male or Female)
7. Family Position (Husband, Wife, Youth, Child, Adult or Other)
8. Marital Status
9. Association (ex. Member, Regular Attender, Visitor)
10. Email
11. Home Phone 1
12. Home Phone 2
13. Address 1
14. Address 2
15. City
16. State (2 character abbreviation)
17 Postal Code
18. Birth Date
19. Cell Phone
20. Work Phone
One Row per Person (custom)
In the one row per person format, each row in the spreadsheet represents an individual.
Roll Call will pull people together based on matches in the address field. The first person
it encounters with an address will be marked as the head of family.
In the custom format, the columns can be in any order you choose. This format also
allows you to import custom fields. As part of the import process you will be able to
define which data belongs to which fields.
Import Process
Once you have created the file that will be imported, do the following to bring the data
into Roll Call.
1. Expand the People menu on the left side.
2. Click on Import People (You can also select File>Import People from the top menu).
3. From the window that is displayed, select your file format type, click NEXT.
4. From this window, select your default Association and default Family Position.
These fields are required, so if you don’t have a value in the record, Roll Call will use
the default value to create the record in Roll Call.
24
5. Indicate which row the data starts. For example if you have titles in row 1, the data
would start on line 2.
6. Click LOAD FILE. Navigate to your text file and open it. Your data will be displayed
in a spreadsheet fashion in the lower section of the window.
Click on Import
menu item.
Choose file format
type, then click
NEXT.
Enter defaults for
Association and
Family Position.
Click LOAD
FILE, navigate
to your date,
then click
OPEN.
7. If you selected a custom file format, you will need to use the drop down box at the top
of each column to define the data represented in that column. If you do not want to
import the data in a column, leave the selection as SKIP.
Click on the column SKIP, to get
the drop down of
fields. Select the
field name that represents this column.
Click FINISH to import
the data once
you’ve mapped
all fields.
25
Enter a new Family
To enter people information into Roll Call using the Add Person screen you can do either
of the following:
1. From the Search Profiles (under People), click on the plus (+) sign in the lower left.
2. OR, Open up the People menu (left sidebar) and click Add a Family.
Click Add Family from menu.
Click plus sign
to add a person
or new family.
You are now in the Add Person screen. If you are entering a new family, enter the person
who will be marked as Head of Family first. When you first come into the form, you’ll be
in the Family Position field. Based on your selection here, the Title, Gender and Marital
Status can be filled in.
Once you enter family position, the title,
gender and marital
status will be filled in
for you.
Enter name and
contact information.
26
Contact Information
Once you’ve entered the Family Position, you can tab through each of the fields on this
main page. Enter the following information:
1. First Name - enter the person’s full first name.
2. Nickname - the nickname will default to the value entered for the first name. You can
change this to the nickname if it is different than the first name.
3. Middle Name – enter the middle name. This field is not required.
4. Last Name – enter the last name. This field is required. If you are entering a
business, enter the business name in the last name field.
5. Suffix - enter the suffix Jr., Sr., etc if applicable.
6. Spouse - if the person you are entering is married, you can enter the spouse’s name
here.
7. Association – enter how this person is involved in the church. Are they a Member,
Regular Attender, Visitor, etc.
8. Birth Date - enter the full birth date for the person.
9. Primary & Alt Phones - enter the phone numbers for the family here.
10. Unlisted - if the family doesn’t want their phone numbers listed in directory check
here.
11. Head of Family – this box will be checked for the head of family. Each family needs
one and only one head.
12. Personal Email – an email address for this person.
13. Envelope Number – you may enter an envelope numbers here, or use the assign
envelope number option under the Bulk Changes menu to assign numbers en masse.
14. Family Number – if you selected “automatic” from preferences, this number will be
assigned by Roll Call. Otherwise, you may assign a family number manually.
15. Badge No. - if the family position is child, a badge number will be assigned. You may
enter a different number if you’d like.
16. Barcode No. – the barcode number is used to identify individuals and families for
child check-in. This number is automatically assigned by Roll Call, unless you have
the preference set to manually assign the number.
Address
Next, we’ll move down to the address/pictures tab on the People screen. Notice there are
three tabs underneath Address. You can now click on the tab to enter Primary Address,
Alternate Address and Notes. The Primary address is the families main address. The
Alternate address if for folks who live in a different part of the country for part of the
year. The notes section can be used to enter driving directions.
Enter the following information on the Primary address tab:
1. Optional Mailing Name - The name entered here will be used as the mailing name
on all correspondence and labels. For example, if you have a husband and wife Jim
& Sue Smith, the default mailing label would be Jim & Sue Smith OR Mr. & Mrs.
Smith. However, if you entered “The Smith Family” as the optional mailing name,
the letters, labels and receipts would be addressed to “The Smith Family”.
2. Address, City, State and Zip.
3. Country – if you have the preference turned on for country there will be a country
field displayed here.
4. Shepherd Area – if your church assigns deacons, congregational care pastors or other
lay people to come along side families, you may indicate that here.
5. Family Email – an email address that can be used to send emails to the entire family.
6. Bad Address – if you’ve had mail returned, so you know it is an invalid mailing
address, you can mark the box for “bad address”.
27
7. Do not send mail – if someone has requested that you not send them mail, mark this
box.
8. Unlisted Address – if someone has requested that their address is not published, mark
this box.
Click on Alternate Address tab.
Enter alternate
address plus effective dates for the
address.
Note WEB
MAP and COPY
address buttons.
If you need to enter a secondary or alternate address, click on the ALT Address tab. Enter
the following information:
1. Address – the street address for the alternate address.
2. More Address – the address line 2.
3. City, State and Zip of the alternate address.
4. Country – if you have the preferences to display country, you can enter the country
here.
5. Phones – enter the home phone numbers for the alternate location.
6. Effective Month & Days – enter the start date when this address takes effective.
7. Ends Month & Day – enter the moth and day that this address should no longer be
used.
To enter Notes regarding the address information, click on the Notes tab. Enter the free
format information here.
If you’d like directions to an address, click on the WEB MAP button on the bottom of the
page. If you’d like to copy the address onto the clip board to paste in another application,
click COPY ADDRESS.
Pictures
You can pull in family pictures and/or individual pictures into Roll Call. Click on the
Address/Pictures tab. Notice the two tabs on the right side for Picture and Family Picture.
The individual picture should be a portrait picture. To pull in the individual picture do the
following:
1. Make sure you are anchored on the Picture tab (click on the word Picture).
2. Click on the plus sign (+) in the lower left.
3. Navigate to your image file and click OPEN.
28
Click on the tab for the
type of picture you are
bringing in.
To navigate to the image file, click on the
plus sign.
The family picture should be in landscape. To pull in the family picture do the following
1. Make sure you are anchored on the Family Picture tab (click on the word Family
Picture).
2. Click on the plus sign (+) in the lower left.
3. Navigate to your image file and click OPEN.
Phones
To enter an individual’s phone numbers, click on the Phones tab. Enter the following
information:
1. Work Phone & Extension – enter the person’s work number.
2. Cell Phone – enter the cell phone number for this person.
3. Pager – enter a pager number for this person if they have one.
4. Fax – enter a fax number for this individual.
Click on Phones
tab.
Enter an individuals
phone numbers.
Click to add additional phone
numbers.
29
If an individual has multiple cell numbers or emergency numbers or additional phone
numbers you’d like to record, use the Additional Phones section to enter these numbers.
To enter these numbers, do the following:
1. Click the plus sign (+) in the lower left.
2. Enter the Phone Number.
3. Enter an Extension if applicable.
4. Select the Description of the phone from the drop down, or enter a new one. For
example is this an emergency number, secondary cell, etc.
Custom Fields
The custom fields in the People screen allows you to track information about a person
that we don’t have as a standard field in Roll Call. The following are all good examples
of custom fields that can be set up in Roll Call: a person’s occupation, whether or not they
want to receive emails or a baptism date.
To define the custom fields that you will track for each person, do the following:
1. Click on the Custom tab.
2. Click on the CHANGE TITLES button.
3. Select the type of field you are defining… field (text), check box (yes or no) or dates.
4. Name the field.
Click on Custom
tab. Click on
Fields or Checkboxes.
Click CHANGE
TITLES to add additional custom field
names.
Choose field type:
Field (text), Checkbox
(Yes/No) or Dates.
Enter field name.
30
To enter the data for a person, do the following:
1. Click on the Custom tab.
2. Click on the sub tab for either Custom Fields or Custom Check Box.
3. Enter the values applicable for this person.
Dates
The Dates tab can be used to enter the Anniversary date for married couples as well as
custom dates that you define. See the Custom Field section for instructions on defining
date custom fields.
This section can also be used to enter Significant Dates. Significant Dates are events that
happen to an individual that you may wish to track so that you can follow up with this
person on the anniversary of the event. Good examples of significant dates would be the
death of a family member or diagnosis of cancer.
To enter significant dates into the system, do the following:
1. Click on the Dates custom tab
2. On the right portion of the tab, click on the plus sign (+).
3. Enter the Date of the event
4. Enter the description of the Significant Date.
Click on Dates tab.
Click plus sign to
add a life event or
significant date.
Groups
If you have groups or classes already set up in Roll Call, you can enroll a person into a
group/class from the People Screen.
To enroll someone in a group/class, do the following:
1. Click on the Groups tab.
2. Click on the plus sign (+) in the lower left portion of the screen.
3. Select the group or groups that you’d like to enroll this person into.
31
Click on the
Groups tab.
Click on plus
sign to enroll this
individual into a
group.
Click on the group you’d like
to enroll this person into. It
will move the group name to
the selected column.
Click SELECT to enroll.
Key Words
The Key Words area allows you to categorize folks. Good examples for key words would
be tracking volunteer interests, spiritual gifts and talents. Once you have assigned a
keyword to people, it is very easy to get a list of all the people that are “prayer warriors”
or “mechanics” etc.
To enter a keyword for an individual, do the following:
1. Click on the Keyword tab.
2. Click the plus sign (+) in the lower left of the window.
3. If applicable, enter the relevant Date for this keyword.
4. Enter the Keyword. Select a value from the drop down list. If the value you need is
not in the list, simply type the keyword and you’ll be asked if you want to add it to the
list.
5. Enter the Rank. The rank could be from a survey… how interested are they in
volunteering in the nursery.
32
Click on Keywords
tab.
Use the drop down
to select a keyword, or enter a
new value.
Click on plus
sign to assign a
keyword to this
individual.
Visits
Visits are used to track telephone calls or personal visits with individuals. Maybe your
church calls first time visitors. You could track those conversations here. Maybe the
pastor visits folks in the hospital. Those visits could be tracked here.
To enter visitation information, do the following:
1. Click on the Visit tab.
2. Click on the plus sign (+) in the lower left of the window.
3. The Visitation screen is displayed.
4. Enter the Last Name of the person from your church who is making the call, going
to the hospital, going to their home, etc. Once you leave that field, a list will
be displayed to pick the individual who is doing the visit. Double click on the
appropriate name.
Click on Visits
tab.
Click on the plus
sign to add a visitation record for
this individual.
33
Enter the Last name
of the person who
made the visit, then
select from the list.
Enter the duration, date
and remarks from the
visit.
5.
6.
7.
8.
Indicate the Type of Visit. This will be either In Person or Telephone.
Enter the Length of the visit
Enter the Date of the visit.
Enter the Remarks. This would be a summary of the visit.
Comments
There are several types of comments that can be tracked within Roll Call. The General
comments would be a comments section that all Roll Call users can see. General
comments also include a field for Special Needs and Allergy information. The Custody
comments allow you to enter any restraining order type information. This will be
displayed in the child check in system on check out. The Confidential comments can only
be entered and viewed by users that have the appropriate security access in Roll Call.
Click on Comments
tab, then click on the
type of comments.
Enter general comments
here.
34
To enter general comments, do the following:
1. Click on the Comments tab.
2. Click on the General tab underneath the Comments tab.
3. Enter your general Comments.
4. Enter any Special Needs or Allergy information in the right field. This information
will be printed on the Sign in Roster and on the Name Tag for children.
To enter custody information, do the following:
1. Click on the Comments tab.
2. Click on the Custody tab underneath the Comments tab.
3. Enter the Custody information.
To enter confidential comments, you must have the proper security access to enter or
view this information. If you don’t have access, you won’t even see the tab. To add a
confidential comment:
1. Click on the Comments tab.
2. Click on the Confidential tab underneath the Comments tab.
3. Click the plus sign (+) on the left portion of the window.
4. Enter the Date of the comment.
5. Enter the Comment.
Enter the date of
the confidential
comment and
the comment
here.
Background Check
Roll Call allows you to record background check information for people you have in the
system. When you are in the People screen you can record the background check request
and/or the background check results.
The Background Check can only be entered and viewed by users that have the
appropriate security access in Roll Call. If you do not have the proper authorization, you
will not see the Background Check tab.
To enter this information, do the following:
1. Click on the Background Check tab.
2. Click on the (+) sign in the lower left. The Background Checks window is displayed.
3. Request Date – enter the date that the background check was requested for this
person.
4. Requested by – enter the department or person who requested the check.
35
5. Indicate whether this person is an employee or volunteer
6. Use the drop down, to select the Type of Check (e.g. Background, Fingerprint,
Reference, etc.).
7. Report Date - enter the date that the background check report was completed.
8. Report Result – use the drop down to select the background check result.
9. Clearance Level – use the drop down to indicate this individuals clearance level. Can
they work with all ages, only over 18, pending, etc.
10. Overall Clearance Level – The overall clearance is displayed on the Comments tab.
So if you want to publish the clearance level for all Roll Call users to view, enter the
clearance level in this field as well.
11. Report Text – You may wish to type in the comments from the background check
report.
Click on the Background Check tab.
Click on the plus
sign to add a new
background check
for this person.
Enter the background
check request information, who requested,
type requested, etc.
Enter the results of the
background check.
36
Add the Next Family Member
Once you have added all the information for an individual, you can do several things:
1. Click SAVE & CLOSE. This will save the information you entered, and return you to
the Search People window.
2. Click SAVE & NEW, then select ADD NEW FAMILY MEMBER. This action will
save the information you just entered. You will be taken to the People Information
window, with the family information displayed. At this point you can start entering
the information for the wife, children or other family member.
3. CLICK SAVE & NEW, then select ADD NEW FAMILY. This option saves the
information you just entered. Then you will be taken to the People Information
window to begin entering a completely new family.
Click SAVE & NEW
to add a new family
member. A drop down
will appear for you to
select new family or
new family member.
Modify Family Relationships
Once you’ve entered the people of your parish or congregation into the system, there
are life events that can cause family relationships to change: birth of a child, marriage,
divorce or a death in the family. This next section discusses how to make changes in Roll
Call for each of these events.
Addition to the Family
To add children (or others) to an existing family, do the following:
1. Open up the People menu on the left side.
2. Click on Search Profiles.
3. Find a person from the family you need to add to, and double click on their record.
4. Click the SAVE & NEW button.
5. Choose the option for ADD NEW FAMILY MEMBER.
6. You will be taken to the People Information window, with the family information
displayed. At this point you can start entering the information for the new family
member.
7. Click SAVE & CLOSE to save the information for the new family member and return
to the Search window. Or click SAVE & NEW to enter another family member.
37
Marriage
When folks get married, their records need to be combined into one family unit. The
different scenarios include:
1. The husband/wife is in Roll Call, but the other is not.
2. Both the individuals are in Roll Call.
3. The husband or wife has children as part of their family.
To handle the situation where one is in the database and the other is not, do the following:
1. Open up the People menu on the left side.
2. Click on Search Profiles.
3. Find the individual (husband or wife) who is in your database.
4. Click the SAVE & NEW button.
5. Choose the option for ADD NEW FAMILY MEMBER.
6. You will be taken to the People Information window, with the family information
displayed. At this point you can start entering the information for the new family
member.
7. Click SAVE & CLOSE to save the information and return to the Search window.
To handle the scenario where both the husband and wife are in Roll Call, do the
following:
1. Pull up the new wife’s record.
2. Click on the Head of Family check box.
3. Select the option for “Make this person member of another family”.
4. Enter the Last Name of the husband.
5. Click OK.
6. A list of people with that last name will be displayed. Double click on the appropriate
person.
7. The wife is now part of the husband’s family. You’ll need to manually change the
Marital Status and Family Position. You may also enter the spouse name in the
Spouse field if you choose.
From the wife’s
record, click on the
Head of Family
checkbox.
38
Select option for
Make member of
another family.
Enter the Last Name
of the husband, then
click OK.
Choose from the list
of people with that
last name.
Notice Kim & Dave
are now in the same
family.
Make sure to update
marital status, titles,
gender and last
name.
39
The final scenario would be a blended family. For this example, let’s say we have a
family of four that was entered as two separate families. One family has the husband and
a child. The other family has the wife and another child.
1. Pull up the wife’s record.
2. Click on the Head of Family check box .
3. Select the option for “Make this person member of another family”.
4. Enter the Last Name of the husband.
5. On the right hand side of the screen, highlight the child’s name to indicate that you’d
like to move the child as well.
6. Click OK.
7. A list of people with that last name will be displayed. Double click on the appropriate
person.
8. The wife and child are now part of the husband’s family. Check that the Marital
Status and Spouse name are correct for the husband and wife’s record.
Select option for
Make member of
another family.
Enter the Last Name
of the husband, highlight the children that
are moving to the new
family, then click OK.
Notice we now
have both Kim
and Taylor in
Dave’s family.
40
Divorce
In the case of divorce you will need to separate the husband and wife into two separate
families in Roll Call. To do this:
1. Pull up the wife’s record.
2. Click on the Head of Family check box.
3. Select the option for “Make this person head of a new family”.
4. On the right hand side of the screen, highlight any children who will be staying with
mom.
5. Mark the Retain Address box, if the wife is staying at the current address.
6. Click OK.
7. The wife is moved into a new family with any children that were marked. Make sure
you enter her new address if she is not staying at the current address. Also change the
Marital Status, Family Position and Spouse Name for both the husband and wife.
Mark to make her
the head of a new
family.
Highlight
children moving with mom.
Click OK.
Notice Kim &
Taylor are now
in a seperate
family.
Make sure to
change marital
status and family position.
41
Change HOF
If you imported people into Roll Call, or used child check in to enter children’s names
into the database and now realize the wrong person is marked as the Head of Family, this
can be changed. To change who is marked as the HOF, do the following:
1. Pull up the record for the person you want to be the HOF
2. Click on the Head of Family check box.
3. A window will be displayed. Mark “make this person the head of the current family”
4. Click OK.
Death
If a person within a family dies, we recommend that you change their Association to
“Deceased”. If the deceased is the Head of the Family and donations were recorded for
him, transfer the donations to the surviving spouse. To ensure that he is not included in
the directory or in any mailings, split him out into a separate family.
To change the association:
1. Pull up the deceased’s record.
2. Change Association to “Deceased”.
To transfer the donations:
1. Click on the contributions tab.
2. Use the drop down and select Details by Week.
.3. Right mouse click and select Transfer.
4. A Find Person window will be displayed to allow you to choose who to transfer these
donations to. Enter a last name. Select from the list.
In husbands
record, go to
Contributions tab.
Click on Detail by
Week view.
Right mouse click
on detail side, click
Transfer. Use the
Find Person window
to find the person to
transfer to.
To move into a separate family:
1. Click on the Head of Family check box or select Additional>Change HOF from the
menu bar at the top of the people screen.
2. Select the option for “Make this person head of new family”.
At the end of this process, you have retained a record of the deceased person.
His donations have been transferred to the spouse, so she will receive the year end
contribution statement and all correspondence will be addressed to her.
42
Delete People from the Database
People who have not made contributions can be deleted from Roll Call. To delete records
you can do it from the People details screen or the Search window.
To delete a person from the People details screen, do the following:
1. Click on the Search Profile menu, under People.
2. Find the person you wish to delete.
3. Double click on the record to view the details.
4. Click the DELETE button in the bottom right of the window.
Pull up the
record for the
person you
wish to delete,
click DELETE.
To delete a person from the Search screen, do the following:
1. Click on the Search Profile menu, under People
2. Find the person or people you wish to delete
3. Highlight their records. To highlight one or more, hold down your CTRL or CMD
key while clicking on the record.
4. Click the minus sign (-) in the lower left of the window
Highlight the
people you wish
to delete, click the
minus sign.
43
This screen allows you to
review a list of the people
who will be deleted. Anyone with contributions
will be in red.
Click to delete all.
A log of all deletions.
Background Checks
Roll Call allows you to record background check information for people you have in the
system. This information can be entered from an individual’s profile or it can be added
from the Background Check menu, under People. If you have multiple background
checks to enter, it may save you time to enter from the Background Check menu.
The Background Check can only be entered and viewed by users that have the appropriate
security access in Roll Call. If you do not have the proper authorization, you will not see
the Background Check menu.
Enter the Request & Results
To enter the Background Check report do the following:
1. Expand the People menu on the left side.
2. Click on Background Check.
3. From the Background Check window, click on the plus sign (+) in the lower left.
4. You are now in the Background Check entry screen. Enter the Last Name of the
44
person that the background check is for. Press tab, and a list of people with that last
name will be displayed. Select the appropriate person from the list.
5. Enter the following information:
a.
b.
c.
d.
Request Date – enter the date that the background check was requested for this person
Requested by – enter the department or person who requested the check
Indicate whether this person is an employee or volunteer
Use the drop down, to select the Type of Check (e.g. Background, Fingerprint,
Reference, etc.)
e. Report Date - enter the date that the background check report was completed
f. Report Result – use the drop down to select the background check result
g. Clearance Level – use the drop down to indicate this individuals clearance level. Can
they work with all ages, only over 18, pending, etc.
h. Overall Clearance Level – The overall clearance is displayed on the Comments tab.
So if you want to publish the clearance level for all Roll Call users to view, enter the
clearance level in this field as well.
i. Report Text – You may wish to type in the comments from the background check
report.
Highlight Background Check
under the People
menu.
To add a new
background check
record, click the
plus sign.
Enter the last
name to find
the appropriate
person.
Enter the information about
the type of request and the
final results.
45
Find/Research Background Checks
To lookup Background Check information, you can do the following:
1. Expand the People menu on the left side
2. Click on Background Check
3. Notice the Find By drop down box. Select the criteria (Name, Type or Clearance
Level) that you’d like to find.
4. Begin entering the criteria. For example, if you looking for the Background Check’s
on file for Diana Conklin, you would enter Conklin in the field to the right of the Find
By drop box. As you begin entering that value, your list will be reduced to just the
Conklin records.
5. To view the details for this background check, double click on the record and the
detail screen will be displayed.
Select your “find by”
criteria.
Enter the criteria you are
searching for.
Visitations
Visits are used to track telephone calls or personal visits with individuals. Maybe your
church calls first time visitors or the pastor visits folks in the hospital. These are both
good examples of visitations.
Roll Call allows you to record visitation information for people you have in the system.
This information can be entered from an individual’s profile or it can be added from the
Visitation menu, under People. If you have multiple visitations to enter, it may save you
time to enter from the Visitation menu.
Enter Visitations
To enter the Visitation information do the following:
1. Expand the People menu on the left side.
2. Click on Visitations.
3. From the Visitation window, click on the plus sign (+) in the lower left.
4. You are now in the Visitation entry screen. Enter the Last Name of the person that
is being visited. Press tab, and a list of people with that last name will be displayed.
Select the appropriate person from the list.
5. Enter the Last Name of the person that is making the visit, for example, the pastor or
deacon. Press tab, and a list of people with that last name will be displayed. Select
the appropriate person from the list.
46
6. Enter the following information:
a.
b.
c.
d.
Visit Type – mark “in person” or “telephone to indicate how the visit was made.
Length – indicate how long the visit was.
Date – enter the date the visit took place.
Remarks – enter any comments applicable to this visit.
Highlight Visitation
under the People
menu.
Click the plus sign to
add a new visitation
record.
Enter last name of the
person who is being
visited.Press tab.
Find/Research Visitations
To look up Visitation information, you can do the following:
1. Expand the People menu on the left side.
2. Click on Visitation.
3. Notice the Find By drop down box. Select the criteria (Name, Type or Date) that
you’d like to find.
4. Begin entering the criteria. For example, if you looking for the Visitations on file for
Diana Conklin, you would enter Conklin in the field to the right of the Find By drop
box. As you begin entering that value, your list will be reduced to just the Conklin
records.
5. To view the details for this visitation, double click on the record and the detail screen
will be displayed.
47
Highlight Visitation under the
People menu.
Select the “find by”
criteria. Then enter
the value you are
looking for.
Confidential Comments
Roll Call allows for Confidential comments that can only be entered and viewed by users
that have the appropriate security access in Roll Call. Confidential comments can be
entered from an individual’s record, or from the Confidential comments menu.
Enter Confidential Comments
To enter the Confidential comments from the menu, do the following:
1. Expand the People menu on the left side.
2. Click on Confidential Comments.
3. From the Search window, click on the plus sign (+) in the lower left.
4. You are now in the Comments entry screen. Enter the Last Name of the person that
this comment is for.
5. Enter the Date of the comment.
6. Enter the Remarks.
Select Confidential
comments, under the
People menu.
Click on the plus sign
to add confidential
comments.
48
Enter the last name,
then press tab. Select
the appropriate person
from the list.
Enter the date and the
comments.
Find/Research Confidential Comments
To look up Comment information, you can do the following:
1. Expand the People menu on the left side
2. Click on Confidential Comments
3. Notice the Find By drop down box. Select the criteria (Name or Date) that you’d like
to find.
4. Begin entering the criteria. For example, if you looking for the Confidential
Comments on file for Diana Conklin, you would enter Conklin in the field to the
right of the Find By drop box. As you begin entering that value, your list will be
reduced to just the Conklin records.
5. To view the details, double click on the record and the detail screen will be displayed.
Select the
“find by”
criteria.
Enter the value
you are searching for.
49
FINDING PEOPLE
Search Profile Window
To find records in Roll Call, use the Search window. To find specific people, expand the
People menu, then click Search Profiles. There are several main sections of the Search
window:
1. The icon bar.
2. The Find By drop down and criteria.
3. The results.
4. The add and delete buttons.
Click PRINT
to print the
contents of the
results list.
Icon Bar
Note the icons across the top of the Search window. These icons allow you send emails,
write letters or create labels for the people that are in the list. You can also print the list,
do more detailed queries or do special searches. For more information on these icons, see
the Getting Started – Icons chapter.
Click to send
corrrespondence.
Click to display
all records, sort or
search further.
Find By
Note the drop down box to the right of “Find by”. Use this drop down to choose the
criteria you’d like to use to find specific records. The field to the right allows you to enter
the value you are looking for.
Select your Find By
criteria. How do
you want to find this
person?
Enter the value you are
looking for.
50
Results
As you type in the value you are looking for, the result set will change. For example, if
you choose to find by “last name”, and start entering Smith, when you type in S, you’ll
get a list of all names that start with S. As you type “m”, the list will be reduced to those
last names that start with “Sm”.
From the results list, simply double click on a record to view the detail information for
that person.
Results where last
name starts with smi.
Double click on a
record to view all
their details.
Click plus or
minus to add
and delete from
list.
Scroll bar to move
to the right or left.
Click and drag lower
right corner to enlarge
window.
Add/Delete
In the lower left of the results section, notice the plus and minus (+/-) signs. Click on the
plus sign to add a new record. Click on the minus sign to delete records from this list.
Customize Search Window
The Search window for People shows the following information: Last Name, First Name,
Head of Family checkbox, Association, Family Position, Individual Email, Home Phone,
Address 1, City, State and Postal Code.
If this information is not all displayed on your screen, you can use the scroll bar at the
bottom of the window to view information that is off the screen. If you have a larger
monitor, you can drag the lower right corner of the window to enlarge it.
Each Roll Call user can set preferences for what fields they’d like displayed in the Search
window. To change the display fields:
1. Click on Prefs icon.
2. Drag a field from the left side to the right side.
3. To re-order the fields, drag the field up or down on the right side.
4. Click SAVE & CLOSE to save changes.
51
Click on arrow in
front of People or
Address to see all
fields available.
To remove a field
from the display list,
highlight it, then click
on the arrow to move
it left.
Click on the field you want
displayed, then drag to the
right, or click on the arrow
to move to right column.
Click SAVE &
CLOSE to save
these preferences.
Find Specific Records
Find By Criteria
To find people by Last Name, First Name, Association, Family Position, Email, Street,
City, Postal Code, Family No, Badge No, Envelope or Keyword you can select that criteria
from the Find By drop down box. Once you’ve selected your criteria, enter the value you
are looking for in the field to the right. The results will be displayed below.
Select your Find By
criteria. How do
you want to find this
person?
Enter the value you are
looking for.
Search Window
If you are searching for people by their Last Name or by a Keyword, use the Search box
on the right side of the screen. Enter the name or keyword, then press Enter. Your results
will be displayed.
Enter last name
or keyword in
search box, then
press ENTER.
52
Query Editor
If you need to search for people by a field that is not listed in the Find By drop down box,
you will need to use the query editor. To use the query editor, do the following:
1. Click on the SEARCH icon.
2. Select a field from the Field drop down box on the left side of the window.
3. Select your comparison operator.
4. Enter the value you are looking for.
5. Click QUERY.
In this first example, let’s say we have a custom date field that we set up for Baptism
Date. We want to find all folks who were baptized this year.
1.
2.
3.
4.
5.
Click on SEARCH icon.
Choose Baptism Date.
Choose “is greater than” as the comparison.
Enter “01/01/11” as the date value.
Click QUERY.
Select “baptism
date” from the
list of available
fields.
Enter the value
you are looking
for here.
Highlight “is
greater than” as
the comparison.
Click QUERY
to find your
results.
The results of
our query. So we
know that these
people have a
baptism date later
than 1/1/11.
53
In this next example, let’s say we want to find folks that are Members, Regular Attenders
or Occational Attenders.
1.
2.
3.
4.
Click on SEARCH icon.
Click on the Association tab.
Click over the Associations Member, Regular Attender and Occational Attender.
Click QUERY.
For more details on using the query editor, see the “Using the Query Editor” chapter.
Click on the associations tab of the
query editor.
Click QUERY
to get your
results.
Click on an Association to move it to the
right side column.
Tag People
If you are a deacon responsible for a certain group of people, or a children’s minister
responsible for the children, you may want to “tag” those people that you work with most
often. By tagging people, you can go straight to the Tagged People menu item, under
Home to see those folks.
Highlight the people
you want tagged.
Right mouse click,
and select Tag.
54
To tag people, do the following:
1. Do a query or find by to get the people in the list.
2. Highlight all the people you’d like “tagged”.
3. Right mouse click.
4. Select “Tag”.
To view the “tagged” people, do the following:
1. Expand the Home menu.
2. Click on Tagged People.
3. Your tagged people are listed here.
Expand the
Home menu, and
click on Tagged
People. Your
“tagged” people
are listed here.
To “un tag” a person, do the following:
1. Expand the Home menu.
2. Click on Tagged People.
3. Highlight the folks you no longer want in your list.
4. Right mouse click, and select “unTag”.
Highlight the people
you wish to remove
from your list, right
mouse click and select
“unTag”.
55
RUNNING REPORTS
The majority of reports in Roll Call are run in the same manner. This chapter discusses
the methodology for running reports and walks you though much of the terminology.
Whether you want a list of people, an attendance report, a contribution report, a pledge
report or a group report, you will process them in the same manner.
Report Selection Window
To begin, you’ll need to decide which report you’d like to run. There is a report option
under each of the main menu options on the left sidebar. For example, if you want to
run a contribution report, expand the Contributions menu and select Reports. The report
selection window for contribution reports will be displayed. Choose the specific report on
the left sidebar of the window.
Expand the menu
for the area you
wish to report on,
then click Reports.
Select your report on
the left hand side.
Click GENERATE to run
the report.
Enter date range and
other criteria.
Notice there is also a Reports menu on the top menu. Once you drop down the reports
menu you can choose People, Attendance, Contribution, Pledge or Groups. Again, the
Report Selection window will be displayed for the area you choose.
Depending on the type of report you selected, there will probably be 3 tabs in the Report
Selection Window: Criteria, Columns and View People. There may also be tabs across
the middle of the page: Who, What and When.
56
Criteria
Most reports will be anchored in the Criteria tab. The information on the criteria tab
will change based on what report you are running. For example if you were running
a contribution report, the criteria tab would allow you to enter the date range of
contributions you wanted to include in the report.
Note we are on the
Criteria tab.
Enter date range for
the report.
Who
If the report you are running is for certain people, attenders or donors there may be a
“Who” tab on the Criteria section. The Who tab allows you to select who should be
considered for the report. For example, you will be able to run the report for certain
associations, groups, keywords, shepherd areas or by using the query editor. First select
the type, association, group, etc. Then choose the specific values you are interested in.
Select who you
want to run this
for.
Choose the specific
values by moving
value from left to right
column.
For example, if you wanted a list of your members who donated to a certain fund, you
would select association as the type, then click over Member to the selected column.
As another example, if you wanted to see who attended children’s church, you would
select Groups as the type, then click over all the classes or groups associated with your
children’s church.
57
What
The “What” tab is used to further refine your criteria. For example if you are running a
contribution report, which funds should be included. If you are running an attendance
report, which attendance should be included.
Click on the What
tab. Choose the
funds in this example that you want
to run the report for.
When
The “When” tab is used in the Absent Present report to further refine your criteria. This
tab allows you to enter your “missing” criteria to further refine your criteria.
Click on When tab
to enter specific
absent present
criteria.
Columns
Once you’ve identified who will be considered for the report, click on the Columns tab to
change what data is included in the report. Each report has a standard set of columns that
will be displayed, but if you’d like to change that, use the columns tab.
All the columns that are available for the report will be listed in the left column. If there
is an arrow in front of a word like People or Addresses, this means you can expand the
list of fields under that table. There is also a section called Special Columns. Special
Columns combine pieces of information into one field. For example if you want the
Head & Spouse as a field, or Parents Names as a field, these can be found under Special
Columns. For a full listing of tables, field names and descriptions please see Appendix A.
58
Click on the
arrow to view
fields under each
section.
Click on Columns tab to
pick fields for
the report.
Double click or
drag a field from
left column to “selected” column.
Move a field
to 3rd column
to sort by that
field.
Move the selected
columns around to
order them in the
report.
View Records
The View Records tab allows you to see which people or data will be included in the
report based on the criteria you selected.
Run the Report
When you click GENERATE, the report results will be displayed in the Report Output
window.
These people will
be included in the
report.
Click GENERATE to
run the report.
Report Output Window
The report results are displayed in the main section of the Report Output Window. Use
the scroll bars on the bottom and to the right of the report to scroll up and down; left and
right.
On the right side of the Report Output Window are actions that can be performed for the
report.
1. Click on PAGE SETUP to set your printer and paper size and orientation.
2. Click on PREVIEW to preview the output. Do not send the report to the printer from
this preview window, it will only send the first page to the printer.
3. To change fonts, column sizes etc., click CUSTOMIZE. The report will be displayed
in 4D View, Roll Call’s spreadsheet program. Make your modifications here.
4. Click on PRINT to send the report to the printer.
59
5. Click ZOOM IN to make the font in the report larger on your screen.
6. Click ZOOM OUT to make the report font smaller on your screen.
7. To save the report as a tab delimited file or html document, click SAVE. Enter the
location and name of the file to be saved.
8. Click SAVE SET to save the list of people for use later within Roll Call.
9. Click CREATE LABELS to create address labels (3 across 10 down size) for this list
of people.
10. Click WRITE LETTER, to compose a mail merge letter to this list of people.
11. Click EMAIL to send an email to this list of people or to email the report to another
individual. If you choose Email people, it will send the email to everyone listed in
your report. If you choose Email report, the email editor will be displayed. You
will need to enter the email address of the person you are emailing. Enter any
introductory text in the body, the report will be sent as an attachment. Click SEND.
12. Click GRAPH to view the report data in a graphical format. This option is generally
available for summary by week, month or year type reports.
13. To enlarge the window, click on the lower right corner of the window and drag to the
appropriate size.
Report results.
Note actions that can be
performed.
60
REPORTING ON PEOPLE
There are quite a few standard reports that can be run to obtain people type information.
You can run a list of people who have a birthday, anniversary or significant date in a
specific month. Or maybe you want a list of people with their envelope number. Maybe
you’d like a one page summary about a family, or a report to send each family to confirm
their contact information. All these reports can be found in the Reports menu under the
People menu.
Report Window
Each report is run in a similar manner. This section will discuss the methodology for
running the People reports. To select a report, do the following:
1. Expand the People menu.
2. Expand the Reports menu.
3. Highlight the report you’d like to run.
Once you’ve selected the report, you’ll see three tabs across the right side of the window.
The criteria let’s you select who should be included in the report. Do you want the report
for certain associations, groups, shepherd areas, keywords, assigned envelopes or other
criteria?
Note the three tabs.
Click on criteria
tab, then choose
which people you’d
like in the report.
Click on columns tab.
Drag field name
from left column
to “Selected” to
include on the
report.
Click GENERATE
to run the report.
61
Once you’ve identified who will be in the list, click on the Columns tab to change what
data is included in the report. Each report has a standard set of columns that will be
displayed, but if you’d like to change that, use the columns tab.
The View Records tab allows you to see which people will be included in the report based
on the criteria you selected.
When you click GENERATE, most reports will be displayed in the Report Output
window. From the report output window you can print the report, zoom in and out, or
change page set up. You can also create mailing labels or write letters to the people listed
in the report. The Email option allows you to email the people listed in the report or
actually email the report to someone else.
To print, zoom
in or out and
change page
setup, use these
buttons.
To correspond
with the people
in this report,
click these buttons.
To email the
report, click the
EMAIL button,
then select email
report.
Enter the email
address of the
person you
wish to email
the report to.
Enter subject
and body text.
The report will
be sent as an
attachment.
62
Envelope Number Report
The Envelope Number report lists people (based on your criteria selection) with their
name, address and current envelope number. To run the report, do the following.
1.
2.
3.
4.
Expand the People menu.
Expand the Reports menu.
Highlight Envelope #.
From the criteria tab, select the associations, keywords, groups, or shepherd area, or
assigned envelopes that you’d like to see in the list
Highlight Envelope
# report.
In this example, I’ve
choose to run the
report for Associations and I selected
Member.
5. If you’d like to change which columns are displayed in the report, click on the
columns tab. Drag the field you’d like to add to the right side “Selected” column.
6. To change the sort order of the report, drag the field you’d like to sort on.
7. Click GENERATE to run the report.
Click on Columns
tab to change what
fields are displayed
on the report.
Drag the column you
wish to add to the
report to the “Selected” column.
Click GENERATE
to run the report.
63
Family Report
The Family report lists all the family members in the top section of the report. Next it
shows the individual contact and email information. Next the addresses are outlined.
Finally the group involvements for each family member are listed. To run the report, do
the following.
1.
2.
3.
4.
Expand the People menu.
Expand the Reports menu.
Highlight Family Report.
From the criteria tab, select the associations, keywords, groups, or shepherd area, that
you’d like to see in the list.
5. There isn’t a columns tab for this report. The format for this report is fixed.
6. Click GENERATE to run the report.
Highlight Family
Report on the left side
menu.
Choose who you want the
reports for. In this example
I’m running the family
report for all families in the
Johnson shepherd area.
Click GENERATE
to run the report.
Here’s an
example of the
Family Report.
64
Birthday Report
The Birthday report will list all the people that meet your birthday criteria and that are in
the associations, shepherd areas, groups or keywords. The default birthday report lists the
name, address, birthday and age. To run the report, do the following:
1.
2.
3.
4.
5.
Expand the People menu.
Expand the Reports menu.
Highlight Birthday Report.
From the criteria tab, chose your birthday date range.
From the criteria tab, select the associations, keywords, groups, or shepherd area that
you’d like to consider for the report.
Click on Columns tab
and enter date range
criteria.
In this example, I wanted
to run this for my 1st,
2nd and 3rd grade
groups.
Click GENERATE to run
the report.
6. If you’d like to change which columns are displayed in the report, click on the
columns tab. Drag the field you’d like to add to the right side “Selected” column.
7. To change the sort order of the report, drag the field you’d like to sort on.
8. Click GENERATE to run the report.
Click on the columns tab.
To add fields to the
report, drag the field
name to the “Selected” column.
Click GENERATE to
run the report.
65
To print, zoom
in or out and
change page
setup, use these
buttons.
This is an
example of the
birthday report.
To correspond
with the people
in this report,
click these buttons.
Anniversary Report
The Anniversary report will list all married folks who have an anniversary in your date
range and that are in the associations, shepherd areas, groups or keywords selected. The
default anniversary report lists the name, address, anniversary and length married. To run
the report, do the following:
1.
2.
3.
4.
5.
Expand the People menu.
Expand the Reports menu.
Highlight Anniversary Report.
From the criteria tab, chose your date range.
From the criteria tab, select the associations, keywords, groups, or shepherd area that
you’d like to consider for the report.
From the criteria tab,
select the date range
you are looking for.
Also select the folks
you want to consider
for this report. In
this example I will
look for any member,
regular attender or occational attender who
has an anniversary in
January.
66
6. If you’d like to change which columns are displayed in the report, click on the
columns tab. Drag the field you’d like to add to the right side “Selected” column.
7. To change the sort order of the report, drag the field you’d like to sort on.
8. Click GENERATE to run the report.
Click on the columns tab.
To add fields to the
report, drag the field
name to the “Selected” column.
Click GENERATE to
run the report.
To print, zoom
in or out and
change page
setup, use these
buttons.
An example of
the Anniversary
report.
To correspond
with the people
in this report,
click these buttons.
Significant Dates
The Significant Dates report will list all folks who have a significant date in your date
range and that are in the associations, shepherd areas, groups or keywords selected. The
default report lists the name, address, the significant event and date. To run the report, do
the following:
1.
2.
3.
4.
5.
Expand the People menu.
Expand the Reports menu.
Highlight Significant Dates Report.
From the criteria tab, chose your date range.
From the criteria tab, select the associations, keywords, groups, or shepherd area that
you’d like to consider for the report.
67
Highlight Significant Date report on
left side menu.
From the criteria tab,
choose time frame,
and who you want
to consider for the
report.
6. If you’d like to change which columns are displayed in the report, click on the
columns tab. Drag the field you’d like to add to the right side “Selected” column.
7. To change the sort order of the report, drag the field you’d like to sort on.
8. Click GENERATE to run the report.
Click on the columns tab.
To add fields to the
report, drag the field
name to the “Selected” column.
Click GENERATE to
run the report.
Use the top buttons to
print, zoom or change
page setup.
Use these buttons to create
mailing labels, write a letter
or email the folks in this
list.
68
Confirm Data Report
The Confirm Data summarizes the families contact information. This report is set up as a
letter to the family so that they can confirm their contact information. To run the report,
do the following.
1.
2.
3.
4.
Expand the People menu.
Expand the Reports menu.
Highlight Confirm Data Report.
From the criteria tab, select the associations, keywords, groups, or shepherd area, that
you’d like to see in the list.
5. There isn’t a columns tab for this report. The format for this report is fixed.
6. Click GENERATE to run the report.
Select the criteria
for who you want to
have a confirmation
report printed.
Click GENERATE to
run the report.
An example of the
confirm data report.
Note when folded,
this fits in #9 envelope.
69
Uninvolved Families Report
The Uninvolved Families report allows you to find families that:
1. Have not given since a certain date
2. Have not attended any service or group since a certain date
3. Are not members of an active group.
To run the report, do the following.
1. Expand the People menu.
2. Expand the Reports menu.
3. Highlight Uninvolved Families Report.
4. From the criteria tab, chose the uninvolved criteria.
Select your
“uninvolved”
criteria.
Select which associations, groups,
keywords, etc. that
you’d like to consider in this report.
5. From the criteria tab, select the associations, keywords, groups, or shepherd area that
you’d like to consider for the report.
6. If you’d like to change which columns are displayed in the report, click on the
columns tab. Drag the field you’d like to add to the right side “Selected” column.
7. To change the sort order of the report, drag the field you’d like to sort on.
8. Click GENERATE to run the report.
Select the fields
you’d like displayed in the
report. Drag from
left column to “Selected” column.
Click GENERATE
to run the report.
70
Use the top buttons to
print, zoom or change
page setup.
Use these buttons to create
mailing labels, write a letter
or email the folks in this
list.
Background Check Report
The Background Check report will list all background checks on file for the people in the
associations, shepherd areas, groups or keywords selected. The default report lists the
name, request date, type, result, and clearance level. To run the report, do the following:
1.
2.
3.
4.
Expand the People menu.
Expand the Reports menu.
Highlight Background Check Report.
From the criteria tab, select the associations, keywords, groups, or shepherd area that
you’d like to consider for the report.
Select which people
you’d like to list
in the background
check report.
Highlight background check
report.
5. If you’d like to change which columns are displayed in the report, click on the
columns tab. Drag the field you’d like to add to the right side “Selected” column.
6. To change the sort order of the report, drag the field you’d like to sort on.
7. Click GENERATE to run the report.
71
To select a column for
the report, drag from
left column to “Selected” column.
Click GENERATE to
run the report. Click
RESET to reset back to
default values.
Use the top buttons to
print, zoom or change
page setup.
Use these buttons to create
mailing labels, write a letter
or email the folks in this
list.
Visitation Log
The visitation log is a sheet that can be used to record comments on a specific visit. It
contains the families address, attendance history, comments from their last visit and a
blank area to make notes. To run the report:
1.
2.
3.
4.
5.
Expand the People menu.
Expand the Reports menu.
Highlight Visitation Log Report.
From the criteria tab, select the associations for the folks you’d like to run the log for.
Click GENERATE to run the report.
72
Select the association of the folks
you’d like to print
logs for.
Highlight Visitation
Logs.
Click GENERATE to
run the report.
Contact information
for this person to be
visited.
Last visit comments.
Blank area to record comments
for this visit.
Visitation History
The visitation history lists all visits made since a certain date. To run this report:
1.
2.
3.
4.
5.
Expand the People menu.
Expand the Reports menu.
Highlight Visitation History Report.
From the criteria tab, enter the beginning date of the visits you’d like to report on.
Click GENERATE to run the report.
73
Enter your date criteria for the history
report.
Click GENERATE to
run the report.
This report shows
all visitation
records since
the date entered
above.
My Reports
The My Reports area allows each user to build their own reports. These reports can then
be saved to run again in the future. To create a report, do the following:
1.
2.
3.
4.
Expand the People menu.
Expand the Reports menu.
Highlight My Reports.
From the criteria tab, select the associations, keywords, groups, or shepherd area that
you’d like to consider for the report.
74
Select the criteria for
which people you’d
like in this report.
Highlight My Reports.
5. Click on the columns tab and drag the columns you’d like in the report to the right
side “Selected” column.
6. To change the sort order of the report, drag the field you’d like to sort on to the Sort
Column.
7. To save the report, click SAVE and name the report.
8. Click GENERATE to run the report.
To select a column for
the report, drag from
left side to “Selected”
column.
Click GENERATE to run
the report.
Click SAVE to save
this report for later
use.
Use this drop down to retrieve
saved reports.
75
RECORDING ATTENDANCE
Worship Attendance
Create Service
Before you can begin recording attendance for worship services you must first create the
service record in Roll Call. The service record contains the name of the service, what day
and time it meets, and which associations you’d like to record attendance for. You may
also indicate if you’ll be recording attendance for only adults.
If you’d like to use the check in system for services, indicate if you’d like a name tag
printed upon check in.
To create the service:
1. Expand the Services menu on the left side bar.
2. Click on Search menu item.
3. Click on the plus sign in the lower left of the Search window.
You can add a
service by selecting
Add a Service or
the plus sign in the
Search window.
Click on the plus
sign from the
services search
window.
4. Enter the Name and Description of the service. The name will be used in the drop
down box for you to select which service you’ll be recording attendance for.
5. Enter the Day, Start Time and End Time that this service meets.
6. If you will have the congregation checking into the service and would like to print
name tags, indicate the Number of Labels to print upon check in.
7. Mark Inactive if this service is not used any more.
Enter day and
time this service
meets.
Enter a name for the
service. This name will
be used to identify which
service you are recording
attendance for.
76
8. Click the associations you’d like to record attendance for this service. Roll Call will
use these associations to build the list of people to mark as present when recording
attendance.
9. Enter any Comments about this service.
10. Click SAVE & NEW to save this service information and create another service
record. Click SAVE & CLOSE to save this service record and return to the search
window.
Mark if you only
want adults in your
list for recording
attendance.
Select the associations of the folks
you want in the
list when you are
recording attendance.
Record Attendance
To record attendance:
1. Expand the Attendance menu.
2. Click on Search, then click on the plus sign in the lower left OR
3. Click on the Record Attendance menu item.
Click Record
Attendance, under
the Attendance
menu.
Select Service
or Group
to indicate
which type
of attendance
you’ll be
recording.
To record attendance for a specific service and date, enter the following information:
1. Select the Type of attendance you’ll be recording. Choose Service.
2. Select the specific Service you are recording for.
3. Enter the Meeting Date that you are recording for.
4. If you know the Head Count, you may enter it manually, or if you will be marking
people present, Roll Call will fill this in for you.
5. If communion was served at this service, mark the communion box and indicate how
many people took communion. This information is optional.
77
6. To record attendance for a specific person, find their name and click on the box to the
left of their name. You may also place your cursor in the last name field, and begin
entering the last name. If the correct row is highlighted, you can press the return key
to mark them as present.
7. When you are done marking the people that attended, click SAVE & NEW to save
this attendance and record for another service or group. Click SAVE & CLOSE to
save the attendance and return to the search screen.
Select specific service
you are recording attendance for.
Enter the date for
which you are recording attendance.
Click on a name to
mark them as present.
Enter portion of the
last name to move
to that section of the
list.
If a person attended the service and they are not in the list (based on associations) you
can click the plus sign in the lower left to find this person in the database and they will be
marked present and added to the list.
If a person attended who is not in the database, you will need to add them first. Once they
are added into Roll Call, you can add them to the list and mark them present.
To record attendance using a bar code roster, click on the bar code symbol on the right
side of the screen. Begin scanning the bar code of the people who are present. Their
names will be marked present in the list.
To record attendance
by bar code scan,
click scanner icon.
Next, scan the bar
code for the first
person present.
To add an existing
person from the
database to your
attendance list, click
the plus sign.
78
Find/Modify Attendance
If you need to modify or continue recording attendance for a specific service and date, do
the following:
1. Expand the Attendance menu.
2. Click Search.
3. Find the attendance record for the specific service and date you are interested in.
4. Double click on that attendance record.
5. Note the people you have already marked present should still be marked present.
Make the necessary changes.
To modify or complete
recording attendance
for Sunday Worship
9 a.m. on the 15th of
May, locate the record
in the search window.
Double click to view
the detailed attendance
and make any necessary changes.
Here are the details
for that attendance.
The people marked
present have a check
in front of their
name.
Group Attendance
Create Group
Before you can begin recording attendance for a group/class, you must first create that
group or class in Roll Call. To create a group/class, do the following:
1. Enter the values for Campus, Group Type, Department and Status.
2. Enter the name of the specific group under Group Section.
3. If the group has a leader, enter the last name in the Leader field. Press tab to view a
list of the folks with that last name. Select from the list.
4. If the group has a co-leader, enter the last name in the Co-Leader field. Press tab to
view a list of the folks with that last name. Select from the list.
5. Enter the Location of the group, if applicable.
6. Indicate if the group meets weekly or randomly.
79
Enter the group
type, department
and name to define
the group.
Make sure to indicate
the day and times this
class meets under the
sessions tab.
7. You may enter any comments or notes in the Notes field.
8. The Start Date will default to today’s date. You may change it if you’d like.
To enroll people into the group, press the Members tab. From within the members tab:
1. Click the plus sign in the lower left of the window. A new window will be displayed
for you to enter the Last Name and First Name (or portion of the last name) of the
person you want to enroll.
2. Select the appropriate person to enroll in the group.
3. Tab across to enter any of the custom field data for this person. If you need to define
the membership custom field names, click CHANGE TITLES and enter the name of
the data you’d like to capture.
Next, you’ll want to indicate which days and at what times the group meets. The meeting
days and times are called sessions in Roll Call. A group that meets weekly can have an
unlimited number of sessions. A group that meets randomly does not have any sessions
defined.
To create a session:
1. Click on the session tab, if sessions are not currently displayed.
2. Click on the plus sign in the lower left. A row will be displayed, with a default of
Sunday and time of 12 a.m.
3. Use the Day of Week drop down box to select the appropriate day.
4. Enter the Start Time.
5. Enter the End Time.
6. Place your cursor under Room and double click to enter the room number of this
group meeting.
Click SAVE & CLOSE to save the information and return to the Search screen. Click
SAVE & NEW to save the information and enter a new group.
Record Attendance
To record attendance:
1. Expand the Attendance menu.
2. Click on Search, then click on the plus sign in the lower left OR
3. Click on the Record Attendance menu item.
80
To record attendance for a specific group and date, enter the following information:
1. Select the Type of attendance you’ll be recording. Choose Group.
2. Select the specific Group you are recording for.
3. Enter the Meeting Date that you are recording for.
4. If you know the Head Count, you may enter it manually, or if you will be marking
people present, Roll Call will fill this in for you.
5. To record attendance for a specific person, find their name and click on the box to the
left of their name. You may also place your cursor in the last name field, and begin
entering the last name. Once the correct row is highlighted, you can press the return
key to mark them as present.
6. When you are done marking the people that attended, click SAVE & NEW to save
this attendance and record for another service or group. Click SAVE & CLOSE to
save the attendance and return to the search screen.
Choose group as the
attendance type.
Enter the date
you are recording attendance
for.
Select the specific
group.
Enter the last
name or portion of the last
name to move
around the list.
Click on a person’s name
to mark them present.
If a person attended the group and they are not in the list you can click the plus sign in the
lower left to find this person in the database and they will be marked present and added to
the group.
If a person attended who is not in the database, you will need to add them first. Once they
are added into Roll Call, you can add them to the list and mark them present.
To record attendance using a bar code roster, click on the bar code symbol on the right
side of the screen. Begin scanning the bar code of the people who are present. Their
names will be marked present in the list.
Find/Modify Attendance
If you need to modify or continue recording attendance for a specific group and date, do
the following:
1. Expand the Attendance menu.
2. Click Search.
3. Find the attendance record for the specific service and date you are interested in.
4. Double click on that attendance record.
5. Note the people you have already marked present should still be marked present.
Make the necessary changes.
81
Find the attendance that you
need to modify
and double click
on it.
Update the attendance
as required.
Attendance Reports
Attendance Summary
The attendance summary report gives head count information for service and group
attendance information. The Attendance Summary by Day lists the group or service, the
meeting date, the number of people enrolled if the attendance is for a group, the number
of visitors (people with the association of visitor) that attended, the head count and the
number of people that attended. For a specific class/service and day the head count
and number of people will be the same. However, on the summary lines, the number
of people represents the number of “unique” people that attended those classes. So if
someone attended 2 classes and a worship service, they would only be counted once.
The Attendance Summary can also be run by week, month or year. When running for this
time frame, it will display the head count.
To run the attendance summary report by day:
1. Expand the Attendance menu.
2. Click on Reports.
3. Highlight Attendance Summary.
4. Enter the date range for the attendance data you are interested in.
5. Select “By Day” as the report type.
82
Enter date range
you are interested
in. Also enter
what type of attendance you are
interested in.
Highlight Attendance Summary
Report.
Click GENERATE to run the
report.
6. Choose which attendance you want to run this for. You may select All and it will list
all worship service attendance as well as all group attendance for the date range you
entered. You may select Service, and then choose which services you’d like to see
or you may choose groups, then pick the specific groups you’d like included in the
report.
7. Click GENERATE to run the report.
Note the daily totals for each class.
Since we selected
all, the small
group and worship services are
included also.
Note the combined totals for all
Children’s classes.
To run the Attendance Summary report by week, month or year:
1. Expand the Attendance menu.
2. Click on Reports.
3. Highlight Attendance Summary.
4. Enter the date range for the attendance data you are interested in.
5. Select by week, by month or by year as the report type.
6. Choose which attendance you want to run this for. You may select All and it will list
all worship service attendance as well as all group attendance for the date range you
entered. You may select Service, and then choose which services you’d like to see
or you may choose groups, then pick the specific groups you’d like included in the
report.
7. Click GENERATE to run the report.
83
Enter date
range.
Choose the
attendance you
are interested in
seeing.
Select by week,
month or year.
Choose the
specific values.
Note each of the
classes I chose is
listed. The head
count for the entire
week is listed.
Click EMAIL
to send this
report to
someone via
Email.
Click graph
to create a
graphical
representation
of this data.
Graph of above
attendance data.
Note weeks
along bottom.
Attendance by Person
The attendance by Person report outlines the different services or groups a person came
to, if you run this report “by day”. If you run this report by week, month or year it will
show you in a spreadsheet format how many times they attended each week, month or
year.
To run the attendance by person report by day:
1. Expand the Attendance menu.
2. Click on Reports.
3. Highlight Attendance by Person.
84
4. Enter the date range for the attendance data you are interested in.
5. Select “By Day” as the report type.
6. On the “Who” tab, select which people you want to run this for. You can choose
by association, groups, keywords, shepherd areas or search the database. Once you
choose your type, you can pick the specific values. For example, if you wanted to see
all your Members and Regular Attenders, choose Associations, then click on Member
and Regular Attender to select those values.
Highlight Attendance by
Person.
Click on the
Who tab.
And choose
which people
you want
included in
the report.
Enter date range
and select “by day”
to get the detail
attendance information.
In this example I
choose groups, and
picked several Sunday School classes.
Click to only
show active
groups in the
list. Mark if
you only want
to see active
members in the
report.
7. Next click on the “What” tab to choose which attendance you want to run this for.
You may select All and it will list all worship service attendance as well as all group
attendance for the date range you entered. You may select Service, and then choose
which services you’d like to see, or you may choose groups then pick the specific
groups you’d like included in the report.
Click on the “What”
tab to choose the type
of attendance data to
include in the report.
In this example
I’ve chosen
to include attendance for the
1st grade - 6th
grade classes.
85
8. Next click on the Columns tab to choose the information you wish to include on
the report. Click on a column name from the left column and move it to the middle
column.
9. Click on the View People tab, to review the people that will be included in the report.
10. Click GENERATE to run the report.
Click on the Columns tab to add
additional fields to
the report.
Double click on
a field in the left
column to move it
to the “Selected”
column.
Click on View Records tab to see all
the people that will
be included in the
report.
Shows a person’s
name, then lists
what they attended and the date
they attended.
86
To run the by person report by week, month or year:
1. Expand the Attendance menu.
2. Click on Reports.
3. Highlight Attendance by Person.
4. Enter the date range for the attendance data you are interested in.
5. Select by week, by month or by year as the report type.
6. On the “Who” tab, select which people you want to run this for. You can choose
by association, groups, keywords, shepherd areas or search the database. Once you
choose your type, you can pick the specific values. For example, if you wanted to see
all your Members and Regular Attenders, choose Associations, then click on Member
and Regular Attender to select those values.
Click on Attendance by
Person.
Click on Who
tab.
Choose who you wish
to see in the report. In
this example, I chose
by Association. Then
picked Member, Reg
Attender and Occasional Attender.
7. Next click on the “What” tab to choose which attendance you want to run this for.
You may select All and it will list all worship service attendance as well as all group
attendance for the date range you entered. You may select Service, and then choose
which services you’d like to see or you may choose groups, then pick the specific
groups you’d like included in the report.
Click on the What
tab. Then choose
the type of attendance data you wish
to consider for this
report.
In this example
I’ve chosen
Service attendance. And
chose these 3
services.
8. Next click on the Columns tab to choose the information you wish to include on
the report. Click on a column name from the left column and move it to the middle
column.
9. Click on the View People tab, to review the people that will be included in the report.
10. Click GENERATE to run the report.
87
Double click on
a a field from the
left side column
to move it to the
Selected column.
The report lists how
many times a person
came each month.
The dash means there
was no attendance for
that month.
The number of
months attended
and # months
missing are also
included.
Note all the
actions that can
be performed.
Attendance by Type
The Attendance by Type report will list all the people who came to a group or service on
a specific day. This is a great report to run if you want to see who came to your Sunday
School classes last weekend and who was absent. Or you can see who attended last
Saturday nights service.
To create the Attendance by Type report, do the following:
1. Expand the Attendance menu.
2. Click on Reports.
3. Highlight Attendance Summary.
4. Enter the date range for the attendance data you are interested in.
5. Choose which attendance you want to run this for. You may select All and it will list
all worship service attendance as well as all group attendance for the date range you
entered. You may select Service, and then choose which services you’d like to see
or you may choose groups, then pick the specific groups you’d like included in the
report.
6. Click GENERATE to run the report.
88
Highlight Attendance by Type.
Select the specific
values based on
the type of attendance you chose.
Select which
type of attendance you are
interested in.
Select group,
service or all.
Click on the
Columns tab
to select additional data to be
included on the
report.
Click GENERATE to run
the report.
Double click
or drag a field
from left side
to “Selected”
column.
Lists the class
name.
Lists members
present for the
date.
Lists absent
members.
Attendance by Session
The Attendance by Session report will list all the people who came to a specific group
session or a specific service time on a specific day.
To create the Attendance by Session report, do the following:
1. Expand the Attendance menu.
2. Click on Reports.
3. Highlight Attendance by Person.
89
4. Enter the date range for the attendance data you are interested in.
5. Choose which attendance you want to run this for. You may select All and it will list
all worship service attendance as well as all group attendance for the date range you
entered. You may select Service, and then choose which services you’d like to see
or you may choose groups, then pick the specific groups you’d like included in the
report.
6. Click GENERATE to run the report.
The report lists the
name of the group
or service and the
specific time.
All who attended
at that time are
listed.
Absent Present Report
The absent/present report allows you to find folks who have been absent so many weeks
or who have attended so many times in a certain time frame.
To run the Absent/Present report:
1. Expand the Attendance menu.
2. Click on Reports.
3. Highlight Absent Present.
4. Enter the date range for the attendance data you wish to view.
5. On the “Who” tab, select the people to consider for the attendance report. You can
choose by association, groups, keywords, shepherd areas or search the database.
Once you choose your type, you can pick the specific values. For example, if you
wanted to evaluate attendance for all your Members and Regular Attenders, choose
Associations, then click on Member and Regular Attender.
Highlight
the Absent/Present
report.
From the
“who” tab,
choose which
people you’d
like to consider for the
report.
Enter date
range of attendance that will
be included on
report.
90
6. Next click on the “What” tab to choose which attendance you want to use in
determining who was present or absent. You may select All and it will evaluate
attendance for all services and groups. Select Services and choose the specific
services to only look at attendance for those services. Select Groups to choose
specific groups.
In determining if a person was absent or present, which attendance
should be considered...
All, specific groups or
specific service attendance.
7. Click on the “When” tab to enter your absent present criteria. Enter how many weeks
you wish to look back. Choose to find people who were absent or find people who
were present. Enter how many times.
8. Next click on the Columns tab to choose the information you wish to include on
the report. Click on a column name from the left column and move it to the middle
column.
9. Click on the View People tab, to review the people that will be included in the report.
10. Click GENERATE to run the report.
Enter how many
weeks to look back
from ending date.
Indicate how
many weeks
absent or
present.
Enter if you are
looking for people
absent or present.
Shows
number
of weeks
missing.
Lists all the people that met that
criteria. Shows
attendance by
week.
91
Visitor Report
The Visitor report will list all your first time, second time, third time visitors, based on the
association of visitor and the attendance data you wish to evaluate.
To create the Visitor report, do the following:
1. Expand the Attendance menu.
2. Click on Reports.
3. Highlight Visitor Report.
4. Enter week of attendance you are interested in looking at.
5. Choose the type of visitor you are looking for from the drop down under the Who tab.
Then choose the association(s) you use to indicate a visitor.
6. Click on the “what” tab and indicate which type of attendance you wish to evaluate.
7. Click GENERATE to run the report.
Highlight
Visitor report.
Choose the
number of
times visited.
Choose the association your church
uses for visitors.
Choose the type of attendance you wish to
consider when determining if it was their 1st,
2nd or 3rd time visiting.
Click GENERATE to
run.
Our list of 1st
time visitors
on the 15th.
92
ENTERING CONTRIBUTIONS
Giving Funds
Before you can begin entering contributions in Roll Call, the giving funds must be
defined. The giving funds are the designations that people can contribute to. A new
Roll Call database will contain one giving fund, “General”. To add giving funds, do the
following:
1. Expand the Contributions menu on the left side bar.
2. Click on Giving Funds
3. Click on the plus sign in the lower left of the Giving Fund summary window.
Click on Giving
Funds, under the
Contributions
menu.
Click on the plus
sign to add a new
fund.
4. Enter the Fund name. This is the name that will be in the drop down box to select
designations from the Enter Contributions screen.
5. Enter the associated Account Number. This number is not mandatory.
6. If this giving fund is no longer valid or used, check the “Inactive” box.
7. If this fund is not tax deductible, mark the box for “Not on Receipt”. If this box
is checked any monies given to this fund will not be printed on the year-end tax
statement.
Enter the fund
name and account number.
Enter GL Account
mapping information.
Click SAVE
to save the
information.
93
8. Select the Fund Color. This color will represent the fund in pie charts showing total
giving. Click on the “…” and click on the color you’d like to use.
9. The GL Fund is used to map the giving funds to your accounting system. For
example if you have a giving fund of “Tithes & Offerings” and you want that to map
to the General Income Fund in your accounting system, you would enter General
Income as the GL Fund. If you are importing into Quickbooks and your fund is a
sub-account, enter the Account, then a colon then the sub account name, for example,
Operating Income:General.
10. The GL Account Number is the account number to map to MYOB accounting.
11. GL Key is the number to map to Roll Call’s accounting system.
Batches
All contributions are entered in Roll Call through a batch. A batch is nothing more than
a grouping of contributions. Typically, users will enter all the giving for a deposit in a
batch.
Because of the integration with Accounting, batches must be either Cash or Non-Cash.
Cash contributions include all cash, checks, credit cards and ACH type transactions. NonCash batches contain property gifts, things that cannot be deposited into the bank.
To create a batch, do the following:
1. Expand the Contributions menu on the left side bar.
2. Click on Add Batch.
Enter the following information:
1. Batch Date – This date will become the default for all contributions entered in this
batch.
2. Description – Enter a qualifying description of this batch. Especially if you will have
multiple batches for the same day. Maybe this group of contributions is for the 9 a.m.
service. You could enter “9 a.m. service” as the description.
3. Anonymous Cash – Enter the amount of loose cash that was in the offering. This is
cash that cannot be associated with any specific donor.
Select Batch
Type.
Click on Add a
Batch.
Enter control totals.
Enter amount
of loose cash
in offering.
Click plus sign
to enter individual contributions.
94
4. Cash Fund – Enter the fund that the anonymous cash should be designated to.
5. Default Fund – Enter the fund that you’d like all contributions in this batch to default
to. This doesn’t mean that you can’t have other funds included in this batch. This is
only used as a default. If the majority of the giving is for Tithes & Offerings… make
“Tithes & Offerings” the default fund.
6. Batch Type – Select Cash for batches that will contain cash, checks, credit card,
online, ACH type contributions. Select Non-Cash for property or in-kind gifts.
7. Asset Fund – This is the fund to map non-cash gifts to the appropriate asset fund in
your accounting system.
8. Batch Control Count – This field can be used as a control count for the number of
entries expected in this batch. This field is not required, but by using it you may be
able to catch any data entry errors. If the Batch Count and Batch Control Count do
not match, they will be displayed in red.
9. Batch Control Total – This field can be used as a control total for the amount expected
in this batch. This field is not required, but by using it you may be able to catch any
data entry errors. If the Batch Total and Batch Control Total do not match, they will
be displayed in red.
10. To begin entering individual contributions, click on the plus sign in the lower left
corner.
Check/Cash Contributions
To begin entering cash or cash equivalent contributions, you will need to create a batch.
To create a new batch, do the following:
1. Expand the Contributions menu.
2. Click on Add Batch.
3. Enter the batch header information as described in the previous section.
4. Click on the plus sign in lower left to begin entering the contributions.
To enter new contributions to an existing batch, you will need to locate your batch.
1. Expand the Contributions menu.
2. Click on Search by Batch.
3. Change the Find By Criteria to “Date”.
4. Select the date of the batch you are adding to.
5. Double click on the appropriate record.
6. Click on the plus sign in the lower left to begin entering new contributions.
Basic
To record a donation, enter the following information:
1. Donor Name or Envelope Number. When recording contributions, the first thing you
need to do is identify the donor. If you use envelope numbers, enter the number and
press tab. The donor information will be displayed on the right side. If you use name
to identify the donor, enter the last name then press tab. You will be taken to the
Select a Person window. You can further reduce the names in the list by typing the
first few characters of the first name. You can double click on the name to select it, or
if it is already highlighted, press Enter on your keyboard.
2. Date – the donation date will default to the same as the batch date. If you’d like to
change this date you can enter it here.
3. Total Amount – Enter the amount of the contribution.
4. Check Number - If the contribution was a check, you may enter the check number in
this field.
5. Donation Type – If you entered a check number, this will automatically change to
check. Or you can select cash, check, credit card etc. from the drop down list of
values.
95
6. Designation – Use the drop down list of values to select the fund that these monies
were given to.
Click SAVE & NEW to enter a new contribution in this batch. Click SAVE & CLOSE to
save the current contribution and return to Batch window.
Enter the last
name of the
donor. Press the
TAB key.
Select from this
list, or reduce the
list further by typing the first name.
Enter the
amount, check
number and
donation type.
Select the fund to
designate this contribution to.
96
Split
A split donation is a single contribution that needs to be designated to 2 or more funds. To
record a split donation, enter the following information:
1. Donor Name or Envelope Number. When recording contributions, the first thing you
need to do is identify the donor. If you use envelope numbers, enter the number and
press tab. The donor information will be displayed on the right side. If you use name
to identify the donor, enter the last name then press tab. You will be taken to the
Select a Person window. You can further reduce the names in the list by typing the
first few characters of the first name. You can double click on the name to select it, or
if it is already highlighted, press Enter on your keyboard.
2. Date – the donation date will default to the same as the batch date. If you’d like to
change this date you can enter it here.
3. Total Amount – Enter the amount of the contribution.
4. Check Number - If the contribution was a check, you may enter the check number in
this field.
5. Donation Type – If you entered a check number, this will automatically change to
check. Or you can select cash, check, credit card etc. from the drop down list of
values.
6. Amount – Notice the amount and designation fields underneath the contribution
header information. Place your cursor in the amount field, and reduce the amount so
that it matches the amount to be designated to the first fund. Press TAB. Note a 2nd
line is created with the remainder, so you can designate that amount.
7. Designation – Use the drop down list of values to select the fund that these monies
were given to.
Reduce this amount
field. Press TAB. A
second line will open
up.
Select the designation
for the second amount.
Click SAVE & NEW to enter a new contribution in this batch. Click SAVE & CLOSE to
save the current contribution and return to the Batch window.
Connect to Pledge
When you are entering a contribution for an individual that has made a pledge, the pledge
will be listed near the bottom of the screen on the pledges tab.
If you enter a contribution and designate it to the fund that the donor pledged to, the
contribution and pledge should be automatically connected. Notice the Pledge ID to the
right of the designation and description fields. If the pledge ID is listed here, you know
the contribution is connected. If you need to change which pledge is connected to this
contribution, use the Pledge ID drop down to change the connection.
97
Note the Pledge ID
on the designation
line tells us this contribution is connected
to her pledge.
All of the donor’s
pledges will be
listed on the
pledge tab.
Quid Pro Quo
Quid Pro Quo contributions are contributions where something of value was given. For
example, if you youth group is selling CD’s as a fund raiser. The CD’s are worth $15. If
someone gives the youth group $50 for the CD, you’d want to enter that as a Quid Pro
Quo contribution.
To enter this transaction, go to the Donation Entry window and enter the following
information:
1. Donor Name or Envelope Number. When recording contributions, the first thing you
need to do is identify the donor. If you use envelope numbers, enter the number and
press tab. The donor information will be displayed on the right side. If you use name
to identify the donor, enter the last name then press tab. You will be taken to the
Select a Person window. You can further reduce the names in the list by typing the
first few characters of the first name. You can double click on the name to select it, or
if it is already highlighted, press Enter on your keyboard.
2. Date – the donation date will default to the same as the batch date. If you’d like to
change this date you can enter it here.
3. Total Amount – Enter the amount of contribution. In the above example this would
be the $50.00.
Click on Quid Pro
Quo tab.
Enter the item and the
item’s value.
98
4. Check Number - If the contribution was a check, you may enter the check number in
this field.
5. Donation Type – If you entered a check number, this will automatically change to
check. Or you can select cash, check, credit card etc. from the drop down list of
values.
6. Designation – Use the drop down list of values to select the fund that these monies
were given to.
7. Click on the Quid Pro Quo tab. Select the item that was given. Enter the value of the
item given. In this example the item was the CD. The value was $15.
Click SAVE & NEW to enter a new contribution in this batch. Click SAVE & CLOSE to
save the current contribution and return to the Batch window.
Non-Cash/Property Gift Contributions
There are 3 ways that you can enter an in-kind or property gift in Roll Call.
1. Donation Type – Use the donation type method if you’d like to assign a value to the
property gift. You will need to use this method if you want to apply this gift towards
a pledge.
2. In-Kind tab – Use this method if you do not want to assign a value to this gift.
3. Non-Cash screen – Use this method if you have a complicated transaction such as
stock or real estate where brokerage fees need to be applied
Donation Type
To record a property gift using the Donation Type method do the following:
1. Create a non-cash type batch.
2. Click on the plus sign in the lower left.
3. Enter Donor Name or Envelope Number. When recording contributions, the first
thing you need to do is identify the donor. If you use envelope numbers, enter the
number and press tab. The donor information will be displayed on the right side. If
you use name to identify the donor, enter the last name then press tab. You will be
taken to the Select a Person window. You can further reduce the names in the list by
typing the first few characters of the first name. You can double click on the name to
select it, or if it is already highlighted, press Enter on your keyboard.
4. Date – the donation date will default to the same as the batch date. If you’d like to
change this date you can enter it here.
5. Total Amount – Enter approximate value of the gift. This amount will be listed on
the year end tax statement with an asterisk to indicate that this amount needs to be
determined by the donor.
Enter value of in-kind
gift. Enter Donation
Type that is classified
as “non-cash”.
Enter description
of gift.
99
6. Donation Type – Select a donation type that has been defined as a “non-cash” type.
7. Designation – Use the drop down list of values to select the fund that these monies
were given to.
8. Description – Enter a description of the property donated.
Click SAVE & NEW to enter a new contribution in this batch. Click SAVE & CLOSE to
save the current contribution and return to Batch window.
In Kind tab
To enter a property gift without having to enter an amount, do the following:
To record a property gift using the Donation Type method do the following:
1. Create a non-cash type batch.
2. Click on the plus sign in the lower left.
3. Enter Donor Name or Envelope Number. When recording contributions, the first
thing you need to do is identify the donor. If you use envelope numbers, enter the
number and press tab. The donor information will be displayed on the right side. If
you use name to identify the donor, enter the last name then press tab. You will be
taken to the Select a Person window. You can further reduce the names in the list by
typing the first few characters of the first name. You can double click on the name to
select it, or if it is already highlighted, press Enter on your keyboard.
4. Date – the donation date will default to the same as the batch date. If you’d like to
change this date you can enter it here.
5. Total Amount – Leave this amount 0.
6. Donation Type – Select a donation type that has been defined as a “non-cash” type.
7. Click on the In Kind tab. You may enter the amount and designation if you wish.
This will be for informational purposes only. The amount will not be used on yearend statements or against pledges.
8. Description – enter the description of the property gift. This description will be listed
on the donation receipt.
Click SAVE & NEW to enter a new contribution in this batch. Click SAVE & CLOSE to
save the current contribution and return to Batch window.
Leave total amount
as 0.
Click on the In-Kind tab.
At a minimum, the
description needs to be
entered here.
100
Non-Cash screen
If you have large property gifts, where you need to track the sale of stock or real estate,
use the Non-Cash gift screen.
To record a property gift using the Non-Cash gift screen:
1. Expand the Contributions menu on the left.
2. Expand the Non-Cash Gift menu.
3. Click on Add a Non-Cash Gift.
4. Enter the Gift Date and select Gift Type. Gift types are the donation types that are
marked as non cash items.
5. Enter a Description of the gift. When you press tab, the first 20 characters of this
description will be copied to Receipt Description. The receipt description is listed on
the donation receipt detail. You may modify this description if you’d like.
6. The Status will be set to “Pending”. When the gift is posted and a donation record is
created, the status will be automatically changed to “Posted”.
7. Enter the donor’s Last Name and press the tab key. A list of people with that last
name will be displayed. Click on the appropriate person to select. Notice the full
name and address is displayed under Donor/Address.
8. Enter the Designation or the fund that this gift was given to.
9. Enter the Quantity, Unit Selling Price and $ Value at Sale. Enter the amount of
Commission & Fees. The Net Sales Cash Proceeds will be calculated.
10. Enter the Sell Date and the Initials of the person responsible, if applicable.
11. Enter the Contribution JE Date and Initials of the person who made the journal entry,
if applicable.
12. Indicate if the Contribution Letter was sent, the Date Letter Sent and Initials of the
person who processed the letter.
13. You may enter the Agent, Contact Name and Contact Phone for the agency the
processed the sale.
14. Click GIFT COMMENT if you’d like to enter additional comments regarding this
gift.
Identify the gift and the
donor.
Enter selling information.
enter broker information.
Check Reader
The check reader, approved to work with Roll Call, is the Mag-Tek keyboard wedge
device check reader. You may order this from us at 800.554.9116 and we’ll configure it
for you.
To begin recording donation, get to the Enter Donation screen.
1. Slide the check through the check reader, with the magnetic numbers on the bottom
facing inward.
101
2. If Roll Call recognizes the account number, the name of the donor and the check
number will be displayed. All you need to enter is the Amount and the Designation.
Press SAVE & NEW to enter another donation.
3. If Roll Call does not recognize the account number, it will ask you to identify the
donor. Enter the Last Name or portion of the last name. A list of all people with that
last name will be displayed. Double click to select the appropriate person.
4. Now the account number from the check and the person are linked. The next time
you get a check from them, Roll Call will automatically pull up their information.
Import Contributions
If you use a service for online contributions, you can import those contributions into Roll
Call. We can import a csv file with the following information in this exact order:
1. Date
2. Last Name
3. First Name
4. Address 1
5. CityNav
6. State
7. Postal Code
8. Amount
9. Fund
The import will create a batch with a contribution for each line in the import file. Each
contribution will be assigned a donation type of Credit Card. To find the appropriate
donor, we will look for a match on name and address. If no match is found, it will create
a person record with the association of IMPORT. If the fund is not found in Roll Call, a
giving fund will be created.
To import the contributions, do the following:
1. Expand the Contributions menu on the left side bar.
2. Click on Import.
3. Click on the Import button.
4. Navigate to your csv file that you wish to import, highlight it and click OPEN.
5. You will get a message that the import is complete.
6. The batch window will be displayed for you to review the import.
Click Import under
Contributions menu.
Click IMPORT and
navigate to csv file.
102
Post a Batch
Posting a batch in Roll Call sets several things in motion. When you post a batch:
1. The batch can NO LONGER be modified.
2. If you are using Roll Call Accounting the receipt information will be sent to the
accounting system.
3. If you are using Quickbooks or MYOB, you can create your export files as part of the
posting process.
4. As part of the post process you can choose to print the batch summary and batch
detail report.
5. As part of the post process you can choose to print a deposit slip.
To post a batch do the following:
1. Expand the Contributions menu.
2. Click on Search by Batch.
3. Highlight one or more batches that need to be posted.
4. Click on POST BATCH button in the lower right of the window.
5. You will be presented with a list of reports to run. Check the options you’d like to
print.
From the batch
window, click on
POST to post the
batch.
From the Search
by Batch window,
highlight one or
more batches and
click POST.
103
Mark the reports you’d
like to run and the export
files you’d like to create.
Click POST to run the reports and
post the batch.
Import deposit to QB or MYOB
When you post a batch in Roll Call you will be given the option to export for MYOB
or Quickbooks. If you marked either box to create an export file, you will be prompted
for a folder to create the file in. The file will automatically be named. Next you will be
prompted for the bank account name that you’ll be depositing the money into.
To import the file in Quickbooks, do the following:
1. Open Quickbooks.
2. Select File>Utilities>Import>IIF files.
3. Navigate to the file you just created.
4. You should now have a deposit journal entry representing the batch.
To import the file into MYOB, select File>Import. Navigate to the file you just created.
You now have a deposit journal entry that represents this batch.
Batch Reports
There are two batch reports available when you post a batch. The first is the batch
summary report. This report will outline how much was given to each fund in this
specific batch. The second report is the batch detail report. It will outline each donor and
how much was given.
To run these reports, mark the box for Batch Summary and or Batch Detail after you
choose to Post the batch.
The Batch Summary shows how
much was given
to each fund in
this batch.
104
The Batch
Detail lists
all donations
included in a
batch.
Deposit Slip
When you close a batch there is an option to print a deposit slip for the batch. Check the
box to print the deposit slip. Click OK.
Mark the box to print
a deposit slip for the
current batch.
If you’d like a deposit slip to
include multiple batches, highlight those batches, choose to
close, then mark combined.
Totals by cash
and check.
Lists contributions.
105
LOOKING UP CONTRIBUTIONS
Search by Person
To research the contribution data for a specific individual, you can use the Search by
Person option under the Contributions menu.
Find By
To use the Find By option, do the following:
1. Expand the Contributions menu.
2. Click on Search by Person.
3. Select your Find By criteria. You can select last name, association, or envelope
number.
Click on Search by
Person under the Contributions menu. Then
select your Find By
criteria.
Double click on the
record you’d like to
view.
4. Enter your criteria.
5. The people that meet that criteria will be displayed.
6. Double click to view details.
Each contribution is
listed on the left.
Choose the type of
summary information
you’d like to see.
106
Query Editor
If you need to find a person by criteria other than last name, envelope number, or
association, you’ll need to use the query editor. To use this option, do the following:
1. Expand the Contributions menu.
2. Click on the Search by Person menu option.
3. Click on the SEARCH icon.
4. Select the field you’d like to query on.
5. Highlight the comparison operator.
6. Enter the value that you are looking for.
7. Double click on the appropriate person to view their contributions.
Choose the Search
by Person menu
under Contributions. Then click
on SEARCH icon.
Choose table to
query in. This
drives what fields
will be in the list.
Choose comparison
and the value you are
looking for.
Click QUERY to return
people that meet this
criteria.
Results
Once you have double clicked on a person’s record, you will get a window that displays
all their individual gifts on the left hand side of the screen. To look at the individual
contribution record, double click to see the contribution entry.
The right side of the window displays summary information. Use the drop down to select
your view. You can choose to view a summary by Year or Overall. The Yearly Summary
will show a bar graph by year. The Overall Summary will display the individual’s giving
in a pie chart by fund. The Details by Month will show a line graph of giving totals by
month. The Details by Week will show a line graph of giving by week.
107
Each contribution is
listed on the left.
Choose the type of
summary information
you’d like to see.
The Summary Overall shows giving over
all time by fund.
The Details by
Month shows a line
graph of giving by
month.
The Details by Week
shows a graph of
giving for the last 12
weeks.
108
Search by Batch
To research the contribution data for a specific batch, you can use the Search by Batch
option under the Contributions menu.
Find By
To use the Find By option, do the following:
1. Expand the Contributions menu.
2. Click on Search by Batch.
3. Select your Find By criteria. You find batches based on date, fund, description or
year.
Click on Search
by Batch under
the Contributions menu. Then
choose your Find
By criteria.
Double click on
the batch you are
looking for.
4. Enter your criteria.
5. The batches that meet the criteria will be displayed.
6. Double click to view details.
The batch window
is displayed. Double
click on a specific
contribution to view
it’s details.
Query Editor
If you need to find a batch by criteria other than the fields listed in the Find By drop
down, you’ll need to use the query editor. To use this option, do the following:
1. Expand the Contributions menu.
2. Click on the Search by Person menu option.
3. Click on the SEARCH icon.
4. Select the field you’d like to query on.
109
Click on Search by
Batch, then click on
the SEARCH icon.
Choose table to
query in. This
drives what fields
will be in the list.
Choose comparison
and the value you are
looking for.
Click QUERY to return
people that meet this
criteria.
5. Highlight the comparison operator.
6. Enter the value that you are looking for.
7. Double click on the appropriate batch to view the details.
Results
Once you have double clicked on batch, the batch window will be displayed. To view the
details for a specific contribution, double click on it.
In People Profile
If you are working the People screen, you can view the contributions for that individual.
To view contributions within an individual’s record, do the following:
1. Expand the People menu.
2. Click on Search Profiles.
3. Use the Find By to select your criteria to find the person.
4. Double click on the record of the person you are interested in.
5. Click on the Contributions tab.
6. Use the display option to select how you’d like the contributions displayed. The
choices are Summary by Year, Overall Summary, Detail by Month and Detail by
Week.
110
Summary by Year charts
the giving for each year.
Summary totals for each year
are displayed.
The Summary Overall
charts all giving and charts
it by Fund.
Totals by fund are
listed on the right
side.
Details by Month
charts giving by the
last 12 months.
Detailed contributions
are listed on the right
side. Double click to
view contribution record.
111
Details by
Week, charts
the last 12
weeks giving.
All contributions are
listed on the right.
Double click to view
contribution record.
112
MODIFYING CONTRIBUTIONS
Open Batches
If a batch has not been posted, you can add contributions to that that batch and you can
make corrections to individual contributions in that batch.
Add Contributions to Existing Batch
To add contributions to an existing batch, find the batch by selecting Search by Batch
under the Contributions menu. Double click on the batch you need to modify. From the
batch window, click on the plus sign in the lower left to start adding new contributions.
Click on Search
by Batch under
the Contributions
menu.
Double click
on the batch
you’d like to
add to.
Click on the
plus sign to
add contribtuions to this
batch.
Correct a Contribution
To correct a contribution that has already been recorded in Roll Call, you will need to
find that specific contribution. If you know the batch it was in, click on Search by Batch
under the Contributions menu. Double click on the batch. Double click on the specific
contribution.
If you know the person that made the contribution, select Search by Person under the
Contributions menu. Double click on the appropriate person. Find the contributions on
the left side, double click on it. Make the necessary changes.
116
You can change
the date, amounttype and check
number.
You can modify the
designation by using the drop down
box.
To change the total amount, date, or type, place your cursor in the field and make the
correction. To change the fund it was designated to, use the drop down to the right of
designation and choose the correct fund.
To change the donor, click on the TRANSFER button and enter the last name for the
correct donor. Select the appropriate person from the list.
Click SAVE & CLOSE to save the changes to the contributions record and return to the
Search screen.
Posted Batches
Corrections are not allowed to posted batches. If errors were made in the batch, you will
need to reverse the batch, make the correction, then re-post the batch.
Reverse the Batch
When you reverse a batch, a reversing journal entry will be written in the Roll Call
Accounting system. Then the status of the batch will change to un-posted. At this point
you can make corrections to the batch.
To reverse the batch, do the following:
1. Expand the Contributions menu.
2. Click on Search by Batch.
3. Highlight the batch that needs to be reversed.
4. Click the REVERSE button.
Highlight the
batch you need
to reverse.
Click REVERSE.
117
You may also reverse from the batch window.:
1. Expand the Contributions menu.
2. Click on Search by Batch.
3. Double click the batch that needs to be reversed.
4. Click the REVERSE button.
Click REVERSE.
Correct the Contribution
Now that the batch is “un-posted”, you can make corrections to existing contributions or
add contributions to the batch. To correct a contribution that has already been recorded
in Roll Call, you will need to find that specific contribution. Click on Search by Batch
under the Contributions menu. Double click on the batch. Double click on the specific
contribution.
To change the total amount, date, or type, place your cursor in the field and make the
correction. To change the fund it was designated to, use the drop down to the right of
designation and choose the correct fund.
To change the donor, click on the TRANSFER button and enter the last name for the
correct donor. Select the appropriate person from the list.
Click SAVE & CLOSE to save the changes to the contributions record and return to the
Search screen.
Re-post the Batch
Once you have corrected the batch, you will need to post it, to send the information over
to Roll Call Accounting. To post the batch:
1. Expand the Contributions menu.
2. Click on Search by Batch.
3. Highlight one or more batches that need to be posted.
4. Click on POST BATCH button in the lower right of the window.
5. You will be presented with a list of reports to run, check the options you’d like to
print.
Transfer Contributions
If a contribution was assigned to the wrong donor, you can transfer the contribution to the
correct donor at any time. You can do this for posted and un-posted batches.
118
A single contributions
To transfer a contribution that has already been recorded in Roll Call, you will need to
find that specific contribution. If you know the batch it was in, click on Search by Batch
under the Contributions menu. Double click on the batch. Double click on the specific
contribution.
If you know the person that the contribution is under, select Search by Person under the
Contributions menu. Double click on the appropriate person. Find the contributions on
the left side, double click on it.
To change the donor, click on the TRANSFER button and enter the last name for the
correct donor. Select the appropriate person from the list.
To transfer this
contribution, click
TRANSFER.
Enter the last name
or part of the last
name of the person
you are transferring
to.
Double click
the appropriate
person.
Multiple contributions
A good example of having to transfer multiple contributions from one person to another,
would be from a wife to the husband. Another example might be person with the same
name. To transfer multiple donations at once, do the following:
1. Expand the People menu on the left.
2. Click on Search Profiles.
3. Find the person who currently has the contributions.
4. Double click on their record.
5. Click on the Contributions tab.
6. Change the view to Detail by Month or Detail by Week.
7. Highlight one or more contributions that need to be transferred.
119
8. Right mouse click and select Transfer
9. Enter the last name of the correct donor.
10. Select the appropriate person.
Open the record
for the person you
are transferring
donations from.
Click on Contributions tab.
Highlight
contributions
to be transferred. Right
mouse click
and select
transfer.
Change view to
Detail by week
or month.
Enter the last
name or portion
of the last name.
Select the appropriate person.
Delete Contributions
Contributions can be deleted from an un-posted batch. The contribution can be deleted
from the batch window or from the individual contribution screen.
To delete one or more contributions from the batch window, do the following:
1. Expand the Contributions menu.
2. Click on Search by Batch.
3. Use the Find By to select your criteria to find the batch.
4. Double click on the batch you need to delete from.
5. Highlight one or more contributions.
6. Click on the minus sign.
To delete a contribution from the contribution window, do the following:
1. Expand the Contributions menu.
2. Click on Search by Batch.
3. Double click on the batch you need to delete from.
4. Double click on the specific contribution you need to delete.
5. Click on the DELETE button.
120
Highlight the
contributions
you need to
delete.
Click on minus sign.
From the individual donation
record, click
DELETE.
121
RECURRING DONATIONS
Recurring Donation Process
A recurring donation exists when a donor arranges for online giving at regular intervals
through your website or through “bill pay” at his bank. To record this regular online
giving, you may set up recurring donation entries in Roll Call. This will save you
from having to enter these donations manually. Roll Call will automatically create the
contribution record on the appropriate day.
The recurring donation process in Roll Call is as follows:
1. A recurring donation entry is added in Roll Call.
2. On the specified date or day (based on interval) a donation record is automatically
created in Roll Call.
3. An email is sent to the “donation administrator” that this has occurred.
4. The donation administrator can review the batch and decide whether or not to post the
batch.
Recurring Donation Preferences
Defaults
To speed up the data entry process for recurring donations, you can set the default
designation as well as the default days for the recurring donation. These defaults will be
used when you add a new recurring donation entry. These defaults can be changed. Also
enter the email information for recurring donation notifications.
Email notification
To enter the recurring donation preferences, expand the Contributions menu. Next,
expand the Recurring Contributions menu. Click Search, then click the Preferences icon.
Select the Default Designation for recurring donations as well as the Default Days. Next
enter the email address for the folks who need to be notified when recurring donations
have been posted. Also enter your outgoing email host information.
Click on the Search
menu under Recurring Contributions.
Enter the default
designation for recurring entries. Enter the
outgoing mail host
information for sending notifications.
122
Import Recurring Donation Profiles
If you already have this information in a spreadsheet or tab delimited file you may import
it into Roll Call. The file can contain up to 12 columns. It must contain the following
information:
1. Donor – The donor can be identified by name, email address or address line 1.
2. Frequency – The frequency must be Monthly, Bimonthly or Weekly.
3. Days - If the donation is monthly, the field must contain a day number. For example,
if the donation should be recorded on the 15th of each month, the day should be 15. If
the donation is bi-monthly, two days are required. These days can be in two different
columns or in the same column separated by a comma.
4. Amount – The amount of the contribution.
5. Designation – Which fund the money should go to.
6. Start Date - When will this recurring donation take effect.
To import the information, expand the Recurring Donations menu. Click Import. The
Import Profiles wizard will be displayed. The first window discusses the data that
is required. Click NEXT. You’ll be asked for the location and name of the file to be
imported. Click OPEN. The next window allows you to indicate the data type for each
column. Enter the column number where the information is located.
Click Import under
the Recurring Contributions menu.
Click NEXT to go to the
next step in the import wizard. You’ll be
prompted for the import
file name.
Enter the column
number that represents this data.
Leave as zero if this
information is not in
the file.
123
Find Recurring Contribution Profiles
To view all your recurring donation profiles expand the Recurring Donations menu. All
profiles will be displayed.
Find By
To view the recurring donation profiles for a specific donor, designation , frequency, day,
creation date or status, select Recurring Contributions under the Contributions menu on
the left side bar. Select the Find By Criteria. Enter the value you wish to view. Press
return.
Click on Search
under the Recurring Contribution
menu.
Choose your find by
criteria. Enter the
value you are looking for.
To view the details of a specific profile, double click on the record in the summary list.
From this window, you can scroll through the list of recurring donations from the
summary list by clicking on the Next and Previous links.
Click NEXT to go
to next profile from
the list in your search
screen.
Query
If you would like to view the recurring donation profiles based on a criteria that is not
included in the Find By drop down box, you can use the query editor. Click the SEARCH
database icon. Perform the query for the criteria you are interested in. See “Using the
Query Editor” for more information on creating custom queries.
To view the details of a specific profile, double click on the record in the summary list.
124
From this window, you can scroll through the list of recurring donations from the
summary list by clicking on the Next and Previous links.
Create Recurring Donation Profile
To enter a new recurring donation profile, click Add Recurring form the Recurring
Contributions menu.
1. Enter the donor’s Last Name and press the tab key. A list of people with that last
name will be displayed. Click on the appropriate person to select. Notice the full
name and address is displayed under Donor/Address.
2. Enter the Designation. The designation is the fund that the person is donating to.
3. Select the Status. The options for status are active or inactive. Donation entries will
Enter the last name
or part of the last
name, then press
TAB.
You can enter a first
name to further refine
the list.
Select the donor from
the list.
only be created for active recurring donations.
4. Enter the Amount of the donation.
5. Enter the Frequency of the recurring donation. If the donor wishes to make this
donation once per month, select Monthly. If the donor wishes to make this donation
twice a month, select Bimonthly. If the donor wishes to make this donation each
week, select Weekly.
6. Enter the value for Day 1 and Day 2, if applicable. If the frequency is monthly, enter
the day of the month that the donation should be posted in Day 1. If the frequency is
Bimonthly, enter the two days that the donation should be posted in Day 1 and Day 2.
If the frequency is weekly, do not enter any value in Day 1 or Day 2.
7. Enter the Day of Week for profiles that are weekly donations.
8. Enter the Start Date. This is the effective date for recurring donation processing.
Donations will not be created before this date.
125
9. Click SAVE & CLOSE to save this profile and return to the Summary window. Click
SAVE & NEW to save and enter a new profile. Enter CANCEL to ignore the data
entered and return to the Summary window.
Enter the fund,
frequency and
date information.
Click SAVE &
CLOSE or SAVE
& NEW to save the
information.
Posting the Recurring Donations
When a Recurring Contribution is posted, that means it becomes a contribution record.
This is different than the posting a batch. Under normal circumstances, recurring
donations are posted automatically by Roll Call. They can also be posted manually by
a user, if need be. When recurring donations are posted, a batch is created and specific
donation records are created in that batch. The donation administrator will be notified via
email that recurring donations have been posted.
Automatically
Each morning, Roll Call evaluates the active recurring donations profiles to determine
if they need to be posted on today’s date. When a recurring donation is posted, a batch
is created with all the donations that are to be created for that day. As an example, lets
say we have 10 monthly recurring donations that are to post on the 15th. Also we have
2 weekly donations that are set up to post on Fridays. In our example, the 15th falls on a
Friday. At around 2 in the morning on the 15th, the recurring donation process will create
a batch that includes the 10 monthly donations as well as the 2 Friday donations.
Our Recurring Contribution batch with
all the contributions
for the 15th and Fri.
126
This is the normal processing for recurring donations. You need to leave Roll Call
running overnight for this processing to occur. If for some reason the system is down,
Roll Call will evaluate recurring donations based on the last time the process was run
when it comes back up.
Manual
You can also manually post recurring donations. You may need to do this if you enter the
recurring donation profile, after the processing for that day has taken place. For example,
if you enter a recurring donation for the 15th of each month on the 15th. The processing for
the 15th has already occurred, so that donation will not post automatically until next month
on the 15th.
To post a recurring donation, select Search under the Recurring Contributions menu. Find
and highlight the donations that need to be posted. Click POST in the lower right of the
window.
Highlight the contributions which
need to be manually posted.
Click POST to create
a batch with these
contributions.
Recurring Donation Log
To view Recurring Contribution activity, click View Log under the Recurring
Contribution menu. This will show you any manual posts that happened, any importing
of profiles and record when the automatic posts happened. Any errors in processing will
be noted here as well.
127
Stopping the Recurring Donation
If a donor decides they no longer want to automatically contribute on a certain day, you’ll
to end that recurring donation. To do that, click Search under the Recurring Contribution
menu. Find the donation that needs to be stopped. Double click on it. Change the status
to inactive. Note the end date will change to today’s date.
To stop the recurring contribution,
change the status
to inactive.
128
CREATING CONTRIBUTION RECEIPTS
(STATEMENTS)
Contribution Receipt Process
The flow for creating contribution statements is as follows:
1. Expand the Contributions menu.
2. Click on the Bulk Receipts menu item. The Contribution Receipts window will be
displayed.
3. Choose your receipt type on the criteria tab.
4. Mark the applicable items on the criteria tab.
5. Click on the View People tab to see all the folks that will be receiving a statement.
6. Click on the Receipt Text tab. Customize your text areas.
7. Click PRINT RECEIPTS to print the statements or click EMAIL to email the receipts.
Contribution Statement Formats
To begin the process of creating the donation receipts, you’ll need to choose the type of
contribution statement.
Quarterly
The quarterly statement is for a single quarter. It will list either summary information or
detail all the contributions made in that quarter.
Quarterly receipt for
period 1/1/11 - 3/31/11.
Details were chosen
to be listed.
Footnote text for noncash gift item.
129
Quarterly Tabular
The quarterly tabular receipt shows weekly giving for the quarter. Pledge information is
displayed at the bottom of the receipt.
Weekly giving amounts
listed under each
month.
Annual
The annual statement summarizes all giving for the year. The statement can show totals
by fund or just a grand total. You can also list all contributions for the year as well.
Pledge information can be displayed on this receipt.
Annual statement for
2011. Includes all detail
and also pledge information.
130
Canadian
The Canadian receipts show total giving for the year. The information required by the
government in Canada is included on this receipt.
A Canadian receipt
in triplicate. Original on top and 2
copies.
Individual Gift
This receipt is for a single contribution.
The receipt for a
single contribution.
131
Quarterly Statements
To create quarterly receipts, do the following:
1. Expand the Contributions menu.
2. Click on the Bulk Receipts menu item. The Contribution Receipts window will be
displayed.
3. Choose Quarterly Receipt from the Receipt Type drop down.
Criteria
When you choose Bulk Receipts, the Contribution Receipt window will be displayed.
You will be anchored on the Criteria tab. From this tab, you can choose the type of
receipt you want and what information should be displayed on the report .
Enter the following information:
1. Year - Indicate the year that these receipts are for.
2. Quarter – Indicate which quarter you are interested in.
3. Period Starting - This date is defaulted to the beginning of the quarter or year you
selected. These dates may be changed.
4. Period Ending. This date is defaulted to the end of the quarter or year you selected.
This date may be changed.
5. Total Giving for Period Over –If you only want to produce statements for folks who
gave over a certain amount, enter that amount here.
6. Receipt Details – choose if you’d like the receipt to only have a grand total or if you’d
like it to display summary information by fund. You may also choose to display each
Select Bulk Receipts
under the Contribution menu.
Choose quarterly
as the receipt type.
Choose applicable
quarter and year.
7.
8.
9.
10.
11.
individual gift.
Include Summary by Fund – If you selected Summary & Details under Receipt
Details, you can mark this box if you’d like to display the summary information by
fund.
Include Detailed Gifts – If you selected Summary & Details under Receipt Details,
you can mark this box if you want to list each contribution for the period.
Include References to Pledges – Under the Pledge Detail section, mark this box if
you’d like to see the pledge information for each fund that this donor contributed to.
This will add a Pledge Received and Pledge Total column to the report.
Include Pledge Remainder – if you would like to include a column Pledge Remainder
mark this box.
Include all who Pledge – if you want to create a quarterly statement for each person
who pledged regardless of their giving for the quarter, mark this box.
132
12. Single Print Job – under the print options section, mark this box if you want Roll Call
to create 1 large print job for the quarterly receipts. If you will be duplexing the print
job (printing on both sides of the paper) you do not want to create a single print job.
If you are emailing receipts you do not want to create a single print job. If you are
using a large copier printer that requires a project code, you would want to check this
box.
13. Cover Letter – if you’d like to print a cover letter before each statement, mark this
box. Use the text tab to create your cover letter.
14. Print on Stationary - mark this box if you will be printing the statements on
letterhead. By checking this box, the churches return address will not be printed on
the statement. The statement will begin about 2 ½ inches down the page.
15. Report In Kind giving – if you entered property or in-kind gifts without an associated
amount and you want to display the item descriptions in the lower section of the
receipt, mark this box.
16. Show Envelope Number – if you would like the envelope number printed on the
statement, mark this box.
17. Sorted By – choose the sort order of the print job. Do you want the receipts sorted by
zip code or by name?
18. Exclude – to exclude receipts for folks who have an address marked as “bad” or “do
not send”, mark this box.
Indicate if you’d like
all contributions listed
or just totals.
Mark if you’d like to
include pledge information on the statement.
Choose your print options.
Text
There are seven different types of “text” that can be used to customize your receipt. They
are as follows:
1. Top Text – The top text area is used as a thank you note at the beginning of the
statement. If you have a verse or a paragraph that you’d like printed at the beginning
of the statement, use the top text area. If you have large thank you note, we
recommend you use the cover letter section.
2. Cover Letter – The cover letter is a 1 page letter that will be printed before each
statement.
3. Bottom Text – The bottom text area is used as footer text. It typically indicates no
goods or services were received.
4. NonCashGifts – if the donor had any non-cash gifts where an amount was assigned
to the gift, an asterisk will be placed beside the amount. Then at the bottom of the
statement, there will be an asterisk with the verbiage you enter for non-cash gifts.
Usually this would state that the donor is responsible for determining the fair market
133
value of the gift.
5. Third Party Gift – if a donor gave a foundation monies to donate to your ministry on
their behalf, the foundation is responsible for giving them a receipt. However, you
would want to include the gift with a notation that the “third party” is responsible for
receipting them..
6. QPQ Gifts – if the donor received something of value for their contribution, maybe
a CD or T-shirt, the QPQ value is indicated on the receipt. Use the QPQ Gift text to
indicate that the amount of the item is reduced from their total contribution.
7. In Kind Gift – if you have a property donation where no value was assigned, these
gifts are listed underneath the detail section of the statement. This text will be used as
the header for the In Kind Gifts.
Top text area.
Note asterisk for non
cash, qpq or third party
gifts. The asterisk text
is printed here.
Bottom text area.
To enter the text you’d like displayed on the statement, do the following:
1. Click on the Receipt Text tab.
2. Click on the type of text you’d like to enter.
3. Enter the text and format it as appropriate.
4. The next window asks you to select the receipt format. First, second, third and forth
quarter receipts display a summary of donations given within that quarter plus the
donation detail.
To include the church name and address and/or donors name and address on the cover
letter text, place your cursor in the position that you want a field, for example, “addressed
to”. Then choose that information from the Function drop down box on the lower section
of the word processor.
134
Click on the Receipt
text tab.
Click on the type of
text you’d like to customize.
View People
The view people tab is used to review the list of people that will be getting a statement.
If you’d like to print a receipt for all these people, click PRINT RECEIPT. If you only
want to print them for several of the people in the list, highlight the people that you want,
then click PRINT RECEIPTS. It will only print statements for those people that were
highlighted.
Click on View
People tab.
Click PRINT
RECEIPTS to print
receipts for everyone
in the list.
Click EMAIL to email
receipts to everyone that has email
checked.
Printing/emailing your receipt
Once you have set up your criteria, reviewed the list of people and set up your text areas,
click on PRINT RECEIPTS. The statements will be printed for everyone in the view
people tab that does not have Email checked. If you want to print a receipt for everyone
in the list regardless of the Email status, simply highlight all the people, then click PRINT
RECEIPT.
If you’d like to email the statements, click EMAIL RECEIPTS. You will be given the
choice to simply create a pdf for each statement, or to create pdf and send email. The
receipts will be emailed to everyone in the list that has Email checked. If you want to
override the Email status, highlight everyone you’d like to email a statement, then click
SEND EMAIL.
135
Quarterly Tabular Statements
To create quarterly tabular receipts, do the following:
1. Expand the Contributions menu.
2. Click on the Bulk Receipts menu item. The Contribution Receipts window will be
displayed.
3. Choose Quarterly (tabular) Receipt from the Receipt Type drop down.
Criteria
When you choose Bulk Receipts, the Contribution Receipt window will be displayed.
You will be anchored on the Criteria tab.
Enter the following information:
1. Year - Indicate the year that these receipts are for.
2. Quarter – Indicate which quarter you are interested in.
3. Special Gifts – Indicate which funds should be listed on the right side as “special
gifts”. All other funds will be listed in the main section of the report.
4. Exclude Pledge Info – mark this box if you do not want pledge information listed at
the bottom of the report.
5. Exclude – mark the appropriate box if you do not want a receipt for folks whose
address is marked as “bad address” or “do not send mail”.
6. Sort – indicate how you’d like the receipts ordered… by name or zip code.
Choose quarterly tabular
as the format.
Choose fund that should
be included in Special
column.
Mark if you’d like to
exclude bad addresses or
do not send addresses.
Text
The standard text areas do not apply to the tabular receipt. Any text entered will not be
used on the tabular statement.
View People
The view people tab is used to review the list of people that will be getting a statement.
If you’d like to print a receipt for all these people, click PRINT RECEIPT. If you only
want to print them for several of the people in the list, highlight the people that you want,
then click PRINT RECEIPTS. It will only print statements for those people that were
highlighted.
Printing your receipt
Once you have set up your criteria, reviewed the list of people and set up your text areas,
click on PRINT RECEIPTS. The statements will be printed for everyone in the view
people tab that does not have Email checked. If you want to print a receipt for everyone
136
in the list regardless of the Email status, simply highlight all the people, then click PRINT
RECEIPT.
If you’d like to email the statements, click EMAIL RECEIPTS. You will be given the
choice to simply create a pdf for each statement, or to create pdf and send email. The
receipts will be emailed to everyone in the list that has Email checked. If you want to
override the Email status, highlight everyone you’d like to email a statement, then click
SEND EMAIL.
Annual Statements
To create quarterly receipts, do the following:
1. Expand the Contributions menu.
2. Click on the Bulk Receipts menu item. The Contribution Receipts window will be
displayed.
3. Choose Annual Receipt from the Receipt Type drop down.
Criteria
From this tab, you can choose the type of receipt you want and what information should
be displayed on the report .
Enter the following information:
1. Year - Indicate the year that these receipts are for.
2. Period Starting - This date is defaulted to the beginning of the year you selected.
These dates may be changed.
3. Period Ending. This date is defaulted to the end of year you selected. This date may
be changed.
4. Total Giving for Period Over –If you only want to produce statements for folks who
gave over a certain amount, enter that amount here.
5. Receipt Details – choose if you’d like the receipt display only a grand total or if you’d
like it to display totals by fund. You may also choose to list each individual gift.
Choose annual, select
year and confirm date
range.
Choose totals only,
summary by fund and
whether or not to list all
contributions.
Choose to include
pledge information.
6. Include Summary by Fund – If you selected Summary & Details under Receipt
Details, you can mark this box if you’d like to display the summary information by
fund.
7. Include Detailed Gifts – If you selected Summary & Details under Receipt Details,
you can mark this box if you want to list each contribution for the period.
8. Include References to Pledges – Under the Pledge Detail section, mark this box if
you’d like to see the pledge information for each fund that this donor contributed to.
137
9.
10.
11.
12.
13.
14.
15.
16.
17.
This will add a Pledge Received and Pledge Total column to the report.
Include Pledge Remainder – if you would like to include a column Pledge Remainder
mark this box.
Include all who Pledge – if you want to create a statement for each person who
pledged regardless of their giving, mark this box.
Single Print Job – under the print options section, mark this box if you want Roll Call
to create 1 large print job that includes all the receipts. If you will be duplexing the
print job (printing on both sides of the paper) you do not want to create a single print
job. If you are emailing receipts you do not want to create a single print job. If you
are using a large copier printer that requires a project code, you would want to check
this box.
Cover Letter – if you’d like to print a cover letter before each statement, mark this
box. Use the text tab to create your cover letter.
Print on Stationary - mark this box if you will be printing the statements on
letterhead. By checking this box, the churches return address will not be printed on
the statement. The statement will begin about 2 inches down the page.
Report In Kind giving – if you entered property or in-kind gifts without an associated
amount and you want to display the item descriptions in the lower section of the
receipt, mark this box.
Show Envelope Number – if you would like the envelope number printed on the
statement, mark this box.
Sorted By – choose the sort order of the print job. Do you want the receipts sorted by
zip code or by name?
Exclude – to exclude receipts for folks who have an address marked as “bad” or “do
not send” mark this box.
Text
There are seven different types of “text” that can be used to customize your receipt. They
are as follows:
1. Top Text – The top text area is used as a thank you note at the beginning of the
statement. If you have a verse or a paragraph that you’d like printed at the beginning
of the statement, use the top text area. If you have large thank you note, we
recommend you use the cover letter section.
2. Cover Letter – The cover letter is a 1 page letter that will be printed before each
statement.
3. Bottom Text – The bottom text area is used as footer text. It typically indicates no
goods or services were received.
4. NonCashGifts – if the donor had any non-cash gifts where an amount was assigned
to the gift, an asterisk will be placed beside the amount. Then at the bottom of the
statement, there will be an asterisk with the verbiage you enter for non-cash gifts.
Usually this would state that the donor is responsible for determining the fair market
value of the gift.
5. Third Party Gift – if a donor gave a foundation monies to donate to your ministry on
their behalf, the foundation is responsible for giving them a receipt. However, you
would want to include the gift with a notation that the “third party” is responsible for
receipting them.
6. QPQ Gifts – if the donor received something of value for their contribution, maybe
a CD or T-shirt, the QPQ value is indicated on the receipt. Use the QPQ Gift text to
indicate that the amount of the item is reduced from their total contribution.
7. In Kind Gift – if you have a property donation where no value was assigned, these
gifts are listed underneath the detail section of the statement. This text will be used as
the header for the In Kind Gifts.
138
Top text area.
Bottom text area.
Note asterisk for non
cash, qpq or third party
gifts. The asterisk text
is printed here.
To enter the text you’d like displayed on the statement, do the following:
1. Click on the Receipt Text tab.
2. Click on the type of text you’d like to enter.
3. Enter the text and format it as appropriate.
4. The next window asks you to select the receipt format. First, second, third and forth
quarter receipts display a summary of donations given within that quarter plus the
donation detail.
To include the church name and address and/or donors name and address on the cover
letter text, place your cursor in the position that you want a field, for example “addressed
to”. Then choose that information from the Function drop down box on the lower section
of the word processor.
View People
The view people tab is used to review the list of people that will be getting a statement.
If you’d like to print a receipt for all these people, click PRINT RECEIPT. If you only
want to print them for several of the people in the list, highlight the people that you want,
then click PRINT RECEIPTS. It will only print statements for those people that were
highlighted.
Printing/emailing your receipt
Once you have set up your criteria, reviewed the list of people and set up your text areas,
click on PRINT RECEIPTS. The statements will be printed for everyone in the view
people tab that does not have Email checked. If you want to print a receipt for everyone
in the list regardless of the Email status, simply highlight all the people, then click PRINT
RECEIPT.
If you’d like to email the statements, click EMAIL RECEIPTS. You will be given the
choice to simply create a pdf for each statement, or to create pdf and send email. The
receipts will be emailed to everyone in the list that has Email checked. If you want to
override the Email status, highlight everyone you’d like to email a statement, then click
SEND EMAIL.
Canadian Receipts
The Canadian receipts are 1/3 page receipts. They can be printed 1 per page or in
triplicate. They summarize the donations for previous year. There can be only one
“original” receipt printed, each subsequent print has the word “copy” on it. There are
three types of Canadian receipts:
1. Check or cash gifts
2. Cash gifts with advantage (Quid Pro Quo)
3. Non-cash or property gifts (In Kind gifts)
Printing Canadian receipts
To print Canadian receipts expand the Contributions menu. Click on Bulk Receipts.
From criteria window select Canadian Receipts.
Select Period
1. Select the year for which you’ll be printing the receipts. Once you choose the year,
the starting and ending dates will be filled in. These dates may be changed.
Print options
2. If you would like to print a sample receipt, mark the Sample box. This uses sample
data. It is used primarily for lining up paper and viewing the format.
3. If you would like to use the receipt text, from Donations>Receipt Text, mark the
Receipt Text box in the Print Options area.
4. Select either a single copy or triplicate within the Print Options box. If you select
“single”, only one receipt will be printed for each donor. If you select triplicate, 3
receipts will be printed. One will be the “original”, the other 2 will be labeled “copy”.
5. Indicate the type of labels you’d like to print in the Print Option area. If you do not
want to print labels, select none. If you are printing on labels that are 3 across and 10
down, select Avery 5160 labels. If you would like to create a custom size and format,
select custom. See “Creating Custom Labels” for more details.
Select Canadian
format, year and date
range.
Chose your print
options.
Enter authorized
signature name
and location.
140
Sort options
6. If you would like to have the receipts printed in alphabetical order, select Last Name
in the Sort options box. If you would like to print the receipts in postal code order,
select Postal Code in the Sort Options box.
Reprint Options
7. Many times receipts must be re-printed for various reasons (they get lost, the printer
jams, or they get lost in the mail). If you need a copy of a receipt that has already
been printed, select “Reprint”. If you need a second “original”, select “Original”.
8. If you would like to print labels only, select the type of label from the Print Options
area, then mark “Labels only”.
Data for the receipt
9. Enter the Name of the person authorized to sign the receipt.
10. Enter the Location at which is issuing the receipt.
Once this information is entered, click PRINT RECEIPTS to print the receipts.
Individual Gifts
Individual gift receipts are receipts for a single contribution. To create these receipts, do
the following:
1. Expand the Contributions menu.
2. Click on the Bulk Receipts menu item. The Contribution Receipts window will be
displayed.
3. Choose Individual from the Receipt Type drop down.
Criteria
From this tab, you can choose the type of receipt you want and what information should
be displayed on the report .
Enter the following information:
1. Year - Indicate the year that these receipts are for.
2. Quarter – Indicate the quarter for these receipts.
3. Period Starting - The date range for these receipts is typically 1 day.
4. Period Ending. The date range for these receipts is typically 1 day.
Choose individual gift,
and the date range.
Choose totals only,
summary by fund and
whether or not to list all
contributions.
Choose to include
pledge information.
141
5. Total Giving for Period Over –If you only want to produce statements for folks who
gave over a certain amount, enter that amount here.
6. Receipt Details – choose if you’d like the receipt to display only a grand total or if
you’d like it to display totals by fund. You may also choose to list each individual
gift.
7. Include Summary by Fund – If you selected Summary & Details under Receipt
Details, you can mark this box if you’d like to display the summary information by
fund.
8. Include Detailed Gifts – If you selected Summary & Details under Receipt Details,
you can mark this box if you want to list each contribution for the period.
9. Include References to Pledges – Under the Pledge Detail section, mark this box if
you’d like to see the pledge information for each fund that this donor contributed to.
This will add a Pledge Received and Pledge Total column to the report.
10. Include Pledge Remainder – if you would like to include a column Pledge Remainder
mark this box.
11. Include all who Pledge – if you want to create a statement for each person who
pledged regardless of their giving, mark this box.
12. Single Print Job – under the print options section, mark this box if you want Roll Call
to create 1 large print job that includes all the receipts. If you will be duplexing the
print job (printing on both sides of the paper) you do not want to create a single print
job. If you are emailing receipts you do not want to create a single print job. If you
are using a large copier printer that requires a project code, you would want to check
this box.
13. Cover Letter – if you’d like to print a cover letter before each statement, mark this
box. Use the text tab to create your cover letter.
14. Print on Stationary - mark this box if you will be printing the statements on
letterhead. By checking this box, the churches return address will not be printed on
the statement. The statement will begin about 2 inches down the page.
15. Report In Kind giving – if you entered property or in-kind gifts without an associated
amount and you want to display the item descriptions in the lower section of the
receipt, mark this box.
16. Show Envelope Number – if you would like the envelope number printed on the
statement, mark this box.
17. Sorted By – choose the sort order of the print job. Do you want the receipts sorted by
zip code or by name?
18. Exclude – to exclude receipts for folks who have an address marked as “bad” or “do
not send” mark this box.
Text
There are seven different types of “text” that can be used to customize your receipt. They
are as follows:
1. Top Text – The top text area is used as a thank you note at the beginning of the
statement. If you have a verse or a paragraph that you’d like printed at the beginning
of the statement, use the top text area. If you have large thank you note, we
recommend you use the cover letter section.
2. Cover Letter – The cover letter is a 1 page letter that will be printed before each
statement.
3. Bottom Text – The bottom text area is used as footer text. It typically indicates no
goods or services were received.
4. NonCashGifts – if the donor had any non-cash gifts where an amount was assigned
to the gift, an asterisk will be placed beside the amount. Then at the bottom of the
statement, there will be an asterisk with the verbiage you enter for non-cash gifts.
Usually this would state that the donor is responsible for determining the fair market
value of the gift.
142
Top text area.
Note asterisk for non
cash, qpq or third party
gifts. The asterisk text
is printed here.
Bottom text area.
5. Third Party Gift – if a donor gave a foundation monies to donate to your ministry on
their behalf, the foundation is responsible for giving them a receipt. However, you
would want to include the gift with a notation that the “third party” is responsible for
receipting them..
6. QPQ Gifts – if the donor received something of value for their contribution, maybe
a CD or T-shirt, the QPQ value is indicated on the receipt. Use the QPQ Gift text to
indicate that the amount of the item is reduced from their total contribution.
7. In Kind Gift – if you have a property donation where no value was assigned, these
gifts are listed underneath the detail section of the statement. This text will be used as
the header for the In Kind Gifts.
To enter the text you’d like displayed on the statement, do the following:
1. Click on the Receipt Text tab.
2. Click on the type of text you’d like to enter.
3. Enter the text and format it as appropriate.
4. The next window asks you to select the receipt format. First, second, third and forth
quarter receipts display a summary of donations given within that quarter plus the
donation detail.
To include the church name and address and/or donors name and address on the cover
letter text, place your cursor in the position that you want a field, for example “addressed
to”. Then choose that information from the Function drop down box on the lower section
of the word processor.
View People
The view people tab is used to review the list of people that will be getting a statement.
If you’d like to print a receipt for all these people, click PRINT RECEIPT. If you only
want to print them for several of the people in the list, highlight the people that you want,
then click PRINT RECEIPTS. It will only print statements for those people that were
highlighted.
143
Printing/emailing your receipt
Once you have set up your criteria, reviewed the list of people and set up your text areas,
click on PRINT RECEIPTS. The statements will be printed for everyone in the view
people tab that does not have Email checked. If you want to print a receipt for everyone
in the list regardless of the Email status, simply highlight all the people, then click PRINT
RECEIPT.
If you’d like to email the statements, click EMAIL RECEIPTS. You will be given the
choice to simply create a pdf for each statement, or to create pdf and send email. The
receipts will be emailed to everyone in the list that has Email checked. If you want to
override the Email status, highlight everyone you’d like to email a statement, then click
SEND EMAIL.
Statement for a Specific Person
To print a receipt for a specific individual, do the following:
1. Expand the Contributions menu.
2. Click on the Personal Receipts menu item. The Select a Person window will be
displayed.
3. Enter the last name of the individual, select from the list or further refine by entering
the first name..
Start entering a
last name, first
name if you wish,
then pick from the
list.
Select Personal
Receipt under the
Contributions menu.
Criteria
From this tab, you can choose the type of receipt you want and what information should
be displayed on the report .
Enter the following information:
1. Year - Indicate the year that these receipts are for.
2. Quarter – Indicate the quarter for these receipts.
3. Period Starting - The date range for these receipts is typically 1 day.
4. Period Ending. The date range for these receipts is typically 1 day.
5. Total Giving for Period Over –If you only want to produce statements for folks who
gave over a certain amount, enter that amount here.
6. Receipt Details – choose if you’d like the receipt display only a grand total or if you’d
like it to display totals by fund. You may also choose to list each individual gift.
7. Include Summary by Fund – If you selected Summary & Details under Receipt
Details, you can mark this box if you’d like to display the summary information by
144
8.
9.
10.
11.
12.
13.
14.
15.
16.
17.
18.
fund.
Include Detailed Gifts – If you selected Summary & Details under Receipt Details,
you can mark this box if you want to list each contribution for the period.
Include References to Pledges – Under the Pledge Detail section, mark this box if
you’d like to see the pledge information for each fund that this donor contributed to.
This will add a Pledge Received and Pledge Total column to the report.
Include Pledge Remainder – if you would like to include a column Pledge Remainder
mark this box.
Include all who Pledge – if you want to create a statement for each person who
pledged regardless of their giving, mark this box.
Single Print Job – under the print options section, mark this box if you want Roll Call
to create 1 large print job that includes all the receipts. If you will be duplexing the
print job (printing on both sides of the paper) you do not want to create a single print
job. If you are emailing receipts you do not want to create a single print job. If you
are using a large copier printer that requires a project code, you would want to check
this box.
Cover Letter – if you’d like to print a cover letter before each statement, mark this
box. Use the text tab to create your cover letter.
Print on Stationary - mark this box if you will be printing the statements on
letterhead. By checking this box, the churches return address will not be printed on
the statement. The statement will begin about 2 inches down the page.
Report In Kind giving – if you entered property or in-kind gifts without an associated
amount and you want to display the item descriptions in the lower section of the
receipt, mark this box.
Show Envelope Number – if you would like the envelope number printed on the
statement, mark this box.
Sorted By – choose the sort order of the print job. Do you want the receipts sorted by
zip code or by name?
Exclude – to exclude receipts for folks who have an address marked as “bad” or “do
not send” mark this box.
Text
There are seven different types of “text” that can be used to customize your receipt. They
are as follows:
1. Top Text – The top text area is used as a thank you note at the beginning of the
statement. If you have a verse or a paragraph that you’d like printed at the beginning
of the statement, use the top text area. If you have a large thank you note, we
recommend you use the cover letter section.
2 Cover Letter – The cover letter is a 1 page letter that will be printed before each
statement.
3. Bottom Text – The bottom text area is used as footer text. It typically indicates no
goods or services were received.
4. NonCashGifts – if the donor had any non-cash gifts where an amount was assigned
to the gift, an asterisk will be placed beside the amount. Then at the bottom of the
statement, there will be an asterisk with the verbiage you enter for non-cash gifts.
Usually this would state that the donor is responsible for determining the fair market
value of the gift.
5. Third Party Gift – if a donor gave a foundation monies to donate to your ministry on
their behalf, the foundation is responsible for giving them a receipt. However, you
would want to include the gift with a notation that the “third party” is responsible for
receipting them..
6. QPQ Gifts – if the donor received something of value for their contribution, maybe
a CD or T-shirt, the QPQ value is indicated on the receipt. Use the QPQ Gift text to
145
indicate that the amount of the item is reduced from their total contribution.
7. In Kind Gift – if you have a property donation where no value was assigned, these
gifts are listed underneath the detail section of the statement. This text will be used as
the header for the In Kind Gifts.
Top text area.
Note asterisk for non
cash, qpq or third party
gifts. The asterisk text
is printed here.
Bottom text area.
To enter the text you’d like displayed on the statement, do the following:
5. Click on the Receipt Text tab.
6. Click on the type of text you’d like to enter.
7. Enter the text and format it as appropriate.
8. The next window asks you to select the receipt format. First, second, third and forth
quarter receipts display a summary of donations given within that quarter plus the
donation detail.
To include the church name and address and/or donors name and address on the cover
letter text, place your cursor in the position that you want a field, for example “addressed
to”. Then choose that information from the Function drop down box on the lower section
of the word processor.
Printing/emailing your receipt
Once you have set up your criteria, reviewed the list of people and set up your text areas,
click on PRINT RECEIPTS. The statements will be printed for everyone in the view
people tab that does not have Email checked. If you want to print a receipt for everyone
in the list regardless of the Email status, simply highlight all the people, then click PRINT
RECEIPT.
If you’d like to email the statements, click EMAIL RECEIPTS. You will be given the
choice to simply create a pdf for each statement, or to create pdf and send email. The
receipts will be emailed to everyone in the list that has Email checked. If you want to
override the Email status, highlight everyone you’d like to email a statement, then click
SEND EMAIL.
146
Email Receipts
If you’d like to email contribution statements, there are several things that need to be in
place first:
1. If you are not using a Mac, you will need to download and install the PDF CREATOR
print driver. You can do that from: http://sourceforge.net/projects/pdfcreator/
2. Make sure “My Email” is set up correctly in Roll Call.
3. For the people that would like to get an emailed receipt, mark that preference under
their contributions tab and the settings tab.
Install the Print Driver
To email receipts from a Windows machine, download the print driver from http://
sourceforge.net/projects/pdfcreator/
1. Click on the Download Now button.
2. Select Run.
3. Select Run again.
4. Follow the on screen directions to install.
Once you have the software installed, you will notice a PDF CREATOR print driver in
your list of printers.
My Email
To email receipts from Roll Call make sure you have your outgoing email host
information set up. To enter this information, expand the Home menu. Choose my Email
settings. Enter the following information.
1. Return address – the email will be “from” this address. If the recipient hits reply, this
is the address that would receive the reply.
2. SMTP Outgoing Host – Determine your email host’s outgoing SMTP address.
Contact your email provider for this information.
3. User Name/Password – If your outgoing email provider requires authentication, enter
the user name and password.
4. Port Number – Some providers require you to use a specific port number for large
email jobs. Contact your provider for this information.
5. SSL – If you provider requires SSL encryption, mark this box.
6. Click SAVE to save these settlings.
Click myEmail
settings under the
Home menu.
Enter your outgoing mail
host information.
Make sure to click SAVE
after you enter this information.
147
Set Email Setting in Profiles
For the people who would like to receive their receipt via email, mark the setting in their
profile. Find their record, click on the Contributions tab, then click on the Settings tab.
Mark Email receipt.
Click on the Contributions, Settings tab in the
person’s profile.
Choose the option
for email.
The email setting can
also be entered from
the View People tab
when you are creating
donation receipts.
Email Receipts
To email receipts from Roll Call, click on the EMAIL RECEIPT button. All donors who
have “email” marked will be sent an email with their statement as an attachment.
The send email window will be displayed. Enter the subject of the email and a comment
in the body of the email. The statement will be a pdf attachment.
If you like to email receipts to people regardless of the “email” setting, highlight all the
people in the View People tab that you’d like to email. Click EMAIL RECEIPTS. This
will email to everyone you have highlighted.
148
Highlight the people
you’d like to email
to. Click EMAIL.
Married Couples filing Individually
By default, Roll Call will combine contributions for a Husband and Wife into one receipt.
If the couple files separately and wants separate receipts, set the “files individually”
setting in their profile.
1. Use Search Profiles to find the person who wants a separate receipt.
2. Click on the Contributions tab.
3. Click n the Settings tab.
4. Mark the option for “file individually”.
Click on Settings tab under
the Contributions tab.
Mark the option for filing
separately.
149
CREATING CONTRIBUTION REPORTS
To run the standard donation reports,
1. Expand the Contributions menu and click Reports OR
2. Select Reports from the Top menu and select Contribution Reports.
Select Contribution
reports from top Reports menu.
Select reports under
the Contribution
menu on the Navigator.
From this Report window, all the reports are listed on the left side. There are also three
tabs across the top: Criteria, Columns and View Records. The Criteria tab allows you
to enter the date range and select who you want to include in the report as well as which
funds to include in the report. The Columns tab allows you to choose what data or fields
you want displayed on the report. The View Records shows you which people will be
included in the report based on your criteria.
All reports are
listed on left side.
Note the
Who and
What tabs.
Note the Criteria,
Columns and View
Records tabs.
Donor Detail Report
The Donor Detail report outlines all donations for a given time period, for the funds you
are interested in, for the people you are interested in. To run the Donor Detail report:
1. Expand the Contributions menu.
2. Click on Reports.
3. Click Donor Detail on the left sidebar.
4. Click on the Criteria tab. From the criteria tab, select the date range that you wish
for this report. Then under the Who tab, select the donors you wish to see on the
report. Do you wish to see all donors, or certain associations or certain groups, etc.
Once you’ve chosen who, click on the What tab. From here, select the funds you are
150
interested in including on this report.
5. Click on the Columns tab. Choose the columns you wish to view on the report.
There are default fields already set up for this report, but you can drag additional
fields from the left side to the Selected column. You can rearrange the ordering in the
Selected column by dragging and dropping in the order you wish to see them in the
report.
6. If you’d like to change the sort order, move the columns from the Selected column to
the “Sort” column.
7. Click GENERATE.
In our first example, lets say we’d like a donor report for all donors (we don’t care what
their association is) and we want to know all of their donations for all funds. On this
report we want to see donor name, email address, donation date and amount.
1.
2.
3.
4.
Highlight Donor Detail on the left sidebar.
From the Criteria tab, select “This Week” from the date range drop down..
Click on the Who tab. Leave “Everyone” selected.
Mark the box for “Combine Families” if you want contributions from families lumped
together.
5. Click on the What tab. Click the double arrow to move all funds to the Selected
column.
6. Mark the box to include non-cash gifts if you want to include property gift amounts in
the report as well.
Click the funds
you are interested
in to the Selected
column.
151
7. Click on the Columns tab. Drag the email, address, city and state fields from the left
side column to the Selected column on the report.
8. Click GENERATE to produce the report.
Drag or double click
the columns to the
Selected column to
include them on the
report.
The Donor
Detail report
with Address
included.
Note actions
that can be performed.
In this next example, lets say we’d like a donor report for all members who have given
to the building fund. On this report we want to see donor name, address, donation date,
fund and amount.
1. Highlight Donation Detail on the left sidebar.
2. From the Criteria tab, select “This Month” from the date range drop down.
3. Click on the Who tab. Select Association from the “Run for” drop down box. Click
on Member to move that value to the Selected column.
4. Mark the box for “Combine Families” if you want contributions from families lumped
together.
5. Click on the What tab. Click on Building to move that fund to the Selected column.
6. Mark the box to include non cash gifts if you want to include property gift amounts in
the report as well.
7. Click on the Columns tab. Drag address, city and state fields from the left side
column to the Selected column on the report.
8. Click GENERATE to produce the report.
152
Select Members
as the folks
you want in the
report.
Select building
fund as the fund
to consider for the
report.
Members who
gave to the building fund.
Donor Summary Report
The Donor Summary report calculates the amount given by the donor for all the funds
selected for the given time period. To run the Donation Summary report:
1. Expand the Contributions menu.
2. Click on Reports.
3. Click Donor Summary on the left sidebar.
4. Click on the Criteria tab. From the criteria tab, select the date range that you wish
for this report. Then under the Who tab, select the donors you wish to see on the
153
report. Do you wish to see all donors, or certain associations or certain groups etc.
Once you’ve chosen who, click on the What tab. From here, select the funds you are
interested in including on this report.
5. Click on the Columns tab. Choose the columns you wish to view on the report.
There are default fields already set up for this report, but you can drag additional
fields from the left side to the Selected column. You can rearrange the ordering in the
Selected column by dragging and dropping in the order you wish to see them in the
report.
6. If you’d like to change the sort order, move the columns from the Selected column to
the “Sort” column.
7. Click GENERATE.
In our first example, lets say we’d like a donor summary report for all donors and we
want a total of all of their donations for the given time period. On this report we want to
see donor name, email, total giving, and number of gifts.
1.
2.
3.
4.
Highlight Donor Summary on the left sidebar.
From the Criteria tab, select “This Quarter” from the date range drop down..
Click on the Who tab. Leave “Everyone” selected.
Mark the box for “Combine Families” if you want contributions from families lumped
together.
5. Click on the What tab. Click the double arrow to move all funds to the Selected
column.
Highlight Donor
Summary.
From What tab,
click over the funds
you want to consider in the report.
Donor Summary
with address columns added.
154
6. Mark the box to include non cash gifts if you want to include property gift amounts in
the report as well.
7. Click on the Columns tab. Drag the email field from the left side column to the
Selected column on the report.
8. Click GENERATE to produce the report.
In this next example, lets say we’d like a donor summary report for all members who have
given to the building fund. On this report we want to see donor name, address, total,
number of gifts and average gift.
1. Highlight Donor Summary on the left sidebar.
2. From the Criteria tab, select “This Month” from the date range drop down.
3. Click on the Who tab. Select Association from the “Run for” drop down box. Click
on Member to move that value to the Selected column.
4. Mark the box for “Combine Families” if you want contributions from families lumped
together.
5. Click on the What tab. Click on Building to move that fund to the Selected column.
6. Mark the box to include non cash gifts if you want to include property gift amounts in
the report as well.
7. Click on the Columns tab. Drag address, city and state fields from the left side
column to the Selected column on the report.
8. Click GENERATE to produce the report.
Choose date
range.
Choose Member to
only look at your
Members.
Choose Building
as the fund you are
interested in.
155
Donor Summary by Fund
The Donor Summary by Fund report calculates the amount given to each fund by the
donor for the given time period. To run the Donor Summary by Fund report:
1. Expand the Contributions menu.
2. Click on Reports.
3. Click Donor Summary by Fund on the left sidebar.
4. Click on the Criteria tab. From the criteria tab, select the date range that you wish
for this report. Then under the Who tab, select the donors you wish to see on the
report. Do you wish to see all donors, or certain associations or certain groups etc.
Once you’ve chosen who, click on the What tab. From here, select the funds you are
interested in including on this report.
5. Click on the Columns tab. Choose the columns you wish to view on the report.
There are default fields already set up for this report, but you can drag additional
fields from the left side to the Selected column. You can rearrange the ordering in the
Selected column by dragging and dropping in the order you wish to see them in the
report.
6. If you’d like to change the sort order, move the columns from the Selected column to
the “Sort” column.
7. Click GENERATE.
In our first example, lets say we’d like a donor summary by fund report for all donors and
we want a total of all of their donations for the given time period. On this report we want
to see donor name, email, amount, and number of gifts.
1.
2.
3.
4.
Highlight Donor Summary by Fund on the left sidebar.
From the Criteria tab, select “This Month” from the date range drop down.
Click on the Who tab. Leave “Everyone” selected.
Mark the box for “Combine Families” if you want contributions from families lumped
together.
5. Click on the What tab. Click the double arrow to move all funds to the Selected
column.
Highlight the
donor summary by fund
report.
Click on the What
tab. Select all the
funds to consider.
156
6. Mark the box to include non cash gifts if you want to include property gift amounts in
the report as well.
7. Click on the Columns tab. Drag the email field from the left side column to the
Selected column on the report.
8. Click GENERATE to produce the report.
Move all columns you wish
to see on the
report to the Selected column.
Click GENERATE to run the
report.
Donor Summary broken
down by
fund.
Donor Giving by Week, Month or Year
The Donor Giving summarizes how much a donor gave by week, month or year in
a spreadsheet format. The weeks, months or years are listed across the top of the
spreadsheet for the time frame you selected.
To run this report:
1. Expand the Contributions menu.
2. Click on Reports.
3. Click Donor Giving on the left sidebar.
4. Click on the Criteria tab. From the criteria tab, select the date range that you wish for
this report. Next, select the Report Type: by Week, by Month or by Year. Then under
the Who tab, select the donors you wish to see on the report. Do you wish to see all
donors, or certain associations or certain groups, etc. Once you’ve chosen who, click
on the What tab. From here, select the funds you are interested in including on this
report.
157
5. Click on the Columns tab. Choose the columns you wish to view on the report.
There are default fields already set up for this report, but you can drag additional
fields from the left side to the Selected column. You can rearrange the ordering in the
Selected column by dragging and dropping in the order you wish to see them in the
report.
6. If you’d like to change the sort order, move the columns from the Selected column to
the “Sort” column.
7. Click GENERATE.
As an example, lets say we’d like a Donor Giving by Month report for all donors and we
want a total of all of their donations for the given time period. On this report we want to
see donor name, birthday and amount for each month.
1.
2.
3.
4.
Highlight Donor Giving on the left sidebar.
From the Criteria tab, select “This Month” from the date range drop down.
Click on the Who tab. Leave “Everyone” selected.
Mark the box for Combine Families if you want contributions from families lumped
together.
Enter date
range to show
on report.
On the What
tab, select
the funds
you want to
consider.
Choose report
type of “by
Month”
5. If you want all people listed, whether or not they gave, uncheck Only Who Gave.
6. Click on the What tab. Click the double arrow to move all funds to the Selected
column.
7. Mark the box to include non cash gifts if you want to include property gift amounts in
the report as well.
8. Click on the Columns tab. Drag the birth date field from the left side column to the
Selected column on the report.
9. Click GENERATE to produce the report.
Move the columns
you’d like to see
in the report to the
selected column.
Click GENERATE
to run the report.
158
All givers
during the
time frame
listed.
Note the months
are listed across
the top.
In this example, lets say we’d like a Donor Giving by Week report for all members who
have given to the building, missions and general fund. On this report we want to see
donor name, association and total.
1. Highlight Donor Summary by Fund on the left sidebar.
2. From the Criteria tab, select “This Year” from the date range drop down.
3. Click on the Who tab. Select Association from the “Run for” drop down box. Click
on Member to move that value to the Selected column.
Choose date
range and report
type.
Run for “Members”.
4. Mark the box for “Combine Families” if you want contributions from families lumped
together.
5. To list all Members regardless of giving, uncheck Only those who gave.
6. Click on the What tab. Click on Building, Missions, and General to move those funds
to the Selected column.
7. Mark the box to include non cash gifts if you want to include property gift amounts in
the report as well.
8. Click on the Columns tab. Drag address, city and state fields from the left side
column to the Selected column on the report.
9. Click GENERATE to produce the report.
159
On the What
tab, select the
funds you wish
to consider for
the report.
Click over the
columns or fields
you wish to
include on the
report.
Click GENERATE to run the
report.
Members who
gave to the
selected funds.
Giving by week
for the date
range selected.
Top Donors
The Top X Givers report lists the top givers based on the date range, funds and the people
you select. To run this report:
To run this report:
1. Expand the Contributions menu.
2. Click on Reports.
3. Click Top X Donors on the left sidebar.
4. Click on the Criteria tab. From the criteria tab, select the date range that you wish
160
for this report. Then under the Who tab, select the donors you wish to see on the
report. Do you wish to see all donors, or certain associations or certain groups etc.
Once you’ve chosen who, click on the What tab. From here, select the funds you are
interested in including on this report.
5. Click on the Columns tab. Choose the columns you wish to view on the report.
There are default fields already set up for this report, but you can drag additional
fields from the left side to the Selected column. You can rearrange the ordering in the
Selected column by dragging and dropping in the order you wish to see them in the
report.
6. If you’d like to change the sort order, move the columns from the Selected column to
the “Sort” column.
7. Click GENERATE.
As an example, lets say we’d like to view the Top 10 donors that are also members. On
this report we want to see donor name, birthday and amount.
1.
2.
3.
4.
Highlight Top X Donors on the left sidebar.
From the Criteria tab, select “This Year” from the date range drop down.
Enter 10 as the number of givers.
Click on the Who tab. In the Run for drop down, select “Association”. Click on
Member to move that value to the Selected column.
5. Mark the box for Combine Families if you want contributions from families lumped
together.
Select date range to
consider.
Select who you want
to run this report for.
In this example, we
picked Member.
From the What
tab, select the
funds you are
interested in
including.
161
6. Click on the What tab. Click the double arrow to move all funds to the Selected
column.
8. Mark the box to include non cash gifts if you want to include property gift amounts in
the report as well.
9. Click on the Columns tab. Drag the birth date field from the left side column to the
Selected column on the report.
10. Click GENERATE to produce the report.
Top 10 donors
who are members.
Note actions that can
be performed.
Donors over X Amount
The Donors over X Amount report lists the donors that meet the specified amount criteria
for the date range, funds and people selected.
To run this report:
1. Expand the Contributions menu.
2. Click on Reports.
3. Click Donors over X Amount on the left sidebar.
4. From the criteria tab, select the date range that you wish for this report.
5. Next enter the amount that you are searching for. The report will search for those
folks who gave exactly that amount or greater over the date range.
6. Next under the Who tab, select the donors you wish to see on the report. Do you
wish to see all donors, or certain associations or certain groups etc. Once you’ve
chosen who, click on the What tab. From here, select the funds you are interested in
including on this report.
7. Click on the Columns tab. Choose the columns you wish to view on the report.
There are default fields already set up for this report, but you can drag additional
fields from the left side to the Selected column. You can rearrange the ordering in the
Selected column by dragging and dropping in the order you wish to see them in the
report.
8. If you’d like to change the sort order, move the columns from the Selected column to
the “Sort” column.
9. Click GENERATE.
As an example, lets say we’d like to view people who have given over $250 this year. We
want to evaluate everyone in the database and we want to consider giving to all funds..
1. Highlight Donors over X amount on the left sidebar.
2. From the Criteria tab, select “This Year” from the date range drop down.
3. Enter 250 as the Amount.
162
Select report
period.
Select Donor
over X report.
To see all donors
leave “Everyone”
selected on the
Who tab.
4. Click on the Who tab. Leave “Everyone” selected.
5. Mark the box for Combine Families if you want contributions from families lumped
together.
6. Click on the What tab. Click the double arrow to move all funds to the Selected
column.
7. Mark the box to include non cash gifts if you want to include property gift amounts in
the report as well.
8. Click on the Columns tab. Drag the address, city, and state fields from the left side
column to the Selected column on the report.
9. Click GENERATE to produce the report.
Click on the What
tab. Click over the
funds you are interested in.
Click on the
Columns tab
to choose the
fields for the
report.
Click
GENERATE
to run the
report.
Listing of
people who
gave over
250 YTD.
163
Given X Times
The Given X Times lists the donors who have given over a certain number of gifts based
on the date range, funds and people you select.
To run this report:
1. Expand the Contributions menu.
2. Click on Reports.
3. Click Given X Times on the left sidebar.
4. From the criteria tab, select the date range that you wish for this report.
5. Next enter the number of times you are searching for. The report will search for those
folks who given at least that many times over the date range.
6. Next under the Who tab, select the donors you wish to see on the report. Do you wish
to see all donors, or certain associations or certain groups, etc. Once you’ve chosen
who, click on the What tab. From here, select the funds you wish to consider for this
report.
7. Click on the Columns tab. Choose the columns you wish to view on the report.
There are default fields already set up for this report, but you can drag additional
fields from the left side to the Selected column. You can rearrange the ordering in the
Selected column by dragging and dropping in the order you wish to see them in the
report.
8. If you’d like to change the sort order, move the columns from the Selected column to
the Sort column.
9. Click GENERATE.
As an example, lets say we’d like to view people who have given at least 6 times this
year. We want to evaluate everyone in the database and we want to consider giving to all
funds.
1.
2.
3.
4.
5.
Highlight Given X times on the left sidebar.
From the Criteria tab, select “This Year” from the date range drop down.
Enter 6 as the Times.
Click on the Who tab. Leave “Everyone” selected.
Mark the box for Combine Families if you want contributions from families lumped
together.
Select
the report
period.
Select Given X
times as the report.
Enter the number of
times that you are
interested in.
Leave “Everyone”
selected.
164
6. Click on the What tab. Click the double arrow to move all funds to the Selected
column.
7. Mark the box to include non cash gifts if you want to include property gift amounts in
the report as well.
8. Click on the Columns tab. Drag the address, city, and state fields from the left side
column to the Selected column on the report.
9. Click GENERATE to produce the report.
Click over the
funds you are
interested in.
Click on the
What tab.
Click GENERATE
to run the report.
Listing of
people that
gave 5 or more
times this year.
Note actions that
can be performed.
Given 0 Times
The Given 0 Times report lists the people in your database who have not contributed
within the specified time period.
To run this report:
1. Expand the Contributions menu.
2. Click on Reports.
3. Click Given 0 Times on the left sidebar.
4. From the criteria tab, select the date range that you wish for this report.
5. Next under the Who tab, select the donors you wish to see on the report. Do you wish
to see all donors, or certain associations or certain groups, etc.
6. Click on the What tab. From here, select the funds you wish to consider for this
report.
7. Click on the Columns tab. Choose the columns you wish to view on the report.
There are default fields already set up for this report, but you can drag additional
165
fields from the left side to the Selected column. You can rearrange the ordering in the
Selected column by dragging and dropping in the order you wish to see them in the
report.
8. If you’d like to change the sort order, move the columns from the Selected column to
the Sort column.
9. Click GENERATE.
As an example, lets say we’d like to view members who have not given at all.
1. Highlight Given 0 times on the left sidebar.
2. From the Criteria tab, select “This Year” from the date range drop down.
3. Click on the Who tab. Select “Associations” as the Run for. Select Member.
Select report
period.
Select Associations
from the “Run for”
drop down. Then
select Member.
4. Mark the box for Combine Families if you want contributions from families lumped
together.
5. Click on the What tab. Click General fund to the Selected column.
6. Mark the box to include non cash gifts if you want to include property gift amounts in
the report as well.
7. Click on the Columns tab. Drag the address, city, and state fields from the left side
column to the Selected column on the report.
8. Click GENERATE to produce the report.
From the What
tab, click over
General fund.
Click on
Columns tab
to choose the
fields you
wish on the
report.
Click GENERATE to run the
report.
166
Listing of
Members who
have not given
to the General
fund.
Note actions
that can be
performed.
Fund Summary
The Fund Summary report calculates the amount given to the fund during the selected
time frame by the selected donors. To run the Fund Summary report:
1. Expand the Contributions menu.
2. Click on Reports.
3. Click Fund Summary on the left sidebar.
4. From the criteria tab, select the date range that you wish for this report.
5. Next under the Who tab, select the donors you wish to see on the report. Do you wish
to see all donors, or certain associations or certain groups etc.
6. Click on the What tab. From here, select the funds you wish to consider for this
report.
7. Click on the Columns tab. Choose the columns you wish to view on the report.
There are default fields already set up for this report, but you can drag additional
fields from the left side to the Selected column. You can rearrange the ordering in the
Selected column by dragging and dropping in the order you wish to see them in the
report.
8. If you’d like to change the sort order, move the columns from the Selected column to
the Sort column.
9. Click GENERATE.
As an example, lets say we’d like to view how much has been given to General and
Building by the small groups.
1. Highlight Fund Summary on the left sidebar.
2. From the Criteria tab, select “This Year” from the date range drop down.
3. Click on the Who tab. Select “Groups” as the Run for criteria. Click over all the
small groups.
4. Mark the box for Combine Families if you want contributions from families lumped
together.
5. Click on the What tab. Click General and Building funds to the Selected column.
6. Mark the box to include non cash gifts if you want to include property gift amounts in
the report as well.
7. Click GENERATE to produce the report.
167
Select report period.
Select which donors
should be included.
In this example we are
looking at giving from
small group members.
From the What tab,
select which funds
you wish to include
in the report.
Click GENERATE to run the
report.
Listing of how
much was given to
the selected funds
by members of the
small groups.
Fund Giving by Week, Month or Year
The Giving by Fund by Week report summarizes all giving for the fund by week, month,
or year for a given time period in a spreadsheet format. The weeks, months, or years are
listed across the top.
To run this report:
1. Expand the Contributions menu.
2. Click on Reports.
168
3. Click Fund Giving on the left sidebar.
4. Click on the Criteria tab. From the criteria tab, select the date range that you wish for
this report.
5. Next, select the Report Type: by Week, by Month, or by Year.
6. Then under the Who tab, select the donors you wish to see on the report. Do you
wish to see all donors, or certain associations or certain groups, etc. Once you’ve
chosen who, click on the What tab. From here, select the funds you are interested in
including on this report.
7. Click on the Columns tab. Choose the columns you wish to view on the report.
There are default fields already set up for this report, but you can drag additional
fields from the left side to the Selected column. You can rearrange the ordering in the
Selected column by dragging and dropping in the order you wish to see them in the
report.
8. If you’d like to change the sort order, move the columns from the Selected column to
the “Sort” column.
9. Click GENERATE.
As an example, lets say we’d like a Fund Giving by Month report for all donors and we
want to include giving from Members and Regular Attenders.
1.
2.
3.
4.
Highlight Fund Giving on the left sidebar.
From the Criteria tab, select “This Year” from the date range drop down.
Select “by Month” as the Report Type.
Click on the Who tab and choose “Associations” as the Run for criteria. Click over
Members and Regular Attenders to the Selected column.
Select report
period.
Choose report type
of by week, month
or year.
Choose which donors
should be included in the
totals. In this example
we are looking at giving from Members and
Regular Attenders.
5. Mark the box for Combine Families if you want contributions from families lumped
together.
6. Click on the What tab. Click the double arrow to move all funds to the Selected
column.
7. Mark the box to include non cash gifts if you want to include property gift amounts in
the report as well.
8. Click GENERATE to produce the report.
169
From the What
tab, select the
funds you’d
like to see in the
report.
Click GENERATE
to run the report.
Listing of Funds
included.
Monthly totals of
giving by Members or Regular
Attenders.
Contribution Detail
The Contribution Detail report outlines all donations for a given time period, for the funds
you are interested in, for the donors you select. To run the Contribution Detail report:
1. Expand the Contributions menu.
2. Click on Reports.
3. Click Contribution Detail on the left sidebar.
4. Click on the Criteria tab. From the criteria tab, select the date range that you wish for
this report.
5. Then under the Who tab, select the donors you wish to include in the report. Once
you’ve chose who, click on the What tab. From here, select the funds you are
interested in including on this report.
6. Click on the Columns tab. Choose the columns you wish to view on the report.
There are default fields already set up for this report, but you can drag additional
fields from the left side to the Selected column. You can rearrange the ordering in the
Selected column by dragging and dropping in the order you wish to see them in the
report.
7. If you’d like to change the sort order, move the columns from the Selected column to
the “Sort” column.
8. Click GENERATE.
In our first example, lets say we’d like a donor report for all donors (we don’t care what
their association is) and we want to know all of their donations for all funds. On this
report we want to see donor name, email address, donation date and amount.
170
1.
2.
3.
4.
Highlight Contribution Detail on the left sidebar.
From the Criteria tab, select “This Week” from the date range drop down..
Click on the Who tab. Leave “Everyone” selected.
Click on the What tab. Click the double arrow to move all funds to the Selected
column.
5. Mark the box to include non cash gifts if you want to include property gift amounts in
the report as well.
6. Click on the Columns tab. Drag the fields from the left side column to the Selected
column on the report.
7. Click GENERATE to produce the report.
Select report
period.
Choose which donors
you’d like to include
in the report.
From the What tab,
choose the funds
you’d like included
in the report.
Click GENERATE
to run the report.
Listing of all
contributions
for “last week”,
totaled by day.
Note actions.
171
Contribution Statistics
The Contribution Statistics report breaks down donations by age range, association and
zip code, marital status and giving range. This file also outlines the number of givers by
range of giving. To run the Donation Statistics report:
1. Expand the Contributions menu.
2. Click on Reports.
3. Click Contribution Statistics on the left sidebar.
4. Click on the Criteria tab. From the criteria tab, select the date range that you wish for
this report.
5. Then under the Who tab, select the donors you wish to include in the report. Once
you’ve chose who, click on the What tab. From here, select the funds you are
interested in including on this report.
6. Click GENERATE.
In this example, let’s run the statistics for all donors for this year and let’s consider all
funds.
1. Highlight Contribution Statistics on the left sidebar.
2. From the Criteria tab, select “This Year” from the date range drop down..
3. Click on the Who tab. Leave “Everyone” selected.
4. Click on the What tab. Click the double arrow to move all funds to the Selected
column.
5. Click GENERATE to produce the report.
Select your report periods to compare.
Choose which
donors to include.
From the What tab,
choose the funds
you’d like to include in the report
totals.
172
Giving broken
down by zip
code, Association, Age range
and Giving range.
First Time Donors
The First Time Donor report lists the folks who have given for the first time within the
reporting period for the funds you select. To run this report:
To run this report:
1. Expand the Contributions menu.
2. Click on Reports.
3. Click First Time Donors on the left sidebar.
4. Click on the Criteria tab. From the criteria tab, select the date range that you wish for
this report.
5. Select the Times Given (First time, Second Time, etc.)
6. Then under the Who tab, select the donors you wish to see on the report. Do you
wish to see all donors, or certain associations or certain groups, etc. Once you’ve
chosen who, click on the What tab. From here, select the funds you are interested in
including on this report.
5. Click on the Columns tab. Choose the columns you wish to view on the report.
There are default fields already set up for this report, but you can drag additional
fields from the left side to the Selected column. You can rearrange the ordering in the
Selected column by dragging and dropping in the order you wish to see them in the
report.
6. If you’d like to change the sort order, move the columns from the Selected column to
the “Sort” column.
7. Click GENERATE.
As an example, lets say we’d like to view our first time donors that are also members. On
this report we want to see donor name, address, city and state.
1. Highlight First Time Donors on the left sidebar.
2. From the Criteria tab, select “Last Week” from the date range drop down.
3. Enter First Time as the Times Given.
173
4. Click on the Who tab. In the Run for drop down, select “Association”. Click on
Member to move that value to the Selected column.
5. Mark the box for Combine Families if you want contributions from families lumped
together.
6. Click on the What tab. Click the double arrow to move all funds to the Selected
column.
7. Mark the box to include non cash gifts if you want to include property gift amounts in
the report as well.
8. Click on the Columns tab. Drag the birth date field from the left side column to the
Selected column on the report.
9. Click GENERATE to produce the report.
Highlight First
Time Donors.
Select report
period.
Choose who want want
to consider. In this
example we are looking for Members who
gave for the first time
last week.
Choose the funds you
want to consider. In this
example we are looking
for people who gave to
any fund.
From the Columns
tab, choose the
fields you wish to
see on the report.
174
MAINTAIN PLEDGES
To track pledges in Roll Call, you must first setup the pledge fund. The pledge fund can
be a multi-year campaign, such as a building fund. Or, it can be a yearly tithe pledge.
Once the pledge fund has been established, you can record the individual pledges.
Pledge Fund
A pledge fund must be for an account that is established in the chart of accounts. If the
chart of accounts does not contain this fund designation, you’ll need to set that up first.
See “Getting Started” for more details.
1. Expand the Pledge menu.
2. Click on Add a Campaign.
Click Add Campaign.
Enter Fund name,
date range and goal.
Click + to begin adding
individual pledges.
First, use the drop down box to select either the Fund Name OR Account Number.
If you selected a fund name, the associated account number will be returned. If you
selected the account number, the fund name will be returned.
Next, enter the Start Date and an End Date. Please note, that once a pledge fund has been
created, the start date may not be changed.
If you have a target goal for this pledge drive, you may enter the Fund Goal in this field.
The pledge progress summaries will use this amount to calculate the percentage of goal
reached. The Fund Type is a free format field you can use to describe the pledge fund.
Click SAVE & CLOSE to save the information. Click SAVE & NEW to enter another
pledge fund.
Individual Pledges
To begin adding individual promises or pledges, click on the plus sign in the lower left of
the pledge fund window.
First, enter the Last Name or a portion of the last name and tab out of the field. A list
of people with that last name will be displayed. Double click on the individual who is
making the pledge. If a married couple is making a pledge together, enter the pledge
175
under the head of families record. If the husband and wife are making separate pledges,
enter the husband’s pledge. Then enter a pledge for the wife.
Note the Start and End Dates from the pledge fund will be entered as the defaults for this
pledge. These dates may be changed. For example, if you have an existing building fund
that runs three years, you may have people that pledge to that fund in the middle of the
campaign. Simply change the individual start date on their pledge record.
Next, use the drop down box to select the applicable Payment Period. Will they be
paying on a weekly, monthly, or annual basis?
Enter the last name,
then press TAB.
Pick from the list of
people with that last
name.
You can change the
amount pledged by
changing the amount
& number of payments.
Enter total amount
pledged.
Next you can enter the Total Amount of their pledge (the amount they will pay over the
course of the entire pledge period) in the Pledge Amount field. Once you’ve entered this
amount, the Each Payment amount (on the right side of the screen) will be calculated.
Or, you can enter the Each Payment amount and the Pledge Amount will be calculated.
If you wish progress against this pledge to be printed on the donation receipt, click “Yes”
for Report on Rcpt. The Date Completed, Pledge Id and Pledge Fund ID fields are
determined by Roll Call and may not be modified.
To save the information you’ve entered and enter another pledge, press SAVE & NEW.
To save the information and return to the pledge summary window click SAVE &
CLOSE. To leave the screen without saving the information click on CANCEL.
To save the information you’ve entered, press OK. To leave the screen, without saving
the information, click on CANCEL.
Finding Pledges
You can search for pledges based on fund name or by donor name. To find a pledge based
on the fund, do the following:
1. Expand the Pledge menu.
2. Click on Search by Fund.
3. Enter the fund name.
4. Double click on the specific fund.
5. Scroll through the list of pledgers and double click on the specific pledge you are
interested in.
176
Click on Search by
Fund.
Choose the fund you
are looking for.
To find a pledge based on person information, do the following:
1. Expand the Pledge menu
2. Click on Search by Person.
3. Use the Find By drop down box to select your criteria.
4. Enter the value you are looking for.
5. Scroll through the list of pledgers and double click on the specific pledge you are
interested in.
Click on Search by
Person.
Choose your Find
By criteria. Then
enter the value.
Modify Pledge Information
Changing the pledge information
The only changes that are allowed to the pledge fund are to the Start Date, End Date,
Fund Goal and Fund Type. If you would like to modify this information, select Search by
Fund under the Pledge menu. Double click on the fund you are interested in changing.
To change individual pledge information, use the Search by Fund or Search by Person to
find the specific pledge. Double click on the pledge. Make the necessary changes.
177
Double click on a
specific pledge to
change it.
Modify the date range,
amount or period.
Click SAVE to save the
changed information.
Deleting a pledge fund
If you would like to delete a pledge fund, click the Search by Fund menu item. Highlight
the fund you’d like to delete, then click minus sign in the lower left of the window. All
pledge funds highlighted will be deleted.
Highlight the campaign
you’d like to delete.
Click the minus sign to delete. THIS WILL DELETE
ALL THE PLEDGES FOR
THIS CAMPAIGN.
178
Deleting pledges
If you would like to delete a pledge, click the Search by Fund menu item. Double click
on the specific pledge fund. From the lower section, highlight the pledge or pledges that
need to be deleted. Click the minus sign in the lower left of the window.
Highlight the pledges
you’d like to delete.
Click the minus sign
to delete.
Pledge Progress Letter
Roll Call allows you to create Pledge Progress Letters to inform donors of how they are
doing against their pledges. You can customize the body of the letter and the closing text.
The middle of the letter contains a summary of their pledge and amounts received. Then
the supporting detail donations are listed.
To create this letter, select Pledge Progress Letter from under the Pledge menu.
Formatting options
From the first window, select the specific pledge fund and the types of information you’d
like to include in the report.
1. Use the drop down box to select the appropriate fund. For example, if you want to
send out progress letters for your Building Fund that started 1/1/05, select Building
– 1/1/2005 from the drop down list.
2. If you would like to include in-kind giving on the pledge progress letter, mark the box
Report In-Kind Giving.
3. If you would like to include in-kind giving values on the pledge progress letter, mark
the box, Report In-Kind Giving Values.
4. If you would like to print the letters on your letterhead, mark the box Print without
headers. If the second page should be printed on plain (non letterhead) paper, click
the box marked First Page only.
5. If you choose to print the letters without headers, you have the option to print your
logo on the letters. Mark the box My Logo in header. A file dialog box will be
presented. Navigate to the graphic file that contains your logo. Select that file. Click
OPEN.
179
Select the fund
that you want to
produce the letters
for.
Click CONTINUE.
Enter the text portions of the letter
There are three different text areas, which allow you to customize your pledge progress
letter.
The next window is a word processor. Enter the main body of the letter in this section.
Once you are satisfied with the text and formatting here, click CONTINUE.
Enter the text for the
body of the letter.
If you are including in-kind gifts in your pledge progress letter, the next text box is used
to enter the wording for the in-kind giving section.
The next text box is used to enter the closing remarks.
The letters will be sent directly to your default printer. To change your default printer
in Windows, go to the control panel and select Printers and Faxes. Double click on the
printer you’d like to select as the default printer. From that window, select Printer>Set as
Default. If you need to change the page set up options from your list of printers, select
File>Printing Preferences. You can make any modifications necessary here.
To change your default printer on the Mac, click on the apple and select System
Preferences, then double click on Printers and Faxes. Click on the Set Up Printers button.
Highlight the printer you’d like, then click on the Make Default icon.
180
Pledge Reports
There are various reports that can be run for pledges. They are all run in the same
manner. The process is as follows:
1. Expand the Pledge menu
2. Click on Pledge Reports.
3. The Pledge report window is displayed. The reports are listed on the left side.
4. Click on the report you wish to run.
5. Complete the criteria section on the right.
6. Click GENERATE.
Criteria section
Once you select your report, the criteria section of the report window will change. For
the majority of the reports, you’ll need to select a date range and which funds you wish
to report on. When you click GENERATE you’ll be taken to the Pledge Report Output
Window.
Highlight the report
you wish to run.
Enter the date range for
this report.
Click over the fund you
wish to run this report
for.
Click GENERATE to run
the report.
Output window
The report will be displayed on the left side of the window. If all the results don’t fit in
this window you can use the scroll bars to move up & down or left to right. There are a
standard set of buttons on the right side of the window. These are as follows:
1. Page Setup – this button allows you to choose the paper size and orientation of the
page for your printed report.
2. Preview – This button will allow you to preview your printed report.
3. Print – click this button to send your report to the printer.
4. Customize – the customize button puts the report in the Roll Call spreadsheet
program. From here, you can save the report to a text file, change fonts, change
columns widths, change column headers etc.
5. Zoom In – to view the report in a larger font, click Zoom In.
6. Zoom Out – to view the report in a smaller font, click Zoom Out.
7. Save Report – this allows you to save the report spreadsheet.
8. Save Set – allows you to save this set of people to use in a different part of the
program.
9. Create Labels – this allows you to print address labels for the folks listed in your
report.
10. Write Letter – this allows you to create a mail merge letter for the folks listed in your
report.
11. Email – the email option allows you to email all the people in your report OR to email
the report to someone else.
181
Body of the report.
Report options. Click to PRINT,
SAVE, EMAIL, WRITE LETTER, etc.
Pledge Status report
The pledge status report lists the folks who have pledged to a specific fund and calculates
how much they’ve pledged for a date range. The report lists the name, how much they
pledged for a period and how much they gave for the same period.
To run the report:
1. Expand the Pledge menu.
2. Click on Reports.
3. Click on Pledge Status on the left side.
4. Select your date range.
5. Select the fund you wish to run this for.
6. Click GENERATE.
Pledge Comparison report
The pledge comparison report compares multiple pledge funds. For example if you
wanted to compare how much folks pledged to the 2008, 2009 and 2010 campaigns, you
could do that through this report.
To run the report:
1. Expand the Pledge menu.
2. Click on Reports.
3. Click on Pledge Comparison on the left side.
4. Select the funds you wish to list across the top.
5. Click GENERATE.
Highlight Pledge
Comparison.
Select the funds you wish to
compare.
182
Lists all the pledgers to the selected
funds.
Note output actions.
Pledge Fund Comparison report
The pledge fund comparison, lists the funds you select, the amounts pledged and the
amounts received for each selected fund.
To run the report:
1. Expand the Pledge menu.
2. Click on Reports.
3. Click on Pledge Fund Comparison on the left side.
4. Select the funds you wish to list.
5. Click GENERATE.
Highlight Pledge Fund
Comparison.
Select the pledge funds
that you’d like to report
on.
183
Listing of selected
pledge funds.
184
MANAGING GROUPS
Group Hierarchy
Groups are defined by the following classifications:
1. Campus. If your church has multiple campuses or locations with different groups and
classes at each site, you may want to define your groups at the campus level. The
campus indicates which site or location the group stems from.
2. Group Type. The next level in the hierarchy is group type. This tells us the general
classification of the group. Is the group a committee, a small group, a Sunday school
class or a youth group? Your church defines these group types or classifications. Roll
Call’s default group types are Group and Class.
3. Department. The next level in the hierarchy is the department. The department is
the ministry area within your church that is responsible for overseeing the group.
Children’s Ministry, Congregational Care, Youth and Music are some common
departments.
4. Status. The status indicates whether the group is active or inactive.
Every group that is defined in Roll Call must be assigned a Group Type, Department,
Name and Status. Status always defaults to active.
Group Custom Fields
Group custom fields
You may want to define custom fields for groups. These fields allow you to customize the
information you capture for your groups.
You can set up default custom field titles per group type. For example, lets say we have a
“small group”, group type. For each small group we need to know an emergency contact,
what they are studying, where they meet, and if they are accepting new members.
To create these group custom field titles:
1. Select RollCall>Preferences from the top menu
2. Click on the Group Custom tab.
3. Select the Group Type, “small group” in the upper left drop down box.
4. Enter “Emergency Contact as Cstm 1.
5. Enter “Studying” as Cstm 2.
6. Enter “Meeting Location” as Cstm 3.
7. Enter “Accepting New Members” as Chk1.
Click on Group
Custom.
Enter the field names
here. Check box field
in the middle column
and Dates in right
column.
185
Now each time you create a small group, there will be fields available to enter Emergency
Contact, Studying, Meeting Location, and Accepting New Members. You can customize
each group further by modifying the custom field titles for a specific group.
Group membership custom fields
Like group custom fields, you may want to define custom fields to track specific
information for each member in a group.
You can set up default custom field titles per group type. For this example, lets say we
need to know certain information about the worship team members. We’d create a group
type of “worship team”. For each of our worship team members we need to know what
instrument they play, can they read music, what is their voice type and how many times
per month are they available.
To create these group member custom field titles:
1. Select RollCall>Preferences from the top menu
2. Click on the Member Custom tab.
3. Select the Group Type, “worship team” in the upper left drop down box.
4. Enter “Instrument” as Cstm 1.
5. Enter “Voice Type” as Cstm 2.
6. Enter “Days Available” as Cstm 3.
7. Enter “Read Music” as Chk1.
Choose your
group type.
Click on Group Member custom.
Enter field names.
Now each time you create a worship team group, there will be membership fields
available to enter Instrument, Voice Type, Days Available, and Read Music. You can
further customize each group by modifying the custom field titles for group members.
Add a Group
Enter general information
There are several options for getting to the Add a Group window:
1. Expand the Groups menu and click Add a Group OR
2. Expand the Groups menu and click Search. Click on the plus sign in the lower left to
add a new group.
Once you are in the screen to add the group:
1. Enter the values for Campus, Group Type, Department and Status.
2. Enter the name of the specific group under Group Section.
186
3. If the group has a leader, enter the last name in the Leader field. Press tab to view a
list of the folks with that last name. Select from the list.
4. If the group has a co-leader, enter the last name in the Co-Leader field. Press tab to
view a list of the folks with that last name. Select from the list.
5. Enter the Location of the group, if applicable.
6. Indicate if the group meets weekly or randomly.
7. You may enter any comments or notes in the Notes field.
8. The Start Date will default to today’s date. You may change it if you’d like.
Click SAVE & CLOSE to save the information and return to the Search screen. Click
SAVE & NEW to save the information and enter a new group.
Enter leader’s
last name, then
press TAB.
Select from the
list
Select the
group type,
department and
name of this
group.
Click plus sign to
add members to
this class.
Choose weekly or random
frequency.
Add Members
To enroll people into the group, press the Members tab. From within the members tab:
1. Click the plus sign in the lower left of the window. A new window will be displayed
for you to enter the Last Name and First Name (or portion of the last name) of the
person you want to enroll.
2. Select the appropriate person to enroll in the group.
3. Tab across to enter any of the custom field data for this person. If you need to define
the membership custom field names, click CHANGE TITLES and enter the name of
the data you’d like to capture.
Enter last name or
portion of last name.
Further refine list by
entering first name.
Double click on the name
to select it. If the name is
highlighted, press enter to
select.
187
Create sessions
Next, you’ll want to indicate which days and at what times the group meets. The meeting
days and times are called sessions in Roll Call. A group that meets weekly can have an
unlimited number of sessions. A group that meets randomly does not have any sessions
defined.
To create a session:
1. Click on the session tab, if sessions are not currently displayed.
2. Click on the plus sign in the lower left. A row will be displayed, with a default of
Sunday and time of 12 a.m.
3. Use the Day of Week drop down box to select the appropriate day.
4. Enter the Start Time.
5. Enter the End Time.
6. Place your cursor under Room and double click to enter the room number of this
group meeting.
Select the day
that the group
meets.
Enter start and
end times.
Click on the plus
sign to add a new
session.
Enter values for group custom information
If you set up custom fields (under Preferences) for this group type, you can enter the
data in the Custom (1) and Custom (2) tab. Lets look at our previous example of a small
group. We had set up custom fields to record emergency contact, studying, meeting
location and accepting new members.
To enter the custom data for this group:
1. Press the Custom(1) tab. The fields on this tab are the text fields.
2. Enter values for each of the custom fields Emergency Contact, Studying and Meeting
Location.
3. Press the Custom (2) tab. The fields on this tab are the check boxes and dates.
4. Check the box for Accepting New Members, if the answer is Yes.
If no custom fields are defined for this group type, you can define them for this specific
group if you’d like. Click on the CHANGE TITLES button to enter the name of the data
you’d like to capture. When you are done entering the titles, click CHANGE DATA to
enter the actual data for that field.
188
Enter the data
for the custom
fields Location,
Studying, etc.
Click CHANGE
TITLES to
change the
names of the
fields.
Preferences
Use the preferences tab in the group screen to:
1. Tell Roll Call how many labels you wanted printed upon check in into this group.
2. Tell Roll Call which fields to print on the Attendance Roster.
3. Set age ranges for graduation.
Enter roster preferences.
Enter the
number of
labels to
print on child
check in.
Enter age ranges
if you will be
graduating on
birthdays.
Copy a Group
To make copies of a group, you’ll want to use the Clone utility. You may make up to 10
copies of one group by cloning. To clone, do the following:
1. Expand the Groups menu
2. Click on Search and find the group you wish to copy.
3. Double click on that group.
4. Select Clone from the Utilities menu at the top.
5. Choose the information you wish to copy. Click NEXT.
6. Enter the new group names. Click FINISH.
189
From the group
you want to copy,
select Clone a
Group from the
Utilities menu.
Mark the information you wish to
copy.
Click NEXT.
Name up to 10 new
groups based on the
original group.
Click FINISH.
Mass Enrollment
To enroll a multiple people into a group at once, expand the Groups menu, double click
on the group you’d like to enroll folks into. Choose Mass Enrollment from the Utilities
menu at the top.
Select Association
To limit the people in the list based on an association, click over each association you’d
like in the list.
Select Male or Female
To limit the list of possible enrollees to a certain Gender, check the box for Male or
Female. This can also be used in combination with Age range and association. For
190
example, if you wanted only male members, you could check the box for male and click
over the association Member.
Enter an age range
To limit the selection of possible enrollees based on age, enter an Age range. You can also
use this option in combination with Male/Female and Association. So if you wanted to
limit the list to boys ages 6 – 8, as example you could check male, and enter an age range
of 6 – 8.
Press CONTINUE to get your list of potential enrollees. Mark the box to Select All if you
want everyone in the list to be enrolled in the group. Or, highlight each person you want
enrolled. To highlight multiple people, hold down the apple key on the Mac, or the shift
key on Windows.
From within the
group you wish to
enroll people into,
select the Mass
Enroll option under
Utilities.
Use this window to build
the list of possible enrollee’s into this group. Choose
associations , gender or
age ranges that should be
included in the list.
Highlight all the
people you’d like to
enroll in the group.
Click ENROLL
SELECTED.
191
Select using query editor
If there is different criteria you’d like to use to determine potential enrollees, you can use
the query editor to get that list. For this example let’s say we want a list of those people
that live in a certain city. From this window, click the QUERY EDITOR button. The
query editor will be displayed.
1.
2.
3.
4.
5.
Change the Query In field to Address.
Select City from the Field Name drop down box.
Highlight “is equal to” in the Comparison box.
Enter the name of the city in the Value field.
Click on the QUERY button.
A list of people that live in that city will be displayed. Mark the box to Select All if you
want everyone in the list to be enrolled in the group. Or, highlight each person you want
enrolled. To highlight multiple people, hold down the apple key on the Mac, or the shift
key on Windows.
Transfer members to a new group
To transfer members from one group to another, do the following:
1. Expand the Groups menu.
2. Click on Search
3. Double click on the group you wish to transfer from.
4. Select the Utilities menu at the top and then select Transfer.
5. On the right side, choose the group you wish to transfer to.
6. Click over each person from the left side to the right side to transfer them.
Choose the group
you are moving them
to.
Click on the names
of people you wish
to transfer.
Choose to transfer or copy
to a new group. Transfer
removes them from one
group and places them in
the other. Copy keeps them
in the original group and
also places them in the new
group.
Mark you transfer option. Transfer to the new group moves from one group to the other.
Enroll in new group/class keeps them in the original group and also enrolls them in the
new group. Copy to new group with data will move them into the new group and also
move the membership custom data.
Click OK to complete the transfer process.
192
Graduation
Graduation Profile
To use the graduation part of Roll Call, you will need to set up graduation profiles. For
example, your nursery profile might include all the “nursery” classes and you may want to
graduate those kids on their birthday. Then you may have your grade school classes that
you’d graduate on a specific date. You would set up that profile to indicate that 1st grade
goes to 2nd grade, and 2nd grade goes to 3rd grade etc. Defining the “to’s” and “from’s” is
called the graduation profile.
Double click on a profile to view the details.
Click the
plus sign to
add a new
graduation
profile.
Click on graduation
to view all graduation profiles.
This profile shows the to
and from classes. Click
GRADUATE NOW to
graduate these classes.
On Birthday
There may be cases where you want a child to automatically move to the next class on
their birthday. In this example let’s say we have a Nursery class for kids 0 – 2years
and a 3 year old class, and a 4 – 5 year old class. For these classes we want the child to
graduate on their birthday.
To create this “pre-school” graduation profile, do the following:
1. Make sure you have the age ranges set in the Preferences tab of each group.
2. Next, click on Graduate under the Groups menu.
3. Click on the plus sign to add a profile.
4. Select the Department and Group Type for your “pre-school” classes.
5. Give this graduation profile a name. In this example, I’ll call it Pre-School.
6. Click the plus sign in the lower left to set up the first graduation from 0 -2 to 3 year
193
olds. Use the drop down to select the “from “class. Use the drop box to the right to
pick the “to” class. Click SAVE & NEW or SAVE & CLOSE.
7. Continue this process until all your pre-school classes have been identified.
8. When you are back at the graduation profile window, click on the box to graduate on
Birthday.
The pre-school
profile graduates
students on their
birthday.
Graduate Now
If you have a series of classes that you need to graduate at the beginning or end of the
school year, do the following:
To create this “grade school” graduation profile, do the following:
1. Click on Graduation under the Groups menu.
2. Click on the plus sign to add a profile.
3. Select the Department and Group Type for your “School Age” classes.
4. Give this graduation profile a name. In this example, I’ll call it Grade School.
5. Click the plus sign in the lower left to set up the first graduation from Kdg to 1st
grade. Select Kdg from the “from” box and 1st grade from the “to” box. Click SAVE
& NEW or SAVE & CLOSE.
6. Continue this process until all your school age classes have been identified.
This profile shows the
“to” and “from” classes.
Click GRADUATE NOW
to graduate these classes.
194
When you are ready to actually do the graduation, do the following:
1. Expand the Groups menu.
2. Click on Graduation.
3. Double click on the profile you wish to graduate.
4. Click GRADUATE NOW.
5. A log will be displayed showing the graduation process.
Modify Group Information
To modify any of the information about a group, change sessions, add or delete people
from a group, do the following:
1. Expand the Groups menu.
2. Click on Search.
3. Double click on the appropriate group.
4. Make the necessary changes. To add or remove members, click on Members tab, use
the plus or minus sign in lower part of window. To add or remove sessions, click on
the Sessions tab, use the plus or minus sign in the lower part of the window.
Double
click on
the group
you wish to
modify.
Make necessary
changes.
To add or
remove session, click on
Sessions tab.
Click plus or
minus sign.
To add or delete
members, click
plus or minus.
Delete Groups
To delete a group, do the following:
1. Expand the Groups menu
2. Click on Search menu item.
3. Highlight the group or groups you’d like to delete.
4. Click the minus sign. You’ll be asked if you want to make the groups inactive or
completely delete them from the database.
195
Highlight the
groups you
wish to delete.
Press the minus sign.
From within the
Groups screen,
you can click the
DELETE button
to delete this
group.
196
Group Reports
Attendance Summary
The attendance summary report gives head count information for group attendance.
This report can be run by day and it will list each group, the day they met, how many
attended and how many visitors attended. The Attendance Summary can also be run by
week, month or year. When running for this time frame, it will display the appropriate
headcount.
To run the attendance summary report by day:
1. Expand the Groups menu.
2. Click on Reports.
3. Highlight Attendance Summary.
4. Click over to the Selected column the groups you wish to view on the report.
Highlight Attendance Summary.
From Groups tab,
click over the
groups you wish to
see on the report.
5. Click on the Criteria tab. Enter the date range for the attendance data you are
interested in.
6. Select “By Day” as the report type.
7. Click GENERATE to run the report.
From Criteria tab
select date range
for the report, and
choose by day, week,
month or year.
197
From the columns tab, choose
the fields you
would like to see
on the report.
The report for
our groups “by
day”.
To run the attendance summary report by week, month or year:
1. Expand the Groups menu.
2. Click on Reports.
3. Highlight Attendance Summary.
4. Click over to the Selected column the groups you wish to view on the report.
5. Click on the Criteria tab. Enter the date range for the attendance data you are
Click over the
groups you’d
like to run the
report for.
198
interested in.
6. Select “By Week, Month or Year” as the report type.
7. Click GENERATE to run the report.
From Criteria
tab, select date
range and “by
month” in this
example.
Report based on
criteria selected.
Note a column for
each month in our
date reange.
Absent Present Report
The absent/present report allows you to find folks who have been absent so many weeks
or who have attended so many times in a certain time frame.
To run the Absent/Present report:
1. Expand the Groups menu.
2. Click on Reports.
3. Highlight Absent Present.
4. On the Groups tab, click over the groups you are interested in running this report for
to the Selected column.
5. On the Criteria tab, select the date to start looking back, how many weeks to look
back and if you are looking for people who have been absent or people present so
many times.
6. Next click on the Columns tab to choose the information you wish to include on
the report. Click on a column name from the left column and move it to the middle
column.
7. Click GENERATE to run the report.
199
From the criteria
tab, choose your
starting date, how
many weeks to look
back and if you are
looking for absent or
present.
The standard absent/
present report will
show people who met
the criteria and their
attendance.
Attendance by Group
The attendance by group report displays weekly attendance data for the members in the
selected groups. If you choose to do this across groups, it will list all the people in the
groups selected and order by name. If you choose to run this within in each group, it will
order it by group, then list each member of that group.
To create the attendance by group report, do the following:
1. Expand the Groups menu.
2. Click on Reports.
3. Highlight Attendance by Group.
4. Click over to the Selected column the groups you wish to include in the report.
5. Click on the Criteria tab. Select the starting and ending date for the report.
6. Click on the Columns tab to add additional fields to the report.
7. Click GENERATE.
200
Highlight Attendance by Group.
Select the groups
you are interested
in.
From the Criteria tab, enter the
date range for the
report.
Choose “across
groups” if you want a
list of people ordered
by name. Choose
“within each group”
if you want it broken
down by group.
You can customize this report
from the columns
tab. Click over
fields you’d like
to add to the Selected column.
201
Listing of
group members
by group and
their attendance data.
Note actions that
can be performed
for this report.
Attendance by Session
This report lists the attendance information for each group by session for each week
within the data range criteria. For each session the number of enrolled, the number of
visitors and the number present are listed.
To create the attendance by session report, do the following:
1. Expand the Groups menu.
2. Click on Reports.
3. Highlight Attendance by Session.
4. Click over to the Selected column the groups you wish to include in the report.
5. Click on the Criteria tab. Select the starting and ending date for the report.
6. Click on the Columns tab to add additional fields to the report.
7. Click GENERATE.
From the Group reports
window, highlight Attendance by Session.
Select the reports you
wish to run this for.
202
From the Criteria
tab, enter your date
range.
The report lists
headcount information for each
session for the date
range selected.
Check in Roster
The check in roster lists the students that have checked into a class, their parents names,
allergy information and their birthdate. This report is typically run from the check in
stations to give to the teachers once check in is complete. It can also be run from the
Group Reports screen.
To create the check in roster, do the following:
1. Expand the Groups menu.
2. Click on Reports.
3. Highlight Check In Roster.
4. Click over to the Selected column the groups you wish to print a check in roster for.
5. Click on the Criteria tab. Select the date for the roster. Highlight the applicable
sessions.
6. Click on the Columns tab to add additional fields to the report.
7. Click GENERATE.
203
Highlight check
in roster from
Group reports.
On the Criteria tab,
select report date, then
highlight the group
and sessions you are
interested in.
Lists all who were
checked into that class
and session.
Attendance Roster
The Attendance Roster displays the group members, an area to record attendance for up to
13 weeks or display 13 weeks of attendance history.
To create the attendance roster, do the following:
1. Expand the Groups menu.
2. Click on Reports.
3. Highlight Attendance Roster.
4. Click over to the Selected column the groups you wish to print a roster for.
5. Click on the Criteria tab. Select the starting date for the roster. Choose “13 weeks
prior” if you want to display attendance history. Choose “13 weeks after” if you want
blank columns to record attendance.
6. Click GENERATE.
204
From Group
Reports window,
highlight Attendance
Roster.
Select groups to run the
roster for.
From the Criteria
tab, enter date for
the report, weeks
prior or post, and
number of visitor
liines.
Lists group members
and dates across top.
Note weeks prior will
include attendance
history.
205
Sign-In Roster
The sign in roster can be used for parents or teachers to check students into a class. It
contains the times that the class meets, the name of the students, parents name, allergy
information and a custom field.
To create the sign in roster, do the following:
1. Expand the Groups menu.
2. Click on Reports.
3. Highlight Sign in Roster.
4. Click over to the Selected column the groups you wish to print a roster for.
5. Click on the Criteria tab. Select the Date of the group meeting and whether or not to
Include Leaders. You may also indicate if you’d like to print a roster for all groups
that are scheduled to meet on that day.
6. Next choose which fields will be displayed on the roster. Check the box next to Bar
Codes, Family Number, Custom field and Special Needs if you’d like that column
included in the report. The Custom field will be a blank column with a title that you
define. The Special Needs column will print the special needs data from Roll Call.
You may enter a different title for that column.
7. Finally select the Group Notes or enter a Custom Title for the roster. You may also
enter a Custom Footer for the report. Use the Blank Lines option to print user defined
number of blank lines for visitors.
8. Click GENERATE.
Select Sign In
Roster from
Group Reports
window.
Select the group
or groups you’d
like to create a
roster for.
From the Criteria
tab, enter the date
for the roster.
Enter header
and footer
information.
Choose the fields to be
included on the roster.
206
Lists sessions, group
members and other
information you
selected.
Check In Log
This report shows check in activity for specified groups. It will list the people who
checked in, the time they checked in and the time they checked out. If they checked in
and out multiple times, this will be displayed as well.
To create the check in log, do the following:
1. Expand the Groups menu.
2. Click on Reports.
3. Highlight Check In Log.
4. Click over to the Selected column the groups you wish to include in the report.
5. Click on the Criteria tab. Select the starting and ending date for the report.
6. Click on the Columns tab to add additional fields to the report.
7. Click GENERATE.
Highlight check
in log.
Select the groups
you’d like to run this
for.
207
From the criteria tab,
enter your date range.
Lists check in
and out times for
the students in
this class.
Group Members
This report lists the members for each of the groups selected. It contains the members
name, and address information.
To create the attendance roster, do the following:
1. Expand the Groups menu.
2. Click on Reports.
3. Highlight Attendance by Session.
4. Click over to the Selected column the groups you wish to include in the report
5. Click on the Criteria tab. Select the starting and ending date for the report.
6. Click on the Columns tab to add additional fields to the report.
7. Click GENERATE.
On the Groups
tab, click over
the groups you
are interested in
to the Selected
column.
208
From the Criteria
tab, select if you
want active members, inactive or
both in the list.
If you select “Winthin
each group”, the report
will be ordered by
group. If you select
“Across”, then it will
order by members
name.
From the
columns tab,
choose the fields
you want in the
report.
Listing of all
nursery group
members.
209
Background Checks for Groups
The background check reports lets you find people in a specific group whose background
check is either obsolete or missing.
To run this report, navigate to the Group Reports window. Highlight Background Check
report. Click on the Group tab and click over each group you’d like to evaluate the
members background check status. Next, click on the Criteria tab.
In this first example, let’s say we want to find all of our Sunday school teachers who have
background checks that are obsolete.
1.
2.
3.
4.
5.
From the Group Reports window, highlight Background Check.
Highlight the Sunday school teachers group on the Groups tab.
On the Criteria tab, enter the date at which the security check is considered obsolete.
Click over the type of security checks you are interested in.
Click GENERATE.
On the Groups
tab, click over the
group you wish to
run this report for.
Enter the Older
than date for obsolete checks.
Click over the type
of checks you are
looking at.
210
Report of Sunday
School teachers
with a missing
background check.
Duplicate Class Enrollment
The duplicate class enrollment report, lists all the people that are enrolled in multiple
active classes. This report can be run from the Group Reports screen. To get to the Group
Reports window, expand the Groups menu on the left and click Reports.
To run this report, highlight Duplicate Class Enrollment, choose the classes you wish to
evaluate, then click GENERATE. To customize the report, click on the Columns tab and
click over additional fields you’d like to see on the report.
Highlight Duplicate
Class Enrollment report.
Click over the classes
you’d like to consider.
Click over the columns you’d like included in the report.
211
Listing of students
that were in multiple
classes.
Group Involvement
The group involvement report, shows a list of people in the first column, then the groups
are outlined in the subsequent columns. An “X” is placed under each group that a person
is involved in.
To create this report, expand the Groups menu. Click on Reports and highlight Group
Involvements. Select each of the groups you’d like displayed in the report. Click on the
appropriate group from the Select column to move it over into the Include column.
Click on the Columns tab to choose additional fields to be displayed in the report. Finally
click GENERATE to run the report.
Highlight
Duplicate Class
Enrollment.
Click over the
classes you are
interested in evaluating.
Choose the additional columns you’d
like displayed on the
report.
212
All group members
displayed, with an
X under each class
they are enrolled
in.
Group Directory
There are two types of directories available for groups. The first directory is a simple list.
It lists the members name, phone, email, birthday and address in a spreadsheet format.
The second directory contains the members name and address in a traditional directory
format.
To create the group directory, do the following:
1. Expand the Groups menu.
2. Click on Reports.
3. Highlight Group Directory.
4. Click over to the Selected column the groups you wish to print a directory for.
5. Click GENERATE.
Highlight Group
Directory.
Click over the group/
groups you’d like to
print a directory for.
Next, choose the format you’d like, simple or detailed. If you choose the detailed format
you can also choose the member custom fields to include in the directory.
213
Choose simple or detailed.
If you chose detailed, you
may also select custom
fields to be included in the
directory.
Example of
detailed group
directory.
Example of simple
list directory.
214
ßGroup Picture Directory
To create the group picture directory, expand the Directories manu and select Group
Picture. Select your group from the drop down list. Next select the information you’d
like included in the directory. Click OK to send the directory to your printer.
Select font and size for
the directory.
Select fields to be included in the directory.
Example of
group picture
directory.
215
CORRESPONDING WITH YOUR CONGREGATION
Determine your Audience
When you are ready to create a letter, compose an email or print mailing labels, the first
thing you need to decide is “who will be getting this”. Will you be sending to all your
members, or people who have donated so much, or parents of your grade school children?
People
If you are determining which people to send the correspondence based on people or
address types of information, you’ll want to start in the Search Profiles menu under the
People menu. Examples of this type of information would be:
• All Members and Regular Attenders
• Everyone who lives in a specific city or zip code
• Everyone over a certain age
• Everyone in a certain Shepherd Area
• Everyone in my database.
From the Search Profiles window, find appropriate people for your mailing or email blast.
Once you have the list of people, click on the appropriate icon (LABELS, EMAIL or
LETTER)
You may also highlight a person or multiple people in your list and only those highlighted
will be included in the correspondence.
Click on the Search
menu item for the
specific area.
Click on the appropriate icon.
Highlight the people you
need to write a letter to,
email, text, etc. OR if
none are highlighted,
everyone in the list will
be used.
Donors
There are several ways you can create correspondence for donors.
1. From a donor report, use the SEND EMAIL, WRITE LETTER or LABELS buttons
on the output screen.
2. Through the Search by Person window.
3. Through the Search by Batch window.
In the first method, you’d need to run a donation report that lists people, for example, the
donor summary, top x givers, given 0 times reports. Once you click GENERATE to run
that report, the results will be listed in the output window. Click the appropriate button to
create the correspondence for the donors included in your report.
216
Donation report
with people listed.
Click to write a
letter, email or
produce labels.
To create correspondence for specific donors, expand the Contributions menu and click on
Search by Person menu item. Find the donors by entering a last name, envelope number
or association. Once you have the list of people in your list, click on the appropriate icon
(LABELS, EMAIL or LETTER).
Click on Search by
Person.
Use Find
By to locate
specific
people.
Click the appropriate icon
to write a letter, produce
labels or send
an email.
To create correspondence for donors in a specific batch, expand the Contributions menu
and click on Search by Batch menu item. Retrieve the batches you are interested in.
All the donors in the listed batches (or highlighted batches) will be included for the
correspondence. Click on the appropriate icon (LABELS, EMAIL or LETTER).
Click the appropriate
icon to write a letter,
send an email, etc., to
everyone included in
this batch.
Click Search by
Batch to locate a
specific batch.
217
Pledgers
There are several ways you can create correspondence for people who pledge.
1. From a pledge report, use the SEND EMAIL, WRITE LETTER or LABELS buttons
on the output screen.
2. Through the Search by Person window.
3. Through the Search by Fund window.
In the first method, you’d need to run a pledge report that lists people, for example, the
pledge comparison. Once you click GENERATE to run that report, the results will be
listed in the output window. Click the appropriate button to create the correspondence for
the pledgers included in your report.
Pledge report that
lists pledgers.
Click on the appropriate button to write a
letter, send an email or
produce labels.
To create correspondence for specific pledgers, expand the Pledge menu and click on
Search by Person menu item. Find the pledgers by entering a last name, envelope number
or association. Once you have the correct pledgers in your list, click on the appropriate
icon (LABELS, EMAIL or LETTER).
To create correspondence for pledgers for a specific pledge campaign, expand the Pledge
menu and click on Search by Fund menu item. Retrieve the campaigns you are interested
in. All the pledgers in the listed campaigns (or highlighted campaigns) will be included
for the correspondence. Click on the appropriate icon (LABELS, EMAIL or LETTER).
Click on Search
by Fund.
Highlight the
campaign(s)
that you want
to send correspondence to.
Click appropriate icon.
218
Group Members
There are several ways you can create correspondence for group members.
1. From a group report that lists people, use the SEND EMAIL, WRITE LETTER or
LABELS buttons on the output screen.
2. Through the Search window under Groups.
In the first method, you’d need to run a group report that lists people; for example, the
group member list. Once you click GENERATE to run that report, the results will be
listed in the output window. Click the appropriate button to create the correspondence for
those members.
Group members
list.
Click on appropriate button to create
a letter, email
or labels.
To create correspondence for people in a specific group or set of groups, expand the
Groups menu and click on the Search menu item. Retrieve the groups you are interested
in. All the people in the listed groups (or highlighted groups) will be included for the
correspondence. Click on the appropriate icon (LABELS, EMAIL or LETTER).
Expand the
Groups menu.
Click on Search.
Click on the
appropriate
icon to send
email, write
letter or produce labels.
Attenders
There are several ways you can create correspondence for people who attended a group/
class or worship service.
1. From an attendance detail report that lists people, use the SEND EMAIL, WRITE
LETTER or LABELS buttons on the output screen.
2. Through the Search window under Attendance.
219
In the first method, you’d need to run an attendance report that lists people; for example,
the attendance by person, visitor report or absent present report. Once you click
GENERATE to run that report, the results will be listed in the output window. Click the
appropriate button to create the correspondence for those attenders.
Attendance report
that lists people.
Click appropriate button to
send correspondence to
these folks.
To create correspondence for people who attended a specific service or class on a given
day, expand the Attendance menu and click on the Search menu item. Retrieve the
attendance you are interested in. All the people who attended that service or class (or
highlighted groups) will be included for the correspondence. Click on the appropriate
icon (LABELS, EMAIL or LETTER).
Click on the
appropriate icon
to send correspondence to the
folks marked as
present.
Attendance for a
specific service,
Letters
Once you have determined who you’ll be writing a letter to, click the LETTER icon
from the search screens or click the WRITE LETTER button from a report. The Letters
window will be displayed for you to compose and print your letter.
This window is made up of three different areas. The template area, in the upper left
of the window, will list saved letters that can be re-used for this new set of people. The
addressing options area is used to create the address block and salutation. For new letters,
you’ll need to choose whether to address the letters to each individual or to the family.
The word processor area is the main part of the window.
220
Template area.
Word processing menu and
icons.
Address block options.
Word processing area.
Addressing Options
The first thing you’ll want to do when creating a new letter is to choose the addressing
option. If you are addressing this letter to each individual represented in your list, choose
Individual. Then choose if you want to use the first name in the salutation or the title, for
example Dave Conley vs. Mr. Conley.
If you want to address this letter to the family represented by the list of people, choose the
family option. Then choose name, title, or all listed, underneath Family. If you choose
name, it will use the first name of the husband and wife if married, or just first name
for single folks. If you choose Title, it will use Mr. & Mrs. for married folks, or just the
title and last name for single folks. If you choose all listed, it will use the first names of
everyone in the family from your list of people
Word Processor
The word processor in Roll Call is similar to other word processors such as Microsoft
Word or Word Perfect.
Note the menu bar items: File, Edit, View, Insert, Style, etc. Underneath the menu items
are icons for the commonly used features such as New, Open, Save, Print Preview, Print
etc. If you place your cursor over the icon, a text description is displayed for that icon’s
function.
Use the paragraph option icons, left justify, center, bullet, etc., to format the text of your
letter. Underneath the paragraph options are the font size and type options. Highlight a
section of text and then change the font name and size, as appropriate. The ruler bar will
allow you to set margins, tabs and paper size.
If you compose your letter in a different word processor and want to copy and past into
Roll Call, make sure to save the original document in an rtf (rich text format) before doing
the copy. If you do not save as text first, the invisible characters from the other word
processor will interfere with proper formatting in Roll Call.
When you are ready to print your letters, click PRINT MERGE. A letter will be generated
for each person or family in your list. Once your send the letters to the printer, you’ll
be prompted to save a record of this correspondence the person’s record. If you like to
record this, answer yes, the correspondence will be noted in the Letters tab in the People
screen.
221
Insert Data
You can also pull data from Roll Call into a letter. Begin typing your letter. When you
are at a point that you’d like to insert some data, select Insert>4D expression from the
word processing menu. Next, click on the arrow in front of the type of information you
need and double click on the field you’d like to insert.
If you are basing this mail merge letter on People (Search Profiles under People) you may
insert fields from People and Addresses.
Choose Insert>4D
expression from
the Word processing menu.
Choose the field
you’d like to
insert.
If you are basing this mail merge letter on Contributions (Search under Contributions) you
may insert People, Address, Batch and Donation fields.
If you are basing this mail merge letter on Groups (Search under Groups) you may insert
Group, Group Membership, People and Address fields.
If you are basing this mail merge letter on Pledges (Search under Pledge) you may insert
Pledge, People and Address information.
Templates
If the letter you composed will be re-used in the future, make sure to save it as a
Template. To save the letter, select File>Save as Template in the word processing menu.
You’ll be prompted for the name of the letter. Once you save it, notice the name is listed
under templates in the upper left of the Letters menu.
222
When you are ready to use the letter a second time, do the following:
1. Determine who should get the letter.
2. Click the LETTERS icon.
3. Highlight your template.
4. Make any necessary changes to the template.
5. Click PRINT MERGE to print the letters.
To save a letter to
use again, select
File>Save As
Template from
Word processing
menu.
To use a template,
highlight it in the
list.
The letter template
will be displayed
in word processing
window.
Email
To send an email to a list of people, click on the EMAIL icon or EMAIL button from a
report. You will be given a choice to send an email or a text. Choose the option to send an
email.
My Email
Each user that will be sending emails from within Roll Call, must set up their email
information.
1. Select My Email Settings under the Home menu on the left side.
2. Choose a plain text or HTML type email.
3. Enter the Return Address. This is the “from” email address. If a recipient replies to
the email this is the address it will go to.
4. Enter the Mail Host Name. This is your Outgoing SMTP mail address.
5. Enter the Username and Password if your provider requires authentication.
6. Mark the box for SSL if your provider requires SSL encryption.
7. Enter the Port Number, if your provider requires a specific port number.
8. Make sure to click SAVE, to save these settings.
223
Expand Home menu
and click on My
Email.
Choose your
preferred email
type.
Enter your return address and
outgoing mail host
information.
Click SAVE.
Compose Email
When you click on the EMAIL icon you will get the “plain text” email window or the
TinyMCE editor for HTML emails based on your preference under MyEmail.
The plain text editor allows you to type in a subject and body. No graphics or
linking capabilities are available. You may send one attachment by clicking on the
ATTACHMENT button.
Choose which
email address to
use.
Type body of email.
No formatting options
are available in the
plain text editor.
Click ATTACHMENT
to send an
attachment.
If you have the preference set for HTML emails, you will get the TinyMCE editor for you
to copy HTML or to build your own. To pull in graphics, drag and drop your image file
into the editor and place it where you’d like it displayed. Begin typing the content of your
email. Notice the font and size options. To create a link within your email, highlight the
word’s you’d like linked, then click the link icon. Enter the URL that you’d like the link
to go to.
224
Change font, size
and type as necessary.
Type the text
of your email.
Highlight portions to change
the font.
To create a
hyper-link,
highlight the
text, then click
on the LINK
icon.
Enter the link address.
Click INSERT.
Log
Once you click send, an e-mail will be sent to each person in your list. Once the send is
complete a log will be displayed indicating which email was sent, and if there were any
send errors. You may SAVE or PRINT this log, or simply click CLOSE to leave the log
and return to Roll Call.
225
All people will be
listed with the email
used. Any send errors will be noted in
this log.
Click to SAVE or
PRINT this log.
Text
To send a text to a list of people a couple of things will need to be configured:
1. You will need to have your outgoing email host information set up under MyEmail.
2. You will to have the person’s cell phone and carrier information entered in the Phones
tab of a person’s profile.
My Email
Each user that will be sending emails or texts from within Roll Call, must set up their
email information.
1. Select MyEmail Settings under the Home menu on the left side.
2. Choose a plain text or HTML type email .
3. Enter the Return Address. This is the “from” email address. If a recipient replies to
the email this is the address it will go to.
4. Enter the Mail Host Name. This is your Outgoing SMTP mail address.
5. Enter the Username and Password if your provider requires authentication.
6. Mark the box for SSL if your provider requires SSL encryption.
7. Enter the Port Number if your provider requires a specific port number.
8. Make sure to click SAVE, to save these settings.
Expand Home menu
and click on My
Email.
Choose your
preferred email
type.
Enter your return address and
outgoing mail host
information.
Click SAVE.
226
Phone information
To send a text you will need to have the cell phone number in the phones tab for each
person you wish to send a text. The carrier information will also need to be included.
Sending the Text
Once you have determined who you’ll be texting, click the EMAIL icon from the search
screen. You’ll be given the option to send email or to send a text. Choose the option for
text. A window will be displayed for you to enter your text message.
Make sure cell number and carrier are
listed for the folks
you need to text.
Use the Search
window to find the
folks you wish to
text.
Click EMAIL
icon, then
choose text option.
Enter your text
message, then click
OK to send.
227
Labels
There are several ways that you can produce mailing labels for people in your system.
You can do it from the search windows or from the Reports & Labels menu option. To
create the mailing labels, do the following:
1. Click the LABELS icon from the search window, or choose the Labels menu under
the Reports and Labels menu item.
2. If you choose the Labels menu item, you’ll need to determine who you want to create
the labels for in the criteria tab. If you used the ICON from the search screen, Roll
Call will produce mailing labels based on the list or the highlighted people in your
list.
3. Click on the Customize tab to change the font, size of font. You can also use the
adjustment areas to move the positioning of the printing on the label.
4. Click PRINT to send the labels to the printer.
Criteria
If you selected the Labels menu item, under the Reports & Labels menu, you be brought
into the Criteria tab to start the process. Use the “Run For” drop down to choose who
you want to print the labels for. Once you’ve chosen your type, select the specific values
you’d like returned. To select, double click on the value and it will move to the right side
“Selected” box.
Choose who you
want to create labels for... groups,
associations, etc.
Choose Labels
under the Reports
& Labels menu.
Click on each of
the values you
wish to select.
When you click on a
value it is moved to
the Selected column.
228
Options
If you clicked on the LABELS icon from a search screen, you will be anchored on the
options tab. In this section you will be able to choose to create a mailing label for each
individual in the list, or one mailing label per family in the list. You can also choose to
use their first name or to use their title to address the label.
You may also opt to exclude people who have an address that is marked as “bad” or who
have indicated “do not send” mail.
The default sort for the labels is by Last Name, First Name. If you’d like to change that to
postal code or to envelope number, make that selection on the options tab.
Click on Options tab.
Mark to include
envelope number on
label.
Choose to create labels
for each individual on
the list, or each family.
Customize
Use the Customize tab to change the font, type and size of the lettering for your label.
You may also add static text to the label, or eliminate the use of Address Line 2 on the
label.
If you have a partial sheet of labels, use the area in the upper right to indicate the label
number to start with. Also, if you need to adjust where the printing starts, use the
adjustment arrows to move to the top, left or right, or up or down.
Choose which information to include on the
label.
Use arrows to
adjust printing
start position.
Choose font, size and
type for printing.
229
View People
If you’d like to review who will have a label printed click the View People tab. Each
person that will have a label printed will be listed.
Envelopes
Creating and printing envelopes is very similar to creating a Mail Merge document. The
difference is the paper size and formatting options. As an example, let’s say we want to
print envelopes for the letters that will be sent to the Members of the congregation.
1. Expand the People menu.
2. Click on Search Profiles.
3. Find by Association and select Member.
4. Click the Letters icon.
5. Choose to address to individual or family in the lower left section of the Letters
window.
Choose to have envelope addressed to
individual or family.
6.
7.
8.
9.
10.
Select File>Page Setup from the word processing window.
Change the paper size to your envelope size.
Change the orientation to landscape.
In the word processing section, delete today’s date.
Delete the salutation.
Select File>Page
Setup and choose
envelope size and
landscape.
230
Enter return
address.
Move send to
name and address
to middle. Delete
salutation.
11. Move the name and address of the member to the middle of the page and down
several lines.
12. Enter the name and address of your church if you’d like it displayed in the upper left
corner of the envelope.
13. Use the Print Preview icon to see how things line up.
14. Click PRINT MERGE to send the envelopes to the printer
15. Select File>Save as Template to save this envelope in the templates area to use again.
231
PRINTING DIRECTORIES
There are four types of directories available in Roll Call.
1. Classic - This directory is a two column directory, that includes all family member
names, address and home phone.
2. Standard - This directory allows the user much more flexibility in choosing the font,
size and what information to display.
3. Picture - This directory contains the families picture, family member’s name and
phone number.
4. Group - This directory contains information on folks in a specific group or class.
Classic Directory
To create the Classic Directory, expand the Directories menu on the left side bar. Click
on Classic Directory. The first window that is displayed asks if you’d like a certain
assocation marked with an asterisk. For example, if you’d like all your members to have
an asterisk by their name, click “Yes”. You may also decide if you’d like the current,
primary or both addresses to be printed in the directory. After you’ve made you selections,
press OK.
To mark a
certain association with an
asterisk, click
Yes.
Select addresses to be
included in
directory.
Select the association
you’d like marked
with an asterisk.
The next window that is displayed is asking for what people you want in the directory. To
indicate specific associations to be included in the directory, click over each association
to be included, over to the Include box. For example, if you’d like to include members
and regular attenders in the directory, click on the association “Member” from the Select
List box. It will move over to the Include box. Next click on “Regular Attender” from
the Select List box. It will move over to the Include Box. Click the PRINT DIRECTORY
button.
When you select an
association it will be
moved to this column.
Click on each
association
that you’d like
included in the
directory.
Once you’ve selected the associations,
click here to create
the directory.
232
Example of Classic Directory
Standard Directory
To create the Standard Directory, exapnd the Directories menu on the left side. Then
click on Standard.
Select the fields and format that will be displayed
The first window that is displayed allows you to customize what information you’d like to
include in the directory.
1. The first item asks if you’d like a certain association marked with an asterisk. For
example, if you’d like all your members to have an asterisk by their name, select
“Member” from the drop down list and click Yes.
2. The next section asks which address you’d like included. You may select Current,
233
3.
4.
5.
6.
7.
8.
9.
10.
11.
Primary or Both addresses to be printed in the directory.
Show Birth Dates should be checked if you’d like the family member’s birth dates to
be included in the directory.
Show Children’s Ages should be checked if you’d like this information listed.
Show Wedding Date should be checked to include this information.
Show Associations should be checked if you’d like each family member’s association
to be displayed.
Show Shepherd Area should be checked if you’d like the families “shepherd” to be
included in the directory.
Show Family Email should be checked if you’d like the family email to be listed.
This directory may be printed in a Two or Three Column format. Click on the format
you’d like.
The Font and Font Size may be selected.
In the Personal Phone numbers section, click on each of the phone number types
you’d like included in the directory. Click on the type to move it over to the Include
box.
If you will be sending this directory to your printer, click on the PRINTER button. If
you’d like to save this directory as a file, click on the SAVE TO DISK button.
Select the type
of address to
display.
Select 2 or 3
column directory.
Change font and
size of type.
Choose individual
phone numbers to
include.
Select the people using associations
The next window that is displayed is asking which people you want to include in the
directory. To indicate specific associations that should be included in the directory, click
over each association, over to the Include box. For example, if you’d like to include
members and regular attenders in the directory, click on the association “Member”
from the Select List box. It will move over to the Include box. Next click on “Regular
attender” from the Select List box. It will move over to the Include box.
Click the PRINT DIRECTORY button. If you opted to send the directory to the Printer,
please note this will go directly to your default printer. If you chose to save the directory
to disk, you will be asked to provide a file name.
234
When you select an
association it will be
moved to this column.
Click on each
association
that you’d like
included in the
directory.
Once you’ve selected the associations,
click here to create
the directory.
Select the people using the query editor
If you would like to determine who is placed in the directory by another criteria, you
can use the Query Editor. For example, lets say you only want those folks that live in a
certain city to be included in the directory. From this window, click the USE QUERY
button. The Query Editor will be displayed.
1. Change the Query In field to Address.
2. Select City from the Field Name drop down box.
3. Highlight “is equal to” in the Comparison box.
4. Enter the name of the city in the Value field.
5. Click on the QUERY button.
If you opted to send the directory to the Printer, please note this will go directly to your
default printer. If you chose to save the directory to disk, you will be asked to provide a
file name.
Select table
to query in.
Select appropriate
operator.
Select field that
will be used as
our criteria.
Enter value
that you are
looking for.
Press to perform
the search.
235
Example of Standard Directory
Family Picture Directory
To create the picture directory, expand the Directories menu on the left side bar. Click on
Family Picture.
Select the people using associations
The next window that is displayed is asking which people you want to include in the
directory. To indicate specific associations that should be included in the directory, click
over each association, over to the Include box. For example, if you’d like to include
members and regular attenders in the directory, click on the association “Member”
from the Select List box. It will move over to the Include box. Next click on “Regular
attender” from the Select List box. It will move over to the Include box.
Click the USE ASSOCIATIONS button.
When you select an
association it will be
moved to this column.
Click on each
association
that you’d like
included in the
directory.
236
Specify formatting options
The next window allows you to select the Font and Font Size for the text. You may also
indicate if you’d like only those families with pictures or all families selected from the
above criteria. You may also check if you’d like the Address, Phone and Email included.
After you’ve made your selections, press CONTINUE.
Next your print dialog boxes will be displayed so you can print your directory.
Select font and size
type.
Select to
include all or
just those with
pictures.
Choose which
information to
include.
Select the people using the query editor
If you would like to determine who is placed in the directory by another criteria, you
can use the Query Editor. For example, lets say you only want those folks that live in a
certain city to be included in the directory. From this window, click the USE QUERY
button. The Query Editor will be displayed.
1. Change the Query In field to Address.
2. Select City from the Field Name drop down box.
3. Highlight “is equal to” in the Comparison box.
4. Enter the name of the city in the Value field.
5. Click on the QUERY button.
Select table
to query in.
Select appropriate
operator.
Select field that
will be used as
our criteria.
Enter value
that you are
looking for.
Press to perform
the search.
237
Example of Family Picture Directory
Group Directory
There are two types of group directories. There is a simple list with name, address,
phone, email and birthdate. Then there is the detail directory that can include custom
field information.
To create the group directory, expand the Directories menu on the left side bar. Click on
Group Directory. Select your groups on from the right side
Select the group
that you are
printing the
directory for.
To reduce
the list of
groups
available,
select campus, type,
department
and status.
238
Select the directory format
There are two group directory formats. The Simple List prints the name, phone, birthday,
email and address of the group members. The Detail List allows you to select the custom
fields you’d like to include in the directory.
Click on Simple List or Detail to determine the type of directory. Then if you
selected Detail, mark each of the custom fields you’d like included in the
directory. Click PRINT to send the directory to the printer.
Group Detail Directory
Group Simple List Directory
239
Group Picture Directory
To create the group picture directory, expand the Directories manu and select Group
Picture. Select your group from the drop down list. Next select the information you’d
like included in the directory. Click OK to send the directory to your printer.
Select font and size for
the directory.
Select fields to be included in the directory.
Example of
group picture
directory.
240
USING THE QUERY EDITOR
Query Editor uses
The query editor is used to produce lists of records that have common characteristics.
Some examples are:
• A list of all the members.
• A list of the people who visited last Sunday.
• A list of the groups that meet on Wednesday night.
• A list of donations given between two dates.
Table Layouts
Before using the query editor it is helpful to understand how information is stored in
Roll Call. Roll Call is based on the relational database 4D. The information is stored in
tables. Each table contains information about a “thing”. For example: people, addresses,
donations, groups and group members. Each table then is related to each other. For
example, each donation must be for a person. A more complete listing of tables and all
fields is located in Appendix A.
Address
The address table contains the family specific information. Some of the fields in the
address table are: Family number, Family email address, Address 1, Address 2, City, State,
Zip, Area Code 1, Phone 1, Area Code 2, Phone 2, Alternate Address, Shepherd Area and
Wedding Date.
People
The people table contains the individual’s information. Some of the fields in the people
table are: Family ID, Title, First Name, Nick Name, Middle Name, Last Name, Gender,
Birthday, Age, Association, email address and envelope number. The individual’s
“standard” (work, fax, pager and cell) phone numbers are stored in this table. The values
for the custom fields that were defined by your church are stored in the people table.
Summary donation information is stored in the people table. There are summary fields for
the donation amounts given 4 years ago, 3 years ago, 2 years ago, last year and YTD.
Donations
The donations table contains the high level information about a donation. Some of the
fields in the donation table are: Person who gave the donation, the donation date, the
donation amount, the type of donation, the check number, property gift information and
quid pro quo donation amount.
Designation
The designation table indicates which fund the donation was assigned to. If the donation
was split into multiple funds, there will be multiple designation records for that donation.
The designation fields are: the ID of the related donation record, the fund designation, the
amount given to that fund, and the pledge ID if the designation was for a pledge fund.
Non-Cast Gift
The non-cash gift table indicates what was given, the donor, and the amount it was sold
for.
Recurring Donation
Recurring donations contain information about regularly scheduled donations. It contains
the donor, amount to be donated, and the frequency.
241
Pledge
The pledge table contains the information about an individual’s pledges. The fields are
the ID of the person who made the pledge, the fund that the pledge was made to, the
amount of the pledge, and the start and end date of the pledge.
Groups
The group table contains the high level information about a group. The fields are the
group type, the department, group name, the campus (if multi-campus is turned on), and
the leader of the group. There are also custom group titles and values stored in this table.
Group Members
The group members table indicates which people are enrolled in a group. The fields
include group name, the person’s ID and the custom fields defined by your church.
Sessions
The sessions table contains the day of the week and the times that a group meets.
Attendance Summary
The meetings table contains an attendance summary for a group or service for a date.
Attendance
The attendance table contains the specific attendance information for a group or service.
Who attended, on what day, and what time.
Sets
A set is a grouping of records. Each time you execute a query a set of records
displayed. Once you have the list or “set” you may save it.
To save a set, press the SAVE SET button. A file dialog box will be displayed allowing
you to choose the location and to name the file. After you’ve entered this information
press SAVE.
Now this set can be used for multiple tasks. For example, let’s say you are creating a
merge letter to people that have donated to a certain fund. You need to give the pastor a
list of those people, you need to create the merge letter and you need to create labels for
that group of people. Those are 3 different tasks, but all with the same “set” of people.
These query
results are our
current set.
Click SAVE
SET icon to
use set later.
242
You could do the query once, save the set, then re-use the set for each of the tasks.
PLEASE NOTE: the set is only a snapshot of who has given to a fund at that particular
time. The set does not change as more people give to that fund.
To call up the “set”, you may use the GET SET button any time you are at a query editor
window with the same Find Records In table name. You may also click on the GET SET
icon from the Summary screen. If your set was for people records then the Find Records
In must also be for people. If the set you saved was Donation records, the Find Records
In must be for Donations.
Click to
retrieve the
latest query
results.
Make sure the
base table is
the same as
your saved set.
Click to
retrieve the
saved set.
Current selection
Roll Call stores the results of the last query performed in memory. You can always recall
those results by clicking the CURRENT SELECTION button from the query editor.
For this example, let’s say you did a query then accidentally clicked on the CANCEL
button from the results screen. You could go back to the query editor and press the
CURRENT SELECTION button to retrieve your results.
Basic Query
To query you’ll need to fill in the following information:
1. The table you’ll be querying from. For example, if the criteria is the City, you’ll
be querying from the Address table. Enter this in the Query In portion of the query
editor.
2. The field name. In that same example, if the criteria is City, you’ll need to select City
from the Field Name drop down box.
3. The comparison. In this example the comparison would be “is equal to”. Highlight
that in the Comparison box.
4. The value. Enter the name of the city you are interested in, in the Value field.
5. Press the QUERY button. A list of all the people who live in that city will be
returned.
243
Change table to
Addresses.
Enter value you
are looking for.
Select Field Name City.
Press
QUERY to
execute.
Multiple criteria query
Let’s say you want to know all the people that are over 30 years old that are members.
We’ll have two lines in this query.
1. Expand the People menu. Click on Search Profiles. Click QUERY icon.
2. Enter People as the Query In table. (Both association and year to date are stored in the
people table)
3. Select “Age” from the Field Name drop down box.
4. Highlight “is greater than” in the Comparison box.
5. Select 30” as the Value.
6. Press the ADD LINE button.
7. Select “Association” from the Field Name drop down box.
8. Highlight “is equal to” from the Comparison box.
9. Enter Member as the Value.
10. Press QUERY. A list of folks over 30 who are members will be displayed.
Select field names
here.
Enter criteria
values.
Click ADD LINE to
add additional criteria to the query.
Click QUERY to
execute query.
244
Associations query
Let’s say you want to know all the people that are Members or Regular Attenders. In this
example, we’ll need to use the Associations tab of the query editor.
1.
2.
3.
4.
Expand the People menu. Click on Search Profiles. Click QUERY icon.
Click on the Associations tab.
Click on each Association you want to include in the query.
Press QUERY to execute the query.
Click on the Associations tab.
Click QUERY to
execute the query.
Click on each Association you’d like to
include.
Groups query
Let’s say you want to know all the people that are in the Children’s Department classes..
In this example, we’ll need to use the Associations tab of the query editor.
1.
2.
3.
4.
Expand the People menu. Click on Search Profiles. Click QUERY icon.
Click on the Associations tab.
Click on each Association you want to include in the query.
Press QUERY to execute the query.
Click on the Groups
tab.
Click QUERY to
execute the query.
Click on each Association you’d like to
include.
245
An either/or criteria
In this example, let’s say we need a list of all the people who live in a certain city OR they
are assigned to a specific shepherd area.
1. Expand the People menu. Click on Search Profiles. Click QUERY icon.
2. Enter “Address” as the Query In table. (both city and shepherd area are stored in the
address table)
3. Select “City” from the Field Name drop down box.
4. Highlight “is equal to” in the Comparison box.
5. Enter “Evergreen” as the Value.
6. Press the ADD LINE button.
Click ADD LINE
to add additional
criteria.
Select OR if they
don’t have to
meet both criteria.
7.
8.
9.
10.
11.
Press the OR button. Notice the AND is changed to OR on the second line.
Select “Shepherd Area” from the Field Name drop down box.
Highlight “is equal to” from the Comparison box.
Select “Aram’s” as the Value.
Press QUERY. A list of people who live in Evergreen OR are in Aram’s shepherd
area is displayed.
Date range criteria
For this example, let’s create a query that gives us a list of people who have given a
donation between January 1, 2006 and July 31, 2006.
1. Expand the People menu. Click on Search Profiles. Click QUERY icon.
2. Enter “Donation” as the Query In table. (donation date is stored in the Donations
table)
3. Select “Donation Date” from the Field Name drop down box.
4. Highlight “is greater than or equal to” in the Comparison box.
5. Enter 1/1/06 as the Value.
6. Press the ADD LINE button.
7. Select “Donation Date” again from the Field Name drop down box.
8. Highlight “is less than or equal to” from the Comparison box.
9. Enter 7/31/06 as the Value.
10. Press QUERY. A list of people who gave between 1/1/06 and 7/31/06 is displayed.
246
By using the
“greater than” and
“less than” comparison operators
we can look at a
date range.
A partial name criteria
In this example we’ll use a wildcard character. The wildcard in Roll Call is the @
symbol. Let’s say we want to find all the people whose first name begins with KIM.
1.
2.
3.
4.
5.
6.
Expand the People menu. Click on Search Profiles. Click QUERY icon.
Enter “People” as the Query In table. (first name is stored in the People table)
Select “First Name” from the Field Name drop down box.
Highlight “is equal to” in the Comparison box.
Enter “KIM@” as the Value.
Press QUERY. A list of people with the first name of Kim or Kimmy or Kimberly etc.
will be returned.
By using
the wildcard
character, we
can find all
the people that
are enrolled
in Childrens
group.
247
Complex Queries
Association plus other criteria
In this example, let’s find all the people that are members, regular attenders and their zip
code is 61010
1. Select People>People Summary from the main menu, then click on the SEARCH
icon..
2. Click on the Associations tab and click over Member and Regular Attender
3. Click on the Editor tab.
4. Select Address as the table.
5. Select City in the Field drop down
5. Highlight “is equal to” in the Comparison box.
6. Enter Evergreen as the Value.
7. Press QUERY. A list of all the people that meet that criteria are listed.
Click on the Associations tab.
Click on each Association you’d like to
include.
Click on Editor tab.
Click query to
get the results
of the criteria
from both tabs.
Association and
editor.
Select the field and
criteria values.
248
Multi-Table query
You may need a list, in which the criteria spans several tables. For example, give me all
the people who have donated since 2006 who live in Evergreen.
1. Expand the People menu. Click on Search Profiles. Click QUERY icon.
2. Enter “Donation” as the Query In table. (donation date is stored in the Donations
table)
3. Select “Donation Date” from the Field Name drop down box.
4. Highlight “is greater than or equal to” in the Comparison box.
5. Enter 1/1/06 as the Value.
6. Press the ADD LINE button.
7. Change the Query In table from “Donations” to “Addresses”.
8. Select “City” from the Field Name drop down box.
9. Highlight “is equal to” in the Comparison box.
10. Enter “Evergreen” in the Value field.
11. Press QUERY. A list of people gave after 1/1/06 a who live in Evergreen is returned.
Change table
here, to get to the
appropriate fields
for your query.
Click QUERY
to get the
results.
Click ADD LINE to add
additional criteria to
your query.
Query in Current Selection
Querying within a current selection allows you to limit your query to only those records
that are in the current selection. Let’s say you’ve just done a query of all the people who
are Members. Then you want to know who has given in the last 6 months.
From the results list, press the SEARCH icon. The query editor is displayed again.
1. Select Donation as the “Query In” table.
2. Select “Donation Date” from the Field Name drop down box.
3. Highlight “is greater than” from the Comparison box.
4. Enter 1/1/11 in the Value field.
5. Press QUERY CURRENT SELECTION. This will reduce your first list of Members
that have given since 1/1/11.
249
Results from our
first query.
To perform additional querys
on these results,
click SEARCH
icon.
To perform the query
against ONLY the
records from the
previous query, click
QUERY CURRENT
SELECTION
Query with a combination of AND and OR
Some queries require the use of the connector AND as well as the connector OR. When
using both And and OR remember to place the OR statements first. An example of this
type of query would be, give me a list of all the children or youth who have been baptized.
I have Baptized as a custom check box field.
1. Select People>Summary from the main menu and click the SEARCH icon.
2. Leave People as the Query In table.
3. Select “Family Position” from the Field Name drop down box.
4. Highlight “is equal to” in the Comparison box.
5. Select “Child” as the Value.
6. Press the ADD LINE button.
7. Press the OR button. Notice the AND is changed to OR on the second line.
8. Select “Family Position” from the Field Name drop down box.
9. Highlight “is equal to” from the Comparison box.
10. Select “Youth” as the Value.
11. Press the ADD LINE button.
12. Select “Baptized” from the Field Name drop down box.
13. Enter True Value.
15. Press QUERY. A list of all children and youth who have been Baptized is displayed.
250
When using a
combination of
OR’s and AND’s
in your criteria,
make sure to put
the ORs first.
Query using Except
For this example let’s say we want to find all people who live in Byron, but not on Staff.
In this example Staff is an Association.
1.
2.
3.
4.
5.
6.
7.
8.
9.
10.
11.
Select People>Query from the main menu.
Leave “People” as the Query In table.
Select “City” from the Field Name drop down box.
Highlight “is equal to” from the Comparison box.
Enter Byron.
Click the ADD LINE BUTTON.
Click the EXCEPT button. The AND changes to EXCEPT.
Select “Association” from the Field Name drop down box.
Highlight “is equal to” from the Comparison box.
Select “Staff” as the Value.
Press QUERY. A list of people that aren’t on staff, who live in Byron is displayed.
Comparing two result sets
There are several ways that you can compare two sets:
An intersection compares the results of two queries and returns the records that were
common to both sets. For example, I want a list of all the people who have donated and
are enrolled in a group.
A union combines the results of two queries. An example of the union is – give me a list
of people who either donated or joined a group.
A difference would subtract out the records that were common to both sets. An example
of the difference is – give me all the people who donated but are not in a group.
For these examples, let’s look at all the people in our database that have donated in the
last year. Then let’s compare that to the list of people that belong to a small group.
For the first query:
1. Select People>People Summary from the main menu, then click SEARCH icon.
2. Change the Query In table to “Donations”.
3. Select “Donation Date” from the Field Name drop down box.
251
4. Highlight “is greater than” from the Comparison box.
5. Enter the earliest date of donations to consider, for example 1/1/06.
6. Press QUERY. A list of people who gave to the church on or after 1/1/06 is displayed.
From the results list, press the SELECT button. This brings up the screen that allows you
to perform the intersections, unions and differences. In the left box labeled Set A, mark
the button for Current Selection then press the button GET SET A. Now SET A contains
all the people who have donated since 1/1/06.
Results of our
first query.
Click on the
SETS icon.
The results
from our first
query.
The results
from our second
query.
Union combines
the results of each
query.
Difference subtracts out the common from the other
set.
The intersection returns the things that are
common between the
two sets.
Next, let’s move over to the box labeled Set B. Click on the button for Query Editor, and
press the button GET SET B. The query editor is displayed.
1. Change the Query In table to Group “Membership”.
2. A window is displayed allowing you to select a specific group. Press the CANCEL
button here. We want all groups for this example.
3. Select “Group Name” from the Field Name drop down box.
4. Highlight “is equal to” in the Comparison box.
5. Enter the wild card character @ (this tells Roll Call we want any group).
6. Press QUERY. The people who are in a group are in SET B.
252
Next, click the button to Combine Sets, if you’d like to see the “union” of the two sets.
That is, the combination of the people who gave and the people who are in a group. Press
the OK button to see the results of the intersection.
Click Subtract B from A, if you’d like to see the “difference” between the two sets. This
would show you all the people that gave but are not enrolled in a group. Press OK to see
the results of this difference.
Click Subtract A from B, if you’d like to see the “difference” between the two sets. This
difference would give you the people that are in a group, but have not donated. Press OK
to see the results of this difference.
Click the button to Common to A and B, if you’d like to see the “intersection” of the two
sets. That is, the people that have both donated and belong to a group. Press the OK
button to see the results of the intersection.
AND, OR and EXCEPT
“Or” increases the possible results by allowing more ways for records to be selected.
“And” restricts the possible results by compounding the requirements. “Except” restricts
results by introducing exceptions or exemptions. If you need to use more than one of
these conjunctions, place the OR statements first, then the AND statements, then the
EXCEPT.
Save a Query
Let’s say you do a query of Members, Regular Attenders and Occasional Attenders on a
regular basis. To save the query text, press the SAVE QUERY button. A file dialog box
asks for the location to save and the name of the file. Enter this information, then press
SAVE.
To use the query later, press the LOAD QUERY button from the query editor. A file
dialog box is displayed. Navigate to the file you saved previously. The query text is
displayed in the query editor. Press the query button to execute the query.
Special Query
There are some searches that require more complex algorithms. These searches have been
“pre-set” for you to use. . From the results list of a query, click on the SPECIAL icon.
Change Selection to Head
This search can only be done from within a results list. It will reduce the list to include
only the Heads of Family for each family that was represented in the list. For this
Click on
the query
you’d
like to
perform.
Then click
OK.
253
example let’s say we had a list of the children from our first grade class. If we choose to
change to the heads of family, the children will not be in the list anymore, only the head
of their family will be listed.
Change Selection to Mothers
This search can only be done from within a results list. It will change the list to include
the Mothers for each family that was represented in the list. For this example let’s say
we had a list of the children from our first grade class. If we choose to change to the
Mothers, the children will not be in the list anymore, only the Moms will be listed.
Change Selection to Fathers
This search can only be done from within a results list. It will change the list to include
the fathers for each family that was represented in the list. For this example let’s say we
had a list of the children from our first grade class. If we choose to change to the fathers,
the children will not be in the list anymore, only the dads will be listed.
Change Selection to Adult and all Children
This search can only be done from within a results list. It will change the list to include
an adult and all the children of each family that was represented in the list. For this
example let’s say we had a list of the children from our first grade class. If we choose to
change to the adult and all children, the husband, wife or adult from the family plus all the
children in the family will be displayed in the list.
Find Single Parents
This search finds the single parents.
Find Keywords
Keywords allow you to classify people by interests, giftings etc. To search for all the
people that have certain interests, talents or gifts – use this special query. Once you click
OK from the special search window, a key word query editor will be displayed.
1.
2.
3.
4.
Click on the appropriate Key Word Field.
Highlight “is equal to” in the Comparison box.
Enter the value of the key word you are searching for, for example “Mechanic”.
Press QUERY to get a list of all the people who are categorized as Mechanics.
To specify more than one key word, use the ADD LINE button and repeat the process.
For more information on multi-line queries, see the section in this chapter on creating
basic queries.
Find possible blended families
This search looks for families with more than two members, where at least one person has
a different last name.
Find people with picture
This search looks for individuals who have a picture in Roll Call.
Find families with a picture
This search looks for families that have a picture in Roll Call.
254
Find possible uninvolved families
This search allows you to specify the type of “uninvolvment”. When you select this
search, the uninvolved window is displayed.
You may check one or all of these boxes. If you select multiples, an AND conjunction is
used.
If you check the box for “hasn’t given”, you may also specify a since date. For example,
I want to know what families have not given since the beginning of the year. I would
check “hasn’t given”, then enter 1/1/06 as the date.
If you check the box for “hasn’t attended” – this will tell you what families haven’t
attended any event (worship service or group/class) in the last year.
If you check the box for “hasn’t joined group” – this will tell you what families haven’t
recently (based on the since date) joined a group.
If you check the box for “haven’t had their record modified” – this will tell you which
families have not had any of their demographic information changed since the date you
specify.
Check the appropriate
criteria for “uninvolved”.
255
CREATING CUSTOM REPORTS
If the standard reports in Roll Call do not meet your needs, use the Quick Report writer to
create custom reports. The Quick Report editor is a tool provided with the 4D database
that Roll Call is written on. This chapter outlines the basic usage of the Quick Report
editor within the context of Roll Call.
To create a Quick Report you’ll need to determine several things:
1. What table should the report be based on. That is, what is the report about, people,
donations, groups etc.?
2. What “set” of information should be included in the report?
3. What columns or fields do I want in the report?
4. How do I want the information sorted?
5. Are there any calculations required in the report?
Create a custom report
To create a Quick Report follow these main steps.
1. Select Reports>Quick Reports from the top menu.
2. Click on the reports tab.
3. Click the ADD icon.
4. Perform the query to determine what data should be included in the report.
5. Format the report.
6. Generate the report.
Click on the Reports tab to create
a custom report.
Click the ADD icon.
Highlight your
“base” table.
256
Base Table
Each Quick Report must be based on a table. The report can contain values from multiple
tables, however, the table which contains the lowest level of information must be the
“base” table. For example, if we want a report with People’s name, Address, Donation
and Designation information, Designation would be the “base” table. If we wanted a
report with Group information as well as the members in the group, Group Membership
would be the base table.
To begin creating the report, expand the Reports&Labels menu on the left side. Select
Quick Reports. Select the base table from the left sidebar. Click on the green plus sign
or ADD icon. Next you’ll be prompted with the query editor to determine what records
should be included in the report.
Data for the Report
Once you’ve clicked the ADD icon the query editor is produced so that you may select the
data you’d like included in the report. For a detailed description of using the query editor,
see “Using the Query Editor”.
For this example, let’s create a report of all the people who have donated over $250.
From the Query Editor, change the Query In table to Donations. In the Field drop down,
select Amount. In the Comparison box, choose “is greater than”. In the Value field, enter
250. Press the QUERY button.
Select the field you
want to search on.
Select the value
you are searching for.
Click QUERY
to execute the
query.
Select columns for the report
Now that you have the data (the people that will be included), you must determine what
information you want to see about each of those people. From the Quick Report editor,
you may select a column by double clicking on it. In this example, notice the list of
people fields under Master Table.
257
To create a report with First Name, Last Name, Address, City, State, and Zip Code, double
click on the First Name field, then the Last Name field. Once you double click on the
field name, a column will be created in the upper part of the quick report editor for that
field.
Next, use the drop down box to change Master Table to Related Tables. You should see
a box to the left of Family Info on Windows or an arrow to the left of Family Info on the
Mac. Click on that box/arrow. The list of Address fields will be displayed below. Double
click on Address, City, State, Zip etc. to include them in the report.
When you select
(double click) on
a field, it is placed
in this report
writer area.
Double click
on fields to
include it in
the report.
Calculated columns
To create a column that uses a formula, select Column>Add from the Quick Report menu.
The formula editor is displayed. The formula editor allows you to combine the values of
multiple fields, return certain values such as YES/NO instead of TRUE/FALSE, perform
mathematical equations and use pre-written functions.
Once you’ve changed
to Related Tables, click
on the box or arrow in
front of Addresses.
Change
Master
Table to
Related
Tables.
The list of address
fields. Double click
on these fields to put
them in your report.
258
Concatenation
To combine the values of multiple fields into one column, you can use the plus sign in the
formula editor. Common examples of combining field values would be to have the last
name, a comma, then the first name, or combining the area code and phone number.
For this example, let’s create a name column. Double click on the Last Name field found
Click on icons
to move them
into formula
editor area.
Type in function,
or double click on
fields from lower
box.
Double click
on a field to
move it to the
formula editor
area above.
Click OK to
accept formula.
under the box Related Tables. The name [People]LastName is placed in the formula
editor box. Next click on the plus sign. Next enter a quote mark, a comma, a space then
another quote mark. Next click on the plus sign again. Now double click on the First
Name in the section below Related Tables. The formula should read:
[People]LastName+”, “+[People]FirstName
Click the OK button to accept the formula.
Equations
You can perform mathematical equations within the formula editor. You can add,
subtract, multiply, divide and create percentages. For this example, let’s say we wanted to
add a person’s total giving this year and last year’s amount.
Double click on the Year to Date field found under the box Related Tables. The name
[People]Year to Date is placed in the formula editor box. Next click on the plus sign.
Now double click on the Last Year field in the section below Related Tables. The formula
should read:
[People]YeartoDate+[People]LastYear
Click the OK button to accept the formula.
NUM function
The num function allows you to return a constant, based on a field value. This comes in
very handy for Boolean or check box type fields where the value is either True or False.
By using the NUM function you could choose to return an X if the value was True or you
could return Yes if it was True and No if it was False.
For this example, let’s assume we have a custom check box called Newsletter. In our
report, we want to return an X if the person wants to receive the newsletter. The formula
is:
(Num([People]Newsletter)*”X”)
259
If you wanted to return a Yes or No, the formula would be:
((Num[People]Newsletter=True)*”Yes”)+(Num[People]Newsletter=True)*”No”)
Roll Call functions
The following functions can be typed into the formula editor, or selected from the
commands by theme box to the right. Scroll down to reach the functions in italics.
Double click to select the function you need.
DoBuild_Label – this function returns an address block for an individual. It contains the
name and current address.
Jim_Sue_Label – returns an address block using the first name of the head of family plus
the spouse name and the last name, then the address.
Family_Label – returns “Mr. & Mrs.” Plus the first and last name of the head of family,
then the address.
Different_Last_Name – returns an address block with the first and last name of the head
of family plus the first and last name of the spouse (if the last name is different).
Get Many -> People -> Group Membership – returns a list of all groups that the person is
involved in.
Get Many -> People -> Pledge funds – returns a list of all the pledge funds this person
has pledged to.
Get Many -> People -> Pledges – returns a list of all the amounts a person has pledged.
List_Phones (“All”) - Produces a list of the “non-standard” individual phone numbers
that are stored in the telephone table.
List_Family(“ “) Returns a list of all the family members.
Get Children(0) – Returns a list of the children for a family.
Build_Salutation – Returns the head of the family’s nickname plus the spouse’s first
name.
Get DES Function(TRUE) – Returns a list of donations to the current pledge record.
Get DES Function (FALSE) – Returns the total of donations to the current pledge record.
Designation SUM – Returns the total for the designations.
Summary Information
You can use the sum, average, minimum, maximum and count functions for a column.
For this example, let’s say we have a report that lists donation information for a date range
and we want the grand total donated as well as the number of donations given.
1. In the cell where donation amount and grand total intersect, click on the SUM icon
(backwards E) or select Cells>Sum from the quick report menu.
260
2. In the cell where name and grand total intersect, click on the COUNT icon (N) or
select Cells>Count from the quick report menu.
Icons for the
Sum, Average,
Min, Max and
Count functions.
Place your cursor
in this cell and then
press the icon for
SUM or COUNT.
Sort the Report
To sort the report by a specific column, highlight the field name. Next, press the green
arrow to the right, to move the field to the sort order box. For example, let’s say we have
a report that lists people information and we want it sorted by name. First highlight Last
Name and press the green arrow. Last Name is now listed in the sort order box. Then if
you’d like to sort by First Name within the same Last name, highlight First Name, and
press the green arrow.
Notice the
field name
changed row
that is created
for each sort
criteria.
Highlight a
field name,
then press this
arrow to move
to the sort
order box.
Format the Report
There are several formatting options in the report writer. These allow you to EDIT the
titles, page breaks, whether to display detail lines, and the presentation of the report.
Titles
To set up the title of your report, select File>Headers and Footers from the quick report
menu. Enter the text you’d like for your title in the appropriate text box.
261
Enter your title
here.
Page breaks
To create a page break, you must have sorted your report on a certain field. Then you can
create a page break, each time the value of that field changes. For example, let’s say we
created a report that lists all donations for a given year. We wanted to sort those donations
by the fund that they were designated to. Then we want a new page for the different
funds.
When you sorted the report by designation, a new line or row is created in the spreadsheet
called Designation changed. Right mouse click on that title and select Totals Spacing.
The subtotals properties window is displayed. Click on the button for Generate Page
Break.
Right mouse
click on the
row for “field
changed”. Then
select Totals
Spacing.
Select page break.
Click OK.
Hide details
To create a summary report you will need to hide detail lines. For example, let’s say you
want a donation report by fund designation. You only want totals for the designation, not
every individual donation.
262
Output presentations
There are several things that can be done to change the appearance of the report.
1. Page Setup
2. Fonts
3. Presentation
To change the orientation of the report from portrait to landscape, select File>Page Setup
from the quick report menu. Choose the appropriate orientation.
You may change the font or the font size for a row, column or specific cell. Highlight the
area you wish to change, then select the font style in size from the drop down boxes in the
middle top of the window.
Highlight area where
you’d like to change
the size and font.
Change the
font size and
type here.
To modify the presentation of the report you can:
1. Select Style>Borders to modify the types of border included in the report.
2. Select Style>Presentation to pick a certain presentation.
3. Select Style>Right/Left Justify to change the justification of a column.
Print the Report
To send the report to the printer, select File>Generate. The print dialog box will be
displayed, so you may choose your printer. If you’d like to save the report to a file, select
File>Destination. Change the destination to a Disk File. Then select File>Generate from
the menu. A file dialog box will be displayed so that you can save this report as a tab
263
delimited text file. These types of files can easily be imported into 3rd party programs
such as a spreadsheet.
Re-use the Report
Once you’ve created the report, you’ll want to save the template so it can be used again.
The template is the columns and the formatting options that were selected. Select
File>Save from the quick report menu. You’ll be asked for a file name and location.
Give the report a name that is meaningful to you. Once you close the quick report editor
window, you’ll see the report listed in the Tables and Templates window.
To run the report again, select Reports>Quick Reports from the top menu. From the
Tables and Template window, highlight the report you’d like to run. Then press the
GENERATE icon. The query editor will be displayed, so you can select the data you
want in the report. A print dialog box will be displayed, so you can send the report to the
printer.
Double click
on the template name
to edit the
template.
Highlight the
report you’d
like to run or
edit.
To simply
run the report
again, click the
GENERATE
icon.
Edit a Saved Template
To edit the report, select Reports>Quick Reports and Labels from the main menu. From
the Tables and Template window, double click on the template you’d like to modify. The
query editor will be displayed, so you can select the data you want to see in the report.
After you review the raw data, press the EDIT icon.
A message will be displayed, telling you the name and location of the template
file. Remember this information. Once you are in the quick report window, select
File>Open from the report writer window. Then navigate the template file from the
message, highlight it and press SAVE. The columns and formatting will be displayed in
the quick report window.
Make any changes you’d like to the columns or formatting on the report template.
To run the report select File>Generate. If you’d like to save the changes, press File>Save.
264
CREATING CUSTOM LABELS
If the standard labels in Roll Call do not meet your needs, use the Custom Label writer to
customize your format. The Label writer is a tool provided with the 4D database that Roll
Call is written on. This chapter outlines the basic usage of the Label writer within the
context of Roll Call.
When creating a custom label you’ll need to determine several things:
1. What “set” of people should have a label?
2. What fields do I want in the label?
3. How do I want the information sorted?
What People
To begin customizing a label:
1. Expand the Report & Labels menu on the left side of the navigator window.
2. Click on the Labels menu.
3. Highlight your base table.
4. Click on the ADD icon.
Click on the
Labels tab,
to customize
labels.
Click on the
ADD icon to
create a new label
template.
Once you’ve clicked ADD LABEL the query editor is produced so that you may select the
people. For a detailed description of using the query editor, see “Using the Query Editor”.
For this example, let’s create a label for all the people who are Members.
1.
2.
3.
4.
Select “People” as the Query In table.
Select “Association” as the Field Name.
Highlight “is equal to” in the Comparison box.
Enter “Member” as the Value.
265
Enter the
value you are
looking for.
Select your field
criteria.
Press QUERY to
find your results.
Place the Fields on the Label
Now that you have the data (the people that will be included), you must determine what
information you want on the label. From the list of fields, highlight the field you want,
then drag it to the label template to the right.
For this example, let’s create a label with the standard name and address.
1. Highlight First Name and drag it to the template.
2. Highlight Last Name and drag it on top of First Name. This will concatenate the two
fields.
3. Click on the plus sign(+) or the arrow in front of Family Info. This will open up the
address fields.
Spacing and
alignment icons.
Label template area.
Highlight the
field here and
drag it to the
label template
area.
Use this area
to change
font size and
type.
Drag fields on
top of each
other to concatenate them
(puts a plus
sign between
field names).
266
4.
5.
6.
7.
8.
Highlight Address 1 and drag it to the label template under the first and last name.
Highlight City and drag it under the Address1 field.
Highlight State and drag it on top of City.
Highlight Zip and drag it on top of State.
To align the fields on the left, click on each field while holding down the shift key.
This should place boxes that indicate the row is selected. When everything is selected
press the ALIGN LEFT icon.
9. To evenly space between the rows of information, leave all fields selected and press
the SPACING icon.
10. To change the font and font size, leave all the fields selected and change the font from
the drop down box in the lower text area.
Static text
Enter the text you’d like on the label in the Static Text field underneath the list of fields.
Then click on the arrow above the field to move the text to the label template. Once the
text is on the label template you may drag it around, change the font and size.
Drag and drop
the text onto
the label template.
Click on this arrow and the text
will move to the
label template
area.
Make sure the
text is selected
(boxes around
the corners)
then change
the font type
and size.
Enter the text
you’d like on the
label.
Change Label Format and Size
Click on the layout tab in the Label editor. This tab allows you to select the number of
labels per sheet, the size of the labels, and the horizontal and vertical gap between labels.
Click on
Layout tab.
Enter gap and
margin information.
Enter the number
of labels across
and down.
Click to Save
the letter template.
Click to print
labels.
267
Print the Labels
To send the labels to the printer, press the PRINT button. The print dialog box will be
displayed, so you may choose your printer.
Re-use the Label Template
Once you’ve created the label template, you’ll want to save it, so it can be used again.
The template is made up of the fields, static text and the formatting options that were
selected. Press the SAVE button. A file dialog box is displayed. Give the label a name
that is meaningful to you. Once you close the label editor window, you’ll see it listed in
the Tables and Templates window.
To print the labels again, expand the Reports & Labels menu. Click on the Labels
menu , highlight the label you’d like to run. Then press the GENERATE icon. The query
editor will be displayed, so you can select the data you want in the label. A print
dialog box will be displayed, so you can send the labels to the printer.
Click on the
GENERATE icon
to print the labels.
Click on the
Labels tab, to
customize labels. Highlight
the name of the
template.
Modify a Label Template
To edit the label, expand the Reports & Labels menu on the left side. Click on the
Labels menu. Double click on the template you’d like to edit. The query editor will be
displayed, so you can select the people you need labels for.
A message will be displayed, telling you the name and location of the template file.
Remember this information. Once you are in the label editor window, press the LOAD
button. A file dialog box is displayed. Navigate to the template file from the message,
highlight it, then press OPEN. The columns and formatting will be displayed in the label
editor window.
Make any changes you’d like to the columns or formatting on the label template.
To print the labels, press the PRINT button. If you’d like to save the changes, press
SAVE.
268
CLEANING UP THE DATA – DATA
ADMINISTRATION
List of Valid Values
Most lists can be changed. The “lists” are the valid values that you can enter for a field
such as Association, Key Words, Custom Field Lists, City, Telephone Types, etc.
To modify this information, expand the Administration menu and click on Lists. A screen
with all the lists will be displayed.
Click on the list
you’d like to
modify.
List of all
the “valid
value”
lists.
Click the plus
sign to add a
value, click minus to delete an
item..
From this window, click on the type of list you’d like to modify. The current list of values
will be displayed on the right. To add a new value, press the plus sign. A line will open
up for you to add the value. To delete a value, highlight it, then press the minus sign. To
modify a value, double click on the value, then make necessary changes.
Duplicate Check
To identify potential duplicate records, expand the people menu. Click on Find Duplicate
Reocrds. The area to the right will all you to select your duplicate criteria.
To see all the people that have the same first and last name, click the First and Last Name
button. To see all the people that have the same address but are in different families, click
on the Same Address option. To see all the folks with the same home number, click on the
option for Home Phone.
From the display of potential duplicates, click on a person that appears to be a duplicate
record, then click on the next record that appears to be a duplicate with the first. These
records will be placed side by side so you can view the information.
From the buttons underneath each record, you may perform several actions:
1. Click the DISPLAY button to view the person’s entire record.
2. Click the TRANSFER$ button to transfer the donations from one record to the other.
3. Click the TRANSFER button to transfer other details such as visitations, group
membership and comments.
4. Once you’ve viewed and transferred information as required, you may delete the
269
Click on Find
Duplicate Records.
Choose how
you’d like to
find the duplicate records.
Display of
a persons
information.
The list of potential
duplications. Click
on name to view it
on the right side.
Use these buttons to transfer
information
and delete
records.
Bulk Changes
Many of the people and group fields can be changed “en masse”. For example if you
wanted to change a city name from from St. Thomas to Saint Thomas, you can use the
bulk changes area.
Global change to people or address information
As an example, let’s say that you want to change all people that have an Association of
Member to a new Association of “Partner”. To do this:
1. Expand the People menu.
2. Click on Bulk Changes.
3. Use the “Run Fo” area to select you want to make this change to. In this example,
select Associations, then click over Member.
4. Next select the column you will be changing. In this example it is Association.
5. Enter the new value for the Assocaiton.
270
Select the column you wish to
update.
Enter the new value.
Select who you want
to change.
Global change to group information
As an example, let’s say that you want to change all the groups that have a Department of
Children’s to “Kidzu”. To do this:
1. Expand the Group menu.
2. Click on Bulk Changes.
3. Use the “Run Fo” area to select you want to make this change to. In this example,
select Groups with a Department of Childrens’
4. Next select the column you will be changing. In this example it is Department
5. Enter the new value Kidzu
271
MAINTAINING THE DATABASE
Data File Location
The data file contains all the information that you have entered in Roll Call. Since this
file contains all your work, make sure you know the name and location of it and that you
back it up regularly.
The data file is comprised of two files: the 4D data file and the 4D resource file. The
4D data file name will end with the extension 4DD. The resource file will end with
the extension 4DR. The name and location of your data file is found by selecting
Help>About Roll Call.
Lists name and
location of your
data file.
User Security
Activate Security
To activate the security system in Roll Call you will need to give Director a password.
Once Director has a password, you will be required to log into Roll Call with a valid user
name and password.
To give Director a password, expand the Administration menu. Click on User Security.
Click on Director form the list on the left. Click on the CHANGE PASSWORD button.
Enter a password.
272
Preferences
There are password preferences you can set for you system. The preferences allow you to
select how often a person needs to change their password, if a password is required, how
many characters the password needs to be, etc.
To set the preferences:
1. Expand the Administration menu.
2. Click on User Security
3. Click on the Prefs icon (right side)
4. Enter the Maximum Password Age. If you do not want passwords to expire, mark the
option for “Passwords Never Expire”. If you want the passwords to expire after a
certain length of time, mark the option for “Expires In” and indicate how long.
5. Enter the Minimum Password Age. If you don’t care how often the user changes their
password, you can mark the option for “Allow Changes Immediately”. If you only
want them to be able to change so often, mark the option for “Expires In” then enter
the number of days.
6. Enter the Minimum Password Length. If you wish to allow blank passwords, mark
the option to “Allow Blank”. Otherwise, enter the “At Least” number of characters.
Click PREFS from the
User Security window.
Select minimum
password length, and
password age preferences.
Create New User
To create a new user:
1. Expand the Administration menu.
2. Click on User Security.
3. Click on the plus sign in the lower left under the user names.
4. Enter the user name for this user.
5. Enter a default password.
6. Indicate if this will be a standard user or a check in user. Standard users will see the
Navigator window when the sign in. Check In users will see the check in screen
when they log in.
7. Click OK to save that user.
8. Next mark the security levels that are appropriate for this user.
Click plus sign
to add a new
user.
Enter user name,
password and the
type of user.
Cick OK to create the
user.
Make sure new user
name is highlighted.
Select security groups
for this user.
Security Levels
The following are the security levels for a standard users.
Read Only
If this box is checked, a user will have read only
privileges for the areas marked.
People
If this box is marked, the user can view, enter and
delete people information
274
Groups
This allows the user to view, enter and delete groups
Services
This allows the user to view, enter and delete worship
services.
Contributions
This allows the user to view, enter and delete
contributions
Contributions Plus
This allows the user to post and reverse batches. They
can also transfer contributions.
Pledges
This allows the user to view, enter and delete pledges.
Letters
Allows this user to access the word processor portion of
roll call.
Visitation
Allows this user to view, enter and delete visitation
information
Background Checks
Allows the user to view, enter and delete background
check information
Attendance
Allows the user to view, record, modify and delete
attendance information
Graduation
Allows the user to set up graduation profiles and to do
the graduation.
Expert
Allows the user to do the duplicate check check, access
preferences, child check in set up preferences and bulk
changes
Confidential Comments
Allows the user to view, enter and delete confidential
comments.
Custody Comments
Allows the user to view, enter and delete custody
comments.
Email
Allows the user to email from Roll Call.
Edit Lists
Allows the user to create, modify and delete list
of values. For example, Associations, Cities, and
Keywords.
Assign Id’s
Allows the user to enter family numbers and badge
number.
People Import
Allows the user to import people into the system.
People Export
Allows the user to export people information to a tab
delimited file.
The security levels for check in allow the user to get to the check in screens. The
information entered for the check in user will determine what the check in screen will
look like.
Self Check In
If the Self Check In is marked, this check in station
will only allows check in by scan or by the last
four digits of a phone number. This user will not
be able to modify any settings or print the check in
roster.
Touch Screen
If the Touch Screen option is selected, the virtual
keyboard will be displayed on the screen.
Rapid Check In
The confirmation screen will not be displayed. The
child is automatically checked into the class they
are enrolled in and name tags are printed.
Return by Family or Return by
Individual
If you choose “Return by Family” A list of families
will be presented for you to choose from. If you
choose “Return by Individual” a list of individuals
will be returned.
Quick Enroll
If this option is marked, this check in user will be
able to add visitors to the system and check them
in.
Search by Name, Phone or Family
Number
This determines how you will be checking folks in.
Will you do a search by name, or a family number
of the last 4 digits of the phone?
Check In Header
Enter the header you’d like for the check in screen.
For example “Wamba Land”.
Header Font, Size and Color
Choose the font size and color you’d like for the
screen’s header.
Check In Image
Pull in the logo for your church or ministry to be
displayed on the check in screen. Each user can
have a different image.
Background Color
Set the background color for your check in screen.
Mark the options that are applicable for the user you have highlighted on the left. Make sure to
click SAVE in the lower right when you are done.
Locked User
If a user tries to log in more than 5 times unsuccessfully, they will be locked out. To
unlock a user, do the following:
1. Sign into the system as Director.
2. Go to the User Security Menu.
3. Highlight the user name that has been locked.
4. Click on the Lock/Unlock button.
5. Change the password for this user.
Backup on single user system
To create a Roll Call backup, select File>Backup. You’ll be taken to the Maintenance
window. Click on the BACKUP icon on the left. Next click the PREFERENCES button to select
Click on the
BACKUP icon.
Click PREFERENCES to select
backup location
and or to set a
backup schedule.
Click to perform backup.
Click on Configuration to indicate
where to put the
backup.
Click here to
browse your
system to select
backup location.
Recover the database
You can recover from a backup from within the Roll Call menus, or from your
operation system.
From within Roll Call
To recover from a backup, select File>Backup from the main menu. Click on the
RESTORE icon on the left. Highlight the backup file, then click RESTORE.
277
Highlight the
file you’d like
to restore, click
RESTORE.
Click on RESTORE.
From the operating system
If you can not get into Roll Call, you can open a backup file, by double clicking on the
Roll Call icon, then immediately holding down the ALT key. The window displayed will
allow you to restore a backup.
1. Select the option to “Restore a Backup”
2. Navigate to and highlight your backup file. Click OPEN.
3. From the next window Click RESTORE.
Select Restore a
backup.
278
Backup a networked system
On the network, the backup can be done on the server or from the client. To backup
from the Server, click on Maintenance from the Server dashboard. Next click START
BACKUP. To perform a backup from one of the clients, select Help>Administration
window. This will display the Server dashboard and you can do the backup as if you
were at the Server.
From the Server
dashboard, click on
Maintenance.
Click START
BACKUP or
click on PREFERENCES to set
location, scheduling etc.
To set backup preferences, location, and frequency, click on Maintenance and click
the PREFERENCES button. When you are anchored on the Configuration link on the
left, you may set up the backup location. Make sure you backup both the data file and
structure file. Also, if your church imports family or individual pictures make sure to also
backup the Images folder under Roll Call Server.
279
Check to
backup data
and resource
files.
Click to
include images folder
in backup.
Choose location of backups.
To implement
transaction log,
click here and
select location.
When you are anchored on the Scheduler link on the left, you may set up the backup
frequency.
Select your
backup frequency and starting
time.
To indicate how many backups to retain and how to handle backup failures, click on the
Backup link on the left.
280
Indicate how many
backups to retain.
Indicate how
to handle
backups if
there are
active transactions.
How do you want
to handle backup
failures?
Recover database from a backup on a network system
To recover from a backup, open Roll Call Server and immediately hold down the
ALT/OPTION key to get the open file dialog box. Choose the option for Restore
from Backup. Click OK. Navigate to your latest backup file. Highlight it and
click OPEN. Your compiled database and data file will be recovered. Next you
can restart Roll Call Server.
Choose the option to
restore from backup.
Click OK.
Navigate to your
backup file.
281
Open a Different Datafile
To open a different data file, double click on the Roll Call or Roll Call Server icon, then
immediately hold down the ALT key. Choose the option for opening a different data file.
Choose the option
for selecting a different data file.
Click OK.
Highlight the data
file you want to
open and click
OPEN.
Compact the data file
Compacting your data removes any fragmentation within your data file. The process of
compacting is slightly different depending on whether or not you use a stand-alone or
server system.
Single user system
1. Select File>Backup from the main menu.
2. Click on the icon for COMPACT on the left.
3. Click on the top icon for Compact data and indexes.
Roll Call Server
1. Make sure all clients are disconnected from Roll Call.
2. From the Server dashboard, click on Maintenance.
3. Click COMPACT DATA.
282
Click on
the data and
indexes option.
Click on the
Compact icon.
When the
compact is
complete,
you’ll get this
message.
Click on Maintenance from the
Server dashboard.
Click COMPACT DATA.
Repair my data file
To repair your data file, follow these steps.
1. Double click on the Roll Call or Roll Call Server icon, then immediately hold down
the ALT key.
2. Choose the option for Maintenance window.
3. Click on the REPAIR icon on the left.
4. Click the REPAIR button.
283
Choose the
option for
Maintenance.
Click on the
REPAIR icon.
Click here to repair the data file.
284
APPENDIX A - TABLE LAYOUTS
Address Table
Field
Special Notes or Description
Family ID
Unique identifier of a family,
assigned by roll call
The number you enter as a
family number in the people
screen
Family No
Address1
Address 2
City
State
Zip
Family Email
Area Code 1
Phone 1
Area Code 2
Phone 2
Unlisted
Alternate Address fields
Wedding Date
The area code portion of the
home phone number
Indicates if this phone number
should NOT be included in
directories
The alternate address
People Table
Field
Special Notes or Description
First, Last, Middle and Nick
Names
Title
Gender
Date of Birth
Month of Date of Birth
The Mr., Mrs, Miss titles
Age
Association
Email
Marital Status
Spouse Name
Work Phone
Cell Phone
Fax
Pager
Head of Family
Person ID
The number indicating the
month that the person was born
How is this person involved in
your church
Personal email address
Value is TRUE if this person is
the head of the family
The number roll call assigns
as the unique identifier of this
person
285
All the custom fields
If you assigned labels to the
custom fields, you will see
them listed. If no labels as
assigned you’ll see Custom
Field 1 etc.
The envelope number that was
assigned to this person last
year
The envelope number for this
year. You will see this number
in the people screen.
To get ready for next year, you
can assign “next env nos”.
During the year end process,
these numbers are moved
around.
The 52 byte field that indicates
if a person attended worship
during the corresponding
week.
A number assigned to the
badge used for Live check-in
Last Years Env No
Current Env No
Next Env No
Attendance
Badge No.
Groups
Field
Campus
Department
Type
Section
Group Name
Inactive
Start Date
End Date
Leader
Location
Special Notes or Description
If you have the mult-campus
feature turned on, this field
will be used to indicate the
campus for which this group is
associated with.
Which department is
responsible for this group
What type of group is this
The name of the group
The combination of
Department and Section
Indicates if this group is
currently active
The beginning date of this
group
The ending date of this group
Who is the primary leader of
this group
Where does this group meet
Group Membership Table
Field
Special Notes or Description
Group Name
Indicates what group this
person is involved in
The type of that group
The name of the member
Type
Member name
286
Person No
Inactive
Inactive Date
Leader
Membership Custom Fields
The identifier of the member
Is this person currently active
in this group
The date the person became
inactive
Is this person a leader in the
group
Donations Table
Field
Special Notes or Description
Person No
Identifies the person giving the
donation
The total amount of the gift
The date of the gift
What was given in return
The value of the item given
Description of in kind gift
The value of the in kind gift
If the donation was given by
check, the check number
If the donation was given by
check, this is TRUE
Comments about the donation
Total Amount
Donation Date
QPQ Description
QPQ Value
Property Gift
Property Value
Check No
Check
Remark
Designations Table
Field
Special Notes or Description
Donation No
Designation
Ties this to a specific donation
The fund that the gift is given
to
The amount that should be
applied to the specific fund
Ties this amount to a specific
pledge.
Amount
Pledge ID
Attendance Table
Field
Special Notes or Description
Name
The person who attended a
group meeting or a service
The attendance date
Indicates which service or
group they attended
If a student was checked in via
the child check in system and
was assigned a security code, it
is recorded here.
For child check in, any notes
recorded.
Attend date
Meeting ID
Security Code
Notes
287
Special Columns
Field
Special Notes or Description
Head & Spouse
Combines into one column
the Head of the Families first
name and the spouses first
name.
Combines into one column
the Head of the Families first
name, the spouses first name
and the last name.
Combines into one column the
title, plus the first name of the
HOF and the last name of the
HOF (head of family)
Combines into one column, the
title and last name of the head
of family.
Lists the names of the children
in a family separated by
commas..
Lists the children in a family
with their ages behind the
name,.
Lists the children in a family
with their birth dates behind
their name.
Combines into one column the
address, city state and postal
code
Calculates the number of years
that a couple has been married
Lists the parents name for a
child
Lists the day of a person’s
birthdate, for example the 15th
Will list the groups or classes
that a person is a member of
The number of times in the
user specified date range that a
person was absent
The number of times in the
user specified date range that a
person was present.
Head & Spouse Last Name
Title Head Last name
Title Last Name
Children
Children + ages
Children + birthdates
Full Address
Years Married
Parents
Day of Birth
Involvement
Times absent
Times present
288
Index
A
Absent Present Report 199
ACH Transaction. See also Recurring Contributions
Add records 19
Allergy Information 35
Anniversary
report 66
Association 27, 234
Attendance
change 79, 81
group 79
record 77, 80
reports 82
Attendance by Group Report 200
Attendance by Session Report 202
Attendance Roster 203
Attendance Summary Report 197
B
Background Check
clearance level 36
enter information 35, 44
report 71, 210
retrieve, find 46
Backup 277
Base Table 257
Batch 94
post 103
reports 104
Batches
reverse 117
Birthday 27
home page 15
report 65
Blended family 254
C
Calculated Columns 258
Canadian Receipts 140
Cash or Check 95
Chart of Accounts
giving funds 93
Check In Log 207
Check In Roster 203
Check Reader 101
Church Address 20
Classes. See also Groups
Classic Directory 232
Clearance Level 36
Clone a Group 189
Comments
allergy 35
confidential 35
confidential comments 48
custody information 35
general 34
special needs 35
Compare two sets 251
Concatenation 259
Concatentation 259
Confidential Comments 48
Confirm Data Report 67
Connect to different data file 282
Contrbutions
find by batch 109
Contributions
add to existing batch 116
connect to pledge 97
correct 116, 118
delete 120
enter new 95
find by person 106
in-kind 100
non-cash 99, 101
property 99
qpq, quid pro quo 98
split 97
transfer 118
Contribution Detail Report 170
Contribution Statements
annual 137
Canadian 140
email 147
formats 129
for a specific person 144
individual gift 141
married, filing seperately 149
quarterly 132
quarterly tabular 136
Contribution Statistics 172
Current Selection 243
Custody Information 35
Custom
dates, people 31
fields, people 30
group fields 185
group member fields 188
labels 265–268
reports 256
Customize
mailing labels 229
my reports 74
receipt text 133
search window 18, 51
statement text 133
Custom labels 265
Custom report 256–264
hide details 262
page break 262
print 263
save as file 263
select columns 257
select data 257
sort 261
titles 261
D
Data file
backup 277
location 272
open different 282
repair 283–284
Delete
contributions 120
people 43
Delete Records 19
Deposit Slip 105
Designation. See also Giving Fund
Directory 232–240
group 213, 215, 238–240, 240
picture 215
Divorce 41
Donation Receipts. See also Contribution Statements
Donation Type 95
non-cash 99
Donors Given X Times 164
Donors over X Amount 162
Donor Detail Report 150
Donor Giving Report 157
Donor Summary Report 153
by fund 156
Duplicate check 269–270
Duplicate Class Report 211
E
Edit list of values 269
Email
contribution statements 147
html emails 224
log 225
my email 223
record address 27
send 224
settings 223
Envelopes
print 230
Envelope number 27
Equations 258
Export
custom 263
F
Family
death in 42
divorce 41
marriage 38
new family member 37
Family number 27
Fathers, list of 254
Find by
criteria 50, 52
Find by Criteria 19
First Time Donors Report 173
Functions 259, 260
Fund
giving 93
pledge 175
Fund Giving Report 168
Fund Summary Report 167
G
Given 0 Times 165
Giving Funds 93
Global changes 270–271
Graduation 193
Groups
create copies 189
creating new 186
custom fields 185
delete 195
directory 213
graduation 193
group reports 197–215
hierarchy 185
mass enroll 190
members 187
sessions 188
transfer members 192
view from people 31
Group Directory 215, 238, 240
picture 215
Group Involvement Report 212
Group Membership List 208
H
Head of family 253
Head of Household
change 42
I
Icons 17, 50
Import
contributions 102
MYOB 104
people info 23
pictures 28
recurring contributions 123
to Quickbooks 104
Involvement 31
In Kind Gifts 100
K
Keywords 32
L
Labels
custom 265–268
mailing 228
Letters 220
License Number 20
List of Values 269
Logo
on home page 16
M
Mail Merge Letters 220
insert data 222
Marriage 38
Mass changes 270
Mass Enrollment 190
Menu
navigator 15
top 15
Mothers, List of 254
MYOB 104
My Reports 74
N
Navigator
menu 15
Network
installation 10
Network system
connect to different data file 282
recover database 281
Non Cash Gift
entry screen 101
NUM Function 259
O
Optional mailing name 27
Organization address 20
Output presentation 263
P
Page breaks 262
Passwords 272
People
enter new records 26
view contributions 110
Phone
cell phone 29
home 27
primary 27
work 29
Phone numbers 27
Picture
find 254
Picture Directory 236
Pledge
changing 177
entering new 175
finding 176
fund 175
progress letter 179
reports 181
Post a Batch 103
Post Batch 103
Preferences
application level 20
search window fields 18
Q
Quarterly Statement 132
tabular 136
Query 241–255
across tables 249
editor 241–255
search 53
search criteria 243–244
sets 242
special 253–255
Quickbooks 104
Quick report 256–264
Quid Pro Quo 98
R
Recurring Contribution
create new 125
Recurring Contributions
email notification 122
find 124
import 123
log 127
post 126
stop 128
Repair data file 283
Reports
absent/present 90
attendance by person 84
attendance by session 89
attendance by type 88
attendance summary 82
batch 104
columns 58
contribution 150
criteria 57
output window 59
report selection window 56
run, generate 59
run for 57
special columns 288
view records 59
visitor 92
Report Output Window 59
Reverse Batch 117
S
Saved reports 74
Search
find by 50
people 50
Search Window 52
Security 272
Server
install 10
recover 281
repair 282
Service
worship 76
Sessions 188
Sets 242, 251
Shepherd area 27
Significant Dates 31
report 67
Sign in Roster 206
Single parents
find 254
Single user system
backup 277
connect to different data file 282
install 10
recover 277
Special Columns 288
Special Needs 35
Special queries 253
Spiritual Gifts 32
Standalone
backup 277
connect to a different data file 282
install 10
recover 277
Standard Directory 233
Sunday School Classes. See also Groups
T
Tables 241
layout 285
Tag People
tag 55
view 55
Tag People 54
Talents 32
Tax Receipts. See also Contribution Statements
Template
label 268
report 264
Text
send text 226
Top Donor Report 160
To Do List 15
Transfer
donations 42
group members 192
U
Uninvolved families 255
Uninvolved Family Report 70
Unlisted phone 27
Upgrade
from 10.0.17 or earlier 13
from 10.0.18 or laater 11
User Security 272
V
Visitations
history 73
log 72
record visit 46
view from people 32
Visitor
report 92
Vistor
list on home page 16
W
Word Processor 220
Writing Letters 220