1
Child Check In
User Manual
v 9.5
Local: (706) 864-4055
Atlanta: (404) 551-4230
Toll Free: (866) 475-1699
www.CAAministries.org
Table of Contents
CHILD Check-in OVERVIEW
What is “child check-in”? ............................................................................................................5
What are my options for checking students in? ...........................................................................5
Bar Code Badge .......................................................................................................................5
Key Tag ....�
6
Name, Family Number or Badge Number ...............................................................................6
Bar Code Roster .......................................................................................................................7
Finger Print ..............................................................................................................................7
What happens after the student checks in? ..................................................................................7
Attendance is recorded .............................................................................................................7
Labels can be printed ...............................................................................................................7
What needs to be set-up before I use child check-in? ..................................................................8
INSTALLING ROLL CALL for CHILD CHECK-IN
What software/hardware is required for child check-in? ...........................................................13
Roll Call workstations............................................................................................................13
Bar Code scanner ..13
Dymo LabelWriter 13
Finger Print Scanner ..............................................................................................................13
Finger Print Software .............................................................................................................13
How do I install Roll Call software on my workstation?...........................................................13
From the CD ..........................................................................................................................13
From the download file ..........................................................................................................13
How do I install Roll Call software on my network? ................................................................14
Installing the Server ...............................................................................................................14
Installing the Client ................................................................................................................14
How do I configure the check-in station hardware? ..................................................................15
Bar Code Scanner ..................................................................................................................15
Dymo Labelwriter ..................................................................................................................15
Finger Print Scanner ..............................................................................................................16
CONFIGURING ROLL CALL FOR Check-in
Where do I enter my church information? .................................................................................17
Setup Assistant .......................................................................................................................17
Main Menu .............................................................................................................................17
How do I set up Roll Call security? ...........................................................................................18
Setup Assistant .......................................................................................................................18
Main Menu .............................................................................................................................19
How do I create “check-in” users?.............................................................................................20
Setup Assistant .......................................................................................................................20
Main Menu .............................................................................................................................21
How do I set up my label options?.............................................................................................21
Setup Assistant .......................................................................................................................21
Main Menu .............................................................................................................................23
How do I set my “check-in” preferences? .................................................................................24
Setup Assistant .......................................................................................................................24
Main Menu .............................................................................................................................24
Can I display my churchʼs logo on the main screen?.................................................................25
CREATING NEW GROUPS
What is a group? ........................................................................................................................27
What needs to be set up before creating new groups? ...............................................................27
Group type .............................................................................................................................27
How do I create a group? ...........................................................................................................28
Enter general information ......................................................................................................28
Add Members.........................................................................................................................29
Set Preferences .......................................................................................................................30
Can I add people into the database from the group members area? ..........................................31
ENTERING FAMILIES
What preferences can I use to speed up data entry? ..................................................................33
Optional Mailing Name ........................................................................................................33
Assign Family Numbers .......................................................................................................33
Family Position Changes .......................................................................................................34
Multiple Campus....................................................................................................................34
Default Church Address .........................................................................................................34
How do I enter a family? ...........................................................................................................34
Enter the Head of Family .......................................................................................................34
Enter Other Members of the Same Family ............................................................................36
How do I enter cell, work or other individual phone numbers? ................................................37
Find the personʼs record .........................................................................................................37
Enter work, cell, pager and fax numbers. ..............................................................................37
What comment fields are available? ..........................................................................................38
General Comments.................................................................................................................38
Special Needs .........................................................................................................................38
How do I import pictures into Roll Call?...................................................................................38
Import individual picture .......................................................................................................39
Import family picture .............................................................................................................39
Picture tips and hints ..............................................................................................................39
Can I enroll students in a class or group from the people screen? .............................................39
How do I assign family numbers? .............................................................................................40
People Screen .........................................................................................................................40
Assign Automatically .............................................................................................................40
How do I assign badge numbers? ..............................................................................................41
People Screen .........................................................................................................................41
Assign Automatically .............................................................................................................41
USING BAR CODES
What needs to be configured to use bar codes? .........................................................................45
Windows �
45
Mac ........�
45
What are my options for checking students in with a bar code? ...............................................45
Bar Code Badge .....................................................................................................................45
Key Tag ..�
45
Bar Code Roster .....................................................................................................................45
How do I create the bar code badge? .........................................................................................45
What needs to be set-up to use key chain tags? .........................................................................47
Order tags from a printer........................................................................................................47
Preferences .............................................................................................................................47
Assign key tag numbers to individuals ..................................................................................47
Assign key tag numbers to a family.......................................................................................47
How do I create a bar code roster?.............................................................................................48
OPERATING THE Check-in STATIONS
How do I log onto the check-in stations?...................................................................................49
How do I check in a family using a last name, family number or badge number?....................50
How do I check a family in using a bar code? ..........................................................................52
How do I check in an individual using a last name or badge no? ..............................................53
How do I check in an individual using a bar code? ...................................................................55
How do I check in a student to a different class? ......................................................................55
Can I record check-out times for students?................................................................................57
USING FINGERPRINTS
What needs to be configured to use fingerprint technology? .....................................................58
How do I set up the fingerprint software so it works with Roll Call? .......................................58
How do I connect a personʼs finger print with Roll Call?..........................................................59
Once a personʼs fingerprint is recorded, how do I check them in? ............................................61
CREATING ATTENDANCE REPORTS
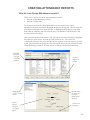
How do I run Group Attendance reports? ..................................................................................64
There are two ways to access the group attendance reports. .................................................64
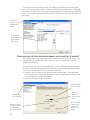
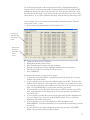
How can you tell who has been absent or present for X weeks? ...............................................65
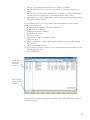
Can I see the attendance stats for each group/class in a department? ........................................67
Can I see the attendance stats for groups for a quarter? ............................................................67
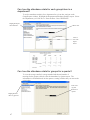
Can I view attendance for a group by week? .............................................................................68
Can I view attendance information by the specific session?......................................................70
Can I see the people that attended group/class in a date range? ................................................71
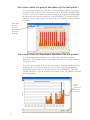
Can I view a chart of a groupʼs attendance for the last quarter? ................................................73
Can I view a chart of a department attendance the last quarter? ...............................................73
CHILD CHECK IN OVERVIEW
What is “child check-in”?
en
ud
st
C
he
t
ou
ck
ck
he
C
ti
n
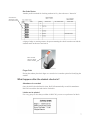
The child check-in system in Roll Call allows you to check students into their classes,
record attendance and print name tags and security labels. This system can be used to
check people into classes, events, activities or any group that is defined in Roll Call.
Print labels
What are my options for checking students in?
Bar Code Badge
One option for checking in children is the bar code badge. These badges are produced
using Roll Call. The badges are printed 8 per page. They can be printed on card stock
paper, then laminated or placed in name tag holders. The badges are printed with a bar
code which identifies the student. They can also include your church logo, the student’s
picture, family number or badge number, allergy information and the parent’s names.
5
Key Tag
Another option is to have key chain tags printed with a bar code to identify the student or
family.
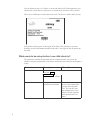
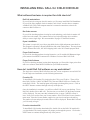
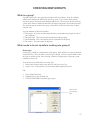
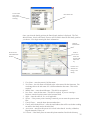
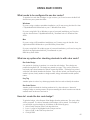
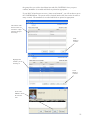
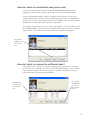
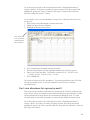
Name, Family Number or Badge Number
Another method for checking students in is by using their name. The person manning the
check-in area simply types the last name, family number or badge number then selects the
student from the list.
To check in by
name, enter the
last name (or
portion of last
name) then click
SEARCH BY
NAME
Highlight one or
more students to
check in
6
NOTE
the toggle
to return
individuals
or all family
members.
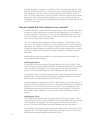
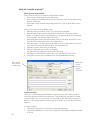
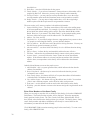
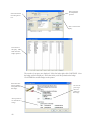
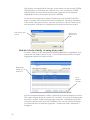
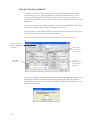
Bar Code Roster
Another possible method for checking students in is by bar code roster. Instead of
Scan the students bar code
from the roster
swiping a badge or entering a name, the person manning the check-in station can find the
students name on the roster and scan it.
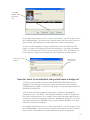
Have student
place his finger
on the scanner.
Finger Print
Having the student place their finger on a scan device is another option for identifying the
student.
What happens after the student checks in?
Attendance is recorded
Once the child is checked into his class, Roll Call automatically records his attendance.
Roll Call records the date and time he checked in.
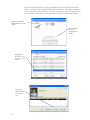
Labels can be printed
For every group or class that you define in Roll Call, you can set a preference for labels.
7
You can choose to print 1 to 5 labels, or not to print labels at all. If the student was just
checked into a class that has a preference set to print labels, the labels will be printed.
There are two different size labels that can be used. The first is a smaller label (30334)
Your church can also opt to use the larger 30256 label. This option gives you more
flexibility as to the information included on the label. Your logo can also be printed on
this label.
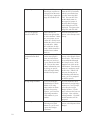
What needs to be set-up before I use child check-in?
The table below outlines the steps that must be completed before you can use the
children’s check-in functionality. Each item is described in more detail in the chapters to
follow.
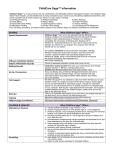
Item
8
Description
Install Roll Call software
Download the installer
www.
www.
files from www.
www
CAAministries.org
bythebook.com or use the
CD to install the software
Enter church information
Enter your church name
and address information
Where Found
This can be entered using
the Set Up Assistant when
you first start using Roll
Call. You can also enter
this information by select
Admin>Church Constants
from the main Roll Call
menu.
Initialize the Roll Call
security system
There are two user names
that come standard
with Roll Call. They
are Administrator and
Director. Once you
assign a password to the
Director user, the security
system in Roll Call is
activated.
You can enter a password
for Director and
Administrator in the Set
Up Assistant when you
first start using Roll Call.
You can also enter these
passwords by selecting
Admin>Edit Access from
the main menu. Double
click on the user name,
then enter the passwords in
the Edit User window.
Create check-in users
When you log into Roll
Call with a “check-in”
user name, the check-in
screen is displayed.
You can enter user names
for your check-in users in
the Set Up Assistant that
is presented when you first
start using Roll Call. Enter
the user name, then check
the appropriate security
group for that user. The
“Automated” group is
meant for “unmanned”
check-in stations. This
security group does not
allow the quick enroll for
visitors. The “Manual”
group will allow check-ins
for visitors
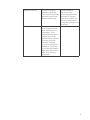
Choose a label size
You can print name tags
and security labels for
two different label stocks.
The larger label is the
30256 shipping label.
The smaller label is the
30334 Misc size label.
You can select your
label stock in the Set
Up Assistant that is
presented when you first
start using Roll Call. You
may also set your label
preference by selecting
Admin>Preferences from
the main menu. Then click
on the Attendance tab.
Next click on the LABEL
PREFERENCES button.
Set check-in preferences
These preferences include
the amount of time
before and after a class
starts that check-ins are
allowed; what is included
on a badge; and if the
CONFIRM button is
required for check-ins.
You can set your checkin preferences in the
Set Up Assistant, which
is presented when you
first start using Roll
Call. You may also set
these preferences from
Admin>Preferences. Then
click on the Attendance tab.
9
10
Import logo
If you would like your
church logo or picture to
be displayed on the main
Roll Call page, import the
image file into Roll Call.
You can import your logo
from the Set Up Assistant,
which is presented when
you first start using Roll
Call. You can also click
on the church name in
the upper left corner of
the main Roll Call page.
A file dialog box will be
displayed. Navigate to the
image file and click OK.
Set up your groups/
classes in Roll Call
People can only be
checked into groups that
are in the database. Make
sure your groups are set
to meet on a weekly basis
and that they have session
days and times. Make
sure to indicate for this
group if labels should be
printed when a student
checks in.
From the main Roll Call
screen, select Groups>Add
Group.
Enter the people
information into Roll
Call.
At a minimum, you’ll
need to enter people’s
names and association
(how they are involved
in your church) into Roll
Call. You can also enter
contact information, note
any allergy or special
needs and import family
and individual pictures.
From the main Roll Call
screen, select People>Enter
New People. This can also
be accomplished through
the Groups screen. In the
members tab, click on the
ADD button. Enter the last
name of a student to enroll
in this class. If Roll Call
does not find anyone in
the database with that last
name, you’ll be prompted
to add this person.
Assign badge numbers
If you’ll be using preprinted badges to check
children in or using
badge number on name
tag labels for security
purposes, you’ll need to
assign badge numbers
to the students in your
database.
If you’d like Roll Call to
automatically assign badge
numbers to a set of people,
select People>Assign
Badge Number. Use the
query editor to find your set
of people. Next enter the
starting number. Click OK
and the numbers will be
assigned.
Print badges
If you’ll be using bar
code badges to check
students in, you’ll need
to print these badges
beforehand.
From the main Roll Call
screen, select Reports>Print
Badges.
Assign bar code id’s
If you’ll be using preprinted key chain tags,
you’ll need to assign each
individual, the bar code
identifier from his tag.
Configure hardware
Set up your Roll Call
client computer stations
in the check-in area of
your church. These
workstations must have
network access to the
Roll Call Server software.
If you are only using
one check-in station,
you can set up Roll Call
Standalone. Next plug
in your bar code scanner,
finger print scanner and
label writer printers as
appropriate.
From the main Roll
Call screen, select
People>Assign Barcodes.
Query the set of people
you’d like to assign a bar
code ID to, then scan the
key tag that will be given to
the student.
.
11
INSTALLING ROLL CALL for CHILD CHECK-IN
What software/hardware is required for child check-in?
Roll Call workstations
If you will only be using one check-in station, you’ll want to install Roll Call Standalone.
If you will be using multiple check-in stations, each “kiosk” needs to have a computer
with Roll Call Client. That computer must have a network connection so that it can
connect to Roll Call Server.
Bar Code scanner
If you will be checking students in using bar code technology, each check-in station will
need a bar code scanner. The scanner needs to be a keyboard wedge device with the
ability to scan a single digit. We recommend the Voyager CG hand held scanner.
Dymo LabelWriter
This printer is required if you wish to print labels for the child and parent upon check-in.
The program is expecting a Dymo LabelWriter 400 or 400 Turbo printer. You may choose
from 2 different label sizes, the 30256 shipping label or the 30334 multi-purpose labels.
Finger Print Scanner
If you will be checking students in using biometrics, you’ll need the M2 Hampster finger
print scanner from M2SYS connected to a Windows version of Roll Call Client.
Finger Print Software
If you’ll be checking students in using their fingerprint, you’ll need the finger print client
and server software from M2SYS installed on your Windows machine.
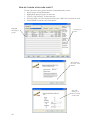
How do I install Roll Call software on my workstation?
The single user version of Roll Call allows one user, on one computer to access Roll Call.
For the single user installation, use the following instructions.
From the CD
To install Roll Call from the CD, simply place the CD in your CD drive. There will be
three Roll Call files: 1)Roll Call 2)Roll Call Client and 3)Roll Call Server. Double click
on the Roll Call file. The install program will prompt you through the process. Click on
the NEXT button to continue through each step of the process.
Once the installation is complete, you will have a Roll Call icon on your desktop. To use
Roll Call, double click on that icon. The first time you use Roll Call, the Setup Assistant
will be displayed. You may enter this information now, or press CANCEL to enter it
later. Next you’ll need to enter your license number. Select File>Enter License from the
main menu. Enter the license number supplied on your invoice and press the tab key.
The number of users and people records allowed will be displayed. Restart Roll Call and
you’ll be ready to begin.
From the download file
To install Roll Call from the downloaded file, double click on the Roll Call installer file
you downloaded. The install program will prompt you through the process. Click on the
NEXT button to continue through each step of the process.
13
Once the installation is complete, you will have a Roll Call icon on your desktop. To use
Roll Call, double click on that icon. The first time you use Roll Call, the Setup assistant
will be displayed. You may enter this information now, or press CANCEL to enter it
later. Next you’ll need to enter your license number. Select File>Enter License from the
main menu. Enter the license number supplied on your invoice and press the tab key.
The number of users and people records allowed will be displayed. Restart Roll Call and
you’ll be ready to begin.
How do I install Roll Call software on my network?
A network installation of Roll Call allows multiple people to access the data. If you have
a multi-user license, multiple users can access the data simultaneously. For example, if
you have purchased a 3 user license, 3 users may access the database at the same time. If
you have purchased a single user license, you may still install the network version, but
only one person may access the data at a time.
First you must decide which computer will house the database. That computer will be
your server. The computer you choose as your server should not be used for many other
applications. For example, if your secretary’s computer is used for creating the bulletin,
writing letters and accounting, you probably wouldn’t want her computer to be your Roll
Call Server. Since the server needs to be running at all times, it would slow down her
other work.
Next decide who will need to use Roll Call. Each of those users will need Roll Call
Client installed on their computer.
Installing the Server
To install Roll Call Server from the CD, simply place the CD in your CD drive. There
will be three Roll Call files: 1)Roll Call 2)Roll Call Client and 3)Roll Call Server. Double
click on the Roll Call Server file. The install program will prompt you through the
process. Click on the NEXT button to continue through each step of the process.
To install Roll Call Server from the downloaded file, double click on the Roll Call Server
installation file. The install program will prompt you through the process. Click on the
NEXT button to continue through each step of the process.
Once the installation is complete, there will be a Roll Call Server icon on the desktop. To
start Roll Call Server, double click on the icon. An open file dialog box will be displayed,
asking you to select your data file or to create a new one. For new installations, click
NEW, then enter the name you wish for your data file, then click SAVE. The Roll Call
Server window will be displayed. For users to work in Roll Call the Server must be
running.
Installing the Client
To install Roll Call Client from the CD, simply place the CD in your CD drive. There
will be three Roll Call files: 1)Roll Call 2)Roll Call Client and 3)Roll Call Server. Double
click on the Roll Call Client file. The install program will prompt you through the
process. Click on the NEXT button to continue through each step of the process.
14
To install Roll Call Client from the downloaded file, double click on the Roll Call Client
installation file. The install program will prompt you through the process. Click on the
NEXT button to continue through each step of the process.
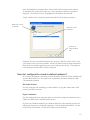
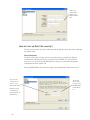
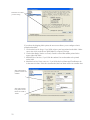
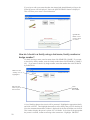
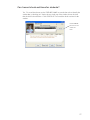
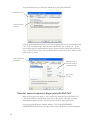
Once the installation is complete, there will be a Roll Call Client icon on the desktop.
To start Roll Call, double click on the icon. The Connection to 4D Server window is
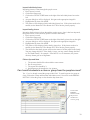
displayed. Click on the TCP tab. Highlight Roll Call database and click OK.
If this is the first time a client has connected into Roll Call, the Setup Assistant is
Make sure to click
on TCP tab.
Roll Call will be
listed here.
Click OK to
connect to Roll
Call.
displayed. You may enter this information now, or press CANCEL to enter it later. Next
you’ll need to enter your license number. Select File>Enter License from the main menu.
Enter the license number supplied on your invoice and press the tab key. The number of
users and people records allowed will be displayed.
How do I configure the check-in station hardware?
In a network environment, each check-in kiosk should have Roll Call Client installed with
access to Roll Call Server. In a single kiosk environment, the station should have Roll
Call standalone installed.
Bar Code Scanner
If will be using bar code technology to check student’s in, plug the scanner into a USB
port on your check-in station.
Dymo Labelwriter
If will be printing labels as name tags and/or security labels, plug your Labelwriter into a
USB port. Make sure to install the printer drivers.
If you are on a Windows machine, go to Printers and Faxes at the operating system level
and choose properties for the Dymo Labelwriter. Click on Printing Preferences. For the
30334 labels, click Portrait. For the 30256 labels, select Landscape.
15
If you are a portable church, or are plugging the Labelwriters in each Sunday, please note,
on some Windows machines, a new printer definition is created each time you plug in the
printer. Make sure you only have ONE Labelwriter printer definition and that it is online.
Finger Print Scanner
If you will be using the finger print scanner, plug the scanner into a USB port on your
Windows check-in station. Make sure that the biometric client software is installed on
your check-in station. See installation instruction for the biometric client and server from
M2SYS.
16
CONFIGURING ROLL CALL FOR CHECK IN
Where do I enter my church information?
You can enter the church address, phone and other demographic information through the
Setup Assistant, or through the Admin menu.
The Setup Assistant allows you to quickly set up the preferences and security you’ll need
to use the child check-in portion of Roll Call. The Setup Assistant welcome screen will
automatically come up the first time you start using Roll Call. Click NEXT from the
welcome screen to move on to the Church Info section, or click on the section you’d like
to navigate to from the left sidebar.
At a minimum, you’ll want to enter the Church Name in this section. You may also wish
to enter the church address information. The church address information is used as the
return address on donation receipts and pledge progress letters. If you’d like to use the
cumulative donations report, make sure to enter your weekly budget. If you’ll be using
Roll Call’s deposit slip, make sure to enter your bank account number. Click NEXT to
move to the next section.
Setup Assistant
To enter the church information from the Setup Assistant, click NEXT from the Welcome
screen, or click on the link on the left for Church Info.
Click on link
to go directly
to that section.
Click NEXT to
navigate through
each section.
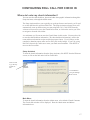
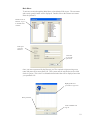
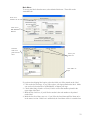
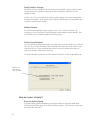
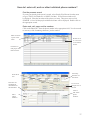
Main Menu
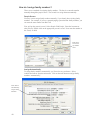
To enter the church information from the Admin menu, select Admin>Church Constants.
The Church Info window will be displayed. Enter the church name and address
information here.
17
Enter your
church name,
address and
phone information.
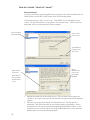
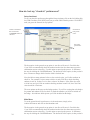
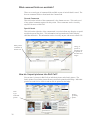
How do I set up Roll Call security?
You can set up security user name and passwords through the Setup Assistant, or through
the Admin menu.
Setup Assistant
To activate Roll Call’s security system, you must provide a password for Director.
Administrator and Director are two users that come with Roll Call. Do not delete
these users. If you’d like to add additional user names, you can do that through the
Administration menu in Roll Call.
Enter a PASSWORD in the field to the right of the Administrator and Director users.
If you do not
want to have to
sign in... leave
these fields blank.
NOTE: security
is required for
the child check in
functionality.
18
To activate
the security
system, enter a
PASSWORD
for the Director.
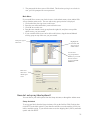
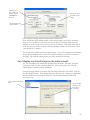
Main Menu
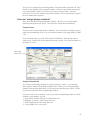
To activate security through the Main Menu, select Admin>Edit Access. The user name
and security group window will be displayed. Double click on the Director user name.
Enter the password.
Double click on
Director, to get
to the Edit User
window.
Enter password for
Director.
Click OK
to save the
password.
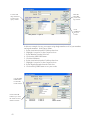
Once you enter a password for the Director, you’ll be required to sign on using a user
name and password to access Roll Call. This system must be activated to use the child
check-in system. This is the User Identification window that will be displayed next time
you open Roll Call.
Highlight the user
youʼd like to sign in as.
Enter password.
Click CONNECT to
sign in.
19
How do I create “check-in” users?
Setup Assistant
To create your check-in users through the Setup Assistant, click on the left sidebar link for
Child Checkin or click NEXT until you get to the Child Checkin portion.
Click on the button for “Sure.. lets set it up”. Click NEXT to move through the set up
screens. The first child check-in set up option is for “check-in users”. These are the user
names that will be used to log onto the check-in stations.
Click on link for
Child Checkin.
Select “Sure..
lets set it up”.
Click NEXT to
navigate to the
next screen.
Enter check in
user names.
Each check in
user must have
the Automated
access.
Check
Manual if the
user can use
the QUICK
ENROLL.
1. Enter the user name for the first check-in user. This user name can be generic like
“checkin1” or it can be more specific, like the name of a person who will be manning
a station.
2. There are two security level choices for each check-in user. The first option is
Automated. This allows the check-in user to find by name or scan badges. It does
not allow the user to enter new people through the QUICK ENROLL option. If you
would like the user to also be able to use the QUICK ENROLL for visitors, mark the
Manual option as well as the Automated option.
20
3. The passwords for these users will be blank. The first time you log in as a check-in
user, you’ll be prompted for a new password.
Main Menu
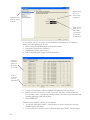
If you would like to create your check-in users via the Admin menu, select Admin>Edit
Access from the main screen. The user and security group window is displayed.
1. Click on the blue plus sign icon, to add a user.
2. Enter the user name and default password for this user.
3. Click OK to save this user.
4. Drag the Auto Attend security group from the right side, and place on top of the
check-in user, you just created.
5. If you want this check-in user to be able to add visitors, drag the Attend Manual
security group on top of the user you just created.
Click plus sign to
add a user.
Highlight Attend Auto and
drag on top of
check in user.
Use the security group Attend
Manual, if you want
the user to have
access to QUICK
ENROLL.
Enter user
name and
default password
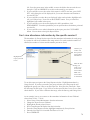
How do I set up my label options?
You can choose your label options from the Setup Assistant, or through the Admin menu.
Setup Assistant
To set up your labels from the Setup Assistant, click on the link for Child Checkin, then
click NEXT to the label option. If your church would like to use the smaller (30334) size
labels, mark this option. If your church wants to use the shipping label (30256), mark this
option and click NEXT.
21
Select the size labels
youʼll be using.
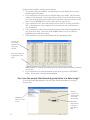
If you chose the shipping label option, the next screen allows you to configure what is
printed on that label.
1. Click on the box for Image, if you’d like to have your logo printed on the label. Make
sure to also click on the box to ADD IMAGE, to import your logo.
2. Check either Badge Number or Family Number to have that number printed in the
upper right of the label.
3. Mark the Bar Code box, if you’d like the student’s bar code number to be printed
on the label.
4. Mark the box Last Name same size if you’d like the Last Name and First Name to be
in the same size font. If this box is unchecked, the Last Name will be in a smaller font.
Select information
printed on labels for
children.
Select the information printed on the
labels for Youth or
Adults.
22
Main Menu
To set up your labels from the menu, select Admin>Preference. Then click on the
Attendance tab.
Click on Attendance tab.
Click on LABEL PREFERENCES.
Select the
fields to be
printed on the
label.
Select your
label size.
Click OK to accept.
If you chose the shipping label option, select the fields you’d like printed on the label.
1. Click on the box for Image, if you’d like to have your logo printed on the label. Make
sure to also click on the box to ADD IMAGE, to import your logo.
2. Check either Badge Number or Family Number to have that number printed in the
upper right of the label.
3. Mark the Bar Code box, if you’d like the student’s bar code number to be printed
on the label.
4. Mark the box Last Name same size if you’d like the Last Name and First Name to be
in the same size font. If this box is unchecked, the Last Name will be in a smaller font.
23
How do I set my “check-in” preferences?
Setup Assistant
To set your check-in preferences through the Setup Assistant, click on the left sidebar link
for Child Checkin or click NEXT until you get to the Child Checkin portion. Click NEXT
until you get to the General Set Up Options.
Check to eliminate
the need for the
CONFIRM button at
check in.
Set check in
time preferences.
Set badge
preferences.
The first option in the general set up option is Auto Record Scanned. Check this box
if you’d like to automatically check the student into the first class that comes up on the
confirmation screen at check-in. Use this option to speed up the process. It eliminates
the step for clicking the CONFIRM button. The downside of this option, is that you don’t
have a chance to change which class the child is checked into.
Next, decide how many minutes before a class session begins, you’ll allow students to
check-in. For example if a class starts at 9:00 a.m. and you’d like to begin checking
students in at 8:30, set the Check-in Starts value to 30 minutes. If the same class ends
at 10:00 a.m. and you’d like to continue checking students in until 9:45, the Class Ends
value should be 15 minutes.
The next options on this page are the badge options. If you’ll be creating bar code badges
for parents and students to use for check-in, mark the numbers you’d like to include on
the badge. Also indicate which picture you’d like included on the badge.
Main Menu
To set the general check-in preferences, via the main menu, simply select
Admin>Preferences and click on the Attendance tab.
24
The first option in the general set up option is Auto Record Scanned. Check this box
if you’d like to automatically check the student into the first class that comes up on the
confirmation screen at check-in. Use this option to speed up the process. It eliminates
the step for clicking the CONFIRM button. The downside of this option, is that you don’t
Check if you
donʼt want user
to have to press
CONFIRM to
check in.
Select info to be
included on the
badge.
Set preferences for
check in times.
have a chance to change which class the child is checked into.
Next, decide how many minutes before a class session begins, you’ll allow students to
check-in. For example if a class starts at 9:00 a.m. and you’d like to begin checking
students in at 8:30, set the Check-in Starts value to 30 minutes. If the same class ends at
10:00 a.m. and you’d like to continue checking students in until 9:45, the Check-in Ends
value should be 15 minutes.
The next options on this page are the badge options. If you’ll be creating bar code badges
for parents and students to use for check-in, mark the numbers you’d like to include on
the badge. Also indicate which picture you’d like included on the badge
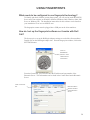
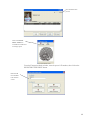
Can I display my church’s logo on the main screen?
Yes. You can import your church logo from the Setup Assistant. The Setup Assistant
is displayed when you first start using Roll Call. You can also get to it by selecting
Admin>Setup Assistant from the main menu.
From the Setup Assistant, click on the Roll Call image link on the left sidebar. Click on
the GET IMAGE button. Then navigate the jpg or gif image file. Please note, Quicktime
must be installed to view images in Roll Call. You can download Quicktime from
www.apple.com.
Click on Roll Call Image
link.
Click on GET
IMAGE, and
navigate to
your logo.
25
CREATING NEW GROUPS
What is a group?
A group in Roll Call is any grouping of people within your church. It can be a Sunday
school class, small group, bible study, activity or event. If you wish to check people
into these groups, they must first be defined in Roll Call. The session or the day and time
a class meets, must be defined so that Roll Call knows what groups are currently meeting.
The students must be enrolled in a group, so that Roll Call knows which class to check
someone into.
A group definition in Roll Call includes:
1) The campus. If you are a multi-campus church, you can define the groups for each of
your campuses.
2) The group type. This is the general classification of the grouping.
3) The department. This is the ministry that is responsible for the group.
4) The section. This is the name of the group.
What needs to be set up before creating new groups?
Group type
Group type is a high level classification of the group. Roll Call has two types pre-defined:
Group and Class. You can define your own types, though. You may want to further refine
the types to include: group, class, meeting, volunteers, small groups, cell groups, youth,
committee, retreat, etc.
To create the list of valid values for Group Type:
1. In the Add a Group window, enter the new value for Group Type.
2. Answer “Yes” to the question, do you want to add this group to the list?
OR
1. Go to Admin>Edit Lists.
2. Highlight Group Type from the list.
3. Click on ADD ITEM to add other group types.
Click to add
a new Group
Type.
27
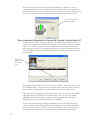
How do I create a group?
Enter general information
There are three ways to navigate to the Add a Group window:
1. Select Groups>Add Group from the main menu.
2. Select Groups>Group Maintenance from the main menu, then click on Add a Group
from the Action Bar.
3. Select Add a Group from the Action drop down box, if you are in the Edit a Group
window.
Once you are in the screen to add the group:
1. Enter the values for Campus, Group Type, Department and Status.
2. Enter the name of the specific group under Group Section. This name must be
unique. Consider using the year in the name so you can keep historical information
on your groups. For example, 2006-First Grade.
3. If the group has a leader, enter the last name in the Leader field. Press tab to view a
list of the folks with that last name. Select from the list.
4. If the group has a co-leader, enter the last name in the Co-Leader field. Press tab to
view a list of the folks with that last name. Select from the list.
5. Enter the Location of the group, if applicable.
6. Indicate if the group meets weekly or randomly.
7. You may enter any comments or notes in the Notes field.
8. The Start Date will default to today’s date. You may change it if you’d like.
9. Click OK to save the group and return to the Group Maintenance window.
Enter the high
level group information first.
Enter leader,
location,
frequency
and date
information.
Create sessions
Once you’ve entered the general information about the group, you’ll want to indicate
which days and at what times the group meets. The meeting days and times are called
sessions in Roll Call. The sessions are very important for the child check in portion of
Roll Call. The sessions indicate which classes are available on a given day and time for
check in.
To create a session:
1. Click on the session tab, if sessions are not currently displayed.
2. Click on the ADD button. A row will be displayed, with a default of Sunday and time
of 12 a.m.
28
3. Use the Day of Week drop down box to select the appropriate day.
4. Click on the clock icon to change the Start Time. On the Mac, move your cursor
from left to right, first selecting am or pm, then selecting the hour, then selecting the
minutes. On Windows, select the time in military time, moving from right to left.
5. The End Time will default to one hour past the start time. If you need to change
this, click on the clock icon. On the Mac, move your cursor from left to right, first
selecting am or pm, then selecting the hour, then selecting the minutes. On Windows,
select the time in military time, moving from right to left.
6. Place your cursor under Room and double click to enter the room number of this
group meeting.
Enter day of the
week and time
that the group or
class meets.
Click ADD
to add a
session.
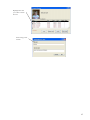
Add Members
To enroll people into the group, press the Members tab. From within the members tab:
1. Click the ADD button or select Member Action>Add Member from the Action drop
down box. A line is opened up and the cursor is placed in the Name field.
2. Enter the last name (or portion of the last name) of the person you want to enroll.
3. Press the tab or enter key. A list of people with that last name will be displayed.
Double click on the appropriate name to select.
4. Tab across to enter any of the custom field data for this person.
Enter the last
name of the
new member,
press tab.
Click ADD
to enroll a
person into
the group.
Action drop
down box.
29
Highlight the
appropriate
person, and
press return.
A list of folks
with that last
name will be
presented.
Set Preferences
To set your group preferences, press the Preferences tab. From within the Preferences
tab:
1. Mark the fields you’d like shown on the attendance roster.
2. Enter the number of labels you’d like printed after a student checks in.
3. Click OK to save the information and return to Group Maintenance.
Select which
fields are
included on
the attendance
roster.
Enter the number of labels
youʼd like
printed after
the student
checks in.
If you select
1 label, youʼll
also be given
the option to
print 2 labels
if the FIND
BY NAME
was used.
30
Can I add people into the database from the group members
area?
Yes. If you enter a last name in the members tab, that isn’t found in the database, you’ll
be asked if you would like to add that person. If you answer yes, you’ll be prompted for
the type of entry.
31
ENTERING FAMILIES
What preferences can I use to speed up data entry?
The following preferences can be used to simplify the data entry process. To get to the
preferences:
1. Select Admin>Preferences from the main menu.
2. Click on the People tab.
Note tab options.
Optional Mailing Name
The Optional Mailing Name is a field in the address section is used to override the
standard mailing names. For example, if you have Jim & Mary Smith, all correspondence
to Jim & Mary would be addressed to Mr. & Mrs. Smith OR Jim & Mary Smith. If
you enter “The Smith Family” as the optional mailing name, all correspondence will be
addressed to “The Smith Family”.
If you enter “Yes” to Auto-Fill the optional mailing name, the head of the families name
will be entered in the optional name field.
Assign Family Numbers
The Family Number is an optional number that your church assigns to a family. Many
churches use this number as part of a parental notification system.
If you select “Automatic”, Roll Call will generate a family number for you. Once you
select “Automatic”, you will be prompted for the starting number. After clicking OK,
all families already in the database will be assigned a family number. As you enter new
families, the number will be assigned.
If you switch the preference from “Automatic” to “Manual”, the program will ask if
you’d like to clear out all existing family numbers. Answer “Yes” if you’d like all family
numbers to be blank.
33
Family Position Changes
The Family Position tells Roll Call if the person is the husband, a spouse, child or youth.
Use this preference to indicate at what age a child is changed to youth and a youth
changed to adult.
Answer “Yes” if you would like these family position changes to be made automatically
based on the birth date. Also enter the age at which a child becomes a youth, and the age
at which a youth becomes an adult.
Multiple Campus
If your church has multiple campus locations, select “Yes” for this preference. By
selecting yes, you will now have a field to indicate which campus a person attends. This
will also allow you to indicate campus location for groups.
Default Church Address
If you would like to default the person’s city to the same city as the church’s city, click the
City box. If you’d like the person’s state to default to the same state as the church’s state,
click the State box. If you would like the person’s zip code to default to the same zip
code as the church’s, click the Zip Code box.
To modify the address preferences, select Admin>Preferences. Click on the Address tab.
Mark to use
churches address as default.
How do I enter a family?
Enter the Head of Family
To begin entering people information, select People>Enter New from the main menu.
The first window that pops up is the Family Position window. You’ll need to need to enter
the head of the family first.
34
Click on the
type of person you are
entering.
Note short cuts.
Once you select the family position, the Enter People window is displayed. The Title,
Marital Status, Gender and Family Position will be filled in based on the family position
you choose. Next begin entering the basic information:
General
information
Note tabs for
individual information.
Click to
save and
enter new
person from
same family.
Click to save
and start entering a new
family.
1. First Name - enter the person’s full first name.
2. Nick Name - the nick name will default to the value entered for the first name. You
can change this to the nick name if it is different than the first name. This field is
required.
3. Middle Name – enter the middle name. This field is not required.
4. Last Name – enter the last name. This field is required. If you are entering a
business, enter the business name in the last name field.
5. Suffix - enter the suffix Jr., Sr., etc if applicable.
6. Spouse - if the person you are entering is married, you can enter the spouses name
here.
7. Family Phones - enter the home phone numbers here.
8. Family and Individual Email – enter the email address that will be used when sending
an email to the family and to the individual..
9. Association – enter how this person is involved in the church. Are they a Member,
Regular Attender, Visitor, etc.
10. Unlisted - if the family does not want their phone numbers listed in the directory,
35
11.
12.
13.
14.
check this box.
Birth Date - enter the full birth date for the person.
Family Number – if you selected “automatic” from preferences, this number will be
assigned by Roll Call. Otherwise, you may assign a family number manually.
Envelope Number – you may enter an envelope numbers here, or use the assign
envelope number option under the Donations menu to assign numbers en masse.
Badge Number - you may enter a badge number here, or use the assign badge
number option under the People menu to assign numbers en masse.
The next section you’ll want to complete is the address information.
1. Optional Mailing Name - The name entered here will be used as the mailing name
on all correspondence and labels. For example, if you have a husband and wife Jim
& Sue Smith, the default mailing label would be Jim & Sue Smith OR Mr. & Mrs.
Smith. However, if you entered “The Smith Family” as the optional mailing name,
the letters, labels and receipts would be addressed to “The Smith Family”
2. Address, City, State and Zip
3. Shepherd Area – if your church assigns deacons, congregational care pastors or other
lay people to come alongside families, you may indicate that here.
4. Notes on Address - this field was used in the past for driving directions. You may use
this field for any general comments you’d like.
5. Alternate Address – use these fields if the family lives in a different location during
the year.
6. Effective Dates – indicate the day and month this address become effective
7. End Date – indicate the day and month the family returns to their primary address
8. Activate button – you must click on the “house” button to activate the alternate
address. If the alternate address is activated, and the current date falls within the
effective dates, correspondence to this family will be addressed to the alternate
address.
Other fields and buttons to note on the people screen:
1. Add. Modified – this is a system generated date, which indicates the last date the
address was modified.
2. Record Confirmed - this date may be entered to indicate the date the person’s
information was verified.
3. Print Family button – this button will kick off a report that outlines all information
within the Roll Call database for this family.
4. Copy Address button - this button will copy the address into a buffer. You can then
paste it into a different program, such as Word or other word processor.
5. Send email – use this button to send an email to this individual or entire family.
6. Web Map - press this button to connect to the internet and get driving directions to the
address.
Enter Other Members of the Same Family
When you are ready to enter the wife or children of this family, click on the OK&SAME
FAM button. The Family Position window will be displayed. Select the appropriate
family position for this person. The Title, Gender, Last Name, Marital Status will all
have default values based on the family position you selected. The family phone, family
email, family number and address information will already be entered based on the
information you entered for the head of family.
Click OK&SAME FAM to continue entering people in the same family. To create a new
family, click OK&NEW FAM.
36
How do I enter cell, work or other individual phone numbers?
Find the person’s record
If you are not already in the person’s record, select People>Find Person from the menu
or type CTRL F (for Windows) or CMD F (for Mac). A Find Person window will
be displayed. Enter the last name of the person you want. Then press enter or click
SEARCH. A list of all the people with that last name will be displayed. Double click on
the appropriate record.
Enter work, cell, pager and fax numbers.
Click on the Phone tab. Enter the phone number in the appropriate field. You do not need
to enter any of the formatting characters, just the number.
Enter last name
or part of last
name.
Double click
on a record to
view all their
details.
Click here to
find people with
that last name.
Click OK to
save.
Note tabs contain different
information for
the individual.
Enter
phone
numbers.
All family
members are
listed here.
Use to scroll
through a list of
records.
Click to
add “other”
phone
numbers.
37
What comment fields are available?
There are several types of comment fields available as part of an individual’s record. The
first two comment fields are found under the Comment tab.
General Comments
This field, on the left side of the comment tab, is free format text area. This can be used
of any general comments required for this person. These comments can be viewed by
anyone with access to Roll Call.
Special Needs
This field, on the right side, of the comment tab, is used to indicate any allergies or special
needs that a person may have. This information can be printed on the labels after the
child has checked in. This information can be viewed by anyone with access to Roll Call.
Enter general
comments on
the left side
Allergy or
special instructions can
be printed on
the labels and
badges
How do I import pictures into Roll Call?
You can store 2 pictures in Roll Call, an individual picture and a family picture. The
family picture is used in the picture directory and can be printed on the badge. Individual
pictures are used for live check-in and can also be printed on the badge.
Click
to get
individual
picture.
38
Click to
get family
picture.
Import individual picture
Importing pictures is done through the people screen.
1. Find a person’s record.
2. Click on the Picture tab.
3. Click on the GET PICTURE button to the right of the individual picture box on the
left.
4. An open dialog box will be displayed. Navigate to the appropriate image file.
5. Highlight the file, then click OPEN.
6. The picture will be displayed in the individual picture box. If the picture needs to be
rotated, use the Rotate 90 CW or Rotate 90 CCW to line the picture properly.
Import family picture
Importing family pictures is done through the people screen. Once it has been imported,
the picture can be viewed from any person’s record in that family.
1. Find a person’s record.
2. Click on the Picture tab.
3. Click on the GET PICTURE button to the right of the family picture box on the right.
4. An open dialog box will be displayed. Navigate to the appropriate image file.
5. Highlight the file, then click OPEN.
6. The picture will be displayed in the family picture box. If the picture needs to be
rotated, use the Rotate 90 CW or Rotate 90 CCW to line the picture properly.
7. The field below the family picture will have the names of all the people in the family.
You may change this label. If the family is large, you may want to change the label
to “The Smith Family” for example. If the label is over 30 characters, the picture
directory format gets out of alignment.
Picture tips and hints
1. The pictures should all be taken with the same camera.
2. Do not crop pictures.
3. The aspect ratio should be ¾.
4. Quicktime must be installed to view pictures.
Can I enroll students in a class or group from the people screen?
Yes, if you’ve already created the groups in Roll Call. To enroll a person in a group or
class, click on the Groups tab from that individuals record. Next click on the ENROLL
BUTTON. Select the group or class from the drop down box.
Click on the
ENROLL
button to make
the person a
member of a
class or group.
39
How do I assign family numbers?
There are two methods of assigning family numbers. The first is to enter the number
manually through the people screen. The second is to assign them automatically.
People Screen
You may want to assign family numbers manually, if you already have existing family
numbers. For example, if you use a parental paging system that has family numbers, you
can enter the same number into Roll Call.
First, pull up the person’s record. Select People>Find People. Enter the last name or
other criteria. Double click on the appropriate person’s record. Next enter the number in
the Family No field.
Enter number in family number
field.
Assign Automatically
To assign family numbers automatically, you’ll need to set a preference. Select
Admin>Preferences from the main menu. Click on the radio button to assign family
numbers “automatically”.
Click here to
automatically
assign family
numbers.
40
Next you’ll be prompted for the starting number. Enter that number and click OK. Each
family in your database will be assigned a number. If there are any families that already
have family numbers, Roll Call will ask if you want to overwrite those. Once this
preference is set, any new families entered in the database will be automatically assigned
the next number in the sequence.
How do I assign badge numbers?
There are two methods of assigning badge numbers. The first is to enter the number
manually through the people screen. The second is to assign them automatically.
People Screen
You may want to assign badge numbers manually. If you already have a badge system or
other person number that you use, you can enter that number as the badge number in Roll
Call.
First, pull up the person’s record. Select People>Find People. Enter the last name or
other criteria. Double click on the appropriate person’s record. Next enter the number in
the Badge No. field.
Enter badge
numbers here
Assign Automatically
If you want to assign badge numbers to a group of people “en mass”, you can assign
them using the People>Assign Badge Numbers menu. When you select Assign Badge
Numbers from the drop down menu, you’ll be presented with the Query Editor. Use this
to pick the people that will be assigned badge numbers.
Lets take a look at a few examples. Lets say you want to assign badge numbers to all the
children in your database, you can:
1. Select Family Position from the Field drop down box.
2. Highlight “is equal to” in the Comparison box.
3. Select Child from the Value drop down box.
4. Click QUERY to see your results.
41
Use the field
drop down box
to select your
query criteria.
Enter the
value that
youʼre looking for here.
Click
QUERY to
see your
results.
In this next example, lets say you want to assign badge numbers to all of your members
and regular attenders. In the Query Editor:
1. Select Association from the Field drop down box.
2. Highlight “is equal to” in the Comparison box.
3. Select Member from the Value box.
4. Click on the ADD LINE button.
5. Click the OR button.
6. Select Association from the Field drop down box.
7. Highlight “is equal to” in the Comparison box.
8. Select Regular Attender from the Value box.
9. Click on the QUERY button to see your results.
Use the ADD
LINE button
to add additional criteria.
Click on the OR
button if you want
the results to meet
either/or criteria.
42
Once you are satisfied with the list that was returned from the Query, click on the DONE
button. You’ll be prompted for the starting badge number. Enter your starting number
and click OK. Roll Call will tell you how many people will be assigned badge numbers,
starting with the number you entered. If you wish to assign those numbers, click YES. If
you’d like to cancel the operation, click NO.
43
USING BAR CODES
What needs to be configured to use bar codes?
To print the bar code font on badges or sign in rosters, you’ll need to move the Roll Call
font file into your system font folder.
Windows
If you are using a windows standalone installation, you’ll want to copy the font file from
C:\BytheBook\RollCall\BarCode to your C:\Windows\Font folder.
If you are using Roll Call on Windows as part of a network installation, you’ll need to
copy the font file from C:\BytheBook\RollCall_Client\BarCode to C:\Windows\Font
folder
Mac
If you are using a OSX standalone installation, you’ll want to copy the font file from
Applications:RollCall:Barcode to your HD:Library:Fonts folder.
If you are using Roll Call on Mac as part of a network installation, you’ll need to copy the
font file from Applications:RollCall_Client:Barcode to your
HD:Library:Fonts folder.
What are my options for checking students in with a bar code?
Bar Code Badge
One option for checking in students, is to create bar code badges. These badges are
produced using Roll Call. The badges are printed 8 per page. They can be printed on
card stock paper, then laminated or placed in name tag holders. The badges are printed
with a bar code which identifies the student. They can also include your church logo, the
student’s picture, family number or badge number, allergy information and the parent’s
names.
Key Tag
Another option is to have key chain tags printed with a bar code to identify the student.
Bar Code Roster
Another possible method for checking students in is by bar code roster. Instead of
swiping a badge or entering a name, the person manning the check-in station can find the
students name on the roster and scan it.
How do I create the bar code badge?
To print the badges, select Reports>Print Badges from the main menu. The query editor
will be presented. Use this to determine which badges will be printed. For example, if
you would like to print a badge for all children, do the following query:
1. Select Family Position in the Field drop down box.
2. Leave “is equal to” highlighted in the Comparison box.
3. Select “Child” in the Value drop down box.
4. Click QUERY.
45
Select field name
from drop down
box.
Select appropriate comparison
operator.
Select value for the
query.
The results of
the query. These
folks will have
badges printed.
The results of your query are displayed. If this list looks right, click CONTINUE. Next
the badge wizard is displayed. Select the fields you’d like printed on the badge.
Click FINISH to send the badges to the printer.
Select the identifying number
to be printed on
the badge.
Select picture to
be included on
badge.
46
Click to import a logo
file to be
printed on
the badge.
What needs to be set-up to use key chain tags?
Order tags from a printer
Make sure the printer uses our bar code font, places a Q and a carriage return after the
number.
Preferences
Set the assignment of bar code numbers to “Manual”. This is done in preferences. Select
Admin>Preferences from the main menu. Select manual assignment.
Select Manual
assignment of bar
codes if youʼll be
using pre-printed
key chain tags.
Assign key tag numbers to individuals
Next, you’ll need to assign the key tag number to a person in Roll Call. Select
People>Assign Barcodes. From this screen, you can find people by their last name, bar
code number or association. You can also click SHOW ALL to list all the people in your
database. Place the cursor in the bar code field to the right of the person’s name, and scan
the key tag that will be given to that person.
Create list of
people who will
be given key
chain tags.
Scan the key
tag for the first
person.
Assign key tag numbers to a family
If you would like to use the same key tag for an entire family, simply scan the same key
chain tag for each person in the family.
47
How do I create a bar code roster?
The bar code roster can be printed from the Group Maintenance screen.
1. Select Groups>Group Maintenance.
2. Highlight the group or groups for the roster.
3. Click on “Sign in Roster” on the Action bar.
4. Select the fields you’d like displayed on the roster. Make sure to include bar code.
5. Click FINISH to send the roster to the printer.
Highlight
the group or
groups.
Click sign in
roster.
Select date for
the roster, click
NEXT.
Select the
fields youʼd
like to include
on the roster.
48
OPERATING THE CHECK IN STATIONS
How do I log onto the check-in stations?
To use the check-in functionality of Roll Call, you need to log on with a user name that
has “Auto Attend” or “Attend Manual” privileges. To start Roll Call, double click on the
Roll Call icon. The User Identification screen is displayed. If you do not get the User
Identification screen, you’ll need to configure Roll Call security. See the chapter on
Check-in Configuration.
Highlight user name.
Enter password.
Click CONNECT to log on.
If you sign on with a user name that has only Auto Attend, the following screen will be
displayed. This station can only check-in existing people. Visitors cannot be entered into
the system.
Notice all menu
items are unavailable.
You can
only check
in using a
bar code or
finger print
scan.
49
If you sign on with a user name that has Auto Attend and Attend Manual privileges, the
following screen will be displayed. Notice the QUICK ENROLL button is displayed.
This will allow you to enter visitor information.
QUICK ENROLL can be
used to check
in visitors.
How do I check in a family using a last name, family number or
badge number?
To check-in using a name, enter last name, then click SEARCH by NAME. If you want
to check in by family number, enter the family number then click SEARCH by FAMILY
NO. If you want to check in by badge number, enter that number then click SEARCH
by BADGE NO.
Make sure the
“Family” box is
highlighted.
Enter the last
name or part of
the last name.
Click
SEARCH
BY NAME.
A list of families that met the criteria will be presented. Highlight the appropriate family
and click on NEXT. Then highlight the members of the family that you’ll be checking in.
Next, the Automated Attendance window is displayed for the first child that was selected.
This window displays the person’s picture if it is available. It also lists all the groups that
the person is enrolled, in that are meeting at the current time. Highlight GROUPS
50
the group/class you wish to check them into and click CONFIRM. Once you press
confirm, attendance is recorded and labels are printed as appropriate.
If your Roll Call preferences are set to “Auto record scanned”, you will not have to press
the CONFIRM button. The person will be checked into the first class on the list after so
many seconds. His attendance is recorded and labels are printed as appropriate.
The families with
that last name are
listed here. Highlight the appropriate family.
Click
NEXT to
continue.
Highlight the
students you are
checking in.
Click
NEXT to
continue.
Click CONFIRM to check
her into this
class
51
If the student is not enrolled in the class they wish to attend, you may press the OTHER
GROUPS button, to check them into a different class. Once you press the OTHER
GROUPS button, all classes that are meeting at the current time will be displayed.
Highlight the one they wish to attend, and press CONFIRM
To enter one time instructions or allergy information, press the ALLERGY/NOTES
button. A window will be displayed to enter this information. The allergy information
will be stored in the person’s record. The notes are not stored. They are meant for onetime instructions. Both pieces of information will be printed on the name tag label.
Enter allergy information
Enter special
instructions or
notes
How do I check a family in using a bar code?
To check a family in, make sure that the RETURN FAMILIES box is highlighted. Next
scan the bar code badge, roster or key tag. A list of all the family members is returned.
Highlight the students you wish to check in.
Highlight the
students you are
checking in.
Click
NEXT to
continue.
Next, the Automated Attendance window is displayed for the first child that was selected.
This window displays the person’s picture if it is available. It also lists all the groups that
the person is enrolled, in that are meeting at the current time. Highlight the group/class
you wish to check them into and click CONFIRM. Once you press confirm, attendance
is recorded and labels are printed as appropriate. Then the next child’s information is
brought up.
52
Click CONFIRM to check
her into this
class
If your Roll Call preferences are set to “Auto record scanned”, you will not have to press
the CONFIRM button. The person will be checked into the first class on the list after so
many seconds. His attendance is recorded and labels are printed as appropriate.
To enter one time instructions or allergy information, press the ALLERGY/NOTES
button. A window will be displayed to enter this information. The allergy information
will be stored in the person’s record. The notes are not stored. They are meant for onetime instructions. Both pieces of information will be printed on the name tag label.
Enter allergy information
Enter special
instructions or
notes
How do I check in an individual using a last name or badge no?
To check a specific student in, make sure that the RETURN INDIVIDUALS box is
highlighted. Next Enter the last name or a portion of the last name in the field then
click SEARCH BY NAME. Or, to check in by Badge No, enter that number, then click
SEARCH by BADGE NO.
A list of people with that last name or badge number is displayed. Highlight the
appropriate person. Click NEXT. The Automated Attendance window is displayed for
this person, with their picture if it is available It also lists all the groups that the person
is enrolled, in that are meeting at the current time. Highlight the group/class you wish to
check them into and click CONFIRM. Once you press confirm, attendance is recorded
and labels are printed as appropriate.
If your Roll Call preferences are set to “Auto record scanned”, you will not have to press
the CONFIRM button. The person will be checked into the first class on the list after so
many seconds. His attendance is recorded and labels are printed as appropriate.
53
To enter one time instructions or allergy information, press the ALLERGY/NOTES
button. A window will be displayed to enter this information. The allergy information
will be stored in the person’s record. The notes are not stored. They are meant for onetime instructions. Both pieces of information will be printed on the name tag label.
Make sure RETURN
INDIVIDUALS is highlighted.
Enter last name.
Then click
SEARCH BY
NAME.
Highlight the
student you wish
to check in. Click
NEXT.
Click CONFIRM to check
her into this
class
54
How do I check in an individual using a bar code?
To check a specific student in, make sure that the RETURN INDIVIDUALS box is
highlighted. Next scan the badge, key chain tag or roster bar code for that student.
Next the Automated Attendance window is displayed for this person. It lists all the
groups that the person is enrolled, in that are meeting at the current time. Highlight the
group/class you wish to check them into and click CONFIRM. Once you press confirm,
attendance is recorded and labels are printed as appropriate.
If your Roll Call preferences are set to “Auto record scanned”, you will not have to press
the CONFIRM button. The person will be checked into the first class on the list after so
many seconds. His attendance is recorded and labels are printed as appropriate.
Click CONFIRM to check
her into this
class
How do I check in a student to a different class?
If the student is not enrolled in a class that is meeting at the current time or you want
to check him into a different class, click the OTHER GROUPS button. A list of all the
classes that are meeting at the current time will be displayed. Highlight the class you
wish to check them into, then press CONFIRM.
Highlight the
class you wish
to check her
into.
Click OTHER GROUPS
to view all
the available
classes.
55
How do I check-in visitors?
To check visitors into a class or group, click on the QUICK ENROLL button. Select
an association of Visitor. Next enter the address and phone information if you’d like.
Next enter the Mom and Dad’s information if you’d like to capture that. In the lower
section enter the children’s names. You can enter up to four children through this QUICK
ENROLL.
If you need to enter allergy or notes information, click on the ALLERGY/NOTES button.
Enter the appropriate allergy and notes information for the child.
The drop down box will contain all the classes that are meeting at the current time. Select
from this list to choose the class to check the child into.
Once you click OK the labels will be printed for each person enrolled in a class.
Enter Association.
Address information
is optional.
Enter childrenʼs info.
Enter mom
and dadʼs info
if youʼd like.
Use drop
down to select
class to check
them into.
If you are using key chain tags and have the bar code assignment preference set to
manual, the following window will be displayed after you click OK from the
Quick Enroll window. If youʼd like to assign this visitor a bar code number, scan
the key chain tag here.
56
Can I record check-out times for students?
Yes. To record check-outs, use the FIND BY NAME or scan the bar code to identify the
student that is checking out. Notice the area in the top of the window shows the class
that the child is checked into. Click CHECK OUT to record the check out time for the
student.
Click CHECK
OUT to record
check out
time.
57
USING FINGERPRINTS
What needs to be configured to use fingerprint technology?
To identify and check children in using finger prints, you will need to install the M2SYS
Server and Client software on Windows machines (Windows 2000, Windows 2000, 2003
Server or Windows XP). The installation instructions for this software can be found on
your installation CD or at www.M2SYS.com.
The fingerprint scanner must be plugged into a USB port on the client machines.
How do I set up the fingerprint software so it works with Roll
Call?
The first step is to set up the BioPlugin Adapter settings on each of the client machines.
Double click on the BioPlugin Adapter icon. From the finger print window, click on the
SETTINGS button.
Click on
SETTINGS
button to enter
administrative
information.
From the General tab, you’ll need to enter the IP address and port number of the
Biometric Server. This information can be found in the Control Panel under Biometric
Server.
Click on General
tab.
Enter IP address
and Port number
of the Biometric
Server.
58
From the Interface tab, you’ll need to indicate this is a Keyboard Interface.
Click Interface tab.
Select Keyboard
interface.
From the Destination Windows tab, you’ll need to indicate that you are connecting to Roll
Call. If you are using a single check in station, the Window Title is “Roll Call”. If you
have multiple check in stations and are using a network version of Roll Call, the Window
Title is “ROLLCALL Client”. Enter rollcall as the Keystroke Destination. Make sure the
suffix is set to p {enter}
Click Destination
Window tab.
Enter Roll Call or
Roll Call Client as
the Window Title.
Set suffix to
p{enter}.
How do I connect a person’s finger print with Roll Call?
When a person arrives to check in, you’ll need to first identify that person in Roll Call.
Click on the FIND BY NAME button and click on the specific individual. From the
Automated Attendance window, note this person’s ID in the upper right corner.
Next, bring up the Biometric SnapOn Adapter. Click on the FINGERPRINT
ADMINISTRATION button to enter this person’s Roll Call ID and scan their fingerprint.
59
Note the ID for this
person.
Click on FINGERPRINT ADMIN to
record Roll Call ID and
scan finger print.
From the Fingerprint Admin window, enter the person’s ID number, then click on the
REGISTER A NEW PRINT button.
Enter the ID
from the Roll
Call checkin
screen.
60
The next screen allows you to scan the individuals fingerprint. Make sure you set a
standard for which finger and on which hand will be scanned. Click on the right side to
capture the fingerprint. Have the student place their finger on the scanner. They will need
to scan their print three times. A message will come up indicating a successful scan.
Click to begin scanning fingerprint.
Once a person’s fingerprint is recorded, how do I check them in?
From the check in screen, scan their fingerprint. The Automated Attendance window is
displayed for the person identified by the fingerprint. This window displays the student’s
picture if it is available. It also lists all the groups that are meeting at the current time,
that the person is enrolled in. Highlight the group/class you wish to check them into and
click CONFIRM. Once you press confirm, attendance is recorded and labels are printed
as appropriate.
Click CONFIRM to check
her into this
class
If your Roll Call preferences are set to “Auto record scanned”, you will not have to press
the CONFIRM button. The person will be checked into the first class on the list after so
many seconds. His attendance is recorded and labels are printed as appropriate.
If the student is not enrolled in the class they wish to attend, you may press the OTHER
GROUPS button, to check them into a different class. Once you press the OTHER
GROUPS button, all classes that are meeting at the current time will be displayed.
Highlight the one they wish to attend, and press CONFIRM.
To enter one time instructions or allergy information, press the ALLERGY/NOTES
button. A window will be displayed to enter this information. The allergy information
will be stored in the person’s record. The notes are not stored. They are meant for onetime instructions. Both pieces of information will be printed on the name tag label.
61
Highlight the class
youʼd like to check
her into.
Enter allergy information.
62
CREATING ATTENDANCE REPORTS
How do I run Group Attendance reports?
There are two ways to access the group attendance reports.
1. From the Group Maintenance screen.
2. From the Groups menu.
To run the reports from the Group Maintenance screen, select Groups>Group
Maintenance from the main menu. Highlight the group or groups you’d like to select and
press Reports & Graphs from the Action Bar. To highlight multiple groups on the Mac,
hold down the CMD key and click on each group. On Windows, hold down the CTRL
key and click on each group.
Once you click on Reports & Graphs, a list of group reports will be displayed. Highlight
the report you’d like to run. Note the two tabs on this screen. The criteria tab
is displayed so that you may select the date or date range for each of the reports you wish
to run. The other tab is the group tab. This will contain the groups you selected from the
Group Maintenance window. You may review or change your group selection here.
Highlight
the group
or groups
to print the
report for.
Highlight the
report you wish
to run.
Criteria
options
change as
you change
reports.
Click on
Reports &
Graphs.
Note the group
tab. This can
be used to
change group
selection.
Click to run
the report.
64
To run the report from the Group menu, select Groups>Group Reports from the main
menu. The group reports window is displayed with the groups tab displayed. Highlight
the report you’d like to run. Next select the group/groups you’d like to run the reports for.
Once you’ve made your group selection, press the criteria tab to enter your date ranges for
the report.
You are in the
groups tab of the
Group Reports
window.
Click over the
groups youʼd
like to include
in the report.
How can you tell who has been absent or present for X weeks?
The absent/present report outlines the people that meet your absent/present criteria. This
report analyzes group attendance data. It does not take into consideration worship
attendance information.
To run this report, navigate to the Group Reports window. Highlight Absent or Present.
If you have not made your group selection, press the group tab and highlight the groups
you’d like to run this report for. Next press the criteria tab.
1. Enter the Start Date that will be used as the basis for this report. The calculations
are based on weeks starting with the Sunday prior to the Start Date you enter. If you
enter a Sunday, it will start with that date.
2. Indicate how many Weeks to look back.
Enter the starting
date to consider.
Highlight Absent or Present.
Enter the
number of
weeks to look
back.
Check if you are
looking for Absent
or Present and
how many weeks.
Do you want to
evaluate each
group separately or as a
whole.
65
3. Indicate if you want to find people that were “Absent” or “Present”.
4. Enter the number of Times the person was “Absent” or “Present” during the time
period.
5. Indicate if you are interested in folks who where “Absent” or “Present” that number
of times in a row (“Consecutively”) or just that number of times (“Any”).
6. Mark whether you’d like the calculation to be for each group individually or across all
the groups that were selected.
For this example, lets say we want to know all the children that have missed Sunday
school for the last 4 weeks.
1. Select Groups>Group Reports from the main menu.
2. Highlight Absent or Present.
3. Change Department to Children’s.
4. Highlight all the classes.
5. Enter today’s date.
6. Indicate that we want to look back 4 weeks.
7. Mark “Absent”.
8. Mark “Consecutively”. (Either option would work here, since we are only looking
back 4 weeks)
9. Enter 4 as the number of Times.
10. Select “Across” groups. (in this case we are just interested in their attendance for any
class not a specific class)
11. Press GENERATE.
List of people
that met the
absent present criteria.
Note actions that
can be performed
for the list.
From the results window you may choose to PRINT, SAVE SET, EMAIL these folks or
CLOSE the window.
66
Can I see the attendance stats for each group/class in a
department?
To see the attendance statistics for a department for a given date, navigate to the
Group Reports window. Highlight the Department Attendance Statistics report. Select
the Departments you’d like to see. Enter the Date. Press GENERATE.
Highlight Department Statistics.
Enter date.
Click to
select the
departments.
Can I see the attendance stats for groups for a quarter?
To view the average enrolled, average attended and the total number of
meetings for the groups selected, select the Attendance by Quarter report. The
information is calculated based on four quarters starting with the date you enter as the
criteria date.
Highlight Attendance by Quarter.
67
Enter starting date
of the first
quarter.
To run this report, navigate to the Group Reports window. Highlight Attendance by
Group by Quarter. If you have not made your group selection, press the group tab and
highlight the groups you’d like to consider in this report. Next press the criteria tab.
Enter the starting date for the 1st quarter.
As an example, lets say we need attendance averages for our Sunday school classes for
the last year.
1. Select Group>Group Maintenance from the main menu.
2. Change the Department to Children’s.
3. Highlight the Sunday school classes.
Note menu and
icons to perform
standard spreadsheet functions.
4. Press Group Reports & Graphs from the Action bar.
5. From the Group Reports window, highlight Attendance by Group by Quarter.
6. Enter 6/1/05 as the Start Date. The quarters would be 6/1/05 – 8/31/05; 9/1/05
– 11/30/05; 12/1/05 – 2/28/06; 3/1/06 – 5/31/06.
7. Press GENERATE.
The results are displayed in 4D’s spreadsheet. To print the spreadsheet select File>Print
from the spreadsheet menu. To save the information select File>Save from the
spreadsheet menu.
Can I view attendance for a group by week?
This report lists the attendance information for each group for each week within the date
range criteria. If there are multiple sessions defined for the group, the attendance is rolled
up and summarized for the group for all sessions that met during the week. For each
week the number of enrolled, the number of visitors and the number present are listed.
To run this report, navigate to the Group Reports window. Highlight Attendance by
Group by Week. If you have not made your group selection, press the group tab and
highlight the groups you’d like to run this report for. Next press the criteria tab. Enter the
date range for the report.
68
Highlight Attendance by Group
by Week.
Mark if youʼd
like to see
Year to Date
information.
Enter the date
range youʼd
like. Make
sure Current
Year to Date
is unchecked.
As an example, lets say we want to see the attendance information for our Children’s
classes since the beginning of the year.
1. Select Group>Group Maintenance from the main menu.
2. Change the Department to Children’s.
3. Highlight the Sunday school classes.
4. Press Group Reports & Graphs from the Action bar.
Listing of
attendance
figures for
the group
for a week.
Note actions that
may be
performed.
5. From the Group Reports window, highlight Attendance by Group by Week.
6. Mark the box for Current Year to Date or enter the Start Date 1/1/06 and the End
Date as today’s date. If you do not want the current year to day, uncheck that box and
enter the appropriate start and end dates.
7. Press GENERATE.
From the results window, you have several options:
1. To print the results press PRINT. A print dialog box will be displayed so you may
send the report to the printer.
2. If you would like to see the results in a different order, press SORT. The Sort Order
69
3.
4.
5.
6.
left. Press the green arrow in the middle, to move the field to the sort order box on
the right. Click on ORDER BY to see the results sorted by your criteria.
If you would like to save the results of this report in a SET to use later, press SAVE
SET. A file dialog box will be displayed for you to enter the name and location to
save the SET file.
If you would like to reduce the rows displayed in the results window, highlight each
row you’d like to keep. Next click on the SUBSET button. Every row that was
highlighted will remain in the report.
If you would like to see the results displayed in 4D’s spreadsheet, click
SPREADSHEET. From the spreadsheet you can perform other calculations, print and
save the file.
If you would like to see other information on the report, press the CUSTOMIZE
button. You are taken to the Quick Report Editor. .
Can I view attendance information by the specific session?
The Attendance by Group Session report lists the attendance information for each group
by session for each week within the date range criteria. For each session the number of
enrolled, the number of visitors and the number present are listed.
Highlight the
report you wish
to run.
Check if you
want to run
the report for
Year to Date
information.
Enter the date
range you
want, if you
do not want
Year to Date.
Make sure
Year to Date
is unchecked.
To run this report, navigate to the Group Reports window. Highlight Attendance by
Group Session. If you have not made your group selection, press the group tab and
highlight the groups you’d like to run this report for. Next press the criteria tab. Enter
the date range for the report. If you’d like to see the report for the Current Year to Date,
check that box. If you’d like a different date range, enter the Starting and Ending Dates.
As an example, lets say we want to see the attendance information for our Children’s
classes from 2/1/06 – 5/11/06
1. Select Group>Group Maintenance from the main menu.
2. Change the Department to Children’s.
3. Highlight the Sunday school classes.
4. Press Group Reports & Graphs from the Action bar.
5. From the Group Reports window, highlight Attendance by Group Session.
6. Enter the Start Date 2/1/06 and the End Date as 5/11/06.
7. Press GENERATE.
70
From the results window, you have several options:
1. To print the results, press PRINT. A print dialog box will be displayed so you may
send the report to the printer.
2. If you would like to see the results in a different order, press SORT. The Sort Order
window will be displayed. Click on the field you’d like to sort on from the list on the
left. Press the green arrow in the middle to move the field to the sort order box on the
right. Click on ORDER BY to see the results sorted by your criteria.
3. If you would like to save the results of this report in a SET to use later, press SAVE
SET. A file dialog box will be displayed for you to enter the name and location to
save the SET file.
4. If you would like to reduce the rows displayed in the results window, highlight each
row you’d like to keep. Next click on the SUBSET button. Every row that was
highlighted will remain in the report.
5. If you would like to see the results displayed in 4D’s spreadsheet, click
Lists the specific session
attendance for
each group
selected.
Note actions that may
be performed on the
report.
SPREADSHEET. From the spreadsheet you can perform other calculations, print and
save the file.
6. If you would like to see other information on the report, press the CUSTOMIZE
button. You are taken to the Quick Report Editor.
Can I see the people that attended group/class in a date range?
To view the People that attended a class for a date, run the Attendance by Group by
Person report.
Highlight the
report youʼd like
to run.
71
Check if
youʼd like to
run the report
for Current
Year to Date.
Enter date
range criteria,
if you donʼt
want Year to
Date.
To run this report, navigate to the Group Reports window. Highlight Attendance by
Group by Person. If you have not made your group selection, press the group tab and
highlight the groups you’d like to run this report for. Next press the criteria tab. Enter
the date range for the report. If you’d like to see the report for the Current Year to Date,
check that box. If you’d like a different date range, enter the Starting and Ending Dates.
As an example, lets say we want to see the attendance information for our Children’s
classes from 3/1/06 – 6/1/06.
1. Select Group>Group Maintenance from the main menu.
Each person
who attended
each group is
listed.
Note actions
that may be
performed
on the
report.
2.
3.
4.
5.
6.
7.
Change the Department to Children’s.
Highlight the Sunday school classes.
Press Group Reports & Graphs from the Action bar.
From the Group Reports window, highlight Attendance by Group Session.
Enter the Start Date 3/1/06 and the End Date as 6/1/06.
Press GENERATE.
From the results window, you have several options:
1. To print the results press PRINT. A print dialog box will be displayed so you may
send the report to the printer.
2. If you would like to see the results in a different order, press SORT. The Sort Order
window will be displayed. Click on the field you’d like to sort on from the list on the
left. Press the green arrow in the middle to move the field to the sort order box on the
right. Click on ORDER BY to see the results sorted by your criteria.
3. If you would like to save the results of this report in a SET to use later, press SAVE
SET. A file dialog box will be displayed for you to enter the name and location to
save the SET file.
4. If you would like to reduce the rows displayed in the results window, highlight each
row you’d like to keep. Next click on the SUBSET button. Every row that was
highlighted will remain in the report.
5. If you would like to see the results displayed in 4D’s spreadsheet, click
SPREADSHEET. From the spreadsheet you can perform other calculations, print and
save the file.
6. If you would like to see other information on the report, press the CUSTOMIZE
button. You are taken to the Quick Report Editor.
72
Can I view a chart of a group’s attendance for the last quarter?
To view the group attendance in a bar chart, run the Attendance Graph by Group report.
To run this report, navigate to the Group Reports window. Highlight Attendance Graph
by Week. If you have not made your group selection, press the group tab and highlight
the groups you’d like to run this report for. Press GENERATE. The results window is
displayed. Click on each group to view their results. Click PRINT to send the graph to
the printer.
Note groups
that were
selected.
Highlight the
group to see
the graph.
Can I view a chart of a department attendance the last quarter?
To view the department’s attendance in a bar char, run the Attendance Graph by
Department. This bar chart summarizes attendance information for each department of
the groups selected.
To run this report, navigate to the Group Reports window. Highlight Attendance Graph
by Department. If you have not made your group selection, press the group tab and
highlight the groups you’d like to run this report for. Press GENERATE. The results
window is displayed. Click on each group to view their results. Click PRINT to send the
graph to the printer.
Departments
selected are
displayed
on legend.
73