1
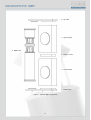
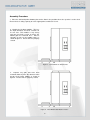
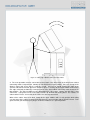
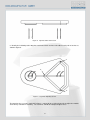
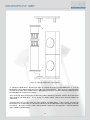
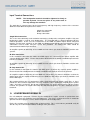
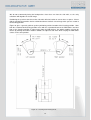
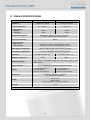
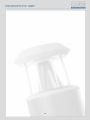
PQS-402 User Manual
This product complies with European Union EMC Directive
(89/336/EEC) and the Low Voltage Directive (73/23/EC)
© German Physiks 2007
Revision o
Released 20th October 2007
We reserve the right to change the information contained in this manual without notice. For the
latest version please see our web site at www.german-physiks.com
TABLE OF CONTENTS
1. INTRODUCTION ............................................................................................................................ 3
2. UNPACKING YOUR LOUDSPEAKERS ....................................................................................... 3
3. ASSEMBLING YOUR LOUD SPEAKERS .................................................................................... 5
Introduction ............................................................................................................................... 5
Assembly Procedure ................................................................................................................. 6
4. CONNECTING YOUR LOUDSPEAKERS .................................................................................... 10
High Frequency Level Control .................................................................................................. 10
Low Frequency Level Control ................................................................................................... 10
Input Terminal Connections ...................................................................................................... 11
Single Wire Connection ....................................................................................................... 11
Bi- Wire Connection ............................................................................................................. 11
Bi- Amp Connection ............................................................................................................. 11
5. LOUDSPEAKER BREAK IN.......................................................................................................... 11
6. LOUDSPEAKER PLACEMENT AND SET-UP ............................................................................. 12
Listening Room Layout ............................................................................................................. 12
Loudspeaker Placement ........................................................................................................... 12
Distance from rear wall: ....................................................................................................... 12
Distance from side wall: ....................................................................................................... 12
7. CARE OF YOUR LOUDSPEAKERS............................................................................................. 14
8. WARRANTY .................................................................................................................................. 14
9. SERVICE AND SUPPORT............................................................................................................ 14
10. HOW TO CONTACT US .............................................................................................................. 15
11. PQS-402 SPECIFICATIONS........................................................................................................ 16
12. WARRANTY REGISTRATION..................................................................................................... 16
2
1. INTRODUCTION
Thank you for selecting the German Physiks PQS 402 for your audio system. It uses an array of two
DDD drivers to cover all frequencies above 220Hz. The low frequencies are handled by a system using
two 10 inch drivers combined with four 8 inch passive radiators. The Loreley is entirely handmade and is
built and tested by highly skilled technicians at our factory in Germany.
Every step in the design and manufacture of this product has been dedicated to producing a loudspeaker
that will provide a lifetime of musical enjoyment.
We strongly recommend that you read this manual before you attempt to use the loudspeakers. The
supplying audio dealer is responsible for assembling and setting up the loudspeakers. This should not
be attempted by the customer. Information on these topics contained in this manual is intended for
general use only.
2. UNPACKING YOUR LOUDSPEAKERS
NOTE:
The customer should not attempt to assemble the loudspeaker.
This will be done by the supplying audio dealer.
The crates and their contents are heavy. To avoid injury, please
ensure that 2 people are available to unpack and position the
loudspeakers.
The PQS-402 is supplied in 3 crates. Before opening them, please inspect them for damage. If you see
any damage to the crates, please contact the supplying audio dealer immediately and provide them with
a full description of the damage. Do not attempt to unpack the loudspeakers until you have spoken with
the dealer and have been advised how to proceed.
The woofer module assemblies for the left and right channels are packed in separate crates which are
marked “left” and “right” on the outside. Take care not to mix components from these two crates up. The
two DDD towers are packed together in the third crate.
Please retain all of the packing as you will need this should it be necessary in the future to ship the
loudspeakers. Should you need to return the loudspeakers to the factory, you must use the original
packing. The use of any other packing may result in the loudspeakers sustaining damage in transit.
Such damage is not covered by the warranty. Should you require replacement packing, please contact
your German Physiks dealer, the national distributor or the factory directly.
Use Figure 1 to identify the major components of the loudspeaker and confirm that the crates contain the
following items:
Item
1
2
3
4
5
6
7
8
9
Quantity
2
2
2
2
2
2
20
1
4
Description
Bottom Plates
Lower Modules
Distance Frames
Upper Modules
Top Plates
DDD towers
Inter-Cabinet Connecting Cables
User manual
Cleaning cloths
If any items are missing, or if any item shows signs of damage, please contact the supplying audio
dealer immediately.
3
5.. Top Plate
4. Upper Module
6. DDD Tower
3. Distance Frame
2. Lower Module
1. Bottom Plate
Figure 1. PQS-402 Major Components
4
3. ASSEMBLING YOUR LOUD SPEAKERS
Introduction
Because of the complexity of the PQS-402, customers are strongly requested not to attempt to assemble
or set up the loudspeakers on their own. These tasks will be carried out by the supplying dealer who has
received detailed training from German Physiks engineers. Many of the component parts are very heavy
and personal injury could result if they are inappropriately lifted. Component parts could also be
damaged by inexpert handling and any resulting damage would not be covered by the warranty.
The following description of the assembly process is for general information only. It is not intended to be
used as a guide for assembling the loudspeakers, as it has been simplified for the sake for clarity.
Please refer to figure 1 to familiarise yourself with the major components.
We will describe the assembly process for the left loudspeaker. This has its two 10 inch drivers located
on the right side of the woofer modules, as can be seen in figure 2 below.
Left Speaker
Right Speaker
Figure 2. PQS-402 Front View
5
Assembly Procedure
1. Place the left loudspeaker bottom plate on the floor in the position where the speaker is to be sited.
Ensure that it is sitting squarely on all 5 support points and that it is level.
2. Identify the left lower module. This has
the input terminals and level selectors on
its rear face. This module is very heavy
and you may find it easier to grip if the
woofer grills are removed first. Place it
carefully on top of the bottom plate as
shown in figure 3. Ensure that it is properly
seated.
Figure 3. Lower Module on Bottom Plate
3. Replace any grills that have been
removed and then place the distance frame
on top of the lower module as shown in
figure 4. Ensure that it is properly seated.
Figure 4. Lower Module with Distance Frame
6
Figure 5. Fitting Upper Module and Connection Cables
4. The next operation must be carried out by two people. You will need 8 of the black inter-cabinet
connecting cables ready to hand. Identify the left loudspeaker upper module. Place this on top of the
distance frame and ensure that it is properly seated. One person should stand at the front of the
speaker and with their hands placed as shown in figure 5, carefully tilt the upper module forward over
one edge sufficiently to allow the second person to fit the inter-cabinet connecting cables between the
two modules. The upper module may be tilted forward on either edge. Choose the one that is most
convenient. Take great care to ensure that it cannot slip forward whilst being tilted. The sockets are
colour coded. Please ensure that all the cables are correctly connected.
When all the cables have been fitted, slowly tilt the upper module until it is fully upright, while taking
care that none of the cables become pinched between the upper module and the distance frame. Take
great also that you do not trap any fingers under the module as it is put into position.
7
Figure 6. Top Plate Cable Connection
5. Identify the left loudspeaker top plate and fit one black and one red cable to each pair of sockets as
shown in figure 6.
X
X
X
Figure 7. Top Plate Adjusting Screws
The top plate has 3 screws, marked X in figure 7, which will be used by the dealer to adjust the module
stack for any variation in verticality. The customer should not attempt to adjust these.
8
Z
Y
Figure 8. Fitting the DDD Tower and Top Plate
6. Identify the DDD tower. Referring to figure 8, carefully fit the base of the DDD tower, Y, over the
locating disc on the bottom plate and ensure that it is sitting squarely. Take great care not to damage
the front of the lower bass module with the DDD tower, as there is very little clearance between where
the DDD tower fits and the bass module.
Offer up the top plate and plug the 4 connecting cables into their respective sockets on the top of the
upper module and DDD tower. These sockets are colour coded. Please check that like colours are
connected.
Carefully lower the top plate onto the upper module and DDD tower. Take especial care that the
locating disc on the top plate sits squarely inside the top of the DDD tower and is not simply resting on
the point Z. Also take care the cables do not become pinched as the top plate is lowered onto the
upper module and DDD tower.
9
4. CONNECTING YOUR LOUDSPEAKERS
The German Physiks PQS-402 is a 2 way loudspeaker with separate input terminals for the low
frequency and high frequency sections of the crossover. These drive the woofers and DDD drivers
respectively and are labeled as such. Provision is also made to allow the output level of the low
frequency and high frequency cross overs to be adjusted.
The input terminals and cross over adjustment points are located on a panel fitted on the back of the
lower woofer cabinet. Figure 9 identifies the features on this panel.
High Frequency
Level Control
Low Frequency
Level Control
Cross Over High
Frequency Input for
DDD Driver
Cross Over Low
Frequency Input for
Woofer
Figure 9. Input Terminals and High Frequency Level Control
High Frequency Level Control
This adjusts the output from the DDD drivers. 4 settings are provided: -2dB, Flat, +2dB and +4dB. For
the initial setting of the speaker this should be set to the flat position. To adjust the control, pull the
jumper out and then push it back into the appropriate pair of sockets. The centre frequency for this
control is 8,000Hz.
Low Frequency Level Control
This adjusts the output from the woofers. 3 settings are provided:
No jumpers fitted
Red socket jumper only fitted
Red and black socket jumpers fitted
The centre frequency for this control is 60Hz.
10
+10dB
+5dB
Flat
Input Terminal Connections
NOTE:
The loudspeaker terminals should be tightened as firmly as
possible by hand. Do not use pliers or any other tools as
this may damage the terminals.
The provision of separate inputs for the low frequency and high frequency sections of the crossover
allows the PQS-402 to be operated in 3 modes:
Single wire connection
Bi-wire connection
Bi-amp connection
Single Wire Connection
This is the most commonly used method of connecting a loudspeaker and power amplifier. Only one
loudspeaker cable is used for each loudspeaker. The PQS-402 will be shipped configured for this
mode of operation. In this case the red terminals on the DDD and woofer inputs will be connected
together and the black terminals on the DDD and Woofer inputs will be connected together. These
connections must be made using the special links provided. The loudspeaker cable should be
connected to the woofer input terminals.
An amplifier capable of delivering at least 340W rms into 4 ohms per channel should be used for each
speaker.
Bi- Wire Connection
In this method of connection the woofer and DDD inputs are connected to the power amplifier with
separate loudspeaker cables. Ensure that the links fitted between the woofer and DDD input terminals
have been removed.
An amplifier capable of delivering at least 340W rms into 4 ohms per channel should be used for each
speaker.
Bi- Amp Connection
In this method of connection the woofer and DDD inputs are driven by separate power amplifiers.
Ensure that the links fitted between the woofer and DDD input terminals have been removed.
An amplifier capable of delivering at least 200W rms into 4 ohms per channel should be used for the
woofer input and one capable of delivering at least 140W rms into 4 ohms per channel should be used
for the DDD input.
We recommend that you use loudspeaker cables terminated with high quality spade lugs, as these
provide the best electrical connection. The lugs should be either soldered or crimped to the speaker
cable – the latter is preferred. We do not recommend the use of bare wire to connect to the speaker
terminal. This produces an inferior connection that will further degrade as the bare conductors become
tarnished.
5. LOUDSPEAKER BREAK IN
Like all audiophile equipment, German Physiks loudspeakers require a break in period from new
before they reach their optimum level of performance. The music used for the break in should be
dynamic in order to properly exercise all the components of the loudspeaker.
For the first 10 hours play the loudspeaker at low level only. This is a level where you would easily be
able to carry out a conversation without needing to raise your voice.
11
After this, the speaker may be played at normal listening levels. The break in process will be complete
after 200 to 300 hours.
6. LOUDSPEAKER PLACEMENT AND SET-UP
NOTE:
DO NOT place the loudspeakers close to cathode ray type
monitors or projectors, as the very powerful magnets used
in the drivers may affect the picture. We recommend a
minimum separation of 2m.
Before the loudspeakers can be set up, the break in procedure in section 5 must be completed.
The German Physiks PQS-402 is an extremely high performance loudspeaker and optimum
performance will only be achieved when set up by a trained technician. For this reason the supplying
audio dealer will carry out the set-up for the customer.
Listening Room Layout
The following points will help you optimise your listening room layout.
1. The left and right sides of the room should be symmetrical. If the room is asymmetrical, this will
degrade the quality of the stereo image. This is because most of the sound energy that you hear is
reflected before it reaches your ears.
2. Place the speakers symmetrically in the room, i.e. the same distance from the centre line of the
room and the same distance from the rear wall.
3. Avoid placing the speakers similar distances from the side and rear walls, as this may lead to an
uneven bass response
4. Avoid having any hard surfaces between your listening position and the loudspeakers. This will
generate additional reflections that may degrade the stereo image. For this reason, where ever
possible equipment should be located at the side of the room. If you have a hardwood floor, it may be
advantageous to place a carpet on the floor covering the area between the loudspeakers and the
listening position, as this will reduce unwanted early reflections.
5. Avoid having the listening position closer than 1.2m from the rear wall as early reflections from this
wall will degrade the stereo image.
Loudspeaker Placement
Distance from rear wall: We recommend that you start with the speaker positioned 1.5m from the
rear wall. As you move the speaker closer to the wall the level of the bass response will be increased.
The converse will be true as you move the speaker away from the rear wall. The PQS-402 should not
be placed closer that 1m from the rear wall. If the speaker is too close to the rear wall, not only will the
bass response be excessive, but the stereo image will be degraded due to an increase in early
reflections. Aim to find a position that provides an even bass response so that all the bass notes in the
music are reproduced at an equal level. Be sure to choose a recording that itself has an even bass
response.
Distance from side wall: We recommend that the distance between the centres of the DDD towers
be 2/3 of the distance of the loudspeakers from the listening point. Moving the speakers further apart
will degrade the stereo image.
12
We do not recommend placing the loudspeakers closer than 1m from the side walls, as the early
reflections will degrade the stereo image.
Positioning the speakers too close to the side walls will also lead to an uneven bass response. Aim to
find the position that provides the best defined and most realistic stereo image when you are seated at
the listening position.
Figure 10 gives a general guide to speaker positioning and the location of the listening position. Note
how the recommended listening position varies with the separation between the DDD towers and also
how as the listening position is moved away from the loudspeakers the woofer modules need to be
toed in by rotating the woofer modules towards the adjacent side walls while keeping the DDD tower
centres in the same position.
Figure 10. Listening Room Arrangement
13
7. CARE OF YOUR LOUDSPEAKERS
NOTE:
NEVER attempt to open the cabinets. There are no user
serviceable parts inside the loudspeakers.
NEVER touch the diaphragm on the DDD driver, or allow
any object to come into contact with the diaphragm.
NEVER attempt to clean the dust off the diaphragm. Dust
has no affect on its performance and may be safely
ignored.
NEVER attempt to clean the speakers with any abrasive
materials or any cleaners containing ammonia, alcohol or
other solvents, as these may damage the finish.
The only maintenance the speakers will require is periodic dusting to remove dust and any finger prints
from the cabinets. Please use the cleaning cloths supplied with the loudspeakers. These cloths
should be used dry. Do not use any form of liquid with them. Additional cloths may be obtained via
local your German Physiks dealer, national distributor or direct from German Physiks.
8. WARRANTY
Your German Physiks loudspeakers are warranted to be free from defects if used under normal
conditions for a period of 5 years from the date of purchase, provided that the customer registers their
purchase by completing and returning the registration form in this manual within 7 days of purchase.
They must also return a copy of the receipt issued at the time of purchase. If this is not done the
warranty period will be 5 years from the date of shipment from the factory. This warranty is
transferable to subsequent owners, who must register their purchase with us.
Modifications or repairs performed by the factory, or by an authorised repair agent, shall be guaranteed
for the remaining period of the warranty, or for 1 year, which ever is greater.
Any unauthorised modifications or repairs will invalidate the warranty. The warranty will also be
invalidated if German Physiks determines that the unit has been subject to misuse including, but not
limited to, burnt out voice coils and dents or scratches on driver diaphragms or cabinets.
There is no other express warranty on German Physiks products. This warranty shall not extend
beyond the stated warranty period. No responsibility is assumed for incidental or consequential
damage.
9. SERVICE AND SUPPORT
In the first instance please contact your local German Physiks dealer or distributor. They will diagnose
the fault and liaise with German Physiks to decide the best way to affect a repair. If they unable to
assist you, please contact German Physiks by phone on + 49 61 09 50 29 823, by fax on + 49 61 09
50 29 826, or by email at [email protected]. You may also contact us via our web site at
www.german-physiks.com. Please take into account time differences between Germany and where
you are calling from should you need to phone us. Email is our preferred method of initial contact.
Please supply the model name and serial numbers of your loudspeakers and as much detail of your
problem as possible.
14
In the vast majority of cases, the repair will be dealt with by sending spare parts from the factory. In the
unlikely even that it becomes necessary to return your loudspeakers or any part of them to the factory,
you will be given a Return Authorization (RA) number. This number must be clearly marked on the
outside of the packing. Returns made without a RA number will not be accepted. Any returned items
must be shipped in the original packing. German Physiks will not be responsible for any damage that
occurs as a result of the use of non-standard packing. Returns received in non-standard packing will
be replaced with new packing at the owner's expense. If you need new packing, please contact your
German Physiks dealer or the factory.
For items returned to the factory under warranty during the first year, German Physiks will pay for the
shipping charges both ways. A shipping company approved by German Physiks must be used and the
items will be returned to the customer using the same carrier, or an equivalent service.
For loudspeakers returned to the factory under warranty after the first year, the customer is responsible
for paying all shipping and related charges back to the factory. A shipping company approved by
German Physiks must be used. Providing this condition is met, German Physiks will pay the cost of
shipping the loudspeakers back to the customer.
German Physiks will not pay any shipping costs if:
a. Loudspeakers or parts are returned without a RA number
b. No fault is found
c. If the fault is judged to be due to misuse such as, but not limited to, burnt out voice
coils and dents or scratches on driver diaphragms or cabinets.
Customers are responsible for all freight, duties and related shipping charges for loudspeakers
returned for non-warranty repairs.
10. HOW TO CONTACT US
If you wish to get in touch with us please use the contact information shown below. Please note that
our office hours are from 9.30 a.m. to 5.00 p.m. Monday to Thursday, excluding public holidays and
that we cannot respond to enquiries outside of these hours. We recommend that where ever possible
you contact us by email, as this will allow us to give your enquiry more consideration and thus provide
a more detailed reply.
Address
Telephone
Fax
Email
Web
DDD-Manufactur GmbH
Gutenbergstraße 4
D-63477 Maintal
GERMANY
+ 49 61 09 50 29 823
+ 49 61 09 50 29 826
[email protected]
www.german-physiks.com
15
11. PQS-402 SPECIFICATIONS
Version
Impedance
Frequency Response
Power Handling
Nominal
Short term
Amplification required
With Titanium DDD Drivers
With Carbon DDD Drivers
2.2 ohms at 1,200 Hz
2.2 ohms at 1,200 Hz
25 – 21,500 Hz
25 – 24,000 Hz
450W
750W
450W
750W
DDD Section: Minimum 140 watts into 4 ohms
Woofer: Minimum 200 watts into 4 ohms
Cross over frequency
220 Hz
Cross over slopes
DDD section
Woofer section
12 dB/octave electronic and 24 dB/octave acoustic
18 dB/octave electronic and 24 dB/octave acoustic
High frequency adjustment
-2dB, flat, +2dB and 4dB. Centre frequency: 8,000Hz
Low frequency adjustment
+10 dB, + 5 dB and flat. Centre frequency: 60 Hz
Sensitivity
Maximum output level
Operating principle
Input connectors
Drivers
Dimensions
88.4 dB for 1 watt a 1m
88.8 dB for 1 watt at 1m
112dB
118dB
2 way speaker using DDD Bending Wave Converters giving a 360°
radiation pattern.
2 sets of binding posts allowing bi-amping and bi-wiring
2 x Titanium DDD drivers
2 x 10 inch woofers
4 x passive 8 inch radiators
2 x Carbon DDD drivers
2 x 10 inch woofers
4 x passive 8 inch radiators
620mm W x 1560mm H x 750mm D
24.4" W x 61.4" H x 29.5" D
Approx 165kg
Approx 363lbs
Weight
Actual weight depends on detailed specification
Warranty
5 years
As part of our process of continually improving our products, we reserve the right to change specifications without notice
16
12. WARRANTY REGISTRATION
In order to register your purchase and obtain the full 5 year warranty, Please complete the form below
within 7 days of purchase and return it by post together with a copy of the receipt of purchase to:
DDD-Manufactur GmbH
Gutenbergstraße 4
D-63477 Maintal
GERMANY
Name
Address
Country
Zip/Post Code
Speaker Model
DDD Type
Delete as necessary
German Physiks PQS 402
Titanium/Carbon
Serial Number
Finish
Date of
Purchase
Where
Purchased
Address
Country
Zip/Post Code
17
18