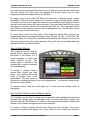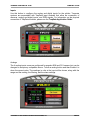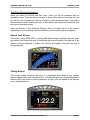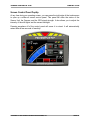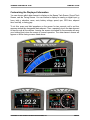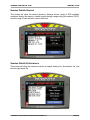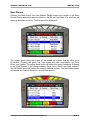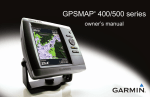
1
Traqmate GPS Data Acquisition System TraqDash User Manual Version 2.80 February 6, 2015 Copyright © 2015 Track Systems Technologies, LLC TraqDASH User Manual V2.80 February 6, 2015 Traqmate, Traqview, TraqData, TraqTach, TraqCam, TraqStudio, TraqSync, TraqDash, TraqDashWiFi, the Traqmate logo, and the Track Systems logo are trademarks of Track Systems Technologies, LLC. ChaseCam, PDR100, and SS1000 are trademarks of Chase Product Development, Inc. Sony, HDR-CX100, HDR-CX110, and LANC are registered trademarks of Sony Corporation. GoPro and GoPro HD are registered trademarks of Woodman Labs, Inc. Replay and Replay XD are trademarks of Stable Imaging Solutions, LLC. AEM is a trademark of AEM Electronics, Inc. PLX is a trademark of PLX Devices, Inc. Microsoft, Windows, XP, Vista, Windows 7, and Windows 8 are trademarks of Microsoft Corp. Velcro is a trademark of Velcro Industries B.V. TraqData HD is manufactured with RaceCam Technology licensed from Northeast Microelectronics. Copyright © 2015 Track Systems Technologies, LLC Page 2 TraqDASH User Manual V2.80 February 6, 2015 Table of Contents What's New in V2.70 and 2.80?.................................................................5 Quick Start..................................................................................................6 Instructional Videos.....................................................................................................8 General Operation........................................................................................................9 Precautions...................................................................................................................9 Kill Switch....................................................................................................................9 Water Intrusion...........................................................................................................9 Using the Touchscreen...............................................................................................9 TraqDashPC..................................................................................................................9 Mounting...................................................................................................10 TraqDash.....................................................................................................................10 Sensor Unit.................................................................................................................10 GPS Antenna Placement and Installation................................................................11 Connecting a Sensor Unit to the TraqDash..............................................................11 Power Connection....................................................................................................12 Cigarette Lighter Adapter......................................................................................12 TraqPaq Rechargeable Li-ion Battery Pack ........................................................12 Permanent Wiring Harness Installation................................................................12 Using the TraqDash..................................................................................14 Startup Screen............................................................................................................14 How to Record Data...................................................................................................14 How to Enter Drivers.................................................................................................15 How to Enter Vehicles and Configure Inputs..........................................................15 Vehicle Settings........................................................................................................16 Tach......................................................................................................................16 Car Metrics............................................................................................................17 Aero / Grip.............................................................................................................17 Gear Ratio.............................................................................................................18 Inputs....................................................................................................................19 Analogs.................................................................................................................................... 19 Filtering Level.......................................................................................................................... 20 Edit Alarm................................................................................................................................ 23 Digitals..................................................................................................................................... 24 Weight...................................................................................................................24 Camera.................................................................................................................25 Wireless................................................................................................................26 Download Data Instructions..................................................................................................... 27 Wireless Troubleshooting........................................................................................................ 29 How to Enter Tracks..................................................................................................30 How to Change Predictive Lap Operation (Laps / Qualifying)..............................31 How to Configure the TraqDash...............................................................................32 TraqDash Recording Screens..................................................................................36 Sweep Tach Screen.................................................................................................36 Timing Screen...........................................................................................................36 Copyright © 2015 Track Systems Technologies, LLC Page 3 TraqDASH User Manual V2.80 February 6, 2015 Round Tach Screen..................................................................................................37 Dual Analog Screen..................................................................................................37 Quad Analog Screen................................................................................................38 Drive Screen.............................................................................................................38 G Meter Screen........................................................................................................39 GPS Info Screen.......................................................................................................39 Screen Control Panel PopUp...................................................................................40 Customizing the Displayed Information....................................................................41 How to Review Lap Times and Data........................................................................42 Session Details General...........................................................................................43 Session Details Performance...................................................................................43 Session Details Inputs .............................................................................................44 Session Details Config.............................................................................................44 Race Review.............................................................................................................45 System Maintenance.................................................................................................46 Cleaning....................................................................................................................46 Archiving Session Files............................................................................................46 Firmware Updates....................................................................................................46 Error / Warning Messages........................................................................................49 SD Card Not Ready..............................................................................................49 SD Card Removed................................................................................................49 Archiving Sessions................................................................................................49 Updating Track Definitions....................................................................................49 New Firmware Found............................................................................................50 New Bootloader Found.........................................................................................50 Settings Warning...................................................................................................50 Check your Settings..............................................................................................50 Cannot delete this track........................................................................................50 Troubleshooting Guide............................................................................51 Scheduling a Repair..................................................................................................52 Warranty Information.................................................................................................52 About GPS Data Acquisition...................................................................53 GPS Frequently Asked Questions............................................................................54 What is GPS?........................................................................................................54 How Does GPS Work?.........................................................................................54 How Accurate is GPS?.........................................................................................54 Glossary....................................................................................................55 Appendix A – TraqDash Menu Tree........................................................56 Appendix B – TraqDash Revisions.........................................................62 Copyright © 2015 Track Systems Technologies, LLC Page 4 TraqDASH User Manual V2.80 February 6, 2015 What's New in V2.70 and 2.80? There are many features and improvements in this latest firmware update. Here are a few of the highlights (click highlighted text to jump to section): Wireless Data Downloads – Using the optional wireless SD card, you can connect to the TraqDash from your PC and download the data files remotely. New G-Meter Screen – Cleaner layout is a real-time version of the Traqview Friction Circle including a shadow tracer so you can view your braking to turning transitions as you practice. More Configurable Screens – You can now choose which input to display on the timing and drive screens. Improved Camera Selection Screen – Choose the right camera setting and make sure your camera connections are working before heading onto the track. New Tracks and Vehicles – Pre-configured definitions for many new vehicles and new / updated Race Track Start/Finish coordinates. New Cameras Supported – Selected cameras can now be controlled and charged through the TraqDash USB port. Check the Traqmate website for new offerings. Drive Mode Start/Finish – now recorded. Bug Fixes – track start/finish detection bug, camera settings loss bug, all vehicles (including user-created) are now shown in list For the complete list, go to Appendix B. Copyright © 2015 Track Systems Technologies, LLC Page 5 TraqDASH User Manual V2.80 February 6, 2015 Quick Start Unpack the TraqDash and follow the instructions on the Quick Install sheet that is in the box to install the Traqmate in your vehicle. TraqDash contains only one button. All other control is done with the color graphical LCD touchscreen. All of the TraqDash features are accessible through a graphical menu system. To access a feature use, simply touch the item you want on the screen. Some items actually perform a function while others go to other menus. The Menu Tree is shown in Appendix A. Turn the TraqDash on using the button on the right side of the display. The Main Menu should appear. It has four main buttons and says ‘TRAQMATE’ at the top of the screen. Along the top of the screen are icons and buttons as shown here. Bright shift lights can be programmed for range and redline Warning LEDs can be mapped to one or more digital or analog inputs Light sensor automatically dims display and shift lights for endurance events Power button on side of unit Press to turn on. Press and hold to turn off. SD Card holds hundreds of hours of data recording USB Jack used for diagnostics only at this time. TraqDash can be powered by PC via this port. Super bright LCD screen Cable to Sensor Unit On-screen Back button to leave current menu level or operation. Press and hold jumps to Main Menu. Easy to understand screens allow unit to be configured Copyright © 2015 Track Systems Technologies, LLC Sensitive touchscreen works with gloves! Page 6 TraqDASH User Manual V2.80 February 6, 2015 The blue ‘i’ icon is found in the upper left corner of almost every screen in the TraqDash and provides contextsensitive help. Pressing the button will pop up a screen explaining what the screen does and what all the buttons will do. Here is an example of an Information Screen. Scroll to the bottom of the Main Menu help screen to see the current TraqDash and Sensor Unit firmware revision levels. When GPS signal is available, the time is shown next to the blue ‘i’ icon. If the time is not the correct local time, you need to set the time zone. The center top of the screen is the descriptive screen name. The three icons in the upper right show the camera status (if so equipped), the SD card status, and the GPS signal strength / Sensor Unit Connectivity. To record some data, press Go Racing to bring up this screen. If you are at a closed circuit race track such as a road course or oval, press Lap/Race and the Traqmate will recognize the track and start timing you. If you are not near a track you will be prompted to press the screen to mark a Start/Finish line for a new track. If you wish to try the AutoX or Drag Race Features press one of those buttons. If you just wish to record some data, use the Drive button. The right side of the button will toggle recording on or off and the left side of the button will start the mode. Recording Off is useful if you just need to use TraqDash as an instrument, rather than a data recorder. You can exit the recording mode by pressing the small red arrow in the lower left of the screen. This causes the data to be written to the SD card. Copyright © 2015 Track Systems Technologies, LLC Page 7 TraqDASH User Manual V2.80 February 6, 2015 To view your data on your PC, press and hold the On/Off button on the right side of the display. When the unit is off, push the lower edge of the SD card in and release. The SD card will pop out so that you can grab and extract it. If you have not done so, install Traqview or TraqStudio from the CD that came with the Traqmate. Now place the SD card into your computer. Usually, a window will pop up asking what you would like to do with the SD card. Choose Open folder to view files. Then click on the MySessions folder. You should see your sessions listed there. Double click on the session you wish to view and the Traqview program will open with your data displayed. Instructional Videos Here are links to some videos that demonstrate TraqDash operation. TraqDash Operation Video http://youtu.be/KEXxtWZ05ao Transferring Data to PC http://youtu.be/A505XBgVh58 Updating TraqDash firmware http://youtu.be/4x0cen6of8I Copyright © 2015 Track Systems Technologies, LLC Page 8 TraqDASH User Manual V2.80 February 6, 2015 General Operation The TraqDash operates differently from the Traqmate Display Unit. The TraqDash never needs connection to your PC so you can permanently mount it in the vehicle. The data is recorded on the included SD card in the MySessions folder. To open data on the PC for analysis, insert the SD card into the PC and either transfer the data files to the PC or open them right on the card using Traqview or TraqStudio. All configuration of drivers, vehicles, and sensor inputs is done from the TraqDash using the color touchscreen. This configuration is stored on the SD card so that you can make backup copies, move from car to car, and share them with friends. Precautions Kill Switch DO NOT test a kill switch when TraqDash is operating. If you are using the TraqDash as the primary instruments in the vehicle and you need to test the vehicle kill switch in order to pass racing inspection, unplug the Sensor Unit before running the test. Revving the engine creates a large amount of energy in the vehicle alternator that must be dissipated when the battery is disconnected. That energy can flow through the Traqmate system causing damage. Water Intrusion The TraqDash is designed to be resistant to occasional dust and light water spray and has internal gaskets to prevent contaminants during normal usage. There are openings in the case for access to the SD card and ports so care should be taken to avoid allowing dirt or water into those openings. If the TraqDash is to be used in the rain, avoid direct rain contact and cover the SD card, and USB port openings with tape. The Sensor Unit can withstand water spray but it should not be placed in a location where standing water can accumulate such as the floorboard of a car during the rain. Using the Touchscreen In order to operate with gloves and be as reliable as possible in the racecar environment, the TraqDash has a resistive touchscreen. This requires slightly more pressure than some cell phones or other devices using a capacitive touchscreen. Press firmly to activate on-screen buttons and slider controls. TraqDashPC The TraqDash SD card ships with a PC program called TraqDashPC. If you insert the SD card into your PC, open it, and double click on TraqDashPC, a TraqDash simulator program will run. You can use this to enter configuration information, practice use of the TraqDash, review laps and sessions, and explore all the features. Copyright © 2015 Track Systems Technologies, LLC Page 9 TraqDASH User Manual V2.80 February 6, 2015 Mounting TraqDash The TraqDash has 4 AMPS pattern screw bosses on the rear of the unit for mounting. There is a drill template available for download on the Traqmate website. The TraqDash can be mounted permanently with screws or removable using the Traqmate Display Unit Mounting Bracket. Sensor Unit The Traqmate sensor unit may be mounted using a variety of methods depending on the following factors: 1) How permanent is the desired mount, 2) where is the preferred mounting point, 3) will the SU be connected to a Display Unit (DU). CHOOSE A LOCATION WHERE THE UNIT WILL NOT BE SUBJECTED TO WATER. EXCESSIVE MOISTURE EXPOSURE WILL DAMAGE THE UNIT. The Sensor Unit must be mounted as flat as possible in the vehicle and such that the arrow on the top label points in the direction of travel. This is to ensure the accelerometers are the most accurate and have the best range for making measurements. It is also a good idea to place the unit as close to the vehicle’s center of gravity as possible. While not required, especially with connection to the DU, it may be desirable to mount the SU in a location that allows the indicator lights to be viewed easily by the driver. Given these considerations, a position on the floor of the front passenger footwell may work well. Other good locations include the trunk floor and on the transmission tunnel. Copyright © 2015 Track Systems Technologies, LLC Page 10 TraqDASH User Manual V2.80 February 6, 2015 The mounting of the SU may be accomplished in a variety of ways, but the most desirable and secure method is to use the Sensor Unit Mounting Tray (shown here), offered as a separate accessory from Track Systems. The mounting tray can be attached permanently to the vehicle, and by placing Velcro on the SU enclosure, and the mounting tray, the SU is securely fastened, while at the same time being easily removable. Once the mounting tray is aligned in the vehicle, the SU can be easily placed in the mounting tray and the alignment is set. Another method for mounting the SU is to apply Velcro directly to the SU and the mating piece directly to the vehicle. Care should be taken when placing the SU on the Velcro that it is properly aligned in the vehicle and that the SU is securely attached. GPS Antenna Placement and Installation The supplied GPS antenna has a magnetic mount, which allows a variety of mounting options to the metal body of the vehicle. In the case where the desired location is not metal, double stick tape is a viable option for mounting the antenna. The placement of the antenna can have a great effect on the performance of the data collection system. Ideally, the antenna should be placed on the highest part of the exterior of the vehicle. Placing the antenna inside the vehicle can cause “blind spots” where the antenna is not able to see as many of the GPS satellites that may be available to it. The system works best when the antenna has the least restricted view of the sky. Once a location has been determined for the antenna placement, the wire connecting the antenna and the SU should be routed in a manner such that it is not placed under stress, and the wire will not be exposed to frequent bending or crimping. After routing the wire to the SU, connect the antenna to the SU by screwing the antenna wire to the GPS connector indicated on the end panel of the SU. Connecting a Sensor Unit to the TraqDash With the TraqDash Complete system a 6’ connection cable is provided. This is a male-to-female locking cable, which allows a great deal of flexibility in the placement of the SU and DU. 6’ extension cables can add additional length if necessary. The cable should be routed to be securely protected from damage during normal vehicle operation. Copyright © 2015 Track Systems Technologies, LLC Page 11 TraqDASH User Manual V2.80 February 6, 2015 Power Connection In all installations, the SU must be supplied with a power source at all times it is in operation. For Traqmate Complete, the DU can receive power via the SU-DU connection cable from the SU or via the USB cable when connected to a PC for uploading sessions. The SU was designed to be powered from a +12 VDC battery supply in four different ways; a permanent wiring harness in the vehicle, a cigarette lighter adapter, a battery pack, and a wall charger. Each of these will be discussed separately. Cigarette Lighter Adapter For installations where a permanent power supply connection is not required or desired, the cigarette lighter adapter offers a quick and convenient solution. This adapter can be secured to the SU by inserting the plug into the power connector (PWR) on the SU and tightening the threaded nut to the power (PWR) socket. Once the SU and the power connector have been secured, the cigarette lighter adapter can be plugged into one of the cigarette lighter sockets located in the vehicle. It should be noted that many automobiles have cigarette lighter sockets that are always ON and do not turn the power off when the ignition switch has been turned to the OFF position. The cigarette lighter adapter has a RED LED to indicate that vehicle battery power is presented to the adapter. During extended vehicle idle periods, the cigarette lighter adapter should be removed from the vehicle socket to prevent vehicle battery drain. TraqPaq Rechargeable Li-ion Battery Pack The TraqPaq Rechargeable is very convenient and has the advantage of reusability. The TraqPaq Rechargeable Battery Pack is capable of powering a Traqmate for 7-10 hours on a full charge. If not handled properly Li-ion batteries can be dangerous. Traqmate Li-ion packs have a protection circuit for overcharge and excessive discharge and should provide years of service under normal circumstances. If the pack ever starts to overheat or swell, discontinue use immediately. To recharge the pack, just plug it into the Traqmate Li-ion charger. It will recharge in approximately 2 hours, at which time the LED on the charger will change from red to green. Only use the Traqmate charger with Traqmate Li-ion Rechargeable battery packs. Never charge any other types of batteries using the Li-ion charger. This includes alkaline or NiCd or NiMH batteries in a non-rechargeable TraqPaq. Permanent Wiring Harness Installation The power cable is a 13 foot, two conductor, red and black zip cable that has a plug on one end and is not terminated on the other end. The power plug contains a threaded nut Copyright © 2015 Track Systems Technologies, LLC Page 12 TraqDASH User Manual V2.80 February 6, 2015 for securing the plug to the power jack (PWR) on the Traqmate Sensor Unit (SU). The other end of the cable is intended to connect to either the automobile battery or a junction box. Since the SU mounting location can vary widely (trunk, under seat, floorboard, etc.) the required cable length will also vary. Consequently, the cable can be cut to an appropriate length suitable for your automobile, once the mounting location is selected. Vehicle +12V 3A 3AG Slow Blow Fuse Posi-Lock Screw-on Fuse Holder 13' cable - cut to length Vehicle GND Power Connector Figure 1 - Permanent Wiring Harness The red wire is to be connected to the positive (+) side of the battery and the black lead to the negative (-) or chassis side. A fuse holder has also been included with the power cable. The red conductor of the zip power cable should be cut and stripped about ¼ inch on both ends. Each end should be inserted into the Posi-Lock fuse holder and screwed down tight. The bare end of the wire should be inserted / crimped into a crimp lug or other suitable connector (not included). The lug should be connected to the positive (+) battery terminal or a switched positive (+) terminal. If the SU is connected directly to the positive (+) battery terminal, the SU will continue to be powered when the ignition switch has been turned to the OFF position. Extended vehicle idle periods may drain the vehicle battery if the unit is not turned off using the front panel button. If this is a concern for your installation, efforts should be made to connect the positive (+) terminal to a switched supply. The black conductor should be stripped and a crimp lug or other suitable connector applied (not included). The lug on the black conductor should then be connected to the negative (-) battery terminal or chassis ground. Copyright © 2015 Track Systems Technologies, LLC Page 13 TraqDASH User Manual V2.80 February 6, 2015 Using the TraqDash Startup Screen When you power on the TraqDash, you will see a temporary screen that provides some useful information. It will show the currently selected driver and vehicle, along with the current camera selection, if any, and which analog and digital inputs are enabled for recording. It also shows if WiFi is ready (feature enabled and WiFi SD card inserted). This is especially useful if multiple drivers use the TraqDash or if it is shared between vehicles. How to Record Data Data can be recorded in one of several modes, depending on what type of driving you are doing. To record data, first press the Go Racing button on the Main Menu screen. At that point you will be presented with four selections, Lap/Race, AutoX/Rally, Drive, and Drag. Copyright © 2015 Track Systems Technologies, LLC Page 14 TraqDASH User Manual V2.80 February 6, 2015 For closed racing circuits such as road courses or ovals you would choose Lap/Racing. This will activate the GPS timer and suggest the closest tracks from the preprogrammed and user-created lists on the SD card. For open racing circuits where the Start and Finish are in different places, choose AutoX/Rally. The next screen allows you to select the type of timing screen desired. This mode will allow you to stage the vehicle and automatically start timing and record the Start Line location when the vehicle launches. When you reach the finish line, touch the display to manually activate and remember the Finish line. This information will be stored with the track name so that you can do subsequent runs over the same course without having to set the Finish Line. For drag racing, select the Drag option. Then stage the vehicle while choosing the desired timing screen and drag race length, either 1/8 mile, 1/4 mile, or 1000 feet. This mode will allow you to stage the vehicle and automatically start timing and record the Start Line location when the vehicle launches. Timing will stop automatically when the selected distance has been traversed. How to Enter Drivers The TraqDash can be used by several drivers, either by sharing the device or the vehicle. It is a simple operation to create and select different drivers. The driver's name is included in the recorded file to assist is analysis and recordkeeping. To create or change drivers, choose Race Setup and then Driver. The system comes with Driver A through Driver E as placeholders. You can create a new driver or change the name of one of the placeholders. You can also delete drivers that are no longer needed. To change drivers, drag the scroll wheel up or down until the desired driver is highlighted. How to Enter Vehicles and Configure Inputs The TraqDash can be used in several vehicles and will create a database for each that includes tach settings, gear and differential ratios, tire sizes, data inputs, weight, and attached cameras. This allows the TraqDash to be moved quickly between vehicles and change all the relevant settings with one screen selection. To create or change vehicles, choose Race Setup and then Vehicles. The system comes with several popular sports cars. If your vehicle is one of these, just choose it Copyright © 2015 Track Systems Technologies, LLC Page 15 TraqDASH User Manual V2.80 February 6, 2015 and then customize the settings. You can create a new vehicle or change the name of an existing vehicle. You can also delete vehicles that are no longer needed. Vehicle Settings To change vehicle settings, press the Vehicle Settings button. This will present the Vehicle Settings screen with choices for Tach, Aero/Grip, Gear Ratio, Inputs, Weight, and Camera. Tach The tach screen accepts all relevant settings for the on-screen tach display and the shift lights. Current RPM – This rectangle shows the current engine RPM when the vehicle is running. This is for reference purposes so you verify your RPM settings are correct. Max RPM - This button sets the maximum range of RPM that the vehicle engine can achieve. This is used to scale the gauges on the TraqDash and the graphs in Traqview. Engine Cylinders – Use this slider control or the button to adjust the tach readings. If your tach is not correct, this parameter is probably incorrect. If the tach wire is Copyright © 2015 Track Systems Technologies, LLC Page 16 TraqDASH User Manual V2.80 February 6, 2015 connected to the negative side of the coil, set the engine cylinders to actual number of cylinders. It the tach wire is connected to an ignition box or the engine ECU, set to ECU / 1. Redline Start – the slider will set the RPM where the large center red shift light will illuminate. For fine tuning, press the button to the right of the slider. Warning Start – the slider will set the RPM where the first amber shift light will illuminate. The rest of the amber shift lights will appear in even steps between the first amber light and the redline. For fine tuning, press the button to the right of the slider. Car Metrics This screen displays useful information about the vehicle. It shows Total Time of operation (when the TraqDash was in a recording mode), Total Distance traveled, and the Max RPM recorded. These values can be reset using the appropriate buttons on the right of the screen. Pressing the Aero / Grip button transfers to the Aero / Grip screen. Aero / Grip This screen accepts information on the aerodynamic drag coefficient and rolling resistance of the vehicle. This information is transferred to Traqview for use in horsepower calculations. Copyright © 2015 Track Systems Technologies, LLC Page 17 TraqDASH User Manual V2.80 February 6, 2015 Gear Ratio Use this button to enter information about the transmission gear ratios, tire size, and differential ratio. This is used to calculate the current gear for display on the screen and in Traqview. Tire Size – information can be entered in one of two ways, by measuring the circumference of the drive tire or by entering the DOT tire size. Diff Ratio – Rotate the dials to display the differential ratio down to the nearest hundredth. If the ratio is expressed as a ratio of two numbers, divide the large number by the small number and enter the result. Transmission Ratios – touch each gear number in order and enter the ratio. If the ratio is expressed as a ratio of two numbers, divide the large number by the small number and enter the result. Enter 0 for any gears that are not present. Copyright © 2015 Track Systems Technologies, LLC Page 18 TraqDASH User Manual V2.80 February 6, 2015 Inputs Use this button to configure the analog and digital inputs for the vehicle. Traqmate systems are expandable with TraqData input modules that allow the connection of cameras, analog and digital inputs, and RPM signals. For information on the physical connection of TraqData modules, please see the TraqData Application Guide. Analogs The 4 analog inputs come pre-configured for popular AEM and PLX sensors but can be changed to accept any compatible sensor. Touch an analog button and then Enable it to show the current value. The readings in volts at the input will be shown, along with the range and the scaling, the filtering, and the alarm settings. Copyright © 2015 Track Systems Technologies, LLC Page 19 TraqDASH User Manual V2.80 February 6, 2015 Edit scale will accept the scaling factors between raw voltage and the desired. For example, if the voltage of a temperature sensor reads 4.2V at 50 degrees F and 0.4V at 250 degrees F, you would select a 5 Volt range and enter 0.4V LOW, 4.2V HIGH. Then you would enter 250 Value as the corresponding LOW and 50 Value as the corresponding HIGH. For more information on configuring Analogs, see the TraqData User Manual. Filtering Level This feature allows you to tailor how a particular input is displayed. The default filtering level is NONE which will apply no filtering and show the changes to the input on the gauges as it occurs. You can change the level to LOW, MEDIUM, HIGH, and VERY HIGH to slow down the rate of change of the input. For example, if an input was monitoring oil pressure, it is likely that you would want NONE or LOW filtering in order to detect fast drops in pressure. If the input was fuel level, you might want VERY HIGH filtering in order to smooth out fast changes as the fuel sloshes in the tank. In the graphs below are examples of the level of filtering applied to a data set at the various levels. Copyright © 2015 Track Systems Technologies, LLC Page 20 TraqDASH User Manual V2.80 February 6, 2015 LOW Filtering Example 3.5 3 2.5 2 Raw Filtered 1.5 1 0.5 0 6 1 16 26 36 46 56 66 76 86 96 106 116 126 136 146 11 21 31 41 51 61 71 81 91 101 111 121 131 141 MEDIUM Filtering Example 3.5 3 2.5 2 Raw Filtered 1.5 1 0.5 0 1 5 13 21 29 37 45 53 61 69 77 85 93 101 109 117 125 133 141 149 9 17 25 33 41 49 57 65 73 81 89 97 105 113 121 129 137 145 Copyright © 2015 Track Systems Technologies, LLC Page 21 TraqDASH User Manual V2.80 February 6, 2015 HIGH Filtering Example 3.5 3 2.5 2 Raw Filtered 1.5 1 0.5 0 1 5 13 21 29 37 45 53 61 69 77 85 93 101109117125133141149 9 17 25 33 41 49 57 65 73 81 89 97 105113121129137145 VERY HIGH Filtering Example 3.5 3 2.5 2 Raw Filtered 1.5 1 0.5 0 1 5 13 21 29 37 45 53 61 69 77 85 93 101109117125133141149 9 17 25 33 41 49 57 65 73 81 89 97 105113121129137145 Copyright © 2015 Track Systems Technologies, LLC Page 22 TraqDASH User Manual V2.80 February 6, 2015 Edit Alarm This sets an alarm value for on-screen and Traqview display. You can select none, one, or two alarm ranges per analog. This allows you to, for example, have an alarm for Water Temperature if the coolant is too cool or too hot. For the Lower and Upper Alarm Levels, choose Above, Below or Off for the alarm and the value in the actual units (e.g. degrees for Temperature, PSI or Bar for pressure). To assign this analog to one of the front panel warning LEDs, toggle the LED to Enabled. Note that more than one alarm can be assigned to an LED. If one or multiple inputs are in an alarm state, all will be noted on the color LCD display with a pop-up indication showing the actual current value. Rename Inputs to tag an analog input with a relevant name such as Oil Pressure, Boost, AirFuel, or Water Temp. Rename Units to tag the units that the analog will read in with an appropriate name. For the examples above that could be PSI, Bar, Ratio, or DegF. Copyright © 2015 Track Systems Technologies, LLC Page 23 TraqDASH User Manual V2.80 February 6, 2015 Digitals There are 2 digital inputs that can be used to detect an ON/OFF condition. NOTE: DO NOT USE DIGITAL 4 IF YOU HAVE A CAMERA CONNECTED VIA THE SENSOR UNIT. Digital 5 comes pre-configured for use to detect Brake application. This will only work for brakes with light bulbs. It will not work with LED brakes. This input is normally high so it should be connected to the 12V side of the brake lamp. Weight Enter the vehicle weight with driver and fuel load using the scroll wheels. This parameter is used for Traqview horsepower and torque. Copyright © 2015 Track Systems Technologies, LLC Page 24 TraqDASH User Manual V2.80 February 6, 2015 Camera Starting with TraqDash firmware release 2.50, cameras can be controlled through the Traqmate in two ways, connected to the USB port on the TraqDash and connected to the Sensor Unit with a TraqSync or TraqData module. You can have cameras connected in both locations but not all camera types can be connected via the USB port. To control a camera through the TraqDash USB port, the TraqDash must have bootloader firmware V1.50 or later and TraqDash firmware V2.50 or later. If your TraqDash is not capable of controlling a USB camera you will see “TraqDash USB Camera Not Supported”. A low-level firmware change can enable this port. Kits are available for purchase to upgrade older TraqDash units. To control a camera, it must be set up in the correct mode. See individual camera instructions to configure the camera itself. Selection of the camera is done on the Camera Setup screen. If a camera is connected through the USB interface on the TraqDash, enable TraqDash USB Camera and set the delay time. Note that the delay time may need to be adjusted depending on the camera connected or if a Sensor Unit Camera is also enabled. To set up cameras connected to the Traqmate Sensor unit via a TraqSync or TraqData input module, press the Sensor Unit Cam button and use the scroll wheel to make a selection. If no camera is connected or if you do not wish to use the camera, select NONE. This may require a power cycle to transfer the information to the Sensor Unit. The Test Camera button on the Camera Setup screen is used to verify the camera connections and settings are correct. Pressing this button will activate all enabled cameras. It will not record data and does not require GPS signal. Pressing the button again will stop the cameras. Copyright © 2015 Track Systems Technologies, LLC Page 25 TraqDASH User Manual V2.80 February 6, 2015 Wireless Starting with TraqDash firmware release 2.80, there is support for a wireless SD card that will allow downloading of data remotely via a WiFi connection. The TraqDash will create a local, private WiFi network and make the session files available to download. Connect your PC to the network, enter the password, and open a browser. Once configured, the WiFi network is automatically transmitted whenever the TraqDash has power so you can download in the pits or the paddock. Just remember to leave the TraqDash powered up. To configure the WiFi, install the Traqmate wireless SD card and allow it to update your bootloader and firmware. Power cycle the system once to apply the new changes. (Systems purchased with wireless come pre-configured) Then go to the System Settings Screen and select WiFi/SD. The default unique network name will be TraqDashWiFi with the last 4 digits of your TraqDash serial number. The default password is traqmate. You can change these to protect the security of your data. Note that the WiFi network name and password are shown in the white area on the left of the screen. Copyright © 2015 Track Systems Technologies, LLC Page 26 TraqDASH User Manual V2.80 February 6, 2015 Download Data Instructions Connect to network on your PC. The network name will be the one shown on the Personalize screen. It is configurable. NOTE: You will need to disconnect from any other WiFi networks first. Enter WiFi password as shown on Personalize screen (PC will remember for next time) Open browser Go to http://traqdash/MySessions Your sessions will be shown on the screen. You can get the full name by pressing the 3 lines icon in the upper right of the browser window. Copyright © 2015 Track Systems Technologies, LLC Page 27 TraqDASH User Manual V2.80 February 6, 2015 To download a session to your PC, right click on the session and choose 'Save As' or 'Save Link As' or 'Save Target As' (depending on browser) and then select the folder where you wish to save it. The Traqmate standard location is My Documents\Traqmate Data. Once you have downloaded the sessions, you can open them in one of two ways: Navigating to My Docuements\Traqmate Data and then clicking on the file Open Traqview/TraqStudio and choosing the Open File menu selection. Then select the file you wish to view. Copyright © 2015 Track Systems Technologies, LLC Page 28 TraqDASH User Manual V2.80 February 6, 2015 Wireless Troubleshooting Sometimes it takes a couple of tries to get the PC and the TraqDash wireless connected. Once it works, it will connect easily on subsequent usages. If you get an error message when you attempt to connect from your browser... try the following: Be Patient. Your computer is applying security screening to the new web site. This may take a minute or so. Eventually you will get this screen (Windows 7, Windows 8): Choose Home network. Try to reach the TraqDash again with your browser. If that does not work, cycle power on the TraqDash and repeat the process. Second times a charm. Copyright © 2015 Track Systems Technologies, LLC Page 29 TraqDASH User Manual V2.80 February 6, 2015 How to Enter Tracks TraqDash comes pre-configured with over 340 tracks world-wide so it is unlikely that you will ever need to enter a track. Just select Go Racing and Lap/Race and TraqDash will suggest the closest tracks. Just confirm the correct one. If you do want to create your own track, select Race Setup and Track. You can show the tracks within a certain distance by pressing the top button to change the search range. Settings will let you select Track Type, enter or view the Start/Finish coordinates, clear the Predictive Lap data or set the Lap Hold Time. The Lap Hold Time is the number of seconds that the lap time is held on the screen after passing Start/Finish before the running timer resumes. The rightmost button on the second line shows the type of track that is being highlighted. Pressing this button will change the tracks in the list to the type of track shown on the button face. The choices are Road (for closed circuit tracks), Drive (for Copyright © 2015 Track Systems Technologies, LLC Page 30 TraqDASH User Manual V2.80 February 6, 2015 point-to-point recordings), AutoX (for autocross and rally stages with launch to start and a separate finish line), and Drag (for drag races of various lengths with launch to start and finish at the prescribed distance). The New Track button will create a New Track of the type shown in the track type button. You can enter the name of the track and choose other parameters. Edit Name lets you change the name of a track. Note that if you change the name of one of the pre-programmed tracks it will make a copy of the track with the new name but the original track will remain. This is a good way to create variations of a track or to create tracks for two drivers or vehicles so that each will have its own predictive lap information. The Delete Track button will erase a user-created track. If you attempt to delete a preprogrammed track, you may get an error ‘Cannot delete this track’. If you have changed the parameters for the pre-programmed track such as putting in a new start/finish or creating a predictive lap time, the Delete Track button will restore that track to factory settings. How to Change Predictive Lap Operation (Laps / Qualifying) Under Race Setup you will find the Laps / Qualify button. This will allow you to change between Laps mode where the predictive lap times will be compared with your best ever lap at this track and Qualifying mode where the predictive lap times will be compared against your best lap of the current session. Copyright © 2015 Track Systems Technologies, LLC Page 31 TraqDASH User Manual V2.80 February 6, 2015 How to Configure the TraqDash TraqDash has many settings to allow you to tailor the operation to your location, preferences, and situation. These include managing the LCD screen, SD card, setting time zones, changing units between US standard and metric, and adjusting the Predictive Lap scale. To change the settings, press System Setup Display – Change the backlight brightness and LED intensity by dragging the sliders left and right. Auto-Adjust will attempt to match the brightness to the ambient light level. Units switches between US (Miles, Pounds) and Metric (Kilometers, Kilograms). Time/GPS allows the selection of time zone and current Daylight Savings Time status. Also can be used to place the system into GPS Simulation mode. This is useful for testing camera operation or recording a dyno session in situations where it is not possible to get GPS signal. Copyright © 2015 Track Systems Technologies, LLC Page 32 TraqDASH User Manual V2.80 February 6, 2015 Startup provides control over two functions, Auto On and Auto Start. When Auto On is enabled (available on Sensor Unit 2 systems only), the Traqmate system will power up when power is applied to the Traqmate Sensor Unit. Depending on wiring, this could be with the ignition system or a kill switch. This function will also disable the On/Off button on the TraqDash. NOTE: while you cannot turn off the Traqmate if Auto On is enabled, you should still turn off recording before power is lost to ensure that data is saved. Auto Start determines which menu the system will start. Normally, the TraqDash will return to the last menu used when turned off and back on. The alternate setting will allow TraqDash to return to a gauge screen if power is lost or the unit is turned off. This is intended for when the TraqDash is used as a dashboard (Drive mode with recording off) and should not be used for recording modes because you should not drop power to the Traqmate while recording. WiFi/SD sets up the WiFi download option and provides several SD card functions. Copyright © 2015 Track Systems Technologies, LLC Page 33 TraqDASH User Manual V2.80 February 6, 2015 Erase All Sessions will do exactly that. It will not erase vehicles, tracks, or drivers. Factory Defaults will erase sessions and user-created vehicles, tracks, and drivers. Format SD Card will wipe out the entire SD card and return it to fresh condition. Use this option if you are getting error messages such as ‘Cannot Read SD Card’ which could indicate the card has become corrupted. It is a good idea to back up your SD card to your PC periodically. Personalize/WiFi options allow you to enter your name and contact information in case the TraqDash is lost or sent in for service. This also is where you configure the WiFi network settings. Copyright © 2015 Track Systems Technologies, LLC Page 34 TraqDASH User Manual V2.80 February 6, 2015 Predictive Scale changes the range of the Predictive Lap display on the Race Mode timing screens. For example, choosing 2 sec will cause the graph to display changes from -2 second to +2 seconds. This can be used for fine tuning. Generally more consistent drivers or shorter tracks will prefer a smaller number. Copyright © 2015 Track Systems Technologies, LLC Page 35 TraqDASH User Manual V2.80 February 6, 2015 TraqDash Recording Screens When you select Go Racing and then Laps / Race you will be presented with an operating screen. There are several screens to choose from and you can select the one you wish to use by pressing at the top or bottom of any operating screen. After exiting the recording mode by pressing the red << Back button, the system will remember your last chosen operating screen. Here are pictures of the Operating Screens. Not all of them will be in the rotation depending on your recording mode and whether you have analog inputs configured. Sweep Tach Screen This screen shows RPM, MPH, a configurable data element, predictive lap time, gear, lap number, and current lap time. A checkered flag icon will appear if the best lap of the session is being displayed. A trophy icon (shown) will appear if the best lap ever is being displayed. Timing Screen This screen shows predictive lap time, a configurable data element, lap number, session elapsed time, and current lap time. A checkered flag icon (shown) will appear if the best lap of the session is being displayed. A trophy icon will appear if the best lap ever is being displayed. Copyright © 2015 Track Systems Technologies, LLC Page 36 TraqDASH User Manual V2.80 February 6, 2015 Round Tach Screen This screen shows RPM, MPH, Max RPM, a configurable data input, predictive lap time, gear, lap number, and current lap time. Dual Analog Screen If one or two analog inputs are enabled, this screen shows those inputs in scaled units as both an analog gauge and digital value. If no analogs are enabled, this screen is skipped in the rotation. Copyright © 2015 Track Systems Technologies, LLC Page 37 TraqDASH User Manual V2.80 February 6, 2015 Quad Analog Screen If three or four analogs are enabled, this screen shows those inputs in scaled units as both an analog gauge and digital value. If less than three analogs are enabled, this screen is skipped in the rotation. Drive Screen This screen is only shown in the Drive mode. It can be used as an general trip computer showing speed, time of day, direction, max speed, trip distance, elapsed time of session, braking, acceleration, and lateral G forces. Copyright © 2015 Track Systems Technologies, LLC Page 38 TraqDASH User Manual V2.80 February 6, 2015 G Meter Screen This screen is shown in Lap and Drive mode. It shows braking and acceleration G forces, along with left and right lateral Gs. It has a friction circle representation and shows the maximum values for (L)eft, (R)ight, (B)raking, and (A)cceleration. Total G (combined lateral and brake/acceleration) is shown in the center of the circle. GPS Info Screen This screen is only shown in the Drive mode. It can be used as a diagnostic screen and shows GPS location, attitude, GPS signal strength and number of satellites, speed, heading, X and Y G forces, time of day, and temperature or Z axis G forces, depending on Sensor Unit. Copyright © 2015 Track Systems Technologies, LLC Page 39 TraqDASH User Manual V2.80 February 6, 2015 Screen Control Panel PopUp At any time during an operating screen, you can press the right edge of the touchscreen to open up a slide-out screen control panel. This panel will show the status of the Sensor Unit, the Camera, and the GPS signal strength. It also allows you to adjust the intensity of the shift lights and the screen backlight. Pressing anywhere off of the control panel will cause it to retract. It will automatically retract after a few seconds of inactivity. Copyright © 2015 Track Systems Technologies, LLC Page 40 TraqDASH User Manual V2.80 February 6, 2015 Customizing the Displayed Information You can choose which data element to display on the Sweep Tach Screen, Round Tach Screen, and the Timing Screen. You can choose to display an analog or digital input, g force, total g, elevation, vmax, vmin, battery voltage, speed, rpm, GPS time, elapsed time, best lap, or timing gap. To do this, press and hold anywhere on the screen for two seconds until a red box appears around the changeable data element. Then, repeatedly touch the data element to step through all the choices. Leaving the screen untouched for five seconds will save your settings and return the screen to normal operation. The data element chosen will appear on all the timing screens listed above. Copyright © 2015 Track Systems Technologies, LLC Page 41 TraqDASH User Manual V2.80 February 6, 2015 How to Review Lap Times and Data Immediately after completing a recording session (Race / Laps, AutoX, Drag, or Drive modes), the Session Detail screen will be displayed showing the information about the session. The scroll bar will allow you to go up and down in the lap list to view all lap times. The Best Lap is highlighted in green. There is more session information available by pressing the blue button. This screen shows the Timing screen. Pressing the blue button will change to the Timing, General, Performance, Inputs, and Config screens in succession. The information displayed is dependent on the racing mode in which the data was collected. Here is a Drag Race Timing Slip. Copyright © 2015 Track Systems Technologies, LLC Page 42 TraqDASH User Manual V2.80 February 6, 2015 Session Details General This screen will show the session duration, distance driven, range of GPS satellites monitored during the session, satellite signal strength range during the session (DOP), and the range of track elevation above sea level. Session Details Performance This screen will show the maximum values for speed, braking Gs, Acceleration Gs, and left and right lateral Gs. Copyright © 2015 Track Systems Technologies, LLC Page 43 TraqDASH User Manual V2.80 February 6, 2015 Session Details Inputs This screen will show the maximum and minimum values for any analog inputs that are enabled as well as engine RPM information for the session. High Revs, is the number of times the RPM exceeded the Red Line value in the Tach Settings. Over Revs is the number of times the RPM exceeded the Max RPM value in the Tach Settings. Session Details Config This screen lists the analog and digital inputs and cameras that were enabled for the session. Copyright © 2015 Track Systems Technologies, LLC Page 44 TraqDASH User Manual V2.80 February 6, 2015 Race Review Pressing the Back button from the Session Details screen will transfer to the Race Review Screen where the sessions stored on the SD card are listed. The scroll bar will move up and down in the list. Touch a session to highlight it. The colored areas along the bottom of the screen are buttons that will show more information. Pressing the green Lap Time button will show sequentially Lap Time, Driver, and Vehicle. The yellow Mode button will select the types of sessions to display in the Track Column. It will change between Race, Drive, AutoX, and Drag sessions. The red Delete button will delete the currently selected session. The blue Details button will transfer into Session Details for the selected session. Copyright © 2015 Track Systems Technologies, LLC Page 45 TraqDASH User Manual V2.80 February 6, 2015 System Maintenance There are a few tasks that if performed regularly will help ensure the best possible user experience. Cleaning The touchscreen has a tough low-glare protective film that should last for a long service life. Racing is a tough environment and the LCD can get covered in fingerprints and dirt. Never wipe off the LCD when it is covered in a gritty substance or you risk scratching the protective film. Blow off the dust and then wipe grease and fingerprints clean with a microfiber cloth. The Sensor Unit can be cleaned with alcohol or a damp cloth. It should not immersed. Archiving Session Files From time to time, you may see a message requesting you to Archive your session files. This is an automatic process but it may take several minutes to complete so you should do it when you have the time to spare. The progress will be shown on the screen and if you need to interrupt the Archive, press and hold the Cancel button and it will stop the process. Archiving will keep your TraqDash operating at peak efficiency with faster initial startup and session save times. No files are lost during the procedure. All you archived session files will be found in the “Archive” folder on the SD card. Firmware Updates Periodically, Traqmate will publish firmware updates for both the Sensor Unit and TraqDash. These are posted on the Traqmate website and notifications are sent by email. Firmware Updates perform two functions, bug fixes and new features and should be applied as soon as practical to do so. Ideally they would be performed in a controlled environment (not at the track) where time is not pressed. If this procedure, known as “reflashing” is not performed successfully, the unit will be rendered not functional and will have to be returned to Traqmate for a new factory firmware load. Copyright © 2015 Track Systems Technologies, LLC Page 46 TraqDASH User Manual V2.80 February 6, 2015 You can determine the firmware level of your TraqDash and Sensor Unit by pressing the “i” button in the upper left of the startup screen. Then scroll to the bottom of the help text. There you will see this information. Shown are firmware versions, serial numbers, hardware revisions, and build date as month / year. The Bootloader is the low-level software that is updated infrequently. The Firmware is the main software that controls the screens and system operation. This is updated occasionally with bug fixes and new features. The Sensor Unit Firmware is the software that is downloaded into the Sensor Unit to control its operation. It is updated occasionally with bug fixes and new features. A Sensor Unit firmware file will have a name such as sufirm340.tqm where 340 is the release level, in this case 3.40. A TraqDash firmware file will have a name such as tdfirm250.tqm where 250 is the release level, in this case 2.50. A bootloader firmware file will have a name such as tdboot150.tqb where 150 is the release level, in this case 1.50. Here is a link to the firmware update page at traqmate.com. http://store.traqmate.com/Latest-Software-Firmware-Downloads-s/286.htm To update your TraqDash system, download the appropriate file or files from the Traqmate website to your computer and then copy them to the top level folder on the SD card. After copying, the file should be listed alongside the MySessions and ConfigFiles folders. Insert the SD card into the TraqDash and power on. You will see a message stating “NEW FIRMWARE FOUND”. The message will state whether the firmware is for the Copyright © 2015 Track Systems Technologies, LLC Page 47 TraqDASH User Manual V2.80 February 6, 2015 Sensor Unit or TraqDash, the old and new revision numbers, and allow you to Reflash the unit or Skip. Reflashing the Sensor Unit will result in the entire system powering off. Do not do anything else until the system powers down. This includes attempting to reflash the TraqDash. Reflashing the TraqDash (firmware or bootloader) will cause the system to reboot. No data or configurations should be lost during this procedure but it is recommended that you make a copy of your SD card contents to your PC before reflashing. Copyright © 2015 Track Systems Technologies, LLC Page 48 TraqDASH User Manual V2.80 February 6, 2015 Error / Warning Messages Error messages will appear as a pop-up over top of a normal screen. They generally give you some information TraqDash Pop-up screens are color-coded. Blue screens are information screens that are reached by pressing the ‘i’ icon. Warning screens are yellow. These generally indicate that something is incorrect and needs correction. Firmware update screens are green. Fatal error messages are shown with a red border. Here is an example. Here are some of the more common error messages and what they mean. SD Card Not Ready No SD Card or Write Protected – Either the SD card is not inserted into the TraqDash or the tiny lock switch on the side of the SD card in in the LOCK position. SD Card Removed Cannot record further data without card – The SD card has been removed from the system while it was operating. At this point it is best to Power Off, insert the card, and then power on again. Archiving Sessions This indicates that you have a large number of session files on the SD card. In order for TraqDash to operate effectively, some of these files will be moved to a folder on the SD card called “Archive”. No files will be deleted. If you select “NOW”, the Archive process will run and could take several minutes. If you select “LATER”, the TraqDash will operate normally and request Archive the next time the unit is powered on. Updating Track Definitions After updating the TraqDash firmware, the system will post a message at the next power-up asking if you would like to update the Track Start/Finish coordinates. If you choose YES and the coordinates for a particular track have changed, the new coordinates for each updated track will overwrite any previous system or user coordinates and all user predictive lap information will be lost for that track. Copyright © 2015 Track Systems Technologies, LLC Page 49 TraqDASH User Manual V2.80 February 6, 2015 New Firmware Found The SD card contains updated firmware for the TraqDash or Sensor Unit. See the section on Firmware Updates for instructions on how to proceed. New Bootloader Found The SD card contains updated low-level firmware for the TraqDash. See the section on Firmware Updates for instructions on how to proceed. Settings Warning Gear Ratios, Diff Ratio, Vehicle Weight, Tachometer Settings, Weight, Start/Finish. The value chosen is not correct and will not allow correct operation of the Traqmate. Review the data entered and try again. Camera Change. The new camera information needs to be sent down to the Sensor Unit which is done at power-up so this function requires the unit to be power cycled. Voltage Outside Range. The voltage chosen for a sensor is larger than the voltage range (5, 10, or 20) selected. Check your Settings The following files were set to defaults: System, Vehicle, Track, or Driver. This message indicates that one or more of the configuration files on the SD card was missing or unreadable and that setting was returned to the factory default. This can happen if a new SD card is inserted, after a ReFlash operation, or if the SD card is corrupted. When this happens, you should check the setting specified in the warning message. For example, if Vehicle was listed, check to make sure the vehicle selected is correct and that the Vehicle Settings are correct for that vehicle. Cannot delete this track This indicates that you have attempted to delete one of the 330 factory pre-programmed tracks. This can be confusing because if you have recorded data at one of the factory tracks, a user file will be created for that track with the predictive lap information or alternate Start/Finish information. Those user settings will take precedence over the factory settings and can be deleted which will return the track back to factory defaults. If you attempt to delete it a second time (when it is already at factory settings), you will receive the error message. Copyright © 2015 Track Systems Technologies, LLC Page 50 TraqDASH User Manual V2.80 February 6, 2015 Troubleshooting Guide Problem Solution Can’t get GPS signal This is most likely antenna placement or the antenna has or Patchy GPS failed. The antenna should be placed OUTSIDE THE Reception VEHICLE with a good view of the sky. Double-sided Velcro can be used to attach the antenna to a non-steel body shell. If the antenna is over 2-3 years old or the wire has been wound tightly or kinked, it might be time to replace the antenna. No GPS Signal can also be caused by a bad connection or cable between the TraqDash and Sensor Unit. Check to make sure the cable is plugged into the Sensor Unit all the way. Replacement locking cables are available at the Traqmate web store. If the pigtail cable attached to the TraqDash has failed this is a moderate cost or warranty repair item. Won’t Turn On Until Recording, Stops If the ON button is held and all 4 LED lights on the front of the Sensor Unit light dimly, the Sensor Unit has failed and must be returned to the factory for repair. Otherwise, it could be a bad pigtail cable or button. Starts SD card might be corrupted. Put it in PC and see if you get a Then warning. If so, copy the files off the SD card and then allow Windows to repair the SD card. Losing Data Make sure you press the small red << Back button on the lower left of the screen to exit recording mode and save the data before shutting off power to the Traqmate. Newer firmware versions save the data and lap times upon power loss so update your firmware. Power Button is Too The first 100 units shipped with a very stiff power button. A Hard new design was implemented and this is a free warranty repair. Case is Separating If the two halves of the TraqDash case are no longer secure, this could cause premature failure of the unit. There is a service bulletin on this fault. Please return the unit for a new case under warranty. Display is Too Dim Adjust brightness under System Setup / Display Display Dims During In hot weather, TraqDash will dim to protect the temperature Copyright © 2015 Track Systems Technologies, LLC Page 51 TraqDASH User Manual V2.80 Use Unit Turns Itself February 6, 2015 of the internal circuitry. This should only happen during extreme conditions. If it is happening frequently, make sure the unit is running the latest firmware as a software update changed the operation. Also make sure the tach shift light is not set so low that the amber LEDs are on a significant portion of the time. If this fails to solve the issue contact customer service for instructions on recalibrating the temperature sensor. Off By This may be caused by a bad power cable, a faulty TraqDash power button, TraqDash pigtail cable, or Sensor Unit to TraqDash cable. This is a moderate cost or warranty repair. There may be other tips that are posted on our web forum at this link: http://store.traqmate.com/TraqTips-and-FAQ-s/283.htm Scheduling a Repair If a failure requires a return to factory repair, you may start a repair ticket by visiting traqmate.com and choosing Support / Service & Repair. Warranty Information Track Systems warrants to the owner of this Traqmate GPS Data Acquisition System that it is free from defects in materials and workmanship for a period of 180 days from the original date of consumer purchase. This warranty does not cover damage to the product as a result of misuse or accident, including but not limited to shock or water damage. Remedies shall be limited to repair or replacement of the defective unit at Track Systems discretion. IN NO EVENT SHALL TRACK SYSTEMS BE LIABLE FOR INCIDENTAL OR CONSEQUENTIAL DAMAGES. Some states do not allow for limitation of incidental or consequential damages, so this limitation may not apply to you. For technical support, call 1-877-289-0312 (9 AM to 5 PM EST M-F). Copyright © 2015 Track Systems Technologies, LLC Page 52 TraqDASH User Manual V2.80 February 6, 2015 About GPS Data Acquisition Several events converged recently to make GPS Data Acquisition viable. First, the US government removed the artificial errors in the GPS signal to improve accuracy. Second, the advent of high-speed single-chip GPS receivers made the technology both affordable and even more accurate. Third, the power of portable PCs increased to the point where they can process a large amount of mathematical and graphical data quickly. And finally, the popularity and increasing sophistication of racing and track enthusiasts created a market for the product. The primary advantages of GPS Data Acquisition over more traditional sensor-based systems are: Easy Installation – Using just the GPS positioning and accelerometers, you can collect an incredible amount of information, enough to compare drivers and cars. This makes the system accessible to street cars, vintage cars, and racecars that run in classes that do not permit sensor-based systems. It also makes it easy to swap the unit between vehicles. This is ideal for driving instructors and people with multiple vehicles. Of course, adding sensors is always an option if you wish to collect even more in-depth information. Easy to Use – By starting with the track map and placing one or more vehicles on it, you have a visual reference for all the rest of the data that can be examined. This makes data analysis faster and much easier. Driving Line Comparisons – By mapping each run, comparisons can be made of driving lines, braking points, and other track-dependent points. Cost – There is no installation cost and no expensive sensors are required. Copyright © 2015 Track Systems Technologies, LLC Page 53 TraqDASH User Manual V2.80 February 6, 2015 GPS Frequently Asked Questions What is GPS? The Global Positioning System is a constellation of 24 satellites that orbit the earth twice a day, transmitting precise time and position (latitude, longitude and altitude) information. With a GPS receiver, users can determine their location anywhere on the Earth. The complete system consists of 24 satellites orbiting about 12,000 miles above the Earth, and five ground stations to monitor and manage the satellite constellation. These satellites provide 24-hour-a-day coverage for both two-and three- dimensional positioning anywhere on Earth. Development of the $10 billion GPS satellite navigation system was begun in the 1970s by the US Department of Defense, which continues to manage the system, to provide continuous, worldwide positioning and navigation data to US military forces around the globe. However, GPS has an even broader civilian, commercial application. To meet these needs, GPS offers two levels of service, one for civilian access and the second encrypted for exclusive military use. The GPS signals are available to an unlimited number of users simultaneously, and there is no charge for using the GPS Satellites. How Does GPS Work? The basis of GPS technology is precise time and position information. Using atomic clocks and location data, each satellite continuously broadcasts the time and its position. A GPS receiver receives these signals, listening to three or more satellites at once, to determine the users position on earth. How Accurate is GPS? Traqmate is equipped with a form of differential GPS known as WAAS. A WAAScapable receiver can give you a position accuracy of better than three meters (10 feet) in absolute terms over a large span of time. In product testing on racetracks, which typically have a good view of the sky, recordings done close together in time were shown to be repeatable to under one meter accuracy. Under normal conditions, the GPS signal will provide a civilian user an accuracy of better than 15 meters (50 feet). However, using a technique called differential GPS (DGPS), the user can increase the overall accuracy of the GPS receiver to approximately 1-3 meters. With DGPS, one GPS receiver unit is placed in a known location and the position information from that receiver is used to calculate correction in the position data transmitted to other GPS receivers in the area. The resulting real-time accuracy is in the 10 foot range. Sub-meter accuracy can be obtained by using DGPS and post-processing calculations in static positioning. WAAS stands for Wide Area Augmentation System, which is a system of satellites and ground stations that provide GPS signal corrections, giving you even better position accuracy. A WAAS-capable receiver can give you a position accuracy of better than three meters, 95 percent of the time. Currently, WAAS satellite coverage is only available in North America. Copyright © 2015 Track Systems Technologies, LLC Page 54 TraqDASH User Manual V2.80 February 6, 2015 Glossary Accelerometer Analysis A sensor that measures the G-forces on the vehicle The effort of examining recorded data for useful information or the results of such an examination Analysis File File with extension of “.tqs” that contains an analysis. May contain one or more sessions AutoOn Feature to allow Traqmate to automatically turn on with power AutoStart Feature to designate automatic starting mode for Traqmate AutoPan A Traqview feature that causes the AutoPan Vehicle to remain in the Track window regardless of Zoom level AutoPan Vehicle The vehicle selected in Traqview menu to be followed during AutoPan Data Acquisition Measuring and recording of information Display Unit Lap Timer component of the Traqmate Complete System DU Display Unit Firmware Software that is embedded into the SU and DU that controls their operation GPS Global Positioning System, a satellite-based location method Post Roll Video recorded after the selected Laps Predictive Lap Timer Display Unit timer that compares current lap progress with a stored reference lap Pre Roll Video recorded before the selected Laps Reference Vehicle In Traqview, first vehicle selected for map display Segment portion of the track that is being analyzed in Segment Analysis Segment Separator bent line on Track Map that separates segments Sensor Unit Silver box containing GPS receiver and accelerometers Session One group of continuous recording, typically a single trip or series of laps Session File File with extension of “.tqm” that contains one recorded session Slider Slide control at bottom of screen for positioning vehicle on track Start/Finish Line Place on track where a lap starts SU Sensor Unit Theoretical Best Lap (TBL) Best combinations of segment times from a session TraqData Analog, Digital and RPM input module TraqData II Analog, Digital and RPM input module with 4-wire ChaseCam interface TraqData HD Analog, Digital and RPM input module with LANC camera interface TraqData PRO Analog, Digital and RPM input module with GoPro Camera interface TraqData HD2 Analog, Digital & RPM input module w/ GoPro or Replay Camera (charging) interface TraqPaq Traqmate Battery Pack Traqmate Basic GPS Data Acquisition system without a Display Unit (Sensor Unit only) Traqmate Complete GPS Data Acquisition system with both Sensor Unit and Display Unit TraqSync RPM input module with 4-wire ChaseCam interface TraqSync PRO RPM input module with GoPro or Replay Camera (non-charging) interface TraqTach RPM input module Traqview Windows data playback and analysis program TraqStudio Windows data and video playback and analysis program Copyright © 2015 Track Systems Technologies, LLC Page 55 TraqDASH User Manual V2.80 February 6, 2015 Appendix A – TraqDash Menu Tree Main Menu Info Go Racing Info Lap / Race Info Change Screen Up Change Screen Down Back Slideout Sweep Tach Timing G-Meter Round Tach Analog 0-1 Analog 2-3 Quad Analog Auto-x / Rally Info Stage Screen Back Sweep Tach Round Tach Timing Timing Slip Drive / Instruments Info Back Slideout Compass Reset Trip Reset Max Sweep Tach GPS Info G-Meter Round Tach Analog 0-1 Analog 2-3 Quad Analog Drag Info Stage Screen Back Sweep Tach Round Tach Timing Timing Slip Race Review Info Choose Session Check Times General Session Info Performance Info Input Peaks Input Configuration Delete Session Yes No Back Race Setup Info Driver Info Select Driver Spinner New Driver Driver Name Keyboard A-Z and space 0-9 and symbols Shift Key Del Cancel Save Edit Name Edit Name Keyboard A-Z and space Copyright © 2015 Track Systems Technologies, LLC Page 56 TraqDASH User Manual V2.80 February 6, 2015 0-9 and symbols Shift Key Del Cancel Save Track Delete Driver Are You Sure Yes Cancel Info Select Track Spinner Within 100 miles Within 200 miles Within 500 miles Within 1000 miles Within 2000 miles All Tracks Settings Info Track Type Info Spinner Lap Hold Time Info Spinner Start / Finish Info Clear Lat Lon Heading Vehicle Numeric Keypad 0-9 and symbols Shift Key Del Cancel Save Numeric Keypad 0-9 and symbols Shift Key Del Cancel Save Numeric Keypad 0-9 and symbols Shift Key Del Cancel Save Reset Predictive Info Reset Time Road / Drive / AutoX / Drag New Track Track Name Keyboard A-Z and space 0-9 and symbols Shift Key Del Cancel Save Edit Name Edit Name Keyboard A-Z and space 0-9 and symbols Shift Key Del Cancel Save Delete Track Are You Sure Yes Cancel Info Select Vehicle Spinner Vehicle Settings Info Tach Copyright © 2015 Track Systems Technologies, LLC Page 57 TraqDASH User Manual V2.80 February 6, 2015 Info Redline Slider Spinner Warning Slider Spinner Engine Cylinders Spinner Max RPM Spinner Aero Grip Info Drag Slider Friction Slider Gear Ratio Info Enter Tire Size Info Tire Size Diff Ratio Inputs Info Width Spinner Aspect Spinner Height Spinner Tire Circumference Numeric Keypad 0-9 and symbols Shift Key Del Cancel Save Info Digit 1 Spinner Digit 2 Spinner Digit 3 Spinner Trans Ratio Info Gear 1-8 Numeric Keypad 0-9 and symbols Shift Key Del Cancel Save Gearing Help Info Analog 0-3 Info Disable / Enable Edit Scale Info Volt Low Volt High Numeric Keypad 0-9 and symbols Shift Key Del Cancel Save Numeric Keypad 0-9 and symbols Shift Key Del Cancel Save Value Low Numeric Keypad 0-9 and symbols Shift Key Del Cancel Save Value High Numeric Keypad 0-9 and symbols Shift Key Del Cancel Save Copyright © 2015 Track Systems Technologies, LLC Page 58 TraqDASH User Manual V2.80 February 6, 2015 Volt Range 5 10 20 Filter Level NONE LOW MEDIUM HIGH VERY HIGH Edit Alarm Info LED 1 Enable LED 1 Disable LED 2 Enable LED 2 Disable Alarm Level Lower Off / Below Numeric Keypad 0-9 and symbols Shift Key Del Cancel Save Upper Off / Above Numeric Keypad 0-9 and symbols Shift Key Del Cancel Save Rename Input Rename Input Keyboard A-Z and space 0-9 and symbols Shift Key Del Cancel Save Rename Units Rename Units Keyboard A-Z and space 0-9 and symbols Shift Key Del Cancel Save Digital 4-5 Info Disable / Enable Edit Alarm Info LED 1 Enable LED 1 Disable LED 2 Enable LED 2 Disable State On Off Rename Input Rename Input Keyboard A-Z and space 0-9 and symbols Shift Key Del Cancel Save Rename High Rename High Keyboard A-Z and space 0-9 and symbols Shift Key Del Cancel Save Rename Low Rename Low Keyboard Copyright © 2015 Track Systems Technologies, LLC Page 59 TraqDASH User Manual V2.80 February 6, 2015 Weight A-Z and space 0-9 and symbols Shift Key Del Cancel Save Info Thousands Spinner Hundreds Spinner Tens Spinner Camera Setup Info Enable TraqDash USB Camera Set USB Camera Delay Sensor Unit Camera Camera Selection Info Camera Spinner Test Cameras New Vehicle Vehicle Name Keyboard A-Z and space 0-9 and symbols Shift Key Del Cancel Save Edit Name Edit Name Keyboard A-Z and space 0-9 and symbols Shift Key Del Cancel Save Delete Track Are You Sure Yes Cancel Lap / Qualify Info Lap Qualify System Setup Info Display Info Backlight Slider LED Slider AutoAdjust On AutoAdjust Off Units Info US Standard Metric Time / GPS Info Time Zone Spinner DST On/Off Normal GPS / Simulate Are You Sure Yes Cancel Start Up Info Auto On Enable / Disable Auto Start Enable / Disable Storage Info Erase All Sessions Confirm Yes Cancel Factory Defautls Confirm Yes Cancel Format SD Copyright © 2015 Track Systems Technologies, LLC Page 60 TraqDASH User Manual V2.80 February 6, 2015 Confirm Yes Cancel Personalize TraqDash Owner Enter Owner Keyboard A-Z and space 0-9 and symbols Shift Key Del Cancel Save Contact Info Enter Contact Info A-Z and space 0-9 and symbols Shift Key Del Cancel Save WiFi Name Enter Broadcast Name A-Z and space 0-9 and symbols Shift Key Del Cancel Save WiFi Password Enter Network Password (min 8 chars) A-Z and space 0-9 and symbols Shift Key Del Cancel Save Predictive Scale Info Scale Spinner Copyright © 2015 Track Systems Technologies, LLC Page 61 TraqDASH User Manual V2.80 February 6, 2015 Appendix B – TraqDash Revisions Release (2.70) Improvements – MUST BE USED WITH SU 3.70 OR LATER Enhancements New G-meter screen Changed default camera settings Added support for new USB and SU based cameras through TraqData USB Improved camera selection screen Added hot camera selection changes Added configurable gauge elements to more screens including Drive Mode Added more configurable gauge elements including GPS Time Added more tracks Updated Info screen help files with more Sensors Improved file archiving Fixed Several Bugs Start/Finish not detected fixed Fixed system losing camera setting issue Expanded vehicle list so newly created vehicles will be shown Drive mode now records start and finish for the session Previous Release (2.50) Improvements Updated TraqDash User Manual Added configurable data elements on Sweep Tach screen, Round Tach screen, and Timing Screen Added Archive mode to move older session files to the Archive folder to ensure fast operation of TraqDash New Startup Screen - now shows chosen driver and vehicle and all enabled inputs and cameras New Screen - Car Metrics tracks vehicle use time, distance traveled, and max RPM Added Test Camera feature Touch and hold red back button (lower left on screen) will return to Main Menu Changed spinner controls in many screens to more user-friendly list controls Tracks, drivers, and vehicles names are now upper / lowercase independent Added damping to accelerometer readings to make easier to read G-force screens Added Flashing Red Shift light when RPM exceeds MAX RPM by a single increment Added Data Element Filtering. This can be used for things such as fuel level floats. Added several new vehicle configurations Added or revised Start/Finish coordinates for several new and existing tracks and Automatic Track Coordinate update feature Copyright © 2015 Track Systems Technologies, LLC Page 62 TraqDASH User Manual V2.80 February 6, 2015 Added support for Mobius, Innovv, and Replay Mini cameras via USB port on TraqDash. (requires update kit to enable) Redesigned and upgraded graphics on round tach screen and timing screen Added Average Speed to post-recording session data Saves lap times on power loss in addition to data Updated on-screen help for several functions Added bootloader reflash capability for adding low level features Added ability to display bootloader software revision. Added New Track function on Confirm Track screen along with AutoCreate Track “All Tracks” list now sorts by track type Enabled monitoring of vehicle 12V without using an analog input When waiting for Start/Finish line on out lap, track name now displayed in predictive lap graphic Revised screen layouts and back button to make it less likely to change settings when leaving a screen Bug Fixes Removed operating mode without SD card that was not functional Fixed bug where more than 200 sessions would cause unstable operation Fixed AutoOn bug - could get stuck in AutoOn mode when used with older Sensor Unit Previous Release (2.40) Improvements Updated TraqDash User Manual New Screen - A Quad Analog graphic screen has been added to the recording screen rotation. This screen appears when three or more analog inputs are enabled. The Dual Analog graphic screen is used when 1 or 2 analog inputs are enabled. Added or revised Start/Finish coordinates for several new and existing tracks - general improvement Added GPS Simulation Mode in Setup Time screen to allow testing of cameras and dyno runs where GPS not available (requires Sensor Unit update) Added support for Replay XD 1080 bullet cameras (requires Sensor Unit update) Shortened power-loss save time - much less chance of losing data sessions if power lost or turned off before exiting record mode Updated on-screen help for several functions Added ability to get Sensor Unit serial number and build date remotely. Created dual-range alarms for analog inputs. For example, you can now create an alarm if water temperature is too cool or too hot. Created icons for "Best Lap of Session" and "Best Lap Ever" that appear on the timing screens. Previous Release (2.20) Improvements Added 60 new vehicles - tach settings, gears, tire sizes, and weight Exiting recording mode transfers to Race Review - this feature saves button presses. Upon stopping a recording mode like LAPS, the session lap times are shown on the screen. After viewing lap times, user must now press red BACK button twice to return to Main Menu. New graphics - redesigned gauge faces, upgraded icons, brighter colors Added Gear and RPM Telltale to round tach screens Better color coding of buttons - clarifies usage Copyright © 2015 Track Systems Technologies, LLC Page 63 TraqDASH User Manual V2.80 February 6, 2015 Added mode information (Race, Drive, AutoX, Drag) to Track column heading in Race Review - clarifies screen operation Total number of laps now shown on Session Details screen - extra information Increased size of track CONFIRM button - ease of use Added or revised Start/Finish coordinates for several new and existing tracks - general improvement Increased capacity to 200 race sessions on SD card Added automatic configuration file conversion for firmware updates Recalibrated Temperature Dimming - screen and LED shift lights would dim in hot weather to protect circuitry. Added calibration software to eliminate excess dimming. Minimum brightness is now readable in full sunlight. When using Metric Units, lap time was not held on screen Fixed Vmax, Vmin -- broken in V 2.05 Qualifying mode works just like Lap mode - now Qualifying only compares against laps from current session GoPro camera status (new Sensor Unit code 3.33) - GoPro status tracks better with on-screen icon Communications Sync with Sensor Unit improved - reduce chance that Sensor Unit and TraqDash get out of sync, especially when starting car after unit is turned on. Changes to analog inputs automatically synched with Sensor Unit (new SU code 3.33) - Updates to TraqDash analog configuration updates Sensor Unit In Race Review, on Details / Inputs screen, analog max and min values are shown correctly in scaled units. Sometimes "None in Range" track was created. If no tracks are in range, system can automatically create new track. After SD card reformat, track table is automatically rebuilt. Eliminates power off. Eliminated some invalid text on Race Review buttons Fixed distance measurement when power up directly into Drive Screen Copyright © 2015 Track Systems Technologies, LLC Page 64