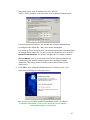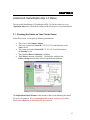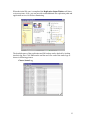
1
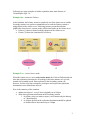
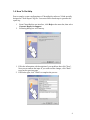
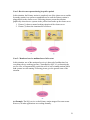
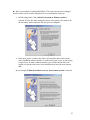
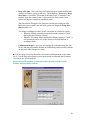
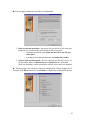
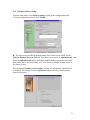
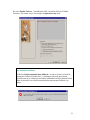
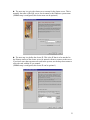
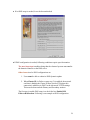
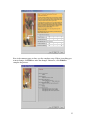
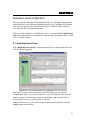
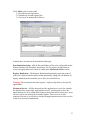
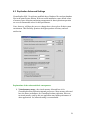
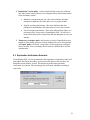
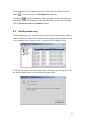
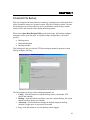
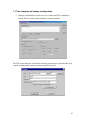
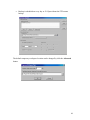
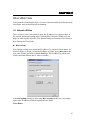
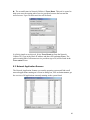
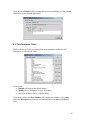
Table of Contents
[ClusterReplica SQL 3.0 User Manual]
CHAPTER 1............................................................... 1
Introduction .............................................................. 1
1.1
1.2
1.3
1.4
What is ClusterReplica SQL 3.0..................................................................... 1
Whom is ClusterReplica SQL 3.0 Designed For ............................................ 2
How Does ClusterReplica SQL 3.0 Work ...................................................... 2
How To Get Help............................................................................................ 4
CHAPTER 2............................................................... 6
Installing/Removing ClusterReplica SQL 3.0 ................. 6
2.1
2.2
2.3
2.4
System Requirements for Running ClusterReplica SQL 3.0.......................... 6
Installation Guide............................................................................................ 7
Running the evaluation package ................................................................... 11
Removing ClusterReplica ............................................................................. 11
CHAPTER 3..............................................................12
Understand ClusterReplica SQL 3.0 Status ..................12
3.1 Checking the Status on Your Cluster Server ................................................ 12
3.2 Other Cluster Status During Operation......................................................... 15
3.3 Email Alert.................................................................................................... 19
CHAPTER 4..............................................................20
Understand Failover and Failback ...............................20
4.1 Failover or Not Failover................................................................................ 20
4.11 Using the Failover functions................................................................... 20
4.12 Not using the Failover functions............................................................. 22
4.2 Failback or Not Failback............................................................................... 22
4.21 ClusterReplica SQL 3.0 offers two ways to Failback............................. 22
4.22 Advantage and disadvantages in each of the Failback method............... 24
CHAPTER 5..............................................................26
Cluster Configuration ................................................26
5.1 Replication Setup .......................................................................................... 26
5.2 Failover Setup ............................................................................................... 30
5.21 Network Configuration Concerning Failover ......................................... 30
5.22 Configure Failover Setup........................................................................ 31
CHAPTER 6..............................................................36
Replication Area Configuration ...................................36
6.1
6.2
6.3
6.4
6.5
Data Replication Setup ................................................................................. 36
Replication Advanced Settings ..................................................................... 38
Replication Verification Schedule ................................................................ 39
Compare replication file info ........................................................................ 40
Data Replication Log .................................................................................... 41
CHAPTER 7..............................................................42
Scheduled File Backup...............................................42
7.1 Two examples on setup backup .....................Error! Bookmark not defined.
CHAPTER 8..............................................................45
Other Utility Tools.....................................................45
8.1 Network Utilities........................................................................................... 45
8.2 Network Application Scanner....................................................................... 46
8.3 Port Reference Table..................................................................................... 47
CHAPTER 1
Introduction
ClusterReplica SQL 3.0 is a software solution specializes in handling MS SQL
database file replications. Running on two Microsoft Windows 2003/2000/XP
systems, ClusterReplica binds them into one clustering system to serve the network
clients.
1.1 What is ClusterReplica SQL 3.0
ClusterReplica SQL 3.0 edition is specially designed for Microsoft SQL database
servers clustering to perform file replication and failover. This special edition is
created as a "turn-key" product that when the MS SQL server is configured with
default settings, data replication and failover functions of ClusterReplica are to be
automatically configured so that users of not much database server knowledge can
use this software without sweat.
Main features of ClusterReplica SQL 3.0 include:
Active/Standby configuration – In this configuration, SQL server service
on the Secondary station is disabled. So the Secondary station is standby and
files on it being updated in real time so that it can be ready should Failover
takes place.
Active/Active configuration - In this configuration, SQL server service on
both Primary and Secondary stations are on so that users can extract data
from the Secondary for data analysis and report purposes. Data replication is
in real time as it is in the Active/Standby mode.
A built-in backup utility tool is included - This tool assist users to backup
data on the cluster server to a remote (or local) location for data protection.
Typically backup runs on the Secondary station so that the process will not
interfere with network traffic serviced on the Primary station.
Besides database files, ClusterReplica SQL 3.0 can also replicate other types of
files including dynamically generated registry files. ClusterReplica SQL 3.0 is a
powerful network server application of all purposes.
1
1.2 Whom is ClusterReplica SQL 3.0 Designed For
ClusterReplica SQL 3.0 is a fully functional data replication and Failover/Failback
server available software. It is a data protection solution for small businesses and
sub-divisions of large corporations.
With automatic default configuration on MS SQL database file replication, small
business owners can utilize the software without depending on IT experts to setup
and run the cluster server for their business needs. When in its active/active
configuration, SQL service on both Primary and Secondary stations are on so that
users can extract data from the Secondary for data analysis and report purposes.
Data replication is in real time as it is in the Active/Standby mode.
For small businesses, ClusterReplica SQL 3.0 comes with easy to use graphic user
interface tools for software configuration. Buttons lead to dialogue boxes for each
of the feature setup. The convenient online help with detailed instructions and the
talk to the person kind of technical support bring assurance to small business
owners in using ClusterReplica. The compatible pricing for the product also helps
small businesses in their data protection decisions.
For sub-division managers in a large corportation, keeping the server available
means to keep up the productivity. Managers also need up-to-date data to make
reports and better direct working strategies.
Small business owners and managers alike should all find it a compatitive and costeffective solustion for server availability and data protection. ClusterReplica SQL
3.0 is a useful tool to satisfy today's data protection need for all.
1.3 How Does ClusterReplica SQL 3.0 Work
ClusterReplica SQL binds two Microsoft Windows systems together to function as
one cluster server, so at any time, there will be at least one system running to serve
the network clients requests.
Within the cluster server, one is taking the ACTIVE role to be the Primary station,
and the other taking the STANDBY role to be the Secondary station. During
standard condition, both systems are running normally, the Primary station will
serve the network clients and replicate all newly changed data to the Secondary
station to keep it current with all data.
This continuous data replication works on open and locked files including the
database files. The process ensures all changed data updated at all times. No data
will be lost due to system down or a service failure, and server service should be
available 24/7.
2
Following are some examples to further explain the three main features of
ClusterReplica SQL 3.0.
Example One - Automatic Failover
In this situation, the Primary station is completely out of the cluster server and the
Secondary station is to operate as standalone server until the Primary station is
plugged back to the cluster server. Following pictures present the situation
graphically where the two systems in the yellow frame make up the cluster server.
• Picture (1) shows a normal working situation of the cluster server.
• Picture (2) shows the situation after a Failover.
Example Two – Active/Active mode
When the cluster server is set in active/active mode, the Failover/Failback and real
time data replication functions are all working in the same manner as it is in the
normal active/standby mode. Data replicated to the Secondary station will,
however, be first saved into a temporary workspace and copied into replication
destination in user defined time interval.
Here is the summary of the situation:
• update time interval - every 4 hours originally set at 8:00pm
• in the data replication destination on the Secondary station
1. at 8:00am, when you make a report, it will contain only the data up
to 7:00am that day
2. at 4:00pm, the data in the replication destination should be updated
to include all new data entered up to 3:00pm.
3
1.4 How To Get Help
Due to complex system configurations of ClusterReplica software, XLink specially
designed an "Error Report" log file. Users must follow listed steps to generate this
report log.
1
2
From ClusterReplica user interface, click Help on the menu bar, then select
Generate Report for Support
Following dialog box will come up
1. Fill in the information with description of your problem, then click "Next".
Next screen confirms the input. If you wish to make changes, click "Back"
to go back to previous page.
2. If all looks right, click "finish" to complete the process.
4
Now you have generated the error log. Go to C:\XLinkCRReport to find the file
"Reportsetup.txt". Email this file to [email protected] and we will contact you for
possible solutions.
If you have further questions regarding this product, please feel free to contact us.
Phone: 408-263-8201
fax: 408-263-8203
email: [email protected]
NOTE: Please always include the product name in the subject line when you send
email for support. Thanks.
5
CHAPTER 2
Installing/Removing ClusterReplica SQL 3.0
A cluster server binds two or more computer systems together to function as one.
The clustered systems need to communicate with each other. At the same time, one
of the clustered systems will take up the responsibility to server the network clients.
This setting requires internal communication between the clustered servers as well
as external communication between the server and the network clients.
2.1 System Requirements for Running ClusterReplica SQL 3.0
Before install ClusterReplica SQL 3.0, please check the system requirements to
make sure your system can handle the software properly.
•
•
•
•
Two Microsoft Windows systems of 2000/XP/2003 platforms with ethernet
connection
RAM: 128MB or above
Hard disk: 8GB or larger
Network connections between the clustered systems
The most important condition being that the clustered systems must not be the
domain controller or the DNS server.
Tips: Using one or two network cards
One network card - If the systems you are going to install ClusterReplica
SQL 3.0 each has one network card, this means the cluster server operates
with both internal and external communications moving within one subnet.
In this situation, the cluster internal communication tangles up with the
server clients communication. The work load on the communication channel
can be constantly overloaded. There is also the concern of data processing
speed and data transfer security.
Two network cards - By installing two network cards on each of the
clustered systems, the internal and external communications are separated.
One set of IPs can then be devoted strictly to the internal communications of
the clustered systems without the interference of the public network traffic.
6
For example:
system1: 123.123.123.10, 195.2.1.74
system2: 123.123.123.16, 195.2.1.75
The 123 subnet is to be used for clustered systems internal communication,
and the 195 subnet is to be used for server/clients connection.
The effect on this setting of two network cards is remarkable. From security
standpoint, the separation of the internal and external traffic on the cluster
server eliminates the possibility of public interference of the servers internal
activities. Now, data transfer security is ensured.
On the same footing, the improvement of server performance in the eyes of
network clients can also be notable. First, with two subnets, network traffic
is reduced. Secondly, each set of IP addresses devoted to specific tasks,
efficiency increased.
2.2 Installation Guide
Before install ClusterReplica SQL 3.0, some attention points are listed blow:
•
One license key is to be used on both systems for installation.
•
A virtual IP must be added on the Primary station on the network card to be
used for public connection.
If each of the servers has two network cards, be sure that the two sets of
subnets are matching on the Primary and the Secondary stations.
•
For example:
system1: 123.123.123.10, 195.2.1.74/195.2.1.76 (virtual IP)
system2: 123.123.123.16, 195.2.1.75
The 195 subnet is to be used for server public connection, and system1 is to
be used for Primary station. So, a virtual IP of 195.2.1.76 is added to
system1.
Steps in details:
With a successful download, you will get the ClusterReplica_sql.exe file as the
installer. Double click on it to start installation process.
7
1. The first screen as seen below greets you with the product name.
2. Click on button Next to move on. Following message box will come up to
remind you the software requires a member of administrators group to
perform the installation.
3. If you are already logged in as a member of the administrators, click on yes
to continue. Along the way, you will see the license agreement with
conditions on using the software properly.
8
Please read the agreement carefully and be sure you fully understand every
term listed and that you agree with this agreement entirely before proceed
with the installation.
Click No if you disagree with any of the terms listed in the license
agreement. The installation process will abort.
4. If you clicked Yes in 3, the next screen prompts for you to fill in the license
key for using the product.
5. The License box is filled with DEMO as the default entry. If you have not
purchase a license for the product and just want to install the demo package,
leave this default entry in the box and click on next to continue.
6. The next screen asks you to decide if you want to set the local system as the
Primary system or the Secondary system. Select one and continue.
9
7. In the next screen, some IP addresses are to be filled in.
NOTE: The IP used here is for the cluster server's internal communication
.
For one network card systems - the internal and external communications
are using the same subnet IPs - there is no need to distinguish.
For systems with two network cards - the internal and external communications
are using different subnet IPs - be sure to enter the IPs that are to be used for
internal communications. As in above example, the 123 subnet is entered.
We recommend you use two network cards for the clustered systems: one
is dedicated to the internal communication, one is dedicated to public
connection. This setting works for better security and efficiency in the
cluster server.
8. Click OK to move along the installation process. If all goes well, a few
more clicks will bring you to the last screen.
Now you have successfully installed ClusterReplica SQL 3.0 software.
For Windows 2003 and XP systems, system reboot at the end of installation
of ClusterReplica SQL 3.0 is not required.
10
2.3 Running the evaluation package
ClusterReplica SQL 3.0, like all other Xlink’s products, has a 30-day evaluation
period. This means you can download a copy of ClusterReplica SQL 3.0 from our
web site and test run it for 30 days to decide if the software fits your needs and
system environment. We encourage and recommend you to take advantage of the
evaluation package and make sure you can use the software before purchase.
If, after careful evaluation, you decide to use the software, a replace of the license
key will allow you to continue using ClusterReplica SQL 3.0 without uninstall.
2.4 Removing ClusterReplica
ClusterReplica MSSQL Edition is equipped with its own uninstall program. You
can find it by clicking on Windows Start/Programs/Xlink ClusterReplica.
If for any reason you want to remove the software from your system, run this
uninstall program will remove all files of it. Using Windows add/remove program
should reach the same result. Be sure to reboot the system after running uninstall.
11
CHAPTER 3
Understand ClusterReplica SQL 3.0 Status
The successful installation of ClusterReplica SQL 3.0 sets the cluster server in
replication only mode. The default settings of the cluster server is presented below.
3.1 Checking the Status on Your Cluster Server
In this first screen, we can pick up following information:
•
•
•
•
•
The server is the Primary Station
The local system has Control IP 123.123.123.10 and functions as the
Active server
The remote system has Control IP 123.123.123.16 and functions as
the Standby server
The scheduled Data Verification is enabled
The Failover function is disabled – Users need to configure the
Failover Setup for automatic Failover and Failback functions.
The Replication Status Window at the bottom of the screen indicating the initial
file sync is in progress. It is recommended that no user action is to be taken
before the completion of this initial file sync process.
12
When the initial file sync is completed, the Replication Status Window will show
as in next picture. Now, you can proceed to add additional file replication paths and
application services for failover monitoring.
The detailed status of data replication and file backup can be checked by looking
into their log files. Click View on the tool bar and view each of the status logs as
shown in following pictures.
Cluster Status Log
13
Data Replication Log
File Backup Log
14
3.2 Other Cluster Status During Operation
Following lists some important cluster status when the cluster server is in operation
with simple explanations.
1. Cluster server is in Always confirm mode. This mode affects only the file
sync process when the cluster server Failback to avoid data loss should the
standalone server start copying files automatically into the newly-start
server. This configuration can be set in Replication configuration.
2. Cluster server is set in Overwrite mode. This is the reciprocal mode of the
first one. So, when cluster server Failback, files on the standalone server
will be copied to the newly-start server without further confirmation.
15
3. Following picture shows the cluster server is to prepare for Failvoer. It
means that a malfunction of the Primary station is detected and the
Secondary station is getting ready to take over the active role and running in
standalone mode.
4. Following picture shows the cluster server is in Failback process. During
this process, files on the standalone server are copied into the newly-start
server, and upon completion of this file sync, the newly-start server will be
reset as the Primary station.
16
5. Following picture shows that the cluster server is waiting for the systems to
swap roles. This status of the cluster server can be found in one of the
situations:
•
•
User manually switch the role of the Primary and Secondary stations
by click the button Switch Role on the status screen.
At the end of a Failback process when file sync is completed and the
newly-start server is to take up the active role and turn itself to
become the Primary station.
6. Following cluster status will show up when one of the clustered systems is
waiting for the other one to determine its role. It will occur in a Failover or
Failback process.
17
7. Following picture shows a Holding status on the Secondary station. This
status indicates that the Primary station failed during a data replication
process and that the data on the Secondary station is incomplete.
The Secondary station is now running in standalone mode, but it cannot take
over the active role because it does not have the usable data to server the
clients. Two things can be done to correct the situation:
1. Manually restart the Primary station to perform a Failback without
having the data on the Primary station to be overwritten - that is
make sure the Primary station is in Always confirm mode (see status
description 1).
2. Fix up the data on the Secondary station and switch its role to be the
Primary station.
This condition is set for data protection purpose.
8. Following picture shows the Failed Server status which indicates that the
ClusterReplica SQL 3.0 service on local system is not running properly. It
now has lost connection to the remote system, and therefore cannot decide
the role it must take in the cluster server.
Users can try to restart the service or reboot the system to bring the system
back to normal state.
18
3.3 Email Alert
In two situations this feature can show importance:
1
When a Failover occurs
2
When a Data Replication definition item is disabled by ClusterReplica process
to prevent improper data replication
With proper setup of this tool, system administrators will be notified of happening
of above situation.
To set it up, from ClusterReplica's main status window, click the tool bar button
"Options", then select "email alert setup".
19
CHAPTER 4
Understand Failover and Failback
Failover is the process in which the Secondary station of the cluster system take
over the active role of the Primary station when failure of the Primary station is
detected. The failure of the Primary station can be either the entire system is down
or one of the monitored services fails.
Failback is the process in which Primary station resumes its Primary role after an
Failover event.
4.1 Failover or Not Failover
The main purposes of clustering servers are:
1. Real-time data replication for data protection
2. Failover for server 24x7 availability
While the first situation requires no Failover function and the second situation does.
ClusterReplica SQL 3.0 supports both purposes.
4.11 Using the Failover functions
To use the Failover functions of ClusterReplica SQL 3.0, users need to configure
Failover Setup with user-defined cluster name and pre-set cluster IP.
(see next section)
Failover triggering events
1. Receives no response during keep-alive period - The
Secondary station monitors the active state of the Primary station
in a pre-set duration of time. The default setting of the keep-alive
period is 15 seconds. Users can make adjustments to this time
period for ClusterReplica SQL 3.0 to determine when to Exercise
Failover
2. Monitored services malfunction or fail to start - when any one
of the monitored services defined is detected in malfunction,
failover will be activated
3. Public connection network adapter fails to function - when
the public connection to the Primary station fails either due to
network card malfunction or the disconnection of the network
cable, failover will be activated
20
Case 1: Receives no response during keep-alive period.
In this situation, the Primary station is completely out of the cluster server and the
Secondary station is to operate as standalone server until the Primary station is
plugged back to the cluster server. Following pictures present the situation
graphically where the two systems in the yellow frame make up the cluster server.
1. Picture (1) shows a normal working situation of the cluster server.
2. Picture (2) shows the situation after a Failover.
Case 2: Monitored service malfunction or fail to start
In this situation, one of the monitored services is detected of malfunction, but
everything else are working just fine. ClusterReplica SQL 3.0, on detecting the
service error, will automatically switch the roles of active/standby stations while
both systems are still running. Following picture give the general sense of the
situation.
An Example: The SQL service on the Primary station stopped for some reason.
However, all other applications are working normally.
21
ClusterReplica SQL 3.0 detected the failure of SQL service on the Primary station.
It starts the SQL service on the Secondary station immediately and checks on all
services in the monitored service list making sure they are also started on the
Secondary station. At this point, the Secondary station takes up the active role and
the original Primary and Secondary stations in the cluster server switched positions.
This switch of roles is done without network clients' notice. The system Admin can
then work on the standby station to figure out what went wrong with the SQL server
on it.
4.12 Not using the Failover functions
When use ClusterReplica SQL 3.0 for the real-time data replication purpose only,
the Failover/Failback functions are not configured. This is the default setting of
ClusterReplica SQL 3.0 with the successful installation of the software on both
Primary and Secondary stations.
Users need only to configure the data replication and, the backup utility if
scheduled routine backup is also desired.
4.2 Failback or Not Failback
The main reason that some users want to Failback is that of the two clustering
systems, the one used for the Primary station is more robust then the one used for
the Secondary station. Failback will keep the more robust system be the active
server as much as it can.
Notice that, if the two systems in the cluster server are comparable in hardware
components and configuration, let the Primary station "float" between the servers
without Failback can be equally efficient.
4.21 ClusterReplica SQL 3.0 offers two ways to Failback
1
Automatic Failback - Failback is to take place as soon as the newly-started
server is reconnected to the cluster server. No human intervention is
required with this Failback method.
2
Confirmed Failback - The newly-started server will first take up the
standby role to allow current data to be copied over, then failback. Users
will be prompted to confirm each step of motion.
If users decide to not failback, they can check No in the confirmation process.
With this action, ClusterReplica SQL 3.0 will keep the current active station
to be the Primary station until the cluster server failover again.
22
► Here is an example of confirmed Failback. The newly-start system is plugged
into the cluster server and the dialog box for user confirmation comes up.
•
In following picture, Yes, switch local system to Primary station is
selected. If select the other setting, the newly-start system will remain to be
the Secondary station when the file sync process completes.
•
In the next picture, you have the choice of having the data on the current
active standalone station copied over to the newly-start server, or not having
it copied over. In most common situation, you would want the data to be
copied over because the active server should always have the most current
data.
In our example, Failback with data recovery from remote system is selected.
23
•
The next picture shows the Summary page which tells you that you have
choose to let the newly-start server to become the Primary station and have
the current data on the active standalone station will be copied over.
If this is not what you really wanted, click on Back to go to the previous pages
to make the changes.
4.22 Advantage and disadvantages in each of the Failback method
Advantages:
•
The automatic Failback is simple and hassle-free to always keeping the
original Primary station to be the active server.
Some users prefer this way because they use a heavy-duty machine to run
the Primary station, but only use an average machine for the backup.
Naturally, they would prefer to use the original Primary to be the active
server as much as possible.
Automatic Failback will, without confirmation, first copy all current data on
the standalone server, and then switch the roles.
•
The confirmed Failback guarantees no mistakes on data overwritten.
In some special circumstances, the newly-started server may contain the
data users wanted. Users then may want to copy the data on the newlystarted server to the standalone server, instead of the other way around as
normal Failover will do. Manual Failback gives you the full control of in
which direction you want the data to flow.
24
Disadvantages:
•
The automatic Failback - In some special situations, the newly-start server
may contain the data users want to keep. If automatic failover is set on the
cluster server, this data will be overwritten as soon as the system is
connected into the clustering. This accidental loss of data then becomes
inevitable then.
•
The confirmed Failback requires a person to sit in front of the server and
make decisions on each move of the configuration for the right result. This
process can be tedious and cause error by human mistakes.
25
CHAPTER 5
Cluster Configuration
This chapter provides details on concept of clustering in ClusterReplica SQL 3.0
and the configuration procedures. The two sections in Cluster Configuration are:
1) Replication Setup – deals with the data replication communications
between the clustered servers
2) Failover Setup – deals with the public connection of network clients to the
server and the cluster failover between the clustered servers
ClusterReplica SQL 3.0 binds two Windows systems together to make up the
cluster server. During normal operation, the Primary station is responsible for
servicing the network clients and replicate the new data to the Secondary station in
real time so that all data on the Secondary station will be current within minutes.
The Secondary station while remain hidden from the network clients is standby and
ready to take over the active role should the Primary station fails for any reason.
Meanwhile, managers can extract data from it for routine checkup or making
periodic reports without interfere the public service job of the cluster server.
5.1 Replication Setup
This part of the Cluster Configuration configures the cluster server sets data
replication and file sync routines.
A little different from Failover Setup, Replication Setup allows some items of the
configuration to be done on both Primary and Secondary stations. To be specific,
the only item that cannot be changed on the Secondary station, in this part of
configuration, is to set SQL operation mode.
This design requires special attention to following:
1. The communication port and communication addresses must match on
both Primary and Secondary stations. Changes made on one system must
also be done one the other system.
2. The keep alive time is the length of time by which a system determines if
the other system is still alive. Because this value is system and network
traffic dependent, it can be set of different values on the Primary and
Secondary stations.
26
3. The Data overwritten protection can also be set individually on Primary
and Secondary stations. When the check box is checked, it means at the
restart of the local system, confirmation on overwritten of local data files
will come up before action is taken.
Click Modify to begin the configuration process. Any change involve data
replication must go through the entire process to complete.
►This first page shows two items:
27
1. Keep alive time - this is the time which helps the local system to determine
whether the remote system is still alive. The default time duration for Keep
alive time is 15 seconds. This means at the end of each 15 seconds, if no
response from the remote system is detected by the local system, local
system will begin to operate in standalone mode.
The general rule of thumb is: the faster the system's processing speed or
busier the network traffic into the local system, the longer the Keep alive
time should be set.
Two things could happen when "death" is detected in a clustered system:
When the Primary station detected the Secondary station is "dead",
data replication function will stop.
When the Secondary station detected the Primary station is "dead", it
will assume the active role of the cluster server and function in
standalone mode.
2.
Communication port - users can also change the communication port, but
be sure that the port number defined on both Primary and Secondary stations
are the same when changes are made.
► The next page is to setup IP numbers for internal communication of the cluster
server. Use the drop down menu to select the network card that has the IP number
you want to use for this purpose.
Make sure the IP numbers on local and remote systems matches on the
Primary and Secondary stations.
28
► The next page contains two sections of configuration:
1. Data overwritten protection - this option lets you decide if you want to be
prompt at every restart of the local system for file overwritten.
Check the box means: yes, please ask me before any file sync
takes place.
Leaving the box unchecked means: no, please don't bother.
2. Select a SQL operation mode - the two selections sets the SQL service on
the Secondary station in Disabled mode or Enabled mode. In enabled
mode, the Secondary station would allow users to access and view database.
► This next page is the summary of the user configuration. If more changes are to
be made, click Back. Otherwise, click Finish to complete the configuration process.
29
5.2 Failover Setup
This section deals with the setup of the public connection and the cluster Failover
settings. Because some of the configuration selections depend on users' system
environment, some general consideration of network design are listed below for
user reference.
5.21 Network Configuration Concerning Failover
The three concepts that involve Failover in ClusterReplica SQL 3.0 are:
1
Cluster Name - the name which network clients use to connect to the
Primary station
2
Cluster IP - the IP address which network clients use to connect to the
Primary station
3
DNS setup – the cross network configuration for failover
The two types of network configuration established on above concepts that concern
cluster Failover using ClusterReplica SQL 3.0. are:
1
The clustered systems are in same network segment
2
The clustered systems are in different network segment
The most important condition being that the clustered systems must not be the
domain controller or the DNS server.
The Failover setup considerations are summed up in following:
When both Primary and Secondary stations are in the same network segment
In this system environment, three situations can be considered:
1
Local host table or IP address is used - the Cluster IP must be set
2
MS Netbios is used to resolve network address - the Cluster Name
must be set
3
DNS is configured - the Cluster Name and Cluster IP can be optional.
In the case where all three situations listed above are involved, users need to
setup the Cluster Name, Cluster IP, and the DNS configuration in Failover
setup.
When the Primary and Secondary stations are in different network subnet
In this system environment, only DNS configuration can be used for Failover
setup. Enable Cluster Name or Cluster IP may result failure of cluster Failover.
30
5.22 Configure Failover Setup
From the main menu, select Failover Setup to bring up the configuration panel.
To begin configuration process, click Modify.
► The first screen presents the default setting of the cluster server which sets the
Failover/Failback functions disabled. The cluster server is now in replication only mode.
When in replication only mode, the Primary and Secondary stations are fixed with
their status, that is once set Primary, a server will always hold the Primary status in
the cluster system.
The selection for Primary and Secondary stations can only be done when Failover
is disabled. This setting is used for replication only mode only to determine the
data flow direction.
31
By select Enable Failover, ClusterReplica SQL 3.0 enables Failover/Failback
functions. The cluster server is no longer in replication only mode.
Set Automatic Failback
If the box Enable automatic data failback... (in above picture) is checked,
automatic Failback will take place. A warning as shown in next picture
should come up to remind you no further confirmation will be checked before
data overwritten. Leave this box unchecked means manual Failback is in
place.
32
► The next step is to give the cluster server a name for the cluster server. This is
normally the name of the SQL server, but it cannot be the Windows system name.
(If DNS setup is configured, this cluster name can be optional.)
► The next step is to define the cluster IP. This is the IP that is to be attached to
the Primary station of the cluster server for network clients to connect to the server.
If you have more than one network cards in the system, use the drop down menu to
select the card with the IP you wanted.
(If DNS setup is configured, this cluster IP can be optional.)
33
♦ If no DNS setup is needed, leave the box unchecked.
♦ If DNS configuration is needed, following conditions require special attention.
The most important condition being that the clustered systems must not be
the domain controller or the DNS server.
Other issues involve DNS configurations are:
1. Users must be able to authorize DNS dynamic update
2. When Cluster IP (in Failover setup step 2) is enabled, the network
card that is binding the Cluster IP must check off "Register this
connection's addresses in DNS" in the Advanced TCP/IP settings.
This must be done on both Primary and Secondary stations.
The first step in enable DNS setup is to check the box Enable DNS
Failover Redirection. Following is an example on DNS configuration.
34
Here is the summary page to show you the complete setup. If there is anything you
want to change, click Back to make the changes. Otherwise, click Finish to
complete the process.
35
CHAPTER 6
Replication Area Configuration
The file replication function of ClusterReplica SQL 3.0 is among the most powerful
and efficient in its class. Besides handling all types of files, including SQL database
files and some registry files, ClusterReplica SQL 3.0 replicates files in real time
even when the file is open and being used.
With successful installation, ClusterReplica SQL 3.0 is set by default in Replication
only mode with automatic configuration to replicate MS SQL database files (on SQL
server’s default settings).
6.1 Data Replication Setup
Select Replication Area Setup" from the main menu, the configuration panel will
look like following picture.
The "stuff" in each section of this panel are the files and services needed for
ClusterReplica SQL 3.0 to correctly replicate all your SQL database files from the
Primary station to the Secondary station at normal times, and activate Failover
process when a service or system failure is detected.
Other files and services to be replicated and monitored can be added by click the
config button on the tool bar.
36
Click Add by each section to add
1) File path for data replication
2) Dynamically created registry files
3) Services to be monitored for failover
In detail, these sections can be described as following:
Data Replication Setup - Add all files and folders of files to be replicated from the
Primary station to the Secondary station here. If a file requires an application to
access, the application/service must be added in the Monitored Service section.
Registry Replication - The Registry Replication functionality meets the needs of
some server systems which require certain dynamically changed key definitions of
registry matched on the Secondary server for a successful failover.
Warning: Do not replicate the entire registry - replicate only the keys for specific
applications.
Monitored Service - All files that need specific application to access (for example,
the database files require SQL application to access), would require to have the
application service to be added in this listing so that when failover takes place, these
services will be activated on the Secondary station. These services are also
monitored for service level failover which will happen when any one of the services
in the list is detected of malfunction.
37
6.2 Replication Advanced Settings
ClusterReplica SQL 3.0 replicates modified data of database files and non-database
files in the point-in-time fashion. With successful installation, some default values
of memory space allocation and timing arrangement for data replication operation
are set as recommended values for best performance.
Users, however, still have the power to change these values to best fit their system
environment. This flexibility promises the highest product efficiency and user
satisfaction.
Explanations of the values and their consequences.
1. Virtual memory usage - the virtual memory allocated here is for
ClusterReplica data replication internal process use. More memory allocated
here, the better performance for ClusterReplica data replication. However,
too much memory used by this one application may hinder performance of
other applications. So, balanced setting is recommended.
38
2. Replication Version-point - values included in this section are related to
how often a new batch of data is to be transported from the Primary station
to the Secondary station.
•
Database version-point time out - this value indicates that data
transport for database files takes place at every eight seconds.
•
Regular version-point timeout - this value indicates that data
transport for non-database files takes place at every four seconds.
•
Forced version-point timeout - This value indicates that if there is a
non-stop in-flow of new data, ClusterReplica SQL 3.0 will force a
break on the data in-flow and perform the data transport at every ten
minutes.
3. Temporary workspace path - this location is where ClusterReplica store
temporary files during operation. If large database files are to be replicated
and report mode is activated, a large space for this temporary workspace
may be needed. Users can change the location to a different drive for this
consideration.
6.3 Replication Verification Schedule
ClusterReplica SQL 3.0 can run automatic data replication verifications which will
auto update files on the Secondary system whose file dates or file size does not
match that on the Primary system. The default set on this data replication
verification is as shown. You can change the verification schedule according to
your needs.
39
6.4
Compare replication file info
The Compare Replication File Info tool allows you to manually check up the
folders and files in the File Replication definitions to make sure all files are copied
properly from the Primary server to the Secondary server.
When in File Replication Setup, click button Advanced on the menu bar to find
Compare File Info to open up the processing screen as shown below.
The first thing to setup here is how you want the comparison result to display. Click
the button Filter on the menu bar to get next dialog box. Select the display option
according to your needs and click OK. The default setting is on Display all results.
40
The next thing to do is to find the source file of the replication. Browse by click
to select the folder of a File Replication definition.
button
Click button
to get the comparison results. By default, all files and folders are
to be listed. If there are problems in some replicated files, you may find wordings
such as file does not exist in the Remark column.
6.5
Data Replication Log
The data replication log is created for you to trace the replication actions on files or
folders, and decide if some files or folders are not properly replicated that you need
to run a manual-sync to ensure accuracy of the data on the Standby system.
If a Event Description is too long, double click it will bring up a message box with
the full description listed in it as shown in the picture below.
41
CHAPTER 7
Scheduled File Backup
This tool completes the data protection routine by assisting users to backup the data
on the Secondary station to a remote location. Why the Secondary station - because
the backup process will not affect the server performance on the Primary station
which services the network clients during normal operation.
When select Open Data Backup Utility on the main menu, the Backup configuretion panel comes up on the right. As regular backup configuration, you need to
provide:
•
•
•
Backup source
Backup destination
Backup schedule
This backup tool also provides the FTP data transport method to promote remote
backup to higher efficiency.
The four buttons on the top of the configuration panel are:
1. Config - click this button to setup the backup source, destination, FTP
choice and schedule
2. Backup - click this button to perform a one-time, instant backup, this action
should not affect the pre-set schedule
3. Advanced - click this button to change the default temporary backup
location if larger space is expected to be needed
4. Log - click this button to view the backup actions logged
42
7.1 Two examples on backup configuration
•
Backup is scheduled at 9:14am on every weekday and FTP is enabled to
backup the files in the source location to a remote location
The FTP remote directory is the home directory on the remote system that the local
system would normally connect to when using FTP protocol
43
•
Backup is scheduled on every day at 12:12pm without the FTP remote
backup.
The default temporary workspace location can be changed by click the Advanced
button.
44
CHAPTER 8
Other Utility Tools
Along with the ClusterReplica SQL 3.0 comes with some utility tools that may help
users better work in their network environment.
8.1 Network Utilities
There are times when a user needs to know the IP address of a registered host, or
the network transaction routing path. ClusterReplica's Network Utilities tool can
help you achieving this objective. This network utility tool consists of two features:
Host Lookup and Trace Rout.
► Host Lookup
Host Lookup can help users match the IP address of a web host with its name. As
shown in figure 6.1 below, to find the IP address of yahoo, type yahoo.com in the
host name window and click on button Look Up. The IP address for yahoo.com
will be found and filled in the IP Address window.
A reverse lookup can also be done using Host Lookup. In this case, user simply
types in the IP address to find the registered host's name.
Trace Route
45
► The second feature in Network Utilities is Trace Route. This tool is created to
help users trace the routing path of service providers between the host and the
traced servers. Up to 20 router activities will be listed.
It is fairly simple to use this tool. Select Trace Route tap from the Network
Utilities GUI, type in the Host's IP address and then click on button Trace. The
packet routing path of all internet service providers (up to 20) will be listed in the
Trace status screen.
8.2 Network Application Scanner
The Network Application Scanner can scan the operating system and find out all
network applications running on it. From its dialog box, click on button scan to get
the services of all applications currently running on the system listed.
46
Click on button Details will get a popup box to come up showing you the detailed
information of the network application.
8.3 Port Reference Table
The Port Reference Table lists some of the most commonly used ports with
description as reference for users.
On the menu,
• Default will bring up the default listing.
• Modify allows changing of a port's description.
• New port definition can be created in New.
Click on the column title Port Number will sort the port numbers in ascending
order; and Description will sort the port descriptions in ascending alphabetical
order.
47