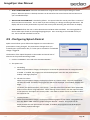
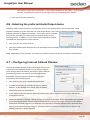
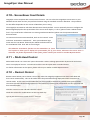
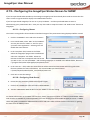
1
Sedao Ltd ImageFlyer User manual revised September 2010. ImageFlyer User Manual Contents 1.0 ‐ What is ImageFlyer ...................................................................................................................................... 2 1.1 ‐ How to install ImageFlyer..................................................................................................................... 2 1.2 – ImageFlyer Basics ................................................................................................................................ 4 1.3 ‐ The Control Panel Explained ................................................................................................................ 5 1.4 – ImageFlyer startup behavior. .............................................................................................................. 6 2.0 – Using the file menu. .................................................................................................................................... 6 3.0 ‐ Adding Media to your presentation layout................................................................................................. 7 3.1 ‐ Adding Audio ........................................................................................................................................ 8 3.2 ‐ Adding a Colour Background ................................................................................................................ 8 3.3 ‐ Adding a HTML Browser ....................................................................................................................... 9 3.4 ‐ Adding an Image Flyer Control File / Using Hot Spots ....................................................................... 11 3.5 ‐ Live Video ........................................................................................................................................... 12 3.6 ‐ Adding a Movie .................................................................................................................................. 13 3.7 ‐ Adding a PowerPoint Slideshow......................................................................................................... 14 3.8 – Adding an RSS News Feed ................................................................................................................. 14 3.9 – Adding Shockwave............................................................................................................................. 16 3.10 ‐ Adding a Still..................................................................................................................................... 17 3.11 ‐ Volume Controls............................................................................................................................... 18 3.12 ‐ WAV Audio ....................................................................................................................................... 19 3.13 ‐ Adding a www.SedaoLive.com Feed ................................................................................................ 19 3.14 ‐ Adding a www.SedaoLive.com Image Feed ..................................................................................... 20 3.15 – Common controls used with RSS feeds. .......................................................................................... 20 3.16 ‐ Common Controls on the ImageFlyer Control panel........................................................................ 23 4.0– Controlling ImageFlyer playback ............................................................................................................... 25 4.1 ‐ Hot Keys ............................................................................................................................................. 25 4.2‐ Using the Schedule.............................................................................................................................. 26 4.3 – Licensing ImageFlyer ......................................................................................................................... 29 4.4 – ImageFlyer Preferences ..................................................................................................................... 30 4.5 ‐ Configuring Splash Control ................................................................................................................. 31 4.6 ‐ Selecting the preferred Audio Output device .................................................................................... 32 4.7 – Configuring Internet Fallback Checker .............................................................................................. 32 4.8 – Iconify Control. .................................................................................................................................. 33 4.9 – Choosing your preferred language .................................................................................................... 33 4.10– ScreenSaver Feed Details ................................................................................................................. 34 4.11 – Multi‐Head Control.......................................................................................................................... 34 4.12 – Restart Control ................................................................................................................................ 34 4.13– Configuring the ImageFlyer Status Screen for SWEP ....................................................................... 35 4.13.1– Configuring ‘Status‘ ............................................................................................................ 35 4.13.2– Configuring ‘Grab Screen’ .................................................................................................. 35 5.0 – The Help Menu .......................................................................................................................................... 36 6.0 – Other Sedao Products ............................................................................................................................... 37 7.0 ‐ Folder Management .................................................................................................................................. 38 Further Information ........................................................................................................................................... 39 V1.0 Page 1 ImageFlyer User Manual 1.0 - What is ImageFlyer? ImageFlyer is Sedao’s highly successful Digital Signage Player. ImageFlyer allows you to play unlimited zones of almost any kind of digital media. This allows you to create screens which can include slide shows of photos, live weather from a website, Live TV from an external set‐top box and much more. Showing multiple types of information on screen simultaneously is essential to give digital signs instant impact. Screens can be designed to be entertaining whilst delivering the all important communications and sales messages that give the screens value to your organisation. ImageFlyer is designed to be incredibly easy to use: simply add your media, move it with your left mouse button and resize it with your right mouse button in real time as it plays. Keep adding more media until you are finished. 1.1 - How to install ImageFlyer If you have purchased a Sedao hardware product, ImageFlyer will have been pre‐installed and your license key will have been entered for you. If you have purchased an ImageFlyer license or wish to use an ImageFlyer trial, then you must install the software onto your playback and/or design PC(s). If you are upgrading from a prior version of ImageFlyer you may be prompted during the installation to remove the existing ImageFlyer version. To do this please 1. Use Add/Remove programs in Control Panel to locate and remove the existing ImageFlyer version 2. Follow the instructions presented on screen during the removal process 3. Install the new ImageFlyer version once the removal has been completed. During an upgrade, any existing license term that is found, will be applied to the new ImageFlyer version. To Install or Upgrade a full or trial version of ImageFlyer: 1. Locate the ImageFlyer installation file in your download folder or on your product CD. Double click the file to start the installation. V1.0 Page 2 ImageFlyer User Manual 2. On the Welcome page, click ‘Next’. 3. Please read the license agreement carefully. Assuming you are authorized to agree to the terms on behalf of yourself and your employer – click ‘I agree’, then click ‘Next’. 4. Please accept the default installation path and follow the remaining onscreen instructions to complete the installation. When installation is complete, click ‘Close’. 5. If user account control and/or your security applications show additional prompts, you should allow the changes if they relate to the ImageFlyer installation. You may wish to add an ‘ImageFlyer’ shortcut to your startup folder. V1.0 Page 3 ImageFlyer User Manual 1.2 – ImageFlyer Basics 1. Open ImageFlyer by Double‐Clicking the icon on the Desktop 2. Press ‘PAGE‐UP’ to show the ImageFlyer Control Panel 3. Click the ‘ADD’ Menu option 4. Select the type of media element that you want to add 5. Browse to the file and click ‘ADD THIS’ or ‘ADD FOLDER’ 6. Move your media by holding down your ‘LEFT’ mouse button and dragging to the desired location 7. Resize media by holding down the ‘RIGHT’ mouse button and dragging your mouse 8. Repeat steps 4 to 7 until you are happy with your screen layout 9. Click ‘Hide Me’ to remove the control panel from display. Press ‘Page Up’ to show the control panel again. 10. Click on ‘FILE’ and ‘SAVE’ to save your screen layout 11. Click on ‘FILE’ and ‘Exit and Hide Next Time’ to exit ImageFlyer. TOP TIP: Hold CTRL while right‐clicking to maintain the aspect ratio of the media V1.0 Page 4 ImageFlyer User Manual 1.3 - The Control Panel Explained The ‘FILE’ menu gives access to basic administration tools. Remember to use ‘EXIT AND HIDE NEXT TIME’ to prevent the control panel showing when ImageFlyer next starts up. The ‘ADD’ menu is used to add or replace media in a screen layout. NB. Grayed out items may not have been enabled in your license. The ‘CONTROLS’ menu gives access to the advanced administration features of Image Flyer The ‘HIDE ME’ button hides the control panel itself – to un-hide the control panel press ‘PAGE-UP’ The ‘ALIGN’ control allows each element to be aligned both vertically and horizontally in a two stage process: First choose left or right, and then choose top or bottom. Alternatively, select centre or the Fill Width and Fill Height options. The ‘HELP’ menu provides software version information and access to the ImageFlyer manual. The layer controls allow the user to choose which elements sit on top of others. By default, newly added elements are automatically added on top. This also allows the removal and duplication of individual elements The Nickname feature allows you to give media files nicknames. For example: ‘C:\Documents\Event_Picture_Fold er’ could be nicknamed as ‘Event Photos’ for ease of recognition. The ‘SUSPEND’ feature allows the user to temporarily stop all screen activity to enable better assessment of the screen design. V1.0 The ‘CURRENT DATA’ Window lists each element in the screen layout – either as file locations or as nicknames. Top layer elements are at the top of the list. Page 5 ImageFlyer User Manual 1.4 – ImageFlyer startup behavior. If you have started ImageFlyer and nothing seemed to happen – please read this section! When you double click the ImageFlyer icon on your desktop, ImageFlyer looks for a presentation that it can play back: 1. It will look for a presentation in the schedule. If it finds one that should be playing at the current date and time, that presentation layout will be opened and displayed. 2. If there is no presentation in the schedule, but a default has been defined – the default presentation will be opened and displayed. 3. If the schedule file is empty, ImageFlyer will look for the last presentation that it had successfully opened and will display that if it is available. 4. The final attempt will be to load a default.sif file located in the programs executable folder. 5. If all the above fail – ImageFlyer will not be able to play a presentation. In some cases it will show the ImageFlyer Control Panel. If the control panel is not shown, you can display it by clicking the ImageFlyer icon on the taskbar, then pressing <PAGE UP> on your keyboard. If using a laptop please check the status of your <NUM LOCK> key if the <PAGE UP> key is ineffective. 2.0 – Using the file menu. 2.0.1 – Starting a ‘New’ presentation To clear the current layout from screen in order to start a new layout from scratch – simply click the ‘FILE’ menu and select ‘NEW’. You may be prompted to save any presentation currently being displayed. When you start a new presentation, you will be shown the desktop of the PC running ImageFlyer. Start adding elements until the desktop can no longer be seen. Presentations should always fill the entire screen. The two most common ways to start are to add a full screen ‘Colour Background’ or a full screen ‘Still’ to form the background of your design. 2.0.2 – Opening an existing presentation Use ‘OPEN’ on the file menu to open an existing presentation. This may be one that you saved earlier, or one of the many sample files available. When you open a presentation, a progress bar will be displayed while the various elements are opened. The progress bar can be disabled in the preferences if required. If green elements are shown in your presentation, you need to check the location that your media is stored in remains available. V1.0 Page 6 ImageFlyer User Manual 2.0.3 – Saving your presentation When you have created or modified your presentation, please remember to save it. It is important to save regularly as if a change in presentation is triggered – for example, by a scheduled event – then the presentation could change without being saved, without any warning. If you have previously saved your presentation, the save command will not prompt for additional information. If your presentation is new, you will be asked to choose a folder and filename in which to save the file. ImageFlyer saves SIF files. These files describe the presentation content as well as where the media files being used can be loaded from. As a SIF file does not contain any media, the file is quite small. This means that you must ensure the content that you add remains available during playback. 2.0.4 – Saving a copy of a presentation If you wish to save a new copy of a presentation, perhaps to generate a new presentation using a similar layout – use the ‘SAVE AS’ option on the file menu. You will be prompted to choose a new filename for your presentation and you can also choose a new folder if required. 2.0.5 – Exit ImageFlyer ImageFlyer is both your design and playback tool. However, it is sometimes necessary to close ImageFlyer to perform advanced design and maintenance tasks. Simply choose ‘EXIT’ from the file menu. ImageFlyer will take a few moments to close the elements being played. When ImageFlyer is next started, the ImageFlyer control panel will be shown. If there is no keyboard or mouse input, the control panel will be hidden after 5 mins. This Auto Hide option can be disabled in the Preferences if required. 2.0.6 – Exit and Hide next time In most cases, ImageFlyer is set to start automatically when the PC is started up. To prevent the ImageFlyer Control Panel being shown for the first 5 minutes, please use ‘Exit and Hide next time’. This will ensure that the next time ImageFlyer starts, the control panel will not be shown 3.0 - Adding Media to your presentation layout. You add media such as stills, movies, RSS Feeds and Live Video to your presentation layout using the options on the ‘Add’ menu. When you add media, you will be prompted to provide details on how to locate the item. Simply browse to the appropriate media you wish to use. You can then customise the media playback using the configuration settings in the centre of the control panel. When adding media, you must ensure you have all the relevant legal permissions to display the media you are using. V1.0 Page 7 ImageFlyer User Manual 3.1 - Adding Audio You can playback any audio file that can be played by Windows Media Player. The most common audio file types are MP3 and WMA. If you are using DRM protected media, please note that licenses will need to be downloaded on the player. Dependant on your media player settings DRM licenses may automatically be downloaded or may require intervention the first time they are used. Sedao suggests the avoidance of DRM protected files wherever possible. 1. From the ‘ADD’ menu select ‘AUDIO’ 2. Click ‘Browse’ and navigate to the location of your desired Audio file. Double click the file. 3. Click ‘ADD THIS’ or ‘ADD FOLDER’. Add Folder will cause the audio files to play back sequentially in alphabetical order. To add a folder, first select any file within the required folder. 4. Once you have added your Audio you can customise a number of options that define how the audio is used. 4.1. ‘WAIT’ This is the length of time after opening your presentation, before your audio file or files start playing. 4.2. ‘ON FOR’ This is how long each file will play for. If this time is longer than the file you are playing then the file will play again from the beginning until the defined time has been used. If the time is shorter than the file being played, only the first part of the file will be heard. 4.3. ‘TOTAL TIME’ This is the total time to play the audio before moving to the next file, or restarting a single file. For example, to play the first 5 seconds of each file three times – set the ‘On for’ to 5 seconds and the ‘Total Time’ to 15 seconds. If the settings are all zero, the files will each play for their correct duration as soon as ImageFlyer is started. 3.2 - Adding a Colour Background Colour backgrounds are useful in several ways. In their simplest form, they can be used to cover vast screen areas in a single colour or in a gradient, such that media elements can easily be added over the top. They can also be used to form borders for media elements and dividing lines between media elements. V1.0 1. From the ‘ADD’ menu select ‘COLOUR BACKGROUND’ 2. Click ‘ADD THIS’. Move and size the background as required. 3. From the ‘STYLE’ Drop Down select if you would like your colour background to be solid or to have a gradient. The gradient direction can be set to ‘Horizontal’, ‘Vertical’, ‘top left’ or ‘top right’. 4. Select ‘COLOUR 1’ and ‘COLOUR 2’ by using either of the following two methods: If you are not using a gradient, then only colour 1 is effective Page 8 ImageFlyer User Manual 4.1 ‘SET…’ a colour Select your colour from the basic colour palette OR define custom colours using RGB values. When defining custom colours, click the required colour in the spectrum, then adjust the intensity slider. Click ‘Add to custom colours’ to be able to select the colour for use. 4.2 ‘GRAB!’ Click and hold your left mouse button on the ‘Grab’ button. With the left button held, point the mouse at a colour on screen you would like to grab. Release the button when the colour is located. TOP TIP: It’s easy to reverse the direction of your gradient – just click the ‘Swap Colours’ button. 3.3 - Adding a HTML Browser HTML browsers are used to add cropped areas of websites to your presentation. The website may be based on the internet – might be from your own intranet – or may simply be an HTML file on your disk. HTML Browser is also the method by which ‘RollerWriter’ files are added to the presentation. For further information on RollerWriter please refer to the RollerWriter Users Guide, or ask your Sedao representative. 1. From the ‘ADD’ menu select ‘HTML BROWSER’ 2. Type or paste in the full address of the page you wish to use eg. www.sedao.co.uk or click ‘BROWSE’ to use a file stored on your hard disk. 3. Click ‘ADD THIS’. Position the web clip at the top left of your screen and expand the clipped area downwards until you can see the entire area you wish to crop. 4. Click the ‘Move and Size content’ checkbox. Using the left mouse button, move the web page within the frame until the top left of the area you require is positioned at the top left of the frame. 5. Using the right mouse button, move the bottom right of the frame up to the top left to remove excess information that you do not need to be shown. You will be left with a grey area at the bottom right. 6. Uncheck the ‘Move and Size content’ checkbox. Now hold the right mouse button to eliminate the grey area that remains at the bottom right of the frame. 7. Once you have added your web page you can customise options that Control how the web page is used. TOP TIP: Select the ‘REFRESH’ button to instantly update the web content. Select the ‘Reset Offset’ button to move the web page clip to the top left of the page. V1.0 Page 9 ImageFlyer User Manual HTML Browser Controls 1. ‘ALLOW USER CONTROL’ tick box Allows touch‐screen users to navigate through the web on the Digital Signage screen. This option enables the ability to click links on the web page either with a mouse or a touch screen. 2. ‘REPLACE URL ON CLICK’ tick box If ‘Allow User Control’ is enabled, this option causes ImageFlyer to always display the most recent page visited by the end‐user. If the presentation is saved, the page will be displayed the next time the presentation is opened. 3. ‘ALLOW RIGHT CLICK MENU’ tick Box If ‘Allow User Control’ is enabled, this option allows the user to make use of right mouse button features in the browser ‐ such as for saving pictures or adding links to your favourites. 4. ‘REFRESH’ time This option causes the web content to be automatically refreshed / reloaded after a specified number of minutes. The optimum value will depend on the rate of change of data on the website as well as the amount of web traffic you are happy to generate. Set the number of minutes and check the ‘enable’ tick box. 5. ‘RESTORE’ function If you have allowed users to change the web page being displayed (Allow User Control), this function can be used to return the web page view to the initial starting page after a preset period of time. Set the number of minutes and check the ‘enable’ tick box. 6. ‘BACKGROUND ‘ colour Defines the colour of the webpage window when the page is cropped and the ImageFlyer crop zone is larger than the remaining viewable area. Where possible, it makes sense to GRAB the colour of the webpage background. 6.1 ‘SET…’ a colour Select your colour from the basic colour palette OR define custom colours using RGB values. When defining custom colours, click the required colour in the spectrum, then adjust the intensity slider. Click ‘Add to custom colours’ to be able to select the colour for use. 6.2 ‘GRAB!’ Click and hold your left mouse button on the ‘Grab’ button. With the left button held, point the mouse at a colour on screen you would like to grab. Release the button when the colour is located. TOP TIP: Remember to make the place holder size suitable for several web pages when using the ‘Allow User Control’ feature. V1.0 Page 10 ImageFlyer User Manual 3.4 - Adding an Image Flyer Control File / Using Hot Spots Image Flyer Control Files are essentially hyperlinks or ‘Hot Spots’ used to jump between different Screen Layouts. These can be activated using a touch screen or mouse pointer. Hot Spots can also activate automatically after a preset time period. Hot Spots can be used in two ways. Either when building an interactive showcase for a touch screen application – or ‐ to run a chain of screen layouts as a simple alternative to using the built in ImageFlyer scheduler. Hot spots appear as grey rectangles while the ImageFlyer control panel is shown. They are not visible once the control panel is hidden. If you are building an interactive presentation, you should cover the hot spots using your own button images so that they become visible when the control panel is hidden. Adding an Image Flyer Control file or ‘Hot Spot’ 1. From the ‘ADD’ menu select ‘IMAGEFLYER CONTROL FILE’ 2. Navigate to the location of you desired ‘.sif’ screen layout. This is the layout that will be loaded when the hot spot is activated. 3. Click ‘ADD THIS’ 4. Left‐Click and hold the mouse button to move the grey rectangle to an appropriate location. If required you can also resize the rectangle by holding the right mouse button. TOP TIP: Remember to create an image to represent a suitable button to encourage your audience to use the hot spot. The image should be added as a still and moved below the hot spot. Auto-Press Feature The auto‐press feature simulates a user pressing or clicking on the Hot Spot. To use this feature, tick the checkbox and select the required number of minutes. TOP TIP: If creating a chain of screen layouts using Hot Spots, ensure that the last screen layout is linked to the first screen layout. This is the simplest way to create a presentation loop. When adding a new presentation into the chain, ensure you update the hot spot on the preceding screen layout to point at the newly inserted screen layout. Presentation 1 Presentation 2 Presentation 3 Arrows Represent Hot Spots Each could have its own delay time V1.0 Page 11 ImageFlyer User Manual 3.5 - Live Video ImageFlyer can play a live video source as part of your layout. This might be the output from a freeview or satellite tuner, or perhaps a DVD or video camera. You will need to install an approved video capture card that has composite and/or S‐Video input. Only cards with WDM compliant drivers are supported. Adding a Live Video Input 1. Click the ‘ADD’ Menu option and select ‘LIVE VIDEO’ 2. Click ‘ADD THIS’ TOP TIP: If you only see the ‘General’ tab – then you may not have a video capture card, or WDM compliant drivers installed. Please check with Sedao Technical Support for further details. Live Video Input Controls 1. ‘GENERAL’ Tab ‘TREAT AS WIDESCREEN DISPLAY’ ‐Creates a wider placeholder for your live video – use this when the live video has a native widescreen format 2. ‘SOURCE’ Tab Your video capture card may have multiple inputs. The ‘SOURCE’ menu can be used to select the required input. Video Composite usually shows the yellow composite video connector, whereas S‐Video would usually show the 4‐pin S‐ Video connection. Video Tuner is not supported. Depending on your hardware, the labels may be different or may not correspond as expected so please try each in turn before assuming there is an issue. TOP TIP: To switch between different video inputs, create several similar screen layouts where the key difference is that Live Video is set to show a different video source 3. V1.0 ‘Tuning’ Tab To adjust the video properties to suit your display, use the ‘BRIGHTNESS’, ‘CONTRAST’, ‘HUE’, and ‘SATURATION’ controls. Use the intended display screen to configure these settings correctly. If the video becomes unusable, click the ‘Default’ button to set the sliders back to zero. This tab may have no function on some video capture hardware. Page 12 ImageFlyer User Manual 3.6 - Adding a Movie ImageFlyer can play back any movie file that can be played in Windows Media Player. In addition, it can also play back any file for which you can obtain a Windows Media Player compatible codec. Sedao Hardware products are pre‐loaded with many common codecs. Adding a Movie 1. Click the ‘ADD’ menu option and select ‘MOVIE’ 2. Navigate to the location of your desired Movie and select it 3. Click ‘ADD THIS’ or ‘ADD FOLDER’. To add a folder, first select any file within the required folder. ImageFlyer will playback movies in alphabetical order. 4. Left‐Click and hold your left mouse button to position the movie window at the top left of your required location. 5. Right‐Click and hold your right mouse button to adjust the movie size. TOP TIP: Hold CTRL while right‐clicking to maintain the aspect ratio of the movie Troubleshooting Movie Playback 1. On the playback PC – does the movie play in Windows Media Player? If not, please obtain the correct codec for installation on the play‐out device. 2. If the movie shows a green screen, please check the path to the movie file is accessible from the player. Wherever possible, movie files should be stored on the players own hard disk to ensure they are readily available and not affected by network bandwidth. 3. If the movie plays in Media Player, but does not play in ImageFlyer – please try adding a separate web browser to the screen at a layer underneath the movie file – then restart ImageFlyer. Movie Playback Options 1. The ‘WAIT’ time is the delay after first loading a presentation, before the first movie file will start to play. 2. ‘ON FOR’ time is the number of seconds that the movie should play for. If the number of seconds is less than the movies duration, the movie will be cut short. If the seconds are longer than the movie duration, the movie will repeat until the seconds have been used up. 3. ‘TOTAL TIME’ should be set to the total amount of time before the playback sequence repeats. For example – If the ‘On for’ time is 30 seconds and the ‘Total time’ is 70 seconds, the first 30 seconds of the movie will play, followed by a break of 40 seconds before the next movie is started. Movie files always start playing from the beginning. If the total time is longer than the ‘on for’ time, the movie zone will be made invisible for the excess time. Please ensure something suitable is displayed underneath the movie zone if you intend to use this configuration. V1.0 Page 13 ImageFlyer User Manual 3.7 - Adding a PowerPoint Slideshow ImageFlyer can play back PowerPoint Slideshows as part of your presentation. In order to do so, the PowerPoint viewer 97 or a full version of PowerPoint must be installed on the player. It is important to note that PowerPoint viewers other than the 97 version will not be able to play the slideshow. 1. From the ‘ADD’ menu select ‘POWERPOINT’. Read the disclaimer text and click ‘OK’ 2. In the ‘Enter Microsoft Office Source’ field, navigate to the location of your PowerPoint file. 3. Click ‘ADD THIS’ 4. Move the PowerPoint Slideshow by holding down your ‘LEFT’ mouse button and dragging the zone to the top left of your desired location. 5. Resize your PowerPoint Slideshow by holding down your ‘RIGHT’ mouse button and dragging your mouse. The slideshow will resize when the next slide is shown. PowerPoint Slideshows will not resize in real time. Guidelines for adding PowerPoint files: 1. Please ensure the PowerPoint slideshow is set to automatically advance to the next slide after a pre‐ defined time period 2. Please also ensure the slideshow is set to automatically repeat (return to Slide 1) after the end of the slideshow has been reached. 3. Depending on your player configuration, some advanced transitions may not be displayed as expected. To display transitions introduced in newer PowerPoint versions requires a full PowerPoint license to be dedicated to your player As an alternative to using a native PowerPoint SlideShow – why not consider exporting your PowerPoint file as a series of JPG files. This is a simple process and allows you to display the PowerPoint SlideShow using the ‘Stills’ feature of ImageFlyer. Only one PowerPoint file may be used in each presentation. 3.8 – Adding an RSS News Feed RSS news feeds are an industry standard way of displaying news items that change on a regular basis. RSS feeds can be located on the internet, or may be stored as files on your local PC. Sedao provide a free tool that can create and save RSS feed files. For further information on RSS Writer, please see the RSS Writer users guide, or ask your Sedao representative. V1.0 Page 14 ImageFlyer User Manual Adding a local RSS feed – such as a feed created in RollerWriter. 1. Click the ‘ADD’ Menu option and select ‘RSS NEWS FEED’ 2. Navigate to the location of your desired RSS feed. The RSS feed will have been saved as an XML file. 3. Click ‘ADD THIS’ 4. See ‘RSS Feed Controls’ below for instructions on how to change the layout and colour of your RSS feed. TOP TIP: RSS Writer is a free download on the Sedao Website. All you need to do is register for a free account and the program is yours to keep with no time limits. RSS Writer is pre‐loaded onto Sedao hardware players for your convenience. 3.8.1 - Retrieving a Live RSS feed from a website 1. Open your Internet Browser and navigate to the website from which you wish to extract an RSS feed. BBC News RSS in Microsoft IE 7 – Other browsers may look different In internet Explorer 6 you need to navigate to a page that ends .XML or .RSS. In later Internet Explorer versions you should navigate to a page that has an RSS variant and click the ‘RSS’ icon in the web browser toolbar. 2. Copy the entire URL by selecting it ‐ right‐clicking and selecting ‘COPY’. Adding a Live RSS feed from a website 1. Click the ‘ADD’ Menu and select ‘RSS NEWS FEED’ 2. ‘PASTE’ the copied URL into the ‘Enter RSS Source’ field. 3. Click ‘ADD THIS’ 4. See ‘RSS Feed Controls’ below for instructions on how to change the layout and colour of your RSS feed. You should pay particular attention to the ‘Server Settings’ section for advice on how to handle loss of internet connection. Picking the Correct Live RSS Feed • Select an RSS feed that is informative and/or entertaining for your target audience • Ensure that the RSS source is reliable and that the players internet connection is always available • Ensure the RSS feed is censored and suitable for viewing by the target audience • Ensure that you are legally able to publically display the RSS feed and observe any conditions of public or commercial display • Ensure any local RSS feed file that you create, cannot be interfered with by persons who should not be able to make changes to it. As RSS files are essentially text, it is easy for anyone to make changes over a network share without needing special tools. V1.0 Page 15 ImageFlyer User Manual 3.9 – Adding Shockwave Shockwave is a file format that is used by Adobe Flash Player. Flash format files are usually animations which may be as complex as a short movie file or as simple as an animated clock. Flash files are usually created by Adobe Flash. Sedao provide a selection of animated clocks that are pre‐installed on Sedao Hardware players. You may also obtain additional animated clocks from www.adamdorman.com 1. From the ‘ADD’ menu select ‘SHOCKWAVE’ 2. Navigate to the location of your desired file. You can select both SWF and FLV files. 3. Click ‘ADD THIS’ or ‘ADD FOLDER’. To add a folder, first select any file within the required folder. 4. Once added you’ll be able to move the Shockwave element by holding your left mouse button and resize the Shockwave element using your right mouse button. 5. The flash file you select will be scaled to fit the dimensions you define. If the original item is not square, the remaining space will be filled with a default colour. You can customize this colour using the options below a. ‘CHANGE’ Select your colour from the basic colour palette OR define custom colours using RGB values. When defining custom colours, click the required colour in the spectrum, then adjust the intensity slider. Click ‘Add to custom colours’ to be able to select the colour for use. b. ‘GRAB!’ Click and hold your left mouse button on the ‘Grab’ button. With the left button held, point the mouse at a colour on screen you would like to grab. Release the button when the colour is located. 6. If you have added a folder of shockwave items you can define the number of seconds before the next item in a folder will be played. For indefinite animations such as clocks, the change will occur after the number of seconds chosen has passed. For linear animations, the time chosen will define how many seconds the animation will play from the start. If the number of seconds is more than the length of the animation, the animation will play again from the start until the number of seconds has been used. V1.0 Page 16 ImageFlyer User Manual 3.10 - Adding a Still Stills are static images such as those taken by a digital stills camera. ImageFlyer can display many different image formats such as JPG, BMP and PNG files. You may add a single still such that it remains a permanent element on the screen, or you can add a folder of stills so that the pictures will automatically cycle through in alphabetical order. 1. From the ‘ADD’ menu select ‘STILLS’ 2. Navigate to the location of your desired Image files. 3. Click ‘ADD THIS’ or ‘ADD FOLDER’. To add a folder, first select any file within the required folder. 4. Move your Image by holding down your ‘LEFT’ mouse button and dragging to the top left of the required location 5. Resize your Image by holding down your ‘RIGHT’ mouse button and dragging your mouse. Motion animating an Image folder 1. Left‐Click on the image folder in your design. 2. Select an ‘APPEAR BY’ method. ‘Just Appearing’ can be selected if no animation effect is required. 3. Select a ‘SPEED’ with the slider. 4. Choose an appropriate ‘On For’ time to define the number of seconds between animations. 5. Select a ‘HIDE BY’ method. ‘Just Disappearing’ can be selected if no animation effect is required. Using transitions instead of animation (Ticker mode) 1. Left click on the image folder in your design. 2. Click the ‘Ticker’ checkbox. 3. Select a ‘SPEED’ with the slider. Slower speeds are required when using transitions. 4. Choose an appropriate ‘On For’ time to define the number of seconds between transitions. 5. Select the transition from the ‘Appear by’ drop down list. In ticker mode, this list displays additional transition effects such as wipes, dissolves and circles. V1.0 Page 17 ImageFlyer User Manual Additional Image Options. • ‘WAIT’ This is the time between the presentation being loaded and the first still being displayed. • ‘TOTAL TIME’ The total time taken for a still display cycle can exceed the ‘on time’ in the event you wish to introduce breaks into the display. For example – if your ‘ON FOR’ time is 5 seconds and your ‘TOTAL TIME’ is 15 seconds, the stills will appear on screen for 5 seconds, then be hidden for 10 seconds before the next still is shown. TOP TIP: In ticker mode, the animation period is considered to be part of the ‘ON FOR’ time, thus a slow transition and short ‘ON FOR’ time will result in a stills transition that is constantly moving. 3.11 - Volume Controls Volume controls provide a convenient way to adjust the sound levels while remaining within ImageFlyer. The volume controls panel does not appear in the presentation – it is only made visible as part of the ImageFlyer control panel. Adding a Volume Level Control 1. Click the ‘ADD’ Menu option and select ‘VOLUME CONTROLS’ 2. Click ‘ADD THIS’ Using the Volume Control 1. The volume control allows you to adjust the volume output levels of different sources. The sources and additional options available will differ depending on the audio hardware installed in your player. 2. Each layout you create can have separate volume controls. If no volume options have been set, they will remain the same as the most recent presentation opened that did have audio settings – or the most recent set in the Windows volume control. Mute All Controls on Exit You may automatically silence all audio sources when ImageFlyer exits. To do so, ensure the ‘Mute All on Control Exit’ checkbox is ticked. This option is useful if you are using sources such as Live Video input, where the audio would continue regardless of whether ImageFlyer is running. V1.0 Page 18 ImageFlyer User Manual 3.12 - WAV Audio ImageFlyer can play one WAV audio file in order to add a sound effect to a presentation. This can be useful to add a startup or a regular sound effect to your presentation. Adding a WAV Audio File 1. Click the ‘ADD’ Menu option and select ‘WAV AUDIO’ 2. Navigate to the location of your desired Audio file. Click ‘ADD THIS’ or ‘ADD FOLDER’. To add a folder, first select any file within the required folder. WAV Audio Controls 1. If you would like your audio file or folder of audio files to play repeatedly, check the ‘REPEAT’ box. 2. Choose a number of seconds in the ‘Every’ field. This defines how long a gap there will be between the WAV files being played. 3.13 - Adding a www.SedaoLive.com Feed SedaoLive.com provides a convenient method of creating your own RSS feeds that are accessible from any PC with an internet connection. Pro’s: Easily accessible and updatable from any PC with a web browser. Unlimited user accounts with individual passwords Multiple feeds can be created in each user account Items within feeds can be preset with validity and expiry dates and times. Images can be shown in synchronisation with your RSS text. Con’s: Relies on a stable internet connection for accurate display If your password is disclosed, your feed could potentially be edited by someone without permission As the feeds are stored on the internet, they will be accessible to the public in the event they guess your unique URL. To use this feature you will need to setup a SedaoLive account and at least one RSS feed. Please visit www.sedaolive.com for more information about this service. V1.0 Page 19 ImageFlyer User Manual 1. From the ‘ADD’ menu select ‘WWW.SEDAOLIVE.COM FEED’ 2. Insert your ‘USER NAME’ eg. ImageFlyer‐Lite 3. Insert your ‘FEED NAME’ eg. Sedaoproducts 4. See ‘RSS Feed Controls’ below for instructions on how to change the layout and colour of your RSS feed. You should pay particular attention to the ‘Server Settings’ section for advice on how to handle loss of internet connection. 3.14 - Adding a www.SedaoLive.com Image Feed In addition to text, a SedaoLive.com RSS feed can also display images. Please see 3.13 above for information on adding your SedaoLive RSS feed. To use this feature you will need to add pictures to an existing RSS feed in your SedaoLive account Please visit www.sedaolive.com for more information about this service. 1. From the ‘ADD’ menu select ‘WWW.SEDAOLIVE.COM IMAGE FEED’ 2. Insert your ‘USER NAME’ eg. ImageFlyer‐Lite 3. Insert your ‘FEED NAME’ eg. Sedaoproducts 4. The images can be configured using the same controls as you would use for ‘STILLS’ in section 3.10 above. 3.15 – Common controls used with RSS feeds. RSS feeds can be added to ImageFlyer in a number of ways. They may be from a local file on your hard disk created by an application such as RSS Writer. They may be from a commercial internet website – or they may be hosted by the SedaoLive website. In all these cases, there are a number of controls that can be customized to configure the appearance and fallback options for RSS feeds. The ‘COLOUR’ tab - Changing Colours and Fonts 1. Left‐Click on the RSS feed. 2. The colours for ‘TITLE’, ‘ITEM’ & ‘BACKGROUND’ can be changed using the following options. i. ‘SET…’ a colour Select your colour from the basic colour palette OR define custom colours using RGB values. When defining custom colours, click the required colour in the spectrum, then adjust the intensity slider. Click ‘Add to custom colours’ to be able to select the colour for use. V1.0 Page 20 ImageFlyer User Manual ii. ‘GRAB!’ Click and hold your left mouse button on the ‘Grab’ button. With the left button held, point the mouse at a colour on screen you would like to grab. Release the button when the colour is located. 3. The font style for the ‘Title’ and ‘item’ text can also be changed. To change the font, left‐click on the ‘FONT…’ button. You can change the font, font‐style (such as Bold, Italic) and Effects. The ‘Size’ selection has no effect. TOP TIP: Choose high contrast colours and clear fonts to ensure the text can be easily read ImageFlyer calculates the font size to use automatically. To do so, the longest combined ‘Title’ and ‘Item’ is sized to fit the space available for the RSS feed. All stories are then set to use this font size. This means that if the RSS feed has 9 short and concise stories AND one long story, all the stories will be sized to reflect the size required to fit the long story. The ‘CONTROL’ tab – Choosing RSS display behavior. 1. If you prefer to have the RSS text scroll from right to left as a single line of text, check the ‘Display as Ticker’ option. When this option is checked, you can use the ‘Speed’ slider to control the scrolling speed – and the separator dropdown to choose a symbol to display between the ‘Title’ and ‘Item’. 2. When the ‘Ticker’ option is not selected, the below controls are available. DURATION: The number of seconds that each RSS feed entry remains on screen. FIT: The method by which each RSS feed entry will be displayed You can choose from the following ‘FIT’ options BOTH: The feed is displayed at the size that ensures it will properly fit the zone. Text is typed out in ‘left to right, top to bottom’ format. HEIGHT: Each message is sized to fit the horizontal space occupied by the longest RSS entry. This typically means a small font size and guarantees the text fits on two lines. WIDTH: Each message is sized to fit half the vertical height. The message scrolls horizontally with the ‘Title’ and ‘Item’ moving simultaneously JUSTIFY: When the FIT is BOTH, you can choose to have text ‘LEFT’, ‘CENTRE’, ‘RIGHT’, ‘BLOCK’ or ‘HANGING BLOCK’ justified. Block is the equivalent of Justified. Hanging Block justifies all text except the last line. JUST APPEAR: To stop the RSS from being animated, you may select the ‘JUST APPEAR’ option TOP TIP: Ensure the text is large enough to read in the display’s intended environment V1.0 Page 21 ImageFlyer User Manual The ‘Advanced’ tab – Advanced RSS Features • ‘AS TEXT NOT XML’ If you do not wish to use RSS Writer or the XML file format for RSS feeds – you may instead choose to use plain text files. Plain text files are simply lines of text separated by carriage returns – with title and story being on subsequent lines. ‘EACH LINE IS SINGLE’ When using a text file, this option treats each line in the text file as a new story. • ‘REMOVE HTML’ Allows you to add RSS feeds that have been embedded within HTML pages. In some cases, your feed may show HTML code if this option is not selected. • ‘BUTT TITLE’ Makes the title and item into a continuous line of text • ‘BORDER’ Allows you to move the RSS text away from the edge of the RSS box. Useful if you do not wish the next to be displayed up to the boundary of the zone. • ‘TIME’ dropdown Adds the time and date as the final story in your RSS feed. You can choose between ‘None’, ‘Short’ and ‘Long’. The short and long formats are defined by your players regional settings. The ‘Server’ tab – choosing your fallback solution. ImageFlyer allows an alternative RSS source to be used automatically in the event of a loss of internet connection when displaying an online RSS feed. There are three fallback options: 1. V1.0 ‘DISPLAY THE OLD DATA’ The system will automatically store the most recent feed data and continue to display the data without alerting to the fact that the data may be out of date. The feed will be updated when the internet connection has been restored. If ImageFlyer playback is interrupted (such as if the application exits, or a different presentation is loaded) while the internet connection is unavailable ‐ the RSS feed will display the internet URL address of the feed it is trying to display. Page 22 ImageFlyer User Manual 2. ‘DISPLAY THIS TEXT’ This option allows a specific message to be displayed in the event of an internet connection failure. This message should be chosen carefully so as not to broadcast the fact that there is an issue, whilst making is evident to the technical staff that there is a connectivity issue to be resolved. 3. ‘USE THIS FILE’ This option allows a pre‐created RSS file, stored locally, to be displayed in place of the Live RSS feed in the event of an internet connection issue. The file should contain generic messages that subtly inform the technical staff that a connection issue exists. Use the browse button to locate the file you require. Click the ‘Update’ button when you have chosen the fallback option that best meets your requirements. 3.16 - Common Controls on the ImageFlyer Control panel. Regardless of the media type you are trying to add – there are a number of buttons on the control panel that retain the same function. These all appear on the main ImageFlyer control panel Add This – is used to add a specific element that you have browsed to. The elements are always added at a preset size and will appear in the mid‐left of the primary screen. The default appearance size and position cannot be changed. Replace – When you have added an element and positioned and sized it to meet your requirements, it is sometimes necessary to change the source. Instead of removing the incorrect item, then adding, positioning and resizing a new item you can use the ‘Replace’ button. The replace button can also help you to avoid the need to re‐create customization options such as those found on RSS feeds. Replace Fldr – Similar to the replace item above. As an example, this button is useful if you have added a single item such as a still ‐ and wish to display the folder of stills instead. Simply click the still in the list and then click ‘Replace Fldr’ Add Folder – When adding certain media elements, it is preferable to add them as a folder, such that a series of files can be displayed in an alphabetical sequence. For example, you could add a single movie – but it is more dynamic to add a movie folder. If additional movies are added to the folder, they will then be played automatically. Raise – Use this button to raise a media element up the ‘Current Data’ list. This causes that element to be displayed in front of other elements. For example, to add a border, create a colour background, and then position it over the element that is being bordered. Then click the original element in the ‘current data’ list and click ‘raise’ until it appears in front of the colour block. Lower – Has the opposite effect of the ‘Raise’ button. This causes the selected element to be moved behind other elements. For example, another method to create a border is to add the colour block over the top of the element being bordered, and then click the ‘Lower’ button until the border appears behind the target element. V1.0 Page 23 ImageFlyer User Manual Copy – This button creates a copy of the element that is currently selected. The copy will be the same size and position as the original and will have all the same customisations. Simply click ‘Copy’ then move the item that has been placed over the top of the original. Remove – Click remove to erase an element from your presentation. Removals cannot be undone. This will not delete any file. You can add the element back using the ‘Add’ menu. Nickname – If filenames don’t make too much sense to you, you can assign each element in the ‘current data’ list a nickname. Click the item in the ‘Current Data’ list then click ‘Nickname’. Type your description in the edit field, then click OK. Use Nicknames – This checkbox toggles the display of nicknames –to‐ ‘file paths’. If you have entered nicknames, it is nonetheless often useful to see the original path name to the file being displayed. Align – You can align an item easily using this drop down list. Choose from ‘Left’, ‘Right’, ‘Top’, ‘Bottom’ and ‘Centre’. There are also the options to ‘Fill Width’ and ‘Fill Height’ which may be useful if you wish to have an element fill the screen. Select the two options in succession if you would like an element to appear full screen. Suspend – Sometimes it is easier to adjust the design of a presentation by stopping the animation and sounds. This will often be less distracting. The suspend checkbox will stop activities when it is checked. To resume, clear the checkbox. When suspend is released, the presentation is treated as though it has just loaded. All element timers are reset. When trying to synchronise pictures with your RSS feed you can switch the suspend option on and then off in order to start each feed from the beginning. The ‘Current Data’ list. The ‘Current Data’ list shows the list of elements that have been added to your presentation. If you click anywhere in your presentation with the control panel showing, the highlight bar will move to that item in the ‘Current Data’ list. V1.0 Page 24 ImageFlyer User Manual 4.0– Controlling ImageFlyer playback ImageFlyer playback can be customized using a variety of tools and methods. You can set playback schedules. You may also set presentation hot keys. There are also a number of additional settings that can be customized to meet your individual preferences. 4.1 - Hot Keys Hot Keys offer an easy method of changing presentations using a keyboard attached directly to the player. This method of control is best for those who wish to change presentations on an ad‐hoc basis. Hot Key functions are supported via VNC and may be supported by other remote control applications. A scheduled event occurring after the hot key has been pressed, will result in the presentation being changed as scheduled. Opening the Hot Keys 1. Click the ‘CONTROLS’ Menu option and select ‘HOT KEYS’. The Hot Keys file in use will be shown in the title of the dialog box. The ‘File’ menu has the following options: New – Clear the hotkey list and start a new hotkeys file. Open – Open an existing hotkeys file, such as one copied from another player Save – Saves a hotkey file that you have opened and modified Save As – Save a new hotkey file that you have created Set As Default Keyset – Please see information below for further details Assigning a Screen Layout to a Hot Key 1. Left‐Click the ‘BROWSE’ button 2. Navigate to where your chosen screen layout ‘.sif’ file is stored and double click it. In the ‘KEY’ field, type the desired key to be used to open the screen layout. This can be any letter or number available on the keyboard 3. Select whether the Hot Key will require the ‘CTRL’ or ‘ALT’ buttons to be pressed simultaneously to open the screen layout. If they will not be required, leave the selection as ‘Normal’ TOP TIP: Using the +CTRL and +ALT functions can offer three times the number of available hotkeys and can also make it more difficult to accidentally change the screen layout 4. Left‐Click the ‘ADD’ button. The presentation will be added to the ‘Existing’ list. The ‘Existing’ list can be used to check the names of presentations and their currently assigned Hot Keys. V1.0 Page 25 ImageFlyer User Manual 5. Presentations can be removed from the ‘Existing’ list by selecting the entry and clicking the ‘Remove’ button. 6. Once the desired Hot Keys have been configured, click ‘FILE’ and select ‘SAVE’. You may also wish to set the current hotkey file as the ‘default’. Please see further information below. TOP TIP: Hotkeys are only active when the control panel is hidden and they can be disabled in the PREFERENCES menu Setting a default Hot Key file You can use ImageFlyer to edit multiple hot keys files. However, only one can be set as the default. The default hot keys file is the file that will be loaded for use in ImageFlyer automatically. To set the default file – first open the file in the Hot Keys screen. Then click ‘FILE’ > ‘SET AS DEFAULT KEYSET’. 4.2- Using the Schedule ImageFlyer features a flexible scheduling system that allows you to define different layouts to be played at different times of day as well as different days of the week. Viewing the Schedule Click the ‘CONTROLS’ Menu and select ‘TIME SETTING’ then ‘CONFIGURE’. The presentation list will be displayed. Any presentations that have already been scheduled will be shown on this page. They will be displayed with the ‘From’ and ‘To’ times as well as the date and file path. NOTE: To schedule a presentation to pass through midnight requires two entries – one for the part before midnight and a second for the part after midnight. Adding a Screen Layout to the Schedule 1. Left‐Click the ‘BROWSE’ button 2. Navigate to where your chosen screen layout ‘.sif’ file is stored and double click it 3. Select the ‘From’ time and ‘To’ times using the From and To fields. 4. Choose how you would like to schedule the screen layout from the options below: • ‘ONLY ON THIS DATE’ This is used to play a presentation on a specific future date. This might be useful for example, in a school for use on ‘Parents Evening’ The presentation can be scheduled at any point in the future by using the drop‐down calendar V1.0 Page 26 ImageFlyer User Manual • ‘OR EVERY’ This allows a presentation to be displayed on a recurring basis, either daily or weekly. For daily select every ‘Day’. For Weekly select the specific day of the week, such as ‘Wednesday’. By also making a selection in the ‘Except’ field, you can schedule a presentation for 6 out of 7 days. As an example, this may be useful if you wish to display a different presentation every Friday. ‘IF IDLE FOR’ This is used in interactive display applications to allow the display to return automatically to a ‘general’ screen once the user has stopped interacting. For example, you may develop a set of layouts that are a map of a building layout. If a user has used the map to locate their destination, then walked away, this setting would be used to re‐load the welcome screen after 30 seconds. • ‘IS THE DEFAULT’ This item is used to allow a general screen layout to be played when no other screen layout has been scheduled. • ‘IS THE INTERNET FALLBACK’ This item is used to select the presentation that will be displayed in the event of the Internet connection becoming unavailable. For additional information please also see ‘Internet Fallback Checker’ later in this section. TOP TIP: The Default scheduled presentation can only be over‐ridden by other presentations that have also been added to the schedule. For example, double clicking any ImageFlyer SIF file in Windows Explorer will cause the ‘Default’ presentation to be loaded and NOT the SIF file you have double clicked on. 5. Having selected one of the options above, click ‘ADD’ 6. Schedule entries can be removed by clicking the ‘REMOVE’ button 7. You can easily replace an existing schedule entry by browsing to an alternate SIF file, then clicking ‘REPLACE’. 8. Once all desired changes have been made to the schedule, click ‘FILE’ and select ‘SAVE’ 9. If the schedule you are editing is the ‘Default’ schedule, when you save the changes, the Schedule becomes effective immediately which may result in an immediate change in presentation. Please see the following pages for examples of how the schedule will react in different situations. V1.0 Page 27 ImageFlyer User Manual From Time To Time Current time Is there a default Result presentation? 09:00 10:00 09:15 Yes Scheduled presentation 09:00 10:00 10:15 Yes Default presentation 09:00 10:00 10:15 No Previously scheduled presentation The above table demonstrates the behaviour at different times of day From Date/Time To Date/Time Current date/time Is there a default Result presentation? Every day 09:00 Every day 17:00 09:15 Yes Daily presentation 21/05 09:00 21/05 10:00 21/05 09:15 Yes Special presentation Every day 09:00 Every day 17:00 17:30 Yes Default presentation Every day 09:00 Every day 17:00 17:30 No Daily presentation The above table demonstrates how to use specific dates in your schedule. Every day except 17:00 Monday 09:30 Yes Daily presentation Saturday 09:00 17:00 Saturday 09:30 Yes Saturday presentation Every day except 17:00 Monday 17:30 Yes Default presentation 17:00 Monday 17:30 No Daily presentation 17:00 Saturday 17:30 No Saturday presentation Saturday 09:00 Saturday 09:00 Every day except Saturday 09:00 Saturday 09:00 The above table demonstrates exceptions to the ‘Every Day’ schedule. By default, Sedao hardware products and the Sedao ‘All In One’ installer are preset to use the schedule stored in c:\imageflyer\imageflyer.sch. If you are using your own computer, and have installed ImageFlyer as a stand‐alone application, the default schedule file will be located in the directory containing the ImageFlyer program files. In the schedule editing Window, the following functions are available on the ‘File’ menu. NEW – Clears the schedule and starts a new schedule file. OPEN – Opens an existing Schedule file, such as one created on a different player SAVE – Saves changes you have made to an existing schedule file. SAVE AS – Saves a Schedule file that you have just created from new SET AS DEFAULT SCHEDULE – See the following section for further information V1.0 Page 28 ImageFlyer User Manual Setting the Default Schedule File You can use ImageFlyer to edit multiple schedule files. However, only one can be set as the default. The default schedule file is the file that will be loaded for use in ImageFlyer automatically. To set the default file – first open the file in the Schedule screen. Then click ‘FILE’ > ‘SET AS DEFAULT SCHEDULE’. NOTE: A change in default schedule file may result in the immediate change of the presentation being displayed. Stopping scheduled events There may be times when you would like to temporarily disable the scheduling feature and play back a single selected presentation indefinitely. To stop the schedule To restart the schedule click CONTROLS > TIME SETTING > PAUSE click CONTROLS > TIME SETTING > RUN 4.3 – Licensing ImageFlyer The ImageFlyer application is installed as a 30 day trial. After the trial period, ImageFlyer will stop being able to display or manipulate presentations. In order to continue using ImageFlyer, you must purchase a license key. Please ask your reseller for pricing information. For information on what you can do with your license, please contact your Sedao representative. In most cases, a license covers one player and a ‘reasonable’ number of design PCs. Inputting an ImageFlyer License Key 1. To License ImageFlyer, click on ‘CONTROLS’ and select ‘LICENSE…’ 2. Input the Serial Number. The cursor will automatically move to the next box while typing. 3. Input the License key and click ‘CHECK’. The check will confirm the expiry date of your license. 4. Click ‘OK’ to close the License window The Upgrade... button will open the Sedao website to show further product information. TOP TIP: The serial number and license key are both CaSe sensitive. When upgrading an existing ImageFlyer installation to a newer version, it is not necessary to re‐enter the license details. Upgrades may be available free of charge, when you register at www.sedao.co.uk V1.0 Page 29 ImageFlyer User Manual 4.4 – ImageFlyer Preferences ImageFlyer preferences allow you to fine tune the behavior of certain features to meet your individual requirements. Opening the Preferences Menu 1. Click the ‘CONTROLS’ Menu option and select ‘PREFERENCES’ PREFERENCES Explained • ‘ENABLE HOT KEYS’ o This feature allows the user to deactivate the hotkeys without deleting them permanently o Choose from ‘Always’ (Default), ‘Never When HotSpots Exist’ or ‘Never’ o The ‘NEVER WHEN HOTSPOTS EXIST’ option allows Hot Keys to automatically activate and deactivate depending on whether the active screen layout has Hot Spots (ImageFlyer Control Files). • ‘WHEN CONTROL IS HIDDEN’ o Choose between ‘Show the Mouse’ and ‘Hide the mouse’ o When building or developing a screen layout, it is recommended to show the mouse o Once a screen layout has been finished and the screen is on display, it is recommended to hide the mouse cursor. The mouse cursor can also be hidden temporarily using the ‘PageDown’ key on the keyboard. • ‘MIMIC MODE’ o Mimic mode allows the user to design a screen layout on a monitor with a different aspect ratio to the intended display screen o Options are ‘Normal’ (Default), ‘Widescreen’, ‘Portrait’ and ‘Widescreen Portrait’. o For example: If designing on a 4:3 screen for a 16:9 screen, it is recommended to set the mimic mode to ‘WIDESCREEN’ • ‘ASSERT ON TOP’ – When checked, this option keeps ImageFlyer in view above any other programs that are running. If any program should come to the top, ImageFlyer will assume the top position momentarily. • ‘SHOW PROGRESS WHEN LOADING’ activates a ‘progress bar’ when loading different screen layouts to reassure viewers that the presentation is changing. • ‘DON’T EXIT UNLESS CONTROL PANEL SHOWING’ ensures that ImageFlyer is not accidentally closed by pressing the ESC button on the keyboard. V1.0 Page 30 ImageFlyer User Manual • ‘DON’T CONSTRAIN MOVE’ should be activated when using the twin screen output setting on certain players. When this option is checked, elements can be moved to the second screen that has been set as your ‘extended desktop’. • ‘HIDE IF IDLE FOR 5 MINUTES’ is checked by default. This option hides the control panel after 5 minutes if there has been no interaction. This is useful if you were working on a design and then get distracted. The display will revert to the presentation to prevent the control panel obscuring the information on display. • ‘LIVE VIDEO IS’ allows the user to select between PAL and NTSC video standards. This setting applies to the live video input found on some Digital Signage players. Set it according to the intended country of use. PAL is selected as default for the UK. 4.5 - Configuring Splash Control Splash control allows you to define what happens on screen when the presentation is being changed. The presentation changes when you manually open a presentation file, or if a hot spot is activated or a scheduled change is triggered. The duration of the ‘Splash’ depends on the number and overall size of elements in the presentation being loaded. 1. Click the ‘CONTROLS’ menu and select ‘SPLASH CONTROL…’ 2. The options are: a. Do Nothing When the presentation changes, the display on screen will be paused while the new presentation is loaded. If enabled, the progress bar will also be displayed. Once the new presentation is loaded, it will begin playback. b. Fill with this colour... When the presentation changes, the display will clear to a chosen colour. The new presentation will then be loaded. If enabled, the progress bar will also be displayed. Once loaded, playback will begin. To choose your preferred colour, click ‘choose...’ and then select from the basic colour palette OR define custom colours using RGB values. When defining custom colours, click the required colour in the spectrum, then adjust the intensity slider. Click ‘Add to custom colours’ to be able to select the colour for use. c. ‘Display this File...’ When the presentation changes, the display will show a graphic of your choice. The graphics can be a JPG, BMP or PNG. Choose a graphic using the ‘Browse...’ button. The graphic will be displayed while the new presentation is loaded. If enabled, the progress bar will be displayed. Once loaded, playback will begin. V1.0 Page 31 ImageFlyer User Manual The graphics should be located where it will remain available to the player. If the graphic becomes unavailable the behaviour will change to be as if ‘Do Nothing’ were selected. 3. Click ‘OK’ to save your preference. 4.6 - Selecting the preferred Audio Output device ImageFlyer offers Volume Controls as a convenience when creating presentations that contain audio. Some playback hardware may have more than one audio output device. This is most commonly found when there is onboard sound and an HDMI sound output. In such cases you must choose which device will output the sound using the standard controls in your operating system. In addition, you can choose which sound device will be controlled with the ImageFlyer Volume Controls. 1. Click ‘Controls’ then ‘Audio Controls’ 2. Click the checkbox beside the device that you would like to be controlled by the ImageFlyer volume controls. Then click OK. NOTE: Depending on your hardware, it is usually not possible to output sound over two devices simultaneously. 4.7 – Configuring Internet Fallback Checker The Internet Fallback Checker needs to be configured if you are making use of the scheduler function “Is the Internet Fallback”. These settings need to be made if you intend to have a different presentation played in the event of the internet becoming unavailable. See also section 4.2 above for choosing the presentation that will be displayed. 1. Click ‘Controls’ then click ‘Internet Fallback Checker’ 2. To enable the function click ‘Enable the Internet Fallback Checker’. If this checkbox is not ticked, then the fallback presentation will never be displayed. 3. In the URL field, enter the website address of a website that will be ‘pinged’ to ensure that traffic can be received from the site. 4. Choose an ‘Interval’ in seconds – and the number of attempts to be made. These two numbers are multiplied to give the timeframe after which it will be assumed that the internet is no longer available and the fallback presentation should be triggered. For example, in the above box, the Sedao website will be checked 4 times with a 5 second break between attempts. Therefore, if the site remains unavailable after 20 seconds, the fallback presentation will be displayed. V1.0 Page 32 ImageFlyer User Manual Click ‘OK’ to save the settings. A small amount of traffic is generated in order to check availability of your chosen site. Please ensure the site administrator does not object to this use of their site. You are always welcome to use the Sedao site that is pre‐configured in the dialog box. If your presentation data is stored on a network server, you may wish to use the fallback checker to check this server remains available. In this event, a. it will not also be possible to check for internet connection availability b. you should of course ensure that your fallback presentation is stored locally! 4.8 – Iconify Control. Iconify Control is used to define what ImageFlyer should do in the event the application is minimised. The application may be minimised if the user holds the <Flag> key and presses <M> on the keyboard. Choose from the following options • Do Nothing and Continue Playing This option causes the presentation to continue playback as though it were displayed on screen. The audio will continue to be played. • Silence Audio This option will cause the presentation to continue playing back as though it were displayed full screen, but the audio will be silenced. • Silence Audio and Pause. This selection will cause the presentation to be paused and the audio to be silenced. You can also choose whether ImageFlyer should automatically restore itself to full screen after being iconified for a number of minutes. This is useful in the event the application was minimised by accident, or the person who minimised the application has been distracted. Simply check the ‘Enabled After’ tick box and then select the number of minutes after which the presentation will be brought back to the display. 4.9 – Choosing your preferred language ImageFlyer can support the display of its application dialog boxes in customised languages. For further information, please contact a Sedao representative. When first installed, the only language available when you click the ‘Controls’ menu and select ‘Language’ is ‘Sedao Default’. If you have created an alternate language file then you will need to exit and restart ImageFlyer after selecting the file. V1.0 Page 33 ImageFlyer User Manual 4.10– ScreenSaver Feed Details ImageFlyer comes complete with a Screen Saver function. You can select the ImageFlyer Screen Saver as your Windows Screen Saver and set your preferred timeout using the standard controls in Windows. The procedure for this differs dependant on the version of Windows you are using. The ImageFlyer ScreenSaver will show demonstration data by default. You can optionally choose to configure the RSS message displayed in the top windows of the screen saver display. To do so, please create a SedaoLive RSS feed. If you need further information on creating a SedaoLive RSS feed, please see the separate SedaoLive documentation. To customize the Screen Saver RSS feed, Click on the ‘Controls’ menu and select ‘ScreenSaver Feed Details’. Enter your SedaoLive login name into the ‘User Name’ field and your SedaoLive feed name into the ‘Feed Name’ field. Click ‘OK’ to save changes. The SedaoLive ScreenSaver function can be extended as an ‘extra cost’ option to allow you to display the presentation file of your choice, whenever the Screen Saver is activated. For further information on this option, please contact your reseller or a Sedao Representative. 4.11 – Multi-Head Control Multi‐Head control is an ‘extra cost’ option that makes it easier to design presentation layouts that work across two or more physical screens. You will not be able to use this option with a standard license. For further information on this option, please contact your reseller or Sedao Representative. 4.12 – Restart Control Restart Control allows you to choose a time of day when the ImageFlyer application will close itself down and then restart automatically. This can be useful when the presentation being displayed remains constant over several weeks. In such cases certain media files can cause specific transitions to gradually lose synchronisation. The restart prevents this becoming apparent to the viewers by restarting the presentation at a time you know will have minimal impact. Click the ‘Controls’ menu and select ‘Restart Control’. Check the tick box for ‘Enable Restart at this time each day’. Type in your chosen time in 24hr format. Click ‘OK’ V1.0 Page 34 ImageFlyer User Manual 4.13– Configuring the ImageFlyer Status Screen for SWEP If you have purchased Sedao Hardware, the settings in ImageFlyer will have already been made to ensure that the status screens are generated for display in the SWEP web interface. If you have purchased ImageFlyer for use on 3rd party hardware – and then purchased SWEP to assist in administering your presentation data – then you may also need to setup the ‘Status’ and ‘Grab Screen’ features in ImageFlyer. 4.13.1– Configuring ‘Status‘ The ‘Status’ settings define how and where thumbnail images of the presentation being displayed will be created. 1. Click the ‘CONTROLS’ menu and select ‘STATUS…’ 2. For use with SWEP, select ‘XML’ as the ‘FORMAT’. You may also choose ‘HTML’ or ‘Text’ for use in your own status application. Selecting ‘Off’ will disable the status feature. 3. In the ‘Template’ field, browse to the folder where the ImageFlyer program was installed and select the ‘Templates’ sub‐folder. Select the relevant IFT file that corresponds with the format you wish to use. For use with SWEP – and assuming ImageFlyer is installed in the default folder, browse to: c:\program files\sedao ltd\imageflyer\templates\xml.ift 4. In the ‘Save As...’ field, select the status file that will be created and overwritten when the grab screen function updates the status information. For use with SWEP you should choose c:\www\swepnet\website\sedao_core\backups\status.xml 5. Click ‘OK’ to save the settings. 4.13.2– Configuring ‘Grab Screen’ 6. Ensure that any previously saved screen layout is open. 7. Click on the ‘CONTROLS’ menu and select ‘GRAB SCREEN…’ 8. Tick the ‘GRAB EVERY MINUTE BOX’ and click ‘GRAB’ to save the setting. For further information on the SWEP web interface, please contact your reseller or a Sedao representative. SWEP web interface is available to purchase providing you have already purchased a Sedao ImageFlyer license. A SWEP client user guide is available for Administrators and for End Users which contains further information on getting the most from the SWEP product. V1.0 Page 35 ImageFlyer User Manual 5.0 - The Help Menu The ‘Help’ menu contains options to help you find further information on your ImageFlyer installation. The ‘About ImageFlyer’ selection displays essential information such as the ‘ImageFlyer version’ and license expiry date. ‘Manual’ displays the version of the ImageFlyer manual that was included with the installation. ‘Upgrade’ open’s the ImageFlyer page on the Sedao website where you can view information about the product and any optional upgrades that have been made available. V1.0 Page 36 ImageFlyer User Manual 6.0 – Other Sedao Products Your digital signage installation is made up of several different software applications. The key applications that are references in this user manual are listed below. RollerWriter – for creation of animated scrolling web pages. RollerWriter is a useful tool for creating animated scrolling text. With a number of options, including support of full rich‐text editing and the ability to pause animation at specific points – RollerWriter can create text based elements that really do grab attention. For further information on the functions of RollerWriter, please refer to the RollerWriter user guide. RSSWriter – for creation of locally based RSS news feeds RSS Writer is another useful tool that allows anyone to create locally saved RSS feeds in a matter of minutes. With absolutely no need to learn any code or worry about any syntax – RSS Writer creates XML files which you can use to display multiple ‘ticker’ stories which help to ensure your audience keep watching your presentation. RSS Writer has its own separate user manual. SedaoLive – for globally accessible RSS feeds. If you require the ability to edit your RSS feeds from any internet connected device, anywhere in the world, then you need to use SedaoLive. For further information on SedaoLive please refer to its own user manual. V1.0 Page 37 ImageFlyer User Manual SWEP - for administering presentations from remote PC’s. SWEP is a web based interface installed on the player and accessed across a network. The software allows you to make changes to presentations, to update the playback schedule and to configure advanced scheduling features. It also allows you to choose who may edit an individual component of a presentation. 7.0 - Folder Management Folder management is an important administrative task for ImageFlyer designers. In order to allow a presentation to playback on multiple players it is essential to ensure. Getting folder management correct from the start can save the time that may be required if it is necessary to redesign a presentation. Guidelines for Folder Management • Name all media files in a manner that enables other users to recognise the content easily. • We suggest creating a sub‐folder of C:\ImageFlyer and then creating a sub‐ folder for each presentation. • In each presentations individual folder, create sub‐folders to store all the different media types ‐ as shown in the illustration on the right. • It is preferable to share your presentation folder(s) on your network for ease of access from your design PC’s. • Always consider the size of media files you use. For example, a high resolution image shown at postcard size is not the best use of resources. The Image could be resized to use less storage space and load faster. • Keep Landscape and Portrait images separate so that stills folders can be easily added in ImageFlyer without causing any images to look ‘stretched’. • As with all important data it is suggested that you regularly back‐up all files used in your digital signage. In the event of an emergency, your backup can get your digital signage back up and running quickly. V1.0 Page 38 ImageFlyer User Manual Important Integration Information If relying upon remote and online content, it is important to ensure the Player has a reliable connection to your LAN and Internet. You also need to configure your firewall to allow the software features that you intend to use. It is also important to deactivate any screen‐savers or power saving features on your hardware. You should consider configuring your player to automatically restart in the event of a power failure with an automatic log‐in. For further advice and documentation covering integration of your player into your infrastructure, please contact your Sedao representative or browse the ‘Manuals’ pages on the Sedao Website. Further Information Sources for Further Information Your Sedao Representative Your Sedao representative will be able to assist you resolving any problems or queries you may have, or put you in direct contact with a technical specialist. Depending on your region, it may be possible to book on‐site, off‐site or remote log‐in training with Sedao through your representative. There is also a range of artwork, template and screen creation services available on request. Software patches and updates are also available. The Sedao Website Create an account here to gain access to the latest software and further information and assistance: www.sedao.co.uk The information in this document may contain information on feaatures which have been superceded or withdrawn. Sedao reserve the right to make changes to software and manuals at any time without notice. Any views expressed in this document may be the views of the author and not the company. The use of any examples or illustrations does not indicate any relationship with or endorsement by any person or entity . Sedao does not accept responsibility or liability for any errors or omissions in or for the accuracy or reliability of the contents of this document. Sedao cannot accept any responsibility for any disruption or loss to your data or computer systems or for any direct, indirect, special, incidental or consequential damages that arise in connection with the use of information in or links contained within this document. Sedao provide advice and examples which have been tested in a generic environment. The outcome of changes you make may differ based on information which is not known to us. It is best practice to always backup your data before following any instructions. V1.0 Page 39