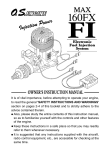
1
Cccc~l.Ar:lm·
Technology that talks to cars and trucks,"
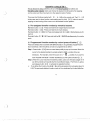
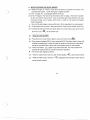
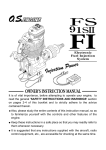
Remote Vehicle Control System
)
Two Way Remote Start
& Security
)
IMPORTANT NOTE: The opsr<!.tion of the TW-1 as described in this
manual Is applicable to most vehicles. However. due to the engine type
and configuration of some vehicles (l.e. diesel engines). sO(lle functions
ANDIOR SAFETY PRECAUTIONS may not apply. Please see your
Installing dealer for more informallon.
101513-0
TABLE OF CONTENTS
Users' Precaution
)
The remote LCD icons with functions ................................................................ 1-2
Operation guide of TW1 unit .................................................................................4
Pre-assigned function modes by remote's buttons .............................................. .4
Programmed function modes by a short press of button [ I ] ........................... .4
Self-defined functions by a short press of button [II] ....................................... 5
Door Lock/arm .................................................. :.................................................. 5
Defective zone bypass ......................................................................................... 5
Door unlock/disarm ............................................................................................. 6
Security diagnostic report .................................................................................... 6
Parking light flash upon door open ..................................................................... 6
Auto relock .................... _.................................................................................... 6
Door Lock/unlock ................................................................................................ 6
Auto door lock/unlock upon ignition on/off .......................................................... 6
Active channel # 3 ............................................................................................... 7
2 Steps door unlock /disarm ................................................................................ 7
Remote engine start... ....................................................................................... 7-8
Remote change of engine run time ..................................................................... 8
Remote engine shut off ....................................................................................... 8
Remote temperature start ON/OFF ..................................................................... 9
Remote check current auto-start temperature setting .................................... :: ... 9
Daily auto-start time ON/OFF .............................................................................. 9
Remote check car indoor temperature/Status ................................................... 10
Active channel # 1 for release trunk ............................·........................................ 10
Remote siren/horn alert ON/OFF ........................................................................ 10
Active channel # 2 .................................................... :.......................................... 11
Car locator/search ............................................................................................... 11
Shock sensor by pass ......................................................................................... 11
Alarm mode & warn away ................................................................................... 11
Light impact trigger. .. ...................................................................................... 12
A
/
Heavier impact trigger ......................................................................................... 12
Door /hood /trunk open trigger ............................................................................ 12
Remote Panic ...................................................................................................... 12
Remote anti-carjack ON/OFF .............................................................................. 12
Switch-controlled anti-carjack ON/OFF ............................................................... 13
Remote valet ON/OFF ........................................................................................ 13
Programmable function by over-ride switch ........................................................ 14
Page-out call ....................................................................................................... 14
Manual ARM and DISARM ............................................................................. 14-15
Procedures of remote start for manual transmission gear car ............................ 15
How to learn codes of the remote transmitter ..................................................... 15
Dash LED status indicator................................................................................... 16
Replacement of battery ....................................................................................... 16
Programming of remote control unit.. .................................................................. 17
B
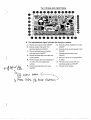
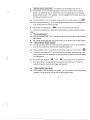
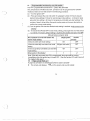
TW-1 ICONS AND FUNCTIONS
The alphabetical signs indicate the function modes
•
A. Remote anti-carjack mode ON/OFF
B. Remote control channel # 3 for
G. Remote activate Audible arm mode
electrical appliance ON/OFF
Remote activate temp-controlled
auto-start mode ON/OFF
D. Remote activate daily auto-start time
mode ON/OFF
E. Remote engine start (or) changing of
run time when the engine gets
H.
c.
)
I.
J.
K.
L.
)
ON/OFF
Remote shock sensor bypass mode
ON/OFF
Remote activate valet mode
ON/OFF
Remote monitor in-car temperature
& status
Remote control channel # 2 for
electrical appliance ON/OFF
Remote trunk release
•
The numerical signs indicate the vehicle's security status or
other function display
J
1. Remote's battery condition
2. Channel # 2 On/OFF
3. Temp-controlled auto-start mode
4. Engine run mode
5. Trunk release
6. Door open
7. Remote unit's vibration mode
8. Valet mode
9. Auto rearm mode
1O.Mute alert mode
11.Audible alert mode
12. Hood open mode
13.lmpact/shock mode
14.Hand-brake disengage
15. Door lock mode
16.Door unlock mode
17. Monitor standby mode
18.Feedback confirmation (Alter each
command by remote unit; display of
this confirms feedback can be picked
up by remote unit. Non-display
means remote is either out-of- range
or feedback is being interfered.
19.Page out-call from car
20.Power save mode of remote(Absolute
current sleep 'mode of the remote,
after system is disarmed)
21.lgnition On mode
22.Alarm clock mode
23.P.M time mode
24.A.M. time mode
25.Daily auto-start time mode
26.Hour, minute, temp. display
27.Centigrade, Celsius mode
28.Count-down time mode
2
TW-1 User's manual 2 Way remote security system
• Precaution before installation
1. Read this manual carefully ahead of operation. You will find this product very
versatile.
2. Park the vehicle in open space each time if the remote start is intended .This avoids
you from being suffocated by the exhaust gas while the engine gets running.
3. For safety purpose, set your car to valet mode "ON" before sending it to workshop for
serviced
4. There are many other functions ,Refer to the installation manual for such extra
functions that require external accessories.
5. You are suggested to refer to the "options Program Table" whenever you find[ options
program table] in the text on the installation manual.
•
Special features:
1. Choice of function mode by cursor on screen for easiest operation (patented
features)
2. 2 Way Super-remote control/monitoring range [Effective range of approx
800-1200 m]
3. Electronic luminescent backlight
4. Hopping code for anti-grabbing
5. Main system's memory able to learn codes from 4 different remotes
6. Remote control of lock/unlock, arm/disarm, engine start, trunk release and etc.
7. Switch-accessed Arm/disarm for emergency
8. Selectable mode for auto/manual transmission gear with safety circuit
9. Selectable rnode for gasoline and diesel engine
10. Programmable for temp-controlled auto-start
11. Programmable for daily auto start time
12. Remote monitoring of car status lin-car temperature on display
13. Display of defective zones bypass when arming
14. Display of remote shock sensor bypass
15. Smart temper report by siren when disarmed
16. Remote control electrical appliances through channel # 1,#2 , #3
17. The main system temporarily by-passes shock sensor at the moment the remote
trunk release is activated
18. Remote control & switch-activated anti-carjack modes
19. Remote panic
20. Remote or manual valet mode
21. Other system's functions accessible by software program
22. LED status indicator to assist programming and anti-theft warning
3
Operation guide of TW-1
This is devised for easy operation just by somel fixed functionl by buttons and
Imovable cursor meansj. Users can choose the desired function just by first popping
out the cursor and then moving it on to the related function Position.
There are total 3 buttons marked with [ I ' II ' ill] on the remote unit. The [ I ' II]
buttons are used in alarm function mode setting and the third [ill] button is used in
popping out and moving of the cursor on to the desired function position.
* Pre-assigned function modes by remote's buttons
Remote's button [I]: Press and hold this for engine-start and shutoff
Remote's button [ II] : Press and hold this for trunk release.
Remote's button [I] [ II] : Press and release both [ I ] & [II] simultaneously for
car find.
Remote's button [1][ II ]: Press and hold both [ I ] & [ II ]simultaneously for remote
panic
* Programmed function modes by a short press of button [ I ]
Press and release this to activate self-defined function .It is generally programmed for
door lock/unlock. Other functions can also be programmed as below:
Step 1: Press button
[ill] twice or more times quickly to pop up the cursor. Move the
cursor to the desired position by pressing button [ill] a number times as
~
necessary. For example, move the cursor on to r t::;I
.J
position, if you want to
have "Audible Arm Mode" function activated by a short press of button [ I ] .
Step 2: When the cursor reaches the desired position, press and hold [ill] again for 6
sec till the remote unit sounds the first 2 and final 3 beeps. From then on, press
and release button [ I ] to activate the selected function.
To re-define the function of button [ I ]re-do the procedure from procedure step (1)
& (2).The previously-defined function mode will be substituted by the last definition.
*
4
)
J
* Self-defined functions by a short press of button [II]
Press and release button [1I] to activate self-defined function .It is generally
programmed to assign
~
rJQ J for Mute Arm Mode. other functions can also be
programmed as below:
Step 1 : Press button [ill] twice or more times quickly to pop up the cursor. Move the
cursor to the desired position by pressing button [ill] a number times as
~
necessary. For example, move the cursor on to r\,$l:JJ , if you want to have
" Status Check" function activated by a short press of button [1I] .
The following 2 way remote's function guide is based on the current
cursor setting in the above passage
1. I Remote arm & door lock I
(a) , Shut off the engine, get out of the car making sure handbrake is depressed, hood
closed and all the door closed.
(b) , Press and release button [ I ] the system will lock the door and enter arm mode
with 1 siren chirp and 1 parking light flash .
•
The remote unit sounds melody and displays
r Q J r(<<" J icons on its screen.
(c) , Press and release button [1I] the system will lock the door and enter arm mode
with 1 siren chirp and 1 parking light flash.
•
The remote unit sounds melody and displays r
e
lr({i)jI Jicons on its screen which
means the system is in mute arm mode.
(d) , Defective zone report and bypass arming: When arming, if the system detects
defective zones, the system will sound 4 siren chirps or the remote unit sounds 4
beeps twice. The remote unit displays on its screen the defective zone ( like the
door open).The system then will bypass the defective zone and can enter arm
mode. When the defective zone is corrected ( just by closing the door later ), the
system immediately enters full arm mode.
(e) , Arm delay time can be programmed: ( like 6 or 30 sec daily arming after door is
closed) as needed. [option program table]
5
I
I
2.
Remote disarm & door unlock
(a) - Press and release the button [ I ] or [IT] the system will unlock the door and
disarm itself with 2 siren chirps and 2 car light flashes. The dome light will turn
on .( Refer to installation manual for dome light features that needs external relay)
• The remote unit sounds 2 beeps and displays' iii ~ icon on its screen
(b) - Smart zone trigger report: Should there be any abnormal security status while in
arm mode, the siren sounds 4 chirps or the remote sounds 4 beeps when the
remote unit's button [ I ] is pressed. The trigged zone during arm mode is
displayed on the remote unit's screen.
(c) - Parking light flash upon door-open: Each time the car door is opened following
disarm, the parking light flashes for 10 sec to caution other vehicles coming behind.
[option program table]
(d) -Auto rearm: This is programmable to have your system rearm itself if the car door is
not opened after 30 sec from the time of remote disarm [ option program table]
3. I Remote door lock/unlock I
(a) Press and release button [ I ] while driving, the system will unlock/lock with parking
light flash.
•
*
The remote unit displays 'd ~ for the door unlock or displays' 6 ~ for door lock.
You can also program to have door lock/unlock upon ignition ON/OFF. [option
program table ]
6
I Remote control channel # 3 I (option program table
]
(a) , If the system is programmed for channel #3 mode ( an external relay is
required)
J
(b) , Press quickly (ill] twice or more rimes to pop up cursor and then move
W
it onto [B3] ) .
(c), Then press and release [ IT] .The system responses in accordance with
Single
selected function mode .The parking light flashes 3 times for confirmation .
• The remote unit displays Car Status on its screen and sounds 3 beeps
Option
( Choose I 2 stage door unlock, disarm I (option program table ]
only one (a) , If the system is programmed channel # 3 for 2 stage door unlock mode.
of these) ( an external accessory is required)
(b) , Press quickly [ill] twice or more times to pop up the cursor and then
W
move it onto (B3] )
(c) , Then press and release ( IT] to unlock all the doors. The system will
unlock and disarm with 2 siren chirps and 2 parking light flashes.
• The remote unit displays • U ~ on its screen and sound 2 beeps .
"" Choose one of the above two options and program ·It as required.
4, I Remote engine start I
(a) , The engine is in shut off state.
(b)' Press and hold ( I ] button. Or press IT button when the active cursor is shifted
onto the
d;b
the column. Siren chirps 3 times with 3 parking light flashes when the
engine gets started.
/)
•
The remote unit displays 2 stages on its screen as below:
(1) , In the 1st stage: The remote unit displays the current status along with
• 51:: ~ while engine is trying for engine start and sounds.
(2)' In the 2nd stage: After the engine gets started, the remote unit displays
along with engine's preset run tirne and sounds.
7
J
-
Ii" ..._ .!l
(c) , The remote start run time can be programmed as required [option program table].
When the preset run time expires, the engine will automatically shotoff:[-The~ --"
remote unit displays 'r 01. when the last one min begins its countdown ]. The 'r
00. displays on the remote unit at the moment of engine shut-off and then
disappears.
(d) , Remote engine start cannot be done under such abnormal conditions. (1).The gear
is not in its neutral position, (2) Ignition key is turned ON , (3) Hood is opened ,(4)
Hand break is depressed .Only under normal condition, the system can be
remote-started for the pre-set runtime. A maximum of 4 start efforts will be made in
case of failure of engine-start in the preceding trials. If engine gets started in any
stage of trials, no second attempt wHi be made.
• When the system fails engine start after the 41h unsuccessful start effort, the remote
unit sounds 4 beeps and its LCD displays 'SP. .
5.
I Remote change of engine run time I
(a) , After the engine gets started by the remote unit
(b) , Press ill button quickly twice or more the to pop up the cursor and move the
cursor on to the
~
[~] column.
(c) ,Press and release [IT] button. Each time press on this button can add up 5 min
run time and additional pressing can get up to the maximum run time of 20 min. The
LCD on the remote unit displays the current run time acquired. The 'r 15. on the
LCD rneans the current run tirne you have gained is 15 min.
Note: The function of run time change is only accessible only when the engine is
running.
6. I Remote engine shutoff I
(a) , The engine is running by remote unit.
(b) , Press and hold [ I ] ; the engine shuts off with 2 siren chirps and 2 parking light
flashes.
• The ,'J: .disappears frorn the remote unit's screen .The car's status is displayed on
the remote unit and melody is heard.
8
)
I
.J
7. Remote control temperature-controlled auto-start ON/OFF
[ intended use in frigid countries)
(a)' Press quickly [ill) 2 or more times to pop up the cursor and move it onto
[~b.
(b)' Then press and release [IT) .The siren chirps 3 times with 3 parking light flashes.
The engine will start automatically at pre-selected temperature and begin running
and will automatically shut off when the pre-set run time expires.
(c) , 'OFF" mode setting of temperature·controlled auto-start' Press and release [IT)
to turn the temperature-controlled auto·start to "OFF" mode.
• The remote unit responses as below:
(d) , If temperature-controlled auto-start ON is activated; the remote screen shows
.1' =-1 ~ to confirm this function is activated and the pre-set temperature icon like
• -lOt ~ appear on the display. The transmitter unit sounds melody. [When the
main system sensed .lOt temperature, the engine will get started automatically).
(e) , If temperature·controlled auto-start OFF is activated; the icon wjC=oI ~ disappears
from remote's screen and the remote unit sounds melody for confirmation.
(f)' The temp-controlled auto-start repeats maximum 6 cycles daily, with 2 hours interval
between cycles.
• The temperature can be selected for auto- start at -5 Q, -10 Q, -20Q , -30Qin
accordance with your requirement.
B. Daily auto-start time ON/OFF
I
I
~
(a)' Press quickly[ ill) 2 or more times to pop up the cursor and then move it onto [~)
(b)'
Press and release [IT). Parking light flashes 6 times with 6 siren chirps .The
engine will get started at the selected time daily after 24 hours from the setting.
(c) , To program OFF mode of the daily auto-start time' Press and release [IT) to set
the above setting to OFF mode.
•
The remote unit displays different icons for different modes following the setting.
(d) , After the daily auto-start time is set to ON mode, the remote unit displays
• ~~
on its screen and sound melody.
(e) , After the daily auto-start time is set to OFF mode, the • ~ ~ disappears from the
remote unit's screen and sound melody.
9
)
9.
I Remote monitor temperature/status check I
(a) , Press quickly [m) 2 or more times to pop up the cursor and then move it onto
J
d~b
(b) , Press and release [II] to monitor in-car temperature and the status of the car.
Parking light flashes 3 times.
• The remote unit displays on its screen the in-car temperature with car's security
status and will sound melody. For example, the • 23t. on the LCD describes the
interior temperature of the car is at 23 degree centigrade.
• The temperature modes on the LCD can be selected to show Celsius or Fahrenheit
as needed.[option program table].
10.
Remote trunk release
(The car must have electric motor for trunk release)
(a) , Regardless of the main system in lock/arm or unlock/disarm modes, remote trunk
release can be done.
(b) , Press and hold [II) for remote trunk release. Siren chirps 3 times with 3 parking
light lashes.
I
•
I
The remote unit displays • .."..,. • on its screen along with the current status and
sounds melody.
Note: The remote LCD displays • ~. when the main system bypasses the shock
sensor at the moment the remote trunk open is operated by the 'remote unit.
11.
[ II) to choose audible arm
mode.
.
)
~
(b)' Move the cursor onto[~],then press and release [II ]to choose mute arm mode .
• The remote 'unit will response as below:
(c) • When the system enters audible arm mode, the remote unit displays • (U•• with
melody sound.
(d)' When the system enters mute arm mode, the remote unit displays·(~ .with melody
sound.
(e) , Even the system is mute arm mode, the siren will blurt when remote panic or
remote anti-carjack is activated
(f) , Programmable for choice of Siren or Horn [option program table)
10
12. I Remote Active channel # 2 I (for example use of headlight auto turn-on)
J
(a) - This function can be controlled regardless of the main system in arm or disarm
modes. ( an additional relay is required and can be programmed for any desired
remote control function ). For example: to turn headlight ON for 30 sec by remote
unit and automatically turns off.
@Tl
(b) , Press quickly (ill] 2 or more times to pop up the cursor and move it on to (@]
(c) - Then press and release (IT]. The parking light flashes 2 times and headlight turns
on for 30 sec before automatic turn-off.
•
*
The remote unit displays the
• (~H21 ~ on its screen and sounds melody.
This can be programmed in accordance with function you require.[option program
table] •
13. Ir-C=-a-r-cI'--o-c-at'--o-r,C-s-e-a-rc7h'I
(a)' Press and release both( I + IT] simultaneously; siren chirps 6 times with 6 parking
light flashes.
• The remote unit displays the car's current status on its screen and sounds melody.
14. I Remote Shock sensor bypass I
(a) - You can use this function to avoid false alarm especially when the car is parked in
an area near a rail-line or where trucks frequently passes by.
(b) - Press quickly ( IT ] 2 or more times to pop up the cursor and move it onto
Iill!l
(~]
(c) , Then press and release (IT] to have remote shock sensor bypass during which
shock sensor becomes ineffective but the other security functions like door trigger
are still effective.
•
*
The remote unit displays
.~.
and
•
~~
on its screen with one beep alert.
If the shock sensor is triggered for 8 consecutive times during arm mode, the
system will ignore shock sensor trigger and bypass it.
15. I Alarm mode & warn away I
(a) , In arm mode; if the car detects any impact, the shock sensor's first stage alert is
triggered. The siren chirps 3 times with 2 parking light flashes.
11
•
The remote unit displays
r
o:a.
on its screen with one long beep alert.
J
(b) , If the heavier impact is detected by the main system, the second stage alert is
triggered .The siren blurts and the parking light flashes for 15 sec duration ..
•
The remote displays
r~ J
with beep alert for 15 sec.
(c) , If the system is triggered by other means like ( door-pen' trunk, hood-open or
ignition "ON" during arm mode) , the siren blurts and the parking light flashes .for
30 sec and the engine start circuit is killed.
• The remote unit displays icon showing triggered zone and keeps beeping for 30 sec.
(d) , For any triggering during arm mode, press and release [ I ] once to disable
triggering. The additional of press and release on [I] to make the main system
enter unlock/disarm mode.
(e) , The main system will enter security mode during or after the triggered zone is
closed. In case of trigged zone still unlearned, the system will
bypass it and can
still protect all other zones.
15. I Remote panic I
(a) , After the engine shuts off, press and hold both [ I + II] simultaneously for remote
panic. The parking light flashes 6 times with 3 siren chirps.
• The remote unit displays the car status on its screen and sounds melody.
16.
I Remote anti-carjack ON/OFF I
(a) , Press quickly [ II] 2 or more times to pop up the cursor and move it onto
•
®J
(b) ,Then press and release [II] to enter anti-carjack mode. The parking light flashes
for 30 sec and the system's start circuit is killed.
(c) , To deactivate the anti-carjack mode, press and release (II] again.
•
The remote unit displays •
@
J
on its screen and sound alert.
12
17.!Switch-controlled anti-carjack ON/OFF]
(a) , While the engine is running; press the anti-carjack to activate this function. The
activated anti-carjack mode undergoes 2 stages as below:
(1) In the 1" stage; the parking light flashes for 30 sec.
(2) In the 20d stage; in the next 30 sec that follows the 1st stage, there will be another
30 sec alert period during which [(a) the parking light keeps flashing, (b) siren
continues blurting, (c) the engine start circuit is cutoff on until active anti-carjack
mode is cleared]
At any of the alert stages, choose either (a) or (b) to deactivate the on-going alert.
(a) , To deactivate alert by switch, press and hold for 5 sec the anti-carjack switch (or)
0
*
(b)· To deactivate alert by remote unit, press [ill] 2 or more times to pop up the cursor
and move onto
@~
W
on the remote unit.
18. ! Remote valet QN /OFF !
(a) • Press [ill] 2 or more times to get the cursor and move onto
[~]
0
(b) • Then press and release [ IT ] to enter valet mode ON. The siren chirps 4 times with
4 flashes of parking light .Under the valet ON mode, all functions are inoperative
except for the remote door unlock and trunk release which are still operable.
( c) • Press and release [IT] again to get valet mode OFF .The main system then
restores all functions back to normal and become operative.
• The remote LCD displays as below :
(d) • While the valet mode is ON, the LCD remote displays
(e) • While the Valet mode is OFF, the
@~
W
remote sounds melody.
13
w~ ~
and sounds melody.
disappears from remote's screen but the
I
/-)
I
19.
Programmable functions by over-ride switch
The TW-1 programmable functions are [valet, daily auto-start
time ,temperature-controlled auto start] these all can be programmed for ON/OFF
modes by means of over· ride switch in the following procedure.
(a) , Turn the ignition OFF
(b) • Press and release the over-ride switch for assigned number of times to acquire
desired mode settings [3 times for valet change mode setting] , [4 times for daily
auto-start time setting] , [5 times for temperature-controlled auto-start setting]. The
number of siren's chirps follow the equal number press on the over-ride switch to
confirm the current mode setting.
(c), Turn the ignition ON when the desired mode setting is reached. (engine must not be
running)
(d) • To choose the ON and OFF in each mode, setting, press again the over-ride switch
1 or 2 flm-es The factory default setting is marked with shaded description like OFF.
Manual features program table
No of presses on over-ride switch VS
active mode setting
3 times to enter valet mode setting·
Single press
ON
Double
presses
OFF
4 times to enter daily auto-start time mode ON{see note below}
setting
5 times to get temp-controlled auto start time
ON
mode setting
Siren and LED indicator
1
OFF
OFF
2
Note: If the dally auto-start time ON IS programmed, the engine Will be running
immediately when the ignition key is turned OFF .( Use the remote LCD unit to shut off
the en ine in this case.)
20.
Pa e-out call from car
If page-out call button on vehicle-base antenna case is pressed
0
•
The remote unit displays •
81. on the screen and sounds melody
14
21. I Manual Arm and Disarm I (In case the remote transmitter is lost)
Manual Arm Mode
(a) Turn the ignition key to ON position (engine must not be running)
(b) Press and release the over-ride switch 8 times
(c)Turn the ignition key to OFF position (siren chirps 1 time with 1 parking light
flash ).After 20 sec, the main system will enter Arm mode.
Manual Disarm Mode
(a) Turn the ignition key to ON position. (engine must not be running)
(b) Press and release the over-ride switch 4 times
(c) Turn the ignition key to OFF position {siren chirps 2 times with 2 flashes of park"ng
light}, The system will enter Disarm mode,
Note: (a)Under manual Arm mode; if the system is triggered, the system will enter initial
alert mode ( siren chirps 3 times with 3 parking light flashes), 20 sec later, the
system enters Alarm and Warn Away Mode, [The alert triggering at this stage
can be terminated by the car owner]
(b) Under manual Arm or Disarm modes, all the system's features<:an still be
operated by the remote unit,
0
22.
','
.. ~)
I Procedures for Code learning of remote units I
The TW-1 main system can memorize transmitter's coding ( from up to 4 different
remote units)
(1) Turn the ignition key to "ON" (But engine must not be running)
Press and hold the over-ride switch for 6 sec and release it after the siren chirps 4
times which confirms the system has entered active learning mode,
(2) Press and hold [ I + II] simultaneously till the siren chirps 1 time ,confirming code
learning is completed,
Follow the same step (2) with other remote transmitters ,one after another, to allow
the main system learn coding of each transmitter.( Maximum 4 remotes can be
learned by the TW-1) ,The system will automatically jump out of learning mode if
no signal is received within 6 sec, from the last signal.
(a) The pre-memorized coding will be erased each time the learning mode is
activated, Re-do the code learning in this case,
(b) If more than one remotes are used in remote-operating the same system, the car
status will be displayed on the single remote which sends the latest signal.
*
15
23. I System status-indicator LED I
Fix the LED status indicator at the appropriate location inside the car to allow maximum
visibility ofit
LED blinking pattern with various standby modes while ignition" OFF"
Different standby modes
Pattern of LED blinking
The remote engine being started
LED solid on
System in disarm mode
No LED
*
*
* * * * * *
* *
System in arm mode
** ** ** ** ** ** ** **
Daily auto·start time ON
*** *** *** *** *** ***
Ternp-controlled auto-start ON
#<*** **** **** **** ****
Daily auto-start time ON + Tempauto-start ON
***** ***** ***** ***** *****
Valet mode ON
24.
[Replacement of battery[
When c~. appears on the remote LCD, its battery is about to exhaust. Replace a
*
new battery immediately to ensure proper function.
Replacement guide
1. Take off old battery
2. Press and release [ I ] once before inserting the new battery
3. . Inser] the new battery [Alkaline battery of size AAA is recommended ]
4. Replace the..battery cover and then press and release [. I ] to monitor the car's
current status.
16
)
25. I Programming of remote control unit I
The TW·1 's LCD remote control unit has basic features of (a) EL backlight (b) most
power saving circuitry (c) audible or vibration alert mode (d) selectable time indication
of [Real time , alarm clock , count-down timer) and follow the procedure as below'
Operation of keys
Functions
Notes
Backlight ON ( automatic turn-off
Press [ill)
after few sec)
Press both [ill + I ) Choice of audible/vibration alert
mode
Press & hold 3 sec Entry/exit of adjust mode by hour,
While in each time entry
[ill]
confirmed by 2 beeps
mode:
Press
[ I ] to choose
Press[ ill]1 time Minute entry ( adjust mode)
"ON"
or
adjustment
Press [ill] 2
Hour entry (to adjust Alarm clock)
upwards
times
Press and hold [ II] for
Press [ill) 3
Min entry (to adjust Alarm clock)
quick adjustment
times
upwards
Press [m] 4
ON/OFF choice for alarm clock
Press [ I ) to choose
times
"OFF" or
Hour entry (to adjust countdown
Press [ill) 5
adjust downwards
timing
times
Press and hold [ II] for
Press [ill] 6
Min entry (to adjust countdown
quick adjustment
times
timinq)
downwards
ON/OFF choice for countdown
Press [ill] 7
timing
times
Press [ill]
ON/OFF choice for self
If the remote unit is power
Stimes
power-saving
saving mode, its current
sleeps after the system is
disarmed.
Entry/exit of alarm adjust mode
[I+ill]
[II+ill] 1 time Choice of 10 min countdown mode
[II+ill) 2 times Choice of 20 min countdown mode
[II+ill] 3 times Choice of 30 min countdown mode
[II+ill] 4times Choice of 60 min countdown mode
[II+ill] 5 times Choice of 90 min countdown mode
[II+ill]
6 times Choice of 120 min countdown mode
17