1
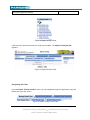
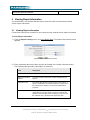
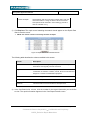
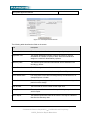
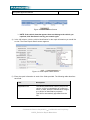
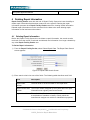
Version: 0.4 VIIS System Application Manual User Manual Repair Data Entry Web Applications ETNJ2_UserManual_Repair V04.00 Document Number: Version: 0.4 Page 1 of 25 © 2008-2010 Parsons Corporation Confidential and Proprietary NJVIIS_Emission Repair Manual.doc VIIS System Application Manual Version: 0.4 1 Introduction This manual provides instructions for using the Repair Facility Portlet. This portlet is used to enter repair information for vehicles that failed an emission inspection. This chapter contains general information about the application, including hardware and software requirements. It also contains information about the text conventions used in this manual. 1.1 About the Repair Facility Portlet The New Jersey Repair Facility Portlet is used to enter information about repairs made to vehicles that failed an emissions inspection. By following the instructions contained in this user manual, you can complete the following tasks: Access, log in, log out and exit the portal Search for and view existing repair records Enter repair information Delete repair information Create and update Repair Facility Technician user accounts 1.2 Hardware and Software Requirements This section describes the minimum hardware and software requirements necessary to run the Repair Facility Portlet: The minimum software and hardware requirements are: Desktop or laptop computer with Pentium processor or equivalent o Minimum desktop resolution - 800 x 600 o Desktop resolution set to 1024 x 768 for best results Internet/Intranet access with a minimum of 56 kilobytes (K) connection speed Java Runtime Environment (JRE) 1.5 or later Microsoft Internet Explorer 1.6 or later Required browser settings: JavaScript enabled Internet cookies enabled Page 2 of 25 © 2008-2010 Parsons Corporation Confidential and Proprietary NJVIIS_Emission Repair Manual.doc VIIS System Application Manual Version: 0.4 2 Getting Started You must first access the New Jersey Vehicle Inspection Portal and log in to it before you can begin using Repair Facility Portlet. This chapter provides instructions for logging in to the portal, logging out of the portal and exiting the portal. It also contains general troubleshooting tips for logging in and an overview of portlet navigation. 2.1 NOTE: To log in to the portal, you must have a valid user name and password. If you do not, contact your supervisor or technical support at: [email protected]! Reference source not found. Accessing and Logging in to the Portal Use the following instructions to access, start and log in to the New Jersey Vehicle Inspection Portal. You must log in to the New Jersey Vehicle Inspection Portal before you can access the Repair Facility Portlet. Be sure that you have an Internet browser set up on your computer before starting the application. Contact your supervisor or system administrator if you do not have an Internet browser, such as Internet Explorer. To Access and Log in to the Portal 1) Select (All) Programs from the Start menu and select your Internet browser from the menu. 2) Enter the Uniform Resource Locator (URL) for the Portal in the Address field and press Enter on your keyboard. The URL for the Portal is: https://portal.appsolgrp.com/njet/html The screen used to log in appears. Figure 1 New Jersey Vehicle Inspection Portal Login Screen 3) Enter your log in information in the User Name and Password fields. Page 3 of 25 © 2008-2010 Parsons Corporation Confidential and Proprietary NJVIIS_Emission Repair Manual.doc VIIS System Application Manual Version: 0.4 4) Click Login. The application attempts to log you in using the log in information you entered. If the log in is unsuccessful, a message appears describing the problem. Doublecheck your user name and password and reenter the information if necessary. If you still have trouble logging in to the portal, see ”Troubleshooting Login in and Accessing the Portal.” Once a connection is made, the home screen for the New Jersey Vehicle Inspection Portal appears. Figure 2: New Jersey Vehicle Inspection Portal Screen Troubleshooting Logging in and Accessing the Portal If you still cannot log in after trying the following troubleshooting tips, contact your supervisor or system administrator. If your attempt to log in fails or you cannot access the portal: Double-check your user name and password and reenter the information if necessary. Passwords are case-sensitive. Make sure you do not have Caps Lock turned on. Contact your supervisor or system administrator if your user account does not allow you to access a portlet, or certain screens within a portlet that are required to perform your job duties. 2.2 Logging Out and Exiting the Portal Use the following instructions to log out and exit the Repair Facility Portlet. Logging out is important to keep unauthorized users from accessing the portal. To Log Out of the Portal Save any changes in the current screen as necessary. Page 4 of 25 © 2008-2010 Parsons Corporation Confidential and Proprietary NJVIIS_Emission Repair Manual.doc Version: 0.4 VIIS System Application Manual 1) Click Logout, located at the top of each screen in the portal. A screen displaying logout information appears. Figure 3 Single Sign-Off Screen 2) Click Return to log in to the portal again. Or Click Close to exit the Internet browser. 2.3 Navigating the Portlet The following sections describe the parts of the Repair Facility Portlet that are used to access application screens and display important information about using the portlet. Navigating with Portlet Links When you log in to the New Jersey Vehicle Inspection Portal, the Repair Facility Portlet menu appears on the screen. NOTE: All of the links shown may not appear for you. The links available depend on the level of access you have with your user account. Page 5 of 25 © 2008-2010 Parsons Corporation Confidential and Proprietary NJVIIS_Emission Repair Manual.doc Version: 0.4 VIIS System Application Manual Figure 4: Repair Facility Portlet Click the link to perform the task you need to accomplish. The Repair Facility Portlet appears. Figure 5: Repair Facility Portlet Navigating with Tabs Once the Repair Facility Portlet is open, you can navigate through the application using the tabs at the top of the screen. Figure 6: Repair Facility Portlet Tabs Page 6 of 25 © 2008-2010 Parsons Corporation Confidential and Proprietary NJVIIS_Emission Repair Manual.doc VIIS System Application Manual Version: 0.4 For example if the Manage Repair Date > Enter Repair Data tab is active and you want to look at a different repair record, click the View Repair Data link on the next tab to display the Repair Data Search screen. Figure 7: Repair Data Search Screen Page 7 of 25 © 2008-2010 Parsons Corporation Confidential and Proprietary NJVIIS_Emission Repair Manual.doc Version: 0.4 VIIS System Application Manual 3 Viewing Repair Information The instructions in this chapter describe how to search for and view previously entered vehicle repair information. 3.1 Viewing Repair Information Follow these instructions to search for and view previously entered vehicle repair information. To View Repair Information 1) From the Repair Facility portlet, click View Repair Data. The Repair Data Search screen appears. Figure 8: Repair Data Search Screen 2) Enter information about the repair record to be located in the search criteria provided. The following table provides a description of each field: Field Description Repair Order Number The work order or invoice number. Repair Confirmation Number The unique repair confirmation number assigned by the system. Registration VIN The vehicle identification number (VIN) for the vehicle. A VIN is a combination of numbers or letters, or both, which the manufacturer assigns to a vehicle for identification purposes. From Date of Repair Used together with the To Date of Repair field, enter the oldest date in a range of dates in which the vehicle was repaired. Enter the date in the mm/dd/yyyy format or click the calendar icon () and select the beginning date. Page 8 of 25 © 2008-2010 Parsons Corporation Confidential and Proprietary NJVIIS_Emission Repair Manual.doc Version: 0.4 VIIS System Application Manual To Date of Repair Used together with the From Date of Repair field, enter the most recent date in a range of dates in which the vehicle was repaired. Enter the date in the mm/dd/yyyy format or click the calendar icon (). 3) Click Retrieve. The repair record matching the search criteria appear on the Repair Data Search Results screen. NOTE: The search results are sorted by the Date of Repair. Figure 9: Repair Data Search Results Screen The following table describes the columns available in this screen: Column Description Confirmation No. The unique number assigned by the system when the repair information was originally entered and saved. Registration VIN The vehicle identification number (VIN) for the vehicle. A VIN is a combination of numbers or letters, or both, which the manufacturer assigns to a vehicle for identification purposes. License Plate Number The DMV-assigned number for the vehicle. Date of Repair The date the repair work was completed. Order No. The work order or invoice number for the repair work. 4) In the Confirmation No. column, click the number for the repair information you would like to view. The repair information appears in the View Repair Details screen. Page 9 of 25 © 2008-2010 Parsons Corporation Confidential and Proprietary NJVIIS_Emission Repair Manual.doc Version: 0.4 VIIS System Application Manual Figure 10: View Repair Details Screen The following table describes the fields on the screen: Field Description Confirmation Number The unique repair confirmation number assigned by the system. Registration VIN The vehicle identification number (VIN) for the vehicle. A VIN is a combination of numbers or letters, or both, which the manufacturer assigns to a vehicle for identification purposes. Data Entry Date The date the repair information was entered into the database in the mm/dd/yyyy format. License Plate Number The DMV-assigned number for the vehicle. Vehicle Make The manufacturer or the vehicle, for example Ford or Toyota. Vehicle Model Name The model name of the vehicle as designated by the manufacturer, for example Explorer or Avalon. Vehicle Model Year The calendar year designated by the manufacturer as the model year for a particular vehicle design. Order Number The work order or invoice number for the repair work. Facility ID The unique identification number of the repair facility that performed the vehicle repairs. Date of Repair The date the repairs were made to the vehicle. This may be a different date from the data entry date. Page 10 of 25 © 2008-2010 Parsons Corporation Confidential and Proprietary NJVIIS_Emission Repair Manual.doc Version: 0.4 VIIS System Application Manual Data Entry Date The date the vehicle repair information was added. Technician ID The unique identification number for the technician that performed the repair. Emission Test Type Indicates whether the emission test was done for a vehicle that runs on gasoline or on diesel. Emission Repair Code(s) Gasoline or diesel emission repair codes that represent specific emissions related items that have been repaired. 5) If you would like to view additional search results, click Back to Search Results. Entering Repair Information This chapter describes how to enter repair information when you have completed repair work on a vehicle that has failed an emission inspection. Some of the information about the vehicle is automatically populated by the Vehicle Information Database (VID). The following section is contained within this chapter: 3.2 Entering Repair Information Once you have completed emission-related repair work to a vehicle that failed an emissions inspection, you must log the repair information in the Repair Facility Portlet. To Enter Repair Information 1) From the Repair Facility Portlet, select Enter Repair Data. The Vehicle Search screen appears. Figure 11: Vehicle Search Screen 2) Enter search criteria in the Registration VIN field or the License Plate Number field. 3) Click Retrieve. The List of Vehicles screen appears. Page 11 of 25 © 2008-2010 Parsons Corporation Confidential and Proprietary NJVIIS_Emission Repair Manual.doc Version: 0.4 VIIS System Application Manual Figure 12: List of Vehicles Screen NOTE: If the vehicle data that appears does not belong to the vehicle you repaired, click New Search and try your search again. 4) In the VIN column, click the vehicle identification for the repair information you would like to view. The Enter Repair Details screen appears. Figure 13: Enter Repair Details Screen 5) Enter the repair information in each of the fields provided. The following table describes each field: Field Description Registration VIN The vehicle identification number (VIN) for the vehicle. A VIN is a combination of numbers or letters, or both, which the manufacturer assigns to a vehicle for identification purposes. This field is automatically populated from the VID. Page 12 of 25 © 2008-2010 Parsons Corporation Confidential and Proprietary NJVIIS_Emission Repair Manual.doc Version: 0.4 VIIS System Application Manual Data Entry Date The date the vehicle repair information was entered in the Repair Facility Portlet. This field is automatically populated with today’s date. License Plate Number The DMV-assigned number for the vehicle. This field is automatically populated from the VID. Vehicle Make The manufacturer or the vehicle, for example Ford or Toyota. This field is automatically populated from the VID. Vehicle Model Name The model name of the vehicle as designated by the manufacturer, for example Explorer or Avalon. This field is automatically populated from the VID. Vehicle Model Year The calendar year designated by the manufacturer as the model year for a particular vehicle design. This field is automatically populated from the VID. Order Number Enter the work order or invoice number for the repair work. Facility ID Select the facility ID from the drop-down. The Facility ID is the unique identification number of the repair facility that performed the vehicle repairs. Date of Repair Select the date the repairs were made to the vehicle by clicking the calendar (). You can also enter the date manually in the mm/dd/yyyy format. Technician ID Enter the unique identification number for the technician that performed the work. Emission Test Type Select gasoline or diesel. Page 13 of 25 © 2008-2010 Parsons Corporation Confidential and Proprietary NJVIIS_Emission Repair Manual.doc Version: 0.4 VIIS System Application Manual Emission Repair Code(s) Gasoline or diesel emission repair codes that represent specific emissions related items that have been repaired. Select all that apply. To make multiple selections hold down the Ctrl key and click the list item. 6) When you have finished entering the repair information, click Save. The screen refreshes and a confirmation message appears. This confirmation number must be written on the FAIL VIR. Figure 14: Confirmation Message Page 14 of 25 © 2008-2010 Parsons Corporation Confidential and Proprietary NJVIIS_Emission Repair Manual.doc VIIS System Application Manual Version: 0.4 4 Deleting Repair Information Repair Facility Portlet users with the role of Repair Facility Supervisor have the ability to delete repair information that has been entered in to the system. Deleting the repair information prevents other Repair Facility Portlet users from viewing invalid information. Deleted repair information must be re-entered for the data to be used: deleting repair information is final and cannot be undone. 4.1 Deleting Repair Information Before the Repair Facility Supervisor can delete a repair information, the record must be retrieved. Once the record is retrieved and deleted, the information is no longer viewable by any other Repair Facility Portlet user. To Delete Repair Information 1) From the Repair Facility Portlet, select Delete Repair Data. The Repair Data Search screen appears. Figure 15: Repair Data Search Screen 2) Enter search criteria into one of the fields. The following table describes each field: Field Description Repair Order Number The work order or invoice number for the repair work. Repair Confirmation The unique number assigned by the system when the repair Number information was originally entered and saved. Registration VIN The vehicle identification number (VIN) for the vehicle. A VIN is a combination of numbers or letters, or both, which the manufacturer assigns to a vehicle for identification purposes. Page 15 of 25 © 2008-2010 Parsons Corporation Confidential and Proprietary NJVIIS_Emission Repair Manual.doc VIIS System Application Manual Version: 0.4 From Date of Repair Used together with the To Date of Repair field, enter the oldest date in a range of dates in which the vehicle was repaired. Enter the date in the mm/dd/yyyy format or click the calendar icon () and select the beginning date. To Date of Repair Used together with the From Date of Repair field, enter the most recent date in a range of dates in which the vehicle was repaired. Enter the date in the mm/dd/yyyy format or click the calendar icon (). 3) Click Retrieve. The Repair Data Search Results screen appears. Figure 16: Repair Data Search Results Screen The following table describes the columns available in this screen: Column Description Confirmation No. The unique number assigned by the system when the repair information was originally entered and saved. Registration VIN The vehicle identification number (VIN) for the vehicle. A VIN is a combination of numbers or letters, or both, which the manufacturer assigns to a vehicle for identification purposes. License Plate Number The DMV-assigned number for the vehicle. Date of Repair The date the repair work was completed. Order No. The work order or invoice number for the repair work. 4) In the Confirmation No. column, click the link for the repair information you would like to delete. The Delete Repair Details screen appears. Page 16 of 25 © 2008-2010 Parsons Corporation Confidential and Proprietary NJVIIS_Emission Repair Manual.doc Version: 0.4 VIIS System Application Manual Figure 17: Delete Repair Details Screen The following table describes the fields on this screen: Field Description Confirmation Number The unique number assigned by the system when the repair information was originally entered and saved. Registration VIN The vehicle identification number (VIN) for the vehicle. A VIN is a combination of numbers or letters, or both, which the manufacturer assigns to a vehicle for identification purposes. Data Entry Date The date the vehicle repair information was entered in the Repair Facility Portlet. License Plate Number The DMV-assigned number for the vehicle. Vehicle Make The manufacturer or the vehicle, for example Ford or Toyota. Vehicle Model Name The model name of the vehicle as designated by the manufacturer, for example Explorer or Avalon. Vehicle Model Year The calendar year designated by the manufacturer as the model year for a particular vehicle design. Page 17 of 25 © 2008-2010 Parsons Corporation Confidential and Proprietary NJVIIS_Emission Repair Manual.doc Version: 0.4 VIIS System Application Manual Order Number The work order or invoice number for the repair work. Facility ID The Facility ID is the unique identification number of the repair facility that performed the vehicle repairs. Date of Repair The date in which the repair work was completed. Technician ID The unique identification number for the technician that performed the repair. Emission Test Type Indicates the type of fuel the vehicle runs on, gasoline or diesel. Emission Repair Code(s) Gasoline or diesel emission repair codes that represent specific emissions related items that have been repaired. 5) Review the information to make sure you have selected the correct repair record. 6) When you are ready to remove the record, click Delete. A message appears asking you to confirm that you want to delete the record. 7) If you want to delete the record, click Ok. The record is deleted from the system. Page 18 of 25 © 2008-2010 Parsons Corporation Confidential and Proprietary NJVIIS_Emission Repair Manual.doc VIIS System Application Manual Version: 0.4 5 Repair Facility Managers Repair Facility Managers are responsible for maintaining user accounts for the technicians at their facility. Only the Motor Vehicle Commission (MVC) User Administrator has the responsibility for setting up and managing Repair Facility Manager accounts for the Repair Facility Portlet. Repair Facility Managers also have permission to view, enter and void repair entries. If you forget your sign on id or your password please send an email to: [email protected] In the subject line of your email please indicate that you need to have your id or password sent to you. Include your ERF number along with a name and contact number if there are any questions Page 19 of 25 © 2008-2010 Parsons Corporation Confidential and Proprietary NJVIIS_Emission Repair Manual.doc VIIS System Application Manual Version: 0.4 6 Managing Repair Facility Technicians The instructions in this chapter are for Repair Facility Managers responsible for adding and updating repair facility technician accounts needed to access the Repair Facility Portlet. 6.1 Managing Repair Facility Technicians Repair Facility Managers are responsible for setting up and maintaining user accounts for the technicians at their facilities using the Repair Facility Portlet. To Create a New Repair Facility Technician User Account 1) From the Repair Facility Portlet, click Setup Technician. The Repair Data User Management screen appears. Figure 23: Repair Data User Management Screen 2) Enter the technician’s information in all of the available fields. The following table describes each field in the top section of the screen: Field Description First Name The Repair Facility Technician’s first name. Middle Initial The Repair Facility Technician’s middle initial. Last Name The Repair Facility Technician’s last name. Page 20 of 25 © 2008-2010 Parsons Corporation Confidential and Proprietary NJVIIS_Emission Repair Manual.doc Version: 0.4 VIIS System Application Manual User Name The Repair Facility Technician’s user name for the New Jersey Vehicle Inspection Portal. Password The password the Repair Facility Technician will use to log in to the New Jersey Vehicle Inspection Portal. Re-enter Password Re-enter the password for verification. Email Address The Repair Facility Technician’s e-mail address. Status If you are ready for the Repair Facility Technicians’s to use the Repair Facility Portlet, set their status to Active. If you do not want the technician to access the portlet, select Inactive. 3) In the Station Authorization section, select the repair facilities to which the technician should be assigned. 4) Click Create User The screen refreshes and a message appears confirming the technician account has been created. To Update a Repair Facility Technician User Account 1) From the Repair Facility Portlet, click Update Technician. The Search User screen appears. Figure 24: Search User Screen 2) Enter search criteria in one of the fields The following table describes each field: Field Description User Name The Repair Facility Technician’s user name for the New Jersey Vehicle Inspection Portal. First Name The Repair Facility Technician’s first name. Last Name The Repair Facility Technicians’s last name. Page 21 of 25 © 2008-2010 Parsons Corporation Confidential and Proprietary NJVIIS_Emission Repair Manual.doc Version: 0.4 VIIS System Application Manual 3) Click Search User. The List of Users screen appears. Figure 25: List of Users Screen 4) In the User Name column, click the user name for the technician record you want to update. The Repair Data User Management screen appears. Figure 26: Repair Data User Management Screen 5) (Optional) Modify the user’s information as needed. The following describes each field in the user information section: Field Description First Name The Repair Facility Technician’s first name. Middle Initial The Repair Facility Technician’s middle initial. Last Name The Repair Facility Technician’s last name. Page 22 of 25 © 2008-2010 Parsons Corporation Confidential and Proprietary NJVIIS_Emission Repair Manual.doc Version: 0.4 VIIS System Application Manual User Name The Repair Facility Technician’s user name for the New Jersey Vehicle Inspection Portal. Change Password? Select Yes to force the user to change their password on their next log in. Email Address The Repair Facility Technician’s e-mail address. Status If you want the Repair Facility Technician to be able to use the Repair Facility Portlet, select Active. If you do not want them to be able to use the portlet, select Inactive. 6) (Optional) Modify the user’s assigned facility by selecting or deselecting facilities in the Station Authorization(s) section. 7) When you have finished updating the user’s information, click Update User. The screen refreshes and a message appears informing you that the user account has been updated. Page 23 of 25 © 2008-2010 Parsons Corporation Confidential and Proprietary NJVIIS_Emission Repair Manual.doc VIIS System Application Manual Version: 0.4 7 Gasoline Repair Codes The following table shows repair codes and descriptions for vehicles that run on gasoline. Repair Code Description 01 PCV System 02 Thermostatic Air Cleaner 03 Air Injection System 04 Air Pump 05 Air Filter 06 EGR System - Other 07 EGR Valve 08 Evaporator Emission Controls - Other 09 Fuel Cap 10 Vapor Lines 11 Charcoal Canister 12 Catalytic Converter / Thermal Reactor 13 Ignition System - Other 14 Spark Plugs / Ignition Wires 15 Timing 16 Fuel Filter 17 Carburetor Adjustment 18 Carburetor Rebuild / Replace 19 Fuel Injectors 20 Fuel Injection System - Other 21 Engine Mechanical - Other 22 Vacuum Hoses / Fittings 23 Computer System / ECM 24 Oxygen Sensor 25 Other Electronic Sensor 99 Other Repairs Page 24 of 25 © 2008-2010 Parsons Corporation Confidential and Proprietary NJVIIS_Emission Repair Manual.doc VIIS System Application Manual Version: 0.4 8 Diesel Repair Codes The following table shows the repair codes and code descriptions for vehicles that run on diesel. Repair Code Description 01 Air Filter R/R 02 Air/Fuel Ratio - Adjust 03 EGR Switch - Replace 04 EGR Valve - Replace 05 Engine - R/R 06 Fuel Filter - Replace 07 Fuel Pump - Replace 08 Fuel Rack - Adjust 09 Governor - Adjust 10 Injection Timing - Adjust 11 Injector Nozzle - R/R 12 Intercooler - R/R 13 Metering Pump - R/R 14 Turbo - R/R 15 Valve Timing - Adjust 16 Decarbonize 17 Chip Flash 18 Low NOx Rebuild 99 Other Repairs Page 25 of 25 © 2008-2010 Parsons Corporation Confidential and Proprietary NJVIIS_Emission Repair Manual.doc