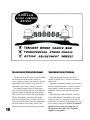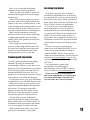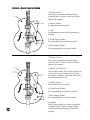
1
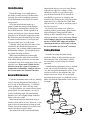
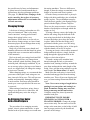
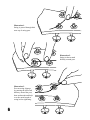
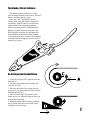
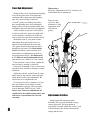
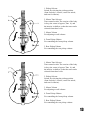
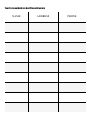
A Memo to Guitar Enthusiasts from Fred Gretsch Jr.
Information essential to every guitarist– students, professionals
and hobbyists–is gathered together here for you. Keep it in your
guitar case accessory pocket for quick reference about the care
of your guitar, how to use it to the full extent of its capabilities,
what to demand when purchasing a guitar, and for your personal
file of phone numbers and addresses.
Your musical instrument is a very personal extension of you,
the musician. It must be worthy of your ability and possibilities.
The musician who plays a GRETSCH guitar finds themselves
producing finer tone, developing increasing speed with
less fatigue, and taking new pride in the superb beauty and
craftsmanship of their instrument.
The guitar you play is a definite factor in the quality of the music
you produce, and a GRETSCH guitar truly glorifies the talents
of the artist who commands it.
Introduction
Thank you for choosing a Gretsch® guitar. We believe this new
instrument will give you many years of pleasure.
Please take a few moments to read through this booklet. In it you
will find answers to many of your questions and other invaluable
information about care and maintenance for your guitar.
Contents
2
2
2
3
3
3
4
4
5
5
7
7
8
8
9
9
10
10
11
11
12
14
16
Moisture Content and Humidity
Protection from Temperature and Humidity
Cracks in the Wood
Finish-Checking
General Maintenance
Tuning Machines
Tuning 6-String Guitars
Tuning 12-String Guitars
Changing Strings
Re-Stringing Your Guitar with a Fixed Tailpiece
The Bigsby® Vibrato Tailpiece
Re-Stringing the Bigsby® Vibrato
Truss Rod Adjustment
Adjustment of Action
Pickup Adjustment
Floating Bridge Adjustment
Space Control Bridge Adjustment
Resolving Tuning Issues
Traveling with Your Guitar
Servicing Your Guitar
Basic Controls Guide
Gretsch® Warranty
Personal Address and Telephone Directory
For detailed specifications of Gretsch instruments,
please visit our website at: www.gretschguitars.com
1
Moisture Content and Humidity
Wood is a porous, organic material, and
is affected dimensionally by changes in the
amounts of moisture it contains. Fine guitars
made from solid woods, are without a doubt,
more susceptible to the effects of changes
in humidity than laminated instruments, and
therefore require ongoing attention to their
condition.
The moisture content of wood is
determined by the relative humidity and
temperature of the surrounding atmosphere.
Relative humidity is expressed as a
percentage of air’s capability to hold
moisture. For example, 30% relative
humidity means that the air is holding 30% of
the moisture it could possibly hold at a given
temperature.
The moisture content for wood and the
relative humidity for air are measured quite
differently. In wood, a 6% moisture content
is present at 30% relative humidity and 72˚ F
temperature, (about 22.2˚ C).
Protection from Temperature
and Humidity
2
The greatest threats to a fine wood guitar,
are extremes of, and rapid changes in,
temperature and humidity.
High humidity can cause softening of
the glues used in the construction of the
instrument. Also, as the woods absorb
moisture from the air, it can cause the top
and back, especially on flat-top and classical
guitars, to expand and rise - making string
action high.
Conversely, if you live in or travel with
your guitar to a drier climate, (either hot or
cold), there is another danger. In areas of low
humidity, the evaporation of moisture in the
wood can cause shrinkage and cracking, no
matter how long the wood may have been
previously aged. It also can cause the top and
back to shrink, making the string action low.
The collective experience of all of the
major guitar manufacturers today, has
demonstrated that the ideal temperature to
preserve the integrity of solid wood acoustic
guitars is room temperature, which is about
70˚ F (20.5˚ C). The ideal humidity is about
40% to 50%.
In the winter, the forced air systems used
to heat most homes, can drive temperatures
up and humidity levels dangerously low for
guitars. A good measure of protection against
drying out your guitar is to use a room
humidifier.
When the instrument is not in use, we
recommend that you keep it in its case and
use one of the small guitar humidifiers such
as “Dampit”, available from many instrument
dealers. Do not leave the guitar out for long
periods near a heating vent, radiator or in
direct sunlight near a window.
Do not leave your guitar in the trunk of
a car for long periods and keep it away
from excessive heat and cold. Please note:
Damage caused to the guitar as the result
of exposure to temperature or humidity
changes will not be covered under the
Gretsch® warranty.
Cracks in the Wood
Cracks in the wood are typically caused
by changes in temperature and humidity.
While a crack may initially be alarming, if
it is taken care of promptly it shouldn’t be a
cause for undue concern. Cracks may easily
be repaired without compromising structural
or tonal integrity.
If the crack is in the top, near the bridge,
loosen all the strings to reduce tension,
(which could potentially exacerbate the
problem), and have the crack repaired as
soon as you can. Please note: Cracks in
the wood, which occur as the result of
exposure to temperature or humidity
changes will not be covered under the
Gretsch® warranty.
Finish Checking
Finish checking, (very small splits in
the finish), usually occurs in winter and is
typically the result of suddenly exposing
a cold instrument to the shock of warmer
temperatures.
All of the materials that make up a
guitar expand and contract with changes
in temperature and humidity, and they do
this at different rates. Wood expands as it
warms, and it does so faster than the finish
placed over it. When this expansion occurs,
the finish does stretch somewhat, but when
it cannot stretch anymore, it will split and
fracture in little lines over the wood.
Although it does not affect the tone of the
instrument, this finish checking mars its
appearance. By avoiding sudden temperature
and humidity changes, you should not have
any finish checking problems.
When an instrument has been brought
into a building after it has been out in the
cold, allow plenty of time for it to become
acclimated to the new temperature before you
open the case. Please note: Finish checks,
which occur as the result of exposure to
temperature or humidity changes will not
be covered under the Gretsch warranty.
General Maintenance
Clean the instrument after each use, making
sure to wipe the fingerboard and strings, as
well as any of the plated parts, i.e. machine
heads, pickups, etc. with a soft dry cloth.
For gloss finishes, use a non-silicone based
guitar polish. For satin finishes, use only a
soft dry polishing cloth. For hand-rubbed
finishes, use a soft, slightly damp cloth and
follow with a dry cloth.
When not playing the instrument, keep it
tuned to pitch and in its case. However, if you
plan to store the instrument for long periods
of time, loosen the strings a bit to relieve the
tension, but do not remove them.
The natural oils in Rosewood and Ebony
fingerboards may dry out over time. Rough,
exposed fret edges are evidence of dry,
shrunken wood. It is a good idea to give
your fretboard a drink of raw linseed oil
periodically to preserve its integrity and
natural beauty. Remove the strings first; then
apply the oil to a clean lint free cloth. Rub
into the wood, let it soak in, and then wipe to
dry any excess oil.
Be careful when using vinyl, plastic or
synthetic leather guitar straps, guitar stands
and wall hangers using surgical rubber
tubing, as these materials may react with,
and mar the finish of your instrument. Please
note: Damage caused to the instrument by
the use of non-FMIC-approved polishes,
cleaning materials or accessories, will not
be covered under the Gretsch® warranty.
Tuning Machines
Gretsch® uses only the finest tuning
machines. Many of these machines are prelubricated, die-cast, sealed tuners, which
do not require periodic oiling for smooth
operation.
A small tension adjustment screw is located
at the end of each die-cast tuner’s button
(A), that also holds the button in place. If the
tension is too loose, the machine may slip
and go out of tune easily. If it is too tight,
the button may become very difficult to turn.
Make sure that the adjustment is firm, but not
too tight.
3
For instruments with open gear tuners, make
sure to lubricate the gear with a drop of
lightweight oil from time to time for smooth
operation.
The Chrome and Gold plating on Gretsch
tuning machines may become degraded from
the acids and oils in finger sweat. Wipe the
machines off with a soft dry cloth after each
use to preserve their appearance and function.
Strings that have not been secured
properly to the tuning machine post may
easily slip and go out of tune. This problem
is commonly misdiagnosed as an issue with
the tuners. Check your string installation
carefully. See illustrations 1, 2, and 3.
Tuning 6-String Guitars
4
There are a couple of different methods
for tuning a guitar, depending on whether
your guitar is acoustic, electric or an
acoustic with a pickup. If you don’t own an
electronic chromatic tuner with a reference
tone, you may want to purchase one. It will
dramatically simplify tuning your acoustic or
electric guitar.
Always tune from below pitch, up to the
correct pitch instead of down from a higher
pitch. This will help eliminate string slack
from the tuning machine and decrease the
possibility of slippage and tuning changes
as you play. The strings should be tuned
as follows, starting from the low (thickest)
string, to the high (thinnest): E, A, D, G, B, E.
If you have an acoustic guitar use the A440 reference tone on your tuner, a guitar
pitch pipe, an A-440 tuning fork or other
pitch reference, and tune the second string,
“A” to pitch.
Then, depress the second, or “A” string at
the 5th fret, to produce a “D”, and tune the
“D” string to that same pitch.
Next, depress the D string at the 5th fret, to
produce a “G”, and tune the “G” string until
the pitches match.
Next, depress the “G” string at the 4th fret,
to produce a “B”, and tune the “B” string
until the two pitches match.
Next, depress the “B” string at the 5th fret,
to produce an “E” and tune the thinnest string
to a matching “E”.
Finally, go back and play the low “E” string
and tune it until the pitch at the 5th fret, an
“A”, matches the “A” on the adjacent string.
If using an electronic tuner on your electric
or acoustic/electric, simply plug in your
guitar, turn the volume up and tune from low
strings to high as noted on the tuner: E, A, D,
G, B, E.
Tuning 12-String Guitars
Due to the tremendous amount of tension
exerted on the neck by the 12 strings, we
suggest that you use a light gauge .010 to
.048 set on your 12-string guitar.
In standard 12-string tuning, the second
string in each pair is tuned to the same
pitches, E, A, D, G, B, E, and using the
same methods as the six string guitar on the
previous page.
For the E, A, D, and G strings, the first
smaller string in each pair is tuned to the
same note, but an octave higher in pitch than
its partner. For the B and E strings, the first
string in each pair is tuned in unison, (exactly
the same pitch), as its partner string.
Many players find it difficult to press the
strings down on a 12-string, due to the high
tension caused by the extra strings.
A remedy that some players choose is to
tune the entire guitar to a lower relative pitch,
such as E-flat or D; thereby reducing the
string tension. You may then use a capo on
the first or second fret, to bring it back up to
where it plays at standard pitch.
The guitar will certainly be easier to play,
and the reduced tension will put less stress on
the neck over time, but bear in mind that it
will also sacrifice a bit of the tone projection
of the instrument.
All Gretsch® 12-strings feature a truss rod
system for superior strength and stability,
however, a 12-string tuned at standard
pitch, should be monitored regularly for
the possible need of truss rod adjustments.
A guitar in need of an adjustment that is
ignored may develop permanent problems.
(See page 14.) Please Note: Warpage of the
neck, caused by the neglect of necessary
adjustments will not be covered under the
Gretsch warranty.
Changing Strings
A fresh set of strings can breathe new life
into your instrument. That is why many
“tone-conscious” touring professionals
change their strings before every
performance. While there is no set rule on
how often to change strings, we have found
that most players do not change them nearly
as often as they should.
Body oils, acids from sweaty hands and
humidity all interact with the metals in guitar
strings and cause a corrosion and breakdown
of the materials.
Don’t wait until your strings break and fall
off from old age before you change them.
Worn, oxidized, pitted and dirty strings will
not hold pitch, and simply sound bad. If you
are an average player, playing several times a
week, we suggest that you change the strings
at least once a month.
When changing strings, we recommend that
you remove and replace each string one at a
time, instead of all at once. This will prevent
sudden and potentially damaging changes
in neck tension. Each new string should be
tuned up to correct pitch before the next one
is removed.
When tuning a brand new string, always
bring it up to pitch slowly. Otherwise, the
rapid stretching may cause the string to
break.
Re-Stringing Your Guitar
with a Fixed Tailpiece
The procedure for re-stringing acoustic
guitars, electric guitars and basses, is quite
similar in the way the strings are wound onto
the tuning machines. There are differences
though, in how the strings are attached to the
bridges of acoustic and electric guitars.
Gretsch® flat-top acoustics have a pin style
bridge with holes and bridge pins to hold the
strings in place. The predominant setup for
Gretsch electric guitars is the floating bridge
paired with the Bigsby Vibrato Tailpiece.
There are also some acoustics and electrics
that have fixed tailpieces through which the
strings are fed.
To string a flat-top, remove the bridge pin
and the old string, drop the ball end of the
new string into the hole in the bridge, then
re-insert the bridge pin to keep the string
in place. Make sure that the bridge pin is
positioned with the groove over the string.
Do not hammer the bridge pin in. A firm push
with the thumb will secure it in place.
To string an electric with a surface mounted
bridge and fixed tailpiece, simply feed the
string through the appropriate hole in the
bridge or slot in the tailpiece.
To attach a string to the machine head,
thread it through the hole or slot on the
machine head, running it halfway around the
post, then underneath the main length of the
string. Next, pull the string end back over the
main length. See illustrations 1, 2 and 3.
Make sure that each string is seated well,
stretched and snugged down on the tuning
machine post. This will prevent slipping and
save you some tuning frustrations down the
road.
Note: Never cut a string to length before
putting it on your guitar and tuning it to
pitch. Premature cutting may cause the
string to unwrap and become useless.
Crimp the string first, then clip near the
machine head post.
IMPORTANT NOTE FOR RESTRINGING A GUITAR WITH A
FLOATING BRIDGE: Change the strings
one at a time only. Do not remove all of the
strings at the same time, as the bridge is held
into its proper position by the downward
pressure of the strings.
5
Illustration 1.
String is passed through hole
near top of string post.
Illustration 2.
String is then wound
halfway around post.
Illustration 3.
Prevent string slippage
by running the short end
halfway around the post,
then underneath and back
over the main length of
string before tightening.
6
The Bigsby® Vibrato Tailpiece
The Bigsby Vibrato Tailpiece is a time
proven design and has been used by Gretsch®
Guitars for more than 45 years.
Since the 1950’s the Bigsby Vibrato
Tailpiece has been the choice of guitarists
worldwide - and the choice of world class
guitar builders for standard equipment
on their premium guitars. Following Paul
Bigsby’s original formulas from the early
fifties, Bigsby tremolos are still hand cast,
hand polished and hand assembled. Hand
cast aluminum frames, stainless steel handles,
and nickel-plated string bars assure years of
trouble free service.
Re-Stringing the Bigsby Vibrato
1. Crimp the string at a 45o angle next to the
ball end (A).
2. Feed the string underneath, around and
over the axle (B).
3. Place the ball end of the string onto the
axle pin (C), keeping tension on the string to
hold the ball in place.
4. Push a foam wedge (D) into the space
under the axle to keep the string in place on
the pin while winding.
5. Wind the string onto the tuning machine,
tune to pitch and remove the foam wedge.
6. Repeat for each string.
7
Truss Rod Adjustment
String tension exerts a tremendous bending
force on the guitar neck. Environmental
conditions like temperature and humidity
may also cause bowing of the neck.
Gretsch® guitars (excluding Lap Steels)
have an adjustable truss rod, running the
length of the neck that counteracts this force,
strengthens the neck and insures straightness.
A truss rod that is too loose will result in
a concave neck bow, (action too high) and
a truss rod that is too tight will result in a
convex neck bow (low action and fret buzz).
Should the neck of your guitar require
adjustment, first remove the rod cover
located on the headstock above the nut.
(The guitar should remain tuned to pitch
during this procedure.) For Professional
Series instruments, insert an 8mm-5/16”
Gretsch truss rod adjustment wrench, (or
an equivalent nut driver.) See illustration
4. For Historic and Synchromatic Series
instruments, use a 5mm-3/16” hex wrench.
If the neck has a concave bow, tighten the
truss rod nut by turning it clockwise.
If the neck is humped or has a convex bow,
loosen the truss rod nut by turning it counter
clockwise.
Adjust the rod only a partial turn at a time,
allow time for the wood to settle and sight
down the neck after each adjustment. Be
careful not to over-tighten the rod.
If you meet excessive resistance or if you
have any doubts in your ability to make
this adjustment correctly, take your guitar
to an Authorized FMIC Service Center.
Please note: Truss rod adjustments are
considered to be routine maintenance and
will not be covered under the Gretsch
warranty.
8
Illustration 4.
Showing adjustment with 5/16” nut driver on
Professional Series instrument.
Remove truss
rod cover from
headstock. Using
appropriate tool,
turn rod nut
gently.
Truss rod cover.
Adjustment of Action
String height and tension typically
determine the ease with which the strings
can be depressed. This description of
playability is usually called the “action”, and
is determined by the distance between the
strings and the frets.
Depending on your technique or style of
play, high action can sometimes be difficult to
play, and low action may result in string buzz.
Most electric guitars have height adjustable
bridges with adjustable saddles that allow
you to easily tailor the action to your needs.
On a flat-top or classical guitar, adjustment
is a little more involved. To lower the action,
the bridge saddle must be removed, cut
down to the appropriate height and then reinstalled. To raise the action, the saddle must
be removed and replaced by a new, higher
saddle.
Please note: These types of action
adjustments on acoustic guitars, should
be performed only by an experienced and
qualified repairman.
A comprehensive guitar setup guide, with
detailed setup specifications, is available on
the F.M.I.C. Customer Service website at
www.mrgearhead.com.
Pickup Adjustment
Each Hilo’TronTM head has one set
of 6 adjustable screw pole-pieces. Each
Filter’TronTM head has two sets of
6 adjustable screw pole-pieces. Each
DynaSonicTM head has 6 alnico pole-pieces
with separate height adjustment screws. The
purpose of these adjusting screws is to enable
the player to adjust the tonal balance of their
guitar to their own personal taste. (Note: The
factory has preset the adjustment screws to
give the best over-all performance for the
majority of guitarists.) However, there are
players who require a specific type of balance
to fit their individual style of playing. By
raising or lowering the pole-pieces with a
small screwdriver, the volume of each string
can be increased or decreased to suit your
particular needs.
CAUTION: When raising the pole-pieces,
make sure that you leave enough clearance
for the string to vibrate freely. Do not let the
screw or pole-piece touch the string.
Floating Bridge Adjustment
Gretsch® guitars use a variety of “floating”
bridges including, the compensated
Synchromatic bridge, the fully adjustable
bridge, the original straight bar-bridge, the
space control bridge, the original roller bridge
and the compensated Bigsby® bridge, coupled
with both fixed and vibrato tailpieces.
A floating bridge typically has an arched
wooden or aluminum base that is held in
its proper position on the instrument by
the downward pressure of the strings. If
the bridge is bumped or moved during restringing, the intonation will no longer be
true.
To reset the intonation adjustment, check
both the 12th fret harmonic and the stopped
12th fret tuning of both the high and low Estrings, and adjust as follows:
If the pitch of the note at the 12th fret is
sharp, relative to the pitch of the harmonic,
lightly tap the foot of the bridge to move
it back toward the tailpiece until the two
pitches agree.
If the pitch of the note at the 12th fret is
flat relative to the pitch of harmonic, lightly
tap the foot of the bridge to move it forward
toward the neck until the two pitches agree.
When the harmonic and 12th fret pitches
agree on both the E-strings of a nonadjustable floating bridge, the instrument is
properly intonated.
To fine-tune the fully adjustable bridges,
adjust each saddle forward or back with the
individual intonation screws while checking
the tuning of the harmonic against the 12th
fret pitch, per the normal intonation process.
IMPORTANT NOTE: When re-stringing
a guitar with a floating bridge, change the
strings one at a time. Do not remove all of
the strings at the same time, as the bridge
is held into its proper position by the
downward pressure of the strings.
9
10
Space Control Bridge Adjustment
Resolving Tuning Problems
The floating Gretsch® Space Control Bridge
has been preset at the factory. However,
every guitarist can now fine-tune the spacing
adjustment of the strings to suit their own
individual style of play, if they so choose.
The knurled string wheels (B) that move
across the threaded bridge bar (A) enable the
player to adjust string spacing at the bridge.
Here’s all you do---loosen the string slightly,
lift the string gently in front of the bridge,
then turn the string wheel slowly to move it
in the desired direction. Once the adjustment
has been made to each string, retune your
guitar and enjoy your custom string spacing.
Most tuning problems are caused by a
couple of minor issues. The most common
sources are:
Improper seating and winding of the strings
onto the tuning machines. (Always wind the
string tightly, stretch the strings as you tune
and make sure you tune from low pitch to
high).
Friction at the saddle or the nut, (due to a
lack of lubrication), or binding of the string
at the nut, (due to a string slot cut in the nut
which does not directly correspond to the size
of the string resting in it). This is a common
problem if increasing the gauge size of
strings from those that were originally
shipped on the guitar.
Here are a few tips that should help
eliminate almost all tuning problems.
Make sure that each string is seated well,
stretched and snugged down on the tuning
machine post.
Tune from low pitch to high, so as not to
leave any slack in the string behind the nut.
If there is any slack, (usually unseen), in the
string windings at the tuning machine, it will
cause the string to go out of tune as soon as
you start using the tremolo or bending notes.
Make sure the instrument is properly
lubricated. With a Q-tip, touch a small drop
of lightweight machine oil to the bridge
saddles. Place some graphite powder in the
slots of the nut.
If the strings are stretched and seated
properly on the tuning machines and if all
the points of friction have been lubricated
properly, it should eliminate most of the
tuning problems you’ll ever run into.
Traveling with Your Guitar
Gretsch® guitars demonstrate the highest
standards of quality in material and
craftsmanship, and deserve only the best in
protection. We recommend that you purchase
a Gretsch factory guitar case that has been
designed and fitted exclusively for your
guitar to give it the utmost protection. *Keep
your guitar in a case when not playing it.
If you plan to travel, carry your instrument
in a hard shell case at all times for protection.
When traveling by air, your guitar may be
exposed to dramatic changes in temperature
and pressure. To help prevent possible
damage, de-tune all of the strings about a
whole step, so that the tension is reduced
from the top and neck of the instrument.
Gretsch offers a variety of hardshell
cases and gig bags for most guitar models.
Please contact your local Gretsch dealer for
information on the appropriate replacement
case for your guitar, or to place an order.
When ordering your factory case please
specify the exact model of your guitar.
Servicing Your Guitar
New guitars typically have a settling in
period where adjustments may be necessary
to compensate for wood movement caused by
the tension of the strings. Many experienced
guitar players have learned to adjust the truss
rod or “action” of their own instruments.
If you do not feel comfortable making
these adjustments to your new guitar we
recommend that you return the instrument
to your Gretsch® Dealer or to an Authorized
Fender® Service Center within 90 days of
the purchase, for an inspection and truss rod
adjustment if needed. This precaution should
identify and prevent potential damage to the
neck.
If major servicing is required, please
contact your local Authorized FMIC Service
Center. If you need assistance locating an
Authorized FMIC Service Center, please
contact your Gretsch Dealer, visit our Gretsch
website at www.gretschguitars.com, or call
our Consumer Relations Department at: (480596-7195).
For comprehensive guitar setup
specifications, and other support
documentation, visit our FMIC Customer
Service website at: www.mrgearhead.com.
Please note: Truss rod adjustments
and action adjustments are considered to
be routine maintenance and will not be
covered under the Gretsch warranty.
11
Gretsch® Basic Controls Guide
1. Pickup Selector
Switch for selecting the pickup position
(front for body’s exterior, center for mixed,
and rear for interior).
2. Master Volume
For adjusting overall volume.
3. Tone
For adjusting the tone of the front and rear
pickups.
4. Front Pickup Volume
For controlling the front pickup volume.
5. Rear Pickup Volume
For controlling the rear pickup volume.
1. Pickup Selector
Switch for selecting the pickup position
(front for body’s exterior, center for mixed,
and rear for interior).
2. Master Tone Selector
Tone control switch. The exterior of the body
is deep, the center is bypass (Tone 0), and
the interior is shallow, so that the tone can be
selected from three levels.
3. Master Volume
For adjusting overall volume.
4. Front Pickup Volume
For controlling the front pickup volume.
5. Rear Pickup Volume
For controlling the rear pickup volume.
12
6. Standby
In the center position, no sound is produced,
regardless of the volume controls. Sound
is produced when switched to either side
position.
1. Pickup Selector
Switch for selecting the pickup position
(front for body’s exterior, center for mixed,
and rear for interior).
2. Master Tone Selector
Tone control switch. The exterior of the body
is deep, the center is bypass (Tone 0), and
the interior is shallow, so that the tone can be
selected from three levels.
3. Master Volume
For adjusting overall volume.
4. Front Pickup Volume
For controlling the front pickup volume.
5. Rear Pickup Volume
For controlling the rear pickup volume.
1. Master Tone Selector
Tone control switch. The exterior of the body
is deep, the center is bypass (Tone 0), and
the interior is shallow, so that the tone can be
selected from three levels.
2. Pickup Selector
Switch for selecting the pickup position
(front for body’s exterior, center for mixed,
and rear for interior).
3. Master Volume
For adjusting overall volume.
4. Front Pickup Volume
For controlling the front pickup volume.
5. Rear Pickup Volume
For controlling the rear pickup volume.
13
Limitations and exclusions
GRETSCH ® GUITARS
1-YEAR LIMITED WARRANTY
FMIC warrants this Gretsch guitar to be free
from defects in materials and workmanship
for one (1) year from the date of original
purchase, subject to the limitations set forth
herein. This warranty applies only to the
original retail purchaser when this instrument
is purchased from an authorized Gretsch
dealer, and requires the purchaser to supply
a copy of the original proof of purchase
(original sales receipt with the instrument
serial number and his/her name indicated as
the purchaser, thereon) at the time service is
requested.
Repair service of defects covered by this
warranty can be performed only at an FMIC
Authorized Warranty Service Center, as
designated by FMIC. Remedies beyond
normal service repair of any Gretsch guitar
require both an evaluation of the defect and
a direct recommendation from an FMIC
authorized service center for alternative
considerations. A network of authorized
service centers is available for warranty
service. Your Gretsch dealer may also be
authorized for warranty service and should be
the first point of contact when service of any
kind is required for your Gretsch guitar.
All transportation, insurance and freight
charges associated with warranty service
and repairs on Gretsch guitars are the
responsibility of the purchaser, as is
any service initiated for the purpose of
customizing adjustments beyond factory
specifications. Initial standard setup
and adjustment of the instrument and its
components at the time of purchase are
considered normal dealer preparation.
14
The following items are not covered by this
warranty.
1. Fret wear, saddle wear, nut wear,
strings and batteries.
2. Setups, adjustments or routine
maintenance of any kind.
3. Damage to finishes or cracks,
splitting, or warpage of wood due to changes
in temperature or humidity, exposure to or
contact with sun, fire, moisture, body salts
and acids of perspiration, guitar straps, guitar
stands/hangers made from vinyl, plastic,
rubber or other synthetic materials, any other
chemicals or non-FMIC-approved polishes.
4. Damage, corrosion or rusting of any
hardware components caused by humidity,
salty air or exposure to the moisture, body
salts and acids of perspiration.
5. Any damage to an instrument
resulting from customization or modification.
6. Normal wear and tear on any part
of the instrument, case or gig bag including
jacks, controls, switches, plated surfaces,
tuning machines, pickguards, zippers, clasps,
handles, latches, case hardware etc.
7. All other damage and deterioration
due to normal usage, wear and tear, aging,
accidents, neglect, abuse, or Acts of Nature.
8. Any instrument, whose serial
number is missing, altered or tampered with
in any fashion.
9. Any instrument purchased from
anyone other than an Authorized Gretsch®
Dealer.
10. Instruments that have been serviced
by unauthorized persons (any person other
than an FMIC Certified Technician at an
Authorized FMIC Service Center).
In case of loss or theft, please record the
pertinent information on your instrument
below:
FMIC ASSUMES NO LIABILITY FOR
PROPERTY DAMAGE RESULTING
FROM FAILURE OF THIS PRODUCT
NOR ANY LOSS OF INCOME,
SATISFACTION, OR DAMAGES ARISING
FROM THE LOSS OF USE OF SAME DUE
TO DEFECTS OR AVAILABILITY OF
SAME DURING SERVICE.
SERIES____________________________
MODEL____________________________
COLOR____________________________
SERIAL NUMBER___________________
DATE PURCHASED_________________
Any warranties implied by law (including
warranties of merchantability or fitness)
are limited to the duration of this express
limited warranty. Some states do not allow
limitations on how long an implied warranty
lasts, so the above limitations may not
apply to you. Some states do not allow
the exclusion or limitations of incidental
or consequential damages, so the above
limitation or exclusion may not apply to you.
This warranty gives you specific legal rights,
and you may also have other rights that vary
from state to state.
PRICE PAID________________________
DEALER___________________________
*This warranty applies only to Gretsch
guitars purchased and serviced within the
U.S.A. and Canada. Warranties outside these
countries are as defined by the authorized
FMIC Distributor for your country or region,
and may vary from the above in terms and/or
length.
EFFECTIVE DATE: JANUARY 1, 2003
GRETSCH GUITARS
FMIC SPECIALTY SALES
8860 EAST CHAPARRAL ROAD - SUITE 100
SCOTTSDALE, ARIZONA 85250-2618 - USA
Phone: 480-596-9690
www.gretschguitars.com
15
Your Personal Address And Phone Directory
NAME
16
ADDRESS
PHONE
NAME
ADDRESS
PHONE
17
GRETSCH® GUITARS
FMIC SPECIALTY SALES
8860 EAST CHAPARRAL ROAD, SUITE 100
SCOTTSDALE, AZ 85250-2618, USA
www.gretschguitars.com
© 2003 Printed in U.S.A,
P/N 991-6026-135 Rev. A