1
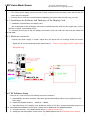
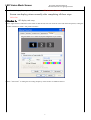
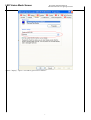
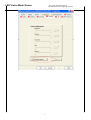
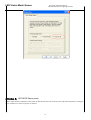
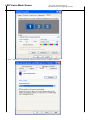
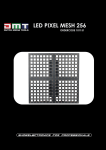
LED Vision Mesh Screen
Neo-Neon International Ltd
He Shan Decorative Lighting Limited
Neo-Neon
LED Vision Mesh Screen
Operation Manual
Neo-Neon International Ltd
He Shan Decorative Lighting Company Limited
LED Display Engineering Department
1
LED Vision Mesh Screen
Neo-Neon International Ltd
He Shan Decorative Lighting Limited
Contents
Chapter1
Specification and Function Parameters……………………………3
Chapeter2
Structure and Installation……………………………………………..4
Chapeter3
Installation of Transmitting System…………………………………5
Chapeter4
Testing of LED Screen……………………………………………….9
Chapeter5
Points for Attention when Using LED Screen……………………10
2
LED Vision Mesh Screen
Neo-Neon International Ltd
He Shan Decorative Lighting Limited
Chapter 1 Specification and Function Parameters
Thanks for choosing Neo-Neon LS-I-40-5OVAL-MESH-RGB, which is a
kind of indoor substantial pixel LED display. Through static scan, the
displayed image is Highly-Fidel in quality and profuse in colors. It is an
excellent display choice for advertisement, bank, shopping center,
school, restaurant, amusement place and so on.
z
z
Product details are subject
to change without notices.
Power supply shall be kept
disconnected before installation is
complete.
z
z
z
z
z
z
z
z
z
z
z
z
z
z
z
z
z
z
z
z
z
Module size: 640mm×640mm×65mm
Signal Input: 16P Double rank D-SUB connecting piece(only the
protruding rank works)
Pitch:40mm
Pixel composition:2R1G1B 4Φ5 oval LED
Module resolution(length*width):16*16
Density(dot/ m2):625
Brightness(cd/ m2):1300
Optimal viewing distance(m):60
Module peak value power(≤W):75
Module average power(≤W):40
Module weight(kg):10
Scanning mode:Static scan
Viewing angle:120°(60°horizontally and vertically)
Driven voltage(V):4.5~5.5
Gray scale:256 levels respectively
Frame change speed:≥60(frame/second)
Control mode:In step with the computer monitor
Screen life:≥100,000USD
Blind spot rate:≤0.0002
Operating voltage:AC220V±15% 47~64HZ
Control distance(m):<130
Temperature environment:-10℃~50℃
Humidity environment:10%~90%RH
Product Performance:
z
z
z
z
z
relatively better evenness, mosaic decreased in some degree and a
good lighting consistency
Substantial pixels display, thus excellent effect of displaying images,
characters and so on;
A large viewing angle, 120°horizontally and vertically; no distortion
and color differentiation
Quality: whole-process strict control from original material to
finished product, assure reliable high-quality
Service: More consummate, more comprehensive
3
LED Vision Mesh Screen
Neo-Neon International Ltd
He Shan Decorative Lighting Limited
Performance Features
DVI Display Card Compatible: directly connectable with DVI port
Single Cable Transmission; 1pc standard SUPER CAT IBDN for transmission
Long distance transmission: advanced data transmission technology, using kilo-mega data communication
chips, static electricity-resistant, lighting shock-resistant, support non-relay long distance transmission, max
length of 130meter, and 100% data recoverable
Reliability: 4-layer PCB and single-chip super scale integrate circuit design; promote system stability and
reliability greatly
Chapter 2.Structure and Installation
Neo-Neon usually packs 2pcs of Screen Module together once; the following structural display module can be
seen after releasing package; module size is 640*640mm. Main fixture of a single LED Mesh Screen is
composed of A3 frame and LED Screen Panel which is mounted on the frame with screws. 1pc frame can
mount 16pcs of panel and 1pc of power supply; the power supply will be fixed onto the strength board of the
frame. On each frame there are 12 M6 installation screws on each frame, every 16pcs of frame shall be given
a scanning board, which will be fixed to the strengthening board of the frame with screws. For the screen is a
specific feature, thus we need to specify installation metal bracket according to panel and accessory
specification. Metal bracket shall be prepared by customers themselves if there is no special declaration. We
strongly suggest customers to fix each mesh screen at the M6 holes noted in following diagram, and lock
screen onto the mounting brackets with screws.
Chapter 3.Installation Steps for LED Screen System
LED Screen can function normally after finishing all these steps according to the following steps.
No.1. Installation for computer operation system
Installation for Windows2000 or Windows XP operation system, Windows XP operation system is strongly
recommended.
No.2. Installation for LED Screen controlling card
Neo-Neon will provide a piece of main card for screen (contained with PCI serial port and com port ), a piece of
4
LED Vision Mesh Screen
Neo-Neon International Ltd
He Shan Decorative Lighting Limited
DVI serial port wire and com port wire, Please refer to the following steps:
1) Turn off the power supply and uncover the PC host computer, insert the screen main card into the PCI
slot of the host computer
2)Connect the PC com port and the luminance adjusting port of the main card with com port wire.
No.3. Installation for Software and Hardware of the Display Card
1)Installation for hardware of the display card:
We recommend to use the display card which contained with both VGA and DVI output port, such as
GeForce 7100GS(recommend to use).
2)Connect the DVI port of both the display card and the main card with DVI wire, and then fasten the
wire with bolts.
No.4. Hardware connection
Connect the power supply of screen, signal wire, the signal wire for scanning board and screen,
signal wire for PC and scanning board, please refer to :Power
and signal cable connection
diagram.dwg
C
I
H
PI
V
A
D
R
G
T
E
U
EVP
A
H
T
H
T
U
T
:
O
SP
EU
C
ME
I
L
T
B
DU
O
E
N
O.
S
TUDC
E
N
AA
EG
A
W
F
T
R
R VE
D
O
DT
R
P
N
A
N
M
A
C
I
I
No.5. PC Software Setup
Connect the PC system and open up after finishing the hardware installation:
1) Install display card drive software: setup drive process beforehand, which is very important for the
latter setup.
2)Install LED Studio8 software
Serial No.:88888,
3 Set the property of PC display card, enable the output of DVI port, and the renovating frequency is
60Hz, and hardware acceleration set as none. Please refer to Addendum for detailed operation
4)Configure receiver:Any details please refer to Configure receiver.Doc
5)Setting the size and position of the screen, any details please refer to LED Studio user's manual
5
LED Vision Mesh Screen
Neo-Neon International Ltd
He Shan Decorative Lighting Limited
7)Add display file, any details please refer to LED Studio user's manual
Screen can display picture normally after completing all those steps.
Addendum:
Addendum A:ATI display card setup
1. Press right bottom of MOUSE on the blank of table-board, enter into shortcut menu and choose Properties, setting the
screen resolution to 1024 x 768 pixels as follows:
2. Press“Advanced”to setting the renovating frequency of the monitor to 60HZ as follows:
6
LED Vision Mesh Screen
Neo-Neon International Ltd
He Shan Decorative Lighting Limited
3. Press“display”option,turn FPD to green color as follows:
7
LED Vision Mesh Screen
Neo-Neon International Ltd
He Shan Decorative Lighting Limited
4.Press“Recover”option, enter into “clone mode options”, and the choose “Same on all”as follow:
8
LED Vision Mesh Screen
Neo-Neon International Ltd
He Shan Decorative Lighting Limited
9
LED Vision Mesh Screen
Neo-Neon International Ltd
He Shan Decorative Lighting Limited
Addendum B:GEFORCE Display setup
1. Press right bottom of MOUSE on the blank of table-board, enter into shortcut menu and choose Properties, setting the
screen resolution to 1024 x 768 pixels as follows:
10
LED Vision Mesh Screen
Neo-Neon International Ltd
He Shan Decorative Lighting Limited
2、Press“Advanced”to setting the refresh rate of the monitor to 60HZ as follows:
11
LED Vision Mesh Screen
Neo-Neon International Ltd
He Shan Decorative Lighting Limited
3、Press“GeForce 6200 Turbocache(TM)” options,setting the nView. Choose nView Display Settings menu, and press
“Clone” on the options box as follows:
Choose“Application”and“Confirm”.Quit from Properties Selection.
No.2. Troubleshooting:
System checking method
Please check system according to the following steps if the LED Screen can not work normally after
finishing the connection and
the power supply:
1、 Check the power supply system of the screen
2、 Check the settings of LED control software
3、 Check power supply, unit screen module, scanning board, power supply indicator light. Measure
connector plugs of the relative circuit board is DC5V±0.3by multi-meter.
4、 The Yellow Light on the scanning board will winkle under normal condition.
5、 The Red Light and the Yellow Light on the main card will last-shining and twinkle respectively under
normal condition. If the Red Light does not work, check the main card. If the Yellow Light does not
twinkle, check the properties settings of main card or check the DVI wire.
12
LED Vision Mesh Screen
Neo-Neon International Ltd
He Shan Decorative Lighting Limited
6、 Check LED screen module circuit according to the following steps:
(1) Check if the connect wires between unit screen module are connect according to the indication
means on the unit board as the following picture.
(2) Check scanning board polarity and module connection as the following picture:
(3) Check the indication light of main card.
(4) Check the indicating light of the scanning board.
(5) Check the connect system refer to the accessory connect mode.
(6) Check the connection of DVI wire.
(7) Check the display card settings; please refer to the PC software setting part.
Common Troubles
Trouble Description
The whole screen do
not work
Screen twinkle
Control software are
out of control
Trouble Analysis
The power supply does not function
LED Control software does not turn on
Transmission cable does not connect well
The display shows black color
Module power supply does not connect well or voltage
does not match
The connect wire between module and scanning board
is too long
Data wire above the stated length or some trouble with
cable wire
Data wire does not fasten stably.
Some trouble with LED unit module
Display card setting incorrect.
LED Control software is locked
Power supply will not increase when increasing power
supply to the module
Resolution
Increase power supply
Setting control software
Reconnect
transmission
cable
Re-set the table-board menu
Make sure the voltage
above DC4.75V
Cut off the cable wire
Make sure the cable wire
quality
Re-insert the wire
Check the module
Reinstall the Display card
Open the control software
Increase power supply of
scanning board
Addendum 4:
Signal wire facture:
Communication wire(connect scanning board and main board)according to the following standards.
1. Take off 3cm at the front end outer skin of the double-twist cable with special double-twist cable peeler (or other tools)
2. Match wire correctly
Please make sure that:wire1 and wire 2 form a circle match;wire3 and wire4 form a circle match;wire5 and wire6 form
a circle match;wire7 and wire8 form a circle match. At both ends of the wire, same methods will be used. The wire match
is arranged in serration after certain color sequence.(Such as: 1、white orange, 2、orange, 3、white green, 4、green, 5、
13
LED Vision Mesh Screen
Neo-Neon International Ltd
He Shan Decorative Lighting Limited
blue, 6、white blue, 7、white brown, 8、brown).
After matching the wires, trim the wires; cut off the bare part of the double-twist cable, with only 15mm length left
outsides. Wire heads shall be trimmed to uniformity, then put each wire of the double-twist wire into to RJ45 connector
lead, the first lead shall be connected with orange-whitish wire, and the following in the same sequence. After all the
double-twist wires have been placed tightly, then press wire and let the wire to meet with the RJ45 connectors with RJ45
wire-meet clamp
On the other end, the connection method is the same; after all above action completed, the RJ45 connectors shall be in
uniformity\. At, test the connection with measuring equipment, then the RJ45 connector is OK.
Signal wire(connect screen module and scanning board, module and module)should be made as following steps:
Step.1.: 1. white orange, 2. orange, 3.white green, 4.green, 5.blue, 6.white blue, 7.white brown, 8、brown)
Step2.:1.brown , 2. white brown, 3. white blue, 4. blue, 5.green, 6.white green, 7.orange, 8.white orange )
At the two ends, the wire shall be arranged in different sequences
If all above measures have been take, problems still can not be solved, please contact
Neo-Neon through phone call to get after-sale service.
14