1
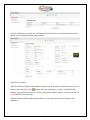
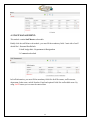
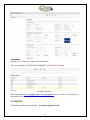
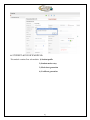
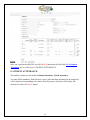
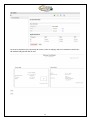
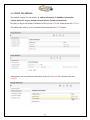
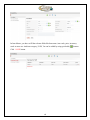
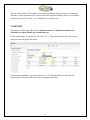
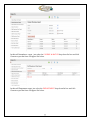
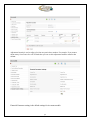
CAMPUSMANAGE
User Manual
Your Work Made Easy…..
www.campusmanage.com
CAMPUS MANAGE WORK FLOW:
After getting the username and password information to your mail id just login to CAMPUS
MANAGE.IN with your received username and password. You can see campus manage
homepage which appears as below.
1. GLOBAL SETTING:
Click on the global setting icon.
This module contains two sub modules: 1) Institute information
2) Global setting
3) Number generation
4) Currency Exchange Rate
Kindly click on the institute information was appeared default in the list. In this, some of the
details you have already given in the registration form at the time of registration. If you have any
changes in this details use EDIT button.
2
Once the edit button is pressed you will find the form as like below, then kindly enter the valid
details of your training institute as shown below
And click save button.
After that click the Global setting module, institute name is displayed as default because its your
login account and click ADD(
)button at the top of the page , you have to fill details like
institute logo position, date format, currency, page limits, holidays and No. of days/week and use
SAVE button to store your data.
Then next click to Global setting Sub-module to set your Date and currency format of your
institution.
3
You will find the above window, in action click EDIT. This will route to the below respective
page
Here, you have to select your institute Logo position,Date format etc. And you can also set your
Grade percentage to generate Marksheet for your students in your institution,if needed.After
giving all the information, kindly click SAVE button.
Then next click to Number Generation Sub-module to generate your unique voucher number for
the students in your institution like Student Enquiry number and student application number.
4
In action click EDIT button. Then you will find this below page. Here in number generation,
below to the prefix zero. You have to select and drag year, month prefix etc. then voucher
number will be generated in that same order. Also you should mention your numeric width part,
prefix and voucher starting number. And click tick to prefix zero and click SAVE button.
Then next click to Currency Exchange Rate Sub-module to set your currency rate by selecting
base currency, convert into drop down list box and by giving Exchange rate and date. Kindly,
click SAVE button.
5
2. COURSE:
This module contain one sub module: 1) course info
Please click the course info sub module and use ADD (
) button at the top of the page,
You must fill the mandatory fields like course name, course code, course registration fee, course
fee and you may fill the other fields like course type, category, grade type, credit units, language,
lesson then click SAVE button.
6
Then next click to Assign Subject to Course Sub-module to Assign Subject name and total marks
allotted for that subject. After giving maximum marks for all subjects for a particular course,
Kindly click SAVE button.
7
Likewise, you can also create unit wise chapters to each subject.
After giving Chapter names for all subjects of a particular course, Kindly click SAVE button.
8
Once you complete the COURSE, just click BACK button and click this link Go To Create
Batches For These Courses you can switch over to BATCH modules
3. BATCH:
This module contains one sub module: 1) Batch info
9
Kindly click the batch info sub module, you must fill the mandatory fields like course name,
batch name, from time, to time, from date, to date, staff name, and class schedule. By using
SAVE button you can store the entered data.
Once you complete the BATCH, just click BACK button and click this link Go To Enquiry info
you can switch over to GLOBAL SETTING modules
10
4. STAFF MANAGEMENT:
This module contain Staff Master sub module:
Kindly click the staff Master sub module, you must fill the mandatory fields 3 main info of staff
details like 1.Personal Profile Info
2. Staff Assign Info - Department & Designation
3. Communication Info
In Staff information, you must fill the mandatory fields like Staff first name, staff last name,
department, father name, mobile Number, Email and optional fields like staff middle name. By
using SAVE button you can store the entered data.
11
By using SAVE button you can store the entered data.
Once you complete the STAFF MANAGEMENT, just click BACK button
and click this links Go To Enquiry Info || Staff Attendance you can switch over to either one of
this modules like STAFF ATTENDANCE or ENQUIRY.
5. ENQUIRY:
This module contains one sub module: 1) Enquiry/application info.
12
you must fill the mandatory fields like Student name, contact No, E-mail, status, assigned to and
you may also fill father name, address 1, address2, state, city, previous qualification, experience,
COURSE INFO,FOLLOW UP INFO etc
13
Then click SAVE button.
Once you complete the ENQUIRY, just click BACK button and click this links Go To Student
Info you can switch over to STUDENT & INVOICE MODULE.
14
6. STUDENT & INVOICE MODULE:
This module contains Four sub modules: 1) Student profile
2) Student marks entry
3) Mark sheet generation
4) Certificate generation.
15
In this STUDENT & INVOICE MODULE, you can view the student status like whether they are
in completed or selected as student. You cannot view the student list those who are in enquiry,
recycled or dead.
16
17
Once you complete the STUDENT & INVOICE, just click BACK button and click this links Go
To Collection
18
You can switch over to BILLING.
7. COLLECTION:
This module contains one sub module: 1) Collection.
You can select a student for collection by using (
and in ACTION click Process.
) Search button by typing the student name
In Collection Info select your payment and Click COLLECT.
In Selected Installment, you have to give your Invoice number, Mode of Payment as Cash, Cheque or DD,
Amount and Date. Then particular Invoice will be collected, and then click SAVE button.
19
Once you complete the BILLING, just click BACK button and click this links Go To Student
Attendance you can switch over to STUDENT ATTENDANCE.
8. STUDENT ATTENDANCE:
This module contain two sub module:1)Student attendance 2)Staff attendance.
You must fill the mandatory fields like date, course, batch and then automatically the student list
will be displayed corresponding to the batch. Here PR-present, AB-absent, OD-on duty, MLmedical leave then click SAVE button.
20
CLEAR button is used to clear all the data’s at the time of enrolling.
Kindly select staff attendance sub modules and fill the department fields by click the dropdown
list box, and also month, year. The attendance calendar of the particular department staff is
displayed then click SAVE button.
9. COMMUNICATION:
This module contain two sub modules: 1) SMS compose
2) EMAIL compose
Kindly click to SMS compose sub-module. In SMS add the message (only add 160 characters)
and select the course , batch .
21
Subsequently you can select the list like Enquiry, selected, confirmed to join, in progress, Dead,
recycled, completed. In that you can select the check box and generate.
Then list of students will be displayed if you want to send SMS for all the students select all
otherwise choose the students and click send.
Similarly, EMAIL compose is used to compose a mail and can be send to students as like SMS.
For that kindly click to EMAIL compose.
In Email add the content and select the course, batch .Subsequently you can select the list like
Enquiry, selected, confirmed to join, in progress, Dead,recycled, completed. In that you can
22
select the check box and generate.
Then list of students will be displayed if you want to send Email for all the students select all
otherwise choose the students and click send.
10. ID CARD GENERATION:
This module contains one sub module : 1) Id card generation.
23
In Id card Generation you can select the course, batch. It displays the list of students in that select
the student and generate the id card.
24
11. STUDY MATERIAL:
This module contain five sub module: 1) Author information 2) Publisher information
3)Study material Category 4)Study material Master 5)Study material issue
In Library to begin with Author information in that you can ADD the Author name and SAVE it.
The author name must be given in Author Information and click SAVE button.
Subsequently edit with Publisher information in that you can ADD the Publisher name and
SAVE it.
25
Next using the link for Book Category in that you can add the Book type, due days etc and
SAVE it.
Then you can add the list of information in Book Master.
26
Finally if you are issue an book from library add that details in Book issue.
12. INVENTORY:
This module contain four sub module:1)Item category 2)Item master 3)Item issue 4)Supplier
information.
27
In Item Master, you have to fill the relevant fields like Item name, item code, price, inventory
stock at stores etc. And item category, UCM, Vat can be added by using quick add (
Click SAVE button.
28
) button.
Next comes to Item Issue for Staff, in this you have to fill the relevant fields like Name,
department, Item name, code, price, Quantity etc. click SAVE button.
29
Same procedure must be followed for Item Issue For Student. And then click SAVE button.
In Inventory you can add the Item Category, Item Issue, Item Master and Supplier information.
This module helps to find the list of item Purchased and issued.
13. PLACEMENT:
This module contain two sub modules:1)Company information 2)Candidate info
In Company information, you must fill the mandatory fields like Company name, Address and
phone number. And in contact, you must fill the mandatory fields like contact person name and
contact person E-mail. You may also fill Zip code, contact person address, designation etc.
CLEAR button is used to clear all the data’s at the time of enrolling.
14. SYSTEM ADMIN:
This module contain many sub module:1)User Name Information 2)User Menu Access
Kindly click on the User name information was appeared default in the list. In Action, give Add
permission some of the details you have already given in the course and batch details and have to
choose user group name from the drop down list as staff or Guest, then have to create an account
by giving user name and password, to give access privilege. After completing your settings click
SAVE button.
30
In User Menu Access the same procedure must be followed like In Action, give Add permission.
31
These are the modules in our software. We can give privilege to particular user by selecting the
check box. So that particular Staff or Guest can access only those modules which we are selected
in this user menu access. Click SAVE button for User Menu Access.
15. REPORT:
This module contain many sub module:1)Student status wise 2)Student attendance wise
3)Student fees report 4)Book issue, book details etc
In this student status wise report just select the STATUS drop down list box and click Generate
report the form will appear like below.
In this student Attendance report just select the STATUS drop down list box and Click the
required status will generate the report form will appear like below.
32
In this staff Attendance report, just select the COURSE & BATCH drop down list box and click
Generate report the form will appear like below.
In this staff Department report, just select the DEPARTMENT drop down list box and click
Generate report the form will appear like below.
33
In this book issue report, just select the FROM and TO drop down list box and click Generate
report the form will appear like below
In Report we can generate the reports for the important module and you can easily view the
preferred details in the report.
16. ACCOUNTS
This module contain many sub module:1)Financial Year 2)Voucher Number Generation
3)Ledger Account 4)Bank Master 5)Bank Branch Master 6)Bank Account Type 7)Bank
Account Master 8)Day Book Entry 9)Contra Entry-Cash 10)Contra Entry-Bank
11)Adjustment Journals 12)Financial Parameter Settings.
34
In Financial Year, You need to set up the financial settings about a year. The Financial year Start date and
End date must be selected and in financial year status select Active from the drop down box. Then select
tick in the copy ledger and in remarks give FY 2013-2014 for your reference.
This voucher number generation is same as in GLOBAL SETTING module. So you need to follow the
same procedure as in Global setting module. But this voucher number is for Student billing number
generation.
35
Ledger Account is the default settings in our software.
Bank Master is to create the various banks which you are using for your institution.
36
Bank Branch Master is to create branch for a particular bank which you were created in Bank Master.
After giving Address, pin code, phone No, Cell No click tick so that bank details will be copied to
Contact person details but you have to give contact person name in bank.
37
Bank Account Master, all fields are mandatory can fill by drop down list. In Name of Signing Authority,
you have to give your institute Authority person’s Name. And for Ledger code you have to click (
that you will find a below window. In that you have to choose your Ledger code.
38
)so
Select ICICI bank 3002 and then Click Select.
39
Next comes to Day Book Entry, You have to select Voucher Type, Transaction Type, Cash/Bank code
etc. If you select Voucher Type as BANK and Transaction Type as Receipt then it means that money gets
transferred from ICICI bank to ledger code and click SAVE button.
Next comes to Contra Entry Cash. This is for Cash to Cash transaction; You have to select Voucher
Type, Transaction Type, Cash/Bank code etc. If you select Voucher Type as BANK and Transaction
Type as Payment then it means that money gets transferred from ledger Cash code to cash and click
SAVE button.
Contra Entry-Bank is similar to Contra Entry-Cash but the major difference is that Bank to Bank
transaction can be done in Contra Entry-Bank.
40
Adjustment Journals is used to adjust a fee from one particular to another. For example: If you want to
adjust money from Course fee to ICICI bank then you can use this adjustment Journal to transfer that
amount.
Financial Parameter setting is the default settings for Accounts module.
41
42