1
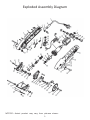
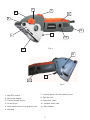
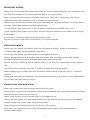
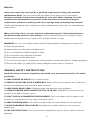
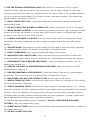
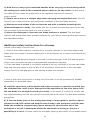
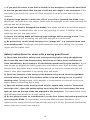
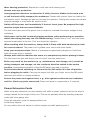
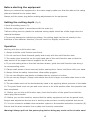
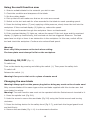
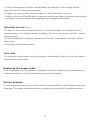
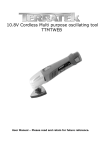
DƵůƟ&ƵŶĐƟŽŶ^Ăǁ
ddD&^
User Manual — Please read and retain for future reference.
IMPORTANT: Read all instructions before use.
Contents
Parts List
Technical Information
Safety Instructions
Using your tool
Maintenance
Warranty
Parts List
No.
Description
No.
Description
1
Cable
38
Shaft circlip
2
Cable protector
39
Small gear
3
Screw ST3.9×16
40
Oil proof piece
4
Cable clamp
41
Bearing 609-2RS
5
Right housing
42
O shape seal22.4×1.8
6
Screw ST3.9×18
43
Bearing 626-2RS
7
Parameter label
44
Big gear
8
Compression spring
45
Worm
9
Self-locking pin
46
Bearing 628-2RS
10
Torsion spring
47
Oil proof piece
11
Screw M4×12
48
Circlip 24
12
Split washer 5
49
Shaft circlip 4
13
Slider
50
Reducer casing
14
Torsion spring
51
Compression spring
15
Lower guard trigger
52
Self-locking button
16
Trigger jacket
53
Screw M4×10
17
Compression spring
54
Bearing 627-2RS
18
self-locking cap for switch
55
Shaft circlip
19
Compression spring
56
Worm gear
20
Switch pushbutton
57
Steel jacket
21
Screw ST3.9×10
58
Reducer casing cover
22
Armature
59
Spring circlip
23
PCB Assembly
60
Screw M4×25
24
Stator
61
Output shaft
25
Tension spring
62
Clamping flange
26
Bearing 607-2RS
63
Dust guide cover
27
Brush holder support
64
Screw M4×8
28
Brush holder
65
Blade
29
Carbon brush
66
Outer flange
30
Carbon brush cover
67
hexagon-headed bolt M6×14-left
31
Right housing
68
nut M5
32
Nameplate
69
Lower guard left support
33
Torsion spring
70
Foot plate
34
Small steel bushing
71
Lower guard
35
Steel ball Л 2.5
72
Lower guard right support
36
Locking knob
73
Screw M5×60
37
Cam
74
Socket wrench 10mm
1
Exploded Assembly Diagram
NOTICE: Actual product may vary from pictures shown.
2
3
1
2
6
5
9
7
4
10
Fig.1
11
8
7
10
Fig.2
1. ON/OFF switch
7. Locking device for the safety hood
2. Overload display
8. Spindle lock
3. Cutting depth limiter
9. Extraction hose
4. Guard hood
10. Carbon brush cap
5. Articulated axle of the guard hood
11. Saw blades
6. Housing
3
3
A
B
Fig.3
A
Fig.2
Fig.4
4
Technical Information
Model:
TTMFS
Rated Voltage:
230 – 240 V~
Rated Power:
500 W
No-load Speed:
8000 /min
Saw Blade:
Ø 80 mm
Cutting depth :
Max. 20 mm
Weight:
2.4 kgs
50Hz
Read this entire manual before using this product.
Failure to do so can result in serious injury. Save this manual
for future reference.
Copyright© 2013 by ACL Group (Intl) Ltd. All rights reserved. This manual or any artwork
contained herein must not be reproduced in any shape or form without the express written
consent of ACL Group (Intl) Ltd. Diagrams within this manual may not be drawn
proportionally. Due to continuing improvements, actual product may differ slightly from the
product described herein.
5
Read and Keep This Manual
Please read carefully all instructions within this manual. Failure to follow all safety warnings
can result in serious personal injury. The term “Power Tool” in all of the following warnings
refers to your mains operated (corded) or battery operated (cordless) power tool.
Important SAFETY Information
This symbol is to warn you of potential personal injury
hazards. Please read carefully the notes along side this warning
to avoid possible injury or death.
General Safety Rules
WARNING! Read all instructions. Failure to follow all instructions
listed below may result in electric shock, fire and/or serious injury.
The term “power tool” in all of the warnings listed refers to corded or
cordless power tools.
Work area safety
Keep work area clean and well lit. Cluttered or dark areas invite accidents.
Do not operate power tools in explosive atmospheres, such as in the presence of flammable
liquids, gases or dust. Power tools create sparks which may ignite the dust or fumes.
Keep children and bystanders away while operating a power tool. Distractions can cause you
to lose control.
6
Electrical safety
Before use, ensure that the power outlet you are using matches the plug on your power tool
and that the voltage of the outlet matches that of your power tool.
Only use grounded extension cords with power tools fitted with 3 pin plugs and if using
outdoors ensure any extension cord is suitable for outdoor use.
Always try to avoid body contact with grounded surfaces, such as radiators, cooking ranges
and any other fixed appliance with metal surfaces.
Do not expose your power tool to wet or damp conditions and NEVER use in rain.
Check regularly the power cord of your machine and any extension cord that you are using
for damage.
Do not carry or pull the machine with the power cord.
Ensure the cord is clear from hot surfaces, oil or sharp objects.
Personal safety
Never use your power tool whilst under the influence of alcohol, drugs or medication.
Tiredness can often cause accidents, stay alert.
Never use your power tool without the correct guards in place.
Always use approved eye protection and dust mask. Non slip safety shoes and hearing
protectors should be worn at all times when using your power tool.
Ensure any dust collecting device supplied with your machine is connected correctly before
use.
Ensure all loose clothing, long hair or jewelry is kept clear of the machine.
Before plugging your power tool into the power outlet ensure the power tool is in the OFF
position.
Check that wrenches or adjusting keys have been removed. Any wrench or key left attached
to a moving part can result in injury.
Power tool use and care.
Keep your power tool clean and well serviced at all times.
Never adjust or service any power tool before disconnecting from the mains electricity supply.
Always use the correct tool for the job.
Never force the tool to work harder than it is designed to do.
Never use your power tool with broken parts such as switches, guide fences or leg stands.
ALWAYS keep your power tools away from children.
Keep cutting tools sharp to ensure less stress on the motor.
Only have your power tool serviced by a qualified repair agent using manufacturers
recommended parts.
7
Service
Have your power tool serviced by a qualified repair person using only identical
replacement parts. This will ensure that the safety of the power tool is maintained.
Develop a periodic maintenance schedule for your tool. When cleaning a tool be
careful not to disassemble any portion of the tool since internal wires may be
misplaced or pinched or safety guard return springs may be improperly mounted.
Certain cleaning agents such as gasoline, carbon tetrachloride, ammonia, etc. may damage
plastic parts.
When servicing a tool, use only identical replacement parts. Follow instructions in
the Maintenance section of this manual. Use of unauthorized parts or failure to follow
Maintenance Instructions may create a risk of electric shock or injury.
WARNING: For your own safety read Instruction Manual before operating your power tool.
A) Wear eye protection.
B) Keep hands out of the path of cutting tools.
C) Do not operate tool without guards in place.
D) Do not perform any operation freehand.
E) Never reach around cutting tools.
F) Turn off tool and wait for cutting tools to stop before moving work piece or changing settings.
G) Disconnect power (or unplug tool) before changing cutting tools or servicing.
GENERAL SAFETY INSTRUCTIONS
Read this owner's manual completely and make sure you understand all of its safety
guidelines.
1. KEEP GUARDS IN PLACE and in working order.
2. REMOVE ADJUSTING KEYS & WRENCHES. Before turning on the power tool, make sure
the keys and adjusting wrenches have been removed.
3. KEEP WORK AREA CLEAN. Cluttered areas and benches invite accidents.
4. ALWAYS REMAIN ALERT WHEN THE TOOL IS IN USE. Inattention on the part of the
operator may lead to serious injury.
5. DON’T USE IN A DANGEROUS ENVIRONMENT. Don’t use power tools in damp or wet
locations or expose them to rain. Keep work area well lit.
6. KEEP CHILDREN AWAY. All visitors should remain at a safe distance from work area.
7. MAKE WORKSHOP CHILD-PROOF with padlocks, master switches or by removing
starter keys.
8. USE THE RIGHT TOOL. Don’t force a tool or attachment to do a job for which it was not
designed.
8
9. USE THE PROPER EXTENSION CORD. Make sure your extension cord is in good
condition. When using an extension cord, be sure to use one heavy enough to carry the
current your product will draw. An undersized cord will cause a drop in line voltage resulting
in loss of power and overheating. If in doubt, use the next heavier gauge. The smaller the
gauge number, the heavier the cord.
10. DON’T FORCE THE TOOL. It has been designed to operate at maximum safety and
performance levels.
11. DO NOT FORCE THE MATERIAL BEING CUT. Always let the tool cut at its own speed.
12. WEAR PROPER APPAREL. Do not wear loose clothing, neckties, rings, bracelets or other
jewelry which may get caught in moving parts. Non-slip foot wear is recommended. Wear
protective hair covering if you have long hair.
13. ALWAYS USE SAFETY GLASSES. Also use face or dust mask for commercial cutting
operations. Everyday eyeglasses only have impact-resistant lenses, they are NOT safety
glasses.
14. SECURE WORK. Use clamps or a vise instead of your hand to hold work when practical.
This safetyprecaution allows for proper tool operation using both hands.
15. DON’T OVERREACH. Keep proper footing and balance at all times.
16. MAINTAIN TOOLS WITH CARE. Keep tools clean and in good working condition for
maximum safety performance. Follow instructions for lubricating and changing accessories.
17. DISCONNECT TOOLS BEFORE SERVICING – when changing accessories, such as
blades, bits, cutters, etc.
18. REDUCE THE RISK OF UNINTENTIONAL STARTING. Make sure switch is in OFF
position before plugging in.
19. USE RECOMMENDED ACCESSORIES. Consult the owner’s manual for recommended
accessories. The use of improper accessories may increase risk of injury.
20. MAKE SURE YOU USE THE CORRECT TOOL for the job you are doing.
21. NEVER STAND ON TOOL. Serious injury could occur if the tool is tipped or if the cutting
tool is unintentionally contacted.
22. CHECK DAMAGED PARTS. Before further use of the tool, damaged part(s), (i.e., guard)
should be carefully checked to determine that it will operate properly and perform its intended
function. Check for alignment of moving parts, binding of moving parts, breakage of parts,
mounting and any other condition that may affect the tools operation. A guard or other part
that is damaged should be properly repaired or replaced.
23. Replace damaged blades/cutters immediately. DO NOT USE DAMAGED BLADES/
CUTTERS. They may cause bodily injury.
24. DIRECTION OF FEED. Feed work into the blade/cutter against the direction of rotation of
the blade/cutter only.
25. DO NOT ALTER THE PLUG.
9
26. NEVER LEAVE TOOL RUNNING UNATTENDED. Turn power off. Don’t leave tool until it
comes to a complete stop.
27. Double Insulation eliminates the need for the three wire grounded power cord and
grounded power supply system.
This power tool is supplied with all the relevant safety guards and features, it should be
checked before every operation, this manual should be read and kept in a safe place. Whilst
we warn of all the possible risks attached to using power tools any operator must have read
and understood the manual and apply their own caution and common sense when using this
power tool.
Following this guide will greatly reduce your risk of electric shock or injury.
Only use qualified repair agents to service this power tool.
Only use qualified electrician to repair any damaged wiring.
NEVER remove the grounding prong from the power tool or extension cord.
ĚĚŝƟŽŶĂůƐĂĨĞƚLJ/ŶƐƚƌƵĐƟŽŶƐ
Multi Function Saw
Danger:
a) Do not reach into the cutting area or touch the saw blade. Hold the additional
handle or the motor casing with your other hand. If you hold the circular saw in both
hands, the saw blade cannot injure them.
b) Do not reach under the workpiece. The guard hood cannot protect you from the saw
blade under the workpiece.
c) Adjust the cutting depth to the thickness of the workpiece. Less than one full tooth
height should be visible under the workpiece.
d) Never hold the workpiece you wish to saw in your hand or on your leg. Secure
the workpiece on a sturdy surface. It is important that you secure the workpiece well to
minimize the danger of body contact, the saw blade jamming or loss of control.
10
e) Hold the tool only by the insulated handles when carrying out work during which
the cutting tool could strike concealed power cables or its own cable. Contact with a
live cable will also make the metal parts of the appliance live and will cause an
electric shock.
f) Always use a stop or a straight edge when carrying out longitudinal cuts. This will
improve your cutting accuracy and reduce the possibility of the saw blade jamming.
g) Always use saw blades of the correct size and with a suitable mounting hole
(diamondshaped or round). Saw blades that do not match the mounting parts of the saw
will not rotate truly and will result in a loss of control.
h) Never use damaged or incorrect saw blade washers or screws. The saw blade
washers and screws have been specially designed for your saw to ensure perfect performance
and operational safety.
Additional safety instructions for all saws
Causes of and ways to avoid recoil:
1. Recoil is the sudden reaction resulting from a caught, jammed or incorrectly aligned saw
blade which may result in the saw leaping out of the workpiece out of control and towards the
operator.
2. If the saw blade becomes caught or jammed in closing saw gap, it will lock and the power
of the motor will cause the saw to leap backwards towards the operator.
3. If the saw blade is twisted or incorrectly aligned in the cut, the teeth in the rear saw blade
edge may become caught in the surface of the workpiece, which results in the saw blade
leaping out of the saw gap and the saw leaping towards the operator.
A recoil is the result of incorrect or wrong use of the saw. It can be prevented by suitable
precautions, as described below.
a)
Hold the saw firmly in both hands and hold your arms in a position in which you
can withstand the recoil forces. Always hold the saw blade to one side. Never hold
the saw blade in a straight line with your body. In the event of a recoil the circular saw
may leap backwards, but the user can still overcome the recoil forces if he has taken suitable
precautions.
b) If the saw blade jams or the sawing operating is interrupted for another reason,
release the ON/OFF switch and hold the saw steady in the workpiece until the saw
blade has reached a complete stop. Never attempt to take the saw out of the
workpiece or to pull it backwards whilst the saw blade is moving or there is a
possibility of a recoil. Find the reason for the blade jamming and rectify it by suitable means.
11
c) If you wish to restart a saw that is already in the workpiece, center the saw blade
in the saw gap and check that the saw’s teeth are not caught in the workpiece. If the
saw blade is jammed it may move out of the workpiece or cause a recoil when the saw is
restarted.
d) Support large panels to reduce the risk of a recoil by a jammed saw blade. Large
panels may sag under their own weight. Panels must be supported on both sides both near the
saw gap and also at the edge.
e) Do not use blunt or damaged saw blades. Saw blades with blunt or incorrectly aligned
teeth will create increased friction due to the saw gap being too small. In addition the saw
blade may also jam and cause recoil.
f) Secure the cutting depth and cutting angle settings before starting to saw. If the
settings change as you are sawing, the saw blade may jam and cause recoil.
g) Be particularly careful when carrying out a “plunge cut” in a concealed area such
as an existing wall. The plunge-cutting saw blade may block when sawing into concealed
objects and thus cause recoil.
Safety instructions for saws with a swing guard hood
a) Check that the bottom safety hood closes perfectly before using the appliance.
Do not use the saw if the bottom safety hood does not move freely and does not
close immediately. Never clamp or tie the bottom guard hood in open position. If you
drop the saw by accident the bottom guard hood may become bent. Open the safety hood
with the lever and ensure that it moves freely and will not come into contact with the saw
blade or other parts regardless of the cutting angle and depth.
b) Check the function of the spring on the bottom safety hood. Have the appliance
serviced before you use it if the bottom safety hood and spring are not in perfect
working order. Damaged parts, sticky deposits or accumulations of chips will result in the
bottom guard hood working with a delay.
c) Open the bottom safety hood by hand only for special cuts, such as “immersion
and angle cuts”. Open the bottom safety hood using the lever and release the lever
again as soon as the saw blade has engaged in the workpiece. The bottom safety hood
must operate automatically for all other sawing work.
d) Do not place the saw on a workbench or on the floor unless the bottom guard hood
is covering the blade. An unprotected, moving saw blade will cause the saw to move
opposite to the sawing direction and saw through anything in its way. Remember that the saw
takes a little time to slow down and stop.
12
Wear hearing protection. Exposure to noise can cause hearing loss.
Always wear eye protection.
Use appropriate detectors to determine if utility lines are hidden in the work area
or call the local utility company for assistance. Contact with electric lines can lead to fire
and electric shock. Damaging a gas line can lead to explosion. Cutting into a water line causes
property damage or may cause an electric shock.
Switch off the power tool immediately if the tool insert jams. Be prepared for high
reaction torque that can cause kickback.
The tool insert jams when:the power tool is subject to overload.it becomes wedged in the
workpiece.
Hold power tool by the insulated gripping surfaces, when performing an operation
where the cutting tool may run into hidden wiring. Contact with a “live” wire will make
exposed metal parts of the tool “live” and shock the operator.
When working with the machine, always hold it firmly with both hands and provide
for a secure stance. The power tool is guided more secure with both hands.
Keep your workplace clean. Blends of materials are particularly dangerous. Dust from
light alloys can burn or explode.
Always wait until the machine has come to a complete stop before placing it down.
The tool insert can jam and lead to loss of control over the power tool.
Before any work on the machine (e. g., maintenance, tool change, etc.) as well as
during transport and storage, set the rotational direction switch to the centre
position. Unintentional actuation of the On/Off switch can lead to injuries.
Avoid unintentional switching on. Ensure the On/Off switch is in the off position
before plugging to outlet. Carrying the power tool with your finger on the On/Off switch
that have the switch on invites accidents.
Protect the power tool against heat, e. g., also against continuous sun irradiation
and fire. Check any parts concerned. Clean such parts or replace them, if required.
Power Extension Cords
When using any extension cord the machine will suffer a power reduction due to the drop in
voltage caused by the length of the cord. This can be partially offset by selecting extension
cords with lower gauge wire.
Check all extension cords for damage before use.
Avoid sharp objects.
Do not position the cord where it could be subject to traffic passing over it
13
Symbols
IMPORTANT: Some of the following symbols may be used on your tool.
V…………………………volts
A…………………………amperes
Hz……………………….hertz
~…………………….….alternating current
…/m……………….....revolutions per minute
.....................class II construction (double insulated)
Kg………………………..kilograms
n0………………………..No load speed
……………….….....Conforms to European Harmonised New Approach Directives.
DC ………………..…….Direct Current
Specific Safety Rules
1) Hold power tools by insulated gripping surfaces when performing an operation where the
cutting tool may contact hidden wiring.
Contact with a “live” wire will make exposed metal parts of the tool “live” and shock the
operator.
2) Wear ear and eye protection. To avoid serious injuries.
3) If the cutter becomes jammed, immediately turn the trigger switch off to prevent an
overload which can damage the battery pack or motor. Use reverse to loosen jammed bits.
4) Do not touch the rotating parts to avoid injury.
5) Do not use the tool continuously for a long period of time. Stop using the tool from time
to time to avoid overheating of the motor.
6) Do not drop the tool.
Unpacking
Carefully remove the product and any accessories from the box. Make sure that all items
listed in the packing list are included.
Package contents
A) Multi function saw
B) User manual
C) 1 diamond blade for cutting tiles, 1 TCT blade for wood-based materials and plastic
and 1 HSS blade for metal
14
Before starting the equipment
Before you connect the equipment to the mains supply make sure that the data on the rating
plate are identical to the mains data.
Always pull the power plug before making adjustments to the equipment.
Setting the cutting depth
(Fig.3)
1.Undo the setting screw (3).
2.Set the cutting depth in accordance with the scale (a).
3.When cutting wood or plastic the selected cutting depth should be a little larger than the
material thickness.
4.To prevent damage to underlying surfaces, the cutting depth can be set exactly to the
thickness of the material. However, this will result in a slightly unclean cut.
Operation
Working with the mXOWL function saw
1. Always hold the mXOWL function saw firmly.
2. Do not use force! Push forwards gently and evenly with the mXOWL function saw.
3. The waste piece should be on the right-hand side of the mXOWL function saw so that the
wide section of the support bench supports its full area.
4. If you are sawing down a line that has been drawn, guide the mXOWL function saw along t
he corresponding notch.
5. Clamp small pieces of wood securely before sawing them. Never hold them with your hand.
6. Always follow the safety instructions. Wear safety goggles.
7. Do not use defective saw blades or blades that are cracked or broken.
8. Do not use any flanges / flange nuts whose bore hole is larger or smaller than those in the
saw blade.
9. The saw blade must not be decelerated by hand or by applying lateral pressure to the blade.
10. The guard hood must not jam and must return to its initial position after the operation has
been completed.
11. Before you use the mXOWL function saw, check the function of the guard hood with the
mains plug disconnected.
12. Before you use the machine, ensure that the safety equipment such as the guard hood,
flanges and adjustment devices are in working order and are correctly adjusted and secure.
13. You can connect a suitable dust extraction system to the sawdust extraction connector (9).
Ensure that the dust extractor line is safely and correctly connected.
Warning! Always pull out the power plug before doing any work on the circular saw!
15
Using the multi function saw
1. Select a suitable blade for the material you wish to saw.
2. Check the condition and sharpness of the blade.
3. Set the cutting depth.
4. Pick up the tool and make sure that no air vents are covered.
5. Switch on the tool and wait for a few seconds for the blade to reach operating speed.
6. Press the locking button (7) and, applying a little pressure, slowly lower the tool into the
workpiece. If the overload display (2) lights up, reduce the speed.
7. Push the saw forwards through the workpiece. Never cut backwards!
8. If the overload display (2) lights up, reduce the speed. If the tool stops and the overload
display (2) lights up continuously, the overload cut-out has triggered. Reasons: The feed
speed was too high or there is an obstruction in the workpiece. In this case, switch off the
tool and check the workpiece. Continue at a reduced feed speed.
Warning!
Exert only little pressure on the tool when cutting.
The base plate must always lie flat on the workpiece.
Switching ON/OFF (Fig. 1)
To switch on:
Turn on the device by pressing and sliding the switch (1). Then press the safety lock.
To switch off:
Release the switch (1).
Warning! Carry out a trial cut in a piece of waste wood
Changing the saw blade
Warning! Always pull out the power plug before doing any work on the circular saw!
Only use saw blades of the same type as the saw blade supplied with this circular saw. Ask
your dealer for advice.
Warning! The mXOWL function saw must not be operated with the Socket wrench inserted in it.
1. Press the spindle lock (Fig.2-8).
2. Undo the screw to secure the saw blade (Fig.3-B) using the Socket wrench and turning
clockwise.
3. Press the locking device for the safety hood (Fig.2-7), push back the hinged guard hood
and hold firmly.
4. Remove the saw blade (Fig.1-11) in a downwards direction.
16
5. Clean the flange and insert the new saw blade. Pay attention to the running direction
(see arrow on the housing and saw blade).
6. Tighten the screw to secure the saw blade (11) and check that it runs true.
7. Before you press the On/Off switch, make sure that the saw blade is correctly fitted and that
moving parts run smoothly and the clamping screws are tightened securely.
Overload cut-out
(Fig.1)
The device is fitted with an overload cut-out. The overload display (2) indicates the tools
operating status. The overload display (2) flashes: The tool is reaching its load limit – reduce
the feed speed.
The overload display (2) lights up continuously: The tool is overloaded or blocked – the tool
shuts down.
In this case, switch off and restart.
Line cuts
You can easily follow a drawn line with the help of the indicators (Fig.4-A), which are fitted to
the guard hood at the front.
Replacing the power cable
If the power cable for this equipment is damaged, it must be replaced by the manufacturer or
its aftersales service or similarly trained personnel to avoid danger.
Carbon brushes
In case of excessive sparking, have the carbon brushes checked only by a qualified electrician.
Important! The carbon brushes should not be replaced by anyone but a qualified electrician.
17
Disposal
Power tools, accessories and packaging should be sorted for environmentally-friendly recycling.
Only for EC countries:
Do not dispose of power tools into household waste!
According to the European Directive 2002/96/EC on waste electrical and
electronic equipment and its incorporation into national right, products
that are no longer suitable for use must beseparately collected and sent
for recovery in an environmentally-friendly manner.
Maintenance
1. Keep all safety devices, air vents and the motor housing free of dirt and dust as far as
possible. Wipe the equipment with a clean cloth or blow it with compressed air at low pressure.
2. We recommend that you clean the device immediately each time you have finished using it.
3. Clean the equipment regularly with a moist cloth and some soft soap. Do not use cleaning
agents or solvents; these could attack the plastic parts of the equipment. Ensure that no water
can seep into the device.
Accessories
CAUTION:
Use only accessories or attachments recommended for use with your Terratek tool
specified in this manual. The use of any other accessories or attachments might present a risk of
injury to persons. Only use accessory or attachment for its stated purpose.
General Maintenance
1. Keep the air vents free from obstruction and clean regularly.
2. Check regularly for any dust particles entering the grills around the motor and the switch.
Use a soft brush to remove any dust particles. Wear safety glasses to protect your eyes whilst
cleaning.
3. Monitor the dust bag (if equipped) and empty when approximately half full. Always empty
into an appropriate container. REMEMBER: dust can be hot and cause fire.
4. If the cutting tool has become dull, replace it. Dull cutters will cause increased tear-out and
ragged edges on the cuts.
5. Lubricate all moving parts at regular intervals.
6. To clean the body of the power tool, only use a soft damp cloth. Do NOT immerse in water.
A mild detergent can be used but NOT petrol or any alcohol based product.
7. Should the power cord become damaged only allow a fully qualified electrician to replace
or repair.
18
ĞĐůĂƌĂƟŽŶŽĨŽŶĨŽƌŵŝƚLJ
We ACL Group (Intl.) Ltd, England DN6 8LZ declare that the Multi Function Saw l has been
manufactured according to our full quality assurance procedures.
The declaration is to certify that it conforms to CE, EMC, MD and RoHS directives:
EN55014-1/A2:2011
EN55014-2/A2:2008
EN61000-3-2/A2: 2009
EN61000-3-3: 2008
All provisions of Annex 1 of Council Directive 2004/108/EC – EMC directive
EN60745-1: 2009
EN ISO 12100-2/A1: 2009
All provisions of Annex 1 of Council Directive 2006/42/EC – Machinery Directive
2006/95/EC – Low Voltage Directive
RoHs 2011/65/EU
2011/65/EU
Mr. Alan Garnett, UK QA Manager
19
Environmental Protection
RECYCLING: WASTE ELECTRICAL PRODUCTS SHOULD NOT BE DISPOSED OF WITH
HOUSEHOLD WASTE. PLEASE RECYCLE WHERE FACILITIES EXIST. CHECK WITH YOUR
LOCAL AUTHORITY OR RETAILER FOR RECYCLING ADVICE.
Please read the following carefully
ACL Group (Intl) Ltd. and/or it’s distributor has provided the parts list and assembly diagram
as a reference tool only. Neither ACL Group (Intl). Ltd. or its distributor makes any
representation or warranty of any kind to the buyer that he or she is qualified to do any
repairs or replace any parts of this product. ACL Group (Intl) Ltd. and its distributor expressly
state that all repairs or parts replacement should be done by certified or licensed technicians.
The buyer assumes all risk and liability arising out of his or her repairs or parts replacement to
the original product.
12 Months Limited Warranty
If within 12 months from the date of purchase you experience any problems with your product,
please return the product to its distributor/dealer for repair or replacement. This warranty
DOES NOT COVER normal wear, or any damage as a result of accidents, misuse, abuse or
negligence.
ACL Group (Intl) Ltd
Doncaster, England
Email: [email protected]
www.terratekintl.com
20