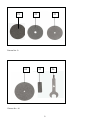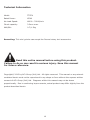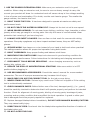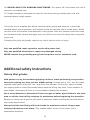
1
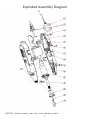
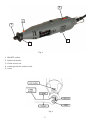
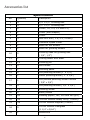
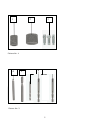
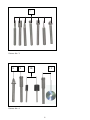
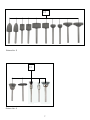
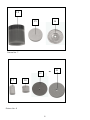
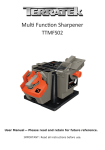
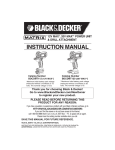
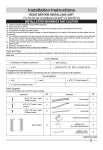
Rotary Mini Grinder TTRTK User Manual — Please read and retain for future reference. IMPORTANT: Read all instructions before use. Contents Parts List Technical Information Safety Instructions Using your tool Maintenance Warranty Parts List No. Description 1 Plug 2 Cord sleeve 3 Screw 4 PCB board 5 Switch 6 Screw 7 Left body 8 Stator 9 Carbon brush 10 Right body 11 Rotor 12 Spindle lock button 13 Nose cap 14 Collet 15 Collet but 16 Bearing 1 Exploded Assembly Diagram NOTICE: Actual product may vary from pictures shown. 2 2 4 3 1 5 Fig.1 1. ON/OFF switch 2. Speed controller 3. Collet chuck nut 4. Locking knob for collet chuck 5. cover Fig.2 3 Accessories list Specification No. Quantity Description 1 4 1/4” x 1/2” Grinding belt 2 4 1/2” x 1/2” Grinding belt 3 6 Collet (1.6, 2.4, 3.2 mm x 2) 4 1 Cutter (Ball shaped) 5 1 Cutter 6 3 HSS Drill bits ( 1.6, 2.3, 3.2mm) 7 7 Diamond-tipped cutter 8 1 Arbor for felt wheels 9 1 Arbor for grinding wheels 10 2 11 1 Cutting wheel with arbor 12 10 Grinding pin 13 5 Wire Brush 14 1 Polishing paste 15 2 Felt polishing Wheels (1” x 1/4”) 16 1 Fabric polishing wheel ( 1” x 1/8”) 17 1 18 4 Felt polishing Wheels ( 1/2" x 1/4") 19 12 Grinding Wheel 20 2 Emery wheel 21 90 Sanding paper (180, 200 and 240 grit) 22 30 Cut Off Wheels Heavy Duty ( 0.8mm) 23 36 24 5 25 1 Grinding head for grinding belt ( 1/4”, 1/2”) Felt pointed polishing Wheel Pointed ( 3/8" x 3/4") Cut Off Wheels Regular (0.4mm) Cut Off Wheels Fiberglass (1 1/4" x 3/64") Whetstone 4 1 2 3 Picture No. 1 4 5 6 Picture No. 2 5 7 Picture No. 3 8 9 11 10 Picture No. 4 6 12 Picture No. 5 13 Picture No. 6 7 14 16 15 Picture No. 7 20 19 17 18 Picture No. 8 8 23 22 21 Picture No. 9 24 26 25 Picture No. 10 9 Technical Information Model: TTRTK Rated Power: 135W No-Load Speed: 10000 - 32000/min Chuck capacity: 3.2mm max. NW/GW: 0.7/1.3kg Remarking: This mini grinder can accept the Dremel rotary tool accessories. Read this entire manual before using this product. Failure to do so can result in serious injury. Save this manual for future reference. Copyright© 2013 by ACL Group (Intl) Ltd. All rights reserved. This manual or any artwork contained herein must not be reproduced in any shape or form without the express written consent of ACL Group (Intl) Ltd. Diagrams within this manual may not be drawn proportionally. Due to continuing improvements, actual product may differ slightly from the product described herein. 10 Read and Keep This Manual Please read carefully all instructions within this manual. Failure to follow all safety warnings can result in serious personal injury. The term “Power Tool” in all of the following warnings refers to your mains operated (corded) or battery operated (cordless) power tool. Important SAFETY Information This symbol is to warn you of potential personal injury hazards. Please read carefully the notes along side this warning to avoid possible injury or death. General Safety Rules WARNING! Read all instructions. Failure to follow all instructions listed below may result in electric shock, fire and/or serious injury. The term “power tool” in all of the warnings listed refers to corded or cordless power tools. Work area safety Keep work area clean and well lit. Cluttered or dark areas invite accidents. Do not operate power tools in explosive atmospheres, such as in the presence of flammable liquids, gases or dust. Power tools create sparks which may ignite the dust or fumes. Keep children and bystanders away while operating a power tool. Distractions can cause you to lose control. 11 Electrical safety Before use, ensure that the power outlet you are using matches the plug on your power tool and that the voltage of the outlet matches that of your power tool. Only use grounded extension cords with power tools fitted with 3 pin plugs and if using outdoors ensure any extension cord is suitable for outdoor use. Always try to avoid body contact with grounded surfaces, such as radiators, cooking ranges and any other fixed appliance with metal surfaces. Do not expose your power tool to wet or damp conditions and NEVER use in rain. Check regularly the power cord of your machine and any extension cord that you are using for damage. Do not carry or pull the machine with the power cord. Ensure the cord is clear from hot surfaces, oil or sharp objects. Personal safety Never use your power tool whilst under the influence of alcohol, drugs or medication. Tiredness can often cause accidents, stay alert. Never use your power tool without the correct guards in place. Always use approved eye protection and dust mask. Non slip safety shoes and hearing protectors should be worn at all times when using your power tool. Ensure any dust collecting device supplied with your machine is connected correctly before use. Ensure all loose clothing, long hair or jewelry is kept clear of the machine. Before plugging your power tool into the power outlet ensure the power tool is in the OFF position. Check that wrenches or adjusting keys have been removed. Any wrench or key left attached to a moving part can result in injury. Power tool use and care. Keep your power tool clean and well serviced at all times. Never adjust or service any power tool before disconnecting from the mains electricity supply. Always use the correct tool for the job. Never force the tool to work harder than it is designed to do. Never use your power tool with broken parts such as switches, guide fences or leg stands. ALWAYS keep your power tools away from children. Keep cutting tools sharp to ensure less stress on the motor. Only have your power tool serviced by a qualified repair agent using manufacturers recommended parts. 12 Service Have your power tool serviced by a qualified repair person using only identical replacement parts. This will ensure that the safety of the power tool is maintained. Develop a periodic maintenance schedule for your tool. When cleaning a tool be careful not to disassemble any portion of the tool since internal wires may be misplaced or pinched or safety guard return springs may be improperly mounted. Certain cleaning agents such as gasoline, carbon tetrachloride, ammonia, etc. may damage plastic parts. When servicing a tool, use only identical replacement parts. Follow instructions in the Maintenance section of this manual. Use of unauthorized parts or failure to follow Maintenance Instructions may create a risk of electric shock or injury. WARNING: For your own safety read Instruction Manual before operating your power tool. A) Wear eye protection. B) Keep hands out of the path of cutting tools. C) Do not operate tool without guards in place. D) Do not perform any operation freehand. E) Never reach around cutting tools. F) Turn off tool and wait for cutting tools to stop before moving work piece or changing settings. G) Disconnect power (or unplug tool) before changing cutting tools or servicing. GENERAL SAFETY INSTRUCTIONS Read this owner's manual completely and make sure you understand all of its safety guidelines. 1. KEEP GUARDS IN PLACE and in working order. 2. REMOVE ADJUSTING KEYS & WRENCHES. Before turning on the power tool, make sure the keys and adjusting wrenches have been removed. 3. KEEP WORK AREA CLEAN. Cluttered areas and benches invite accidents. 4. ALWAYS REMAIN ALERT WHEN THE TOOL IS IN USE. Inattention on the part of the operator may lead to serious injury. 5. DON’T USE IN A DANGEROUS ENVIRONMENT. Don’t use power tools in damp or wet locations or expose them to rain. Keep work area well lit. 6. KEEP CHILDREN AWAY. All visitors should remain at a safe distance from work area. 7. MAKE WORKSHOP CHILD-PROOF with padlocks, master switches or by removing starter keys. 8. USE THE RIGHT TOOL. Don’t force a tool or attachment to do a job for which it was not designed. 13 9. USE THE PROPER EXTENSION CORD. Make sure your extension cord is in good condition. When using an extension cord, be sure to use one heavy enough to carry the current your product will draw. An undersized cord will cause a drop in line voltage resulting in loss of power and overheating. If in doubt, use the next heavier gauge. The smaller the gauge number, the heavier the cord. 10. DON’T FORCE THE TOOL. It has been designed to operate at maximum safety and performance levels. 11. DO NOT FORCE THE MATERIAL BEING CUT. Always let the tool cut at its own speed. 12. WEAR PROPER APPAREL. Do not wear loose clothing, neckties, rings, bracelets or other jewelry which may get caught in moving parts. Non-slip foot wear is recommended. Wear protective hair covering if you have long hair. 13. ALWAYS USE SAFETY GLASSES. Also use face or dust mask for commercial cutting operations. Everyday eyeglasses only have impact-resistant lenses, they are NOT safety glasses. 14. SECURE WORK. Use clamps or a vise instead of your hand to hold work when practical. This safetyprecaution allows for proper tool operation using both hands. 15. DON’T OVERREACH. Keep proper footing and balance at all times. 16. MAINTAIN TOOLS WITH CARE. Keep tools clean and in good working condition for maximum safety performance. Follow instructions for lubricating and changing accessories. 17. DISCONNECT TOOLS BEFORE SERVICING – when changing accessories, such as blades, bits, cutters, etc. 18. REDUCE THE RISK OF UNINTENTIONAL STARTING. Make sure switch is in OFF position before plugging in. 19. USE RECOMMENDED ACCESSORIES. Consult the owner’s manual for recommended accessories. The use of improper accessories may increase risk of injury. 20. MAKE SURE YOU USE THE CORRECT TOOL for the job you are doing. 21. NEVER STAND ON TOOL. Serious injury could occur if the tool is tipped or if the cutting tool is unintentionally contacted. 22. CHECK DAMAGED PARTS. Before further use of the tool, damaged part(s), (i.e., guard) should be carefully checked to determine that it will operate properly and perform its intended function. Check for alignment of moving parts, binding of moving parts, breakage of parts, mounting and any other condition that may affect the tools operation. A guard or other part that is damaged should be properly repaired or replaced. 23. Replace damaged blades/cutters immediately. DO NOT USE DAMAGED BLADES/CUTTERS. They may cause bodily injury. 24. DIRECTION OF FEED. Feed work into the blade/cutter against the direction of rotation of the blade/cutter only. 25. DO NOT ALTER THE PLUG. 14 26. NEVER LEAVE TOOL RUNNING UNATTENDED. Turn power off. Don’t leave tool until it comes to a complete stop. 27. Double Insulation eliminates the need for the three wire grounded power cord and grounded power supply system. This power tool is supplied with all the relevant safety guards and features, it should be checked before every operation, this manual should be read and kept in a safe place. Whilst we warn of all the possible risks attached to using power tools any operator must have read and understood the manual and apply their own caution and common sense when using this power tool. Following this guide will greatly reduce your risk of electric shock or injury. Only use qualified repair agents to service this power tool. Only use qualified electrician to repair any damaged wiring. NEVER remove the grounding prong from the power tool or extension cord. ĚĚŝƟŽŶĂůƐĂĨĞƚLJ/ŶƐƚƌƵĐƟŽŶƐ Rotary Mini grinder Hold power tool by the insulated gripping surfaces, when performing an operation where the cutting tool may run into hidden wiring. Contact with a “live” wire will make exposed metal parts of the tool “live” and shock the operator. Do not drill, fasten or break into existing walls or other blind areas where electrical wiring may exist. If this situation is unavoidable, disconnect all fuses or circuit breakers feeding this worksite. Use a metal detector to determine if there are gas or water pipes hidden in the work area or call the local utility company for assistance before beginning the operation. Striking or cutting into a gas line will result in explosion. Water entering an electrical device may cause electrocution. Always hold the tool firmly with both hands for maximum control. Keep proper footing and balance at all times. This enables better control of the power tool in unexpected situations. 15 Keep hands away from cutting area. Do not use dull or damaged cutters. Accessories must be rated for at least the speed recommended on the tool warning label. Wheels and other accessories running over rated speed can fly apart and cause injury. Do not operate the flexible shaft with a sharp bend. Over bending the shaft can generate excessive heat on the jacket or hand piece. The recommended minimum is 5" radius. Never work in area which is soaked with a liquid, such as a solvent or water, or dampened such as newly applied wallpaper. There is an electrical shock hazard when working in such conditions with a power tool and heating of the liquid caused by scraping action may cause harmful vapors to be emitted from work piece. Always wear eye protection and a dust mask for dusty applications and when sanding. Sanding particles can be absorbed by your eyes and inhaled easily and may cause health complications. Use special precautions when sanding chemically pressure treated lumber, paint that may be lead based, or any other materials that may contain carcinogens. A suitable breathing respirator and protective clothing must be worn by all persons entering the work area. Work area should be sealed by plastic sheeting and persons not protected should be kept out until work area is thoroughly cleaned. Always wait until the machine has come to a complete stop before placing it down. Before any work on the machine (e. g., maintenance, tool change, etc.) as well as during transport and storage make sure the switch is off. Unintentional actuation of the On/Off switch can lead to injuries. After changing the bits or making any adjustments, make sure the collet nut and nose cap are both securely tightened. Loose adjustment devices can unexpectedly shift, causing loss of control, loose rotating components will be violently thrown. Do not reach in the area of the spinning bit. The proximity of the spinning bit to your hand may not always be obvious. Allow brushes to run at opera ting speed for at least one minute before using wheel. During this time no one is to stand in front or in line with the brush. Loose bristles or wires will be discharged during the run-in time. Wire and bristle brushes must never be operated at speeds greater than 15,000/min. Direct the discharge of the spinning wire brush away from you. Small particles and tiny wire fragments may be discharged at high velocity during the “cleaning” action with these brushes and may become imbedded in your skin. Bristles or wires will be discharged from the brush at high speeds. 16 Carefully handle both the tool and individual grinding wheels to avoid chipping or cracking. Install a new wheel if tool is dropped while grinding. Do not use a wheel that may be damaged. Fragments from a wheel that bursts during operation will fly away at great velocity possibly striking you or bystanders. Use clamps to support workpiece whenever practical. Never hold a small workpiece in one hand and the tool in the other hand while in use. Allow for sufficient space, at least 6", between your hand and the spinning bit. Round material such as dowel rods, pipes or tubing have a tendency to roll while being cut, and may cause the bit to “bite” or jump toward you. Clamping a small workpiece allows you to use both hands to control the tool. Inspect your workpiece before cutting. When cutting irregularly shaped workpieces, plan your work so it will not slip and pinch the bit and be torn from your hand. For example, if carving wood, make sure there are no nails or foreign objects in the workpiece. Nails or foreign objects can cause the bit to jump. Never start the tool when the bit is engaged in the material. Avoid bouncing and snagging the wheel, especially when working corners, sharp edges etc. This can cause loss of control and kick-back. The direction of feed with the bit into the material when carving, routing or cutting is very important. Always feed the bit into the material in the same direction as the cutting edge is exiting from the material (which is the same direction as the chips are thrown). Feeding the tool in the wrong direction, causes the cutting edge of the bit to climb out of the work and pull the tool in the direction of this feed. If the workpiece or bit becomes jammed or bogged down, turn the tool “OFF” by the switch. Wait for all moving parts to stop and unplug the tool, then work to free the jammed material. If the switch to the tool is left “ON” the tool could restart unexpectedly causing serious personal injury. Do not grind or sand near flammable materials. Sparks from the wheel could ignite these materials. Do not touch the bit or collet after use. After use the bit and collet are too hot to be touched by bare hands. Check any parts concerned. Clean such parts or replace them, if required. 17 When using the steel saws, cut off wheels, high speed cutters or tungsten carbide cutters, always have the work securely clamped. Never attempt to hold the work with one hand while using any of these accessories. The reason is that these wheels will grab if they become slight ly canted in the groove, and can kick back causing loss of control resulting in serious in jury. Your second hand should be used to steady and guide the hand holding the tool. When a cutoff wheel grabs, the wheel itself usually breaks. When the steel saw, high speed cutters or tungsten carbide cutter grab, it may jump from the groove and you could lose control of the tool. This product is not intended for use as a dental drill, in human or veterinary medical applications. Serious personal injury may result. WARNING: Some dust created by power sanding, sawing, grinding, drilling, and other construction activities contains chemicals known to cause cancer, birth defects or other reproductive harm. Some examples of these chemicals are: /HDGIURPOHDGEDVHGSDLQWV &U\VWDOOLQHVLOLFDIURPEULFNVDQGFHPHQWDQGRWKHUPDVRQU\SURGXFWVDQG $UVHQLFDQGFKURPLXPIURPFKHPLFDOO\WUHDWHGOXPEHU Your risk from these exposures varies, depending on how often you do this type of work. To reduce your exposure to these chemicals: work in a well ventilated area, and work with approved safety equipment, such as those dust masks that are specially designed to filter out microscopic particles. 18 Symbols IMPORTANT: Some of the following symbols may be used on your tool. V…………………………volts A…………………………amperes Hz……………………….hertz ~…………………….….alternating current …/m……………….....revolutions per minute .....................class II construction (double insulated) Kg………………………..kilograms n0………………………..No load speed ……………….….....Conforms to European Harmonised New Approach Directives. DC ………………..…….Direct Current Specific Safety Rules 1) Hold power tools by insulated gripping surfaces when performing an operation where the cutting tool may contact hidden wiring. Contact with a “live” wire will make exposed metal parts of the tool “live” and shock the operator. 2) Wear ear and eye protection. To avoid serious injuries. 3) Be aware that this tool is always in an operating condition, since it does not have to be plugged into an electrical outlet. 4) If the bit becomes jammed, immediately turn the trigger switch off to prevent an overload which can damage the battery pack or motor. 5) Do not touch the rotating parts to avoid injury. 6) Do not use the tool continuously for a long period of time. Stop using the tool from time to time to avoid overheating of the motor. 7) Do not drop the tool. Unpacking Carefully remove the product and any accessories from the box. Make sure that all items listed in the packing list are included. Package contents A) Grinder B) 233 piece accessory kit C) User manual 19 Functional Description (Fig.1) WARNING: Disconnect the plug from the power source before making any assembly, adjustments or changing accessories. Such preventive safety measures reduce the risk of starting the tool accidentally. Application This rotary tool can be used for drilling, grinding, sanding and polishing, as well as engraving, cutting and removing rust in tight spaces or inaccessible places. The tool can be used on most metals, glass, wood and ceramics. For best performance and results keep the speed as even as possible without exercising too much pressure. As a guideline, use the tool at low speed for all large accessories, such as polishing for example, and at high speed for smaller accessories such as those used for engraving. For grinding and engraving, hold the tool as if it were a pen. Operation CAUTION! Always be sure that the tool is switched off before assembly or adjustments Installing and Removing Accessories (Fig.2) Always switch the tool off first and unplug. Hold the locking button at the front of the tool down and undo the collet chuck (anti-clockwise). Insert the collet that matches the shaft size of the accessory to be used. Place the collet nut over the collet and then insert the accessory shaft into the collet chuck ensuring maximum shaft contact then tighten up the collet nut. (DO NOT USE PLIERS). Switching On/Off The tool is switched "ON" by the slide switch located on the motor housing.(Fig.1-1) TO TURN THE TOOL "ON" slide the switch button forward. TO TURN THE TOOL "OFF" slide the switch button backward. Warning! Hold the tool with both hands while starting the tool, since torque from the motor can cause the tool to twist. Variable speed control dial This tool is equipped with a variable speed control dial, adjustment from 10000 to 32000 rpm. (Fig.1-2). 20 Disposal Power tools, accessories and packaging should be sorted for environmentally-friendly recycling. Only for EC countries: Do not dispose of power tools into household waste! According to the European Directive 2002/96/EC on waste electrical and electronic equipment and its incorporation into national right, products that are no longer suitable for use must beseparately collected and sent for recovery in an environmentally-friendly manner. Maintenance Use only a dry, soft cloth for wiping the unit. Do not use a damp cloth, thinner, or other volatile solvents for cleaning. Accessories CAUTION: Use only accessories or attachments recommended for use with your Terratek tool specified in this manual. The use of any other accessories or attachments might present a risk of injury to persons. Only use accessory or attachment for its stated purpose. General Maintenance 1. Keep the air vents free from obstruction and clean regularly. 2. Check regularly for any dust particles entering the grills around the motor and the switch. Use a soft brush to remove any dust particles. Wear safety glasses to protect your eyes whilst cleaning. 3. Monitor the dust bag (if equipped) and empty when approximately half full. Always empty into an appropriate container. REMEMBER: dust can be hot and cause fire. 4. If the cutting tool has become dull, replace it. Dull cutters will cause increased tear-out and ragged edges on the cuts. 5. Lubricate all moving parts at regular intervals. 6. To clean the body of the power tool, only use a soft damp cloth. Do NOT immerse in water. A mild detergent can be used but NOT petrol or any alcohol based product. 7. Should the power cord become damaged only allow a fully qualified electrician to replace or repair. 21 ĞĐůĂƌĂƟŽŶŽĨŽŶĨŽƌŵŝƚLJ We ACL Group (Intl.) Ltd, England DN6 8LZ declare that the Mini Grinder has been manufactured according to our full quality assurance procedures. The declaration is to certify that it conforms to CE, EMC, LVD, MD and RoHS directives: EN55014-1: 2006/ + A1:2009 EN55014-2: 1997/ + A1: 2001/ + A2:2008 EN61000-3-2: 2006/ + A1: 2009/ + A2:2009 EN61000-3-3: 2008 All provisions of Annex 1 of Council Directive 2004/108/EC – EMC directive EN60745-1: 2009 EN60745-2-3: 2007/ + A11:2009 All provisions of Annex 1 of Council Directive 2006/42/EC – Machinery Directive 2006/95/EC – Low Voltage Directive RoHs 2011/65/EU 2011/65/EU Mr. Alan Garnett, UK QA Manager 22 Environmental Protection RECYCLING: WASTE ELECTRICAL PRODUCTS SHOULD NOT BE DISPOSED OF WITH HOUSEHOLD WASTE. PLEASE RECYCLE WHERE FACILITIES EXIST. CHECK WITH YOUR LOCAL AUTHORITY OR RETAILER FOR RECYCLING ADVICE. Please read the following carefully ACL Group (Intl) Ltd. and/or it’s distributor has provided the parts list and assembly diagram as a reference tool only. Neither ACL Group (Intl). Ltd. or its distributor makes any representation or warranty of any kind to the buyer that he or she is qualified to do any repairs or replace any parts of this product. ACL Group (Intl) Ltd. and its distributor expressly state that all repairs or parts replacement should be done by certified or licensed technicians. The buyer assumes all risk and liability arising out of his or her repairs or parts replacement to the original product. 12 Months Limited Warranty If within 12 months from the date of purchase you experience any problems with your product, please return the product to its distributor/dealer for repair or replacement. This warranty DOES NOT COVER normal wear, or any damage as a result of accidents, misuse, abuse or negligence. ACL Group (Intl) Ltd Doncaster, England Email: [email protected] www.terratekintl.com 23